目录
前沿
在上一篇yolov5的博客中,我们用yolov5训练了一个二维码检测器,可以用来检测图像中是否有二维码,后续可以接一个二维码解码器,就可以解码出二维码的信息了(后续可以聊聊)。这篇博客再讲讲另一个方面:模型轻量化,具体的是轻量化中的模型剪枝。
为什么要做轻量化
我们训练的模型不仅仅会用在GPU这种算力高的硬件上,也有可能用在嵌入式CPU或者NPU上,这类硬件算力往往较低,尽管在这些设备上运行模型时,我们可以将模型量化为int8,可以大大降低计算量,但有时候只靠这一方式也是不够的。比较直观能想到的提升模型运行速度的方式是裁剪模型,比如减少通道数或模型的深度,这种方式是以牺牲模型精度为代价的。这就促使我们寻找更好的模型轻量化方法,剪枝就是一种使用比较广泛的模型轻量化方法。
什么是剪枝
模型剪枝(Model Pruning)是一种通过减少神经网络模型中的冗余参数和连接来优化模型的方法。它旨在减小模型的大小、内存占用和计算复杂度,同时尽可能地保持模型的性能。
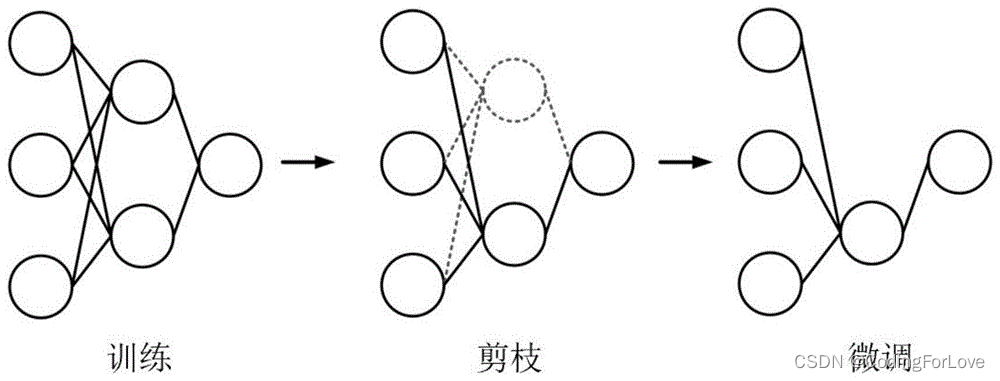
模型剪枝的基本思想是通过识别和删除对模型性能影响较小的参数或连接,以达到模型精简和优化的目的。方法包括剪枝后的参数微调、重新训练和微调整体网络结构等。直观的理解就是像下图这样。
模型剪枝可以在不显著损失模型性能的情况下,大幅度减少模型的参数量和计算量,从而提高模型的部署效率和推理速度。它特别适用于嵌入式设备、移动设备和边缘计算等资源受限的场景,以及需要部署在较小存储空间或带宽受限环境中的应用。
本文选择的模型剪枝方法:Learning Efficient Convolutional Networks through Network Slimming
源代码:https://github.com/foolwood/pytorch-slimming
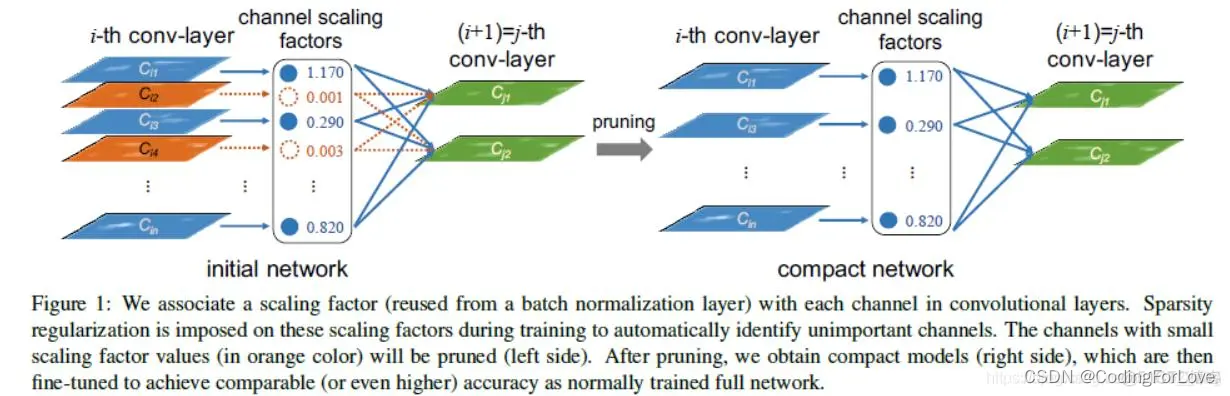
这个方法基于的想法是通过稀疏化训练,通过BN层的参数,自动得到权重较小通道,去掉这些通道,从而达到模型裁剪的目的。
稀疏化训练
如上文述,为了达到剪枝的目的,我们要使用稀疏化训练,以使得让模型权重更紧凑,能够去掉一些权重较小的通道,达到模型裁剪的目的。
为了进行稀疏化训练,引入一个稀疏化稀疏参数,这个参数越大,模型越稀疏,能够裁剪的比例越大,需要在实际中调整,参数过大,模型性能可能会下降较多,参数过小,能够裁剪的比例又会过小。
为了进行稀疏化训练,首先汇总模型的所有BN层:
    if opt.sl > 0:
        print("Sparse Learning Model!")
        print("===> Sparse learning rate is ", hyp['sl'])
        prunable_modules = []
        prunable_module_type = (nn.BatchNorm2d, )
        for i, m in enumerate(model.modules()):
            if isinstance(m, prunable_module_type):
                prunable_modules.append(m)
在训练loss中增加稀疏化loss:
def compute_pruning_loss(p, prunable_modules, model, loss):
    '''
    Compute the pruning loss
    :param p: predicted output
    :param prunable_modules: list of prunable modules
    :param model: model
    :param loss: original yolo loss
    :return: loss
    '''
    float_tensor = torch.cuda.FloatTensor if p[0].is_cuda else torch.Tensor
    sl_loss = float_tensor([0])
    hyp = model.hyp  # hyperparameters
    red = 'mean'  # Loss reduction (sum or mean)
    if prunable_modules is not None:
        for m in prunable_modules:
            sl_loss += m.weight.norm(1)
        sl_loss /= len(prunable_modules)
    sl_loss *= hyp['sl']
    bs = p[0].shape[0]  # batch size
    loss += sl_loss * bs
    return loss
# Forward
            with amp.autocast(enabled=cuda):
                pred = model(imgs)  # forward
                loss, loss_items = compute_loss(pred, targets.to(device), model)  # loss scaled by batch_size
                # Sparse Learning
                if opt.sl > 0:
                    loss = compute_pruning_loss(pred, prunable_modules, model, loss)
                if rank != -1:
                    loss *= opt.world_size  # gradient averaged between devices in DDP mode
设置合适的稀疏化稀疏进行训练,这一过程和普通的yolov5模型训练一样。
剪枝
pruning.py
#!/usr/bin/env python
# -*- coding: utf-8 -*-
"""
Copyright (c) 2019 luozw, Inc. All Rights Reserved

Authors: luozhiwang([email protected])
Date: 2020/9/7
"""
import os
import argparse
import numpy as np
import torch
import torch.nn as nn
import torch_pruning as tp
import copy
import matplotlib.pyplot as plt
from models.yolo import Model
import math

def load_model(cfg="models/mobile-yolo5l_voc.yaml", weights="./outputs/mvoc/weights/best_mvoc.pt"):
    restor_num = 0
    ommit_num = 0
    model = Model(cfg).to(device)
    ckpt = torch.load(weights, map_location=device)  # load checkpoint
    names = ckpt['model'].names
    dic = {}
    for k, v in ckpt['model'].float().state_dict().items():
        if k in model.state_dict() and model.state_dict()[k].shape == v.shape:
            dic[k] = v
            restor_num += 1
        else:
            ommit_num += 1

    print("Build model from", cfg)
    print("Resotre weight from", weights)
    print("Restore %d vars, ommit %d vars" % (restor_num, ommit_num))

    ckpt['model'] = dic
    model.load_state_dict(ckpt['model'], strict=False)
    del ckpt

    model.float()
    model.model[-1].export = True
    return model, names

def bn_analyze(prunable_modules, save_path=None):
    bn_val = []
    max_val = []
    for layer_to_prune in prunable_modules:
        # select a layer
        weight = layer_to_prune.weight.data.detach().cpu().numpy()
        max_val.append(max(weight))
        bn_val.extend(weight)
    bn_val = np.abs(bn_val)
    max_val = np.abs(max_val)
    bn_val = sorted(bn_val)
    max_val = sorted(max_val)
    plt.hist(bn_val, bins=101, align="mid", log=True, range=(0, 1.0))
    if save_path is not None:
        if os.path.isfile(save_path):
            os.remove(save_path)
        plt.savefig(save_path)
    return bn_val, max_val

def channel_prune(ori_model, example_inputs, output_transform, pruned_prob=0.3, thres=None, rules=1):
    model = copy.deepcopy(ori_model)
    model.cpu().eval()

    prunable_module_type = (nn.BatchNorm2d)

    ignore_idx = [] #[230, 260, 290]

    prunable_modules = []
    for i, m in enumerate(model.modules()):
        if i in ignore_idx:
            continue
        if isinstance(m, nn.Upsample):
            continue
        if isinstance(m, prunable_module_type):
            prunable_modules.append(m)
    ori_size = tp.utils.count_params(model)
    DG = tp.DependencyGraph().build_dependency(model, example_inputs=example_inputs,
                                               output_transform=output_transform)
    bn_val, max_val = bn_analyze(prunable_modules, "render_img/before_pruning.jpg")
    if thres is None:
        thres_pos = int(pruned_prob * len(bn_val))
        thres_pos = min(thres_pos, len(bn_val)-1)
        thres_pos = max(thres_pos, 0)
        thres = bn_val[thres_pos]
    print("Min val is %f, Max val is %f, Thres is %f" % (bn_val[0], bn_val[-1], thres))

    for layer_to_prune in prunable_modules:
        # select a layer
        weight = layer_to_prune.weight.data.detach().cpu().numpy()
        if isinstance(layer_to_prune, nn.Conv2d):
            if layer_to_prune.groups > 1:
                prune_fn = tp.prune_group_conv
            else:
                prune_fn = tp.prune_conv
            L1_norm = np.sum(np.abs(weight), axis=(1, 2, 3))

        elif isinstance(layer_to_prune, nn.BatchNorm2d):
            prune_fn = tp.prune_batchnorm
            L1_norm = np.abs(weight)

        pos = np.array([i for i in range(len(L1_norm))])
        pruned_idx_mask = L1_norm < thres
        prun_index = pos[pruned_idx_mask].tolist()
        if rules != 1:
            prune_channel_nums = len(L1_norm) - max(rules, int((len(L1_norm) - pruned_idx_mask.sum())/rules + 0.5)*rules)
            _, index = torch.topk(torch.tensor(L1_norm), prune_channel_nums, largest=False)
            prun_index = index.numpy().tolist()

        if len(prun_index) == len(L1_norm):
            del prun_index[np.argmax(L1_norm)]

        plan = DG.get_pruning_plan(layer_to_prune, prune_fn, prun_index)
        plan.exec()

    bn_analyze(prunable_modules, "render_img/after_pruning.jpg")

    with torch.no_grad():

        out = model(example_inputs)
        if output_transform:
            out = output_transform(out)
        print("  Params: %s => %s" % (ori_size, tp.utils.count_params(model)))
        if isinstance(out, (list, tuple)):
            for o in out:
                print("  Output: ", o.shape)
        else:
            print("  Output: ", out.shape)
        print("------------------------------------------------------\n")
    return model


if __name__ == '__main__':
    parser = argparse.ArgumentParser()
    parser.add_argument('--cfg', default="models/yolov5s_voc.yaml", type=str, help='*.cfg path')
    parser.add_argument('--weights', default="runs/exp7_sl-2e-3-yolov5s/weights/last.pt", type=str, help='*.data path')
    parser.add_argument('--save-dir', default="runs/exp7_sl-2e-3-yolov5s/weights", type=str, help='*.data path')
    parser.add_argument('-r', '--rate', default=1, type=int, help='通道数为rate的倍数')
    parser.add_argument('-p', '--prob', default=0.5, type=float, help='pruning prob')
    parser.add_argument('-t', '--thres', default=0, type=float, help='pruning thres')
    opt = parser.parse_args()

    cfg = opt.cfg
    weights = opt.weights
    save_dir = opt.save_dir

    device = torch.device('cpu')
    model, names = load_model(cfg, weights)

    example_inputs = torch.zeros((1, 3, 64, 64), dtype=torch.float32).to()
    output_transform = None
    # for prob in [0, 0.01, 0.1, 0.2, 0.3, 0.4, 0.5, 0.6, 0.7]:
    if opt.thres != 0:
        thres = opt.thres
        prob = "p.auto"
    else:
        thres = None
        prob = opt.prob

    pruned_model = channel_prune(model, example_inputs=example_inputs,
                                 output_transform=output_transform, pruned_prob=prob, thres=thres,rules=opt.rate)
    pruned_model.model[-1].export = False
    pruned_model.names = names
    save_path = os.path.join(save_dir, "pruned_"+str(prob).split(".")[-1] + ".pt")
    print(pruned_model)
    torch.save({"model": pruned_model.module if hasattr(pruned_model, 'module') else pruned_model}, save_path)
可以按比例剪枝, 如剪枝比例0.5:
python prune.py --cfg models/yolov5s_voc.yaml --weights runs/exp7_sl-2e-3-yolov5s/weights/last.pt --save-dir runs/exp7_sl-2e-3-yolov5s/weights/ --prob 0.5
还可以按权重大小剪枝,比如小于0.01权重的通道剪:
python prune.py --cfg models/yolov5s_voc.yaml --weights runs/exp7_sl-2e-3-yolov5s/weights/last.pt --save-dir runs/exp7_sl-2e-3-yolov5s/weights/ --thres 0.01
往往通道是8的倍数时,神经网络推理较快:
python prune.py --cfg models/yolov5s_voc.yaml --weights runs/exp7_sl-2e-3-yolov5s/weights/last.pt --save-dir runs/exp7_sl-2e-3-yolov5s/weights/ --thres 0.01 --rate 8
执行剪枝后,模型将会变小。
微调
剪枝后,模型性能会下降,此时我们需要再微调剪枝后的模型,其训练过程与剪枝前训练方式一致。一般情况下,可以接近剪枝前的性能。
结语
通过剪枝可以在精度损失较小的情况下,加快模型的推理速度,在我们需要做实时分析的任务中非常有用。
模型下载
轻量级二维码检测模型:模型下载
标签:实战,剪枝,yolov5,prune,val,loss,模型,model From: https://www.cnblogs.com/haoliuhust/p/17509904.html