“AI Earth”人工智能创新挑战赛:助力精准气象和海洋预测Baseline[3]:TCNN+RNN模型、SA-ConvLSTM模型
1.气象海洋预测-模型建立之TCNN+RNN
本次任务我们将学习来自TOP选手“swg-lhl”的冠军建模方案,该方案中采用的模型是TCNN+RNN。
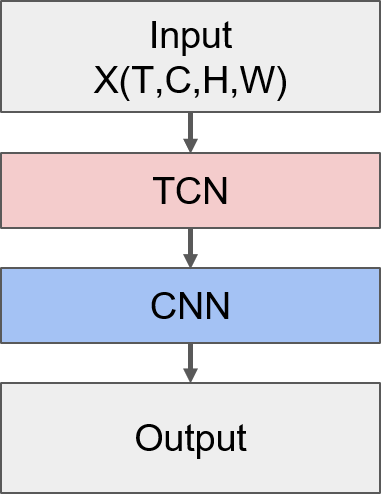
在Task3中我们学习了CNN+LSTM模型,但是LSTM层的参数量较大,这就带来以下问题:一是参数量大的模型在数据量小的情况下容易过拟合;二是为了尽量避免过拟合,在有限的数据集下我们无法构建更深的模型,难以挖掘到更丰富的信息。相较于LSTM,CNN的参数量只与过滤器的大小有关,在各类任务中往往都有不错的表现,因此我们可以考虑同样用卷积操作来挖掘时间信息。但是如果用三维卷积来同时挖掘时间和空间信息,假设使用的过滤器大小为(T_f, H_f, W_f),那么一层的参数量就是T_f×H_f×W_f,这样的参数量仍然是比较大的。为了进一步降低每一层的参数,增加模型深度,我们本次学习的这个TOP方案对时间和空间分别进行卷积操作,即采用TCN单元挖掘时间信息,然后输入CNN单元中挖掘空间信息,将TCN单元+CNN单元的串行结构称为TCNN层,通过堆叠多层的TCNN层就可以交替地提取时间和空间信息。同时,考虑到不同时间尺度下的时空信息对预测结果的影响可能是不同的,该方案采用了三个RNN层来抽取三种时间尺度下的特征,将三者拼接起来通过全连接层预测Nino3.4指数。
1.1 数据处理
该TOP方案的数据处理主要包括三部分:
- 数据扁平化。
- 空值填充。
- 构造数据集
项目链接以及码源见文末
在该方案中除了没有构造新的特征外,其他数据处理方法都与Task3基本相同,因此不多做赘述。
import netCDF4 as nc
import random
import os
from tqdm import tqdm
import pandas as pd
import numpy as np
import matplotlib.pyplot as plt
%matplotlib inline

import torch
from torch import nn, optim
import torch.nn.functional as F
from torch.utils.data import Dataset, DataLoader

from sklearn.metrics import mean_squared_error
# 固定随机种子
SEED = 22

def seed_everything(seed=42):
    random.seed(seed)
    os.environ['PYTHONHASHSEED'] = str(seed)
    np.random.seed(seed)
    torch.manual_seed(seed)
    torch.cuda.manual_seed(seed)
    torch.backends.cudnn.deterministic = True

seed_everything(SEED)
# 查看GPU是否可用
train_on_gpu = torch.cuda.is_available()

if not train_on_gpu:
    print('CUDA is not available.  Training on CPU ...')
else:
    print('CUDA is available!  Training on GPU ...')
CUDA is available! Training on GPU ...
# 读取数据

# 存放数据的路径
path = '/kaggle/input/ninoprediction/'
soda_train = nc.Dataset(path + 'SODA_train.nc')
soda_label = nc.Dataset(path + 'SODA_label.nc')
cmip_train = nc.Dataset(path + 'CMIP_train.nc')
cmip_label = nc.Dataset(path + 'CMIP_label.nc')
1.2 数据扁平化
采用滑窗构造数据集。
def make_flatted(train_ds, label_ds, info, start_idx=0):
    keys = ['sst', 't300', 'ua', 'va']
    label_key = 'nino'
    # 年数
    years = info[1]
    # 模式数
    models = info[2]

    train_list = []
    label_list = []

    # 将同种模式下的数据拼接起来
    for model_i in range(models):
        blocks = []

        # 对每个特征,取每条数据的前12个月进行拼接
        for key in keys:
            block = train_ds[key][start_idx + model_i * years: start_idx + (model_i + 1) * years, :12].reshape(-1, 24, 72, 1).data
            blocks.append(block)

        # 将所有特征在最后一个维度上拼接起来
        train_flatted = np.concatenate(blocks, axis=-1)

        # 取12-23月的标签进行拼接,注意加上最后一年的最后12个月的标签(与最后一年12-23月的标签共同构成最后一年前12个月的预测目标)
        label_flatted = np.concatenate([
            label_ds[label_key][start_idx + model_i * years: start_idx + (model_i + 1) * years, 12: 24].reshape(-1).data,
            label_ds[label_key][start_idx + (model_i + 1) * years - 1, 24: 36].reshape(-1).data
        ], axis=0)

        train_list.append(train_flatted)
        label_list.append(label_flatted)

    return train_list, label_list
soda_info = ('soda', 100, 1)
cmip6_info = ('cmip6', 151, 15)
cmip5_info = ('cmip5', 140, 17)

soda_trains, soda_labels = make_flatted(soda_train, soda_label, soda_info)
cmip6_trains, cmip6_labels = make_flatted(cmip_train, cmip_label, cmip6_info)
cmip5_trains, cmip5_labels = make_flatted(cmip_train, cmip_label, cmip5_info, cmip6_info[1]*cmip6_info[2])

# 得到扁平化后的数据维度为(模式数×序列长度×纬度×经度×特征数),其中序列长度=年数×12
np.shape(soda_trains), np.shape(cmip6_trains), np.shape(cmip5_trains)
((1, 1200, 24, 72, 4), (15, 1812, 24, 72, 4), (17, 1680, 24, 72, 4))
1.3 空值填充
将空值填充为0。
# 填充SODA数据中的空值
soda_trains = np.array(soda_trains)
soda_trains_nan = np.isnan(soda_trains)
soda_trains[soda_trains_nan] = 0
print('Number of null in soda_trains after fillna:', np.sum(np.isnan(soda_trains)))
Number of null in soda_trains after fillna: 0
# 填充CMIP6数据中的空值
cmip6_trains = np.array(cmip6_trains)
cmip6_trains_nan = np.isnan(cmip6_trains)
cmip6_trains[cmip6_trains_nan] = 0
print('Number of null in cmip6_trains after fillna:', np.sum(np.isnan(cmip6_trains)))
Number of null in cmip6_trains after fillna: 0
# 填充CMIP5数据中的空值
cmip5_trains = np.array(cmip5_trains)
cmip5_trains_nan = np.isnan(cmip5_trains)
cmip5_trains[cmip5_trains_nan] = 0
print('Number of null in cmip6_trains after fillna:', np.sum(np.isnan(cmip5_trains)))
Number of null in cmip6_trains after fillna: 0
- 构造数据集
构造训练和验证集。
# 构造训练集

X_train = []
y_train = []
# 从CMIP5的17种模式中各抽取100条数据
for model_i in range(17):
    samples = np.random.choice(cmip5_trains.shape[1]-12, size=100)
    for ind in samples:
        X_train.append(cmip5_trains[model_i, ind: ind+12])
        y_train.append(cmip5_labels[model_i][ind: ind+24])
# 从CMIP6的15种模式种各抽取100条数据
for model_i in range(15):
    samples = np.random.choice(cmip6_trains.shape[1]-12, size=100)
    for ind in samples:
        X_train.append(cmip6_trains[model_i, ind: ind+12])
        y_train.append(cmip6_labels[model_i][ind: ind+24])
X_train = np.array(X_train)
y_train = np.array(y_train)
# 构造验证集

X_valid = []
y_valid = []
samples = np.random.choice(soda_trains.shape[1]-12, size=100)
for ind in samples:
    X_valid.append(soda_trains[0, ind: ind+12])
    y_valid.append(soda_labels[0][ind: ind+24])
X_valid = np.array(X_valid)
y_valid = np.array(y_valid)
# 查看数据集维度
X_train.shape, y_train.shape, X_valid.shape, y_valid.shape
((3200, 12, 24, 72, 4), (3200, 24), (100, 12, 24, 72, 4), (100, 24))
# 保存数据集
np.save('X_train_sample.npy', X_train)
np.save('y_train_sample.npy', y_train)
np.save('X_valid_sample.npy', X_valid)
np.save('y_valid_sample.npy', y_valid)
1.4 模型构建
# 读取数据集
X_train = np.load('../input/ai-earth-task04-samples/X_train_sample.npy')
y_train = np.load('../input/ai-earth-task04-samples/y_train_sample.npy')
X_valid = np.load('../input/ai-earth-task04-samples/X_valid_sample.npy')
y_valid = np.load('../input/ai-earth-task04-samples/y_valid_sample.npy')
X_train.shape, y_train.shape, X_valid.shape, y_valid.shape
((3200, 12, 24, 72, 4), (3200, 24), (100, 12, 24, 72, 4), (100, 24))
# 构造数据管道
class AIEarthDataset(Dataset):
    def __init__(self, data, label):
        self.data = torch.tensor(data, dtype=torch.float32)
        self.label = torch.tensor(label, dtype=torch.float32)

    def __len__(self):
        return len(self.label)

    def __getitem__(self, idx):
        return self.data[idx], self.label[idx]
batch_size = 32

trainset = AIEarthDataset(X_train, y_train)
trainloader = DataLoader(trainset, batch_size=batch_size, shuffle=True)

validset = AIEarthDataset(X_valid, y_valid)
validloader = DataLoader(validset, batch_size=batch_size, shuffle=True)
1.4.1 构造评估函数
def rmse(y_true, y_preds):
    return np.sqrt(mean_squared_error(y_pred = y_preds, y_true = y_true))

# 评估函数
def score(y_true, y_preds):
    # 相关性技巧评分
    accskill_score = 0
    # RMSE
    rmse_scores = 0
    a = [1.5] * 4 + [2] * 7 + [3] * 7 + [4] * 6
    y_true_mean = np.mean(y_true, axis=0)
    y_pred_mean = np.mean(y_preds, axis=0)
    for i in range(24):
        fenzi = np.sum((y_true[:, i] - y_true_mean[i]) * (y_preds[:, i] - y_pred_mean[i]))
        fenmu = np.sqrt(np.sum((y_true[:, i] - y_true_mean[i])**2) * np.sum((y_preds[:, i] - y_pred_mean[i])**2))
        cor_i = fenzi / fenmu
        accskill_score += a[i] * np.log(i+1) * cor_i
        rmse_score = rmse(y_true[:, i], y_preds[:, i])
        rmse_scores += rmse_score
    return 2/3.0 * accskill_score - rmse_scores
1.4.2 模型构造
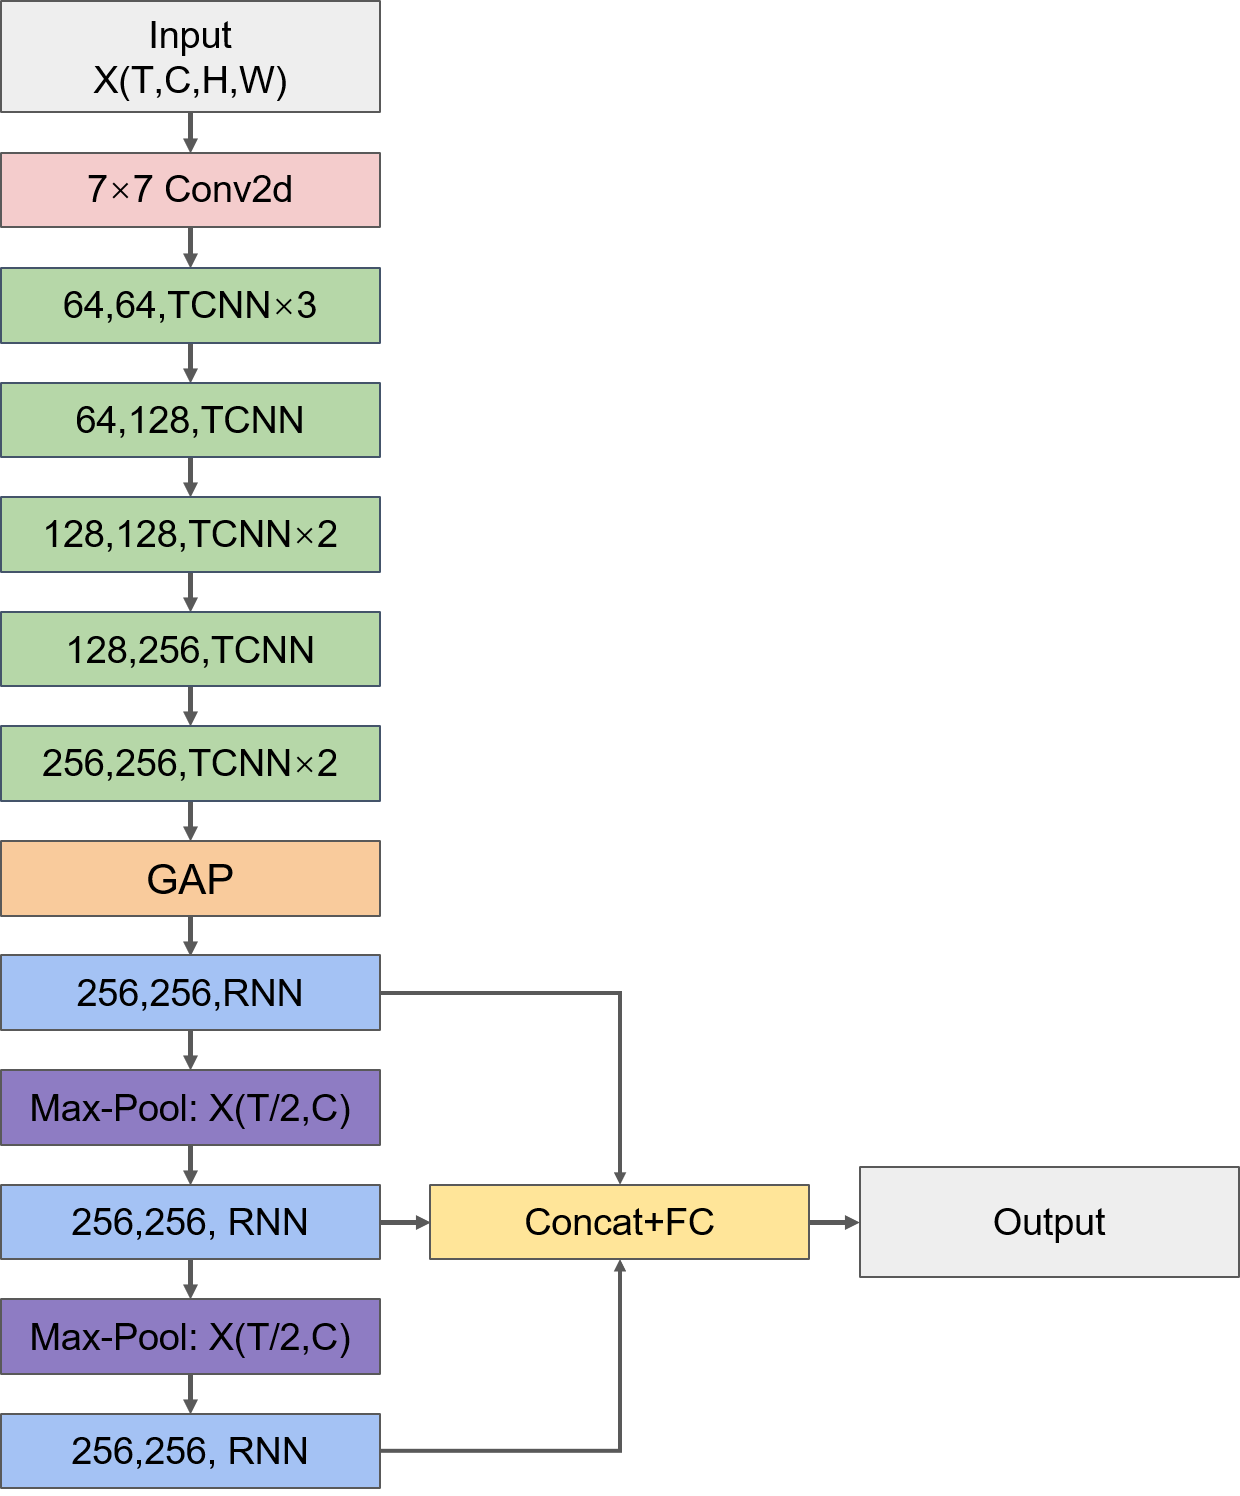
该TOP方案采用TCN单元+CNN单元串行组成TCNN层,通过堆叠多层的TCNN层来交替地提取时间和空间信息,并将提取到的时空信息用RNN来抽取出三种不同时间尺度的特征表达。
- TCN单元
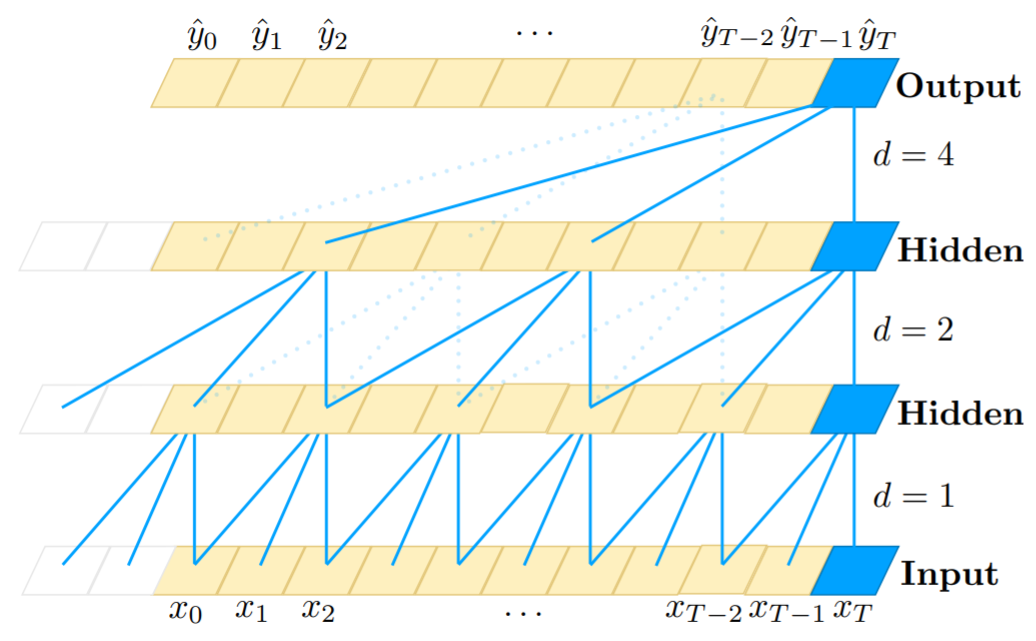
TCN模型全称时间卷积网络(Temporal Convolutional Network),与RNN一样是时序模型。TCN以CNN为基础,为了适应序列问题,它从以下三方面做出了改进:
- 因果卷积
TCN处理输入与输出等长的序列问题,它的每一个隐藏层节点数与输入步长是相同的,并且隐藏层t时刻节点的值只依赖于前一层t时刻及之前节点的值。也就是说TCN通过追溯前因(t时刻及之前的值)来获得当前结果,称为因果卷积。
- 扩张卷积
传统CNN的感受野受限于卷积核的大小,需要通过增加池化层来获得更大的感受野,但是池化的操作会带来信息的损失。为了解决这个问题,TCN采用扩张卷积来增大感受野,获取更长时间的信息。扩张卷积对输入进行间隔采样,采样间隔由扩张因子d控制,公式定义如下:
$$
F(s) = (X * df)(s) = \sum_{i=0}^{k-1} f(i) \times X_{s-di}
$$
其中X为当前层的输入,k为当前层的卷积核大小,s为当前节点的时刻。也就是说,对于扩张因子为d、卷积核为k的隐藏层,对前一层的输入每d个点采样一次,共采样k个点作为当前时刻s的输入。这样TCN的感受野就由卷积核的大小k和扩张因子d共同决定,可以获取更长时间的依赖信息。
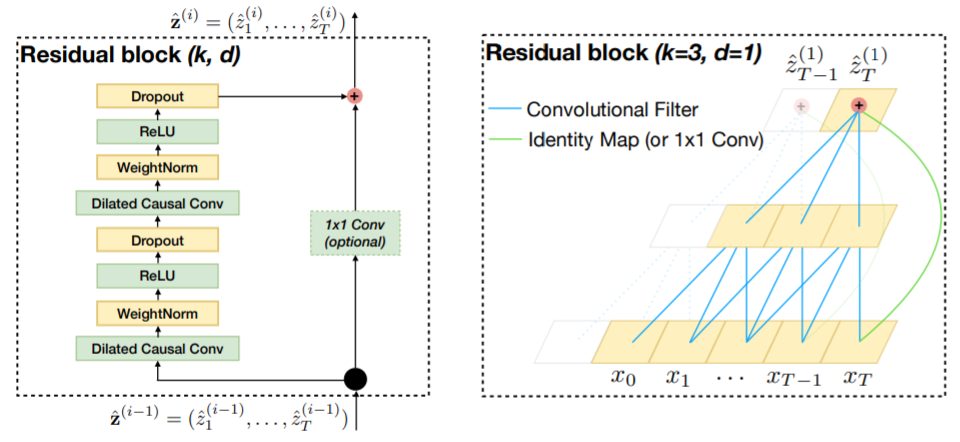
- 残差连接
网络的层数越多,所能提取到的特征就越丰富,但这也会带来梯度消失或爆炸的问题,目前解决这个问题的一个有效方法就是残差连接。TCN的残差模块包含两层卷积操作,并且采用了WeightNorm和Dropout进行正则化,如下图所示。
总的来说,TCN是卷积操作在序列问题上的改进,具有CNN参数量少的优点,可以搭建更深层的网络,相比于RNN不容易存在梯度消失和爆炸的问题,同时TCN具有灵活的感受野,能够适应不同的任务,在许多数据集上的比较表明TCN比RNN、LSTM、GRU等序列模型有更好的表现。
想要更深入地了解TCN可以参考以下链接:
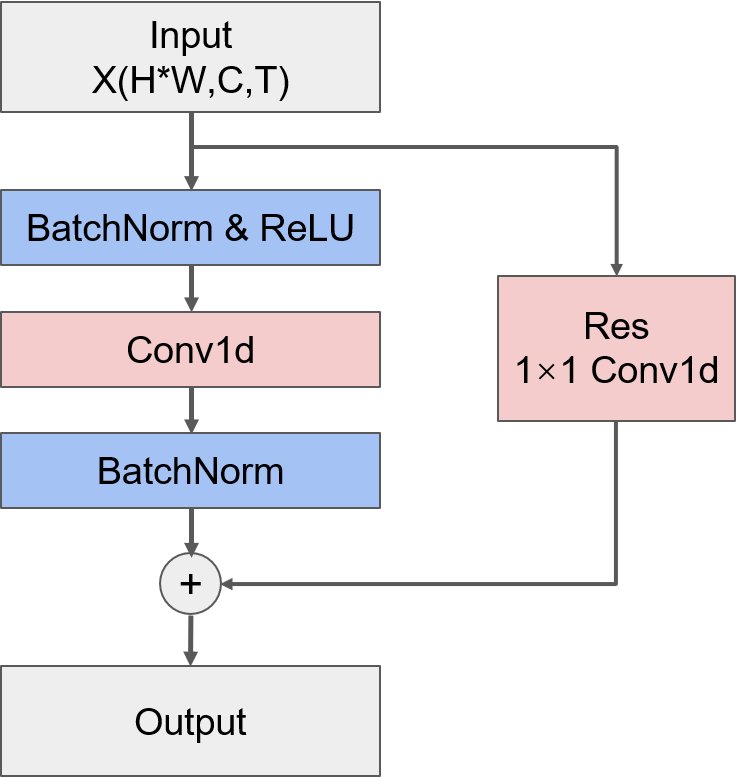
该方案中所构建的TCN单元并不是标准的TCN层,它的结构如下图所示,可以看到,这里的TCN单元只是用了一个卷积层,并且在卷积层前后都采用了BatchNormalization来提高模型的泛化能力。需要注意的是,这里的卷积操作是对时间维度进行操作,因此需要对输入的形状进行转换,并且为了便于匹配之后的网络层,需要将输出的形状转换回输入时的(N,T,C,H,W)的形式。
# 构建TCN单元
class TCNBlock(nn.Module):
    def __init__(self, in_channels, out_channels, kernel_size, stride, padding):
        super().__init__()
        self.bn1 = nn.BatchNorm1d(in_channels)
        self.conv = nn.Conv1d(in_channels, out_channels, kernel_size, stride, padding)
        self.bn2 = nn.BatchNorm1d(out_channels)

        if in_channels == out_channels and stride == 1:
            self.res = lambda x: x
        else:
            self.res = nn.Conv1d(in_channels, out_channels, kernel_size=1, stride=stride)

    def forward(self, x):
        # 转换输入形状
        N, T, C, H, W = x.shape
        x = x.permute(0, 3, 4, 2, 1).contiguous()
        x = x.view(N*H*W, C, T)

        # 残差
        res = self.res(x)
        res = self.bn2(res)

        x = F.relu(self.bn1(x))
        x = self.conv(x)
        x = self.bn2(x)

        x = x + res

        # 将输出转换回(N,T,C,H,W)的形式
        _, C_new, T_new = x.shape
        x = x.view(N, H, W, C_new, T_new)
        x = x.permute(0, 4, 3, 1, 2).contiguous()

        return x
- CNN单元
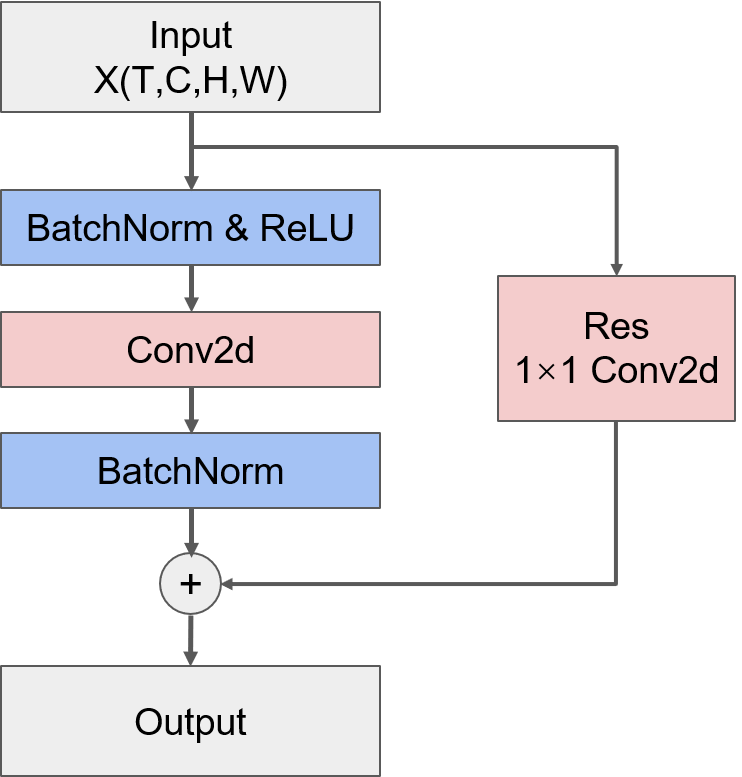
CNN单元结构与TCN单元相似,都只有一个卷积层,并且使用BatchNormalization来提高模型泛化能力。同时,类似TCN单元,CNN单元中也加入了残差连接。结构如下图所示:
# 构建CNN单元
class CNNBlock(nn.Module):
    def __init__(self, in_channels, out_channels, kernel_size, stride, padding):
        super().__init__()
        self.bn1 = nn.BatchNorm2d(in_channels)
        self.conv = nn.Conv2d(in_channels, out_channels, kernel_size, stride, padding)
        self.bn2 = nn.BatchNorm2d(out_channels)

        if (in_channels == out_channels) and (stride == 1):
            self.res = lambda x: x
        else:
            self.res = nn.Conv2d(in_channels, out_channels, kernel_size=1, stride=stride)

    def forward(self, x):
        # 转换输入形状
        N, T, C, H, W = x.shape
        x = x.view(N*T, C, H, W)

        # 残差
        res = self.res(x)
        res = self.bn2(res)

        x = F.relu(self.bn1(x))
        x = self.conv(x)
        x = self.bn2(x)

        x = x + res

        # 将输出转换回(N,T,C,H,W)的形式
        _, C_new, H_new, W_new = x.shape
        x = x.view(N, T, C_new, H_new, W_new)

        return x
- TCNN层
将TCN单元和CNN单元串行连接,就构成了一个TCNN层。
class TCNNBlock(nn.Module):
    def __init__(self, in_channels, out_channels, kernel_size, stride_tcn, stride_cnn, padding):
        super().__init__()
        self.tcn = TCNBlock(in_channels, out_channels, kernel_size, stride_tcn, padding)
        self.cnn = CNNBlock(out_channels, out_channels, kernel_size, stride_cnn, padding)

    def forward(self, x):
        x = self.tcn(x)
        x = self.cnn(x)
        return x
- TCNN+RNN模型
整体的模型结构如下图所示:
- TCNN部分
TCNN部分的模型结构类似传统CNN的结构,非常规整,通过逐渐增加通道数来提取更丰富的特征表达。需要注意的是输入数据的格式是(N,T,H,W,C),为了匹配卷积层的输入格式,需要将数据格式转换为(N,T,C,H,W)。
- GAP层
GAP全称为全局平均池化(Global Average Pooling)层,它的作用是把每个通道上的特征图取全局平均,假设经过TCNN部分得到的输出格式为(N,T,C,H,W),那么GAP层就会把每个通道上形状为H×W的特征图上的所有值求平均,最终得到的输出格式就变成(N,T,C)。GAP层最早出现在论文《Network in Network》(论文原文:https://arxiv.org/pdf/1312.4400.pdf )中用于代替传统CNN中的全连接层,之后的许多实验证明GAP层确实可以提高CNN的效果。
那么GAP层为什么可以代替全连接层呢?在传统CNN中,经过多层卷积和池化的操作后,会由Flatten层将特征图拉伸成一列,然后经过全连接层,那么对于形状为(C,H,W)的一条数据,经Flatten层拉伸后的长度为C×H×W,此时假设全连接层节点数为U,全连接层的参数量就是C×H×W×U,这么大的参数量很容易使得模型过拟合。相比之下,GAP层不引入新的参数,因此可以有效减少过拟合问题,并且模型参数少也能加快训练速度。另一方面,全连接层是一个黑箱子,我们很难解释多分类的信息是怎样传回卷积层的,而GAP层就很容易理解,每个通道的值就代表了经过多层卷积操作后所提取出来的特征。更详细的理解可以参考https://www.zhihu.com/question/373188099
在Pytorch中没有内置的GAP层,因此可以用adaptive_avg_pool2d来替代,这个函数可以将特征图压缩成给定的输出形状,将output_size参数设置为(1,1),就等同于GAP操作,函数的详细使用方法可以参考https://pytorch.org/docs/stable/generated/torch.nn.functional.adaptive_avg_pool2d.html?highlight=adaptive_avg_pool2d#torch.nn.functional.adaptive_avg_pool2d
- RNN部分
至此为止我们所使用的都是长度为12的时间序列,每个时间步代表一个月的信息。不同尺度的时间序列所携带的信息是不尽相同的,比如用长度为6的时间序列来表达一年的SST值,那么每个时间步所代表的就是两个月的SST信息,这种时间尺度下的SST序列与长度为12的SST序列所反映的一年中SST变化趋势等信息就不完全相同。所以,为了尽可能全面地挖掘更多信息,该TOP方案中用MaxPool层来获得三种不同时间尺度的序列,同时,用RNN层来抽取序列的特征表达。RNN非常适合用于线性序列的自动特征提取,例如对于形状为(T,C1)的一条输入数据,R经过节点数为C2的RNN层就能抽取出长度为C2的向量,由于RNN由前往后进行信息线性传递的网络结构,抽取出的向量能够很好地表达序列中的依赖关系。
此时三种不同时间尺度的序列都抽取出了一个向量来表示,将向量拼接起来再经过一个全连接层就得到了24个月的预测序列。
# 构造模型
class Model(nn.Module):
    def __init__(self):
        super().__init__()
        self.conv = nn.Conv2d(4, 64, kernel_size=7, stride=2, padding=3)
        self.tcnn1 = TCNNBlock(64, 64, 3, 1, 1, 1)
        self.tcnn2 = TCNNBlock(64, 128, 3, 1, 2, 1)
        self.tcnn3 = TCNNBlock(128, 128, 3, 1, 1, 1)
        self.tcnn4 = TCNNBlock(128, 256, 3, 1, 2, 1)
        self.tcnn5 = TCNNBlock(256, 256, 3, 1, 1, 1)
        self.rnn = nn.RNN(256, 256, batch_first=True)
        self.maxpool = nn.MaxPool1d(2)
        self.fc = nn.Linear(256*3, 24)

    def forward(self, x):
        # 转换输入形状
        N, T, H, W, C = x.shape
        x = x.permute(0, 1, 4, 2, 3).contiguous()
        x = x.view(N*T, C, H, W)

        # 经过一个卷积层
        x = self.conv(x)
        _, C_new, H_new, W_new = x.shape
        x = x.view(N, T, C_new, H_new, W_new)

        # TCNN部分
        for i in range(3):
            x = self.tcnn1(x)
        x = self.tcnn2(x)
        for i in range(2):
            x = self.tcnn3(x)
        x = self.tcnn4(x)
        for i in range(2):
            x = self.tcnn5(x)

        # 全局平均池化
        x = F.adaptive_avg_pool2d(x, (1, 1)).squeeze()

        # RNN部分,分别得到长度为T、T/2、T/4三种时间尺度的特征表达,注意转换RNN层输出的格式
        hidden_state = []
        for i in range(3):
            x, h = self.rnn(x)
            h = h.squeeze()
            hidden_state.append(h)
            x = self.maxpool(x.transpose(1, 2)).transpose(1, 2)

        x = torch.cat(hidden_state, dim=1)
        x = self.fc(x)

        return x
model = Model()
print(model)
1.4.3 模型训练
# 采用RMSE作为损失函数
def RMSELoss(y_pred,y_true):
    loss = torch.sqrt(torch.mean((y_pred-y_true)**2, dim=0)).sum()
    return loss
model_weights = './task04_model_weights.pth'
device = 'cuda' if torch.cuda.is_available() else 'cpu'
model = Model().to(device)
criterion = RMSELoss
optimizer = optim.Adam(model.parameters(), lr=1e-3)
epochs = 10
train_losses, valid_losses = [], []
scores = []
best_score = float('-inf')
preds = np.zeros((len(y_valid),24))

for epoch in range(epochs):
    print('Epoch: {}/{}'.format(epoch+1, epochs))

    # 模型训练
    model.train()
    losses = 0
    for data, labels in tqdm(trainloader):
        data = data.to(device)
        labels = labels.to(device)
        optimizer.zero_grad()
        pred = model(data)
        loss = criterion(pred, labels)
        losses += loss.cpu().detach().numpy()
        loss.backward()
        optimizer.step()
    train_loss = losses / len(trainloader)
    train_losses.append(train_loss)
    print('Training Loss: {:.3f}'.format(train_loss))

    # 模型验证
    model.eval()
    losses = 0
    with torch.no_grad():
        for i, data in tqdm(enumerate(validloader)):
            data, labels = data
            data = data.to(device)
            labels = labels.to(device)
            pred = model(data)
            loss = criterion(pred, labels)
            losses += loss.cpu().detach().numpy()
            preds[i*batch_size:(i+1)*batch_size] = pred.detach().cpu().numpy()
    valid_loss = losses / len(validloader)
    valid_losses.append(valid_loss)
    print('Validation Loss: {:.3f}'.format(valid_loss))
    s = score(y_valid, preds)
    scores.append(s)
    print('Score: {:.3f}'.format(s))

    # 保存最佳模型权重
    if s > best_score:
        best_score = s
        checkpoint = {'best_score': s,
                      'state_dict': model.state_dict()}
        torch.save(checkpoint, model_weights)
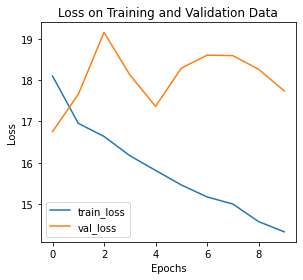
# 绘制训练/验证曲线
def training_vis(train_losses, valid_losses):
    # 绘制损失函数曲线
    fig = plt.figure(figsize=(8,4))
    # subplot loss
    ax1 = fig.add_subplot(121)
    ax1.plot(train_losses, label='train_loss')
    ax1.plot(valid_losses,label='val_loss')
    ax1.set_xlabel('Epochs')
    ax1.set_ylabel('Loss')
    ax1.set_title('Loss on Training and Validation Data')
    ax1.legend()
    plt.tight_layout()
training_vis(train_losses, valid_losses)
1.4.4模型评估
在测试集上评估模型效果。
# 加载最佳模型权重
checkpoint = torch.load('../input/ai-earth-model-weights/task04_model_weights.pth')
model = Model()
model.load_state_dict(checkpoint['state_dict'])
# 测试集路径
test_path = '../input/ai-earth-tests/'
# 测试集标签路径
test_label_path = '../input/ai-earth-tests-labels/'
import os

# 读取测试数据和测试数据的标签
files = os.listdir(test_path)
X_test = []
y_test = []
for file in files:
    X_test.append(np.load(test_path + file))
    y_test.append(np.load(test_label_path + file))
X_test = np.array(X_test)
y_test = np.array(y_test)
X_test.shape, y_test.shape
((103, 12, 24, 72, 4), (103, 24))
testset = AIEarthDataset(X_test, y_test)
testloader = DataLoader(testset, batch_size=batch_size, shuffle=False)
# 在测试集上评估模型效果
model.eval()
model.to(device)
preds = np.zeros((len(y_test),24))
for i, data in tqdm(enumerate(testloader)):
    data, labels = data
    data = data.to(device)
    labels = labels.to(device)
    pred = model(data)
    preds[i*batch_size:(i+1)*batch_size] = pred.detach().cpu().numpy()
s = score(y_test, preds)
print('Score: {:.3f}'.format(s))
4it [00:00, 12.75it/s]

Score: 20.274
1.5 小结
- 该方案充分考虑到数据量小、特征少的数据情况,对时间和空间分别进行卷积操作,交替地提取时间和空间信息,用GAP层对提取的信息进行降维,尽可能减少每一层的参数量、增加模型层数以提取更丰富的特征。
- 该方案考虑到不同时间尺度序列所携带的信息不同,用池化层变换时间尺度,并用RNN进行信息提取,综合三种不同时间尺度的序列信息得到最终的预测序列。
- 该方案同样选择了自己设计模型,在构造模型时充分考虑了数据集情况和问题背景,并能灵活运用各种网络层来处理特定问题,这种模型构造思路要求对不同网络层的作用有较为深刻地理解,方案中各种网络层的用法值得大家学习和借鉴。
参考文献
- Top1思路分享:https://tianchi.aliyun.com/forum/postDetail?spm=5176.12586969.1002.6.561d482cp7CFlx&postId=210391
2.气象海洋预测-模型建立之SA-ConvLSTM
本次任务我们将学习来自TOP选手“吴先生的队伍”的建模方案,该方案中采用的模型是SA-ConvLSTM。
前两个TOP方案中选择将赛题看作一个多输出的任务,通过构建神经网络直接输出24个nino3.4预测值,这种思路的问题在于,序列问题往往是时序依赖的,当我们采用多输出的方法时其实把这24个nino3.4预测值看作是完全独立的,但是实际上它们之间是存在序列依赖的,即每个预测值往往受上一个时间步的预测值的影响。因此,在这次的TOP方案中,采用Seq2Seq结构来考虑输出预测值的序列依赖性。
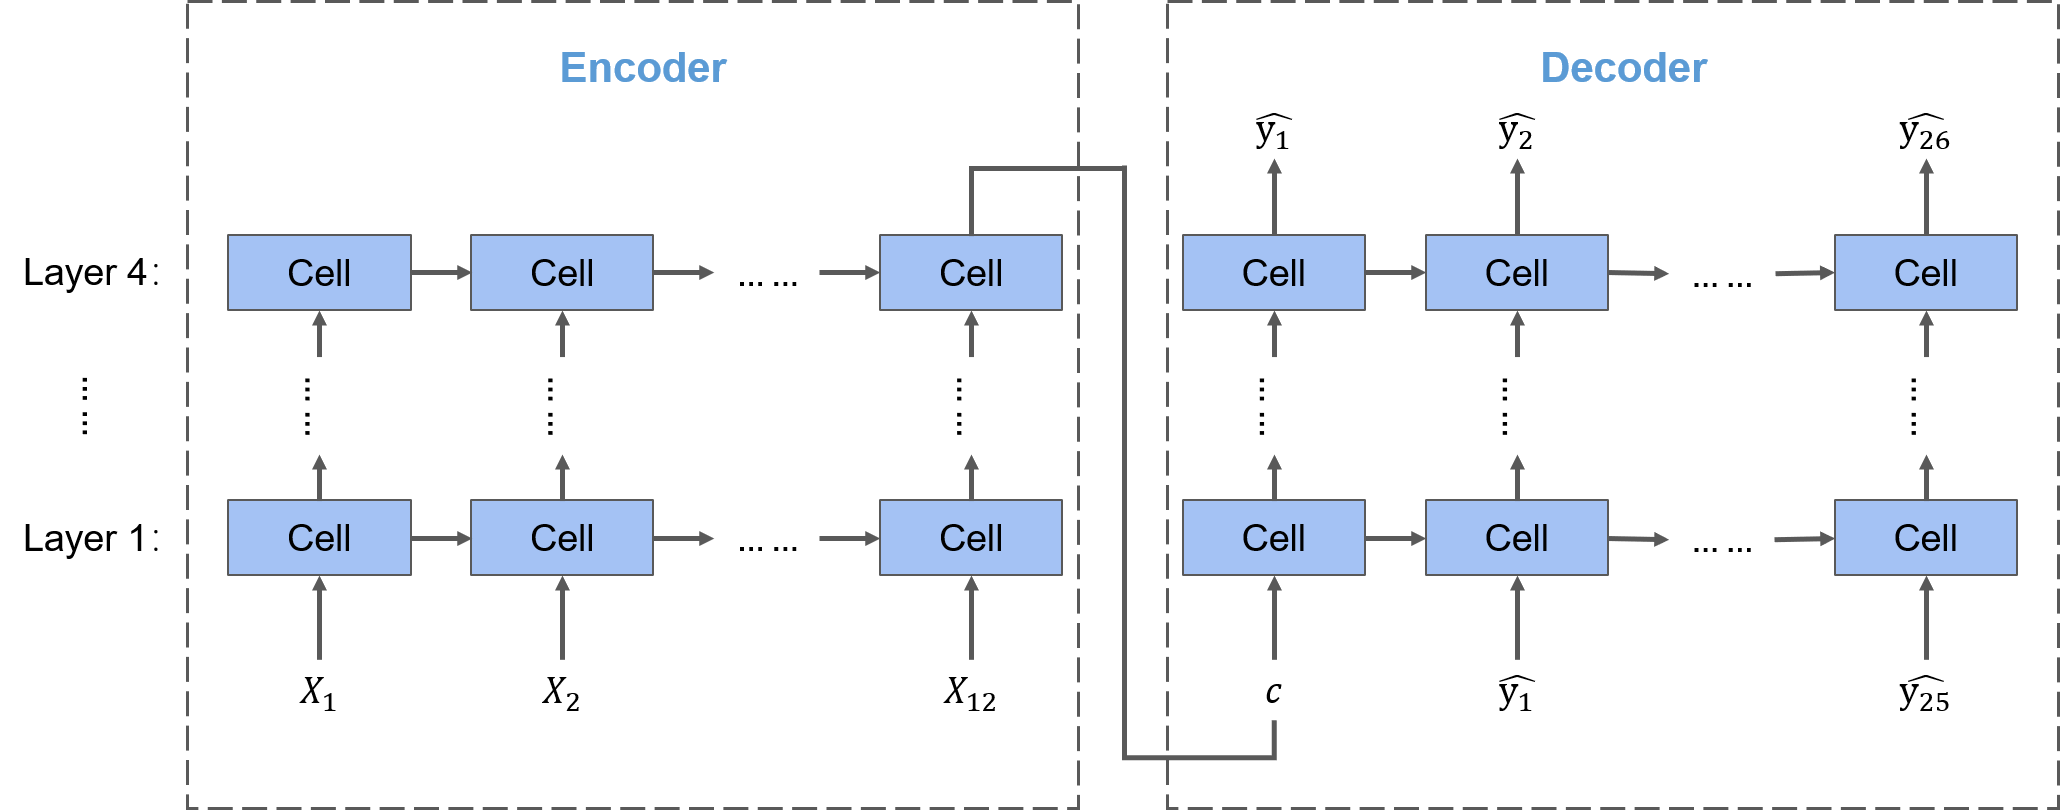
Seq2Seq结构包括Encoder(编码器)和Decoder(解码器)两部分,Encoder部分将输入序列编码成一个向量,Decoder部分对向量进行解码,输出一个预测序列。要将Seq2Seq结构应用于不同的序列问题,关键在于每一个时间步所使用的Cell。我们之前说到,挖掘空间信息通常会采用CNN,挖掘时间信息通常会采用RNN或LSTM,将二者结合在一起就得到了时空序列领域的经典模型——ConvLSTM,我们本次要学习的SA-ConvLSTM模型是对ConvLSTM模型的改进,在其基础上引入了自注意力机制来提高模型对于长期空间依赖关系的挖掘能力。
另外与前两个TOP方案所不同的一点是,该TOP方案没有直接预测Nino3.4指数,而是通过预测sst来间接求得Nino3.4指数序列。
import netCDF4 as nc
import random
import os
from tqdm import tqdm
import pandas as pd
import numpy as np
import math
import matplotlib.pyplot as plt
%matplotlib inline

import torch
from torch import nn, optim
import torch.nn.functional as F
from torch.utils.data import Dataset, DataLoader
from torch.optim.lr_scheduler import ReduceLROnPlateau

from sklearn.metrics import mean_squared_error
# 固定随机种子
SEED = 22

def seed_everything(seed=42):
    random.seed(seed)
    os.environ['PYTHONHASHSEED'] = str(seed)
    np.random.seed(seed)
    torch.manual_seed(seed)
    torch.cuda.manual_seed(seed)
    torch.backends.cudnn.deterministic = True

seed_everything(SEED)
# 查看CUDA是否可用
train_on_gpu = torch.cuda.is_available()

if not train_on_gpu:
    print('CUDA is not available.  Training on CPU ...')
else:
    print('CUDA is available!  Training on GPU ...')
CUDA is available! Training on GPU ...
# 读取数据

# 存放数据的路径
path = '/kaggle/input/ninoprediction/'
soda_train = nc.Dataset(path + 'SODA_train.nc')
soda_label = nc.Dataset(path + 'SODA_label.nc')
cmip_train = nc.Dataset(path + 'CMIP_train.nc')
cmip_label = nc.Dataset(path + 'CMIP_label.nc')
2.1 数据扁平化
采用滑窗构造数据集。该方案中只使用了sst特征,且只使用了lon值在[90, 330]范围内的数据,可能是为了节约计算资源。
def make_flatted(train_ds, label_ds, info, start_idx=0):
    # 只使用sst特征
    keys = ['sst']
    label_key = 'nino'
    # 年数
    years = info[1]
    # 模式数
    models = info[2]

    train_list = []
    label_list = []

    # 将同种模式下的数据拼接起来
    for model_i in range(models):
        blocks = []

        # 对每个特征,取每条数据的前12个月进行拼接,只使用lon值在[90, 330]范围内的数据
        for key in keys:
            block = train_ds[key][start_idx + model_i * years: start_idx + (model_i + 1) * years, :12, :, 19: 67].reshape(-1, 24, 48, 1).data
            blocks.append(block)

        # 将所有特征在最后一个维度上拼接起来
        train_flatted = np.concatenate(blocks, axis=-1)

        # 取12-23月的标签进行拼接,注意加上最后一年的最后12个月的标签(与最后一年12-23月的标签共同构成最后一年前12个月的预测目标)
        label_flatted = np.concatenate([
            label_ds[label_key][start_idx + model_i * years: start_idx + (model_i + 1) * years, 12: 24].reshape(-1).data,
            label_ds[label_key][start_idx + (model_i + 1) * years - 1, 24: 36].reshape(-1).data
        ], axis=0)

        train_list.append(train_flatted)
        label_list.append(label_flatted)

    return train_list, label_list
soda_info = ('soda', 100, 1)
cmip6_info = ('cmip6', 151, 15)
cmip5_info = ('cmip5', 140, 17)

soda_trains, soda_labels = make_flatted(soda_train, soda_label, soda_info)
cmip6_trains, cmip6_labels = make_flatted(cmip_train, cmip_label, cmip6_info)
cmip5_trains, cmip5_labels = make_flatted(cmip_train, cmip_label, cmip5_info, cmip6_info[1]*cmip6_info[2])

# 得到扁平化后的数据维度为(模式数×序列长度×纬度×经度×特征数),其中序列长度=年数×12
np.shape(soda_trains), np.shape(cmip6_trains), np.shape(cmip5_trains)
((1, 1200, 24, 48, 1), (15, 1812, 24, 48, 1), (17, 1680, 24, 48, 1))
空值填充
将空值填充为0。
# 填充SODA数据中的空值
soda_trains = np.array(soda_trains)
soda_trains_nan = np.isnan(soda_trains)
soda_trains[soda_trains_nan] = 0
print('Number of null in soda_trains after fillna:', np.sum(np.isnan(soda_trains)))
Number of null in soda_trains after fillna: 0
# 填充CMIP6数据中的空值
cmip6_trains = np.array(cmip6_trains)
cmip6_trains_nan = np.isnan(cmip6_trains)
cmip6_trains[cmip6_trains_nan] = 0
print('Number of null in cmip6_trains after fillna:', np.sum(np.isnan(cmip6_trains)))
Number of null in cmip6_trains after fillna: 0
# 填充CMIP5数据中的空值
cmip5_trains = np.array(cmip5_trains)
cmip5_trains_nan = np.isnan(cmip5_trains)
cmip5_trains[cmip5_trains_nan] = 0
print('Number of null in cmip6_trains after fillna:', np.sum(np.isnan(cmip5_trains)))
Number of null in cmip6_trains after fillna: 0
2.2构造数据集
构造训练和验证集。注意这里取每条输入数据的序列长度是38,这是因为输入sst序列长度是12,输出sst序列长度是26,在训练中采用teacher forcing策略(这个策略会在之后的模型构造时详细说明),因此这里在构造输入数据时包含了输出sst序列的实际值。
# 构造训练集

X_train = []
y_train = []
# 从CMIP5的17种模式中各抽取100条数据
for model_i in range(17):
    samples = np.random.choice(cmip5_trains.shape[1]-38, size=100)
    for ind in samples:
        X_train.append(cmip5_trains[model_i, ind: ind+38])
        y_train.append(cmip5_labels[model_i][ind: ind+24])
# 从CMIP6的15种模式种各抽取100条数据
for model_i in range(15):
    samples = np.random.choice(cmip6_trains.shape[1]-38, size=100)
    for ind in samples:
        X_train.append(cmip6_trains[model_i, ind: ind+38])
        y_train.append(cmip6_labels[model_i][ind: ind+24])
X_train = np.array(X_train)
y_train = np.array(y_train)
# 构造测试集

X_valid = []
y_valid = []
samples = np.random.choice(soda_trains.shape[1]-38, size=100)
for ind in samples:
    X_valid.append(soda_trains[0, ind: ind+38])
    y_valid.append(soda_labels[0][ind: ind+24])
X_valid = np.array(X_valid)
y_valid = np.array(y_valid)
# 查看数据集维度
X_train.shape, y_train.shape, X_valid.shape, y_valid.shape
((3200, 38, 24, 48, 1), (3200, 24), (100, 38, 24, 48, 1), (100, 24))
# 保存数据集
np.save('X_train_sample.npy', X_train)
np.save('y_train_sample.npy', y_train)
np.save('X_valid_sample.npy', X_valid)
np.save('y_valid_sample.npy', y_valid)
2.3模型构建
# 读取数据集
X_train = np.load('../input/ai-earth-task05-samples/X_train_sample.npy')
y_train = np.load('../input/ai-earth-task05-samples/y_train_sample.npy')
X_valid = np.load('../input/ai-earth-task05-samples/X_valid_sample.npy')
y_valid = np.load('../input/ai-earth-task05-samples/y_valid_sample.npy')
X_train.shape, y_train.shape, X_valid.shape, y_valid.shape
((3200, 38, 24, 48, 1), (3200, 24), (100, 38, 24, 48, 1), (100, 24))
# 构造数据管道
class AIEarthDataset(Dataset):
    def __init__(self, data, label):
        self.data = torch.tensor(data, dtype=torch.float32)
        self.label = torch.tensor(label, dtype=torch.float32)

    def __len__(self):
        return len(self.label)

    def __getitem__(self, idx):
        return self.data[idx], self.label[idx]
batch_size = 2

trainset = AIEarthDataset(X_train, y_train)
trainloader = DataLoader(trainset, batch_size=batch_size, shuffle=True)

validset = AIEarthDataset(X_valid, y_valid)
validloader = DataLoader(validset, batch_size=batch_size, shuffle=True)
2.3.1构造评估函数
def rmse(y_true, y_preds):
    return np.sqrt(mean_squared_error(y_pred = y_preds, y_true = y_true))

# 评估函数
def score(y_true, y_preds):
    # 相关性技巧评分
    accskill_score = 0
    # RMSE
    rmse_scores = 0
    a = [1.5] * 4 + [2] * 7 + [3] * 7 + [4] * 6
    y_true_mean = np.mean(y_true, axis=0)
    y_pred_mean = np.mean(y_preds, axis=0)
    for i in range(24):
        fenzi = np.sum((y_true[:, i] - y_true_mean[i]) * (y_preds[:, i] - y_pred_mean[i]))
        fenmu = np.sqrt(np.sum((y_true[:, i] - y_true_mean[i])**2) * np.sum((y_preds[:, i] - y_pred_mean[i])**2))
        cor_i = fenzi / fenmu
        accskill_score += a[i] * np.log(i+1) * cor_i
        rmse_score = rmse(y_true[:, i], y_preds[:, i])
        rmse_scores += rmse_score
    return 2/3.0 * accskill_score - rmse_scores
2.3.2 模型构造
不同于前两个TOP方案所构建的多输出神经网络,该TOP方案采用的是Seq2Seq结构,以本赛题为例,输入的序列长度是12,输出的序列长度是26,方案中构建了四个隐藏层,那么一个基础的Seq2Seq结构就如下图所示:
要将Seq2Seq结构应用于不同的问题,重点在于使用怎样的Cell(神经元)。在该TOP方案中使用的Cell是清华大学提出的SA-ConvLSTM(Self-Attention ConvLSTM),论文原文可参考https://ojs.aaai.org//index.php/AAAI/article/view/6819
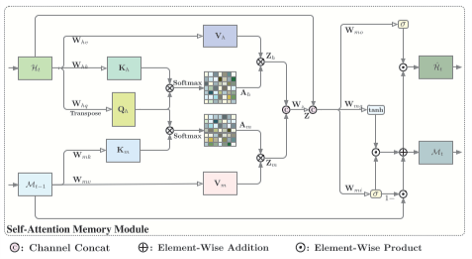
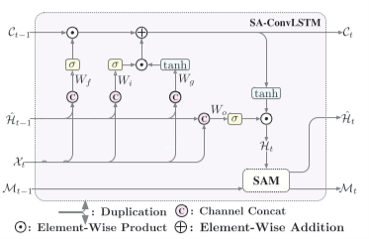
SA-ConvLSTM是施行健博士提出的时空序列领域经典模型ConvLSTM的改进模型,为了捕捉空间信息的时序依赖关系,它在ConvLSTM的基础上增加了SAM模块,用来记忆空间的聚合特征。ConvLSTM的论文原文可参考https://arxiv.org/pdf/1506.04214.pdf
- ConvLSTM模型
LSTM模型是非常经典的时序模型,三个门的结构使得它在挖掘长期的时间依赖任务中有不俗的表现,并且相较于RNN,LSTM能够有效地避免梯度消失问题。对于单个输入样本,在每个时间步上,LSTM的每个门实际是对输入向量做了一个全连接,那么对应到我们这个赛题上,输入X的形状是(N,T,H,W,C),则单个输入样本在每个时间步上输入LSTM的就是形状为(H,W,C)的空间信息。我们知道,全连接网络对于这种空间信息的提取能力并不强,转换成卷积操作后能够在大大减少参数量的同时通过堆叠多层网络逐步提取出更复杂的特征,到这里就可以很自然地想到,把LSTM中的全连接操作转换为卷积操作,就能够适用于时空序列问题。ConvLSTM模型就是这么做的,实践也表明这样的作法是非常有效的。
- SAM模块
然而,ConvLSTM模型存在两个问题:
一是卷积层的感受野受限于卷积核的大小,需要通过堆叠多个卷积层来扩大感受野,发掘全局的特征。举例来说,假设第一个卷积层的卷积核大小是3×3,那么这一层的每个节点就只能感知这3×3的空间范围内的输入信息,此时再增加一个3×3的卷积层,那么每个节点所能感知的就是3×3个第一层的节点内的信息,在第一层步长为1的情况下,就是4×4范围内的输入信息,于是相比于第一个卷积层,第二层所能感知的输入信息的空间范围就增大了,而这样做所带来的后果就是参数量增加。对于单纯的CNN模型来说增加一层只是增加了一个卷积核大小的参数量,但是对于ConvLSTM来说就有些不堪重负,参数量的增加增大了过拟合的风险,与此同时模型的收效却并不高。
二是卷积操作只针对当前时间步输入的空间信息,而忽视了过去的空间信息,因此难以挖掘空间信息在时间上的依赖关系。
因此,为了同时挖掘全局和本地的空间依赖,提升模型在大空间范围和长时间的时空序列预测任务中的预测效果,SA-ConvLSTM模型在ConvLSTM模型的基础上引入了SAM(self-attention memory)模块。
SAM模块引入了一个新的记忆单元M,用来记忆包含时序依赖关系的空间信息。SAM模块以当前时间步通过ConvLSTM所获得的隐藏层状态$H_t$和上一个时间步的记忆$M_{t-1}$作为输入,首先将$H_t$通过自注意力机制得到特征$Z_h$,自注意力机制能够增加$H_t$中与其他部分更相关的部分的权重,同时$H_t$也作为Query与$M_{t-1}$共同通过注意力机制得到特征$Z_m$,用以增强对$M_{t-1}$中与$H_t$有更强依赖关系的部分的权重,将$Z_h$和$Z_m$拼接起来就得到了二者的聚合特征$Z$。此时,聚合特征$Z$中既包含了当前时间步的信息,又包含了全局的时空记忆信息,接下来借鉴LSTM中的门控结构用聚合特征$Z$对隐藏层状态和记忆单元进行更新,就得到了更新后的隐藏层状态$\hat{H_t}$和当前时间步的记忆$M_t$。SAM模块的公式如下:
$$
\begin{aligned}
& i't = \sigma (W \ast Z + W_{m;hi} \ast H_t + b_{m;i}) \
& g't = tanh (W \ast Z + W_{m;hg} \ast H_t + b_{m;g}) \
& M_t = (1 - i't) \circ M + i't \circ g't \
& o't = \sigma (W \ast Z + W \ast H_t + b) \
& \hat{H_t} = o'_t \circ M_t
\end{aligned}
$$
关于注意力机制和自注意力机制可以参考以下链接:
- 深度学习中的注意力机制:https://blog.csdn.net/malefactor/article/details/78767781
- 目前主流的Attention方法:https://www.zhihu.com/question/68482809
- SA-ConvLSTM模型
将以上二者结合起来,就得到了SA-ConvLSTM模型:
# Attention机制
def attn(query, key, value):
    # query、key、value的形状都是(N, C, H*W),令S=H*W
    # 采用缩放点积模型计算得分,scores(i)=key(i)^T query/根号C
    scores = torch.matmul(query.transpose(1, 2), key / math.sqrt(query.size(1)))  # (N, S, S)
    # 计算注意力得分
    attn = F.softmax(scores, dim=-1)
    output = torch.matmul(attn, value.transpose(1, 2))  # (N, S, C)
    return output.transpose(1, 2)  # (N, C, S)
# SAM模块
class SAAttnMem(nn.Module):
    def __init__(self, input_dim, d_model, kernel_size):
        super().__init__()
        pad = kernel_size[0] // 2, kernel_size[1] // 2
        self.d_model = d_model
        self.input_dim = input_dim
        # 用1*1卷积实现全连接操作WhHt
        self.conv_h = nn.Conv2d(input_dim, d_model*3, kernel_size=1)
        # 用1*1卷积实现全连接操作WmMt-1
        self.conv_m = nn.Conv2d(input_dim, d_model*2, kernel_size=1)
        # 用1*1卷积实现全连接操作Wz[Zh,Zm]
        self.conv_z = nn.Conv2d(d_model*2, d_model, kernel_size=1)
        # 注意输出维度和输入维度要保持一致,都是input_dim
        self.conv_output = nn.Conv2d(input_dim+d_model, input_dim*3, kernel_size=kernel_size, padding=pad)

    def forward(self, h, m):
        # self.conv_h(h)得到WhHt,将其在dim=1上划分成大小为self.d_model的块,每一块的形状就是(N, d_model, H, W),所得到的三块就是Qh、Kh、Vh
        hq, hk, hv = torch.split(self.conv_h(h), self.d_model, dim=1)
        # 同样的方法得到Km和Vm
        mk, mv = torch.split(self.conv_m(m), self.d_model, dim=1)
        N, C, H, W = hq.size()
        # 通过自注意力机制得到Zh
        Zh = attn(hq.view(N, C, -1), hk.view(N, C, -1), hv.view(N, C, -1))  # (N, C, S), C=d_model
        # 通过注意力机制得到Zm
        Zm = attn(hq.view(N, C, -1), mk.view(N, C, -1), mv.view(N, C, -1))  # (N, C, S), C=d_model
        # 将Zh和Zm拼接起来,并进行全连接操作得到聚合特征Z
        Z = self.conv_z(torch.cat([Zh.view(N, C, H, W), Zm.view(N, C, H, W)], dim=1))  # (N, C, H, W), C=d_model
        # 计算i't、g't、o't
        i, g, o = torch.split(self.conv_output(torch.cat([Z, h], dim=1)), self.input_dim, dim=1)  # (N, C, H, W), C=input_dim
        i = torch.sigmoid(i)
        g = torch.tanh(g)
        # 得到更新后的记忆单元Mt
        m_next = i * g + (1 - i) * m
        # 得到更新后的隐藏状态Ht
        h_next = torch.sigmoid(o) * m_next
        return h_next, m_next
# SA-ConvLSTM Cell
class SAConvLSTMCell(nn.Module):
    def __init__(self, input_dim, hidden_dim, d_attn, kernel_size):
        super().__init__()
        self.input_dim = input_dim
        self.hidden_dim = hidden_dim
        pad = kernel_size[0] // 2, kernel_size[1] // 2
        # 卷积操作Wx*Xt+Wh*Ht-1
        self.conv = nn.Conv2d(in_channels=input_dim+hidden_dim, out_channels=4*hidden_dim, kernel_size=kernel_size, padding=pad)
        self.sa = SAAttnMem(input_dim=hidden_dim, d_model=d_attn, kernel_size=kernel_size)

    def initialize(self, inputs):
        device = inputs.device
        N, _, H, W = inputs.size()
        # 初始化隐藏层状态Ht
        self.hidden_state = torch.zeros(N, self.hidden_dim, H, W, device=device)
        # 初始化记忆细胞状态ct
        self.cell_state = torch.zeros(N, self.hidden_dim, H, W, device=device)
        # 初始化记忆单元状态Mt
        self.memory_state = torch.zeros(N, self.hidden_dim, H, W, device=device)

    def forward(self, inputs, first_step=False):
        # 如果当前是第一个时间步,初始化Ht、ct、Mt
        if first_step:
            self.initialize(inputs)

        # ConvLSTM部分
        # 拼接Xt和Ht
        combined = torch.cat([inputs, self.hidden_state], dim=1)  # (N, C, H, W), C=input_dim+hidden_dim
        # 进行卷积操作
        combined_conv = self.conv(combined)
        # 得到四个门控单元it、ft、ot、gt
        cc_i, cc_f, cc_o, cc_g = torch.split(combined_conv, self.hidden_dim, dim=1)
        i = torch.sigmoid(cc_i)
        f = torch.sigmoid(cc_f)
        o = torch.sigmoid(cc_o)
        g = torch.tanh(cc_g)
        # 得到当前时间步的记忆细胞状态ct=ft·ct-1+it·gt
        self.cell_state = f * self.cell_state + i * g
        # 得到当前时间步的隐藏层状态Ht=ot·tanh(ct)
        self.hidden_state = o * torch.tanh(self.cell_state)

        # SAM部分,更新Ht和Mt
        self.hidden_state, self.memory_state = self.sa(self.hidden_state, self.memory_state)

        return self.hidden_state
在Seq2Seq模型的训练中,有两种训练模式。一是Free running,也就是传统的训练方式,以上一个时间步的输出$\hat{y_{t-1}}$作为下一个时间步的输入,但是这种做法存在的问题是在训练的初期所得到的$\hat{y_{t-1}}$与实际标签$y_{t-1}$相差甚远,以此作为输入会导致后续的输出越来越偏离我们期望的预测标签。于是就产生了第二种训练模式——Teacher forcing。
Teacher forcing就是直接使用实际标签$y_{t-1}$作为下一个时间步的输入,由老师(ground truth)带领着防止模型越走越偏。但是老师不能总是手把手领着学生走,要逐渐放手让学生自主学习,于是我们使用Scheduled Sampling来控制使用实际标签的概率。我们用ratio来表示Scheduled Sampling的比例,在训练初期,ratio=1,模型完全由老师带领着,随着训练论述的增加,ratio以一定的方式衰减(该方案中使用线性衰减,ratio每次减小一个衰减率decay_rate),每个时间步以ratio的概率从伯努利分布中提取二进制随机数0或1,为1时输入就是实际标签$y_{t-1}$,否则输入为$\hat{y_{t-1}}$。
# 构建SA-ConvLSTM模型
class SAConvLSTM(nn.Module):
    def __init__(self, input_dim, hidden_dim, d_attn, kernel_size):
        super().__init__()
        self.input_dim = input_dim
        self.hidden_dim = hidden_dim
        self.num_layers = len(hidden_dim)

        layers = []
        for i in range(self.num_layers):
            cur_input_dim = self.input_dim if i == 0 else self.hidden_dim[i-1]
            layers.append(SAConvLSTMCell(input_dim=cur_input_dim, hidden_dim=self.hidden_dim[i], d_attn = d_attn, kernel_size=kernel_size))
        self.layers = nn.ModuleList(layers)

        self.conv_output = nn.Conv2d(self.hidden_dim[-1], 1, kernel_size=1)

    def forward(self, input_x, device=torch.device('cuda:0'), input_frames=12, future_frames=26, output_frames=37, teacher_forcing=False, scheduled_sampling_ratio=0, train=True):
        # 将输入样本X的形状(N, T, H, W, C)转换为(N, T, C, H, W)
        input_x = input_x.permute(0, 1, 4, 2, 3).contiguous()

        # 仅在训练时使用teacher forcing
        if train:
            if teacher_forcing and scheduled_sampling_ratio > 1e-6:
                teacher_forcing_mask = torch.bernoulli(scheduled_sampling_ratio * torch.ones(input_x.size(0), future_frames-1, 1, 1, 1))
            else:
                teacher_forcing = False
        else:
            teacher_forcing = False

        total_steps = input_frames + future_frames - 1
        outputs = [None] * total_steps

        # 对于每一个时间步
        for t in range(total_steps):
            # 在前12个月,使用每个月的输入样本Xt
            if t < input_frames:
                input_ = input_x[:, t].to(device)
            # 若不使用teacher forcing,则以上一个时间步的预测标签作为当前时间步的输入
            elif not teacher_forcing:
                input_ = outputs[t-1]
            # 若使用teacher forcing,则以ratio的概率使用上一个时间步的实际标签作为当前时间步的输入
            else:
                mask = teacher_forcing_mask[:, t-input_frames].float().to(device)
                input_ = input_x[:, t].to(device) * mask + outputs[t-1] * (1-mask)
            first_step = (t==0)
            input_ = input_.float()

            # 将当前时间步的输入通过隐藏层
            for layer_idx in range(self.num_layers):
                input_ = self.layers[layer_idx](input_, first_step=first_step)

            # 记录每个时间步的输出
            if train or (t >= (input_frames - 1)):
                outputs[t] = self.conv_output(input_)

        outputs = [x for x in outputs if x is not None]

        # 确认输出序列的长度
        if train:
            assert len(outputs) == output_frames
        else:
            assert len(outputs) == future_frames

        # 得到sst的预测序列
        outputs = torch.stack(outputs, dim=1)[:, :, 0]  # (N, 37, H, W)
        # 对sst的预测序列在nino3.4区域取三个月的平均值就得到nino3.4指数的预测序列
        nino_pred = outputs[:, -future_frames:, 10:13, 19:30].mean(dim=[2, 3])  # (N, 26)
        nino_pred = nino_pred.unfold(dimension=1, size=3, step=1).mean(dim=2)  # (N, 24)

        return nino_pred
# 输入特征数
input_dim = 1
# 隐藏层节点数
hidden_dim = (64, 64, 64, 64)
# 注意力机制节点数
d_attn = 32
# 卷积核大小
kernel_size = (3, 3)

model = SAConvLSTM(input_dim, hidden_dim, d_attn, kernel_size)
print(model)
2.3.3模型训练
# 采用RMSE作为损失函数
def RMSELoss(y_pred,y_true):
    loss = torch.sqrt(torch.mean((y_pred-y_true)**2, dim=0)).sum()
    return loss
model_weights = './task05_model_weights.pth'
device = 'cuda' if torch.cuda.is_available() else 'cpu'
model = SAConvLSTM(input_dim, hidden_dim, d_attn, kernel_size).to(device)
criterion = RMSELoss
optimizer = optim.Adam(model.parameters(), lr=1e-3)
lr_scheduler = ReduceLROnPlateau(optimizer, mode='max', factor=0.3, patience=0, verbose=True, min_lr=0.0001)
epochs = 5
ratio, decay_rate = 1, 8e-5
train_losses, valid_losses = [], []
scores = []
best_score = float('-inf')
preds = np.zeros((len(y_valid),24))

for epoch in range(epochs):
    print('Epoch: {}/{}'.format(epoch+1, epochs))

    # 模型训练
    model.train()
    losses = 0
    for data, labels in tqdm(trainloader):
        data = data.to(device)
        labels = labels.to(device)
        optimizer.zero_grad()
        # ratio线性衰减
        ratio = max(ratio-decay_rate, 0)
        pred = model(data, teacher_forcing=True, scheduled_sampling_ratio=ratio, train=True)
        loss = criterion(pred, labels)
        losses += loss.cpu().detach().numpy()
        loss.backward()
        optimizer.step()
    train_loss = losses / len(trainloader)
    train_losses.append(train_loss)
    print('Training Loss: {:.3f}'.format(train_loss))

    # 模型验证
    model.eval()
    losses = 0
    with torch.no_grad():
        for i, data in tqdm(enumerate(validloader)):
            data, labels = data
            data = data.to(device)
            labels = labels.to(device)
            pred = model(data, train=False)
            loss = criterion(pred, labels)
            losses += loss.cpu().detach().numpy()
            preds[i*batch_size:(i+1)*batch_size] = pred.detach().cpu().numpy()
    valid_loss = losses / len(validloader)
    valid_losses.append(valid_loss)
    print('Validation Loss: {:.3f}'.format(valid_loss))
    s = score(y_valid, preds)
    scores.append(s)
    print('Score: {:.3f}'.format(s))

    # 保存最佳模型权重
    if s > best_score:
        best_score = s
        checkpoint = {'best_score': s,
                      'state_dict': model.state_dict()}
        torch.save(checkpoint, model_weights)
# 绘制训练/验证曲线
def training_vis(train_losses, valid_losses):
    # 绘制损失函数曲线
    fig = plt.figure(figsize=(8,4))
    # subplot loss
    ax1 = fig.add_subplot(121)
    ax1.plot(train_losses, label='train_loss')
    ax1.plot(valid_losses,label='val_loss')
    ax1.set_xlabel('Epochs')
    ax1.set_ylabel('Loss')
    ax1.set_title('Loss on Training and Validation Data')
    ax1.legend()
    plt.tight_layout()
training_vis(train_losses, valid_losses)
2.3.4模型评估
在测试集上评估模型效果。
# 加载得分最高的模型
checkpoint = torch.load('../input/ai-earth-model-weights/task05_model_weights.pth')
model = SAConvLSTM(input_dim, hidden_dim, d_attn, kernel_size)
model.load_state_dict(checkpoint['state_dict'])
<All keys matched successfully>
# 测试集路径
test_path = '../input/ai-earth-tests/'
# 测试集标签路径
test_label_path = '../input/ai-earth-tests-labels/'
import os

# 读取测试数据和测试数据的标签
files = os.listdir(test_path)
X_test = []
y_test = []
for file in files:
    X_test.append(np.load(test_path + file))
    y_test.append(np.load(test_label_path + file))
X_test = np.array(X_test)[:, :, :, 19: 67, :1]
y_test = np.array(y_test)
X_test.shape, y_test.shape
((103, 12, 24, 48, 1), (103, 24))
testset = AIEarthDataset(X_test, y_test)
testloader = DataLoader(testset, batch_size=batch_size, shuffle=False)
# 在测试集上评估模型效果
model.eval()
model.to(device)
preds = np.zeros((len(y_test),24))
for i, data in tqdm(enumerate(testloader)):
    data, labels = data
    data = data.to(device)
    labels = labels.to(device)
    pred = model(data, train=False)
    preds[i*batch_size:(i+1)*batch_size] = pred.detach().cpu().numpy()
s = score(y_test, preds)
print('Score: {:.3f}'.format(s))
2.4小结
这一次的TOP方案没有自己设计模型,而是使用了目前时空序列预测领域现有的模型,另一组TOP选手“ailab”也使用了现有的模型PredRNN++,关于时空序列预测领域的一些比较经典的模型可以参考https://www.zhihu.com/column/c_1208033701705162752
项目链接以及码源见文末
更多文章请关注公重号:汀丶人工智能
