Yolov8 源码解析(十二)
comments: true
description: Learn to simplify the logging of YOLOv8 training with Comet ML. This guide covers installation, setup, real-time insights, and custom logging.
keywords: YOLOv8, Comet ML, logging, machine learning, training, model checkpoints, metrics, installation, configuration, real-time insights, custom logging
Elevating YOLOv8 Training: Simplify Your Logging Process with Comet ML
Logging key training details such as parameters, metrics, image predictions, and model checkpoints is essential in machine learning—it keeps your project transparent, your progress measurable, and your results repeatable.
Ultralytics YOLOv8 seamlessly integrates with Comet ML, efficiently capturing and optimizing every aspect of your YOLOv8 object detection model's training process. In this guide, we'll cover the installation process, Comet ML setup, real-time insights, custom logging, and offline usage, ensuring that your YOLOv8 training is thoroughly documented and fine-tuned for outstanding results.
Comet ML

Comet ML is a platform for tracking, comparing, explaining, and optimizing machine learning models and experiments. It allows you to log metrics, parameters, media, and more during your model training and monitor your experiments through an aesthetically pleasing web interface. Comet ML helps data scientists iterate more rapidly, enhances transparency and reproducibility, and aids in the development of production models.
Harnessing the Power of YOLOv8 and Comet ML
By combining Ultralytics YOLOv8 with Comet ML, you unlock a range of benefits. These include simplified experiment management, real-time insights for quick adjustments, flexible and tailored logging options, and the ability to log experiments offline when internet access is limited. This integration empowers you to make data-driven decisions, analyze performance metrics, and achieve exceptional results.
Installation
To install the required packages, run:
!!! Tip "Installation"
=== "CLI"

    ```py
    # Install the required packages for YOLOv8 and Comet ML
    pip install ultralytics comet_ml torch torchvision
    ```
Configuring Comet ML
After installing the required packages, you'll need to sign up, get a Comet API Key, and configure it.
!!! Tip "Configuring Comet ML"
=== "CLI"

    ```py
    # Set your Comet Api Key
    export COMET_API_KEY=<Your API Key>
    ```
Then, you can initialize your Comet project. Comet will automatically detect the API key and proceed with the setup.
import comet_ml

comet_ml.login(project_name="comet-example-yolov8-coco128")
If you are using a Google Colab notebook, the code above will prompt you to enter your API key for initialization.
Usage
Before diving into the usage instructions, be sure to check out the range of YOLOv8 models offered by Ultralytics. This will help you choose the most appropriate model for your project requirements.
!!! Example "Usage"
=== "Python"

    ```py
    from ultralytics import YOLO

    # Load a model
    model = YOLO("yolov8n.pt")

    # Train the model
    results = model.train(
        data="coco8.yaml",
        project="comet-example-yolov8-coco128",
        batch=32,
        save_period=1,
        save_json=True,
        epochs=3,
    )
    ```
After running the training code, Comet ML will create an experiment in your Comet workspace to track the run automatically. You will then be provided with a link to view the detailed logging of your YOLOv8 model's training process.
Comet automatically logs the following data with no additional configuration: metrics such as mAP and loss, hyperparameters, model checkpoints, interactive confusion matrix, and image bounding box predictions.
Understanding Your Model's Performance with Comet ML Visualizations
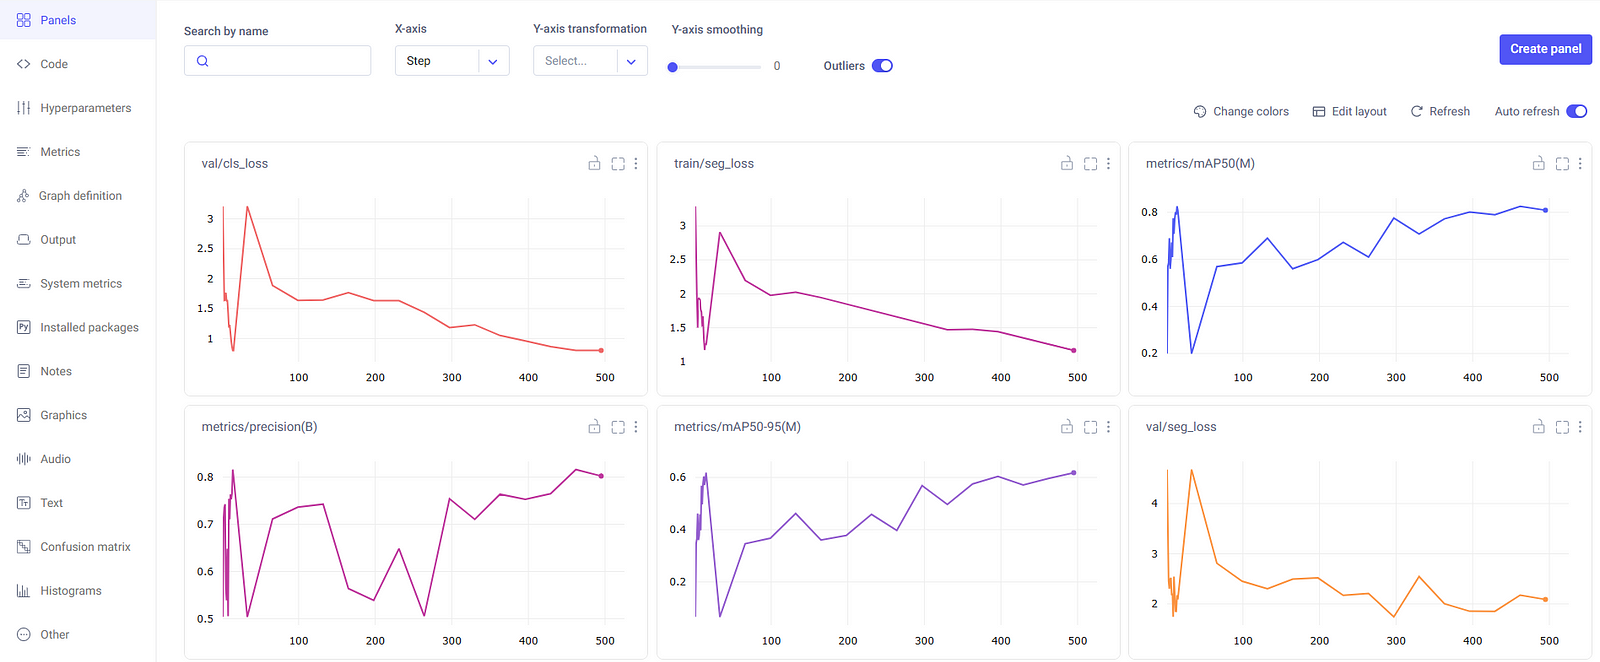
Let's dive into what you'll see on the Comet ML dashboard once your YOLOv8 model begins training. The dashboard is where all the action happens, presenting a range of automatically logged information through visuals and statistics. Here's a quick tour:
Experiment Panels
The experiment panels section of the Comet ML dashboard organize and present the different runs and their metrics, such as segment mask loss, class loss, precision, and mean average precision.
Metrics
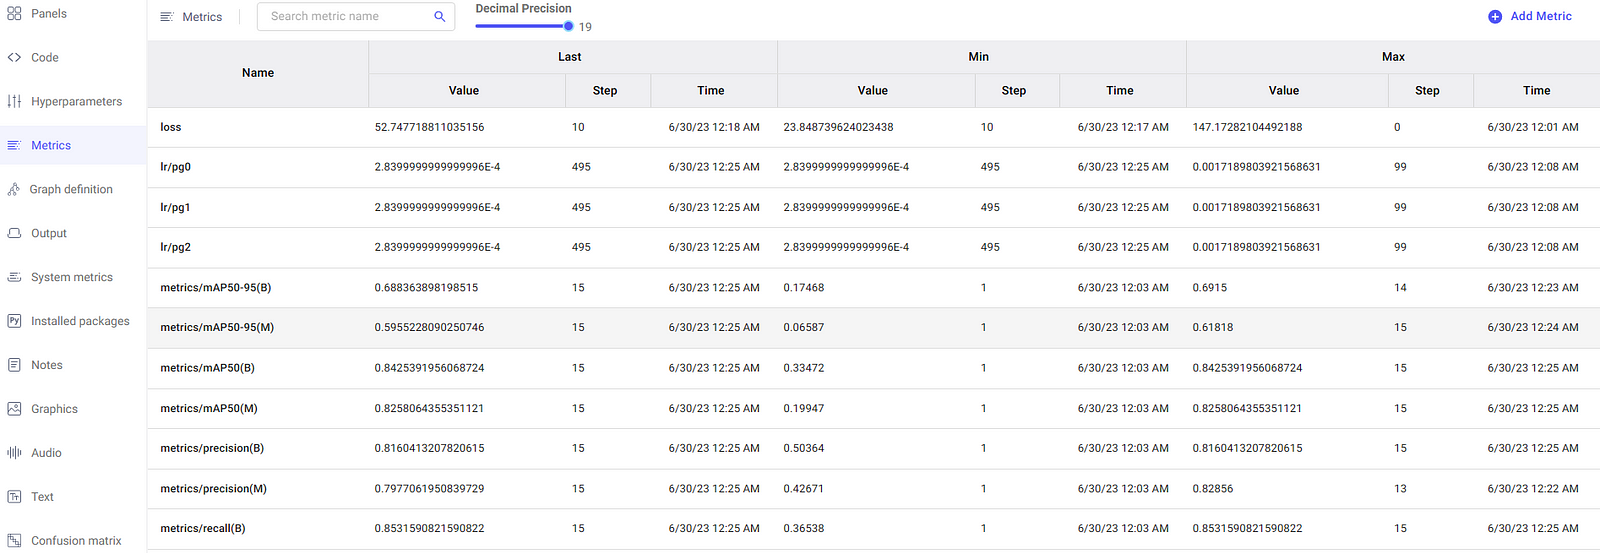
In the metrics section, you have the option to examine the metrics in a tabular format as well, which is displayed in a dedicated pane as illustrated here.
Interactive Confusion Matrix
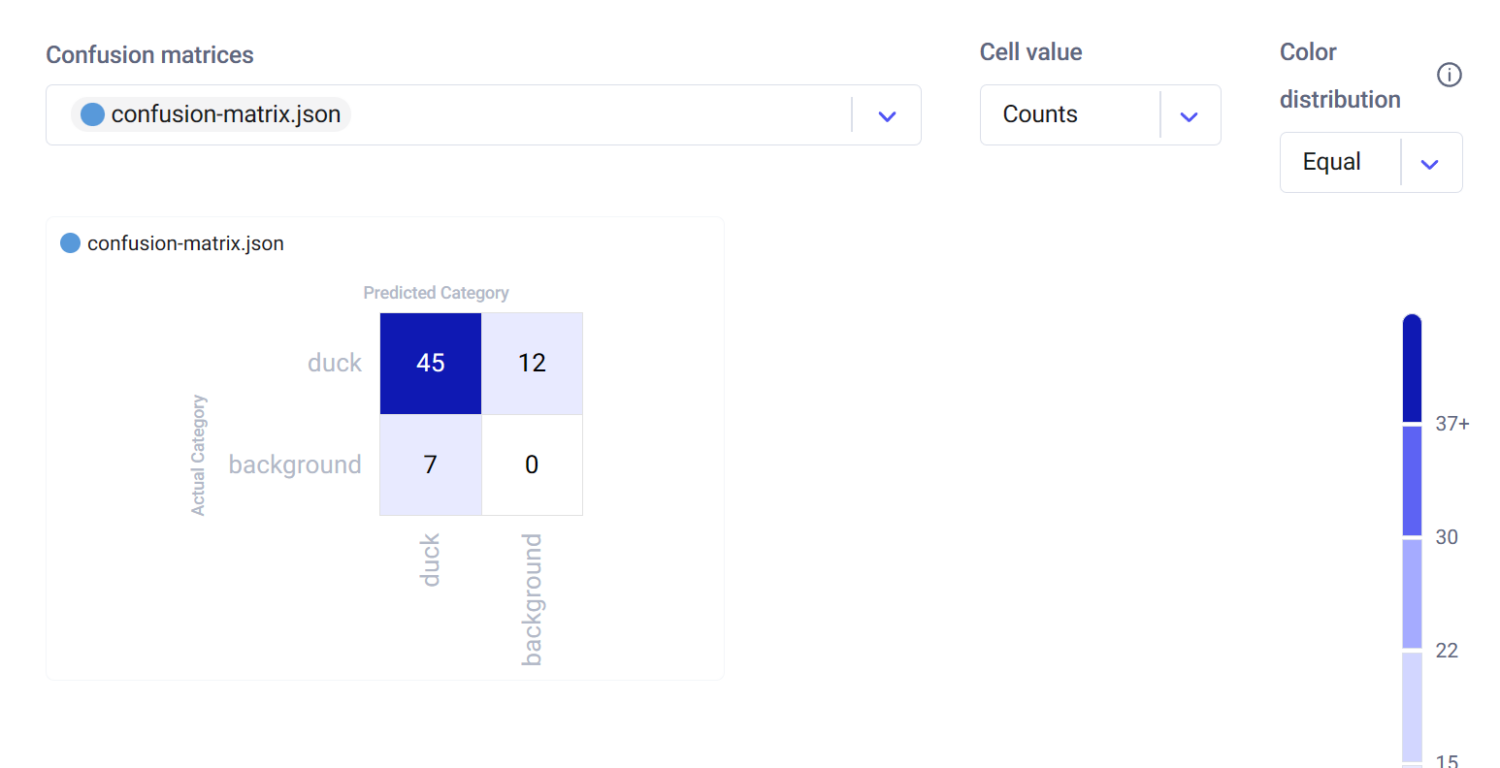
The confusion matrix, found in the Confusion Matrix tab, provides an interactive way to assess the model's classification accuracy. It details the correct and incorrect predictions, allowing you to understand the model's strengths and weaknesses.
System Metrics
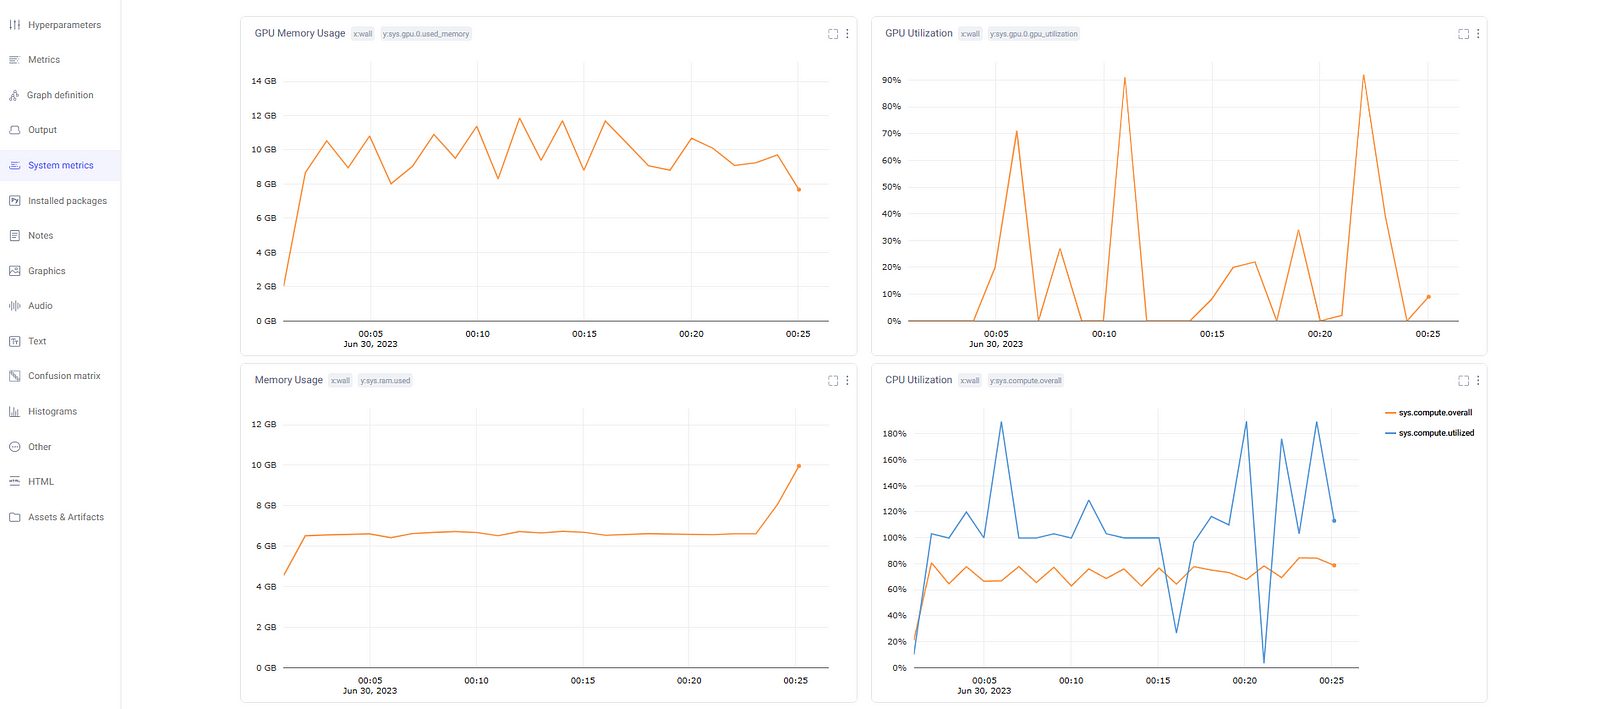
Comet ML logs system metrics to help identify any bottlenecks in the training process. It includes metrics such as GPU utilization, GPU memory usage, CPU utilization, and RAM usage. These are essential for monitoring the efficiency of resource usage during model training.
Customizing Comet ML Logging
Comet ML offers the flexibility to customize its logging behavior by setting environment variables. These configurations allow you to tailor Comet ML to your specific needs and preferences. Here are some helpful customization options:
Logging Image Predictions
You can control the number of image predictions that Comet ML logs during your experiments. By default, Comet ML logs 100 image predictions from the validation set. However, you can change this number to better suit your requirements. For example, to log 200 image predictions, use the following code:
import os

os.environ["COMET_MAX_IMAGE_PREDICTIONS"] = "200"
Batch Logging Interval
Comet ML allows you to specify how often batches of image predictions are logged. The COMET_EVAL_BATCH_LOGGING_INTERVAL environment variable controls this frequency. The default setting is 1, which logs predictions from every validation batch. You can adjust this value to log predictions at a different interval. For instance, setting it to 4 will log predictions from every fourth batch.
import os

os.environ["COMET_EVAL_BATCH_LOGGING_INTERVAL"] = "4"
Disabling Confusion Matrix Logging
In some cases, you may not want to log the confusion matrix from your validation set after every epoch. You can disable this feature by setting the COMET_EVAL_LOG_CONFUSION_MATRIX environment variable to "false." The confusion matrix will only be logged once, after the training is completed.
import os

os.environ["COMET_EVAL_LOG_CONFUSION_MATRIX"] = "false"
Offline Logging
If you find yourself in a situation where internet access is limited, Comet ML provides an offline logging option. You can set the COMET_MODE environment variable to "offline" to enable this feature. Your experiment data will be saved locally in a directory that you can later upload to Comet ML when internet connectivity is available.
import os

os.environ["COMET_MODE"] = "offline"
Summary
This guide has walked you through integrating Comet ML with Ultralytics' YOLOv8. From installation to customization, you've learned to streamline experiment management, gain real-time insights, and adapt logging to your project's needs.
Explore Comet ML's official documentation for more insights on integrating with YOLOv8.
Furthermore, if you're looking to dive deeper into the practical applications of YOLOv8, specifically for image segmentation tasks, this detailed guide on fine-tuning YOLOv8 with Comet ML offers valuable insights and step-by-step instructions to enhance your model's performance.
Additionally, to explore other exciting integrations with Ultralytics, check out the integration guide page, which offers a wealth of resources and information.
FAQ
How do I integrate Comet ML with Ultralytics YOLOv8 for training?
To integrate Comet ML with Ultralytics YOLOv8, follow these steps:
-
Install the required packages:
pip install ultralytics comet_ml torch torchvision -
Set up your Comet API Key:
export COMET_API_KEY=<Your API Key> -
Initialize your Comet project in your Python code:
import comet_ml comet_ml.login(project_name="comet-example-yolov8-coco128") -
Train your YOLOv8 model and log metrics:
from ultralytics import YOLO

model = YOLO("yolov8n.pt")
results = model.train(
    data="coco8.yaml",
    project="comet-example-yolov8-coco128",
    batch=32,
    save_period=1,
    save_json=True,
    epochs=3,
)
For more detailed instructions, refer to the Comet ML configuration section.
What are the benefits of using Comet ML with YOLOv8?
By integrating Ultralytics YOLOv8 with Comet ML, you can:
- Monitor real-time insights: Get instant feedback on your training results, allowing for quick adjustments.
- Log extensive metrics: Automatically capture essential metrics such as mAP, loss, hyperparameters, and model checkpoints.
- Track experiments offline: Log your training runs locally when internet access is unavailable.
- Compare different training runs: Use the interactive Comet ML dashboard to analyze and compare multiple experiments.
By leveraging these features, you can optimize your machine learning workflows for better performance and reproducibility. For more information, visit the Comet ML integration guide.
How do I customize the logging behavior of Comet ML during YOLOv8 training?
Comet ML allows for extensive customization of its logging behavior using environment variables:
-
Change the number of image predictions logged:
import os os.environ["COMET_MAX_IMAGE_PREDICTIONS"] = "200" -
Adjust batch logging interval:
import os os.environ["COMET_EVAL_BATCH_LOGGING_INTERVAL"] = "4" -
Disable confusion matrix logging:
import os

os.environ["COMET_EVAL_LOG_CONFUSION_MATRIX"] = "false"
Refer to the Customizing Comet ML Logging section for more customization options.
How do I view detailed metrics and visualizations of my YOLOv8 training on Comet ML?
Once your YOLOv8 model starts training, you can access a wide range of metrics and visualizations on the Comet ML dashboard. Key features include:
- Experiment Panels: View different runs and their metrics, including segment mask loss, class loss, and mean average precision.
- Metrics: Examine metrics in tabular format for detailed analysis.
- Interactive Confusion Matrix: Assess classification accuracy with an interactive confusion matrix.
- System Metrics: Monitor GPU and CPU utilization, memory usage, and other system metrics.
For a detailed overview of these features, visit the Understanding Your Model's Performance with Comet ML Visualizations section.
Can I use Comet ML for offline logging when training YOLOv8 models?
Yes, you can enable offline logging in Comet ML by setting the COMET_MODE environment variable to "offline":
import os

os.environ["COMET_MODE"] = "offline"
This feature allows you to log your experiment data locally, which can later be uploaded to Comet ML when internet connectivity is available. This is particularly useful when working in environments with limited internet access. For more details, refer to the Offline Logging section.
comments: true
description: Learn how to export YOLOv8 models to CoreML for optimized, on-device machine learning on iOS and macOS. Follow step-by-step instructions.
keywords: CoreML export, YOLOv8 models, CoreML conversion, Ultralytics, iOS object detection, macOS machine learning, AI deployment, machine learning integration
CoreML Export for YOLOv8 Models
Deploying computer vision models on Apple devices like iPhones and Macs requires a format that ensures seamless performance.
The CoreML export format allows you to optimize your Ultralytics YOLOv8 models for efficient object detection in iOS and macOS applications. In this guide, we'll walk you through the steps for converting your models to the CoreML format, making it easier for your models to perform well on Apple devices.
CoreML
CoreML is Apple's foundational machine learning framework that builds upon Accelerate, BNNS, and Metal Performance Shaders. It provides a machine-learning model format that seamlessly integrates into iOS applications and supports tasks such as image analysis, natural language processing, audio-to-text conversion, and sound analysis.
Applications can take advantage of Core ML without the need to have a network connection or API calls because the Core ML framework works using on-device computing. This means model inference can be performed locally on the user's device.
Key Features of CoreML Models
Apple's CoreML framework offers robust features for on-device machine learning. Here are the key features that make CoreML a powerful tool for developers:
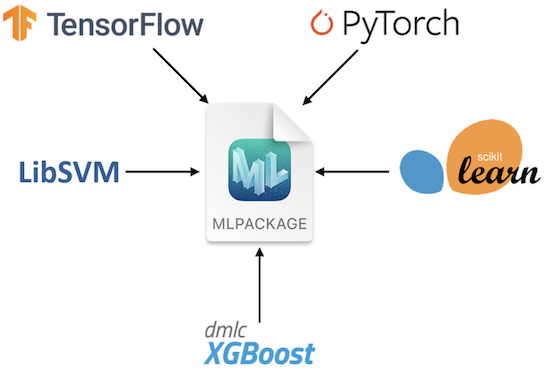
- Comprehensive Model Support: Converts and runs models from popular frameworks like TensorFlow, PyTorch, scikit-learn, XGBoost, and LibSVM.
-
On-device Machine Learning: Ensures data privacy and swift processing by executing models directly on the user's device, eliminating the need for network connectivity.
-
Performance and Optimization: Uses the device's CPU, GPU, and Neural Engine for optimal performance with minimal power and memory usage. Offers tools for model compression and optimization while maintaining accuracy.
-
Ease of Integration: Provides a unified format for various model types and a user-friendly API for seamless integration into apps. Supports domain-specific tasks through frameworks like Vision and Natural Language.
-
Advanced Features: Includes on-device training capabilities for personalized experiences, asynchronous predictions for interactive ML experiences, and model inspection and validation tools.
CoreML Deployment Options
Before we look at the code for exporting YOLOv8 models to the CoreML format, let's understand where CoreML models are usually used.
CoreML offers various deployment options for machine learning models, including:
-
On-Device Deployment: This method directly integrates CoreML models into your iOS app. It's particularly advantageous for ensuring low latency, enhanced privacy (since data remains on the device), and offline functionality. This approach, however, may be limited by the device's hardware capabilities, especially for larger and more complex models. On-device deployment can be executed in the following two ways.
-
Embedded Models: These models are included in the app bundle and are immediately accessible. They are ideal for small models that do not require frequent updates.
-
Downloaded Models: These models are fetched from a server as needed. This approach is suitable for larger models or those needing regular updates. It helps keep the app bundle size smaller.
-
-
Cloud-Based Deployment: CoreML models are hosted on servers and accessed by the iOS app through API requests. This scalable and flexible option enables easy model updates without app revisions. It's ideal for complex models or large-scale apps requiring regular updates. However, it does require an internet connection and may pose latency and security issues.
Exporting YOLOv8 Models to CoreML
Exporting YOLOv8 to CoreML enables optimized, on-device machine learning performance within Apple's ecosystem, offering benefits in terms of efficiency, security, and seamless integration with iOS, macOS, watchOS, and tvOS platforms.
Installation
To install the required package, run:
!!! Tip "Installation"
=== "CLI"

    ```py
    # Install the required package for YOLOv8
    pip install ultralytics
    ```
For detailed instructions and best practices related to the installation process, check our YOLOv8 Installation guide. While installing the required packages for YOLOv8, if you encounter any difficulties, consult our Common Issues guide for solutions and tips.
Usage
Before diving into the usage instructions, be sure to check out the range of YOLOv8 models offered by Ultralytics. This will help you choose the most appropriate model for your project requirements.
!!! Example "Usage"
=== "Python"

    ```py
    from ultralytics import YOLO

    # Load the YOLOv8 model
    model = YOLO("yolov8n.pt")

    # Export the model to CoreML format
    model.export(format="coreml")  # creates 'yolov8n.mlpackage'

    # Load the exported CoreML model
    coreml_model = YOLO("yolov8n.mlpackage")

    # Run inference
    results = coreml_model("https://ultralytics.com/images/bus.jpg")
    ```

=== "CLI"

    ```py
    # Export a YOLOv8n PyTorch model to CoreML format
    yolo export model=yolov8n.pt format=coreml  # creates 'yolov8n.mlpackage''

    # Run inference with the exported model
    yolo predict model=yolov8n.mlpackage source='https://ultralytics.com/images/bus.jpg'
    ```
For more details about the export process, visit the Ultralytics documentation page on exporting.
Deploying Exported YOLOv8 CoreML Models
Having successfully exported your Ultralytics YOLOv8 models to CoreML, the next critical phase is deploying these models effectively. For detailed guidance on deploying CoreML models in various environments, check out these resources:
-
CoreML Tools: This guide includes instructions and examples to convert models from TensorFlow, PyTorch, and other libraries to Core ML.
-
ML and Vision: A collection of comprehensive videos that cover various aspects of using and implementing CoreML models.
-
Integrating a Core ML Model into Your App: A comprehensive guide on integrating a CoreML model into an iOS application, detailing steps from preparing the model to implementing it in the app for various functionalities.
Summary
In this guide, we went over how to export Ultralytics YOLOv8 models to CoreML format. By following the steps outlined in this guide, you can ensure maximum compatibility and performance when exporting YOLOv8 models to CoreML.
For further details on usage, visit the CoreML official documentation.
Also, if you'd like to know more about other Ultralytics YOLOv8 integrations, visit our integration guide page. You'll find plenty of valuable resources and insights there.
FAQ
How do I export YOLOv8 models to CoreML format?
To export your Ultralytics YOLOv8 models to CoreML format, you'll first need to ensure you have the ultralytics package installed. You can install it using:
!!! Example "Installation"
=== "CLI"

    ```py
    pip install ultralytics
    ```
Next, you can export the model using the following Python or CLI commands:
!!! Example "Usage"
=== "Python"

    ```py
    from ultralytics import YOLO

    model = YOLO("yolov8n.pt")
    model.export(format="coreml")
    ```

=== "CLI"

    ```py
    yolo export model=yolov8n.pt format=coreml
    ```
For further details, refer to the Exporting YOLOv8 Models to CoreML section of our documentation.
What are the benefits of using CoreML for deploying YOLOv8 models?
CoreML provides numerous advantages for deploying Ultralytics YOLOv8 models on Apple devices:
- On-device Processing: Enables local model inference on devices, ensuring data privacy and minimizing latency.
- Performance Optimization: Leverages the full potential of the device's CPU, GPU, and Neural Engine, optimizing both speed and efficiency.
- Ease of Integration: Offers a seamless integration experience with Apple's ecosystems, including iOS, macOS, watchOS, and tvOS.
- Versatility: Supports a wide range of machine learning tasks such as image analysis, audio processing, and natural language processing using the CoreML framework.
For more details on integrating your CoreML model into an iOS app, check out the guide on Integrating a Core ML Model into Your App.
What are the deployment options for YOLOv8 models exported to CoreML?
Once you export your YOLOv8 model to CoreML format, you have multiple deployment options:
-
On-Device Deployment: Directly integrate CoreML models into your app for enhanced privacy and offline functionality. This can be done as:
- Embedded Models: Included in the app bundle, accessible immediately.
- Downloaded Models: Fetched from a server as needed, keeping the app bundle size smaller.
-
Cloud-Based Deployment: Host CoreML models on servers and access them via API requests. This approach supports easier updates and can handle more complex models.
For detailed guidance on deploying CoreML models, refer to CoreML Deployment Options.
How does CoreML ensure optimized performance for YOLOv8 models?
CoreML ensures optimized performance for Ultralytics YOLOv8 models by utilizing various optimization techniques:
- Hardware Acceleration: Uses the device's CPU, GPU, and Neural Engine for efficient computation.
- Model Compression: Provides tools for compressing models to reduce their footprint without compromising accuracy.
- Adaptive Inference: Adjusts inference based on the device's capabilities to maintain a balance between speed and performance.
For more information on performance optimization, visit the CoreML official documentation.
Can I run inference directly with the exported CoreML model?
Yes, you can run inference directly using the exported CoreML model. Below are the commands for Python and CLI:
!!! Example "Running Inference"
=== "Python"

    ```py
    from ultralytics import YOLO

    coreml_model = YOLO("yolov8n.mlpackage")
    results = coreml_model("https://ultralytics.com/images/bus.jpg")
    ```

=== "CLI"

    ```py
    yolo predict model=yolov8n.mlpackage source='https://ultralytics.com/images/bus.jpg'
    ```
For additional information, refer to the Usage section of the CoreML export guide.
comments: true
description: Unlock seamless YOLOv8 tracking with DVCLive. Discover how to log, visualize, and analyze experiments for optimized ML model performance.
keywords: YOLOv8, DVCLive, experiment tracking, machine learning, model training, data visualization, Git integration
Advanced YOLOv8 Experiment Tracking with DVCLive
Experiment tracking in machine learning is critical to model development and evaluation. It involves recording and analyzing various parameters, metrics, and outcomes from numerous training runs. This process is essential for understanding model performance and making data-driven decisions to refine and optimize models.
Integrating DVCLive with Ultralytics YOLOv8 transforms the way experiments are tracked and managed. This integration offers a seamless solution for automatically logging key experiment details, comparing results across different runs, and visualizing data for in-depth analysis. In this guide, we'll understand how DVCLive can be used to streamline the process.
DVCLive
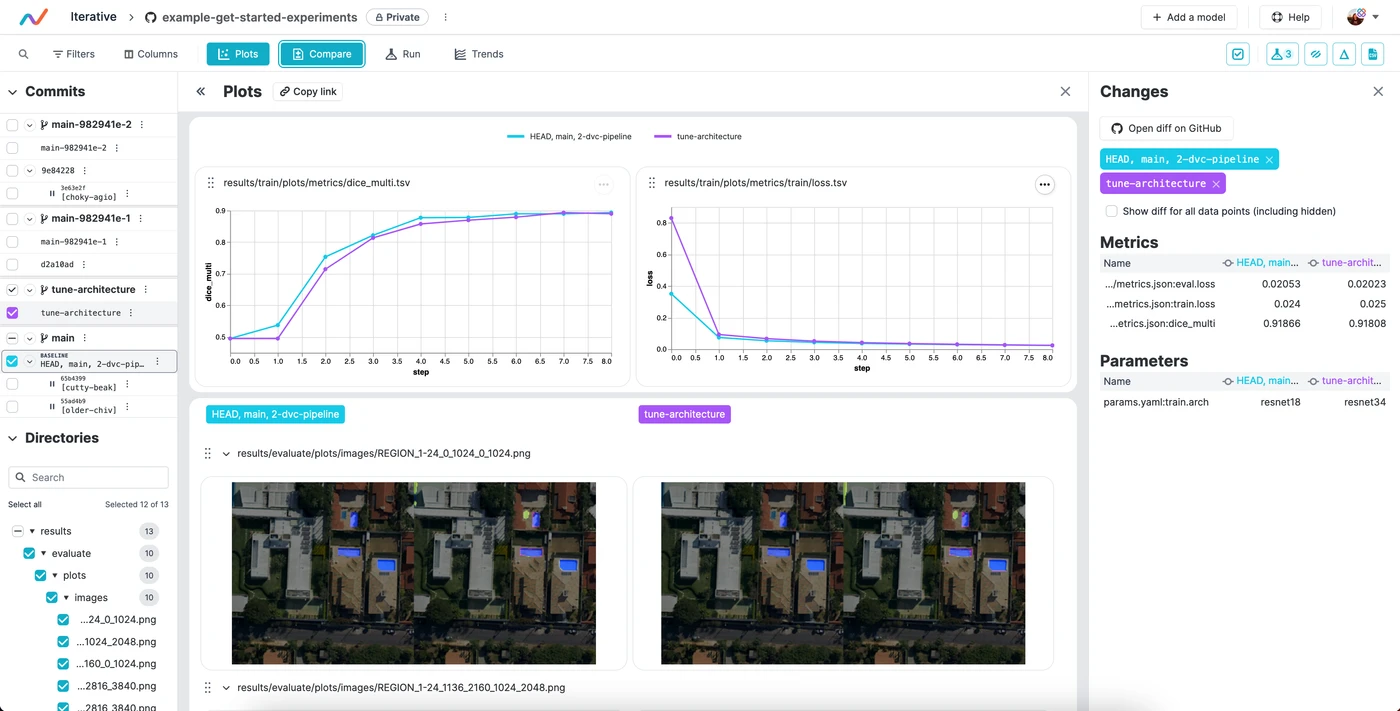
DVCLive, developed by DVC, is an innovative open-source tool for experiment tracking in machine learning. Integrating seamlessly with Git and DVC, it automates the logging of crucial experiment data like model parameters and training metrics. Designed for simplicity, DVCLive enables effortless comparison and analysis of multiple runs, enhancing the efficiency of machine learning projects with intuitive data visualization and analysis tools.
YOLOv8 Training with DVCLive
YOLOv8 training sessions can be effectively monitored with DVCLive. Additionally, DVC provides integral features for visualizing these experiments, including the generation of a report that enables the comparison of metric plots across all tracked experiments, offering a comprehensive view of the training process.
Installation
To install the required packages, run:
!!! Tip "Installation"
=== "CLI"

    ```py
    # Install the required packages for YOLOv8 and DVCLive
    pip install ultralytics dvclive
    ```
For detailed instructions and best practices related to the installation process, be sure to check our YOLOv8 Installation guide. While installing the required packages for YOLOv8, if you encounter any difficulties, consult our Common Issues guide for solutions and tips.
Configuring DVCLive
Once you have installed the necessary packages, the next step is to set up and configure your environment with the necessary credentials. This setup ensures a smooth integration of DVCLive into your existing workflow.
Begin by initializing a Git repository, as Git plays a crucial role in version control for both your code and DVCLive configurations.
!!! Tip "Initial Environment Setup"
=== "CLI"

    ```py
    # Initialize a Git repository
    git init -q

    # Configure Git with your details
    git config --local user.email "you@example.com"
    git config --local user.name "Your Name"

    # Initialize DVCLive in your project
    dvc init -q

    # Commit the DVCLive setup to your Git repository
    git commit -m "DVC init"
    ```
In these commands, ensure to replace "you@example.com" with the email address associated with your Git account, and "Your Name" with your Git account username.
Usage
Before diving into the usage instructions, be sure to check out the range of YOLOv8 models offered by Ultralytics. This will help you choose the most appropriate model for your project requirements.
Training YOLOv8 Models with DVCLive
Start by running your YOLOv8 training sessions. You can use different model configurations and training parameters to suit your project needs. For instance:
# Example training commands for YOLOv8 with varying configurations
yolo train model=yolov8n.pt data=coco8.yaml epochs=5 imgsz=512
yolo train model=yolov8n.pt data=coco8.yaml epochs=5 imgsz=640
Adjust the model, data, epochs, and imgsz parameters according to your specific requirements. For a detailed understanding of the model training process and best practices, refer to our YOLOv8 Model Training guide.
Monitoring Experiments with DVCLive
DVCLive enhances the training process by enabling the tracking and visualization of key metrics. When installed, Ultralytics YOLOv8 automatically integrates with DVCLive for experiment tracking, which you can later analyze for performance insights. For a comprehensive understanding of the specific performance metrics used during training, be sure to explore our detailed guide on performance metrics.
Analyzing Results
After your YOLOv8 training sessions are complete, you can leverage DVCLive's powerful visualization tools for in-depth analysis of the results. DVCLive's integration ensures that all training metrics are systematically logged, facilitating a comprehensive evaluation of your model's performance.
To start the analysis, you can extract the experiment data using DVC's API and process it with Pandas for easier handling and visualization:
import dvc.api
import pandas as pd

# Define the columns of interest
columns = ["Experiment", "epochs", "imgsz", "model", "metrics.mAP50-95(B)"]

# Retrieve experiment data
df = pd.DataFrame(dvc.api.exp_show(), columns=columns)

# Clean the data
df.dropna(inplace=True)
df.reset_index(drop=True, inplace=True)

# Display the DataFrame
print(df)
The output of the code snippet above provides a clear tabular view of the different experiments conducted with YOLOv8 models. Each row represents a different training run, detailing the experiment's name, the number of epochs, image size (imgsz), the specific model used, and the mAP50-95(B) metric. This metric is crucial for evaluating the model's accuracy, with higher values indicating better performance.
Visualizing Results with Plotly
For a more interactive and visual analysis of your experiment results, you can use Plotly's parallel coordinates plot. This type of plot is particularly useful for understanding the relationships and trade-offs between different parameters and metrics.
from plotly.express import parallel_coordinates

# Create a parallel coordinates plot
fig = parallel_coordinates(df, columns, color="metrics.mAP50-95(B)")

# Display the plot
fig.show()
The output of the code snippet above generates a plot that will visually represent the relationships between epochs, image size, model type, and their corresponding mAP50-95(B) scores, enabling you to spot trends and patterns in your experiment data.
Generating Comparative Visualizations with DVC
DVC provides a useful command to generate comparative plots for your experiments. This can be especially helpful to compare the performance of different models over various training runs.
# Generate DVC comparative plots
dvc plots diff $(dvc exp list --names-only)
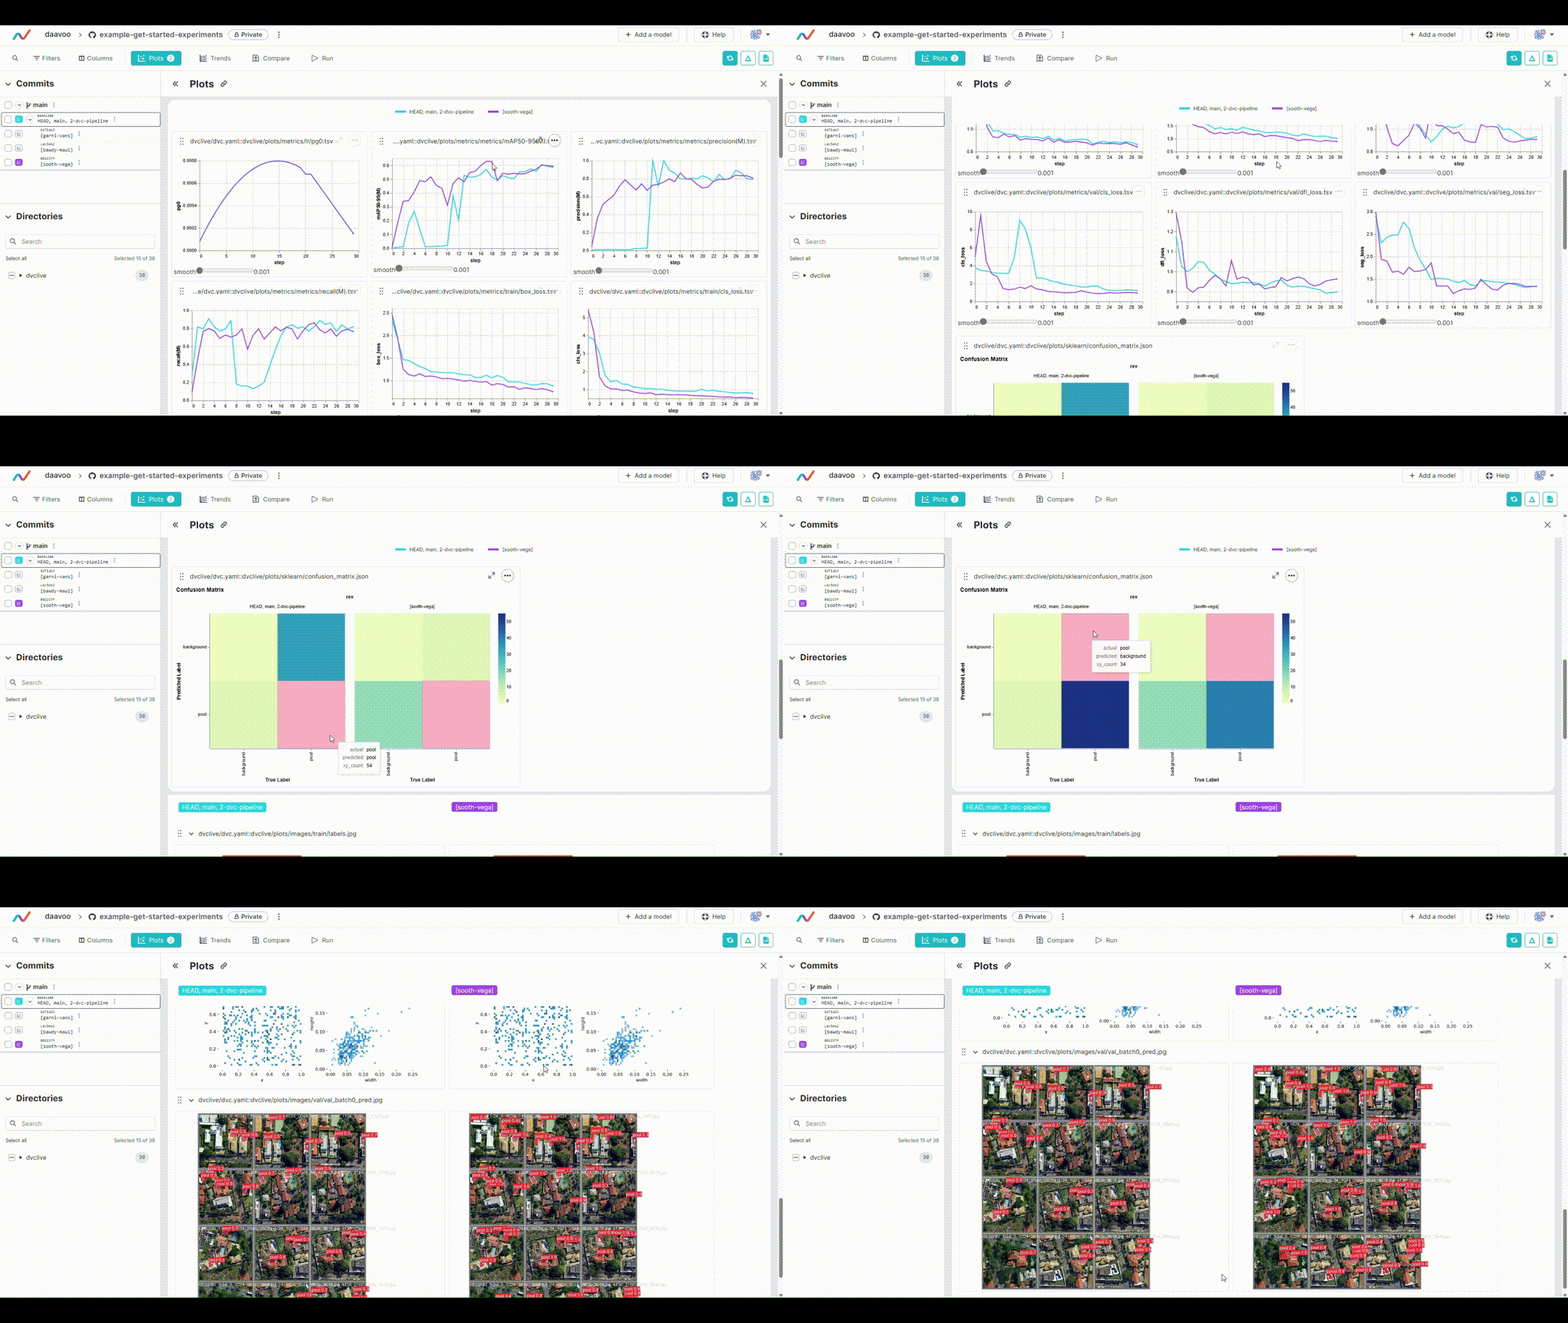
After executing this command, DVC generates plots comparing the metrics across different experiments, which are saved as HTML files. Below is an example image illustrating typical plots generated by this process. The image showcases various graphs, including those representing mAP, recall, precision, loss values, and more, providing a visual overview of key performance metrics:
Displaying DVC Plots
If you are using a Jupyter Notebook and you want to display the generated DVC plots, you can use the IPython display functionality.
from IPython.display import HTML

# Display the DVC plots as HTML
HTML(filename="./dvc_plots/index.html")
This code will render the HTML file containing the DVC plots directly in your Jupyter Notebook, providing an easy and convenient way to analyze the visualized experiment data.
Making Data-Driven Decisions
Use the insights gained from these visualizations to make informed decisions about model optimizations, hyperparameter tuning, and other modifications to enhance your model's performance.
Iterating on Experiments
Based on your analysis, iterate on your experiments. Adjust model configurations, training parameters, or even the data inputs, and repeat the training and analysis process. This iterative approach is key to refining your model for the best possible performance.
Summary
This guide has led you through the process of integrating DVCLive with Ultralytics' YOLOv8. You have learned how to harness the power of DVCLive for detailed experiment monitoring, effective visualization, and insightful analysis in your machine learning endeavors.
For further details on usage, visit DVCLive's official documentation.
Additionally, explore more integrations and capabilities of Ultralytics by visiting the Ultralytics integration guide page, which is a collection of great resources and insights.
FAQ
How do I integrate DVCLive with Ultralytics YOLOv8 for experiment tracking?
Integrating DVCLive with Ultralytics YOLOv8 is straightforward. Start by installing the necessary packages:
!!! Example "Installation"
=== "CLI"

    ```py
    pip install ultralytics dvclive
    ```
Next, initialize a Git repository and configure DVCLive in your project:
!!! Example "Initial Environment Setup"
=== "CLI"

    ```py
    git init -q
    git config --local user.email "you@example.com"
    git config --local user.name "Your Name"
    dvc init -q
    git commit -m "DVC init"
    ```
Follow our YOLOv8 Installation guide for detailed setup instructions.
Why should I use DVCLive for tracking YOLOv8 experiments?
Using DVCLive with YOLOv8 provides several advantages, such as:
- Automated Logging: DVCLive automatically records key experiment details like model parameters and metrics.
- Easy Comparison: Facilitates comparison of results across different runs.
- Visualization Tools: Leverages DVCLive's robust data visualization capabilities for in-depth analysis.
For further details, refer to our guide on YOLOv8 Model Training and YOLO Performance Metrics to maximize your experiment tracking efficiency.
How can DVCLive improve my results analysis for YOLOv8 training sessions?
After completing your YOLOv8 training sessions, DVCLive helps in visualizing and analyzing the results effectively. Example code for loading and displaying experiment data:
import dvc.api
import pandas as pd

# Define columns of interest
columns = ["Experiment", "epochs", "imgsz", "model", "metrics.mAP50-95(B)"]

# Retrieve experiment data
df = pd.DataFrame(dvc.api.exp_show(), columns=columns)

# Clean data
df.dropna(inplace=True)
df.reset_index(drop=True, inplace=True)

# Display DataFrame
print(df)
To visualize results interactively, use Plotly's parallel coordinates plot:
from plotly.express import parallel_coordinates

fig = parallel_coordinates(df, columns, color="metrics.mAP50-95(B)")
fig.show()
Refer to our guide on YOLOv8 Training with DVCLive for more examples and best practices.
What are the steps to configure my environment for DVCLive and YOLOv8 integration?
To configure your environment for a smooth integration of DVCLive and YOLOv8, follow these steps:
- Install Required Packages: Use
pip install ultralytics dvclive. - Initialize Git Repository: Run
git init -q. - Setup DVCLive: Execute
dvc init -q. - Commit to Git: Use
git commit -m "DVC init".
These steps ensure proper version control and setup for experiment tracking. For in-depth configuration details, visit our Configuration guide.
How do I visualize YOLOv8 experiment results using DVCLive?
DVCLive offers powerful tools to visualize the results of YOLOv8 experiments. Here's how you can generate comparative plots:
!!! Example "Generate Comparative Plots"
=== "CLI"

    ```py
    dvc plots diff $(dvc exp list --names-only)
    ```
To display these plots in a Jupyter Notebook, use:
from IPython.display import HTML

# Display plots as HTML
HTML(filename="./dvc_plots/index.html")
These visualizations help identify trends and optimize model performance. Check our detailed guides on YOLOv8 Experiment Analysis for comprehensive steps and examples.
comments: true
description: Learn how to export YOLOv8 models to TFLite Edge TPU format for high-speed, low-power inferencing on mobile and embedded devices.
keywords: YOLOv8, TFLite Edge TPU, TensorFlow Lite, model export, machine learning, edge computing, neural networks, Ultralytics
Learn to Export to TFLite Edge TPU Format From YOLOv8 Model
Deploying computer vision models on devices with limited computational power, such as mobile or embedded systems, can be tricky. Using a model format that is optimized for faster performance simplifies the process. The TensorFlow Lite Edge TPU or TFLite Edge TPU model format is designed to use minimal power while delivering fast performance for neural networks.
The export to TFLite Edge TPU format feature allows you to optimize your Ultralytics YOLOv8 models for high-speed and low-power inferencing. In this guide, we'll walk you through converting your models to the TFLite Edge TPU format, making it easier for your models to perform well on various mobile and embedded devices.
Why Should You Export to TFLite Edge TPU?
Exporting models to TensorFlow Edge TPU makes machine learning tasks fast and efficient. This technology suits applications with limited power, computing resources, and connectivity. The Edge TPU is a hardware accelerator by Google. It speeds up TensorFlow Lite models on edge devices. The image below shows an example of the process involved.
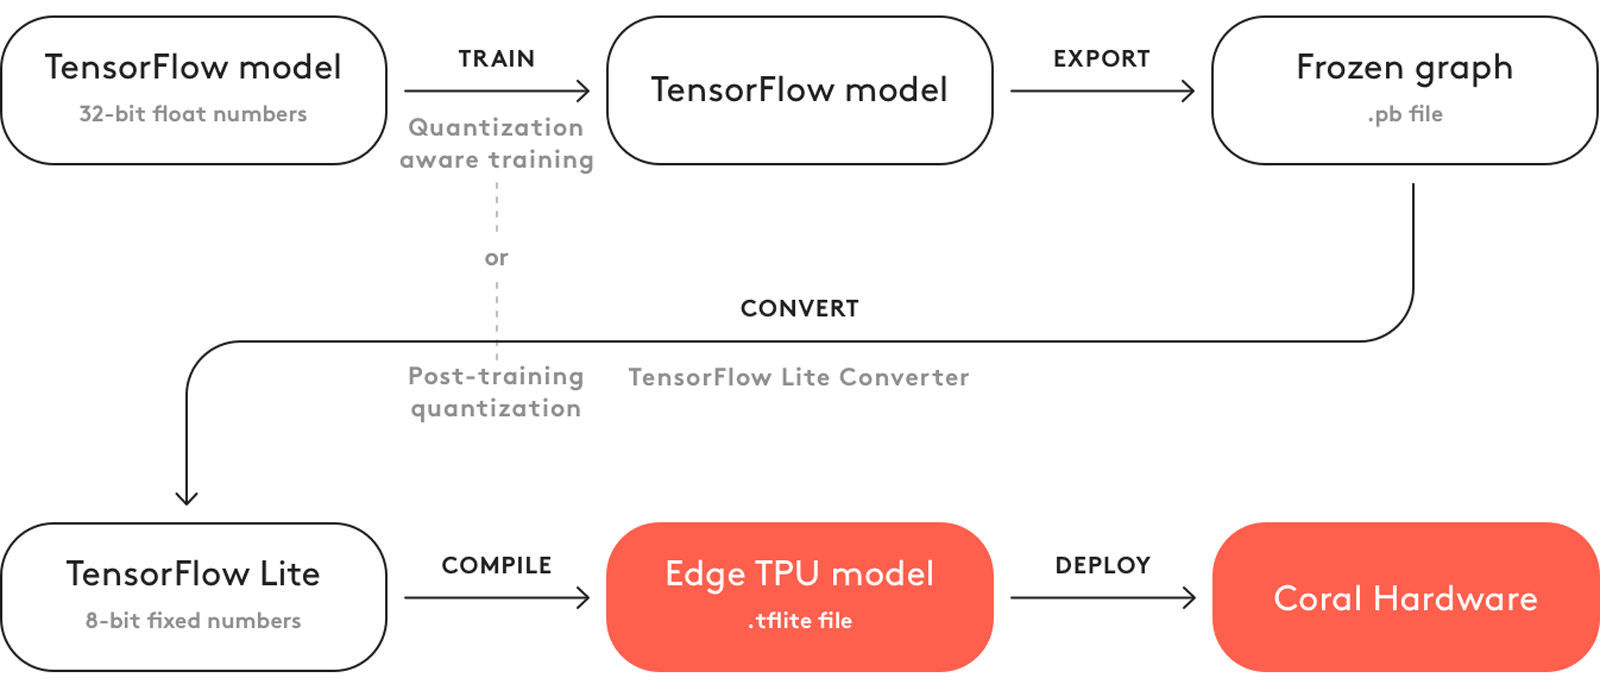
The Edge TPU works with quantized models. Quantization makes models smaller and faster without losing much accuracy. It is ideal for the limited resources of edge computing, allowing applications to respond quickly by reducing latency and allowing for quick data processing locally, without cloud dependency. Local processing also keeps user data private and secure since it's not sent to a remote server.
Key Features of TFLite Edge TPU
Here are the key features that make TFLite Edge TPU a great model format choice for developers:
-
Optimized Performance on Edge Devices: The TFLite Edge TPU achieves high-speed neural networking performance through quantization, model optimization, hardware acceleration, and compiler optimization. Its minimalistic architecture contributes to its smaller size and cost-efficiency.
-
High Computational Throughput: TFLite Edge TPU combines specialized hardware acceleration and efficient runtime execution to achieve high computational throughput. It is well-suited for deploying machine learning models with stringent performance requirements on edge devices.
-
Efficient Matrix Computations: The TensorFlow Edge TPU is optimized for matrix operations, which are crucial for neural network computations. This efficiency is key in machine learning models, particularly those requiring numerous and complex matrix multiplications and transformations.
Deployment Options with TFLite Edge TPU
Before we jump into how to export YOLOv8 models to the TFLite Edge TPU format, let's understand where TFLite Edge TPU models are usually used.
TFLite Edge TPU offers various deployment options for machine learning models, including:
-
On-Device Deployment: TensorFlow Edge TPU models can be directly deployed on mobile and embedded devices. On-device deployment allows the models to execute directly on the hardware, eliminating the need for cloud connectivity.
-
Edge Computing with Cloud TensorFlow TPUs: In scenarios where edge devices have limited processing capabilities, TensorFlow Edge TPUs can offload inference tasks to cloud servers equipped with TPUs.
-
Hybrid Deployment: A hybrid approach combines on-device and cloud deployment and offers a versatile and scalable solution for deploying machine learning models. Advantages include on-device processing for quick responses and cloud computing for more complex computations.
Exporting YOLOv8 Models to TFLite Edge TPU
You can expand model compatibility and deployment flexibility by converting YOLOv8 models to TensorFlow Edge TPU.
Installation
To install the required package, run:
!!! Tip "Installation"
=== "CLI"

    ```py
    # Install the required package for YOLOv8
    pip install ultralytics
    ```
For detailed instructions and best practices related to the installation process, check our Ultralytics Installation guide. While installing the required packages for YOLOv8, if you encounter any difficulties, consult our Common Issues guide for solutions and tips.
Usage
Before diving into the usage instructions, it's important to note that while all Ultralytics YOLOv8 models are available for exporting, you can ensure that the model you select supports export functionality here.
!!! Example "Usage"
=== "Python"

    ```py
    from ultralytics import YOLO

    # Load the YOLOv8 model
    model = YOLO("yolov8n.pt")

    # Export the model to TFLite Edge TPU format
    model.export(format="edgetpu")  # creates 'yolov8n_full_integer_quant_edgetpu.tflite'

    # Load the exported TFLite Edge TPU model
    edgetpu_model = YOLO("yolov8n_full_integer_quant_edgetpu.tflite")

    # Run inference
    results = edgetpu_model("https://ultralytics.com/images/bus.jpg")
    ```

=== "CLI"

    ```py
    # Export a YOLOv8n PyTorch model to TFLite Edge TPU format
    yolo export model=yolov8n.pt format=edgetpu  # creates 'yolov8n_full_integer_quant_edgetpu.tflite'

    # Run inference with the exported model
    yolo predict model=yolov8n_full_integer_quant_edgetpu.tflite source='https://ultralytics.com/images/bus.jpg'
    ```
For more details about supported export options, visit the Ultralytics documentation page on deployment options.
Deploying Exported YOLOv8 TFLite Edge TPU Models
After successfully exporting your Ultralytics YOLOv8 models to TFLite Edge TPU format, you can now deploy them. The primary and recommended first step for running a TFLite Edge TPU model is to use the YOLO("model_edgetpu.tflite") method, as outlined in the previous usage code snippet.
However, for in-depth instructions on deploying your TFLite Edge TPU models, take a look at the following resources:
-
Coral Edge TPU on a Raspberry Pi with Ultralytics YOLOv8: Discover how to integrate Coral Edge TPUs with Raspberry Pi for enhanced machine learning capabilities.
-
Code Examples: Access practical TensorFlow Edge TPU deployment examples to kickstart your projects.
-
Run Inference on the Edge TPU with Python: Explore how to use the TensorFlow Lite Python API for Edge TPU applications, including setup and usage guidelines.
Summary
In this guide, we've learned how to export Ultralytics YOLOv8 models to TFLite Edge TPU format. By following the steps mentioned above, you can increase the speed and power of your computer vision applications.
For further details on usage, visit the Edge TPU official website.
Also, for more information on other Ultralytics YOLOv8 integrations, please visit our integration guide page. There, you'll discover valuable resources and insights.
FAQ
How do I export a YOLOv8 model to TFLite Edge TPU format?
To export a YOLOv8 model to TFLite Edge TPU format, you can follow these steps:
!!! Example "Usage"
=== "Python"

    ```py
    from ultralytics import YOLO

    # Load the YOLOv8 model
    model = YOLO("yolov8n.pt")

    # Export the model to TFLite Edge TPU format
    model.export(format="edgetpu")  # creates 'yolov8n_full_integer_quant_edgetpu.tflite'

    # Load the exported TFLite Edge TPU model
    edgetpu_model = YOLO("yolov8n_full_integer_quant_edgetpu.tflite")

    # Run inference
    results = edgetpu_model("https://ultralytics.com/images/bus.jpg")
    ```

=== "CLI"

    ```py
    # Export a YOLOv8n PyTorch model to TFLite Edge TPU format
    yolo export model=yolov8n.pt format=edgetpu  # creates 'yolov8n_full_integer_quant_edgetpu.tflite'

    # Run inference with the exported model
    yolo predict model=yolov8n_full_integer_quant_edgetpu.tflite source='https://ultralytics.com/images/bus.jpg'
    ```
For complete details on exporting models to other formats, refer to our export guide.
What are the benefits of exporting YOLOv8 models to TFLite Edge TPU?
Exporting YOLOv8 models to TFLite Edge TPU offers several benefits:
- Optimized Performance: Achieve high-speed neural network performance with minimal power consumption.
- Reduced Latency: Quick local data processing without the need for cloud dependency.
- Enhanced Privacy: Local processing keeps user data private and secure.
This makes it ideal for applications in edge computing, where devices have limited power and computational resources. Learn more about why you should export.
Can I deploy TFLite Edge TPU models on mobile and embedded devices?
Yes, TensorFlow Lite Edge TPU models can be deployed directly on mobile and embedded devices. This deployment approach allows models to execute directly on the hardware, offering faster and more efficient inferencing. For integration examples, check our guide on deploying Coral Edge TPU on Raspberry Pi.
What are some common use cases for TFLite Edge TPU models?
Common use cases for TFLite Edge TPU models include:
- Smart Cameras: Enhancing real-time image and video analysis.
- IoT Devices: Enabling smart home and industrial automation.
- Healthcare: Accelerating medical imaging and diagnostics.
- Retail: Improving inventory management and customer behavior analysis.
These applications benefit from the high performance and low power consumption of TFLite Edge TPU models. Discover more about usage scenarios.
How can I troubleshoot issues while exporting or deploying TFLite Edge TPU models?
If you encounter issues while exporting or deploying TFLite Edge TPU models, refer to our Common Issues guide for troubleshooting tips. This guide covers common problems and solutions to help you ensure smooth operation. For additional support, visit our Help Center.
comments: true
description: Learn how to efficiently train Ultralytics YOLOv8 models using Google Colab's powerful cloud-based environment. Start your project with ease.
keywords: YOLOv8, Google Colab, machine learning, deep learning, model training, GPU, TPU, cloud computing, Jupyter Notebook, Ultralytics
Accelerating YOLOv8 Projects with Google Colab
Many developers lack the powerful computing resources needed to build deep learning models. Acquiring high-end hardware or renting a decent GPU can be expensive. Google Colab is a great solution to this. It's a browser-based platform that allows you to work with large datasets, develop complex models, and share your work with others without a huge cost.
You can use Google Colab to work on projects related to Ultralytics YOLOv8 models. Google Colab's user-friendly environment is well suited for efficient model development and experimentation. Let's learn more about Google Colab, its key features, and how you can use it to train YOLOv8 models.
Google Colaboratory
Google Colaboratory, commonly known as Google Colab, was developed by Google Research in 2017. It is a free online cloud-based Jupyter Notebook environment that allows you to train your machine learning and deep learning models on CPUs, GPUs, and TPUs. The motivation behind developing Google Colab was Google's broader goals to advance AI technology and educational tools, and encourage the use of cloud services.
You can use Google Colab regardless of the specifications and configurations of your local computer. All you need is a Google account and a web browser, and you're good to go.
Training YOLOv8 Using Google Colaboratory
Training YOLOv8 models on Google Colab is pretty straightforward. Thanks to the integration, you can access the Google Colab YOLOv8 Notebook and start training your model immediately. For a detailed understanding of the model training process and best practices, refer to our YOLOv8 Model Training guide.
Sign in to your Google account and run the notebook's cells to train your model.
Learn how to train a YOLOv8 model with custom data on YouTube with Nicolai. Check out the guide below.
Watch: How to Train Ultralytics YOLOv8 models on Your Custom Dataset in Google Colab | Episode 3
Common Questions While Working with Google Colab
When working with Google Colab, you might have a few common questions. Let's answer them.
Q: Why does my Google Colab session timeout?
A: Google Colab sessions can time out due to inactivity, especially for free users who have a limited session duration.
Q: Can I increase the session duration in Google Colab?
A: Free users face limits, but Google Colab Pro offers extended session durations.
Q: What should I do if my session closes unexpectedly?
A: Regularly save your work to Google Drive or GitHub to avoid losing unsaved progress.
Q: How can I check my session status and resource usage?
A: Colab provides 'RAM Usage' and 'Disk Usage' metrics in the interface to monitor your resources.
Q: Can I run multiple Colab sessions simultaneously?
A: Yes, but be cautious about resource usage to avoid performance issues.
Q: Does Google Colab have GPU access limitations?
A: Yes, free GPU access has limitations, but Google Colab Pro provides more substantial usage options.
Key Features of Google Colab
Now, let's look at some of the standout features that make Google Colab a go-to platform for machine learning projects:
-
Library Support: Google Colab includes pre-installed libraries for data analysis and machine learning and allows additional libraries to be installed as needed. It also supports various libraries for creating interactive charts and visualizations.
-
Hardware Resources: Users also switch between different hardware options by modifying the runtime settings as shown below. Google Colab provides access to advanced hardware like Tesla K80 GPUs and TPUs, which are specialized circuits designed specifically for machine learning tasks.
-
Collaboration: Google Colab makes collaborating and working with other developers easy. You can easily share your notebooks with others and perform edits in real-time.
-
Custom Environment: Users can install dependencies, configure the system, and use shell commands directly in the notebook.
-
Educational Resources: Google Colab offers a range of tutorials and example notebooks to help users learn and explore various functionalities.
Why Should You Use Google Colab for Your YOLOv8 Projects?
There are many options for training and evaluating YOLOv8 models, so what makes the integration with Google Colab unique? Let's explore the advantages of this integration:
-
Zero Setup: Since Colab runs in the cloud, users can start training models immediately without the need for complex environment setups. Just create an account and start coding.
-
Form Support: It allows users to create forms for parameter input, making it easier to experiment with different values.
-
Integration with Google Drive: Colab seamlessly integrates with Google Drive to make data storage, access, and management simple. Datasets and models can be stored and retrieved directly from Google Drive.
-
Markdown Support: You can use Markdown format for enhanced documentation within notebooks.
-
Scheduled Execution: Developers can set notebooks to run automatically at specified times.
-
Extensions and Widgets: Google Colab allows for adding functionality through third-party extensions and interactive widgets.
Keep Learning about Google Colab
If you'd like to dive deeper into Google Colab, here are a few resources to guide you.
-
Training Custom Datasets with Ultralytics YOLOv8 in Google Colab: Learn how to train custom datasets with Ultralytics YOLOv8 on Google Colab. This comprehensive blog post will take you through the entire process, from initial setup to the training and evaluation stages.
-
Curated Notebooks: Here you can explore a series of organized and educational notebooks, each grouped by specific topic areas.
-
Google Colab's Medium Page: You can find tutorials, updates, and community contributions here that can help you better understand and utilize this tool.
Summary
We've discussed how you can easily experiment with Ultralytics YOLOv8 models on Google Colab. You can use Google Colab to train and evaluate your models on GPUs and TPUs with a few clicks.
For more details, visit Google Colab's FAQ page.
Interested in more YOLOv8 integrations? Visit the Ultralytics integration guide page to explore additional tools and capabilities that can improve your machine-learning projects.
FAQ
How do I start training Ultralytics YOLOv8 models on Google Colab?
To start training Ultralytics YOLOv8 models on Google Colab, sign in to your Google account, then access the Google Colab YOLOv8 Notebook. This notebook guides you through the setup and training process. After launching the notebook, run the cells step-by-step to train your model. For a full guide, refer to the YOLOv8 Model Training guide.
What are the advantages of using Google Colab for training YOLOv8 models?
Google Colab offers several advantages for training YOLOv8 models:
- Zero Setup: No initial environment setup is required; just log in and start coding.
- Free GPU Access: Use powerful GPUs or TPUs without the need for expensive hardware.
- Integration with Google Drive: Easily store and access datasets and models.
- Collaboration: Share notebooks with others and collaborate in real-time.
For more information on why you should use Google Colab, explore the training guide and visit the Google Colab page.
How can I handle Google Colab session timeouts during YOLOv8 training?
Google Colab sessions timeout due to inactivity, especially for free users. To handle this:
- Stay Active: Regularly interact with your Colab notebook.
- Save Progress: Continuously save your work to Google Drive or GitHub.
- Colab Pro: Consider upgrading to Google Colab Pro for longer session durations.
For more tips on managing your Colab session, visit the Google Colab FAQ page.
Can I use custom datasets for training YOLOv8 models in Google Colab?
Yes, you can use custom datasets to train YOLOv8 models in Google Colab. Upload your dataset to Google Drive and load it directly into your Colab notebook. You can follow Nicolai's YouTube guide, How to Train YOLOv8 Models on Your Custom Dataset, or refer to the Custom Dataset Training guide for detailed steps.
What should I do if my Google Colab training session is interrupted?
If your Google Colab training session is interrupted:
- Save Regularly: Avoid losing unsaved progress by regularly saving your work to Google Drive or GitHub.
- Resume Training: Restart your session and re-run the cells from where the interruption occurred.
- Use Checkpoints: Incorporate checkpointing in your training script to save progress periodically.
These practices help ensure your progress is secure. Learn more about session management on Google Colab's FAQ page.