引入JS
# react 开发JS
react.development.js
# react dom渲染JS
react-dom.development.js
# jsx语法转换JS
babel.min.js
# 参数传值校验JS
prop-types.js
JSX语法
# 容器
<div id="test"></div>
# 注意写JSX语法需要定义为babel
<script type="text/babel">
  const myName = "flower";
  # 创建虚拟DOM, 不需要写双引号 换行使用()包裹
  const vdom = (
        # 最外侧只能包裹一个标签 建议使用div
        <div>
            # 变量取值使用{}, style样式使用{{中间使用逗号隔开}}
            <h1 style={{color:'yellow'}}>{myName}</h1>
            # 声明class属性使用className
            <h2 className="title"></h2>
        </div>
    )
    # 渲染到页面 传入虚拟DOM或者组件, 容器
    ReactDOM.render(vdom,document.getElementById("test"))
</script>
函数式组件
function Demo(){
    # 直接返回虚拟DOM
    return <h1>函数式组件2</h1>
}
类组件+State
# 首字母大写 并 继承 React.Component
class Demo extends React.Component {
  # state 状态管理
  state = {
    # 需要使用的变量 建议直接在state中声明好
    isHot: true
  }
  # 渲染函数返回虚拟DOM
  render(){
    const { isHot } = this.state;
    return (
      <h1 onClick={this.modifyWater}>今天天气很{isHot?"炎热":"寒冷"}</h1>
    )
  }
  // 只能写箭头函数, 不然this指针就需要在构造方法中绑定this
  modifyWater = () => {
    // 不能直接修改对象, 需要调用setState, 传入对象修改值, 修改不是替换对象,而是对比赋值
    this.setState({isHot:!this.state.isHot})
  }
}
组件使用
# 开头大写就是组件, 小写就是html标签
ReactDOM.render(<Demo />,document.getElementById("test"))
Props组件传值+参数校验
class Person extends React.Component {
  // 参数校验 必须写static
  static propTypes = {
    // 字符串必填
    name: PropTypes.string.isRequired,
    sex: PropTypes.string,
    // 数字
    age: PropTypes.number,
    // 函数
    speck: PropTypes.func
  }
  # 设置默认值
  static defaultProps = {
    sex: "无"
  }
  render() {
    # 从props取值
    const {name, age, sex} = this.props;
    return (
      <ul>
        <li>姓名:{name}</li>
        <li>性别:{sex}</li>
        <li>年龄:{age}</li>
      </ul>
    )
  }
}
let personInfo = {
  name:"flower",
  sex: "男",
  age: 18
}
# 结构传值
# 相当于 name={personInfo.name} sex=.....
ReactDOM.render(<Person {...personInfo}/>, document.getElementById("test"))
refs的三种写法
# 定义方式一 : 字符串 : 不建议
<input ref="leftInput" type="text" placeholder="点击按钮显示数据"/>
# 获取方式, 获取到的是真实DOM节点
const leftInput = this.refs.leftInput
# 定义方式二 : 函数 : 建议[建议使用引用函数, 不然会每次渲染都重新赋值一遍,但是官方说没啥事]
<input ref={ val => this.val=val} type="text" />
# 获取方式
const val = this.val
# 定义方式三 : React.createRef() : 推荐
# 我对这种方式进行了优化
# 调用函数
<input ref={this.refsiCopy('inputOne')} type="text" onBlur={this.blur} placeholder="失去焦点显示数据"/>
# 存储容器
refsi = {}
# 函数赋值
refsiCopy = nodeName => {
  return this.refsi[nodeName] = React.createRef()
}
# 使用, 从自定义存储容器中获取
blur = () => {
  console.log(this.refsi);
  const {value} = this.refsi['inputOne'].current;
  alert(value)
}
Event事件
class Demo extends React.Component {
  render() {
    return (
      <div>
        # 定义事件, 通过驼峰定义, React在原生事件上,包装了一层, 默认会传入event对象
        <input type="text" onBlur={this.blur} placeholder="失去焦点显示数据"/>
      </div>
    )
  }
  // 获取事件 入参event
  blur = (event) => {
    console.log(event.target);
    # 获取值
    console.log(event.target.value)
  }
}
非受控组件与受控组件
# 非受控组件 值直接挂在对象上, 而不是state, 所以是非受控组件
class Demo extends React.Component {
  render() {
    return (
      <div>
         # 表单提交
        <form onSubmit={this.handlerSubmit}>
          # 函数ref
          用户名:<input ref={c => this.username = c} name="username" type="text"/>
          密码:<input ref={c => this.password = c} name="password" type="password"/>
          <button>登录</button>
        </form>
      </div>
    )
  }
  # 执行表单
  handlerSubmit = (event) => {
    // 阻止表单默认事件
    event.preventDefault();
    const {username,password} = this;
    console.log(username.value,password.value)
  }
}
# 受控组件, 使用state控制值
class NameForm extends React.Component {
  state = {
    value:'123'
  }

  handleChange = (event) => {
    # 通过setState修改值
    this.setState({value: event.target.value});
  }

  handleSubmit = (event) =>{
     # 获取state中的值
    alert('提交的名字: ' + this.state.value);
    event.preventDefault();
  }

  render() {
    return (
      <form onSubmit={this.handleSubmit}>
        <label>
          名字:
          <input type="text" value={this.state.value} onChange={this.handleChange} />
        </label>
        <input type="submit" value="提交" />
      </form>
    );
  }
}
函数传值
class NameForm extends React.Component {
  state = {
    input: '123'
  }

  // 返回一个函数给onChange 然后让React传入event 解决传递参数的问题
  handleChange = (input) => {
    # 返回函数, 用于React调用,传入event对象
    return event => {
      this.setState({[input]: event.target.value})
    }
  }

  render() {
    return (
      <label>
        # 因为事件必须赋值一个函数, 但是直接加(),会被渲染的时候直接就执行掉,返回的是值/undefined, 所以需要在执行函数中, 返回一个函数, 来给React调用
        名字:<input type="text" onChange={this.handleChange('input')}/>
        <span>{this.state.input}</span>
      </label>
    );
  }
}
生命周期
class Demo extends React.Component {
  // 会在组件挂载后(插入 DOM 树中)立即调用。
  // 依赖于 DOM 节点的初始化应该放在这里。如需通过网络请求获取数据,此处是实例化请求的好地方。
  componentDidMount() {
    // 启动定时器
    this.action()
  }
  // 将要卸载的时候执行
  componentWillUnmount(){
    // 取消定时器
    clearInterval(this.state.active)
  }
  state = {
    opacity: 1,
    active: undefined
  }
  action = () => {
    const active = setInterval(() => {
      console.log("1")
      let {opacity} = this.state
      opacity -= 0.1
      if (opacity <= 0) opacity = 1
      this.setState({opacity})
    }, 200)
    this.setState({active})
  }

  remove = () => {
    // 卸载组件
    ReactDOM.unmountComponentAtNode(document.getElementById("test"))
  }

  render() {
    return (
      <div>
        <h2 style={{opacity: this.state.opacity}}>React好难呀</h2>
        <button onClick={this.remove}>不学了</button>
      </div>
    )
  }
}
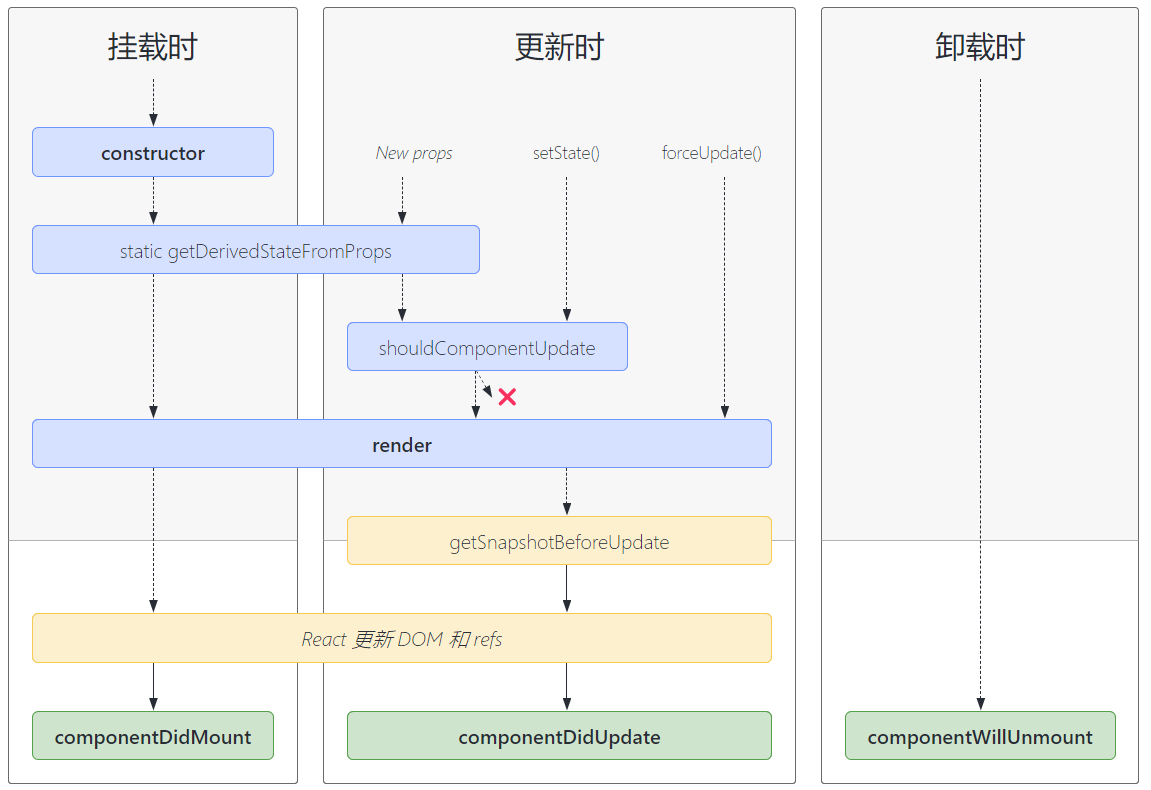
16.3

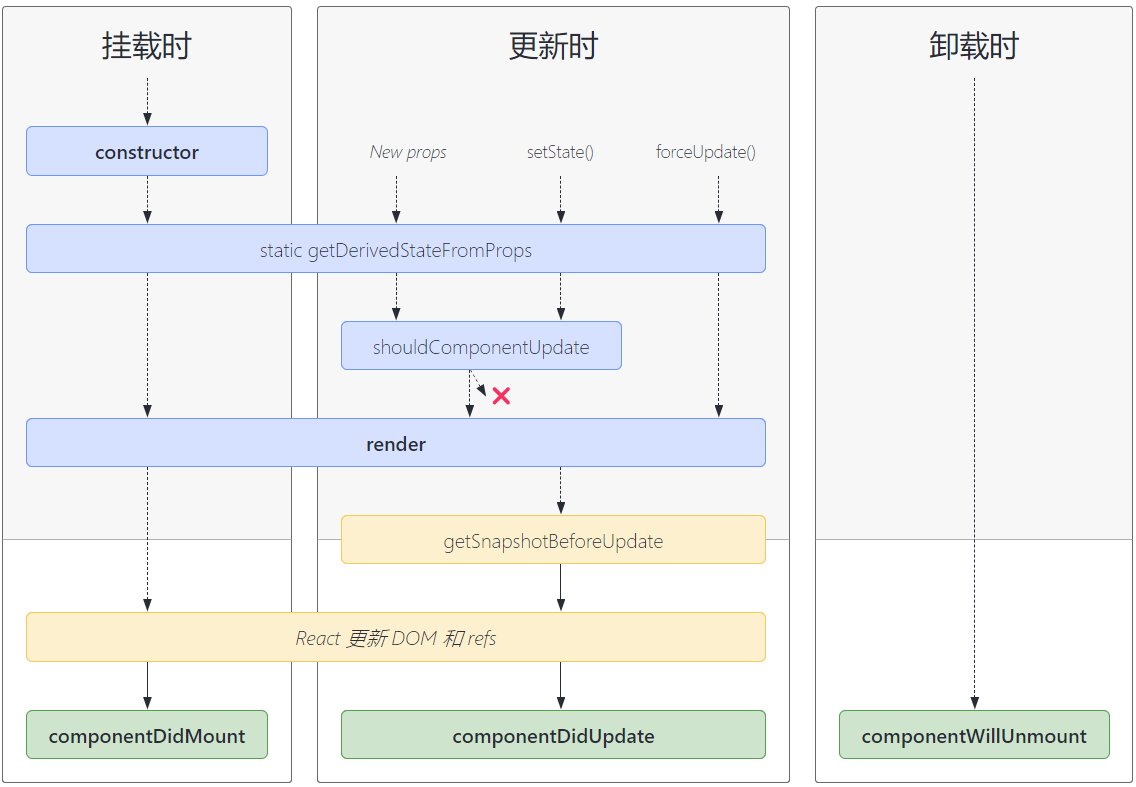
>=16.4

其实其他生命周期的基本不用, 用的话也可以通过别的方式实现
常用的生命周期就三个
|
生命周期 |
作用 |
|
render |
渲染DOM |
|
componentDidMount |
挂载完组件后,一般用于加载网络请求初始化数据 |
|
componentWillUnmount |
组件将要卸载, 做一些处理关闭的操作, 比如关闭定时器啥的 |