学会Sequelize,让你操作数据更丝滑
 转转技术团队
3 人赞同了该文章
Sequelize 是一个基于 promise 的 Node.js ORM, 目前支持 Postgres, MySQL, MariaDB, SQLite 以及 Microsoft SQL Server. 它具有强大的事务支持, 关联关系, 预读和延迟加载,读取复制等功能。
一、前言
本文希望通过下面的知识讲解及一些实战经验分享,给予即将入门或正在学习的同学一些帮助。
在之前刚接触 Sequelize 的时候,遇到挺多问题,比如数据的聚合统计应该这么做?复杂的排序规则应该怎么写?索引这块应该如何定义?性能如何衡量?等等这些问题,后来经过自己的琢磨及与后台人员交流探讨,这些问题都得予解决。
我们直接进入主题,学习目录结构如下:
二、入门
1.配置
module.exports = () => {
 const config = (exports = {})
 config.sequelize = {
  //支持的数据库类型
  dialect: 'mysql',
  //连接数据库的主机
  host: 'localhost',
  //连接数据库的端口
  port: 3306,
  //数据库名称
  database: 'db_test',
  //数据库用户名
  username: 'root',
  //数据库密码
  password: 'xxxxxx',
  //设置标准时区
  timezone: '+08:00',
  //配置
  dialectOptions: {
    // 时间格式化,返回字符串
    dateStrings: true,
    typeCast(field, next) {
      if (field.type === 'DATETIME') {
        return field.string()
      }
      return next()
    }
  }
 }
 return config
}
注:如果没有加 dialectOptions 配置上的 typeCast 属性值为 true的话,返回的时间是 ISO 标准时间日期字符。(如:'2022-04-16T15:02:08.017Z')
2.创建模型
2.1 常用数据类型
| 类型 | 说明 |
|---|---|
| INTEGER | 整数类型 |
| STRING | 字符串 |
| TEXT | 文本类型 |
| BOOLEAN | 布尔类型 |
| DATE | 时间类型 |
像数字、字符类型默认都有一些长度的限定,有时候因为长度问题导致接口出错,所以需要根据情况而定。
还有其他类型就不一一列了,需要用到的可以参照文档看看。Sequelize数据类型[1]
2.2 定义模型
module.exports = (app) => {
  const { STRING, INTEGER, DATE } = app.Sequelize

  const model = app.model.define(
    'student',
    {

      id: {
        //类型
        type: INTEGER(11),
        //是否允许为空
        allowNull: false,
        //是否为主键
        primaryKey: true,
        //自动自增
        autoIncrement: true,
        //备注
        comment: '学生id',
      },
      name: {
        type: STRING(50),
        allowNull: false,
        validate: {
          notEmpty: true,
        },
        comment: '学生姓名',
      },
      class_id: {
        type: INTEGER(11),
        allowNull: false,
        validate: {
          notEmpty: true,
        },
        comment: '班级',
      },
      cid: {
        type: STRING(50),
        allowNull: false,
        unique: 'cid',
        validate: {
          notEmpty: true,
        },
        comment: '身份证',
      }
    },
    {
      // 启动时间,设置为ture会自动生成创建和更新时间,默认字段名称为createAt、updateAt。
      timestamps: true,
      //对应的表名将与model名相同
      freezeTableName: true,
      //表备注
      comment: '表1',
      //创建时间字段别名或不展示
      createdAt: 'createTime',
      //更新时间字段别名或不展示
      updatedAt: 'updateTime'
    }
  )

  return model
}
使用 model.sync(options) 可自动执行 SQL 语句建表,但这个不建议用,第一这么做容易出现问题,第二我们的规范也不允许这么做。
2.3 表字段规范
这里讲的是我们公司的 SQL 规范,先来看一个案例:
CREATE TABLE `student` (
  `id` int NOT NULL AUTO_INCREMENT COMMENT '学生id',
  `name` varchar(50) NOT NULL COMMENT '学生姓名',
  `cid` varchar(50) NOT NULL COMMENT '身份证',
  `class_id` int NOT NULL COMMENT '班级',
  `create_time` datetime NOT NULL COMMENT '',
  `update_time` datetime NOT NULL COMMENT '更新时间',
  `mobile` varchar(50) DEFAULT NULL COMMENT '手机号',
  PRIMARY KEY (`id`),
  UNIQUE KEY `cid_unique` (`cid`),
  KEY `class_id` (`class_id`)
) ENGINE = InnoDB DEFAULT CHARSET = utf8mb4 COMMENT = '学生表';
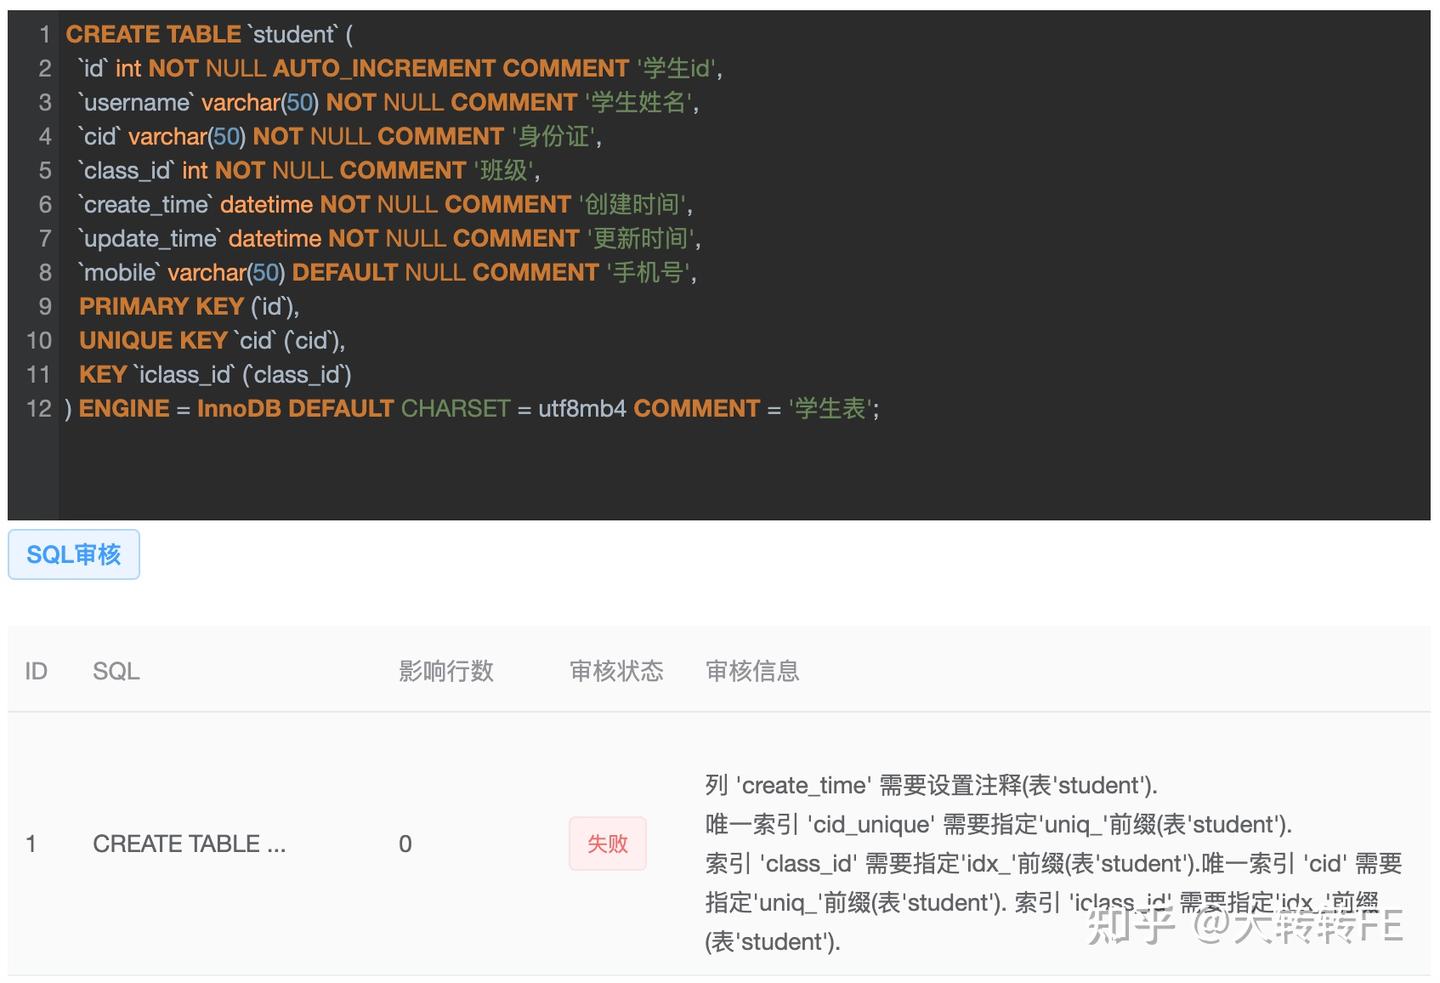
审核结果:
 审核结果
审核结果
下面讲一下基本的设计规范:
1) 禁用关键字
在设计的时候注意不要用到关键字,比如 name、type、status 等字段。
常见关键字:
 关键字
关键字
2) 字段禁止默认值为null
从上面的案例中 mobile 字段使用了允许为 null 值,审核平台这块没有强限制,但不建议用 null 为默认值,很容易出现问题。
3) 需要添加字段注释和表注释
CREATE TABLE `student` (
  `id` int NOT NULL AUTO_INCREMENT COMMENT '学生id',
  `username` varchar(50) NOT NULL COMMENT '学生姓名',
  `cid` varchar(50) NOT NULL COMMENT '身份证',
  `class_id` int NOT NULL COMMENT '班级',
  `create_time` datetime NOT NULL COMMENT '创建时间',
  `update_time` datetime NOT NULL COMMENT '更新时间',
  `mobile` varchar(50) DEFAULT NULL COMMENT '手机号',
  PRIMARY KEY (`id`),
  UNIQUE KEY `cid` (`cid`),
  KEY `iclass_id` (`class_id`)
) ENGINE = InnoDB DEFAULT CHARSET = utf8mb4 COMMENT = '学生表';
4)创建时间和更新时间字段
该表中必须含有 create_time 和 update_time 字段,如果没有该2个字段的话审核会不通过。
5) 索引命名
唯一索引:必须以 uniq_ 前缀命名。
普通索引:必须以 idx_ 前缀命名。
 索引命名
索引命名
6) 其它
以上是常用的基本规范,更多根据自己公司情况而定。
3.增删改查
3.1 create
创建数据
const values = {
 username: '张三',
 age: 18
}
const result = await this.model.create(values)
console.log(result)
3.2 findAll
查询数据并返回数组
const filter = {
 username: '张三',
 age: 18
}
const result = await this.model.findAll({
 where: filter
})
console.log(result)
3.3 findAndCountAll
查询数据并返回总数和数组列表
const filter = {
 username: '张三',
 age: 18
}
const result = await this.model.findAndCountAll({
 where: filter
})
console.log(result)
3.4 findOne
查询某一条数据返回对象
const filter = {
 id: 20
}
const result = await this.model.findOne({
 where: filter
})
console.log(result)
3.5 count
返回总条数
const total = await this.model.count()
console.log(total)
3.6 update
更新数据
const value = {
 id: 2,
 username: '张三',
 age: 20
}
const result = await this.model.update(value)
console.log(result)
3.7 destroy
删除数据
const filter = {
 id: 1
}
const result = await this.model.destroy({
 where: filter
})
console.log(result)
3.8 其它
还有一些其他的方法,具体可以看看 Sequelize方法文档[2]。
4.查询条件
这个具体的查询用法就不一一说了,根据自己需要的查询条件看下对应的查询功能即可。
this.Op = this.app.Sequelize.Op
this.model.findAll({
  where: {
    [Op.and]: [{ a: 5 }, { b: 6 }],            // (a = 5) AND (b = 6)
    [Op.or]: [{ a: 5 }, { b: 6 }],             // (a = 5) OR (b = 6)
    someAttribute: {
      // 基本
      [Op.eq]: 3,                              // = 3
      [Op.ne]: 20,                             // != 20
      [Op.is]: null,                           // IS NULL
      [Op.not]: true,                          // IS NOT TRUE
      [Op.or]: [5, 6],                         // (someAttribute = 5) OR (someAttribute = 6)

      // 使用方言特定的列标识符 (以下示例中使用 PG):
      [Op.col]: 'user.organization_id',        // = "user"."organization_id"

      // 数字比较
      [Op.gt]: 6,                              // > 6
      [Op.gte]: 6,                             // >= 6
      [Op.lt]: 10,                             // < 10
      [Op.lte]: 10,                            // <= 10
      [Op.between]: [6, 10],                   // BETWEEN 6 AND 10
      [Op.notBetween]: [11, 15],               // NOT BETWEEN 11 AND 15

      // 其它操作符

      [Op.all]: sequelize.literal('SELECT 1'), // > ALL (SELECT 1)

      [Op.in]: [1, 2],                         // IN [1, 2]
      [Op.notIn]: [1, 2],                      // NOT IN [1, 2]

      [Op.like]: '%hat',                       // LIKE '%hat'
      [Op.notLike]: '%hat',                    // NOT LIKE '%hat'
      [Op.startsWith]: 'hat',                  // LIKE 'hat%'
      [Op.endsWith]: 'hat',                    // LIKE '%hat'
      [Op.substring]: 'hat',                   // LIKE '%hat%'
      [Op.iLike]: '%hat',                      // ILIKE '%hat' (不区分大小写) (仅 PG)
      [Op.notILike]: '%hat',                   // NOT ILIKE '%hat'  (仅 PG)
      [Op.regexp]: '^[h|a|t]',                 // REGEXP/~ '^[h|a|t]' (仅 MySQL/PG)
      [Op.notRegexp]: '^[h|a|t]',              // NOT REGEXP/!~ '^[h|a|t]' (仅 MySQL/PG)
      [Op.iRegexp]: '^[h|a|t]',                // ~* '^[h|a|t]' (仅 PG)
      [Op.notIRegexp]: '^[h|a|t]',             // !~* '^[h|a|t]' (仅 PG)

      [Op.any]: [2, 3],                        // ANY ARRAY[2, 3]::INTEGER (仅 PG)
      [Op.match]: Sequelize.fn('to_tsquery', 'fat & rat') // 匹配文本搜索字符串 'fat' 和 'rat' (仅 PG)

      // 在 Postgres 中, Op.like/Op.iLike/Op.notLike 可以结合 Op.any 使用:
      [Op.like]: { [Op.any]: ['cat', 'hat'] }  // LIKE ANY ARRAY['cat', 'hat']
    }
  }
});
三、进阶
1.联表查询
1.1 一对一
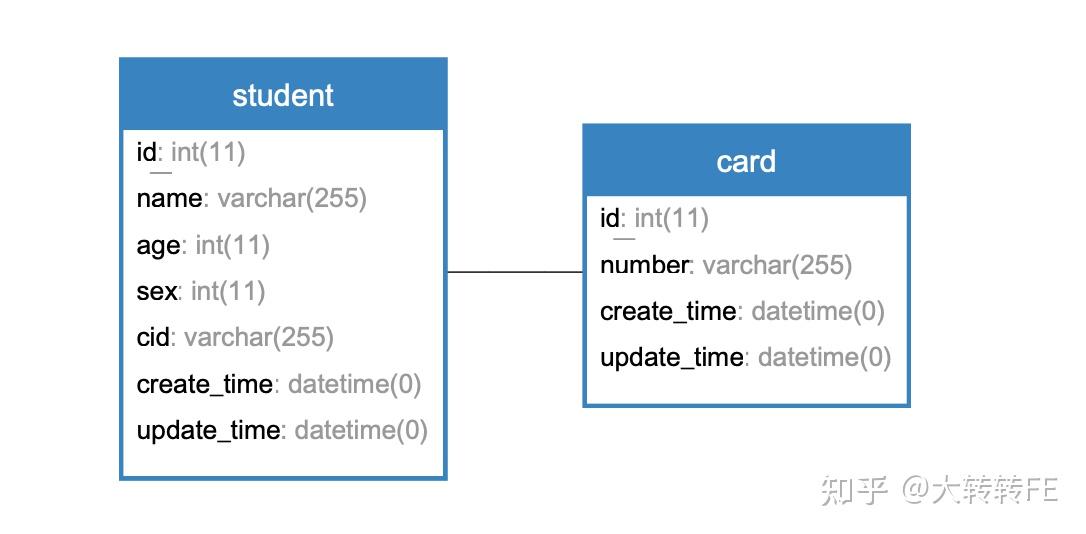
比如学生表和身份证表,一名学生只会有一个身份证号码,一张身份证只会对应一名学生。
这种就是一对一的关系,如图:
 一对一
一对一
假如学生表作为主表,身份证表作为副表,那边这张副表的外键就是学生表的id。
在使用 Sequelize 库中,我们想通过学生表关联到相应的身份证表信息,可通过 hasOne 方法做关联:
student.hasOne(card, {foreignKey : 'id'});
如果我们想通过身份证表反向关联到学生表,这是可以用 belongsTo 方法做关联:
card.belongsTo(student, {foreignKey : 'cid'});
总结一下 hasOne 和 belongsTo 的区别:
| 方法 | 说明 |
|---|---|
| hasOne | 正向关联,可以理解为一名学生拥有一张身份证。 |
| belongsTo | 反向关联,可以理解为一张身份证属于一名学生。 |
1.2 一对多
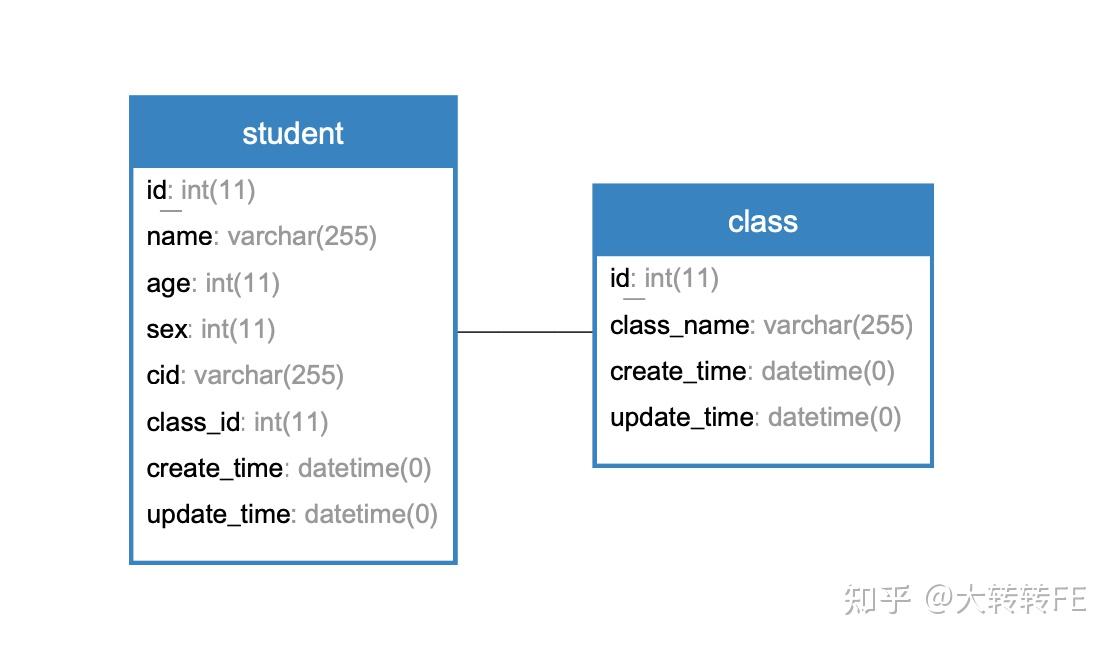
比如学生表和班级表,一名学生只有一个班级,一个班级由多名学生组成,这种是一对多(多对一)的关系,如图:
 一对多
一对多
在使用 Sequelize 库中,可通过 hasMany 方法做关联:
class.hasMany(student, {foreignKey : 'class_id'});
1.3 多对多
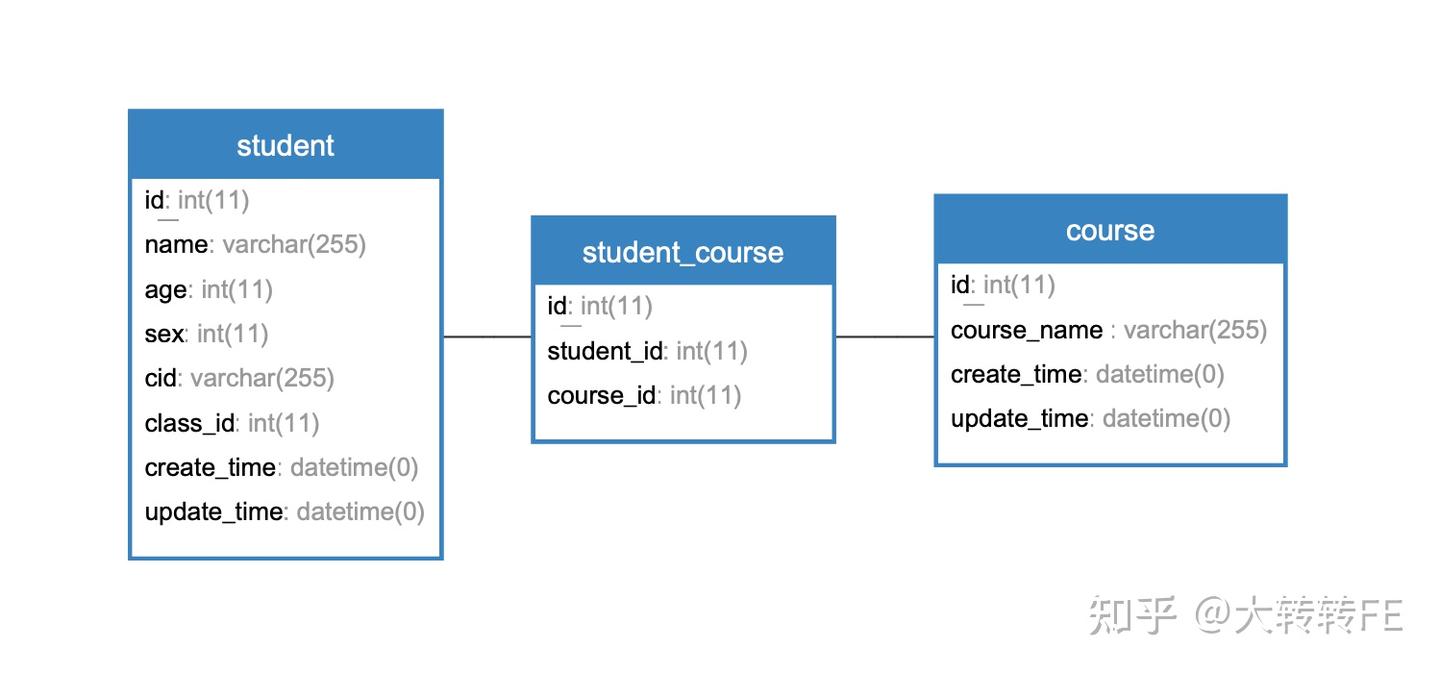
比如学生表和课程表,一名学生可以有多门课程,一门课程可以由多名学生参与,这种是多对多的关系,如图:
 多对多
多对多
在使用 Sequelize 库中,可通过 belongsToMany 方法做关联:
const Student = sequelize.define('Student', { name: DataTypes.STRING });
const Course = sequelize.define('Course', { name: DataTypes.STRING });
const StudentCourse = sequelize.define('StudentCourse', {
  studentId: {
    type: DataTypes.INTEGER,
    references: {
      model: Student,
      key: 'id'
    }
  },
  courseId: {
    type: DataTypes.INTEGER,
    references: {
      model: Course,
      key: 'id'
    }
  }
});
Student.belongsToMany(Course, { through: StudentCourse });
Course.belongsToMany(Student, { through: StudentCourse });
1.4 联表查询优劣
优点:联表查询用起来很方便,不需要做太多了处理,尤其在 B 端场景会用的比较多。
缺点:对于 C 端这种流量较大场景,使用联表查询效率会很低下,可能会导致服务器奔溃,所以现在大多数在 C 端都不采用 SQL 自带的联表查询功能,一般会通过代码逻辑来处理,大大减少查询效率。
有兴趣的可以了解下 mysql 联表查询的步骤是怎样的,这样对比起来会更加直观一点。
2.分组
举个例子,你想对订单各个状态的数量进行一个统计,你应该会怎么做?
在之前不知道分组这个功能时,我是这么做的:
const obj = {}
obj.problemAmoumt = await this.model.count()
obj.resolvedAmoumt = await this.model.count({
  where: {
    problemStatus:2
  }
})
return ctx.returnStatus.SUCCESS(obj)
这似乎看起来很爆粗。
后来发现可通过 SQL 语句中的 group 进行一个分组,group 是指定要进行分组的字段,示例如下:
this.model.count({
 attributes: ['order_status'],
 group: 'order_status'
})
最终转换成 SQL 语句如下:
SELECT `order_status`, count(*) AS `count` FROM `order_list` AS `order_list` GROUP BY `order_status`;
返回结果
[
 {
     "order_status": 1,
     "count": 4
 },
 {
     "order_status": 2,
     "count": 2
 },
 {
     "order_status": 3,
     "count": 2
 }
]
思考:
1.分组在应用时会不会有坑?自己在使用时可以看看。
2.如果想对 order_status 进行一个别名 bbb 字段返回,这时的查询语句应该如何调整?
3.聚合函数
3.1 count
统计总数,比如统计各个订单的数量:
this.model.findAll({
  attributes: [
    'orderStatus',
    [sequelize.fn('count', sequelize.col('order_status')), 'total']
  ],
  group: 'orderStatus'
})
3.2 sum
求和,比如统计全部同学的成绩总数:
this.model.findAll({
  attributes: [
    [sequelize.fn('sum', sequelize.col('score')), 'score']
  ]
})
3.3 max
查询最大值,比如找到这个分数最高的同学:
this.model.findAll({
  attributes: [
    [sequelize.fn('max', sequelize.col('score')), 'score']
  ]
})
3.4 min
查询最小值,比如找到这个分数最低的同学:
this.model.findAll({
  attributes: [
    [sequelize.fn('min', sequelize.col('score')), 'score']
  ]
})
当然这些方法也可以通过 this.model.方法(字段名称) 来实现,参数为指定的字段。
4 索引
索引就是一种将数据库中的记录按照特殊形式存储的数据结构。通过索引,能够提高数据查询的效率,从而提升服务器的性能。
4.1 主键索引
一个表只能由一个主键索引,且不为空。
可通过 primaryKey 属性来设置主键,通常会把 id 设为该表的主键,当然你也可以指定其它字段来作为主键,该字段值必须是唯一的。
 const student = app.model.define(
    'student',
    {
      id: {
        type: INTEGER(11),
        allowNull: false,
        primaryKey: true,
        autoIncrement: true,
        default: 10000,
        comment: '学生id',
      },
      name: {
        type: STRING(50),
        allowNull: false,
        validate: {
          notEmpty: true,
        },
        comment: '学生姓名',
      }
    }
 )
 return student
4.2 唯一索引
唯一索引的列的值必须唯一,但是允许出现空值。
可通过 unique 属性设置为唯一索引,值为 true 的话,索引名称会自动生成,也可以设置为自定义索引名称。
 const student = app.model.define(
    'student',
    {
      id: {
        type: INTEGER(11),
        allowNull: false,
        primaryKey: true,
        autoIncrement: true,
        default: 10000,
        comment: '学生id',
      },
      name: {
        type: STRING(50),
        allowNull: false,
        validate: {
          notEmpty: true,
        },
        comment: '学生姓名',
      },
      cid: {
        type: STRING(50),
        allowNull: false,
        unique: 'cid_unique',
        validate: {
          notEmpty: true,
        },
        comment: '身份证',
      }
    }
 )
 return student
4.3 组合索引
用多个列组合构建的索引,这多个列中的值不允许有空值。
const student = app.model.define(
    'student',
    {
      id: {
        type: INTEGER(11),
        allowNull: false,
        primaryKey: true,
        autoIncrement: true,
        default: 10000,
        comment: '学生id',
      },
      name: {
        type: STRING(50),
        allowNull: false,
        validate: {
          notEmpty: true,
        },
        comment: '学生姓名',
      },
      class_id: {
        type: INTEGER(11),
        allowNull: false,
        validate: {
          notEmpty: true,
        },
        comment: '班级',
      },
      cid: {
        type: STRING(50),
        allowNull: false,
        unique: 'cid',
        validate: {
          notEmpty: true,
        },
        comment: '身份证',
      }
    },
    {
      indexes: [{
        name: 'name',
        fields: ['name']
      }, {
        name: 'cid',
        fields: ['cid']
      }]
    }
  )
  return student
4.4 普通索引
用表中的普通列构建的索引,没有任何限制。
用法只要在 indexed 属性里不设置 unique 字段即可。
const student = app.model.define(
    'student',
    {
      id: {
        type: INTEGER(11),
        allowNull: false,
        primaryKey: true,
        autoIncrement: true,
        default: 10000,
        comment: '学生id',
      },
      name: {
        type: STRING(50),
        allowNull: false,
        validate: {
          notEmpty: true,
        },
        comment: '学生姓名',
      },
      class_id: {
        type: INTEGER(11),
        allowNull: false,
        validate: {
          notEmpty: true,
        },
        comment: '班级',
      },
      cid: {
        type: STRING(50),
        allowNull: false,
        unique: 'cid',
        validate: {
          notEmpty: true,
        },
        comment: '身份证',
      }
    },
    {
      indexes: [{
     unique: true,
        name: 'name',
        fields: ['name']
      }, {
     unique: true,
        name: 'class_id',
        fields: ['class_id']
      }]
    }
  )
  return student
4.5 加与不加索引的区别?
优点:增加索引会提供查询效率
缺点:增加内存空间
我们来看一条查询语句:
explain select * from `experience_problem_list` where `experience_problem_list`.`page_type` = 2;
先看看没加索引的执行结果:
| id | type | possible_keys | key | key_len | ref | rows | filtered | Extra |
|---|---|---|---|---|---|---|---|---|
| 1 | ALL | (NULL) | (NULL) | (NULL) | (NULL) | 16416 | 10 | (NULL) |
表中总共有16416条数据,扫描行数也是16416条。
再看下加了索引的执行结果:
| id | type | possible_keys | key | key_len | ref | rows | filtered | Extra |
|---|---|---|---|---|---|---|---|---|
| 1 | ref | page_type | page_type | 4 | const | 4 | 100 | Using where |
我们来看下 rows 字段的对比,加了索引的扫描行数只有4条,由此可以看到,加索引的查询效率大大高于普通查询。
5.事务
可以理解为一个事务对应的是一组完整的业务,并且在这个事务中所作的一切操作要么全部成功,要么全部失败,只要有一个操作没成功,整个事务都将回滚到事务开始前。
这里简单放一个官方使用案例吧:
// 首先,我们开始一个事务并将其保存到变量中
const t = await sequelize.transaction();
try {
  // 然后,我们进行一些调用以将此事务作为参数传递:
  const user = await User.create({
    firstName: 'Bart',
    lastName: 'Simpson'
  }, { transaction: t });
  await user.addSibling({
    firstName: 'Lisa',
    lastName: 'Simpson'
  }, { transaction: t });
  // 如果执行到此行,且没有引发任何错误.
  // 我们提交事务.
  await t.commit();
} catch (error) {
  // 如果执行到达此行,则抛出错误.
  // 我们回滚事务.
  await t.rollback();
}
四、实战演练
1.查询数据不想返回内置的数据结构,只想单纯返回纯数据结构怎么处理?
来看下默认返回查询的数据结果:
{
  count: 8,
  rows: [
    student {
      dataValues: [Object],
      _previousDataValues: [Object],
      uniqno: 1,
      _changed: Set(0) {},
      _options: [Object],
      isNewRecord: false
    }
  ]
}
这里 rows 里面对象返回了很多层,在业务处理时可能取值会不太方便,我们可以在调用方法的参数里加上 raw 等于 true,就返回正常的数据格式。
const result = await this.model.findAll({
 where: filter,
 raw: true
})
返回:
{
  count: 8,
  rows: [
    {
      id: 8,
      name: '张三',
      cid: 'xxx',
      createTime: '2022-04-08 18:06:52',
      updateTime: '2022-04-08 18:06:52'
    }
  ]
}
2.如果列表筛选涉及到主副表应该怎么查询合适?
有几种方案:
1)直接用 mysql 语句做表关联即可,但性能比较低下。
2)用代码逻辑处理,但写起来可能有点绕,但效率比直接用 mysql 表关联效率高。
3)如果主表字段固定且不多的话,可以直接冗余副表中,但如果后续主表加字段的话,副表更新是个问题。
4)采用 ES,将这2张表的数据合并同步到 ES 的一张表里,但 ES 使用场景一般都是量很大的,加上 nodejs 新增其它数据库交互,有额外的开销成本。
综合以上考虑,如果是内部项目,量也不是很多的话,查询比较复杂的话可以直接采用第一种方法,如果逻辑相对比较简单,也可以采用第二种方法。
3.分组 group 遇到的问题。
group 只能填写已有的查询字段。比如你表中有这个字段 aaa,但查询返回的字段 aaa 被过滤了,这时不能以 aaa 进行分组。
4.如何获取今日、最近7天、一个月的数据?
可通过字符串函数 DATE_FORMAT 实现:
1)首先通过时间选择器获取到今日、最近7天、一个月的开始时间和结束时间。
2)然后使用对改模型使用 count 进行查询,这时获取到的知识该时期的总条数。
3)对改数据进行分组,使用 group 属性,字段为创建的时间,但我们创建的时间是包含时分秒的,如果这么聚合的话,生成的数据并不是我们想到的,我们需要的是针对年月日,所以需要对这个时间进行一个处理。
[
    {
        "create_time": "2022-04-12 17:02:36",
        "count": 1
    },
    {
        "create_time": "2022-04-14 17:02:38",
        "count": 1
    },
    {
        "create_time": "2022-04-14 17:03:38",
        "count": 1
    },
    {
        "create_time": "2022-04-14 17:03:58",
        "count": 1
    }
]
这个显然不是我们想要的一个结果。
4)然后函数 DATE_FORMAT,将时间格式化为年月日。
总体实现如下:
const countArr = await this.model.count({
  where: filter,
  attributes: [
    [sequelize.fn('DATE_FORMAT', sequelize.col('create_time'), '%Y-%m-%d'), 'createTime'],
  ], group: 'createTime',
})
假设我想获取4月10日-4月14日的数据,正常返回结构如下:
[
    {
        "createTime": "2022-04-12",
        "count": 1
    },
    {
        "createTime": "2022-04-14",
        "count": 3
    }
]
5)因为表中只有12号和14号的数据,10、11、13号没有,这块需要自己对代码进行一个处理,把其它日期没有的数据为0即可。
最终希望达到的效果:
[
 {
     "time": "2022-04-10",
     "count": 0
 },
 {
     "time": "2022-04-11",
     "count": 0
 },
 {
     "time": "2022-04-12",
     "count": 1
 },
 {
     "time": "2022-04-13",
     "count": 0
 },
 {
     "time": "2022-04-14",
     "count": 3
 }
]
五、问题思考
- 如果想要获取一年中每个月的订单量,应该怎么查询?
答案:关注 "大转转FE" 公众号,回复"统计"、"一年"其中一个即可
- 如何根据查询条件的顺序,返回相应的数据顺序?
答案:关注 "大转转FE" 公众号,,回复"filed"、"排序"其中一个即可
- 如何进行动态分表?
答案:关注 "大转转FE" 公众号,回复"分表"即可。
注:如果您还有其它问题想交流,欢迎在底部留言。
参考资料
[1]
Sequelize数据类型: https://www.sequelize.com.cn/core-concepts/model-basics
[2]
Sequelize方法文档: https://www.sequelize.com.cn/core-concepts/model-querying-finders
发布于 2022-04-28 11:12 标签:count,const,Sequelize,学会,更丝滑,model,true,id,Op From: https://www.cnblogs.com/sexintercourse/p/18533770