模型架构
先上图
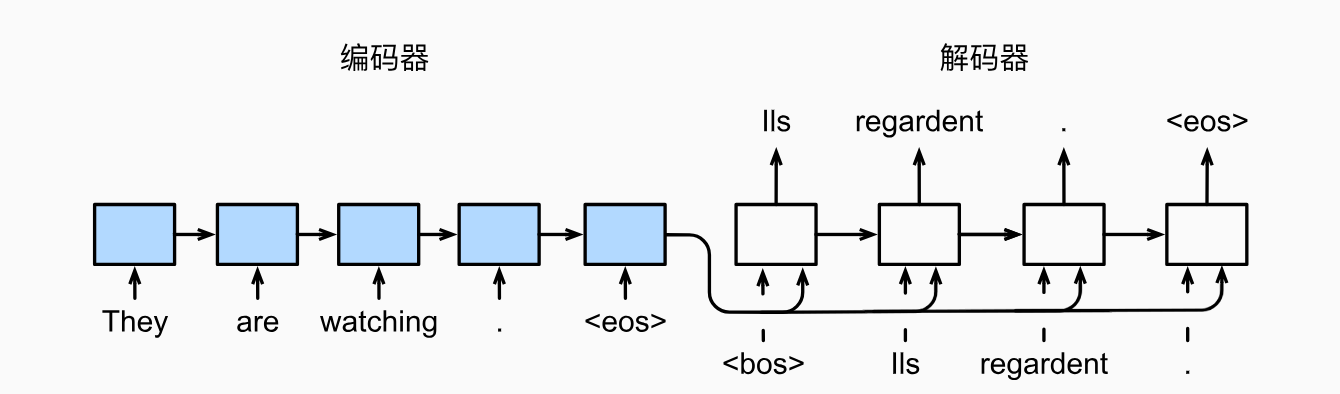
我们这里选用GRU来实现该任务,因此上图的十个方框框都是GRU块,如第二张图,放第一张图主要是强调编码器的输出是作用在解码器每一次输入的观点,具体的详细流程图将在代码实现部分给出。
编码阶段
1. 准备工作
-
导入相关的库和编写字符处理的函数
from io import open
import unicodedata
import re
import random
import torch
import torch.nn as nn
from torch import optim
import torch.nn.functional as F

device = torch.device("cuda" if torch.cuda.is_available() else "cpu")
data_path = 'data/eng-fra.txt'


# 字符规范化
# 将unicode字符串转换为ascii码,主要是去掉法文的重音符号例如:é
def unicodeToAscii(s):
    return ''.join(
        c for c in unicodedata.normalize('NFD', s)
        if unicodedata.category(c) != 'Mn'
    )
def normalizeString(s):
    # 大写变小写,去掉前后空格,然后将字符串转换为ascii码
    s = unicodeToAscii(s.lower().strip())
    # 在标点符号前后添加空格
    s = re.sub(r"([.!?])", r" \1", s)
    # 字符串中除了字母和标点符号外,其他字符替换为空格
    s = re.sub(r"[^a-zA-Z.!?]+", r" ", s)
    return s
注意:
data_path改为自己的数据集地址
2. 数据处理
编写主要类,Lang这个类的主要作用是一个词典,这个类会有两个实例,一个是英语实例,其中存储了所有的英语词汇,另一个是法语实例,其中存储了所有的法语词汇。该类会为每个词语建立一个对应的自然数索引,有两个字典来实现映射,分别是word2index和index2word,n_words记录了所有的词汇数,由于有启动子和终止子(也就是SOS_token和EOS_token)的存在,因此n_words初始值为2
该类的具体实现如下
SOS_token = 0
EOS_token = 1

class Lang:
    def __init__(self, name):
        # 初始化函数中参数name代表某种语言的名字
        self.name = name
        self.word2index = {}
        self.index2word = {0: "SOS", 1: "EOS"}
        # 初始化词汇对应的自然数索引,从2开始,0、1已经被占用
        self.n_words = 2

    def addSentence(self, sentence):
        # 将句子中的词汇添加到词汇表中
        for word in sentence.split(' '):
            self.addWord(word)

    def addWord(self, word):
        # 将词汇添加到词汇表中
        if word not in self.word2index:
            self.word2index[word] = self.n_words
            self.index2word[self.n_words] = word
            self.n_words += 1

# 测试
# name = 'eng'
# input_lang = Lang(name)
# sentence = 'I love you.'
# input_lang.addSentence(sentence)
# print(input_lang.word2index)
# print(input_lang.index2word)
接下来实例化Lang,将单词信息存入两个Lang实例中,并且将句子信息存入到一个pairs这个二维列表中,其中pairs的结构如下
[[英语句子1,法语翻译1],[英语句子2,法语翻译2]......]
编写readLangs函数,来实现这个功能,该函数有三个输出,两个Lang实例,一个pairs
# 将持久化文件中的数据读取到内存中,并实例化Lang类
def readLangs(lang1, lang2):
    # 读取文件中的数据
    lines = open(data_path, encoding='utf-8').read().strip().split('\n')
    # 将每一行用'\t'分割,然后将两种语言的句子分别存储
    pairs = [[normalizeString(s) for s in l.split('\t')] for l in lines]
    # 实例化Lang类
    input_lang = Lang(lang1)
    output_lang = Lang(lang2)

    return input_lang, output_lang, pairs
编写数据过滤函数,选出符合要求的部分数据
# 过滤出符合要求的语言对
# 过滤条件:两种语言中的句子长度都小于max_length
MAX_LENGTH = 10

# 选择带有特定前缀的句子作为训练数据
eng_prefixes = (
    "i am ", "i m ",
    "he is", "he s ",
    "she is", "she s",
    "you are", "you re ",
    "we are", "we re ",
    "they are", "they re "
)

def filterPair(p):
    return len(p[0].split(' ')) < MAX_LENGTH and len(p[0].split(' ')) < MAX_LENGTH and p[0].startswith(eng_prefixes)
def filterPairs(pairs):
    return [pair for pair in pairs if filterPair(pair)]

# 测试filterPairs
# lang1 = 'eng'
# lang2 = 'fra'
# input_lang, output_lang, pairs = readLangs(lang1, lang2)
# print('Read %s sentence pairs' % len(pairs))
# pairs = filterPairs(pairs)
# print('Leave %s sentence pairs' % len(pairs))
编写数据整合函数,将上述几个功能整合起来,功能是直接返回Lang和过滤好的pairs
# 整合上述函数,并使用Lang对language pair进行数值映射
def prepareData(lang1, lang2):
    input_lang, output_lang, pairs = readLangs(lang1, lang2)
    # 过滤数据
    pairs = filterPairs(pairs)
    for pair in pairs:
        input_lang.addSentence(pair[0])
        output_lang.addSentence(pair[1])
    return input_lang, output_lang, pairs

# 测试
def test_prepareData():
    lang1 = 'eng'
    lang2 = 'fra'
    input_lang, output_lang, pairs = prepareData(lang1, lang2)
    print("input_lang.n_words:", input_lang.n_words)
    print("output_lang.n_words:", output_lang.n_words)
    print(random.choice(pairs))

# test_prepareData()
将句子转化成张量,pairs是一个一个的句子对,接下来将其转换成一个一个的张量对
# 将语言转化为模型输入需要的张量
def indexesFromSentence(lang, sentence):
    indexes = [lang.word2index[word] for word in sentence.split(' ')]
    indexes.append(EOS_token)
    return torch.tensor(indexes, dtype=torch.long, device=device).view(-1, 1)

# 将语言转换为张量对,pair为一个语言对
def tensorFromPair(pair, input_lang, output_lang):
    input_tensor = indexesFromSentence(input_lang, pair[0])
    target_tensor = indexesFromSentence(output_lang, pair[1])
    return input_tensor, target_tensor

# 测试
def test_tensorFromPair():
    lang1, lang2 = 'eng', 'fra'
    input_lang, output_lang, pairs = prepareData(lang1, lang2)
    pair = random.choice(pairs)
    print(pair)
    input_tensor, target_tensor = tensorFromPair(pairs[0], input_lang, output_lang)
    print(input_tensor)
    print(target_tensor)
# test_tensorFromPair()
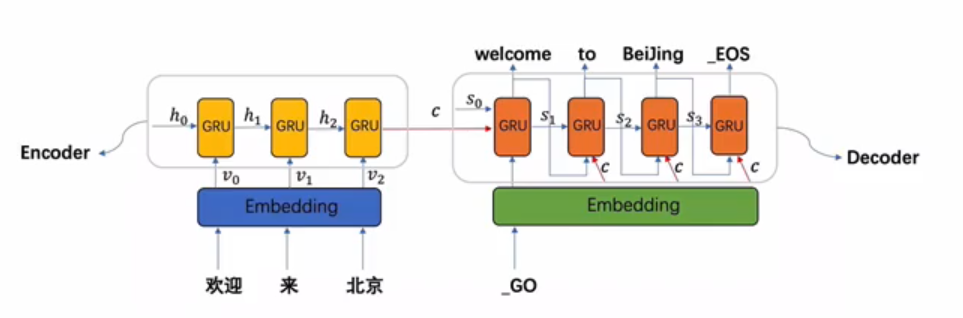
3. 构建基于GRU的编码器
先上图

这里只需要照着编码器结构实现就行了
这里需要用到pytorch中的一个工具函数nn.Embedding,它的作用是将高维,稀疏的离散数据转换成低维、密集的连续向量,这里不过多赘述
注意:GRU的输入参数有两个分别是
- 输入序列:GRU 接收一个序列作为输入。这个序列通常表示为一个三维张量,其维度为
(sequence_length, batch_size, input_size),其中:
sequence_length表示序列的长度,即时间步的数量。batch_size表示每个时间步同时处理的样本数量。input_size表示每个时间步输入的特征向量的维度。- 初始隐藏状态:GRU 还接收一个初始的隐藏状态作为输入。这个隐藏状态通常表示为一个二维张量,其维度为
(num_layers * num_directions, batch_size, hidden_size),其中:
num_layers表示 GRU 层的数量。num_directions表示 GRU 的方向数,通常为 1(单向)或 2(双向)。hidden_size表示隐藏状态的维度,即 GRU 单元中的隐藏单元数量。
# 构建基于GRU的编码器
class EncoderRNN(nn.Module):
    def __init__(self, input_size, hidden_size):
        """
        :param input_size: 源语言词汇表的大小
        :param hidden_size: 隐层节点数,要和词嵌入维度一致
        """
        super(EncoderRNN, self).__init__()
        self.hidden_size = hidden_size
        self.embedding = nn.Embedding(input_size, hidden_size)
        self.gru = nn.GRU(hidden_size, hidden_size)

    def forward(self, input, hidden):
        """
        :param input: 源语言embedding层输入张量
        :param hidden: 编码器层gru的初始隐层张量
        """
        # 将输入张量进行embedding操作,使其形状变为(1,1,hidden_size)
        # 理论上我们的编码器每次只以一个词作为输入,因此词汇映射后尺寸应该是(1, embedding_dim)
        output = self.embedding(input).view(1, 1, -1)
        output, hidden = self.gru(output, hidden)
        return output, hidden

    def initHidden(self):
        return torch.zeros(1, 1, self.hidden_size, device=device)

# 测试
def test_EncoderRNN():
    input_lang, output_lang, pairs = prepareData('eng', 'fra')
    pair = random.choice(pairs)
    input_tensor, target_tensor = tensorFromPair(pair, input_lang, output_lang)
    encoder = EncoderRNN(input_lang.n_words, 256)
    hidden = encoder.initHidden()
    # 输入一个词
    output, hidden = encoder(input_tensor[0], hidden)
    print(output.size(), hidden.size())
# test_EncoderRNN()
4. 构建基于GRU的解码器
1. 传统解码器
先上图
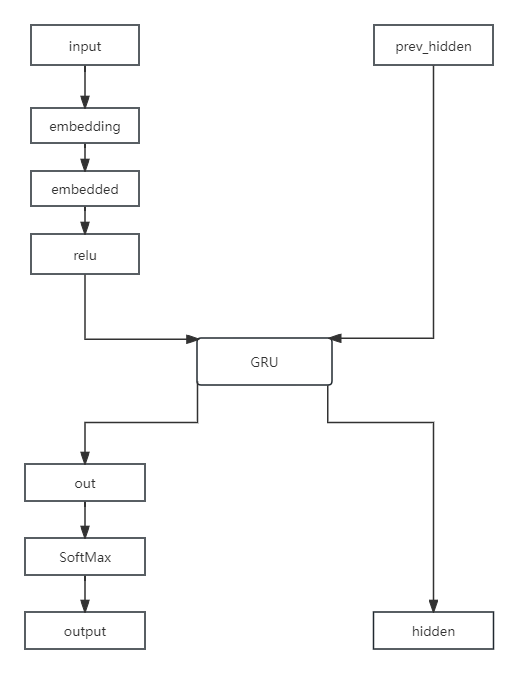
这里要注意,编码器的prev_hidden是来自编码器最后的隐层输出,也就是hidden,细节会在注释中给出
# 构建基于GRU的解码器
class DecoderRNN(nn.Module):
    def __init__(self, hidden_size, output_size):
        '''
        解码器初始化函数
        :param hidden_size: 代表解码器中GRU的输入尺寸,也就是其隐藏节点数
        :param output_size: 整个解码器的输出尺寸,也是我们希望得到的指定尺寸,即目标语言的词汇表大小
        '''
        super(DecoderRNN, self).__init__()
        self.hidden_size = hidden_size
        self.embedding = nn.Embedding(output_size, hidden_size)
        self.gru = nn.GRU(hidden_size, hidden_size)
        self.out = nn.Linear(hidden_size, output_size)
        self.softmax = nn.LogSoftmax(dim=1)

    def forward(self, input, hidden):
        '''
        :param input: 解码器的输入张量
        :param hidden: 解码器的隐层张量
        '''
        # GRU只接受三维张量作为输入,因此这里需要对输入张量进行view操作
        output = self.embedding(input).view(1, 1, -1)
        # 使用ReLU激活函数使Embedding矩阵更加稀疏,防止过拟合
        output = F.relu(output)
        # 将output张量和隐层张量传入GRU中
        output, hidden = self.gru(output, hidden)
        # 将GRU的输出结果传入全连接层,output是三维张量,第一维是没有意义的,因此我们使用output[0]来降维
        output = self.softmax(self.out(output[0]))
        return output, hidden

    def initHidden(self):
        return torch.zeros(1, 1, self.hidden_size, device=device)

# 测试
def test_DecoderRNN():
    input_lang, output_lang, pairs = prepareData('eng', 'fra')
    pair = random.choice(pairs)
    input_tensor, target_tensor = tensorFromPair(pair, input_lang, output_lang)
    encoder = EncoderRNN(input_lang.n_words, 256)
    decoder = DecoderRNN(256, output_lang.n_words)
    hidden = encoder.initHidden()
    encoder_output, encoder_hidden = encoder(input_tensor[0], hidden)
    decoder_input = torch.tensor([[SOS_token]], device=device)
    decoder_hidden = encoder_hidden
    decoder_output, decoder_hidden = decoder(decoder_input, decoder_hidden)
    print(decoder_output.size(), decoder_hidden.size())

# test_DecoderRNN()
2. 基于Attention机制的解码器
先上图
对于attention部分,先做如下解释:
根据Q、K、V理论,attention的输入为三个参数Q、K、V。(Q:input,K:prev_hidden,V:encoder_outputs)
- 使用Q与K进行attention权值计算得到权重矩阵,再与V做矩阵乘法,得到V的注意力表示
这里的常见计算方式有三种:- 将Q、K进行纵轴拼接,做一次线性变换,再使用SoftMax处理获得结果最后与V做矩阵乘法
- 将Q、K进行纵轴拼接,做一次线性变换后再使用tanh激活函数,然后再进行内部求和,最后用SoftMax处理获得结果最后与V做矩阵乘法
- 将Q、K的转置进行点积运算,然后除以一个缩放系数,再使用softmax处理获得结果最后与V做矩阵乘法
说明:当注意力权重和V都是三维张量且第一维代表batch条数时,我们可以使用torch.bmm()函数进行矩阵乘法
- 根据第一步采用的计算方法
- 如果是拼接方法,则需要将Q与第二步的计算结果再进行拼接
- 如果是点积方法,一般是自注意力,Q与V相同,因此不需要再拼接
- 最后为了使整个attention结构按照指定尺寸输出,使用线性层作用在第二步的结果上做变换
我们这里使用的是第一步中的第一种计算方式,因此需要一个线性变换的矩阵,实例化nn.Linear()类,因为他的输入是Q、K的拼接,所以第一个参数是hidden_size * 2,第二个参数是self.max_length,这里的max_length是指句子的最大长度,我们在前面定义了MAX_LENGTH = 10。这里的Q是解码器的Embedding层的输出,K是解码器的GRU的隐层输出,V是编码器的GRU的隐层输出。
我们这里选用注意力机制是将Q、K进行纵轴拼接,做一次线性变换,再使用SoftMax处理获得结果最后与V做矩阵乘法,所以上图attn那里接受两个输入,然后concat一下,再使用一个线性层调整输出数量,attn_combine中也用了类似的方法来调整
# 基于GRU和注意力机制的解码器
class AttnDecoderRNN(nn.Module):
    def __init__(self, hidden_size, output_size, dropout_p=0.1, max_length=MAX_LENGTH):
        '''
        :param hidden_size: 解码器GRU的输入尺寸,也是其隐藏节点数
        :param output_size: 整个解码器的输出尺寸,也是我们希望得到的指定尺寸,即目标语言的词汇表大小
        :param dropout_p: dropout概率
        :param max_length: 句子的最大长度
        '''
        super(AttnDecoderRNN, self).__init__()
        self.hidden_size = hidden_size
        self.output_size = output_size
        self.dropout_p = dropout_p
        self.max_length = max_length
        self.embedding = nn.Embedding(self.output_size, self.hidden_size)

        self.attn = nn.Linear(self.hidden_size * 2, self.max_length)
        # 实例化另外一个线性层,用于规范输出尺寸
        self.attn_combine = nn.Linear(self.hidden_size * 2, self.hidden_size)
        self.dropout = nn.Dropout(self.dropout_p)
        self.gru = nn.GRU(self.hidden_size, self.hidden_size)
        self.out = nn.Linear(self.hidden_size, self.output_size)

    def forward(self, input, hidden, encoder_outputs):
        '''
        :param input: 源数据的输入张量
        :param hidden: 初始的隐层张量
        :param encoder_outputs: 解码器的输出张量
        '''
        # 将输入张量进行embedding操作,使其形状变为(1,1,hidden_size)
        embedded = self.embedding(input).view(1, 1, -1)
        embedded = self.dropout(embedded)

        # attention权重计算
        attn_weights = F.softmax(self.attn(torch.cat((embedded[0], hidden[0]), 1)), dim=1)
        # 将attention权重与encoder_outputs做矩阵乘法
        attn_applied = torch.bmm(attn_weights.unsqueeze(0), encoder_outputs.unsqueeze(0))
        # 将embedded降维,拼接
        output = torch.cat((embedded[0], attn_applied[0]), 1)
        output = self.attn_combine(output).unsqueeze(0)
        output = F.relu(output)
        output, hidden = self.gru(output, hidden)
        output = F.log_softmax(self.out(output[0]), dim=1)
        return output, hidden, attn_weights

    def initHidden(self):
        return torch.zeros(1, 1, self.hidden_size, device=device)

# 测试
def test_AttnDecoderRNN():
    input_lang, output_lang, pairs = prepareData('eng', 'fra')
    pair_tensor = tensorFromPair(pairs[0], input_lang, output_lang)
    hidden_size = 25
    output_size = 10
    input1 = pair_tensor[1][0]
    hidden = torch.zeros(1, 1, hidden_size, device=device)
    encoder_output = torch.randn(10, 25)

    decoder_attn = AttnDecoderRNN(hidden_size, output_size)
    output, hidden, attn_weights = decoder_attn(input1, hidden, encoder_output)
    print(output.size(), hidden.size(), attn_weights.size())

# test_AttnDecoderRNN()
5. 构建模型训练函数
这里使用了一个在NLP中常用叫做teacher forcing的技巧,在训练过程中,将解码器的真实输出作为下一个时刻的输入,而不是将上一个时刻的输出作为下一个时刻的输入。
它是一种用于序列生成任务的训练技巧,在seq2seq架构中,根据循环神经网络理论,解码器每次应该使用上一步的结果作为输入的一部分,但是训练过程中,一旦上一步的结果是错误的,就会导致这种错误被累积,无法达到训练效果,因此,我们需要一种机制改变上一步出错的情况,因为训练时我们是已知正确的输出应该是什么,因此可以强制将上一步结果设置成正确的输出,这种方式就叫做teacher_forcing。
作用:
- 能够在训练的时候矫正模型的预测,避免在序列生成的过程中误差进一步放大。
- teacher_forcing能够极大的加快模型的收敛速度,令模型训练过程更快更平稳。
这里调用的是基于Attention机制的解码器,当然,我们也可以调用传统解码器试试效果
# 模型训练函数
teacher_forcing_ratio = 0.5
def train(input_tensor, target_tensor, encoder, decoder, encoder_optimizer, decoder_optimizer, criterion, max_length=MAX_LENGTH):
    '''
    :param input_tensor: 输入张量
    :param target_tensor: 目标张量
    :param encoder: 编码器
    :param decoder: 解码器
    :param encoder_optimizer: 编码器优化器
    :param decoder_optimizer: 解码器优化器
    :param criterion: 损失函数
    :param max_length: 句子最大长度
    '''
    encoder_hidden = encoder.initHidden()
    # 梯度清零
    encoder_optimizer.zero_grad()
    decoder_optimizer.zero_grad()
    # 获取输入张量的长度
    input_length = input_tensor.size(0)
    target_length = target_tensor.size(0)
    # 初始化encoder_outputs
    encoder_outputs = torch.zeros(max_length, encoder.hidden_size, device=device)
    loss = 0
    # 将input_tensor输入encoder中
    for ei in range(input_length):
        # 根据索引取出input_tensor中的每个词,和初始化的隐层张量一同输入encoder
        encoder_output, encoder_hidden = encoder(input_tensor[ei], encoder_hidden)
        # 每次得到的encoder_output是一个三维张量,我们只需要第一维,因此使用[0, 0]来降维
        encoder_outputs[ei] = encoder_output[0, 0]

    # 初始化decoder的输入张量,即SOS_token
    decoder_input = torch.tensor([[SOS_token]], device=device)
    # decoder的初始隐层张量是encoder的最终隐层张量
    decoder_hidden = encoder_hidden
    # 是否使用teacher_forcing
    use_teacher_forcing = True if random.random() < teacher_forcing_ratio else False

    if use_teacher_forcing:
        # 使用teacher_forcing
        for di in range(target_length):
            '''
            decoder_input: Q
            decoder_hidden: K
            encoder_outputs: V
            '''
            decoder_output, decoder_hidden, decoder_attention = decoder(decoder_input, decoder_hidden, encoder_outputs)
            # 因为使用了teacher_forcing,因此无论解码器输出的decoder_output是什么,我们都将其与target_tensor[di]进行损失函数计算
            loss += criterion(decoder_output, target_tensor[di])
            # 将解码器的下一个输入设置为正确答案
            decoder_input = target_tensor[di]

    else:
        # 不使用teacher_forcing
        for di in range(target_length):
            decoder_output, decoder_hidden, decoder_attention = decoder(decoder_input, decoder_hidden, encoder_outputs)
            # 取出解码器输出的概率最大的词
            topv, topi = decoder_output.topk(1)
            decoder_input = topi.squeeze().detach()
            loss += criterion(decoder_output, target_tensor[di])
            if decoder_input.item() == EOS_token:
                break

    loss.backward()
    encoder_optimizer.step()
    decoder_optimizer.step()

    # 返回平均损失
    return loss.item() / target_length
构建一个时间计算函数,输出好看一点
# 构建时间计算函数
import time
import math
def timeSince(since):
    '''
    :param since: 开始时间
    '''
    now = time.time()
    s = now - since
    m = math.floor(s / 60)
    s -= m * 60
    return '%dm %ds' % (m, s)
构建一个调用训练函数的函数,并完成制图等一些功能
# 调用训练函数并打印日志和制图
import matplotlib.pyplot as plt
def trainIters(encoder, decoder, n_iters, input_lang, output_lang, pairs, print_every=1000, plot_every=100, learning_rate=0.01):
    '''
    :param encoder: 编码器
    :param decoder: 解码器
    :param n_iters: 迭代次数
    :param input_lang: 输入语言
    :param output_lang: 输出语言
    :param pairs: 语言对
    :param print_every: 每隔多少次迭代打印日志
    :param plot_every: 每隔多少次迭代绘制图像
    :param learning_rate: 学习率
    '''
    start = time.time()
    plot_losses = []
    # 每个打印日志间隔总损失,初始为0
    print_loss_total = 0
    # 每个绘图间隔总损失,初始为0
    plot_loss_total = 0
    # 初始化优化器
    encoder_optimizer = optim.SGD(encoder.parameters(), lr=learning_rate)
    decoder_optimizer = optim.SGD(decoder.parameters(), lr=learning_rate)

    # 根据设置迭代步进行循环
    for iter in range(1, n_iters + 1):
        # 随机选择一个句子对
        training_pair = tensorFromPair(random.choice(pairs), input_lang, output_lang)
        input_tensor = training_pair[0]
        target_tensor = training_pair[1]
        # 调用训练函数
        loss = train(input_tensor, target_tensor, encoder, decoder, encoder_optimizer, decoder_optimizer, nn.NLLLoss())
        # 累加总损失
        print_loss_total += loss
        plot_loss_total += loss

        if iter % print_every == 0:
            print_loss_avg = print_loss_total / print_every
            print_loss_total = 0
            print('%s (%d %d%%) %.4f' % (timeSince(start), iter, iter / n_iters * 100, print_loss_avg))

        if iter % plot_every == 0:
            plot_loss_avg = plot_loss_total / plot_every
            plot_losses.append(plot_loss_avg)
            plot_loss_total = 0

    # 绘制图像
    plt.figure()
    plt.plot(plot_losses)
    plt.show()
    # 保存图像
    plt.savefig('train_loss.png')
    # 保存模型
    torch.save(encoder, 'encoder.pkl')
    torch.save(decoder, 'decoder.pkl')
训练模型
def train_model():
    # 参数
    hidden_size = 256
    input_lang, output_lang, pairs = prepareData('eng', 'fra')
    encoder1 = EncoderRNN(input_lang.n_words, hidden_size).to(device)
    attn_decoder1 = AttnDecoderRNN(hidden_size, output_lang.n_words, dropout_p=0.1).to(device)

    # 设置迭代次数
    n_iters = 75000
    # 设置打印间隔
    print_every = 5000

    trainIters(encoder1, attn_decoder1, n_iters, input_lang, output_lang, pairs, print_every=print_every)
train_model()
6. 构建评估函数
这个没有什么好说的,已经不是重点了,一些细节代码中我也没有注释,直接复制即可
# 评估函数构建
def evaluate(encoder, decoder, sentence, input_lang, output_lang, max_length=MAX_LENGTH):
    '''
    :param encoder: 编码器
    :param decoder: 解码器
    :param sentence: 输入句子
    :param input_lang: 输入语言
    :param output_lang: 输出语言
    :param max_length: 句子最大长度
    '''
    with torch.no_grad():
        input_tensor = indexesFromSentence(input_lang, sentence)
        input_length = input_tensor.size()[0]
        encoder_hidden = encoder.initHidden()
        encoder_outputs = torch.zeros(max_length, encoder.hidden_size, device=device)

        for ei in range(input_length):
            encoder_output, encoder_hidden = encoder(input_tensor[ei], encoder_hidden)
            encoder_outputs[ei] = encoder_output[0, 0]

        decoder_input = torch.tensor([[SOS_token]], device=device)
        decoder_hidden = encoder_hidden
        decoded_words = []
        decoder_attentions = torch.zeros(max_length, max_length)

        for di in range(max_length):
            decoder_output, decoder_hidden, decoder_attention = decoder(decoder_input, decoder_hidden, encoder_outputs)
            decoder_attentions[di] = decoder_attention.data
            topv, topi = decoder_output.data.topk(1)
            if topi.item() == EOS_token:
                decoded_words.append('<EOS>')
                break
            else:
                decoded_words.append(output_lang.index2word[topi.item()])
            decoder_input = topi.squeeze().detach()
        return decoded_words, decoder_attentions[:di + 1]
调用评估函数,随机选一个句子来进行评估,输出格式如下
> 输入的源语言
= 正确的翻译
< 模型预测的翻译
# 随机选择一个句子进行评估
def evaluateRandomly(encoder, decoder, input_lang, output_lang, pairs, n=10):
    for i in range(n):
        pair = random.choice(pairs)
        print('>', pair[0])
        print('=', pair[1])
        output_words, attentions = evaluate(encoder, decoder, pair[0], input_lang, output_lang)
        output_sentence = ' '.join(output_words)
        print('<', output_sentence)
        print('')
调用评估函数,由于我的模型不在本机上训练的,我在云上训练完成把参数下载下来的,所以我直接读取文件了,你也可以修改一下test_evaluate()函数,把训练好的模型当作参数传入test_evaluate函数再去测试也行
# 带参数的评估函数
def test_evaluate():
    input_lang, output_lang, pairs = prepareData('eng', 'fra')
    pair = random.choice(pairs)
    encoder1 = torch.load('encoder.pkl', map_location=device)
    attn_decoder1 = torch.load('decoder.pkl', map_location=device)
    evaluateRandomly(encoder1, attn_decoder1, input_lang, output_lang, pairs)

test_evaluate()
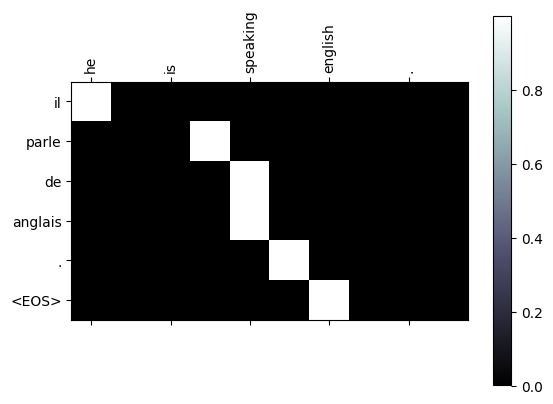
绘制attention图像,Attention图像的纵坐标代表输入的源语言各个词汇对应的索引,例如0-6分别对应[“we”,“re”,“both","teachers”,"","],纵坐标代表生成的目标语言各个词汇对应的索引,0-7代表['nous','sommes’, 'toutes', 'deux,'enseignantes,…,”],图中浅色小方块(颜色越浅说明影响越大)代表词汇之间的影响关系,比如源语言的第1个词汇对生成目标语言的第1个词汇影响最大,源语言的第4,5个词对生成目标语言的第5个词会影响最大,通过这样的可视化图像,我们可以知道Attention的效果好坏,与我们人为去判定到底还有多大的差距。进而衡量我们训练模型的可用性。
我训练的模型测试出的图像如下
import numpy as np
def showAttention(input_sentence, output_words, attentions):
    '''
    :param input_sentence: 输入句子
    :param output_words: 输出句子
    :param attentions: 注意力
    '''
    # 设置图像尺寸
    fig = plt.figure()
    ax = fig.add_subplot(111)
    cax = ax.matshow(attentions.numpy(), cmap='bone')
    fig.colorbar(cax)

    # 设置X轴刻度位置,假设input_sentence单词数量加上'<EOS>'一共是n个
    n = len(input_sentence.split(' ')) + 2  # 加2因为还有''和'<EOS>'
    x_ticks = np.arange(n)  # 创建一个从0到n-1的数组
    ax.set_xticks(x_ticks)  # 设置X轴刻度位置
    ax.set_xticklabels([''] + input_sentence.split(' ') + ['<EOS>'], rotation=90)  # 设置X轴刻度标签

    # 设置Y轴刻度位置,假设output_words的数量是m个
    m = len(output_words) + 1  # 加1因为还有''
    y_ticks = np.arange(m)  # 创建一个从0到m-1的数组
    ax.set_yticks(y_ticks)  # 设置Y轴刻度位置
    ax.set_yticklabels([''] + output_words)  # 设置Y轴刻度标签

    # 显示图像
    plt.show()

# 测试
def test_showAttention():
    input_lang, output_lang, pairs = prepareData('eng', 'fra')
    pair = random.choice(pairs)
    encoder1 = torch.load('model/encoder.pkl', map_location=device)
    attn_decoder1 = torch.load('model/decoder.pkl', map_location=device)
    output_words, attentions = evaluate(encoder1, attn_decoder1, pair[0], input_lang, output_lang)
    showAttention(pair[0], output_words, attentions)

test_showAttention()
代码纯享版
from io import open
import unicodedata
import re
import random
import torch
import torch.nn as nn
from torch import optim
import torch.nn.functional as F
import numpy as np

device = torch.device("cuda" if torch.cuda.is_available() else "cpu")
data_path = 'data/eng-fra.txt'


# 字符规范化
# 将unicode字符串转换为ascii码,主要是去掉法文的重音符号例如:é
def unicodeToAscii(s):
    return ''.join(
        c for c in unicodedata.normalize('NFD', s)
        if unicodedata.category(c) != 'Mn'
    )
def normalizeString(s):
    # 大写变小写,去掉前后空格,然后将字符串转换为ascii码
    s = unicodeToAscii(s.lower().strip())
    # 在标点符号前后添加空格
    s = re.sub(r"([.!?])", r" \1", s)
    # 字符串中除了字母和标点符号外,其他字符替换为空格
    s = re.sub(r"[^a-zA-Z.!?]+", r" ", s)
    return s

SOS_token = 0
EOS_token = 1

class Lang:
    def __init__(self, name):
        # 初始化函数中参数name代表某种语言的名字
        self.name = name
        self.word2index = {}
        self.index2word = {0: "SOS", 1: "EOS"}
        # 初始化词汇对应的自然数索引,从2开始,0、1已经被占用
        self.n_words = 2

    def addSentence(self, sentence):
        # 将句子中的词汇添加到词汇表中
        for word in sentence.split(' '):
            self.addWord(word)

    def addWord(self, word):
        # 将词汇添加到词汇表中
        if word not in self.word2index:
            self.word2index[word] = self.n_words
            self.index2word[self.n_words] = word
            self.n_words += 1

# 测试
# name = 'eng'
# input_lang = Lang(name)
# sentence = 'I love you.'
# input_lang.addSentence(sentence)
# print(input_lang.word2index)
# print(input_lang.index2word)

# 将持久化文件中的数据读取到内存中,并实例化Lang类
def readLangs(lang1, lang2):
    # 读取文件中的数据
    lines = open(data_path, encoding='utf-8').read().strip().split('\n')
    # 将每一行用'\t'分割,然后将两种语言的句子分别存储
    pairs = [[normalizeString(s) for s in l.split('\t')] for l in lines]
    # 实例化Lang类
    input_lang = Lang(lang1)
    output_lang = Lang(lang2)

    return input_lang, output_lang, pairs

# 过滤出符合要求的语言对
# 过滤条件:两种语言中的句子长度都小于max_length
MAX_LENGTH = 10

# 选择带有特定前缀的句子作为训练数据
eng_prefixes = (
    "i am ", "i m ",
    "he is", "he s ",
    "she is", "she s",
    "you are", "you re ",
    "we are", "we re ",
    "they are", "they re "
)

def filterPair(p):
    return len(p[0].split(' ')) < MAX_LENGTH and len(p[0].split(' ')) < MAX_LENGTH and p[0].startswith(eng_prefixes)
def filterPairs(pairs):
    return [pair for pair in pairs if filterPair(pair)]

# 测试filterPairs
# lang1 = 'eng'
# lang2 = 'fra'
# input_lang, output_lang, pairs = readLangs(lang1, lang2)
# print('Read %s sentence pairs' % len(pairs))
# pairs = filterPairs(pairs)
# print('Leave %s sentence pairs' % len(pairs))

# 整合上述函数,并使用Lang对language pair进行数值映射
def prepareData(lang1, lang2):
    input_lang, output_lang, pairs = readLangs(lang1, lang2)
    # 过滤数据
    pairs = filterPairs(pairs)
    for pair in pairs:
        input_lang.addSentence(pair[0])
        output_lang.addSentence(pair[1])
    return input_lang, output_lang, pairs

# 测试
def test_prepareData():
    lang1 = 'eng'
    lang2 = 'fra'
    input_lang, output_lang, pairs = prepareData(lang1, lang2)
    print("input_lang.n_words:", input_lang.n_words)
    print("output_lang.n_words:", output_lang.n_words)
    print(random.choice(pairs))

# 将语言转化为模型输入需要的张量
def indexesFromSentence(lang, sentence):
    indexes = [lang.word2index[word] for word in sentence.split(' ')]
    indexes.append(EOS_token)
    return torch.tensor(indexes, dtype=torch.long, device=device).view(-1, 1)

# 将语言转换为张量对,pair为一个语言对
def tensorFromPair(pair, input_lang, output_lang):
    input_tensor = indexesFromSentence(input_lang, pair[0])
    target_tensor = indexesFromSentence(output_lang, pair[1])
    return (input_tensor, target_tensor)

# 测试
def test_tensorFromPair():
    lang1, lang2 = 'eng', 'fra'
    input_lang, output_lang, pairs = prepareData(lang1, lang2)
    pair = random.choice(pairs)
    print(pair)
    input_tensor, target_tensor = tensorFromPair(pairs[0], input_lang, output_lang)
    print(input_tensor)
    print(target_tensor)
test_tensorFromPair()


# 构建基于GRU的编码器
class EncoderRNN(nn.Module):
    def __init__(self, input_size, hidden_size):
        """
        :param input_size: 源语言词汇表的大小
        :param hidden_size: 隐层节点数,要和词嵌入维度一致
        """
        super(EncoderRNN, self).__init__()
        self.hidden_size = hidden_size
        self.embedding = nn.Embedding(input_size, hidden_size)
        self.gru = nn.GRU(hidden_size, hidden_size)

    def forward(self, input, hidden):
        """
        :param input: 源语言embedding层输入张量
        :param hidden: 编码器层gru的初始隐层张量
        """
        # 将输入张量进行embedding操作,使其形状变为(1,1,hidden_size)
        # 理论上我们的编码器每次只以一个词作为输入,因此词汇映射后尺寸应该是(1, embedding_dim)
        output = self.embedding(input).view(1, 1, -1)
        output, hidden = self.gru(output, hidden)
        return output, hidden

    def initHidden(self):
        return torch.zeros(1, 1, self.hidden_size, device=device)

# 测试
def test_EncoderRNN():
    input_lang, output_lang, pairs = prepareData('eng', 'fra')
    pair = random.choice(pairs)
    input_tensor, target_tensor = tensorFromPair(pair, input_lang, output_lang)
    encoder = EncoderRNN(input_lang.n_words, 256)
    hidden = encoder.initHidden()
    output, hidden = encoder(input_tensor[0], hidden)
    print(output.size(), hidden.size())
# test_EncoderRNN()

# 构建基于GRU的解码器
class DecoderRNN(nn.Module):
    def __init__(self, hidden_size, output_size):
        '''
        解码器初始化函数
        :param hidden_size: 代表解码器中GRU的输入尺寸,也就是其隐藏节点数
        :param output_size: 整个解码器的输出尺寸,也是我们希望得到的指定尺寸,即目标语言的词汇表大小
        '''
        super(DecoderRNN, self).__init__()
        self.hidden_size = hidden_size
        self.embedding = nn.Embedding(output_size, hidden_size)
        self.gru = nn.GRU(hidden_size, hidden_size)
        self.out = nn.Linear(hidden_size, output_size)
        self.softmax = nn.LogSoftmax(dim=1)

    def forward(self, input, hidden):
        '''
        :param input: 解码器的输入张量
        :param hidden: 解码器的隐层张量
        '''
        # GRU只接受三维张量作为输入,因此这里需要对输入张量进行view操作
        output = self.embedding(input).view(1, 1, -1)
        # 使用ReLU激活函数使Embedding矩阵更加稀疏,防止过拟合
        output = F.relu(output)
        # 将output张量和隐层张量传入GRU中
        output, hidden = self.gru(output, hidden)
        # 将GRU的输出结果传入全连接层,output是三维张量,第一维是没有意义的,因此我们使用output[0]来降维
        output = self.softmax(self.out(output[0]))
        return output, hidden

    def initHidden(self):
        return torch.zeros(1, 1, self.hidden_size, device=device)

# 测试
def test_DecoderRNN():
    input_lang, output_lang, pairs = prepareData('eng', 'fra')
    pair = random.choice(pairs)
    input_tensor, target_tensor = tensorFromPair(pair, input_lang, output_lang)
    encoder = EncoderRNN(input_lang.n_words, 256)
    decoder = DecoderRNN(256, output_lang.n_words)
    hidden = encoder.initHidden()
    encoder_output, encoder_hidden = encoder(input_tensor[0], hidden)
    decoder_input = torch.tensor([[SOS_token]], device=device)
    decoder_hidden = encoder_hidden
    decoder_output, decoder_hidden = decoder(decoder_input, decoder_hidden)
    print(decoder_output.size(), decoder_hidden.size())

# test_DecoderRNN()

# 基于GRU和注意力机制的解码器
class AttnDecoderRNN(nn.Module):
    def __init__(self, hidden_size, output_size, dropout_p=0.1, max_length=MAX_LENGTH):
        '''
        :param hidden_size: 解码器GRU的输入尺寸,也是其隐藏节点数
        :param output_size: 整个解码器的输出尺寸,也是我们希望得到的指定尺寸,即目标语言的词汇表大小
        :param dropout_p: dropout概率
        :param max_length: 句子的最大长度
        '''
        super(AttnDecoderRNN, self).__init__()
        self.hidden_size = hidden_size
        self.output_size = output_size
        self.dropout_p = dropout_p
        self.max_length = max_length
        self.embedding = nn.Embedding(self.output_size, self.hidden_size)

        self.attn = nn.Linear(self.hidden_size * 2, self.max_length)
        # 实例化另外一个线性层,用于规范输出尺寸
        self.attn_combine = nn.Linear(self.hidden_size * 2, self.hidden_size)
        self.dropout = nn.Dropout(self.dropout_p)
        self.gru = nn.GRU(self.hidden_size, self.hidden_size)
        self.out = nn.Linear(self.hidden_size, self.output_size)

    def forward(self, input, hidden, encoder_outputs):
        '''
        :param input: 源数据的输入张量
        :param hidden: 初始的隐层张量
        :param encoder_outputs: 解码器的输出张量
        '''
        # 将输入张量进行embedding操作,使其形状变为(1,1,hidden_size)
        embedded = self.embedding(input).view(1, 1, -1)
        embedded = self.dropout(embedded)

        # attention权重计算
        attn_weights = F.softmax(self.attn(torch.cat((embedded[0], hidden[0]), 1)), dim=1)
        # 将attention权重与encoder_outputs做矩阵乘法
        attn_applied = torch.bmm(attn_weights.unsqueeze(0), encoder_outputs.unsqueeze(0))
        # 将embedded降维,拼接
        output = torch.cat((embedded[0], attn_applied[0]), 1)
        output = self.attn_combine(output).unsqueeze(0)
        output = F.relu(output)
        output, hidden = self.gru(output, hidden)
        output = F.log_softmax(self.out(output[0]), dim=1)
        return output, hidden, attn_weights

    def initHidden(self):
        return torch.zeros(1, 1, self.hidden_size, device=device)

# 测试
def test_AttnDecoderRNN():
    input_lang, output_lang, pairs = prepareData('eng', 'fra')
    pair_tensor = tensorFromPair(pairs[0], input_lang, output_lang)
    hidden_size = 25
    output_size = 10
    input1 = pair_tensor[1][0]
    hidden = torch.zeros(1, 1, hidden_size, device=device)
    encoder_output = torch.randn(10, 25)

    decoder_attn = AttnDecoderRNN(hidden_size, output_size)
    output, hidden, attn_weights = decoder_attn(input1, hidden, encoder_output)
    print(output.size(), hidden.size(), attn_weights.size())

# test_AttnDecoderRNN()


# 模型训练函数
teacher_forcing_ratio = 0.5
def train(input_tensor, target_tensor, encoder, decoder, encoder_optimizer, decoder_optimizer, criterion, max_length=MAX_LENGTH):
    '''
    :param input_tensor: 输入张量
    :param target_tensor: 目标张量
    :param encoder: 编码器
    :param decoder: 解码器
    :param encoder_optimizer: 编码器优化器
    :param decoder_optimizer: 解码器优化器
    :param criterion: 损失函数
    :param max_length: 句子最大长度
    '''
    encoder_hidden = encoder.initHidden()
    # 梯度清零
    encoder_optimizer.zero_grad()
    decoder_optimizer.zero_grad()
    # 获取输入张量的长度
    input_length = input_tensor.size(0)
    target_length = target_tensor.size(0)
    # 初始化encoder_outputs
    encoder_outputs = torch.zeros(max_length, encoder.hidden_size, device=device)
    loss = 0
    # 将input_tensor输入encoder中
    for ei in range(input_length):
        # 根据索引取出input_tensor中的每个词,和初始化的隐层张量一同输入encoder
        encoder_output, encoder_hidden = encoder(input_tensor[ei], encoder_hidden)
        # 每次得到的encoder_output是一个三维张量,我们只需要第一维,因此使用[0, 0]来降维
        encoder_outputs[ei] = encoder_output[0, 0]

    # 初始化decoder的输入张量,即SOS_token
    decoder_input = torch.tensor([[SOS_token]], device=device)
    # decoder的初始隐层张量是encoder的最终隐层张量
    decoder_hidden = encoder_hidden
    # 是否使用teacher_forcing
    use_teacher_forcing = True if random.random() < teacher_forcing_ratio else False

    if use_teacher_forcing:
        # 使用teacher_forcing
        for di in range(target_length):
            '''
            decoder_input: Q
            decoder_hidden: K
            encoder_outputs: V
            '''
            decoder_output, decoder_hidden, decoder_attention = decoder(decoder_input, decoder_hidden, encoder_outputs)
            # 因为使用了teacher_forcing,因此无论解码器输出的decoder_output是什么,我们都将其与target_tensor[di]进行损失函数计算
            loss += criterion(decoder_output, target_tensor[di])
            # 将解码器的下一个输入设置为正确答案
            decoder_input = target_tensor[di]

    else:
        # 不使用teacher_forcing
        for di in range(target_length):
            decoder_output, decoder_hidden, decoder_attention = decoder(decoder_input, decoder_hidden, encoder_outputs)
            # 取出解码器输出的概率最大的词
            topv, topi = decoder_output.topk(1)
            decoder_input = topi.squeeze().detach()
            loss += criterion(decoder_output, target_tensor[di])
            if decoder_input.item() == EOS_token:
                break

    loss.backward()
    encoder_optimizer.step()
    decoder_optimizer.step()

    # 返回平均损失
    return loss.item() / target_length

# 构建时间计算函数
import time
import math
def timeSince(since):
    '''
    :param since: 开始时间
    '''
    now = time.time()
    s = now - since
    m = math.floor(s / 60)
    s -= m * 60
    return '%dm %ds' % (m, s)

# 调用训练函数并打印日志和制图
import matplotlib.pyplot as plt
def trainIters(encoder, decoder, n_iters, input_lang, output_lang, pairs, print_every=1000, plot_every=100, learning_rate=0.01):
    '''
    :param encoder: 编码器
    :param decoder: 解码器
    :param n_iters: 迭代次数
    :param input_lang: 输入语言
    :param output_lang: 输出语言
    :param pairs: 语言对
    :param print_every: 每隔多少次迭代打印日志
    :param plot_every: 每隔多少次迭代绘制图像
    :param learning_rate: 学习率
    '''
    start = time.time()
    plot_losses = []
    # 每个打印日志间隔总损失,初始为0
    print_loss_total = 0
    # 每个绘图间隔总损失,初始为0
    plot_loss_total = 0
    # 初始化优化器
    encoder_optimizer = optim.SGD(encoder.parameters(), lr=learning_rate)
    decoder_optimizer = optim.SGD(decoder.parameters(), lr=learning_rate)

    # 根据设置迭代步进行循环
    for iter in range(1, n_iters + 1):
        # 随机选择一个句子对
        training_pair = tensorFromPair(random.choice(pairs), input_lang, output_lang)
        input_tensor = training_pair[0]
        target_tensor = training_pair[1]
        # 调用训练函数
        loss = train(input_tensor, target_tensor, encoder, decoder, encoder_optimizer, decoder_optimizer, nn.NLLLoss())
        # 累加总损失
        print_loss_total += loss
        plot_loss_total += loss

        if iter % print_every == 0:
            print_loss_avg = print_loss_total / print_every
            print_loss_total = 0
            print('%s (%d %d%%) %.4f' % (timeSince(start), iter, iter / n_iters * 100, print_loss_avg))

        if iter % plot_every == 0:
            plot_loss_avg = plot_loss_total / plot_every
            plot_losses.append(plot_loss_avg)
            plot_loss_total = 0

    # 绘制图像
    plt.figure()
    plt.plot(plot_losses)
    plt.show()
    # 保存图像
    plt.savefig('train_loss.png')
    # 保存模型
    torch.save(encoder, 'model/encoder.pkl')
    torch.save(decoder, 'model/decoder.pkl')


def train_model():
    # 参数
    hidden_size = 256
    input_lang, output_lang, pairs = prepareData('eng', 'fra')
    encoder1 = EncoderRNN(input_lang.n_words, hidden_size).to(device)
    attn_decoder1 = AttnDecoderRNN(hidden_size, output_lang.n_words, dropout_p=0.1).to(device)

    # 设置迭代次数
    n_iters = 10000
    # 设置打印间隔
    print_every = 5000

    trainIters(encoder1, attn_decoder1, n_iters, input_lang, output_lang, pairs, print_every=print_every)
# train_model()

# 评估函数构建
def evaluate(encoder, decoder, sentence, input_lang, output_lang, max_length=MAX_LENGTH):
    '''
    :param encoder: 编码器
    :param decoder: 解码器
    :param sentence: 输入句子
    :param input_lang: 输入语言
    :param output_lang: 输出语言
    :param max_length: 句子最大长度
    '''
    with torch.no_grad():
        input_tensor = indexesFromSentence(input_lang, sentence)
        input_length = input_tensor.size()[0]
        encoder_hidden = encoder.initHidden()
        encoder_outputs = torch.zeros(max_length, encoder.hidden_size, device=device)

        for ei in range(input_length):
            encoder_output, encoder_hidden = encoder(input_tensor[ei], encoder_hidden)
            encoder_outputs[ei] = encoder_output[0, 0]

        decoder_input = torch.tensor([[SOS_token]], device=device)
        decoder_hidden = encoder_hidden
        decoded_words = []
        decoder_attentions = torch.zeros(max_length, max_length)

        for di in range(max_length):
            decoder_output, decoder_hidden, decoder_attention = decoder(decoder_input, decoder_hidden, encoder_outputs)
            decoder_attentions[di] = decoder_attention.data
            topv, topi = decoder_output.data.topk(1)
            if topi.item() == EOS_token:
                decoded_words.append('<EOS>')
                break
            else:
                decoded_words.append(output_lang.index2word[topi.item()])
            decoder_input = topi.squeeze().detach()
        return decoded_words, decoder_attentions[:di + 1]


# 随机选择一个句子进行评估
def evaluateRandomly(encoder, decoder, input_lang, output_lang, pairs, n=10):
    for i in range(n):
        pair = random.choice(pairs)
        print('>', pair[0])
        print('=', pair[1])
        output_words, attentions = evaluate(encoder, decoder, pair[0], input_lang, output_lang)
        output_sentence = ' '.join(output_words)
        print('<', output_sentence)
        print('')

# Attention 制图
def showAttention(input_sentence, output_words, attentions):
    '''
    :param input_sentence: 输入句子
    :param output_words: 输出句子
    :param attentions: 注意力
    '''
    # 设置图像尺寸
    fig = plt.figure()
    ax = fig.add_subplot(111)
    cax = ax.matshow(attentions.numpy(), cmap='bone')
    fig.colorbar(cax)

    # 设置X轴刻度位置,假设input_sentence单词数量加上'<EOS>'一共是n个
    n = len(input_sentence.split(' ')) + 2  # 加2因为还有''和'<EOS>'
    x_ticks = np.arange(n)  # 创建一个从0到n-1的数组
    ax.set_xticks(x_ticks)  # 设置X轴刻度位置
    ax.set_xticklabels([''] + input_sentence.split(' ') + ['<EOS>'], rotation=90)  # 设置X轴刻度标签

    # 设置Y轴刻度位置,假设output_words的数量是m个
    m = len(output_words) + 1  # 加1因为还有''
    y_ticks = np.arange(m)  # 创建一个从0到m-1的数组
    ax.set_yticks(y_ticks)  # 设置Y轴刻度位置
    ax.set_yticklabels([''] + output_words)  # 设置Y轴刻度标签

    # 显示图像
    plt.show()
    # plt.savefig('attention.png')


# 测试
def test_showAttention():
    input_lang, output_lang, pairs = prepareData('eng', 'fra')
    pair = random.choice(pairs)
    encoder1 = torch.load('model/encoder.pkl', map_location=device)
    attn_decoder1 = torch.load('model/decoder.pkl', map_location=device)
    output_words, attentions = evaluate(encoder1, attn_decoder1, pair[0], input_lang, output_lang)
    showAttention(pair[0], output_words, attentions)

test_showAttention()


# 带参数的评估函数
def test_evaluate():
    input_lang, output_lang, pairs = prepareData('eng', 'fra')
    pair = random.choice(pairs)
    encoder1 = torch.load('model/encoder.pkl', map_location=device)
    attn_decoder1 = torch.load('model/decoder.pkl', map_location=device)
    evaluateRandomly(encoder1, attn_decoder1, input_lang, output_lang, pairs)

test_evaluate()