深度学习入门笔记
python基础知识
numpy库
import numpy as np
-
numpy数组(numpy.ndarray):
np.array(list) -
np数组算术运算需元素个数相同,否则报错。
-
np数组间的算术运算为
element-wise,即对应元素的运算。 -
np数组与单一数值(标量)的运算为广播,即标量自动补全与数组各元素计算。
-
numpy可以生成多维数组,
.shape可获得数组形状,.dtype可获得元素的数据类型。 -
一维数组为向量,二维数组为矩阵,三维及以上的数组为张量(多维数组)。
-
广播可以将不同形状的数组进行运算,可将小数组自动拓展后进行运算。
>>> A = np.array([1, 2], [3, 4])
>>> B = np.array([10, 20])

>>> A * B
'''
输出:
array([[ 10, 40],
       [ 30, 80]])
'''
广播条件:从右到左比较维度,维度相等或其中一个为1
举例:(100,10)(100,) 不可以计算,因为一个最右边维度是10,而另一个是100 -
numpy访问元素方式同普通二维甚至多维列表,也可用通过迭代访问。
>>> X = np.array([51, 55], [14, 19], [0, 4]) >>> x[0] # 输出:array([51, 55]) >>> x[0][1] # 输出:55 -
numpy库特有
.flatten()可将np数组转换为一维数组。 -
numpy可使用数组访问各个元素,其中作为索引的数组既可以是numpy数组也可以是普通列表。
>>> X = X.flatten() >>> X[np.array(0, 2, 4)] # 输出:array([51, 14, 0]) -
对numpy数组使用不等号运算符,结果会获得一个布尔型数组。
>>> X > 15 # 输出:array([ True, True, False, True, False, False], dtype=bool) >>> X[X > 15] # 输出:array([51, 55, 19]) -
在python中,运算量大的处理对象一般使用C或C++实现,python知只是负责调用,numpy库就是一个很好的例子。
matplotlib库
import matplotlib.pyplot as plt
import matplotlib.image import imread
-
基础演示:
-
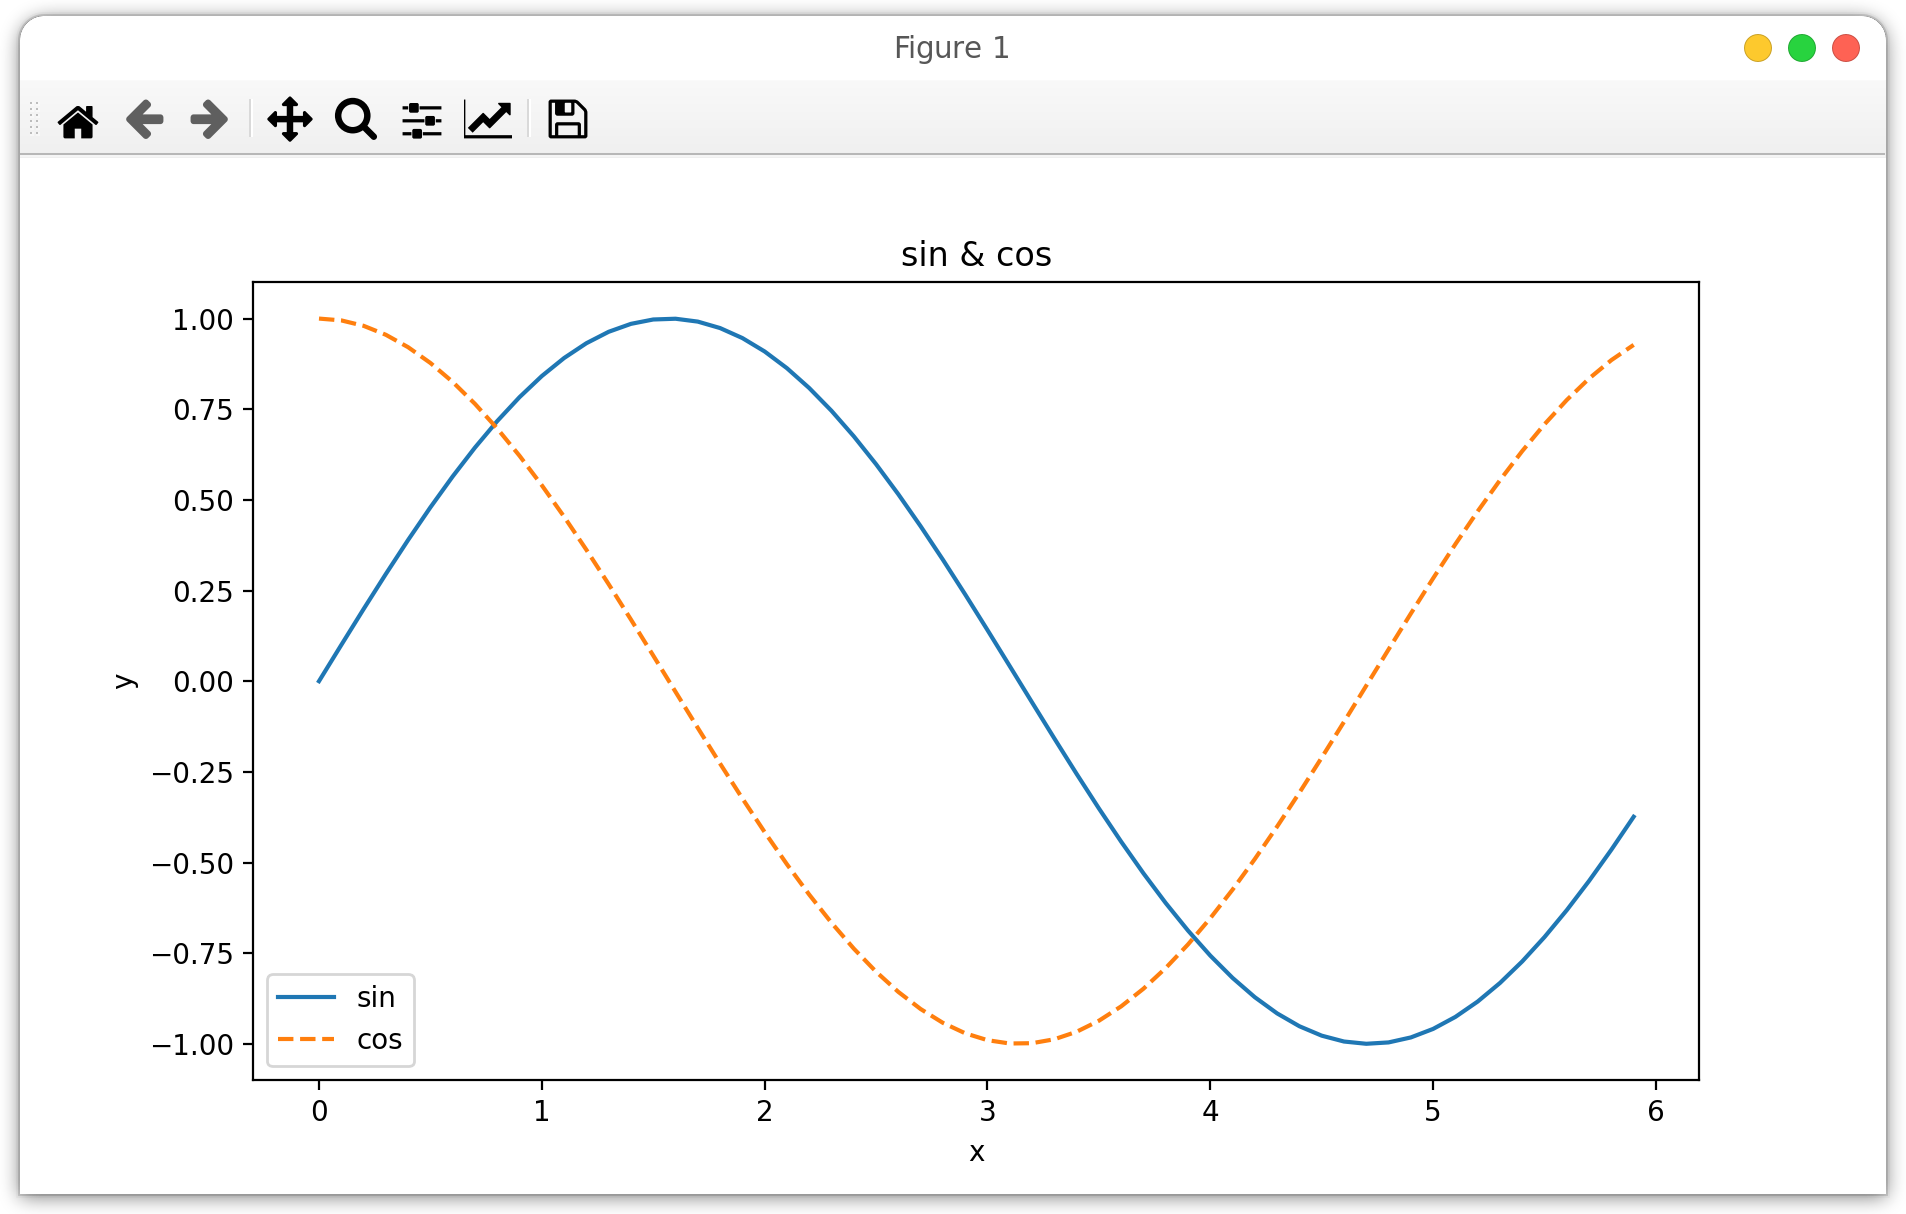
基础演示1
import numpy as np
import matplotlib.pyplot as plt

x = np.arange(0, 6, 0.1)  # x轴点
y1 = np.sin(x)  # y轴y1图像点
y2 = np.cos(x)

plt.plot(x, y1, label="sin")  # label为标签名
plt.plot(x, y2, linestyle="--",label="cos")  # linestyle为图形的描绘方式,"--"为虚线描绘
plt.xlabel("x")  # x轴标签
plt.ylabel("y")
plt.title("sin & cos")  # 标题
plt.legend()  # 显示图例
plt.show()  # 显示内容
运行结果:
-
基础演示2
import matplotlib.pyplot as plt
from matplotlib.image import imread

img = imread('lean.jpeg')  # 读入图像,imread(路径)
plt.imshow(img)  # 描绘内容,但不显示
plt.show()  # 显示内容
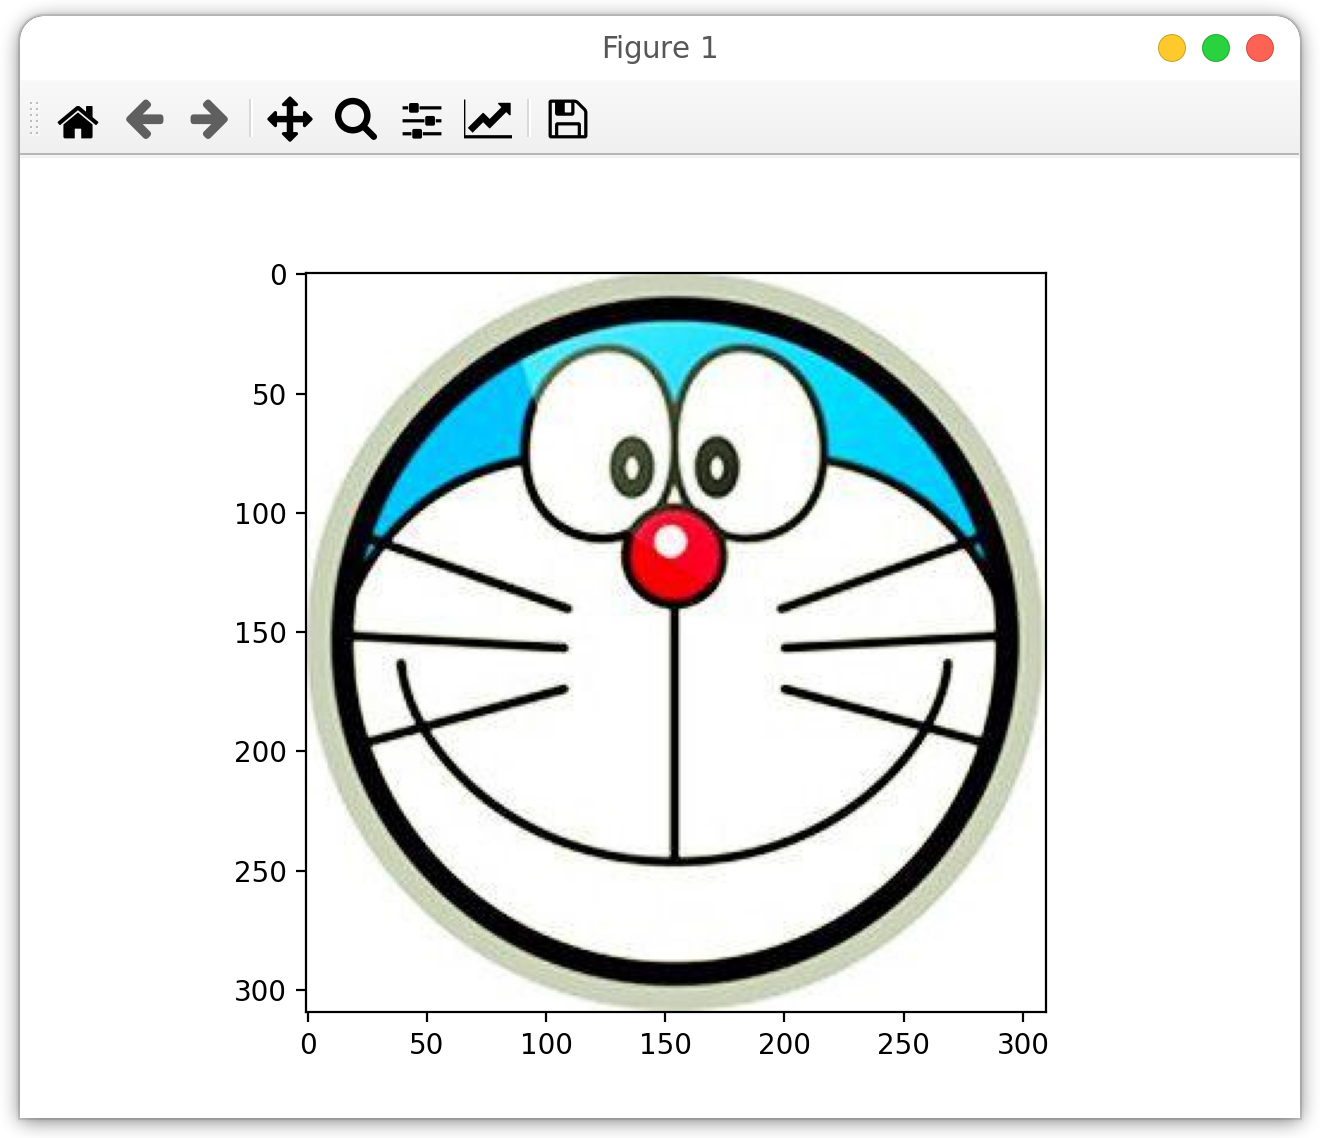
运行结果:
-
-
imshow是一个用于在Matplotlib的坐标轴上显示图像的函数。它主要用于显示二维数组,如灰度图像或彩色图像。这个函数会将二维数组中的数据映射到颜色上,以可视化数据。 -
show函数则是用于显示整个图形或图像窗口。
感知机
基础概念
-
感知机接受多个信号输出一个信号。
-
通过判断输入
多个信号*各自权重ω之和 是否大于阈值θ来判断是否激活神经元或输出信号1。 -
感知机权重类电流中的电阻,感知机权重越大,通过的信号越大。
简单逻辑电路
-
AND门(与门)
输入A 输入B 输出 0 0 0 0 1 0 1 0 0 1 1 1 -
OR门(或门)
输入A 输入B 输出 0 0 0 0 1 1 1 0 1 1 1 1 -
NOT门(非门)
输入 输出 0 1 1 0 -
Not AND门(与非门)
输入A 输入B 输出 0 0 1 0 1 1 1 0 1 1 1 0 -
感知机表示门,
(ω1,ω2,θ)的值即类似于逻辑门中的输入权重与阈值,而输入信号则类似于逻辑门中的输入值。 -
感知机表示门,把与门的参数值符号
(ω1,ω2,θ)取反即可实现与非门(-ω1,-ω2,-θ)。 -
机器学习是将由人决定参数的工作交由计算机自动进行,学习是确定合适参数的过程,人做的则是思考感知机的构造。
-
实现不同门的感知机构造相同,参数不同,所以只需适当调整参数就可以实现不同的门。
感知机的实现
-
AND实现
def AND(x1, x2): w1, w2, theta = 0.5, 0.5, 0.7 tmp = w1*x1 + w2*x2 if tmp <= theta: return 0 elif tmp > theta: return 1 print(AND(1, 1)) # 输出:1 -
将阈值转换为偏置(类似于函数中的b),即可简化比较,只需与0比较。
-
输入信号和权重的乘积加上偏置与0比较,若大于0则输出1,否则输出0。
-
感知机偏置代替阈值的实现,把
-θ看作b。def AND(x1, x2): x = np.array([x1, x2]) w = np.array([0.5, 0.5]) b = -0.7 tmp = np.sum(x*w)+b if tmp >= 0: return 1 else: return 0 -
偏置的权重的作用不同。权重控制输入信号,偏置决定神经元被激活的容易程度。
-
与非门和或门。
- 与非门
def NAND(x1, x2): x = np.array([x1, x2]) w = np.array([0.5, 0.5]) b = 0.7 # 仅权重和偏置与AND不同 tmp = np.sum(x*w)+b if tmp >= 0: return 1 else: return 0- 或门
def OR(x1, x2):
    x = np.array([x1, x2])
    w = np.array([0.5, 0.5])
    b = -0.2  # 仅权重和偏置与AND不同
    tmp = np.sum(x*w)+b
    if tmp >= 0:
        return 1
    else:
        return 0
感知机的的局限
-
异或门(XOR) 或称 逻辑异或 无法用感知机实现。
输入A 输入B 输出 0 0 0 0 1 1 1 0 1 1 1 0 -
异或是拒绝其他的意思。
-
与门、或门、与非门都是线性空间可实现的,而感知机的作用是表示由一条直线分割的空间(线性空间),所以可以用感知机实现。
-
感知机的函数是线性函数,只可实现线性空间,而异或门是非线性空间才能实现的。
-
异或门可以用多层感知机实现。
多层感知机
-
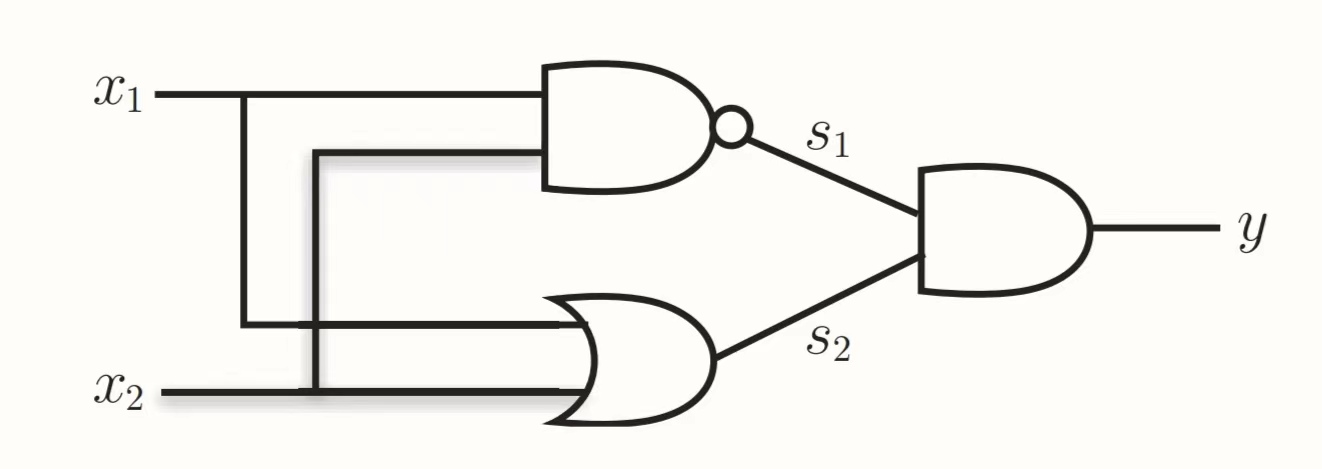
异或门实现图与真值表。
-
异或门实现图:
-
真值表:
x1 x2 s1 s2 y 0 0 1 0 0 0 1 1 1 1 1 0 1 1 1 1 1 0 1 0 -
-
异或门实现。
def XOR(x1, x2): s1 = NAND(x1, x2) s2 = OR(x1, x2) y = AND(s1, s2) return y -
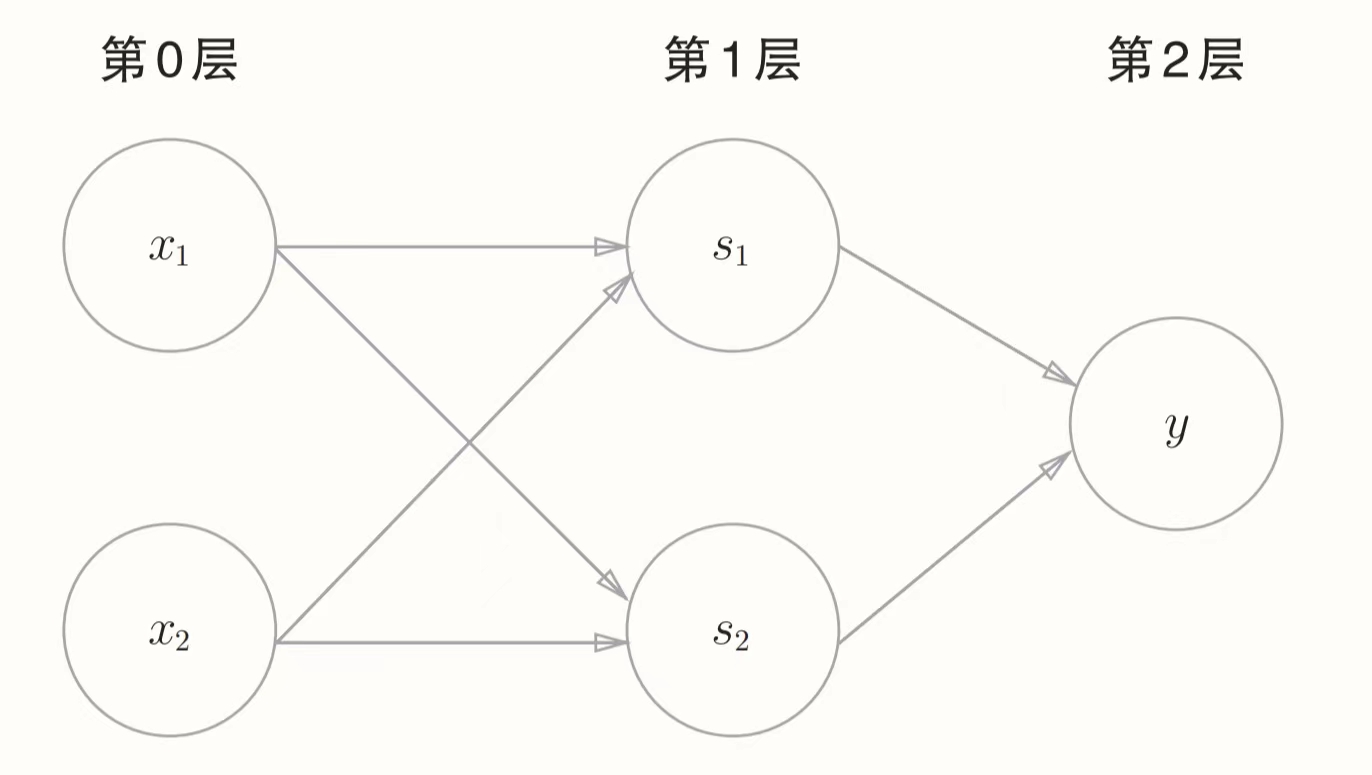
异或门是一种多层结构的神经网络。
-
用感知机表示异或门。
-
图中感知机由三层组成,但只有两层权重,所以称为二层感知机,但有些文献称为三层感知机。
-
-
与门、或门是单层感知机,异或门是2层感知机,叠加了多层的感知机叫多层感知机。
-
0层的神经元接收输入信号发送给1层神经元,1层神经元再将信号发送给二层神经元,二层神经元输出y。
-
通过叠加层,感知机能更加灵活。
-
多层感知机可以实现复杂线路,加法器也可以用多层感知机实现,感知机甚至可以表示计算机。
-
二层感知机(激活函数使用了非线性的sigmoid函数感知机)可以表示任意函数。
-
感知机将权重和偏置设定为参数。
神经网络
感知机与神经网络
-
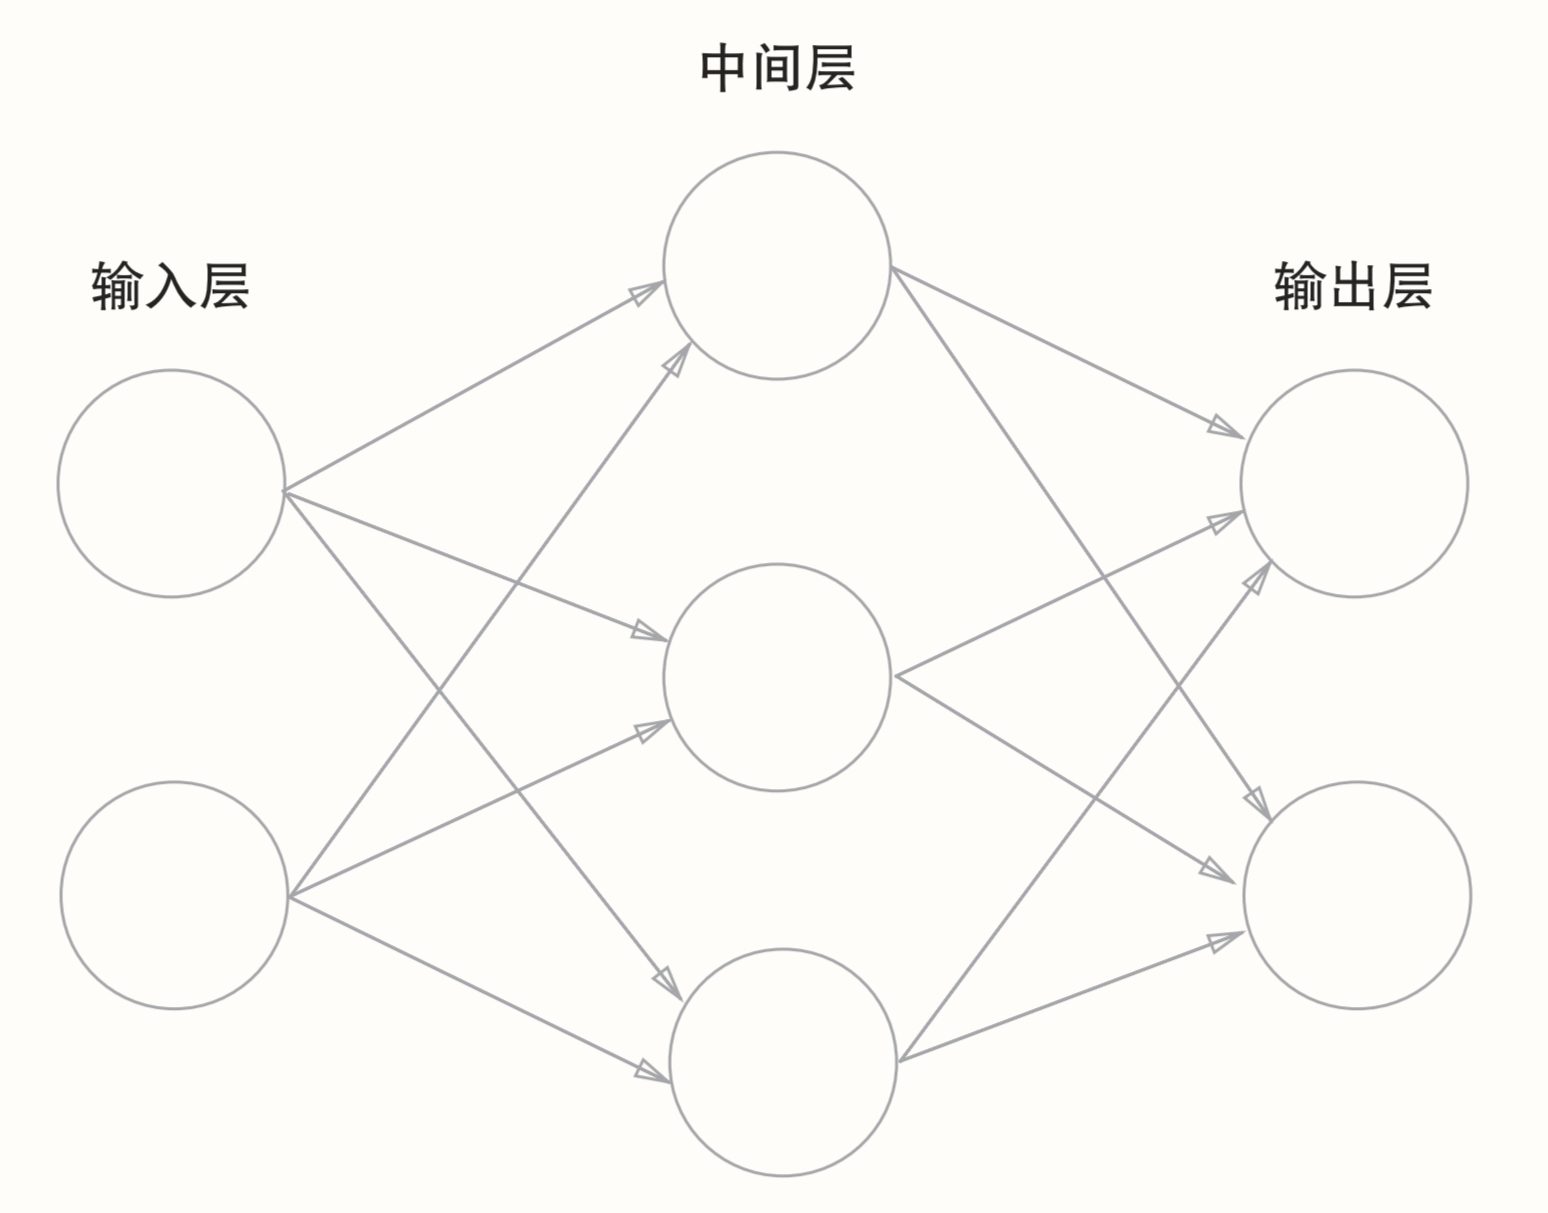
神经网络有三层,从左到右依次是输入层、中间层(亦称隐藏层)、输出层。
-
示意图
-
图中虽然由三层神经元构成,但实质只有两层神经元有权重,所以称作两层网络。有的书按层数算,称作三层网络。
-
-
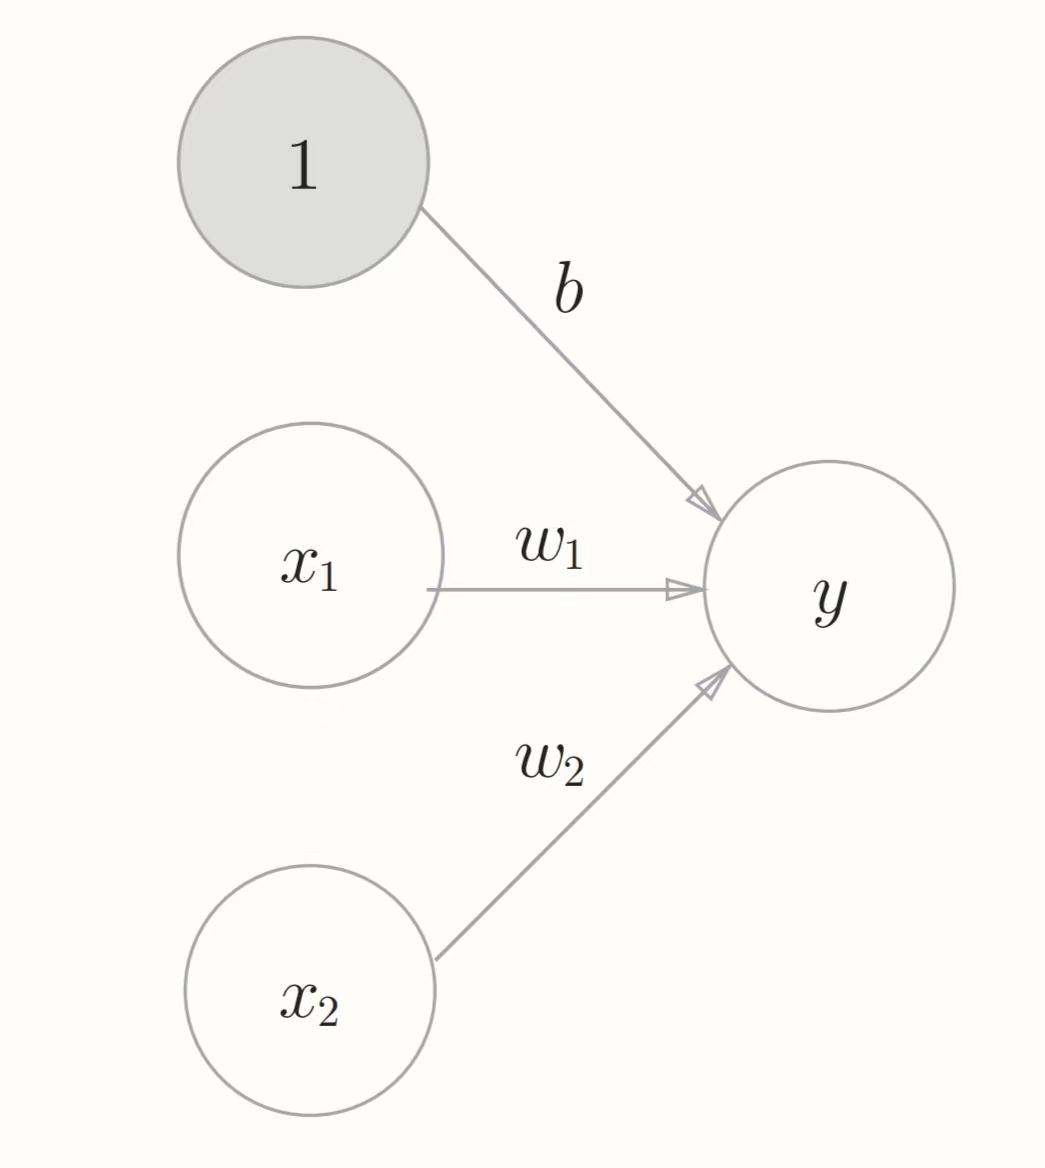
可将偏置b看作输入信号恒为1且权重为b的神经元。
-
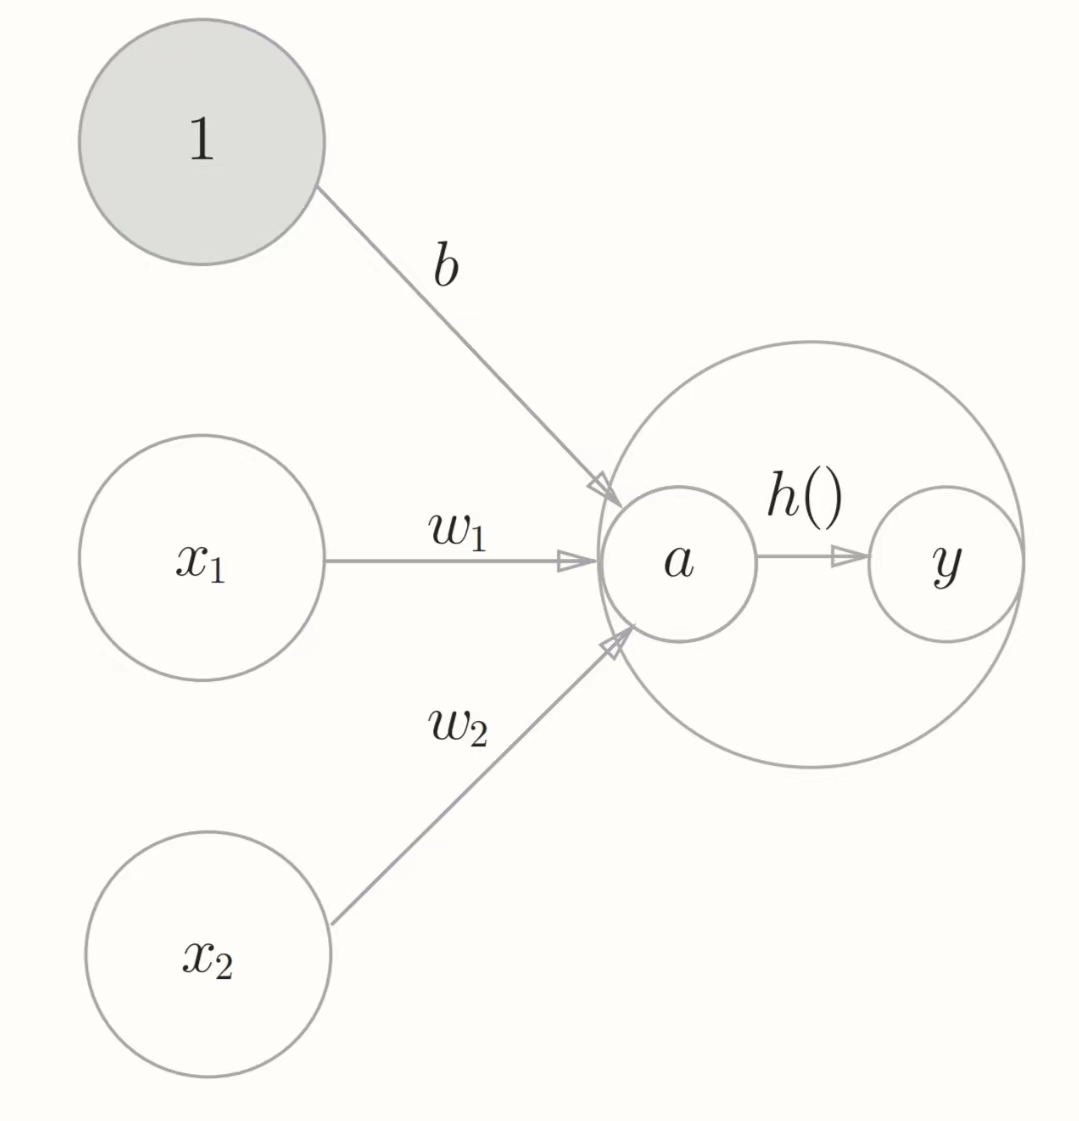
将输入信号的总和转换为输出信号的函数称为激活函数。
例如:
$h\left( x \right)= \left{
\begin{array}{}
0 & \left(x \leq 1\right)\
1 & \left(x > 0\right) \
\end{array} \right.$在输入超过0时返回1,否则返回0。
-
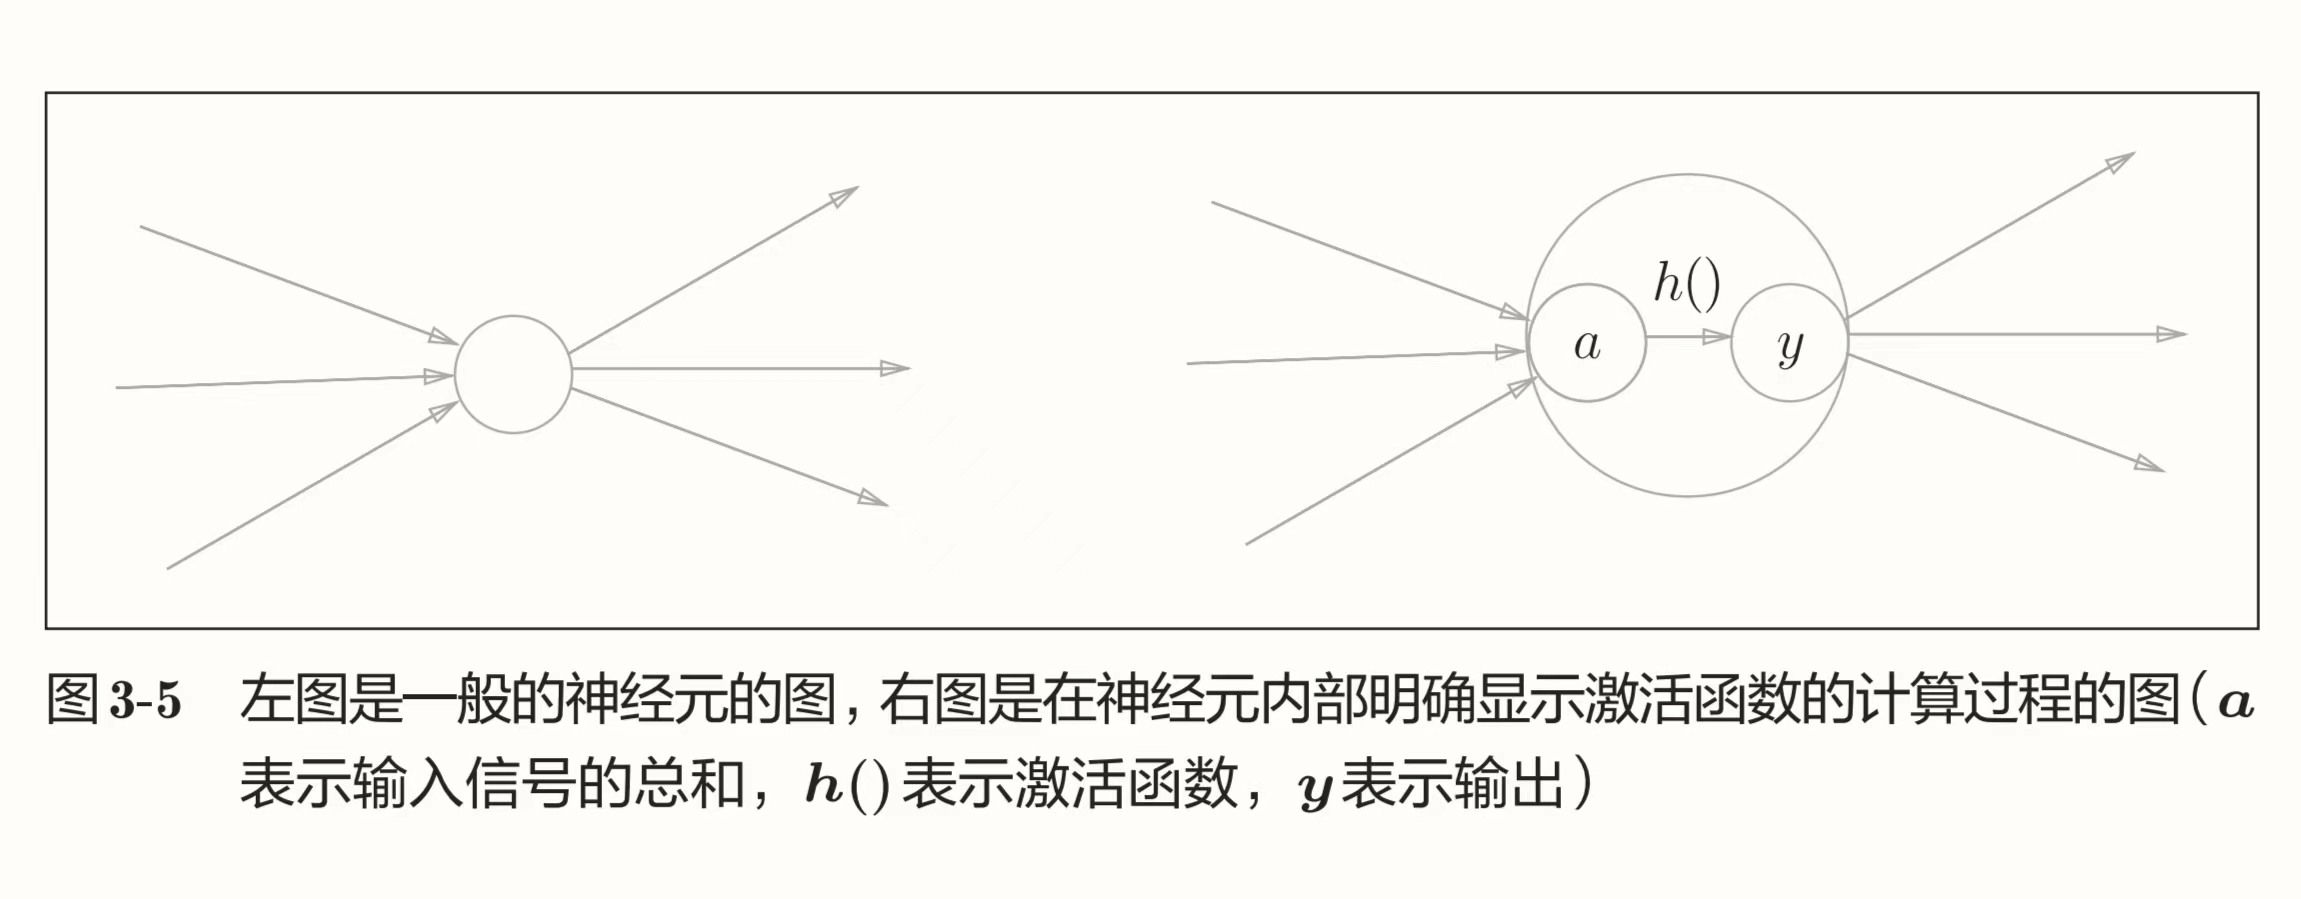
信号加权总节点(神经元)与被激活函数转换为节点(神经元)y的整体是一个神经元。
-
激活函数是连接感知机和神经网络的桥梁。
-
“朴素感知机”是指单层网络,是指激活函数使用了阶跃函数的模型,“多层感知机”是指神经网络,是激活函数使用了sigmoid函数等平滑函数的多层网络。
激活函数
阶跃函数与传统常用激活函数:sigmoid函数
-
神经网络常用激活函数:sigmoid函数。
$h\left(x\right)= \cfrac{1} {1+\exp(-x)}$
exp(-x) 即代表 $e^{-x}$.
-
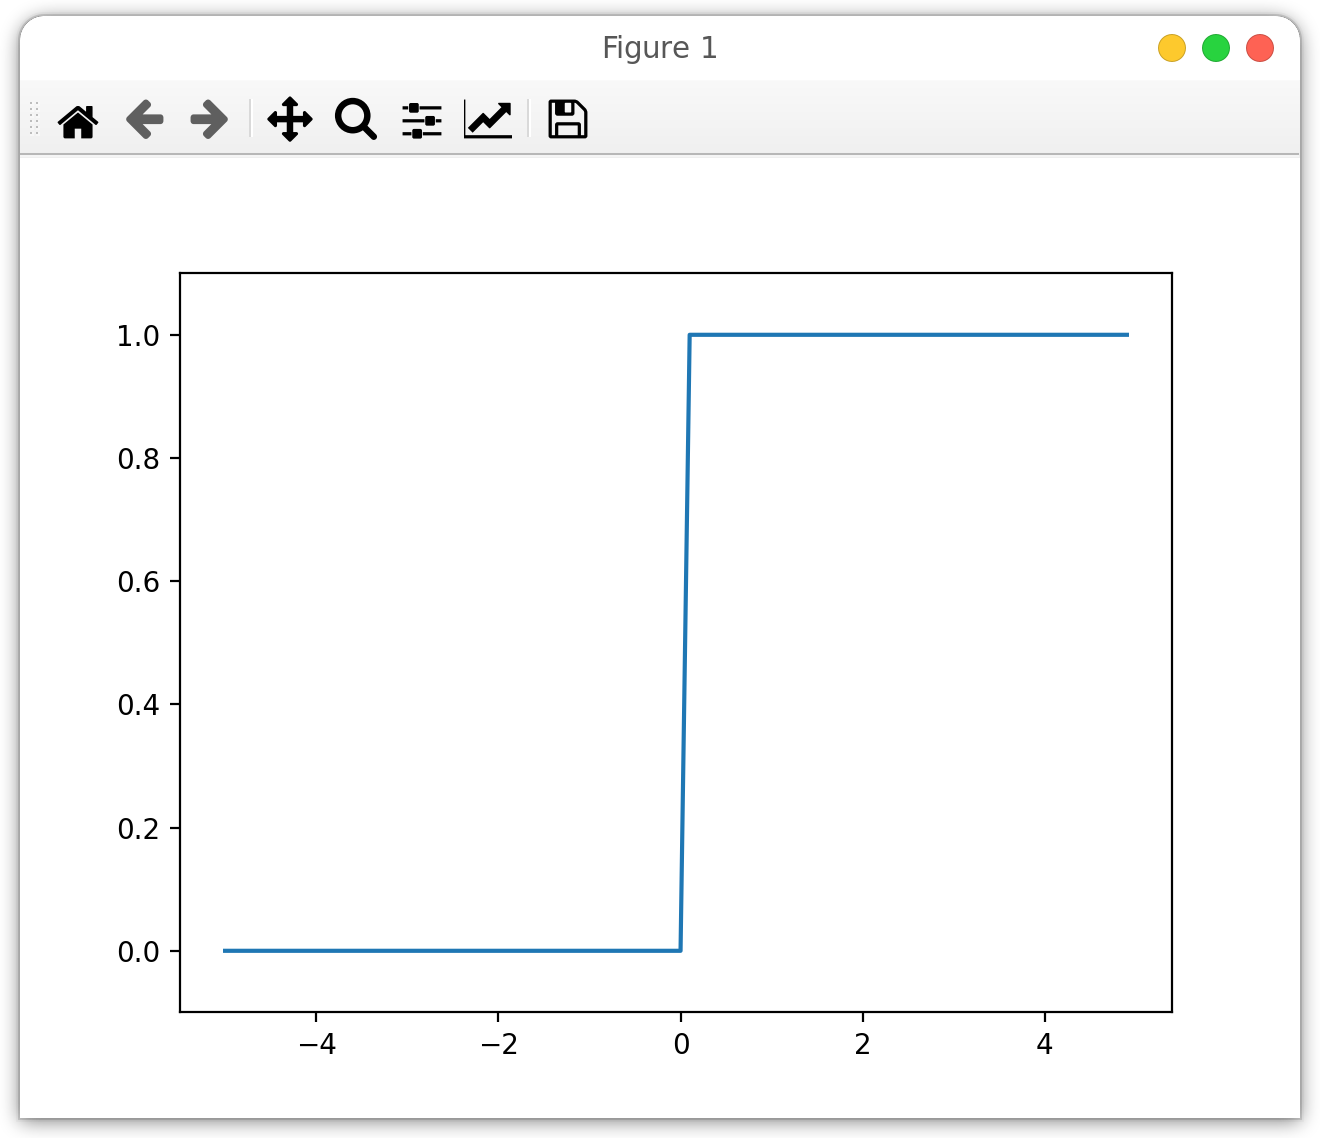
阶跃函数的实现。
# 基础实现 def step_function(x): if x > 0: return 1 else: return 0 # 实现对nupmy的支持 def step_function(x): y = x > 0 return y.astype(np.int64) ''' y = x > 0 实现先把np数组x与0比较使得x的数组元素变为bool类型,然后将其赋给y y.astype(np.int) 实现把bool型数组转化为int型 ''' # astype()方法通过参数指定转化期望类型。 -
制作阶跃函数图形。
-
阶跃函数
def step_function(x): return np.array(x > 0, dtype=np.int64) -
制图代码段:
import numpy as np import matplotlib.pylab as plt def step_function(x): return np.array(x > 0, dtype=np.int64) # np.int不推荐使用(新版本numpy库使用会报错),在新版本numpy库中,应用int64或int32,因为int类型模糊 x = np.arange(-5.0, 5.0, 0.1) # 生成规律元素numpy数组 y = step_function(x) plt.plot(x, y) plt.ylim(-0.1, 1.1) # 限制或者制定y轴显示范围 plt.show() -
图形输出
-
-
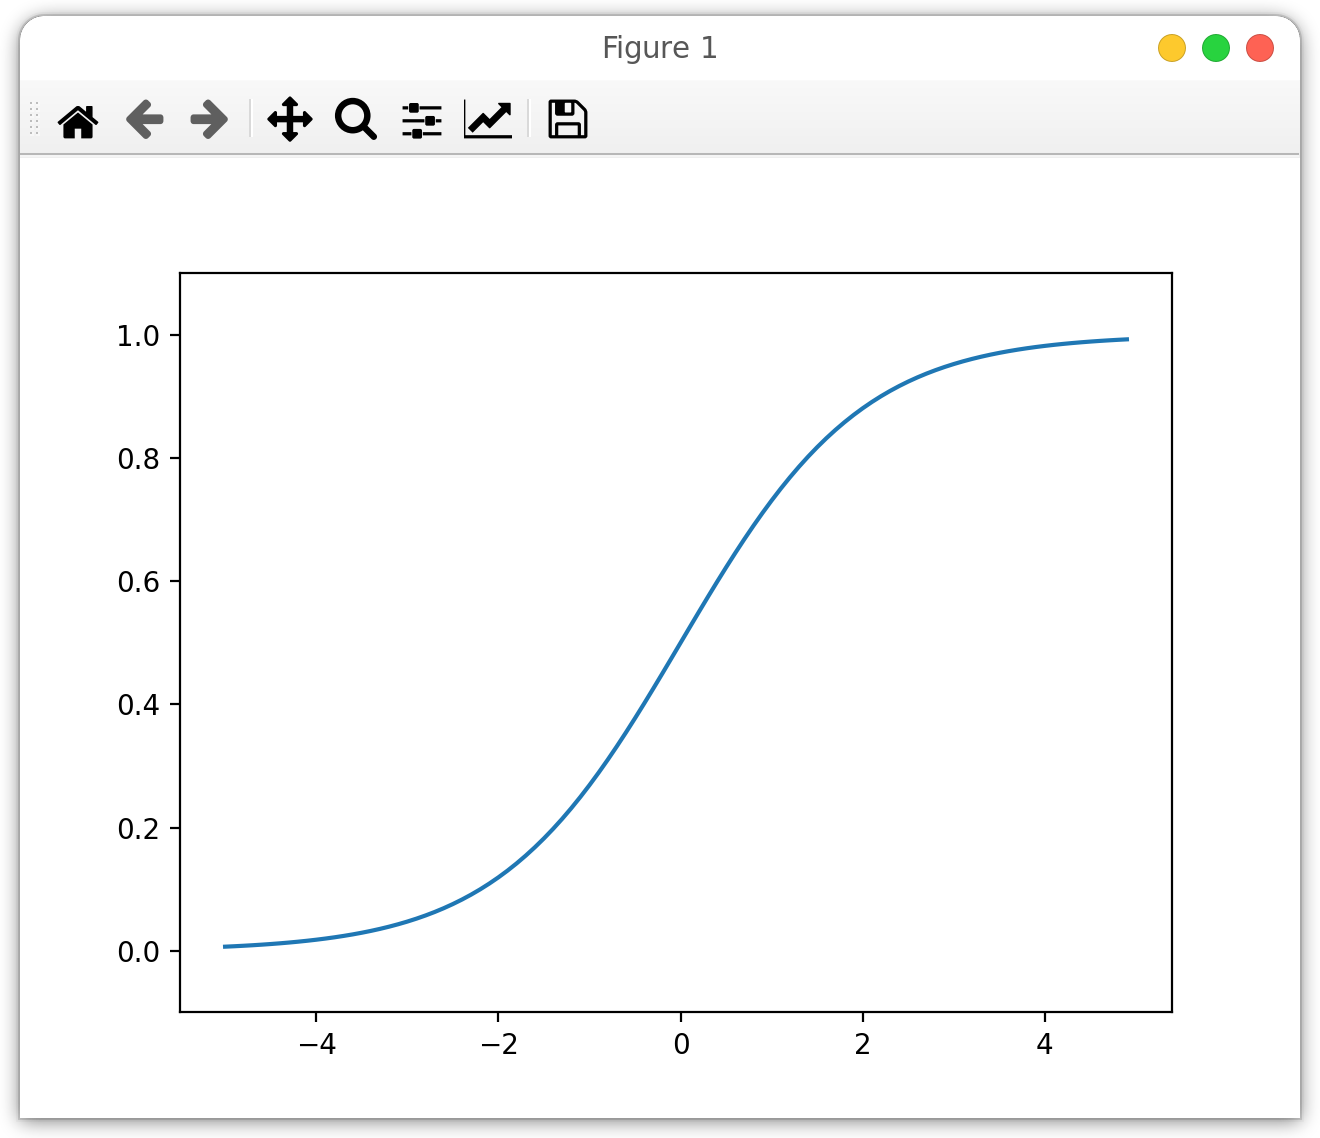
sigmoid函数实现与制图。
-
sigmoid函数
def sigmoid(x): return 1 / (1 + np.exp(-x)) -
制图代码段
import numpy as np import matplotlib.pylab as plt def sigmoid(x): return 1 / (1 + np.exp(-x)) x = np.arange(-5.0, 5.0, 0.1) y = sigmoid(x) plt.plot(x, y) plt.ylim(-0.1, 1.1) plt.show() -
图形输出
-
-
在阶跃函数和sigmoid函数的实现中,这两个函数都可以接受np数组作为参数,其原因是np的广播功能,而函数的计算中都是标量。
-
阶跃函数和sigmoid函数的共同点是重要信息输出较大值,不重要信息输出较小值且都在0和1之间。差异点是阶跃函数是0和1二元信号,是间断的,而sigmoid函数是连续的实数值信号。
-
阶跃函数和sigmoid函数都属于非线性函数,且激活函数必须是非线性函数。
-
只有激活函数是非线性函数才能发挥叠加层的优势。而使用线性函数加深神经网络就没有意义了。
新秀常用激活函数:ReLU函数
-
神经网络常用激活函数新秀:ReLU函数
$h\left(x\right)=\left {
\begin{array}{}x & \left(x > 0\right)\0 & \left(x \leq 0\right)\\end{array}\right.$ -
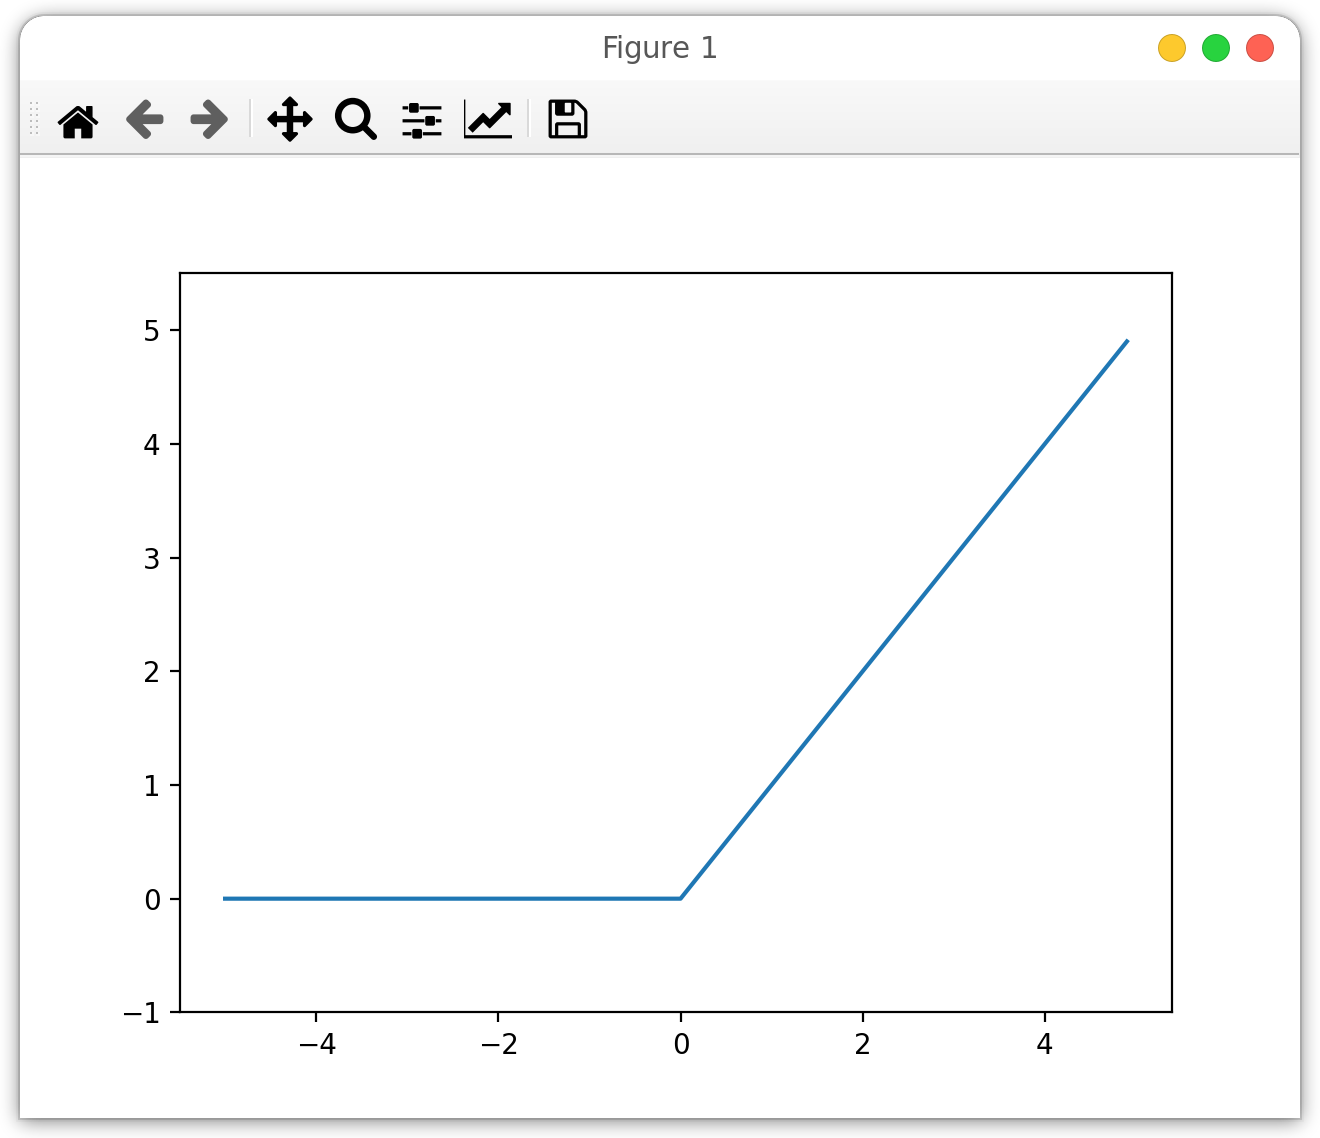
ReLU函数的实现与制图。
-
ReLU函数
def relu(x): return np.maximun(0, x) # maximum()函数会从输入的数值里选择较大的值输出。 -
制图代码段
import numpy as np import matplotlib.pylab as plt def relu(x): return np.maximun(0, x) x = np.arange(-5.0, 5.0, 0.1) y = sigmoid(x) plt.plot(x, y) plt.ylim(-0.1, 1.1) plt.show() -
图形输出
-
多维数组
多维数组和矩阵乘法
-
np.ndim()函数可以获得数组的维数,返回类型是int。 -
np.shape()函数返回的结果是tuple,所以一维数组返回的结果是(n,)。 -
二维数组也称为矩阵,横行竖列。
-
矩阵乘法是通过左边的矩阵的行和右边矩阵的列以对应元素的方式相乘后求和得到新矩阵的相应列。
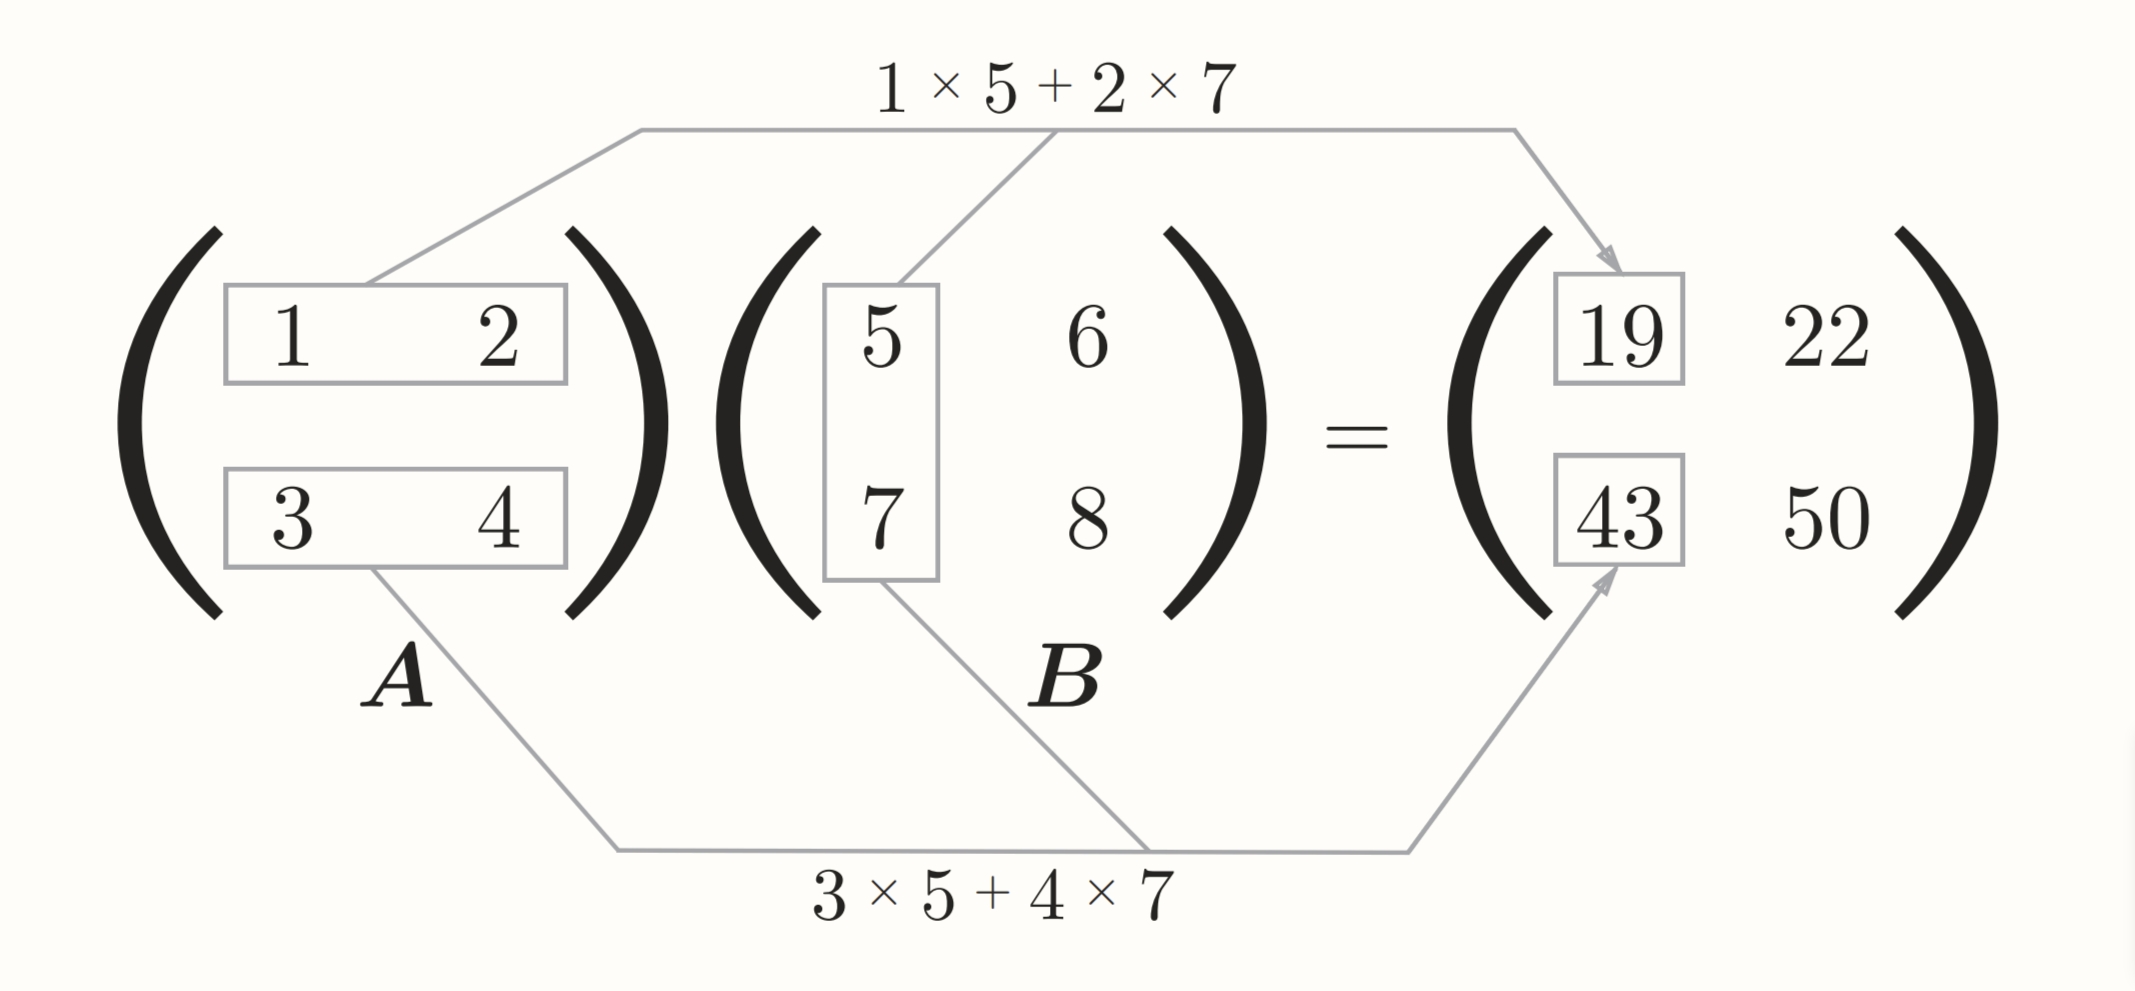
-
.dot为矩阵的点积(乘积、内积)运算方法。 -
矩阵的点积运算操作数的顺序不同,结果也不同。
-
矩阵乘法矩阵A的第1维的元素个数(列数)必须和矩阵B的第0维(行数)的元素个数相等。
-
两个矩阵 A 和 B,其中 A 是一个 m×n 矩阵(即有 m 行和 n 列),B 是一个 p×q 矩阵(即有 p 行和 q 列),那么 A 和 B 可以相乘的条件是 A 的列数n 必须等于 B 的行数p 。其生成矩阵C是一个 m×q 矩阵。
-
矩阵C的行数由A的行数决定,列数由矩阵B的列数决定。
-
当矩阵B为一维数组时,要求原则依然成立。
矩阵乘法和广播计算不同。
神经网络的内积
-
神经网络内积必须要确定x与$\omega$的维度元素个数的一致,符合矩阵点积的原则。
-
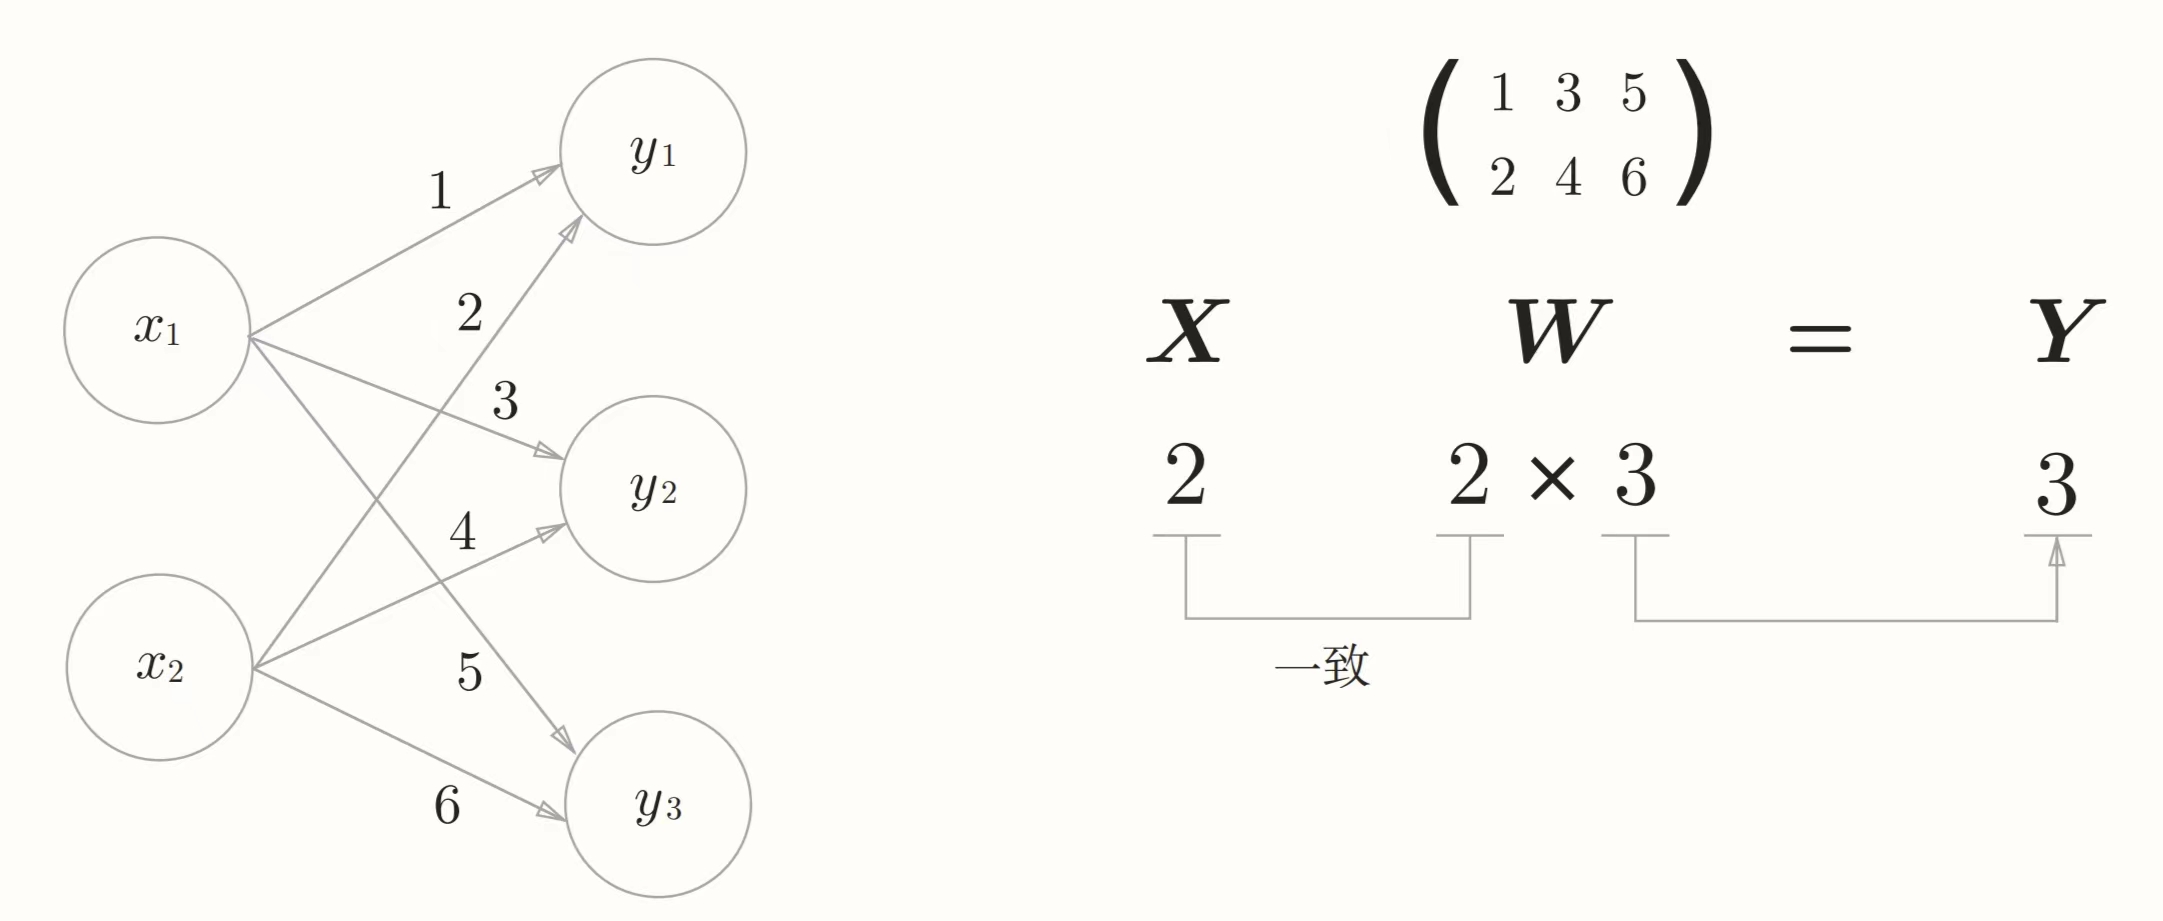
简单神经网络的示例。
-
代码。
>>> x = np.array([1, 2]) >>> w = np.array([[1, 3, 5],[2, 4, 6]]) >>> Y = np.dot(x, w) >>> print(Y) # 输出:[ 5 11 17] -
神经网络图示例。
-
-
使用np.dot可以一次性计算出Y的结果,简便了计算。
三层神经网络的实现
-
符号确认:
-
权重:通常表示为 $w_{ij}^ l$,其中 l 表示第 l 层,i 表示后一层神经元中的第 i 个神经元,j 表示前一层神经元中的第 j 个神经元。
-
偏置:通常表示为 $b_i^l$,其中 l 表示第 l 层,i 表示第 l 层中的第 i 个偏置神经元。
-
-
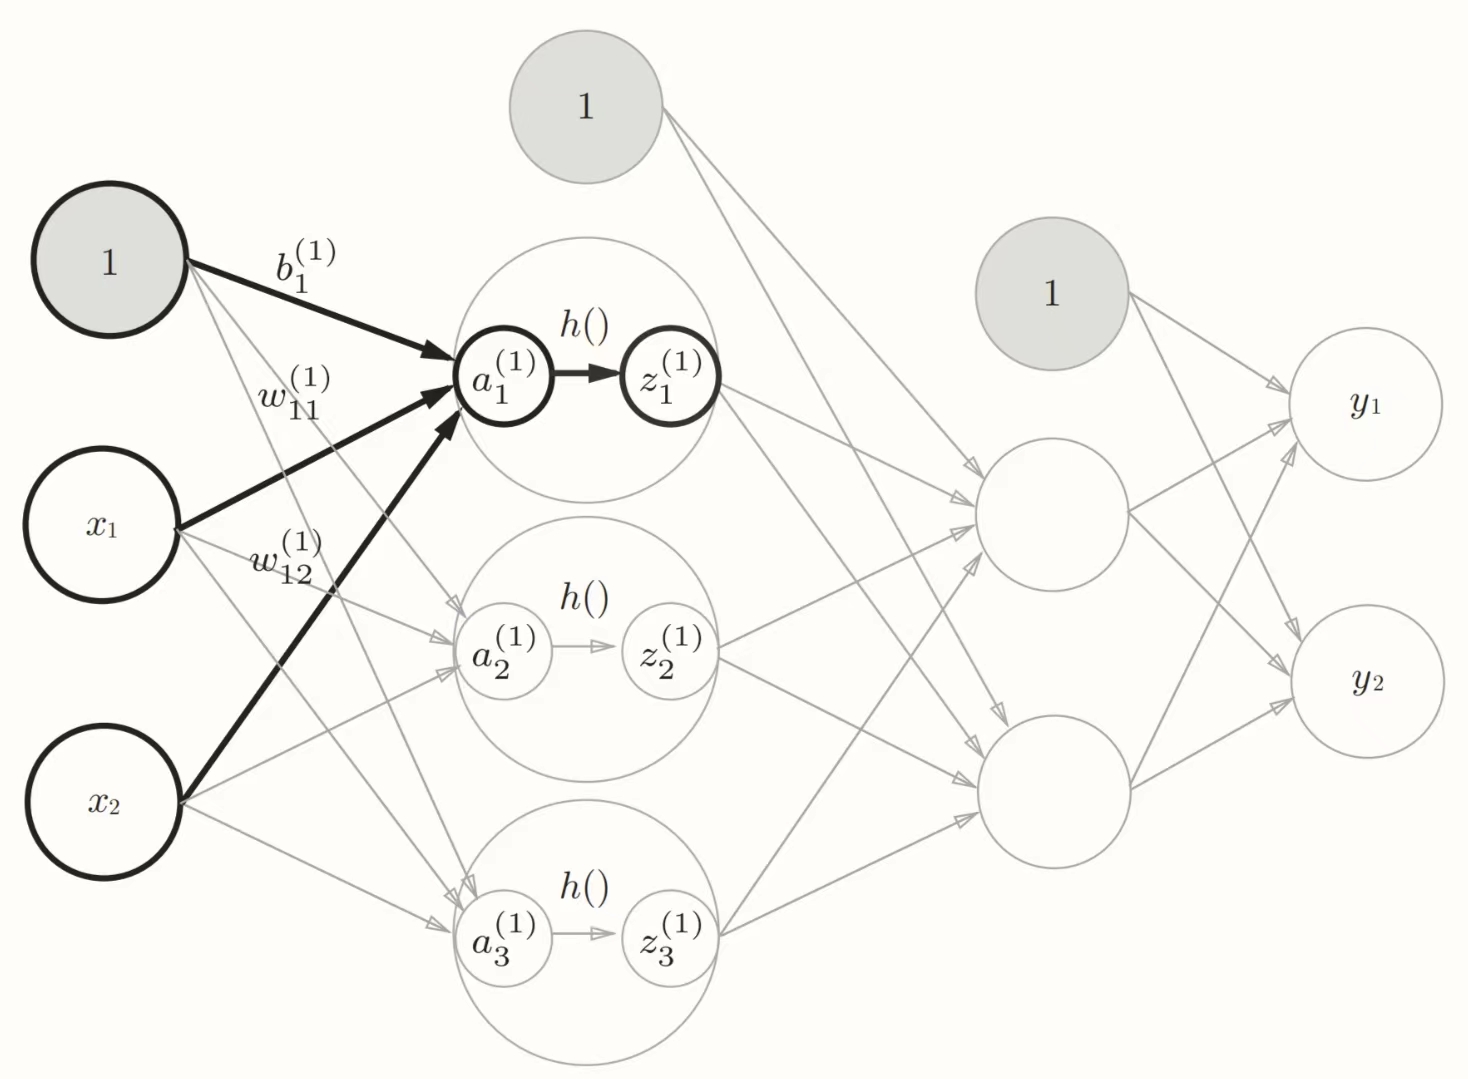
各层级的信号传递图像表达式和实现代码示例。
-
图像
-
表达式:
$a_1^1$ = $w_{11}^1 x_1 + w_{12}^ 1 x_2 + b_1^1$
-
矩阵乘法表示:
$A^1 = XW^1 + B^1$
其中$A^1 = \bigl( \begin{matrix}a_1^1 & b_2^1 & c_3^1 \end{matrix} \bigr)$,
$X = \bigl( \begin{matrix} x_1 & x_2\end{matrix} \bigr)$,
$B^1 = \bigl( \begin{matrix} b_1^1 & b_2^1 & b_3^1\end{matrix} \bigr)$,
$W^1=\bigl( \begin{matrix}w_{11}1&w_{21}1&w_{31}1\w_{12}1&w_{22}1&w_{32}1\end{matrix} \bigr)$
-
实现代码
'''第一层'''
X = np.array([1.0, 0.5])
W1 = np.array([[0.1, 0.3, 0.5], [0.2, 0.4, 0.6]])
B1 = np.array([0.1, 0.2, 0.3])

A1 = np.dot(X, W1) + B1

Z1 = sigmoid(A1)
'''第二层''' W2 = np.array([[0.1, 0.4], [0.2, 0.5], [0.3, 0.6]]) B2 = np.array([0.1, 0.2]) A2 = np.dot(Z1, W2) + B2 Z2 = sigmoid(A2)'''输出层''' # 恒等函数作为激活函数 def identity_function(x): return x W3 = np.array([[0.1, 0.3], [0.2, 0.4]]) B3 = np.array([0.1, 0.2]) A3 = np.dot(Z2, W3) + B3 Y = identity_function(A3)
-
-
输出层的激活函数用$\sigma\left(x\right)$表示,而隐藏层激活函数用$h\left(x\right)$。
-
输出层用的函数根据求解问题性质决定。
-
一般地,回归问题可以使用恒等函数,二元分类问题可以使用sigmoid函数,多元分类问题可以使用softmax函数。
-
代码实现总结:
import numpy as np

def sigmoid(x):
    return 1 / (1 + np.exp(-x))

def identity_function(x):
    return x

# 权重和偏置初始化
def init_network():
    network = {}
    network['W1'] = np.array([[0.1, 0.3, 0.5], [0.2, 0.4, 0.6]])
    network['b1'] = np.array([0.1, 0.2, 0.3])
    network['W2'] = np.array([[0.1, 0.4], [0.2, 0.5], [0.3, 0.6]])
    network['b2'] = np.array([0.1, 0.2])
    network['W3'] = np.array([[0.1, 0.3], [0.2, 0.4]])
    network['b3'] = np.array([0.1, 0.2])

    return network

# 输入信号转换为输出信号的处理
def forward(network, x):
    W1, W2, W3 = network['W1'], network['W2'], network['W3']
    b1, b2, b3 = network['b1'], network['b2'], network['b3']

    a1 = np.dot(x, W1) + b1
    z1 = sigmoid(a1)
    a2 = np.dot(z1, W2) + b2
    z2 = sigmoid(a2)
    a3 = np.dot(z2, W3) + b3
    y = identity_function(a3)

    return y


network = init_network()
x = np.array([1.0, 0.5])
y = forward(network, x)
print(y)
输出层的设计
softmax函数
-
机器学习的问题大致分为分类问题和回归问题,回归是预测。
-
softmax函数:
$y_k = \cfrac{\exp\left(a_k\right)}{\sum_{k=1}^n\exp\left(a_i\right)}$
式子表示假设输出层共有n个神经元,计算第k个神经元的输出。
-
输出层的各个神经元都受到所有输入信号的影响。
-
softmax函数的实现。
def softmax(a): exp_a = np.exp(a) sum_exp_a = np.sum(exp_a) y = exp_a / sum_exp_a return y -
因为softmax函数涉及指数级运算,所以容易出现溢出,需要改进。
-
改进后的softmax函数(可自己推理)。
$y_k = \cfrac{\exp\left(a_k + C\right)}{\sum^n_{i=1}\exp\left(a_i + C\right)}$
-
改进后的softmax函数。
def softmax(a): c = np.max(a) exp_a = np.exp(a - c) # 溢出对策 sum_exp_a = np.sum(exp_a) y = exp_a / sum_exp_a return y # np.max方法针对np数组 -
改进后的softmax函数可以避免出现溢出的问题。
-
softmax函数的输出可以解释为“概率”。
-
softmax函数因为和输出层神经元数量有关,其所有输出的概率和为1(重要特征),而sigmoid函数输出相互独立,不保证和为1,所以作为概率分布的softmax函数更具优势。 13
-
神经网络输出层运用softmax函数的目的是将网络的输出转换为概率分布的形式,因为softmax函数是一个单调递增函数,所以输入值越大,输出值越大。
-
softmax函数输出值大小和输入值大小以及输入数组的总大小有关。所以softmax函数图像并不是固定的,而是和所有输入值有关。
-
因为神经网络只把输出值最大的神经元所对应的类别作为识别结果,并且通过softmax函数的计算后,输出值最大的神经元位置不变,所以一般输出层的softmax函数会省略。
-
求解机器学习问题的步骤分为“学习”和“推理”两个阶段。
-
对于分类问题,输出层神经元数量一般设定为类别的数量。
-
如果输出层神经元数量不符合策略,那么可能会有冗余性和复杂性、过拟合风险、精确度下降。
补充:
输入层和隐藏层用sigmoid函数,输出层用softmax函数是各取所需
手写数字识别
-
实现神经网络的推理处理为向前传播。
-
把数据限定到某个范围内的处理称为正规化(例如把位图各个像素值除以255,使其处于0~1之间),对神经网络的输入数据进行某种既定的转换称为预处理。
-
数据白化,将数据整体的分布形状均匀化。
-
打包式的输入数据称为批,批处理比分布更快。
-
源代码:
import sys, os
sys.path.append(os.pardir)  # 为了导入父目录的文件而进行的设定
import numpy as np
import pickle   # 导入pickle模块,将程序运行中的对象保存为文件,并且可以加载复原。
from dataset.mnist import load_mnist


def sigmoid(x): # sigmoid激活函数
    return 1 / (1 + np.exp(-x))

def softmax(a): # softmax激活函数
    c = np.max(a)
    exp_a = np.exp(a - c)
    sum_exp_a = np.sum(exp_a)
    y = exp_a / sum_exp_a

    return y

def get_data(): # 加载mnist包数据
    (x_train, t_train), (x_test, t_test) = load_mnist(normalize=True, flatten=True, one_hot_label=False)
    # normalize 正规化,flatten 一维化, one_hot_label 对1错0化
    return x_test, t_test

def init_network(): # 加载network已经训练好的参数集
    with open("sample_weight.pkl", 'rb') as f:
        network = pickle.load(f)

        return network

def predict(network, x):    # 神经网络系统主体
    W1, W2, W3 = network['W1'], network['W2'], network['W3']
    b1, b2, b3 = network['b1'], network['b2'], network['b3']

    a1 = np.dot(x, W1) + b1
    z1 = sigmoid(a1)
    a2 = np.dot(z1, W2) + b2
    z2 = sigmoid(a2)
    a3 = np.dot(z2, W3) + b3
    y = softmax(a3)

    return y

x, t = get_data()
network = init_network()

batch_size = 100    # 批处理数量
accuracy_cnt = 0    # 识别精度
for i in range(0, len(x), batch_size): #获得识别精度
    x_batch = x[i:i+batch_size]
    y_batch = predict(network, x_batch)
    p = np.argmax(y_batch, axis=1)   # 获取概率最高的元素的索引,axis则是沿着第一维(水平)方向找到最大的元素索引值。
    accuracy_cnt += np.sum(p == t[i:i+batch_size])  # 得到的sum结果为()内True的数量。

print("Accuracy:" + str(float(accuracy_cnt) / len(x)))
神经网络的学习
从数据中学习
-
学习是指从训练数据中自动获取最优权重参数的过程。
-
感知机可以自动学习从而解决线性可分问题,但无法解决非线性可分问题。
-
数据是机器学习的核心,数据驱动。
-
特征量是指可以从输入数据(输入图像)中准确地提取本质数据的转换器。
-
图像的特征量通常表示为向量的形式。
-
要想高效地解决问题,必须寻找到合适的特征量(专门设计的特征量),例如CV中的SIFT、SURF、HOG等。
-
深度学习也称为端到端机器学习,即从原始数据(输入)中获得目标结果(输出)的意思。
-
传统机器学习更偏向于人工设定特征量,而神经网络、深度学习更偏向于机器从数据中学习特征量。
-
机器学习数据一般分为训练数据(也称为监督数据)和测试数据,训练数据用作学习,测试数据用于评价泛化能力。
-
泛化能力是指处理未被观察过的数据的能力,获得泛化能力是机器学习的最终目标。
-
只对某个数据集过度拟合的状态称为过拟合。
损失函数
-
损失函数是衡量模型预测结果与真实结果之间的差距的指标(或称表示神经网络性能的恶劣程度的指标)(即误差),一般以这个指标为线索寻找最优权重参数。
-
损失函数可以用任意函数,一般用均方误差和交叉熵误差等。
均方误差
-
均方误差:
$E = \sum_{k}\left(y_k - t_k\right)^2$
(书上的式子是变式,即$\frac{1}{2}E$)$y_k$表示神经网络输出,$t_k$表示监督数据,$k$表示数据的维度。
-
one-hot表示法:正确解标签表示为1,其他表示为0。
-
均方误差的实现,均方误差越小结果越吻合。
def mean_squared_error(y, t): return np.sum((y-t)**2) -
均方误差举例:
>>> t = [0,0,1,0,0,0,0,0,0,0]
>>> y = [0.1,0.05,0.6,0.0,0.05,0.1,0.0,0.1,0.0,0.0]
>>> mean_squared_error(np.array(y), np.array(t))
0.0975000000000000031

>>> y = [0.1,0.05,0.1,0.0,0.05,0.1,0.0,0.6,0.0,0.0]
>>> mean_squared_error(np.array(y), np.array(t))
0.5975000000000000003
交叉熵误差
-
交叉熵误差:
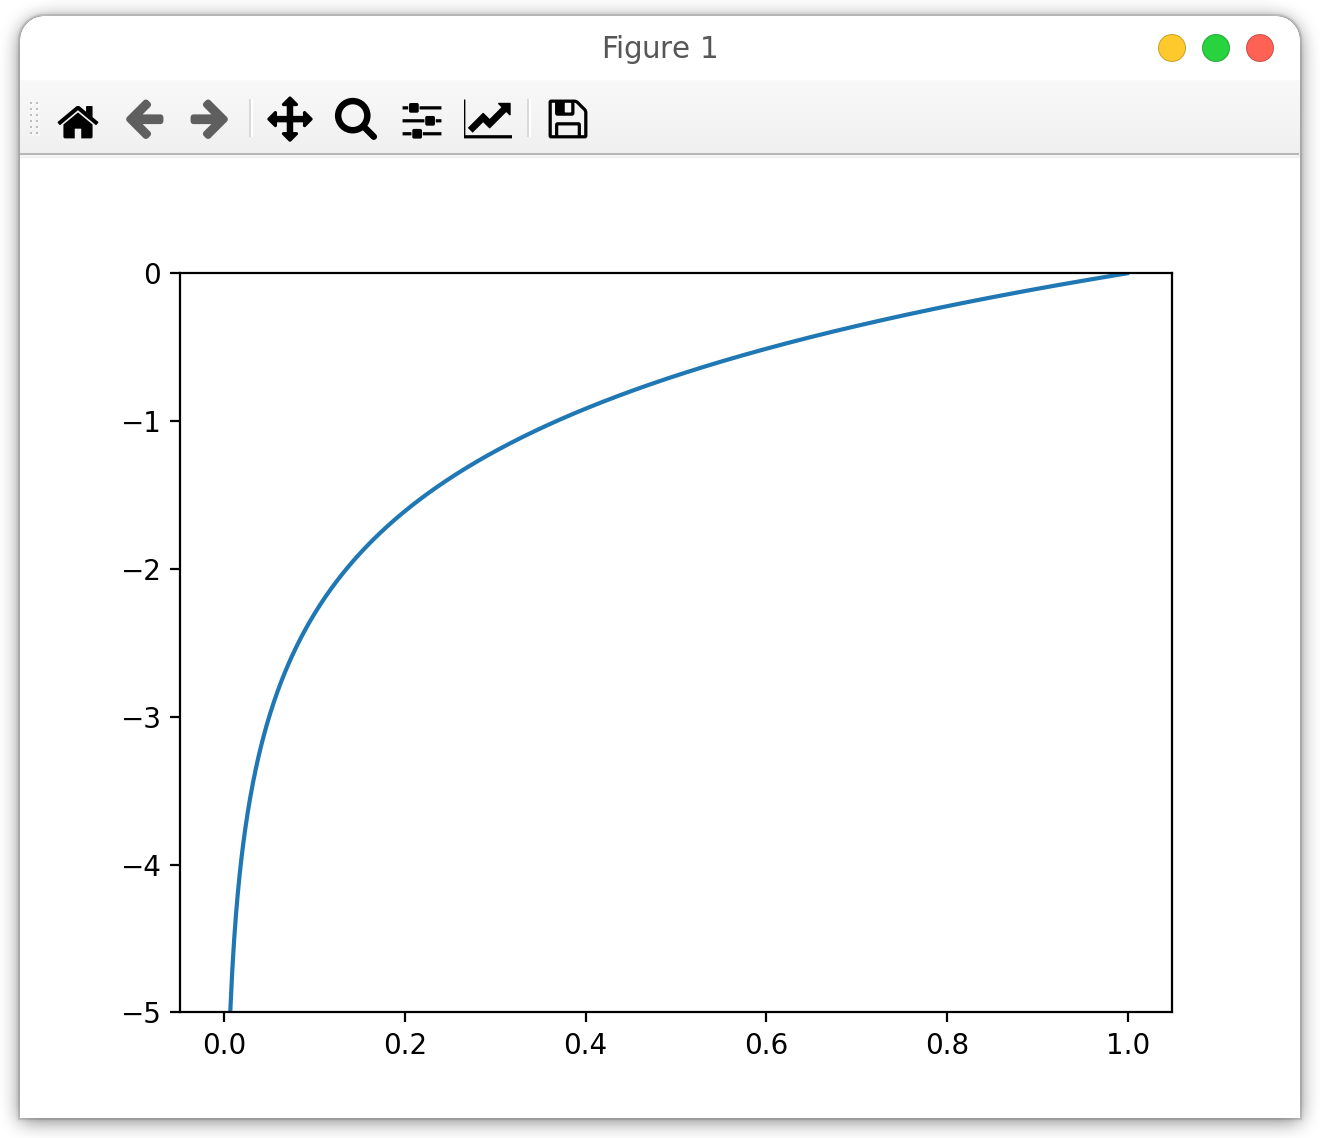
$E = - \sum_{k}t_k \log{y_k}$$\log$ 表示 $\ln$,$y_k$表示神经网络输出,$t_k$表示正确解标签(one-hot表示)。
-
交叉熵误差越小,模型越精确(由$y = \log{x}$图像可得)。
-
交叉熵误差的实现:
def cross_entropy(y, t): delta = 1e-7 return -np.sum(t * np.log(y + delta)) # delta是个微小值,避免np.log(0)时出现负无限大-inf导致无法计算 -
交叉熵误差举例:
>>> t = [0,0,1,0,0,0,0,0,0,0]
>>> y = [0.1,0.05,0.6,0.0,0.05,0.1,0.0,0.1,0.0,0.0]
>>> cross_entropy(np.array(y), np.array(t))
0.51082545709933802

>>> y = [0.1,0.05,0.1,0.0,0.05,0.1,0.0,0.6,0.0,0.0]
>>> cross_entropy(np.array(y), np.array(t))
2.3025840929945458
mini-batch(小批量)
-
计算损失函数时必须将所有的训练数据作为对象。
-
平均交叉熵误差:
$E = - \frac{1}{N}\sum_{n}\sum_{k}t_{nk} \log{y_{nk}}$ -
当数据量过大时,以全部数据计算损失函数不现实,所以从全部数据中选出一批数据(mini-batch)近似,然后对每个mini-batch进行学习。
-
选取mini-batch。
(x_train, t_train), (x_test, t_test) = load_mnist(flatten=True, normalize=False) x_train.shape # (60000, 784)训练数据 t_train.shape # (60000, 10)对应数据正确解标签 train_size = x_train.shape[0] # 训练数据量 batch_size = 10 # mini-batch_size batch_mask = np.random.choice(train_size, batch_size) # 从指定数字中随机选择batch_size个数字 x_batch = x_train[batch_mask] t_batch = t_train[batch_mask] -
mini-batch版交叉熵误差(监督数据是标签形式,非one-hot表示)
-
监督数据是one-hot版
def cross_entropy_error(y, t): if y.ndim == 1: t = t.reshape(1, t.size) # reshape成一维数组 y = y.reshape(1, y.size) batch_size = y.shape[0] return -np.sum(t * np.log(y + 1e-7)) / batch_size -
监督数据是标签形式,非one-hot版
def cross_entropy_error(y, t): if y.ndim == 1: t = t.reshape(1, t.size) # reshape成一维数组 y = y.reshape(1, y.size) batch_size = y.shape[0] return -np.sum(np.log(y[np.arrange(batch_size), t] + 1e-7)) / batch_size # 其中np.arrange(batch_size)得到的是一共从0到batch_size-1的数组,而t则是正确解标签数组 # 最终得到的则是神经元输出结果(正确解标签对应神经元输出结果),所以不需要*t -
兼容两个形式版(最终版)
def cross_entropy_error(y, t):
    if y.ndim == 1:
        t = t.reshape(1, t.size)
        y = y.reshape(1, y.size)

    # 监督数据是one-hot-vector的情况下,转换为正确解标签的索引
    if t.size == y.size:
        t = t.argmax(axis=1)  # argmax返回最大值索引

    batch_size = y.shape[0]
    return -np.sum(np.log(y[np.arange(batch_size), t] + 1e-7)) / batch_size

# argmax函数返回数组最大元素索引,axis参数决定寻找沿哪个轴,=0时沿着行对列求,=1是沿着列对行求
-
-
$E = -∑t_k log(y_k)$
其中 t_k 是真实标签的 one-hot 编码,y_k 是模型预测的概率,t_k 的作用是作为掩码(mask),确保只有真实标签对应的预测概率被考虑在内。
在神经网络的实践中,t 通常不是一个 one-hot 编码的数组,而是一个包含每个样本真实类别索引的数组。因此,我们不需要显式地将 t 与对数概率相乘,因为高级索引已经为我们完成了这个工作。通过 y[np.arange(batch_size), t],我们直接选取了每个样本真实标签对应的预测概率。
-
在进行神经网络的学习时,不能将识别精度作为指标,如果以识别精度作为指标,则参数的导数在绝大多数地方都会变为0(即连续性与离散性,识别精度是离散的,微变化无法改善识别精度,从而导致导数为0,类似阶跃函数)。
数值微分
-
为避免计算机舍入误差,微小值一般设定在$10^{-4}$。
-
为减小真导数与数值微分(利用数值方法近似求导)之间的误差,一般计算中心差分,即$\left(x+h\right) - \left(x-h\right)$(取代向前差分,即$\left(x+h\right) - \left(x\right)$)。
-
微小差分求导叫做数值微分。
-
数值微分代码示例:
def numerical_diff(f, x): h = 1e-4 # 0.0001 return (f(x+h) - f(x-h)) / (2*h) -
有多个变量的函数称为偏导数。
-
偏导数举例。
$f\left(x_0,x_1\right) = x_0^2 +x_1^2$ -
偏导数需要将多个变量中的一个变量定为目标变量,并将其他变量固定为某个值。
梯度
-
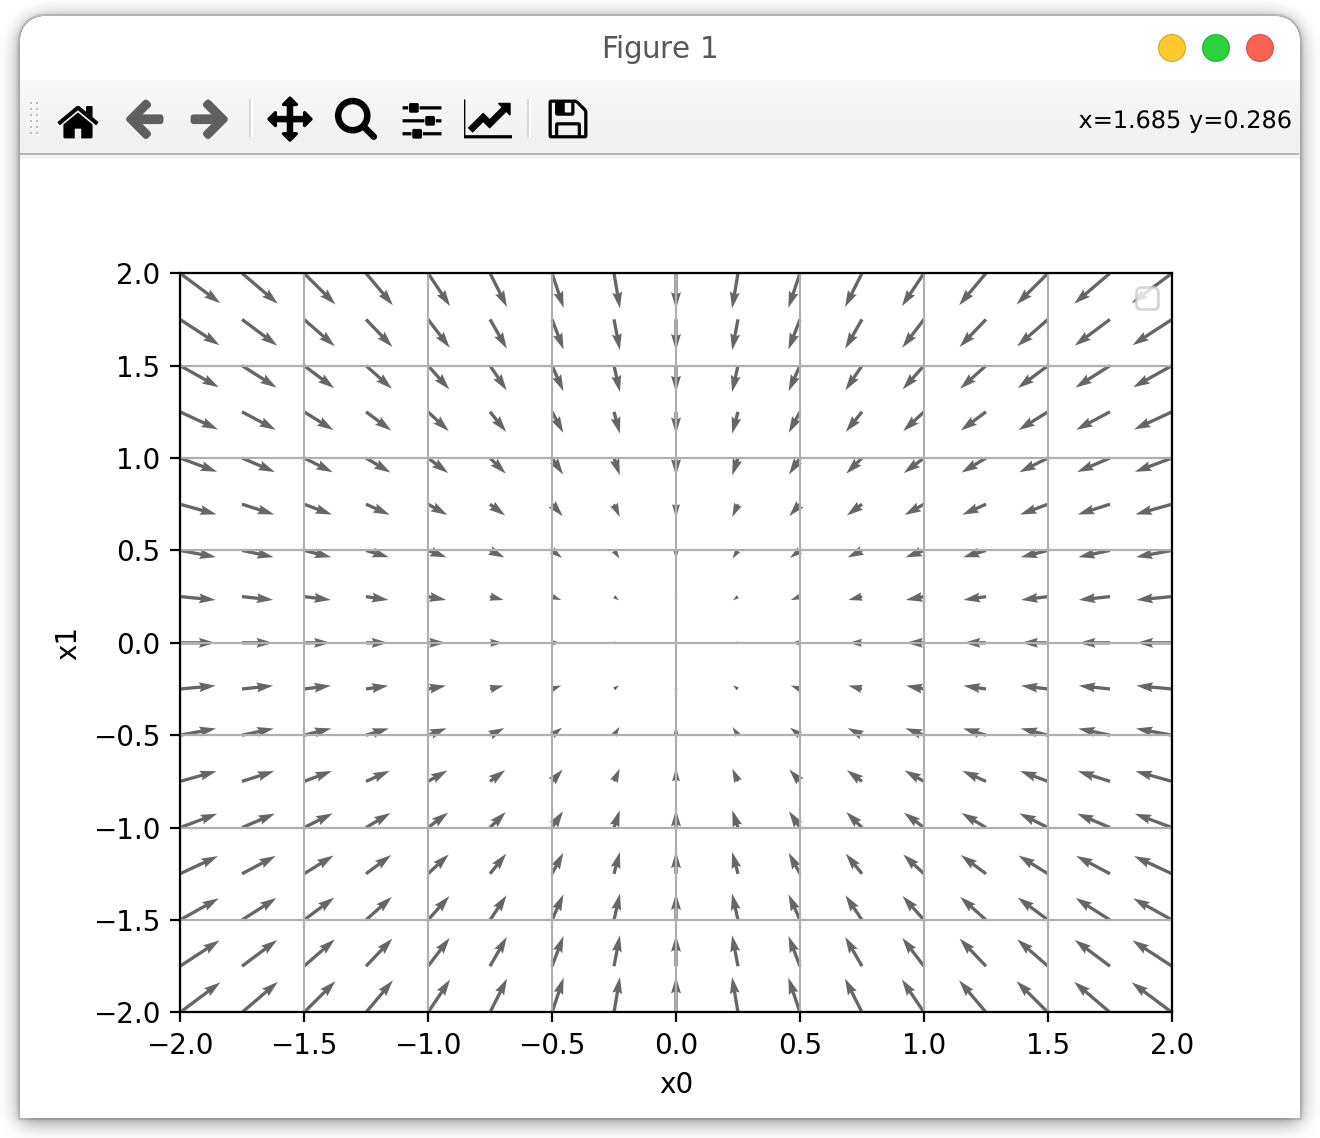
由全部变量汇总而成的向量称为梯度,例如上个偏导数($\frac{\delta{f}}{\delta{x_0}},\frac{\delta{f}}{\delta{x_1}}$)。
-
梯度代码示例:
def numerical_gradient(f, x):
    h = 1e-4 # 0.0001
    grad = np.zeros_like(x) # 生成与x形状相同的数组

    for idx in range(x.size):
        tmp_val = x[idx]
        # f(x+h)的计算
        x[idx] = tmp_val + h
        fxh1 = f(x)

        # f(x-h)的计算
        x[idx] = tmp_val - h
        fxh2 = f(x)

        grad[idx] = (fxh1 - fxh2) / (2*h)
        x[idx] = tmp_val

    return grad

# 在这其中x是np数组,是需要求梯度偏函数的自变量的集合,类似于(x,y,z)
# 在梯度运算中,最终得到的是以权重w为自变量、损失函数f为因变量的偏函数的梯度
'''改进为适应多维数组的函数''' def numerical_gradient(f, x): h = 1e-4 # 0.0001 grad = np.zeros_like(x) # 生成与x形状相同的数组 it = np.nditer(x, flags=['multi_index'], op_flags=['readwrite']) # flags是控制迭代器行为的标志,multi_index是迭代至当前位置的多维数组索引 # op_flags是修改数据的读写模式,readwrite代表可读写权限 # finished是nditer对象检查是否达到结尾的属性,结尾是为True while not it.finished: idx = it.multi_index tmp_val = x[idx] # f(x+h)的计算,float无需显式表达 x[idx] = tmp_val + h fxh1 = f(x) # f(x-h)的计算 x[idx] = tmp_val - h fxh2 = f(x) grad[idx] = (fxh1 - fxh2) / (2*h) x[idx] = tmp_val # 还原值 it.iternext() return grad -
略有误差的值在输出成np数组时会自动修改成易读的形式。
-
梯度指示的方向是函数值减小最多的方向。
-
负梯度是指函数值下降最快的方向,反之,正梯度同理。
梯度法
-
梯度表示的是各点处的函数值减小最多的方向,并不能保证梯度所指的方向就是函数的最小值或者真正应该前进的方向,所以在复杂函数中,梯度指示的方向基本上都不是函数值最小处。
-
函数的极小值和最小值和鞍点梯度都为0,梯度法寻找的梯度为0的地方,所以不一定是最小值,同时当函数复杂且为扁平状时,学习很可能会进入“学习高原”的停滞期。
-
梯度法:函数的取值从当前位置沿着梯度方向前进一段距离,然后在新的地方重新求梯度,再沿着新梯度方向前进,如此反复,通过不断地沿梯度方向前进逐渐减小函数值的过程就是梯度法。
-
一般来说,神经网络(深度学习)中,梯度法主要是指梯度下降法,但同时也有梯度上升法(寻找最大值)。
-
梯度法的数学表示:
$x_0 = x_0 - \eta\frac{\delta{f}}{\delta{x_0}}$
$x_0 = x_0 - \eta\frac{\delta{f}}{\delta{x_0}}$$\eta$表示更新量,在神经网络的学习中称为学习率。
-
梯度法的步骤会反复执行,逐渐减小函数值。
-
梯度法的代码实现:
def gradient_descent(f, init_x, lr=0.01, step_num=100): # 参数f是要优化的函数,init_x是初始值,lr是学习率learning rate,step_num是梯度法的重复次数 x = init_x for i in range(step_num): grad = numerical_gradient(x, x) x -= lr*grad return x -
梯度法举例
>>>def function_2(x):
...    return x[0]**2 + x[1]**2

>>> init_x = np.array([-3.0, 4.0])
>>> gradiant descent(function_2, init_X, lr=0.1, step_num=100)
# 输出:array([-6.11110793e-10, 8.14814391e-10]),十分接近正确结果(0,0)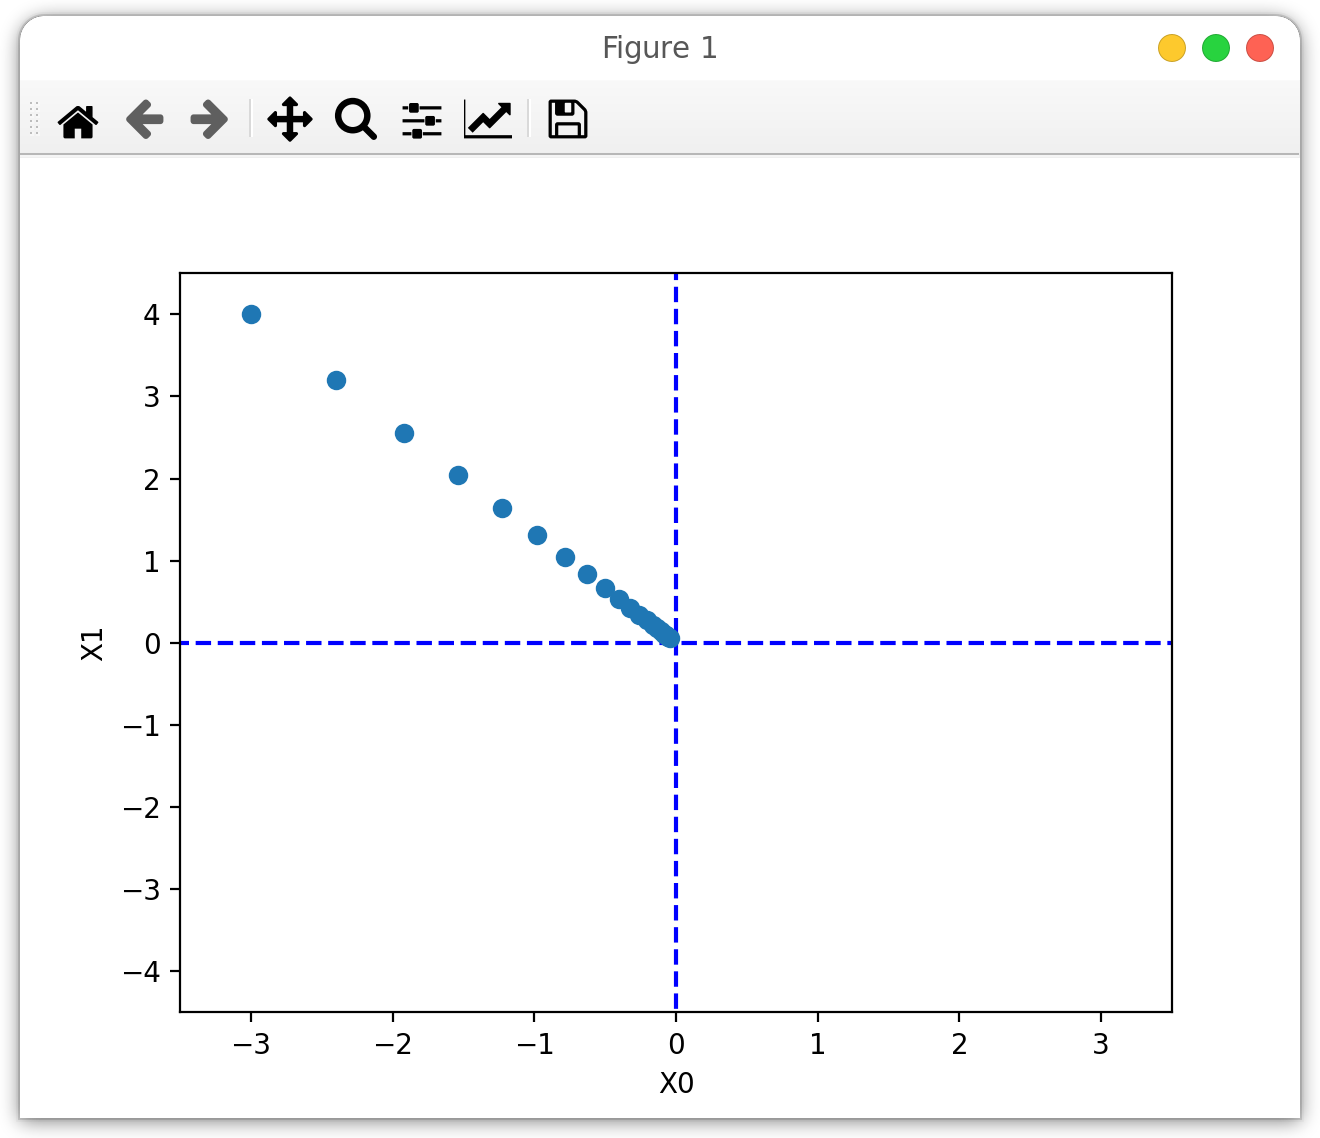
-
设定合适的学习率很重要,过大发散,过小更新太少。
-
学习率是超参数,一种神经网络的参数,由人工设定,一般需要尝试多个值。
梯度法深究关键字:牛顿法(更精确)、Hessian矩阵
神经网络的梯度
-
神经网络的梯度数学表达式:
权重$W$$W = \begin{pmatrix}w_{11} & w_{12} & w_{13}\ w_{21} & w_{22} & w_{23}\
\end{pmatrix}$损失函数L、梯度$\frac{\delta{L}}{\delta{W}}$
$\cfrac{\delta{L}}{\delta{W}} = \begin{pmatrix}\cfrac{\delta{L}}{\delta{w_{11}}} & \cfrac{\delta{L}}{\delta{w_{12}}} & \cfrac{\delta{L}}{\delta{w_{13}}}\ \ \cfrac{\delta{L}}{\delta{w_{21}}} & \cfrac{\delta{L}}{\delta{w_{22}}} & \cfrac{\delta{L}}{\delta{w_{23}}}\
\end{pmatrix}$ -
在神经网络的梯度中,以损失函数$L$为因变量,以函数的所有权重$w$作为自变量来进行梯度下降(最后就可以获得在一定范围内梯度为0的损失函数)。
-
简单一层神经网络类代码实现:
class simpleNet: def __init__(self): self.W = np.random.randn(2, 3) # 利用高斯分布进行初始化权重 def predict(self, x): return np.dot(x, self.W) # 对矩阵进行点乘运算,x是输入信号n*2 def loss(self, x, t): z = self.predict(x) y = softmax(z) loss = cross_entropy_error(y, t) # cross_entropy_error是最终版本,求的损失函数值,x是运算后的输出信号,t是正确解标签 return loss -
简单一层神经网络类示例:
>>> net = simpleNet()
>>> x = np.array([0.6,0.9])
>>> p = net.predict(x)
# p = [1.0541, 0.6307,1.1328]
>>> t = np.array([0, 0, 1])
>>> net.loss(x,t)
0.9280568

>>> f = lambda w:net.loss(x, t)
# f(W)的参数W是个伪参数,只是需要兼容numerical_gradient函数而定义f(W)。
>>> dW = numerical_gradient(f, net.W)
# dW:权重的变化率/梯度,[[0.2192, 0.1435, -0.3628],[0.3288, 0.2153, -0.5442]]
>>> f = lambda w:net.loss(x, t)
在上式中,如果需要校正权重只需要把numerical_gradient函数换为gradient_descent函数即可。
学习算法的实现
步骤及二层神经网络的类的实现
-
选出mini-batch
-
计算梯度,准备更新参数
-
更新参数
-
重复步骤123,结束
-
因为使用的mini-batch数据是随机选择的,所i在这里使用梯度下降法称为随机梯度下降法(SGD),在很多深度学习的框架中,随机梯度下降法一般是SGD函数实现。
-
二层神经网络的类的实现
class TwoLayerNet:
    # 初始化
    def __init__(self, input_size, hidden_size, output_size, weight_init_std=0.01):
        # 随机取权重,偏置取0
        self.params = {}
        self.params['W1'] = weight_init_std * np.random.randn(input_size, hidden_size)
        self.params['b1'] = np.zeros(hidden_size)
        self.params['W2'] = weight_init_std * np.random.randn(hidden_size, output_size)
        self.params['b2'] = np.zeros(output_size)

    # 进行推理
    def predict(self, x):
        W1, W2 = self.params['W1'], self.params['W2']
        b1, b2 = self.params['b1'], self.params['b2']

        a1 = np.dot(x, W1) + b1
        z1 = sigmoid(a1)
        a2 = np.dot(z1, W2) + b2
        y = softmax(a2)

        return y

    # 计算损失函数值,x:输入数据(图像数据),t:监督数据(正确解标签)
    def loss(self, x, t):
        y = self.predict(x)

        return cross_entropy_error(y, t)

    # 计算识别精度,x:输入数据(图像数据),t:监督数据(正确解标签)
    def accuracy(self, x, t):
        y = self.predict(x)
        y = np.argmax(y, axis=1)
        t = np.argmax(t, axis=1)

        accuracy = np.sum(y == t) / float(x.shape[0])
        return accuracy

    # 计算权重参数的梯度,x:输入数据(图像数据),t:监督数据(正确解标签)
    def numerical_gradient(self, x, t):
        loss_W = lambda W: self.loss(x, t)

        grads = {}
        grads['W1'] = numerical_gradient(loss_W, self.params['W1'])
        grads['b1'] = numerical_gradient(loss_W, self.params['b1'])
        grads['W2'] = numerical_gradient(loss_W, self.params['W2'])
        grads['b2'] = numerical_gradient(loss_W, self.params['b2'])

        return grads
类的初始化参数 作用 input_size 输入层神经元数量 hidden_size 隐藏层神经元数量 ooutput_size 输出层神经元数量 -
部分应用示例:
net = TwoLayerNet(input_size=784, hidden_size=100, output_size=10)
x = np.random.rand(100, 784)  # 随机生成一个取值范围在[0, 1)的大小100*784的数组
y = net.predict(x)  # 进行推理

t = np.random.rand(100, 10)  # 随机生成(伪)正确解标签
grads = net.numerical_gradient(x, t)  # 计算梯度
mini-batch的实现
-
实现与记录代码
# 加载数据集 (x_train, t_train), (x_test, t_test) = load_mnist(normalize=True, one_hot_label=True) # 创建损失函数值记录列表 train_loss_list = [] # 两种数据精度记录列表 train_acc_list = [] test_acc_list = [] # 超参数 iter_num = 200 # 循环次数 train_size = x_train.shape[0] # 训练数据大小 batch_size = 100 # mini-batch大小 learning_rate = 0.1 # 学习率 iter_per_epoch = max(train_size / batch_size, 1) # 平均每个epoch的重复次数 network = TwoLayerNet(input_size=784, hidden_size=50, output_size=10) # 建立神经网络 for i in range(iter_num): # 循环执行 # 获取mini-batch batch_mask = np.random.choice(train_size, batch_size) x_batch = x_train[batch_mask] t_batch = t_train[batch_mask] # 计算梯度 grad = network.numerical_gradient(x_batch, t_batch) # 更新参数 for key in ('W1', 'b1', 'W2', 'b2'): network.params[key] -= learning_rate * grad[key] # 记录学习过程 loss = network.loss(x_batch, t_batch) train_loss_list.append(loss) # 计算每个epoch的识别精度(两种数据) if i % iter_per_epoch == 0: train_acc = network.accuracy(x_train, t_train) test_acc = network.accuracy(x_test, t_test) train_acc_list.append(train_acc) test_acc_list.append(test_acc) x = np.arange(iter_num) y = np.array(train_loss_list) plt.plot(x, y) plt.show() -
随着学习的进行,对训练数据的某个mini-batch的损失汉和速度值逐渐减小,神经网络的学习正常进行。
-
神经网络的学习必须确认是否能正确识别训练数据以外的其他数据,即确认是否会发生过拟合。
-
神经网络的最初目标是掌握泛化能力,因此要评价神经网络的泛化能力就必须要使用不包含在训练数据中的数据,所以要定期地对训练数据和测试数据记录识别精度。
-
一个epoch表示学习中所有训练数据均被使用过一次时的更新次数(即训练量达到一轮完整训练数据次数)。
-
一般会事先将所有训练数据随机打乱,然后按照批次大小,按序生成mini-batch,然后用索引遍历所有mini-batch。
误差反向传播
计算图、链式法则
-
计算图:将计算过程用图形(数据结构图:节点+边)表示出来。
-
节点和箭头表示计算过程,节点用$\circ$表示,其中是计算过程。
-
计算图解题过程:构建、从左到右计算。
-
计算图的特征是可以通过传递局部计算获得最终结果。
-
计算图可以通过正向传播和反向传播高效计算导数。
-
如果某个函数由符合函数表示,则该复合函数的导数可以用构成复合函数的各个函数的导数的乘积表示。
-
反向传播计算先将节点的输入信号乘以节点的局部导数,然后再传递给下一个节点。
反向传播
-
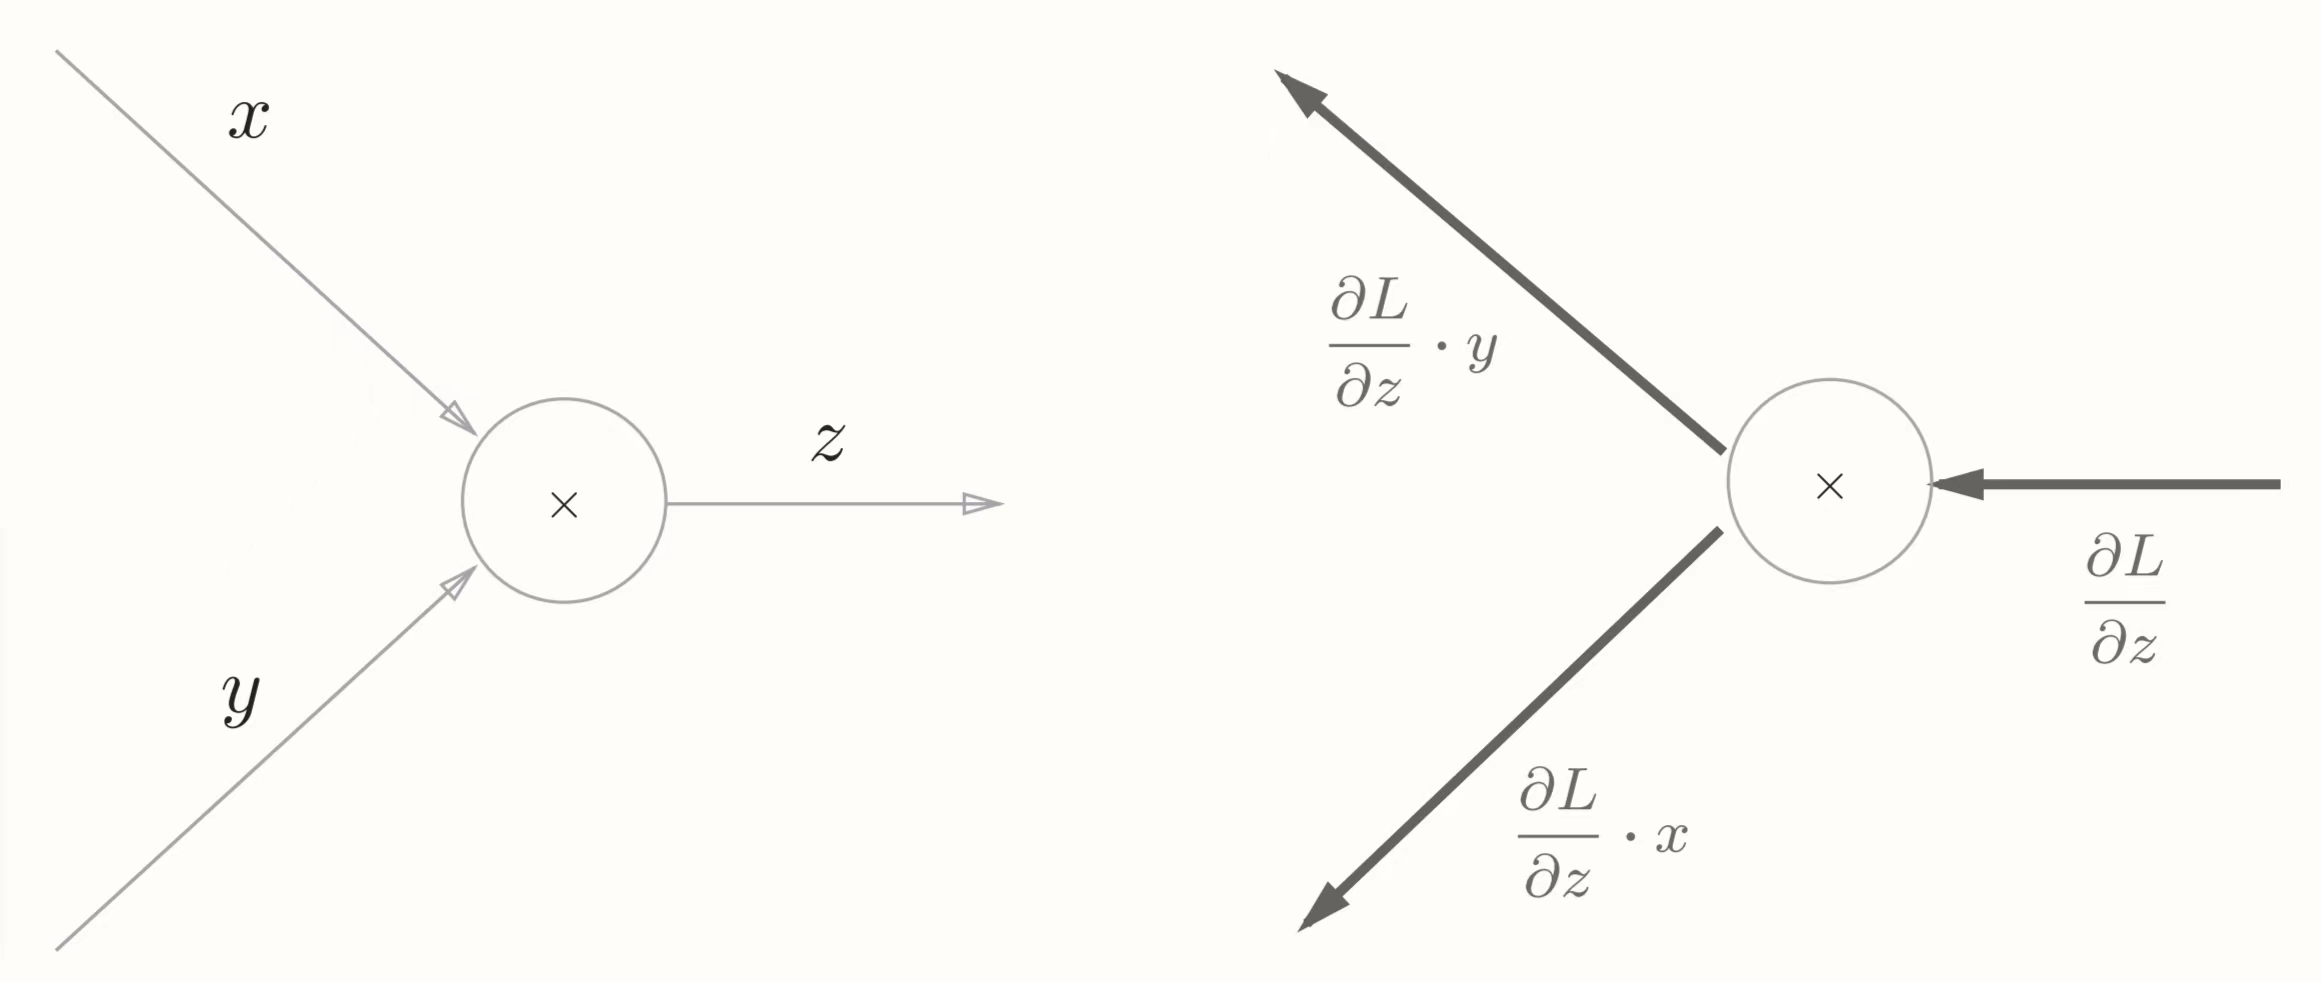
加法节点反向传播导数乘1。
-
乘法节点反向传播导数乘输入信号的“翻转值”。
简单层的实现
-
乘法层(MulLayer)的构建。
class MulLayer: def __init__(self): self.x = None self.y = None # 正向传播 def forward(self, x, y): self.x = x self.y = y out = x * y return out # 反向传播,dout是正向传播时的输出变量的导数 def backward(self, dout): dx = dout * self.y # 翻转x和y dy = dout * self.x return dx, dy -
调用backward()的顺序与调用forward()的顺序相反。
-
加法层(AddLayer)的构建。
class AddLayer:
    def __init__(self):
        pass

    def forward(self, x, y):
        out = x + y
        return  out

    def backward(self, dout):
        dx = dout * 1
        dy = dout * 1
        return dx, dy
激活函数层的实现
-
ReLU层。
-
原理图

-
实现代码
class Relu:
    # mask 是由True和False构成的np数组
    def __init__(self):
        self.mask = None

    # mask 会把正向传播时输入的小于0的地方保存为True,其他为False
    def forward(self, x):
        self.mask = (x <= 0)
        out = x.copy()
        out[self.mask] = 0

        return out

    def backward(self, dout):
        dout[self.mask] = 0
        dx = dout

        return dx
-
-
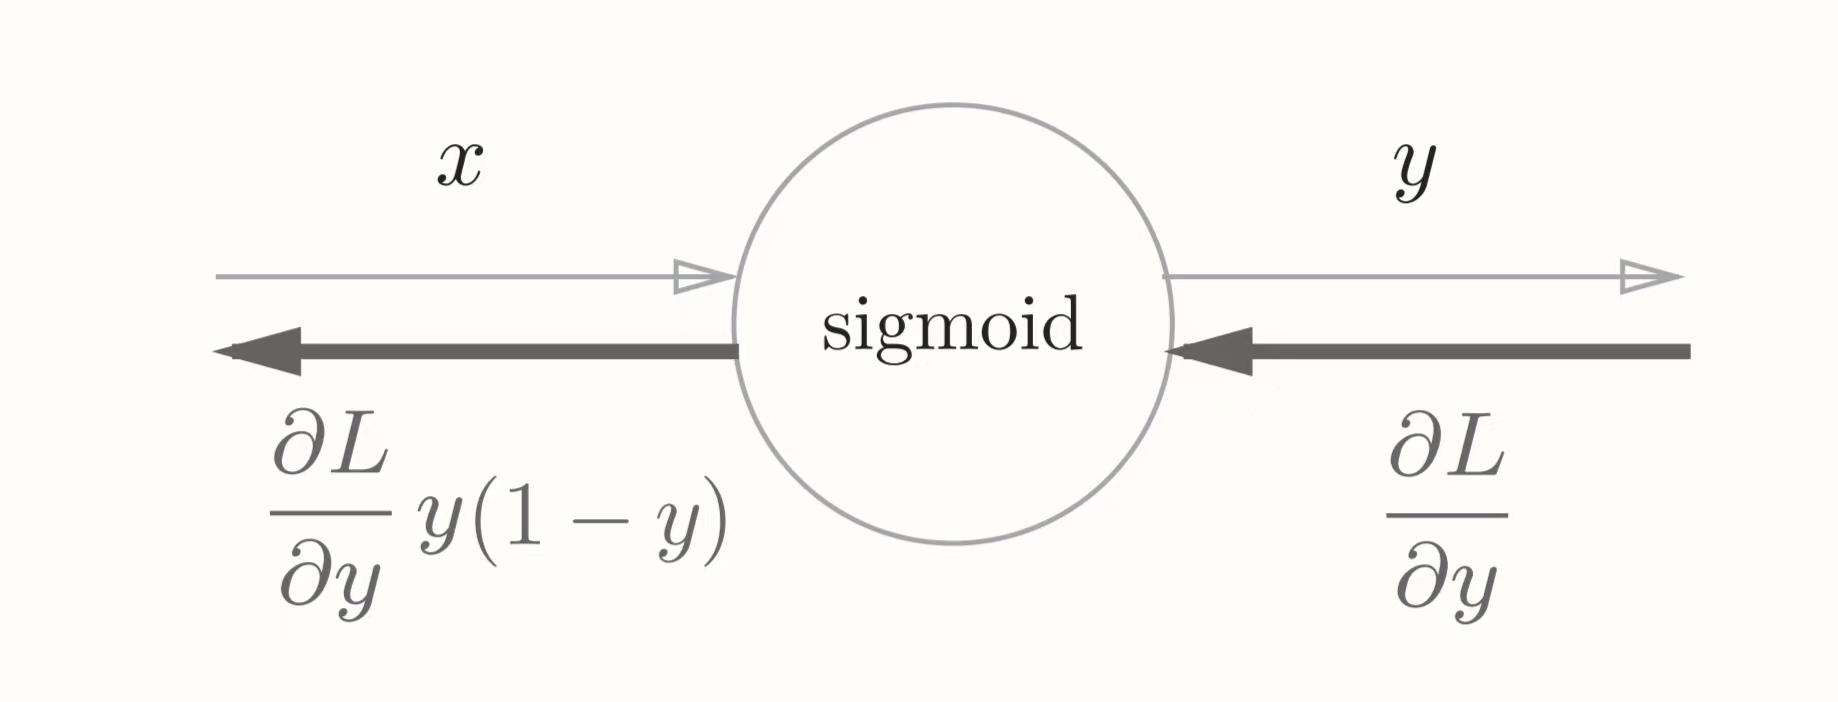
Sigmoid层。
-
原理图(步步反推即可)
-
实现代码
class Sigmoid:
    def __init__(self):
        self.out = None

    def forward(self, x):
        out = 1 / (1 + np.exp(-x))
        self.out = out

        return out

    def backward(self, dout):
        dx = dout * (1.0 - self.out) * self.out

        return dx
-
Affine/Softmax层的实现
Affine层
-
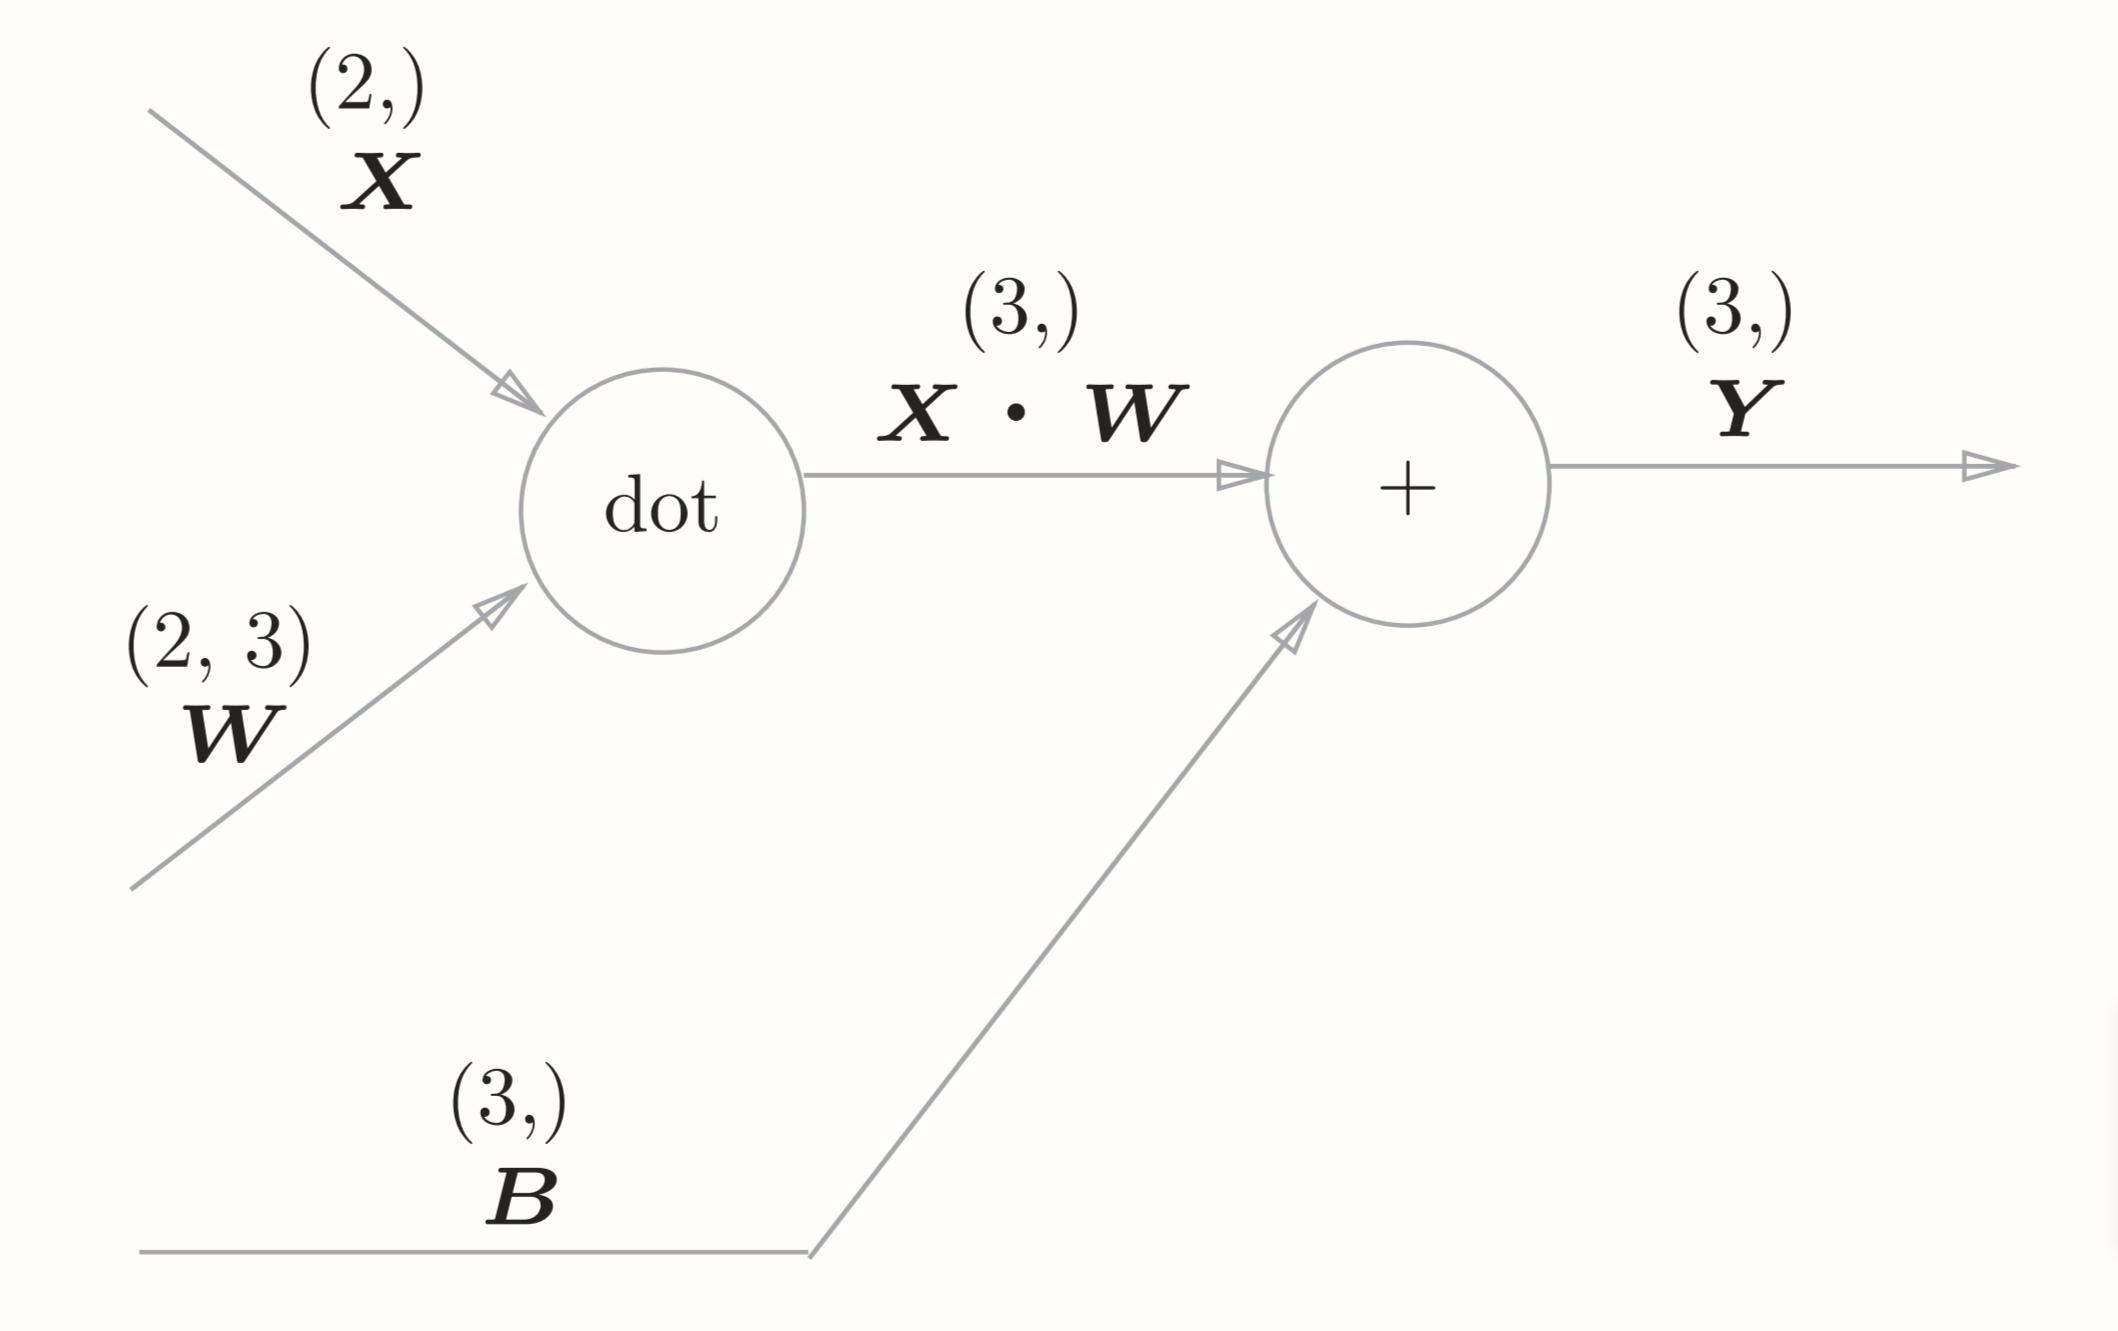
Affine层是仿射变换(一次线性变换和一次平移,即加权和运算与加偏置运算)的处理,仿射变换即正向传播中矩阵乘积运算。
-
Affine层的计算图。
-
Affine层的反向传播图。
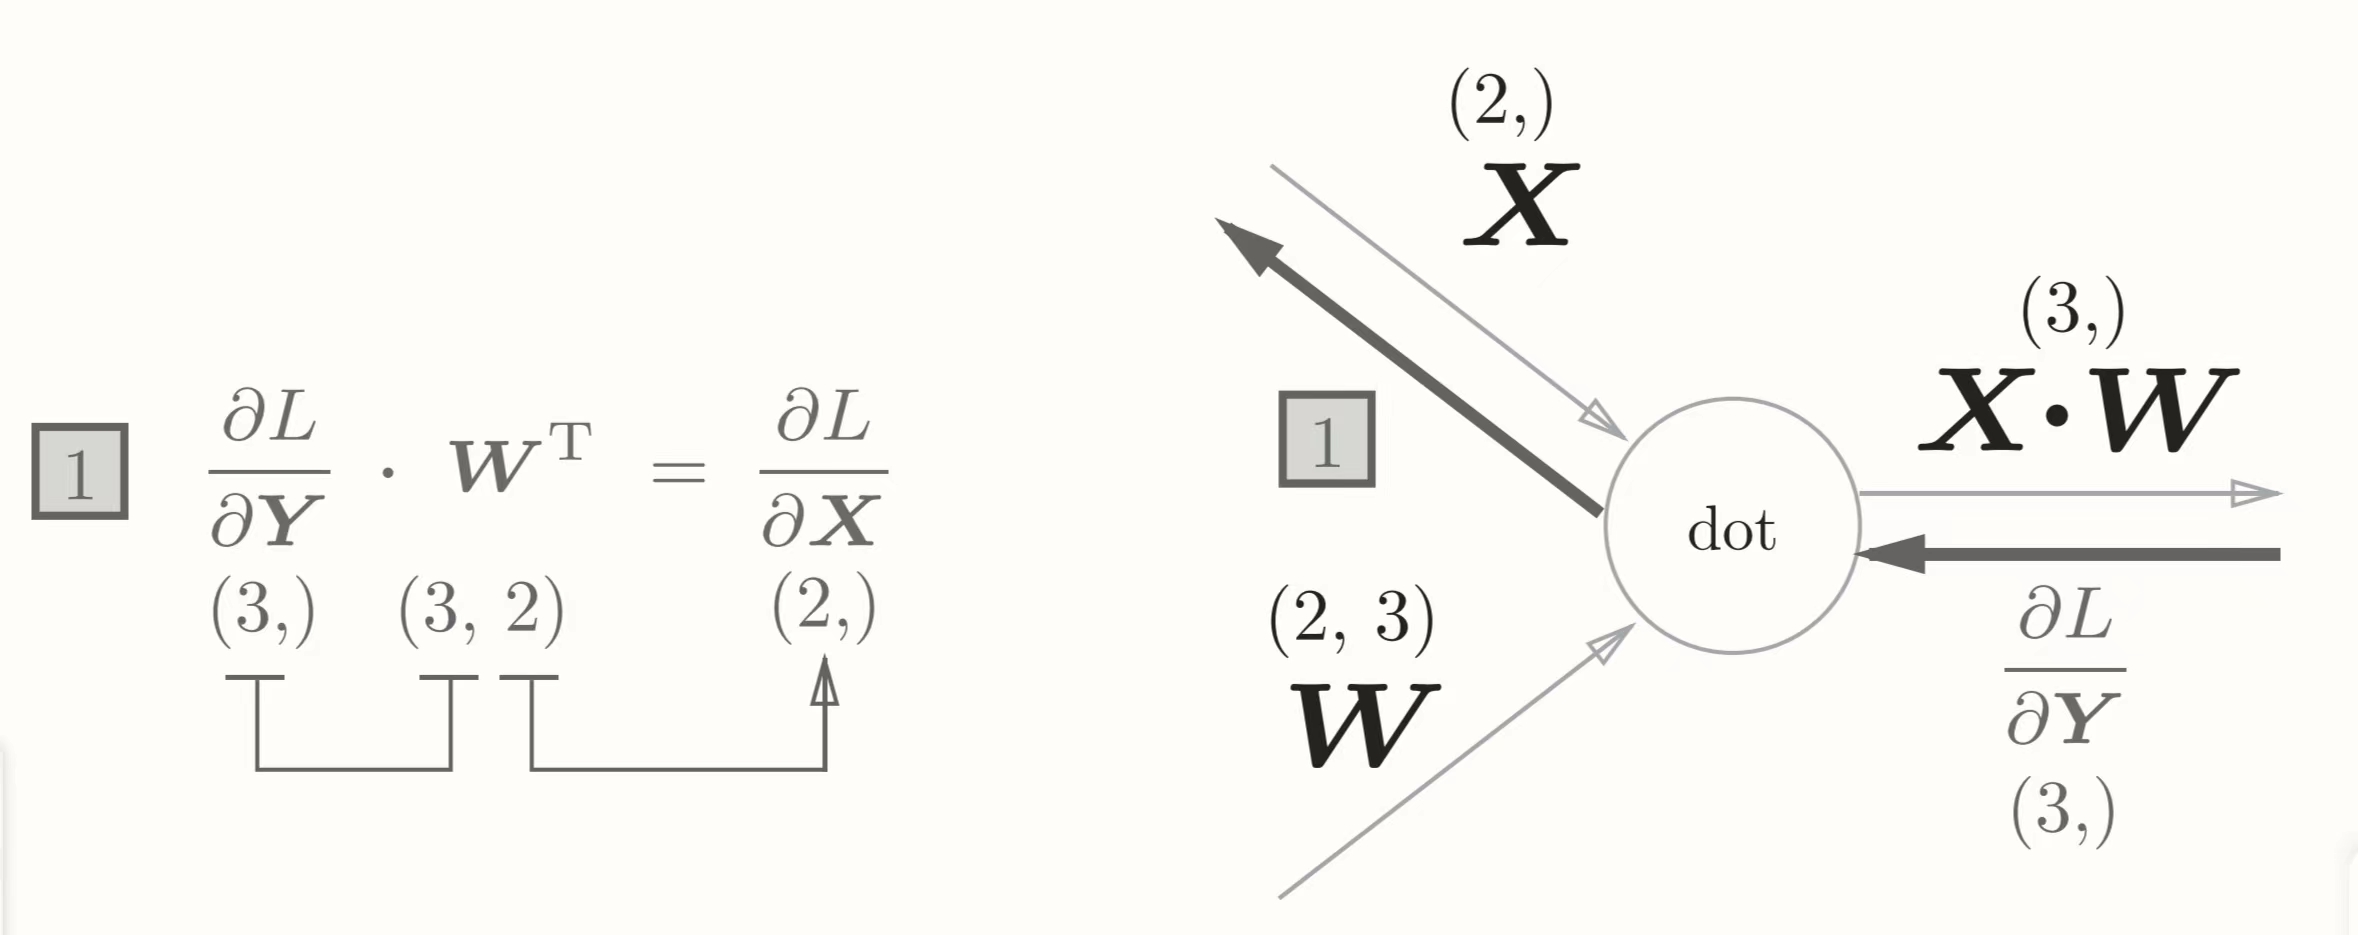
-
批版本的Affine计算图。
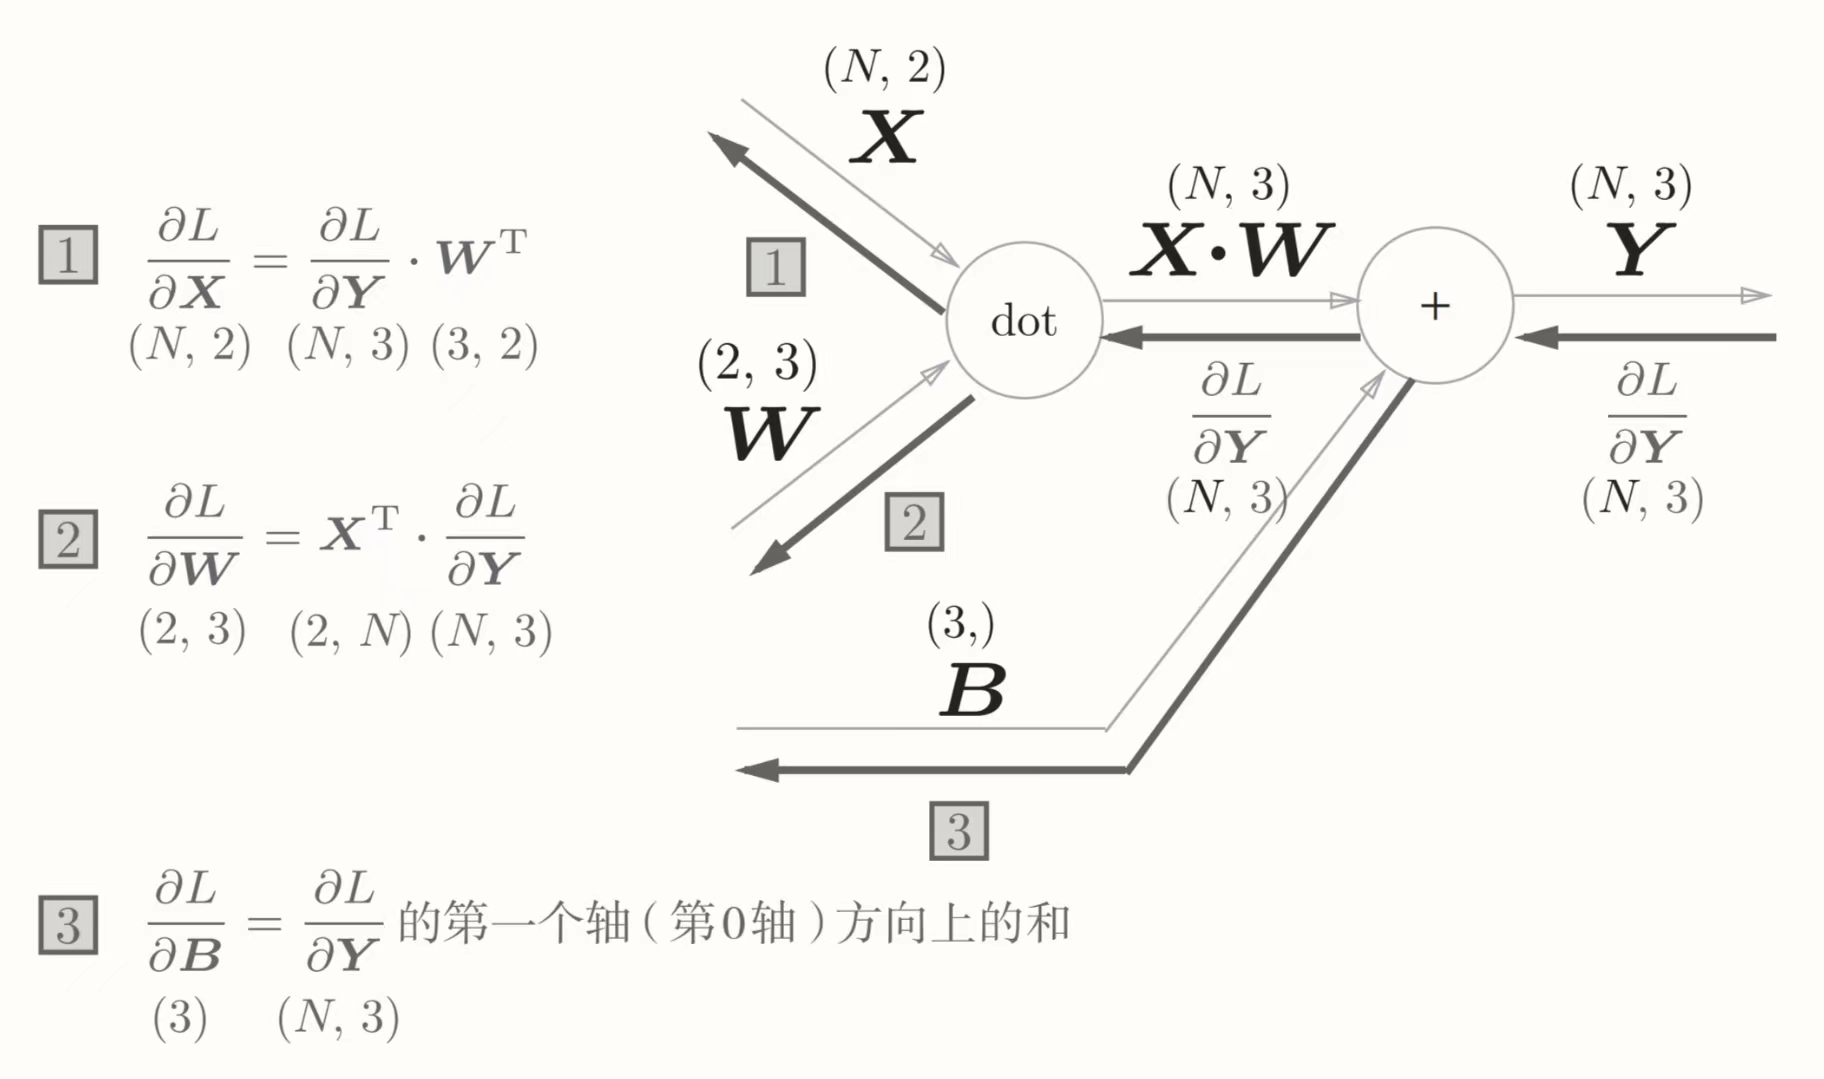
-
Affine层的代码实现。
-
不考虑张量(四维数据)
class Affine: def __init__(self, W, b): self.W = W self.b = b self.x = None self.dW = None self.db = None def forward(self, x): self.x = x out = np.dot(x, self.W) + self.b return out def backward(self, dout): dx = np.dot(dout, self.W.T) self.dW = np.dot(self.x.T, dout) self.db = np.sum(dout, axis=0) return dx -
考虑张量
class Affine:
    def __init__(self, W, b):
        self.W =W
        self.b = b

        self.x = None
        self.original_x_shape = None
        # 权重和偏置参数的导数
        self.dW = None
        self.db = None

    def forward(self, x):
        # 对应张量
        self.original_x_shape = x.shape
        x = x.reshape(x.shape[0], -1)
        self.x = x

        out = np.dot(self.x, self.W) + self.b

        return out

    def backward(self, dout):
        dx = np.dot(dout, self.W.T)
        self.dW = np.dot(self.x.T, dout)
        self.db = np.sum(dout, axis=0)

        dx = dx.reshape(*self.original_x_shape)  # 还原输入数据的形状(对应张量)
        return dx
-
Softmax-with-Loss层
-
识别过程。
-
神经网络中进行的处理有推理和学习,其中推理通常不使用softmax层,学习阶段需要softmax层。
-
SwL计算图。
-
计算式。
softmax函数
$y_k = \cfrac{\exp\left(a_k + C\right)}{\sum^n_{i=1}\exp\left(a_i + C\right)}$
交叉熵误差损失函数
$E = - \frac{1}{N}\sum_{n}\sum_{k}t_{nk} \log{y_{nk}}$ -
计算图
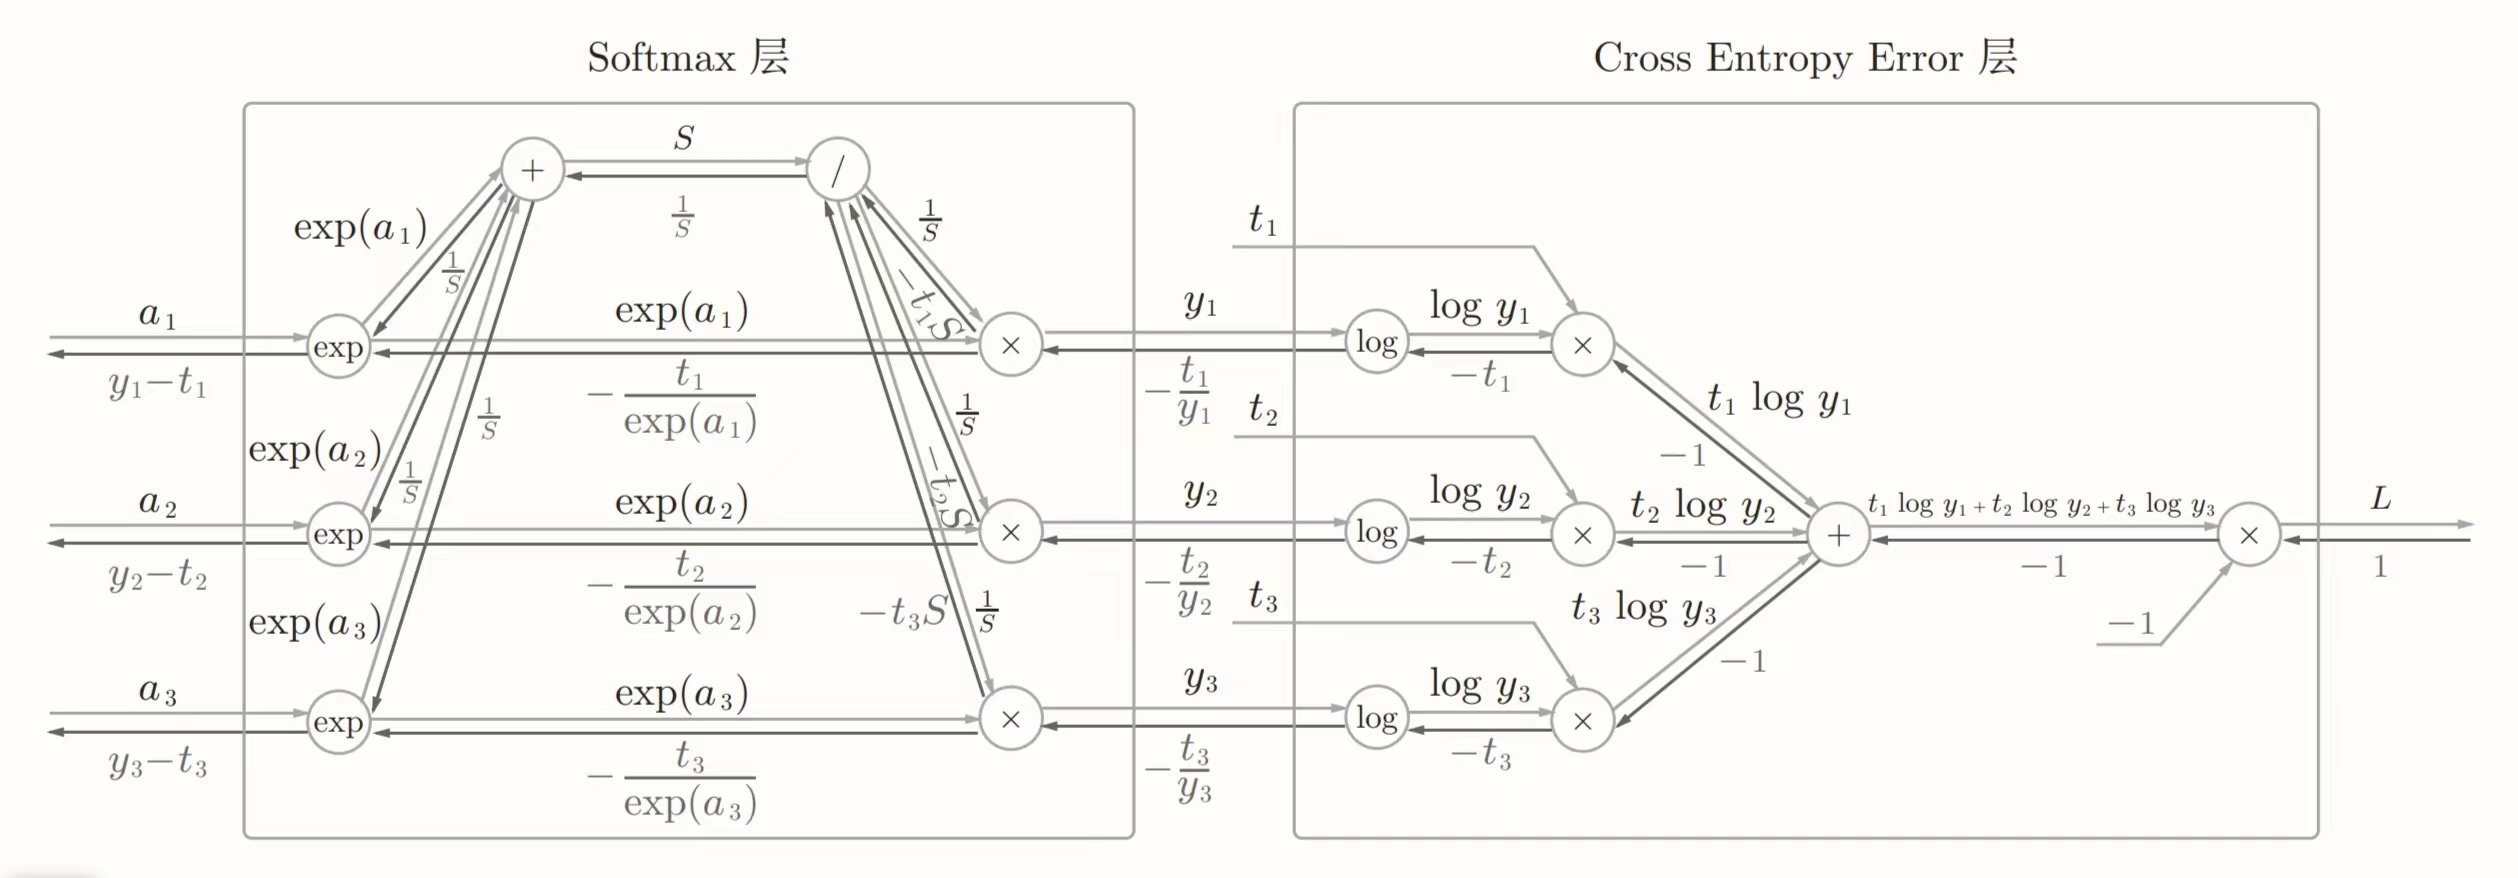
-
-
SwL实现代码。
class SoftmaxWithLoss:
    def __init__(self):
        self.loss = None
        self.y = None
        self.t = None

    def forward(self, x, t):
        self.t = t
        self.y = softmax(x)
        self.loss = cross_entropy_error(self.y, self.t)

        return self.loss

    def backward(self, dout=1):
        batch_size = self.t.shape[0]
        dx = (self.y - self.t) / batch_size

        return dx
改进版。
class SoftmaxWithLoss: def __init__(self): self.loss = None self.y = None self.t = None def forward(self, x, t): self.t = t self.y = softmax(x) self.loss = cross_entropy_error(self.y, self.t) return self.loss def backward(self, dout=1): batch_size = self.t.shape[0] if self.t.size == self.y.size: # 监督数据是one-hot-vector的情况 dx = (self.y - self.t) / batch_size else: dx = self.y.copy() dx[np.arange(batch_size), self.t] -= 1 dx = dx / batch_size return dx -
SwL传播的是监督数据与输出的误差,目的是使得监督数据与输出的误差变小。
误差反向传播的实现
-
优化版二层神经网络的实现。
class TwoLayerNet: def __init__(self, input_size, hidden_size, output_size, weight_init_std=0.01): # 初始化权重,随机取权重,偏置取0 self.params = {} self.params['W1'] = weight_init_std * np.random.randn(input_size, hidden_size) self.params['b1'] = np.zeros(hidden_size) self.params['W2'] = weight_init_std * np.random.randn(hidden_size, output_size) self.params['b2'] = np.zeros(output_size) # 生成层,将神经网络层保存为有序字典,之后调用内部方法可直接按顺序迭代调用 self.layers = OrderedDict() self.layers['Affine1'] = Affine(self.params['W1'], self.params['b1']) self.layers['Relu1'] = Relu() self.layers['Affine2'] = Affine(self.params['W2'], self.params['b2']) self.lastLayer = SoftmaxWithLoss() # 进行推理,x:输入数据 def predict(self, x): for layer in self.layers.values(): x = layer.forward(x) return x # 计算损失函数值,x:输入数据(图像数据),t:监督数据(正确解标签) def loss(self, x, t): y = self.predict(x) return self.lastLayer.forward(y, t) # 计算识别精度,x:输入数据(图像数据),t:监督数据(正确解标签) def accuracy(self, x, t): y = self.predict(x) y = np.argmax(y, axis=1) if t.ndim != 1 : t = np.argmax(t, axis=1) accuracy = np.sum(y == t) / float(x.shape[0]) return accuracy # 梯度运算,得出损失函数的梯度 def numerical_gradient(self, x, t): loss_W = lambda W: self.loss(x, t) grads = {} grads['W1'] = numerical_gradient(loss_W, self.params['W1']) grads['b1'] = numerical_gradient(loss_W, self.params['b1']) grads['W2'] = numerical_gradient(loss_W, self.params['W2']) grads['b2'] = numerical_gradient(loss_W, self.params['b2']) return grads # 误差反向传播计算权重梯度 def gradient(self, x, t): # forward self.loss(x, t) # backward,调用softmaxWithLoss函数的反向传播 dout = 1 dout = self.lastLayer.backward(dout) # ordered.values()可获得ordered中的有序字典列表,通过调用方法的反向传播求出导数 layers = list(self.layers.values()) layers.reverse() for layer in layers: dout = layer.backward(dout) # 设定 grads = {} grads['W1'] = self.layers['Affine1'].dW grads['b1'] = self.layers['Affine1'].db grads['W2'] = self.layers['Affine2'].dW grads['b2'] = self.layers['Affine2'].db return grads -
误差反向传播梯度确认。
(x_train, t_train), (x_test, t_test) = load_mnist(normalize=True, one_hot_label=True) network = TwoLayerNet(input_size=784, hidden_size=50, output_size=10) # 选取mini-batch x_batch = x_train[:3] t_batch = t_train[:3] # 计算两种梯度算法的计算公式 grad_numerical = network.numerical_gradient(x_batch, t_batch) grad_backprop = network.gradient(x_batch, t_batch) # 求各个权重的绝对误差平均值 for key in grad_numerical.keys(): diff = np.average(np.abs(grad_backprop[key] - grad_numerical[key])) print(key + ":" + str(diff)) -
误差反向传播法神经网络学习的实现。
(x_train, t_train), (x_test, t_test) = load_mnist(normalize=True, one_hot_label=True)

network = TwoLayerNet(input_size=784, hidden_size=50, output_size=10)

iters_num = 10000
train_size = x_train.shape[0]
batch_size = 100
learning_rate = 0.1
train_loss_list = []
train_acc_list = []
test_acc_list = []

iter_per_epoch = max(train_size / batch_size, 1)

for i in range(iters_num):
    batch_mask = np.random.choice(train_size, batch_size)
    x_batch = x_train[batch_mask]
    t_batch = t_train[batch_mask]

    # 通过误差反向传播法求梯度
    grad = network.gradient(x_batch, t_batch)

    # 更新
    for key in ('W1', 'W2', 'b1', 'b2'):
        network.params[key] -= learning_rate * grad[key]

    loss = network.loss(x_batch, t_batch)
    train_loss_list.append(loss)

    if i % iter_per_epoch == 0:
        train_acc = network.accuracy(x_train, t_train)
        test_acc = network.accuracy(x_test, t_test)
        train_acc_list.append(train_acc)
        test_acc_list.append(test_acc)
        print(train_acc, test_acc)
已完成神经网络的改进与修改
原书讲解代码(运行中报错误,且结果错误)
import sys,os
sys.path.append(os.pardir)
from dataset.mnist import load_mnist
import numpy as np
from collections import OrderedDict


# softmax激活函数(输出层激活函数)
def softmax(a):
    c = np.max(a)
    exp_a = np.exp(a - c)  # 溢出对策
    sum_exp_a = np.sum(exp_a)
    y = exp_a / sum_exp_a

    return y


# 交叉熵误差损失函数
def cross_entropy_error(y, t):
    if y.ndim == 1:
        t = t.reshape(1, t.size)
        y = y.reshape(1, y.size)

    # 监督数据是one-hot-vector的情况下,转换为正确解标签的索引
    if t.size == y.size:
        t = t.argmax(axis=1)

    batch_size = y.shape[0]
    return -np.sum(np.log(y[np.arange(batch_size), t] + 1e-7)) / batch_size


# 数值梯度,f是函数、x是自变量(输入值)
def numerical_gradient(f, x):
    h = 1e-4  # 0.0001
    grad = np.zeros_like(x)

    it = np.nditer(x, flags=['multi_index'], op_flags=['readwrite'])
    while not it.finished:
        idx = it.multi_index
        tmp_val = x[idx]
        x[idx] = float(tmp_val) + h
        fxh1 = f(x)  # f(x+h)

        x[idx] = tmp_val - h
        fxh2 = f(x)  # f(x-h)
        grad[idx] = (fxh1 - fxh2) / (2 * h)

        x[idx] = tmp_val  # 还原值
        it.iternext()

    return grad


# Affine层
class Affine:
    def __init__(self, W, b):
        self.W = W
        self.b = b

        self.x = None
        self.original_x_shape = None
        # 权重和偏置参数的导数
        self.dW = None
        self.db = None

    def forward(self, x):
        # 对应张量
        self.original_x_shape = x.shape
        x = x.reshape(x.shape[0], -1)
        self.x = x

        out = np.dot(self.x, self.W) + self.b

        return out

    def backward(self, dout):
        dx = np.dot(dout, self.W.T)
        self.dW = np.dot(self.x.T, dout)
        self.db = np.sum(dout, axis=0)

        dx = dx.reshape(*self.original_x_shape)  # 还原输入数据的形状(对应张量)
        return dx


# Relu激活函数层计算识别精度,x:输入数据(图像数据),t:监督数据(正确解标签)
class Relu:
    # mask 是由True和False构成的np数组
    def __init__(self):
        self.mask = None

    # mask 会把正向传播时输入的小于0的地方保存为True,其他为False
    def forward(self, x):
        self.mask = (x <= 0)
        out = x.copy()
        out[self.mask] = 0

        return out

    def backward(self, dout):
        dout[self.mask] = 0
        dx = dout

        return dx


# softmax函数与loss函数层
class SoftmaxWithLoss:
    def __init__(self):
        self.loss = None
        self.y = None
        self.t = None

    def forward(self, x, t):
        self.t = t
        self.y = softmax(x)
        self.loss = cross_entropy_error(self.y, self.t)

        return self.loss

    def backward(self, dout=1):
        batch_size = self.t.shape[0]
        if self.t.size == self.y.size:  # 监督数据是one-hot-vector的情况
            dx = (self.y - self.t) / batch_size
        else:
            dx = self.y.copy()
            dx[np.arange(batch_size), self.t] -= 1
            dx = dx / batch_size

        return dx

# 二层神经网络的构建
class TwoLayerNet:

    def __init__(self, input_size, hidden_size, output_size, weight_init_std=0.01):
        # 初始化权重,随机取权重,偏置取0
        self.params = {}
        self.params['W1'] = weight_init_std * np.random.randn(input_size, hidden_size)
        self.params['b1'] = np.zeros(hidden_size)
        self.params['W2'] = weight_init_std * np.random.randn(hidden_size, output_size)
        self.params['b2'] = np.zeros(output_size)

        # 生成层,将神经网络层保存为有序字典,之后调用内部方法可直接按顺序迭代调用
        self.layers = OrderedDict()
        self.layers['Affine1'] = Affine(self.params['W1'], self.params['b1'])
        self.layers['Relu1'] = Relu()
        self.layers['Affine2'] = Affine(self.params['W2'], self.params['b2'])

        self.lastLayer = SoftmaxWithLoss()

    # 进行推理,x:输入数据
    def predict(self, x):
        for layer in self.layers.values():
            x = layer.forward(x)

        return x

    # 计算损失函数值,x:输入数据(图像数据),t:监督数据(正确解标签)
    def loss(self, x, t):
        y = self.predict(x)
        return self.lastLayer.forward(y, t)

    # 计算识别精度,x:输入数据(图像数据),t:监督数据(正确解标签)
    def accuracy(self, x, t):
        y = self.predict(x)
        y = np.argmax(y, axis=1)
        if t.ndim != 1 : t = np.argmax(t, axis=1)

        accuracy = np.sum(y == t) / float(x.shape[0])
        return accuracy

    # 梯度运算,得出损失函数的梯度
    def numerical_gradient(self, x, t):
        loss_W = lambda W: self.loss(x, t)

        grads = {}
        grads['W1'] = numerical_gradient(loss_W, self.params['W1'])
        grads['b1'] = numerical_gradient(loss_W, self.params['b1'])
        grads['W2'] = numerical_gradient(loss_W, self.params['W2'])
        grads['b2'] = numerical_gradient(loss_W, self.params['b2'])

        return grads

    # 误差反向传播计算权重梯度
    def gradient(self, x, t):
        # forward
        self.loss(x, t)

        # backward,调用softmaxWithLoss函数的反向传播
        dout = 1
        dout = self.lastLayer.backward(dout)

        # ordered.values()可获得ordered中的有序字典列表,通过调用方法的反向传播求出导数
        layers = list(self.layers.values())
        layers.reverse()
        for layer in layers:
            dout = layer.backward(dout)

        # 设定
        grads = {}
        grads['W1'] = self.layers['Affine1'].dW
        grads['b1'] = self.layers['Affine1'].db
        grads['W2'] = self.layers['Affine2'].dW
        grads['b2'] = self.layers['Affine2'].db

        return grads


# # 梯度确认
# (x_train, t_train), (x_test, t_test) = load_mnist(normalize=True, one_hot_label=True)
#
# network = TwoLayerNet(input_size=784, hidden_size=50, output_size=10)
#
# x_batch = x_train[:3]
# t_batch = t_train[:3]
#
# grad_numerical = network.numerical_gradient(x_batch, t_batch)
# grad_backprop = network.gradient(x_batch, t_batch)
#
# # 求各个权重的绝对误差平均值
# for key in grad_numerical.keys():
#     diff = np.average(np.abs(grad_backprop[key] - grad_numerical[key]))
#     print(key + ":" + str(diff))


# 误差反向传播的实现
(x_train, t_train), (x_test, t_test) = load_mnist(normalize=True, one_hot_label=True)

network = TwoLayerNet(input_size=784, hidden_size=50, output_size=10)

iters_num = 10000
train_size = x_train.shape[0]
batch_size = 100
learning_rate = 0.1

train_loss_list = []
train_acc_list = []
test_acc_list = []

iter_per_epoch = max(train_size / batch_size, 1)

for i in range(iters_num):
    batch_mask = np.random.choice(train_size, batch_size)
    x_batch = x_train[batch_mask]
    t_batch = t_train[batch_mask]

    # 通过误差反向传播法求梯度
    grad = network.gradient(x_batch, t_batch)

    # 更新
    for key in ('W1', 'W2', 'b1', 'b2'):
        network.params[key] -= learning_rate * grad[key]

    loss = network.loss(x_batch, t_batch)
    train_loss_list.append(loss)

    if i % iter_per_epoch == 0:
        train_acc = network.accuracy(x_train, t_train)
        test_acc = network.accuracy(x_test, t_test)
        train_acc_list.append(train_acc)
        test_acc_list.append(test_acc)
        print(train_acc, test_acc)
在这其中,结果一直在0.09左右,后发现是softmax函数问题,需改进
改进后有注解正确代码
import sys,os
sys.path.append(os.pardir)
from dataset.mnist import load_mnist
import numpy as np
from collections import OrderedDict


# 二维数组的softmax激活函数(输出层激活函数)
def softmax(x):
    if x.ndim == 2:
        x = x.T # 转置,不转置将导致无法广播,
        x = x - np.max(x, axis=0)   # 减去每一列的最大值,从而防止溢出
        y = np.exp(x) / np.sum(np.exp(x), axis=0)
        return y.T

    x = x - np.max(x) # 溢出对策
    return np.exp(x) / np.sum(np.exp(x))

# 交叉熵误差损失函数
def cross_entropy_error(y, t):
    if y.ndim == 1:
        t = t.reshape(1, t.size)
        y = y.reshape(1, y.size)

    # 监督数据是one-hot-vector的情况下,转换为正确解标签的索引
    if t.size == y.size:
        t = t.argmax(axis=1)  # argmax是返回最大值索引

    batch_size = y.shape[0]
    return -np.sum(np.log(y[np.arange(batch_size), t] + 1e-7)) / batch_size

'''numerical_gradient的目的是梯度确认
# 数值梯度,f是函数、x是自变量(输入值)
def numerical_gradient(f, x):
    h = 1e-4  # 0.0001
    grad = np.zeros_like(x)

    it = np.nditer(x, flags=['multi_index'], op_flags=['readwrite'])
    while not it.finished:
        idx = it.multi_index
        tmp_val = x[idx]
        x[idx] = float(tmp_val) + h
        fxh1 = f(x)  # f(x+h)

        x[idx] = tmp_val - h
        fxh2 = f(x)  # f(x-h)
        grad[idx] = (fxh1 - fxh2) / (2 * h)

        x[idx] = tmp_val  # 还原值
        it.iternext()

    return grad
'''


# Affine层
class Affine:
    def __init__(self, W, b):
        self.W = W
        self.b = b

        self.x = None
        self.original_x_shape = None
        # 权重和偏置参数的导数
        self.dW = None
        self.db = None

    def forward(self, x):
        # 对应张量
        self.original_x_shape = x.shape
        x = x.reshape(x.shape[0], -1)
        self.x = x

        out = np.dot(self.x, self.W) + self.b

        return out

    def backward(self, dout):
        dx = np.dot(dout, self.W.T)
        self.dW = np.dot(self.x.T, dout)
        self.db = np.sum(dout, axis=0)

        dx = dx.reshape(*self.original_x_shape)  # 还原输入数据的形状(对应张量)
        return dx


# Relu激活函数层计算识别精度,x:输入数据(图像数据),t:监督数据(正确解标签)
class Relu:
    # mask 是由True和False构成的np数组
    def __init__(self):
        self.mask = None

    # mask 会把正向传播时输入的小于0的地方保存为True,其他为False
    def forward(self, x):
        self.mask = (x <= 0)
        out = x.copy()
        out[self.mask] = 0

        return out

    def backward(self, dout):
        dout[self.mask] = 0
        dx = dout

        return dx


# softmax函数与loss函数层
class SoftmaxWithLoss:
    def __init__(self):
        self.loss = None
        self.y = None  # softmax的输出
        self.t = None  # 监督数据
    def forward(self, x, t):
        self.t = t
        self.y = softmax(x)
        self.loss = cross_entropy_error(self.y, self.t)

        return self.loss

    def backward(self, dout=1):
        batch_size = self.t.shape[0]
        if self.t.size == self.y.size:  # 监督数据是one-hot-vector的情况
            dx = (self.y - self.t) / batch_size
        else:
            dx = self.y.copy()
            dx[np.arange(batch_size), self.t] -= 1
            dx = dx / batch_size

        return dx

# 二层神经网络的构建
class TwoLayerNet:

    def __init__(self, input_size, hidden_size, output_size, weight_init_std=0.01):
        # 初始化权重,随机取权重,偏置取0
        self.params = {}
        self.params['W1'] = weight_init_std * np.random.randn(input_size, hidden_size)
        self.params['b1'] = np.zeros(hidden_size)
        self.params['W2'] = weight_init_std * np.random.randn(hidden_size, output_size)
        self.params['b2'] = np.zeros(output_size)

        # 生成层,将神经网络层保存为有序字典,之后调用内部方法可直接按顺序迭代调用
        self.layers = OrderedDict()
        self.layers['Affine1'] = Affine(self.params['W1'], self.params['b1'])
        self.layers['Relu1'] = Relu()
        self.layers['Affine2'] = Affine(self.params['W2'], self.params['b2'])

        self.lastLayer = SoftmaxWithLoss()

    # 进行推理,x:输入数据
    def predict(self, x):
        for layer in self.layers.values():
            x = layer.forward(x)

        return x

    # 计算损失函数值,x:输入数据(图像数据),t:监督数据(正确解标签)
    def loss(self, x, t):
        y = self.predict(x)
        return self.lastLayer.forward(y, t)

    # 计算识别精度,x:输入数据(图像数据),t:监督数据(正确解标签)
    def accuracy(self, x, t):
        y = self.predict(x)
        y = np.argmax(y, axis=1)
        if t.ndim != 1:
            t = np.argmax(t, axis=1)

        accuracy = np.sum(y == t) / float(x.shape[0])
        return accuracy

    '''
    # 梯度运算,得出损失函数的梯度
    def numerical_gradient(self, x, t):
        loss_W = lambda W: self.loss(x, t)

        grads = {}
        grads['W1'] = numerical_gradient(loss_W, self.params['W1'])
        grads['b1'] = numerical_gradient(loss_W, self.params['b1'])
        grads['W2'] = numerical_gradient(loss_W, self.params['W2'])
        grads['b2'] = numerical_gradient(loss_W, self.params['b2'])

        return grads
    '''

    # 误差反向传播计算权重梯度
    def gradient(self, x, t):
        # forward
        self.loss(x, t)

        # backward,调用softmaxWithLoss函数的反向传播
        dout = 1
        dout = self.lastLayer.backward(dout)

        # ordered.values()可获得ordered中的有序字典列表,通过调用方法的反向传播求出导数
        layers = list(self.layers.values())
        layers.reverse()
        for layer in layers:
            dout = layer.backward(dout)

        # 设定
        grads = {}
        grads['W1'] = self.layers['Affine1'].dW
        grads['b1'] = self.layers['Affine1'].db
        grads['W2'] = self.layers['Affine2'].dW
        grads['b2'] = self.layers['Affine2'].db

        return grads

'''梯度确认
# 梯度确认
(x_train, t_train), (x_test, t_test) = load_mnist(normalize=True, one_hot_label=True)

network = TwoLayerNet(input_size=784, hidden_size=50, output_size=10)

x_batch = x_train[:3]
t_batch = t_train[:3]

grad_numerical = network.numerical_gradient(x_batch, t_batch)
grad_backprop = network.gradient(x_batch, t_batch)

# 求各个权重的绝对误差平均值
for key in grad_numerical.keys():
    diff = np.average(np.abs(grad_backprop[key] - grad_numerical[key]))
    print(key + ":" + str(diff))
'''

# 误差反向传播的实现
(x_train, t_train), (x_test, t_test) = load_mnist(normalize=True, one_hot_label=True)

network = TwoLayerNet(input_size=784, hidden_size=50, output_size=10)

iters_num = 10000
train_size = x_train.shape[0]
batch_size = 100
learning_rate = 0.1

train_loss_list = []
train_acc_list = []
test_acc_list = []

iter_per_epoch = max(train_size / batch_size, 1)

for i in range(iters_num):
    batch_mask = np.random.choice(train_size, batch_size)
    x_batch = x_train[batch_mask]
    t_batch = t_train[batch_mask]

    # 通过误差反向传播法求梯度
    grad = network.gradient(x_batch, t_batch)

    # 更新
    for key in ('W1', 'W2', 'b1', 'b2'):
        network.params[key] -= learning_rate * grad[key]

    loss = network.loss(x_batch, t_batch)
    train_loss_list.append(loss)

    if i % iter_per_epoch == 0:
        train_acc = network.accuracy(x_train, t_train)
        test_acc = network.accuracy(x_test, t_test)
        train_acc_list.append(train_acc)
        test_acc_list.append(test_acc)
        print(train_acc, test_acc)
与学习相关技巧
参数的更新
寻找最优参数的过程称为最优化,则列出一些最优化方法以下。
SGD(随机梯度下降法)
-
SGD数学式表示。
$W \gets W - \eta\dfrac{\delta{L}}{\delta{W}}$
$W$是需要更新的权重参数
$\eta$表示学习率 -
SGD代码实现
class SGD: def __init__(self, lr=0.01): # lr学习率 self.lr = lr def update(self, params, grads): for key in params.keys(): params[key] -= self.lr * grads[key] -
SGD应用示例。
network = TwoLayerNet(...) optimizer = SGD() for i in range(10000): ... x_batch, t_batch = get_mini_batch(...) # mini-batch grads = network.gradient(x_batch, t_batch) 数学式表示。params = network.params optimizer.update(params, grads) ... -
SGD缺点:
-
如果函数的形状非均向,搜索路径就会非常低效,例如呈延伸状函数$f\left(x,y\right)=\frac{1}{20}x^2 + y^2$。
-
根本原因是梯度的方向没有指向最小值。
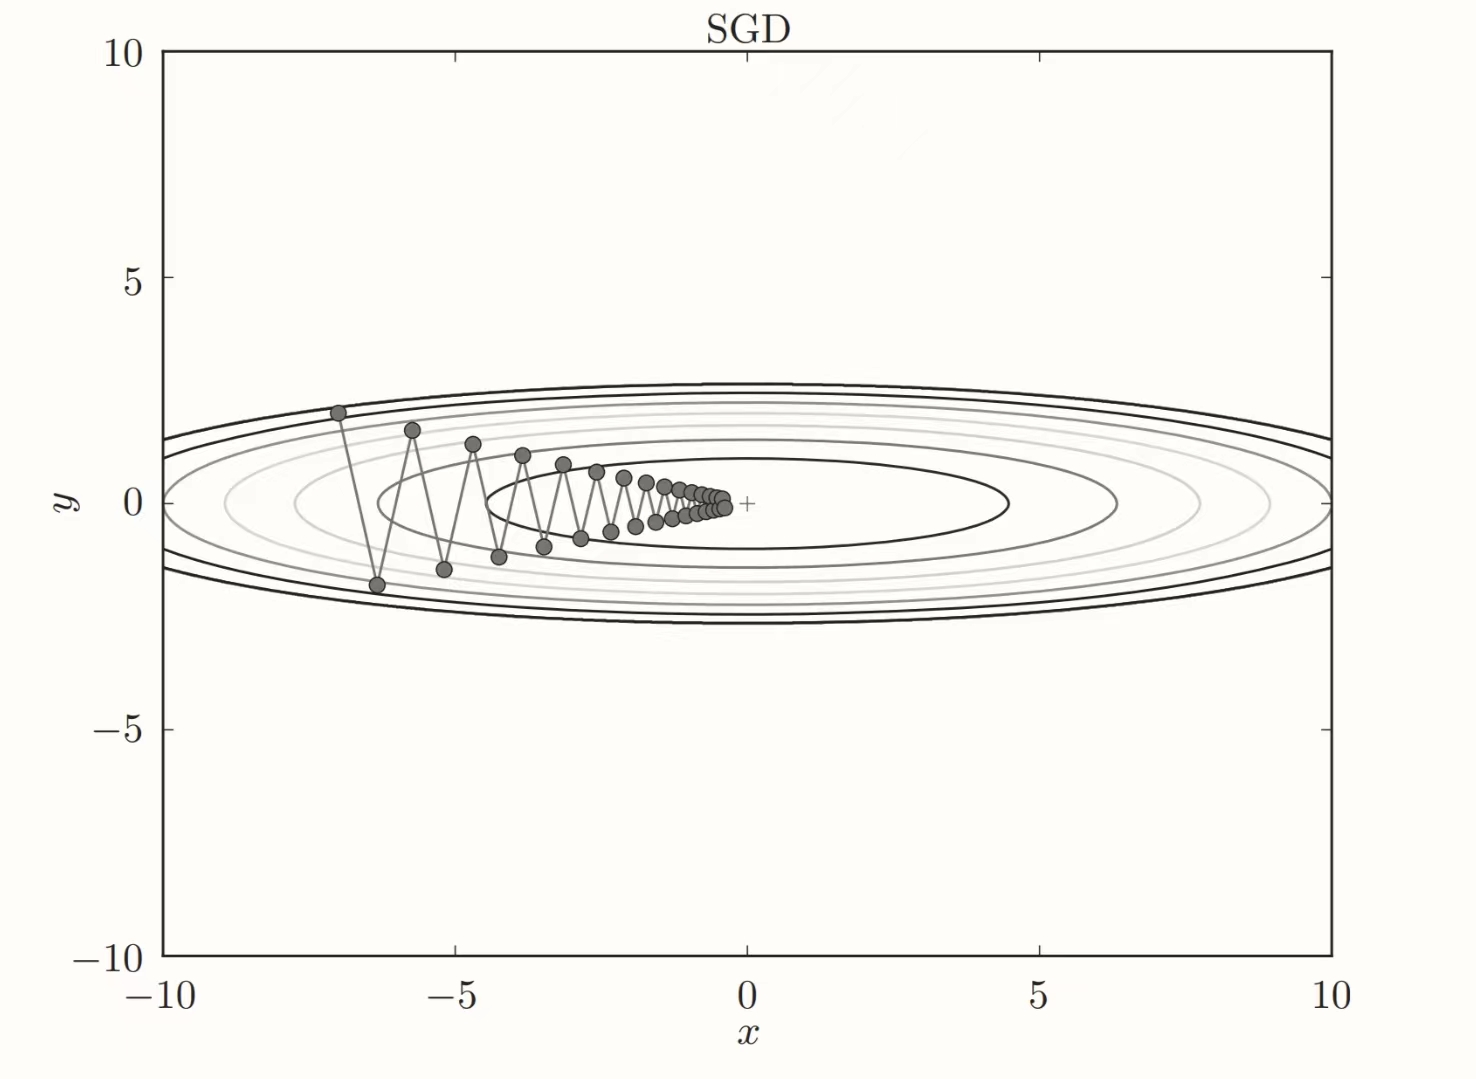
-
Momentum
-
Momentum数学式表示。
$v \gets \alpha v - \eta\dfrac{\delta{L}}{\delta{W}}$
$W \gets W+v$$v$是速度
$\alpha$是影响速度变化的因素(一般是0.9之类)class Momentum: def __init__(self, lr=0.01, momentum=0.9): self.lr = lr self.momentum = momentum self.v = None def update(self, params, grads): if self.v is None: self.v = {} for key, val in params.items(): self.v[key] = np.zeros_like(val) for key in params.keys(): self.v[key] = self.momentum*self.v[key] - self.lr*grads[key] params[key] += self.v[key]