前提
你需要准备好node.js版本不低于6.14.8 和 git
文章内容比较长(保姆级别教程),全是干货,请耐心看完
通过create-react-app脚手架搭建项目
1.第一步
注: 项目名称不可以出现大写字母
- 打开文件夹,呼出cmd,输入搭建命令:
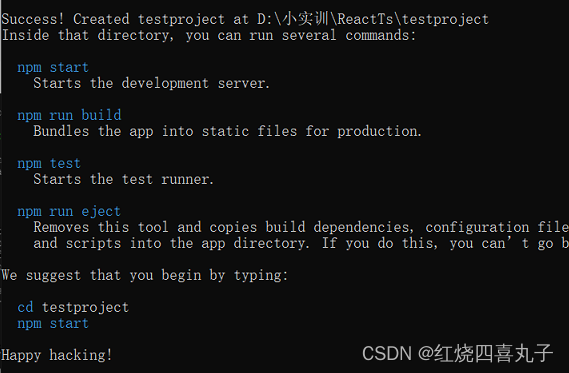
npx create-react-app testproject --template typescript npx create-react-app testproject(项目名称) --template typescript
出现Happy hacking! 就说明项目搭建成功
打开vscode查看项目
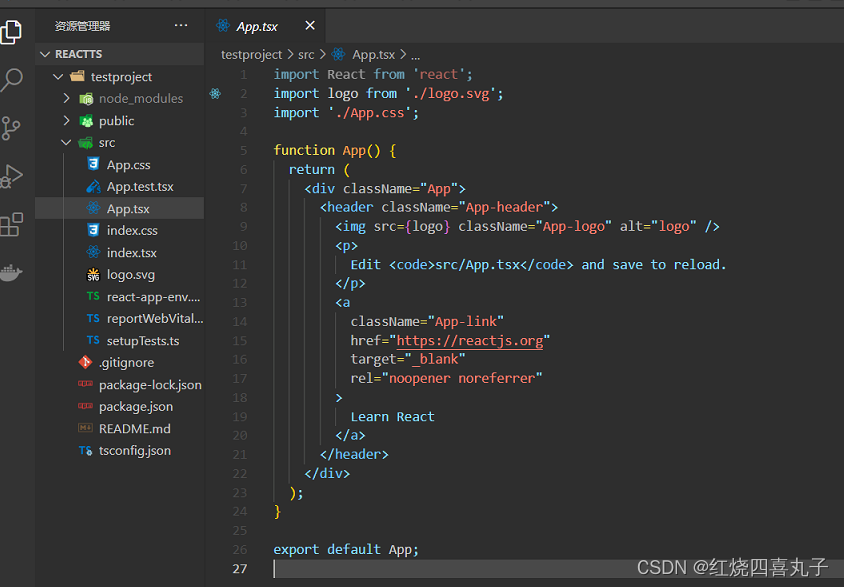
当项目中出现tsx 就说明项目搭建成功
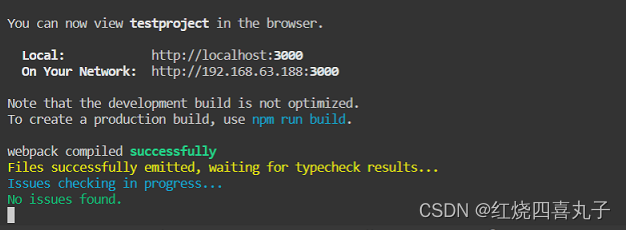
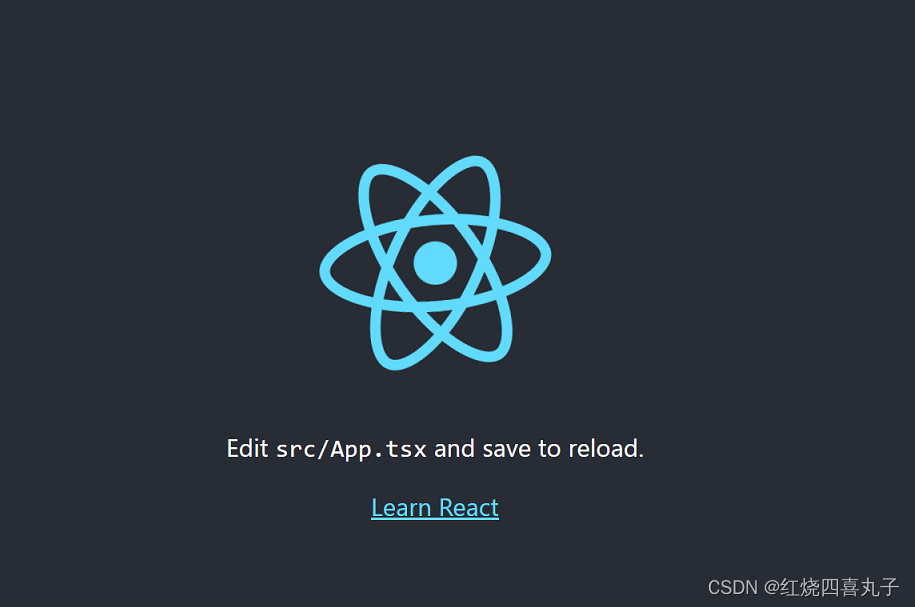
然后启动项目 npm start / npm run start
二、配置路由
下载路由
npm i [email protected] react-router-config @types/react-router-config @types/react-router-dom -Ssrc目录下创建views文件夹,views内创建Home,Contact,About,Navbar四个tsx文件,其中Navbar用来控制路由,其他三个页面用来展示
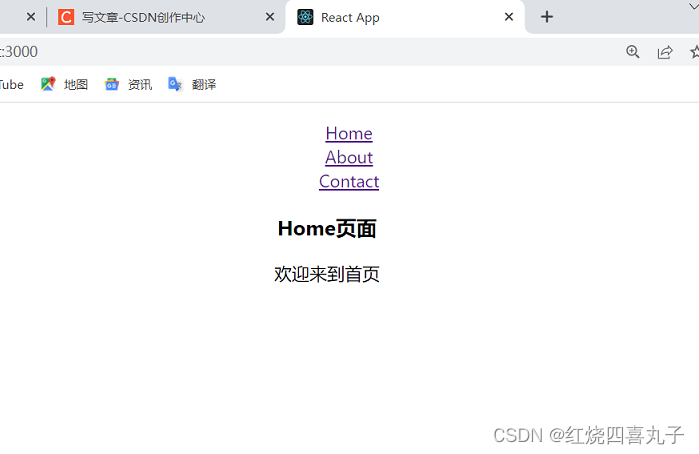
Home:
- import React, { Component } from "react";
- export default class Home extends Component {
- render() {
- return (
- <div className="home">
- <div className="container">
- <h3 className="center"> Home页面</h3>
- <p>欢迎来到首页</p>
- </div>
- </div>
- );
- }
- }
Contact:
- import React, { Component } from "react";
- export default class Contact extends Component {
- render() {
- return (
- <div className="contact">
- <div className="container">
- <h3 className="center"> Contact页面</h3>
- <p>欢迎来到联系我们页面!</p>
- </div>
- </div>
- );
- }
- }
About:
- import React, { Component } from "react";
- export default class About extends Component {
- render() {
- return (
- <div className="about">
- <div className="container">
- <h3 className="center"> About页面</h3>
- <p>欢迎来到关于我们页面!</p>
- </div>
- </div>
- );
- }
- }
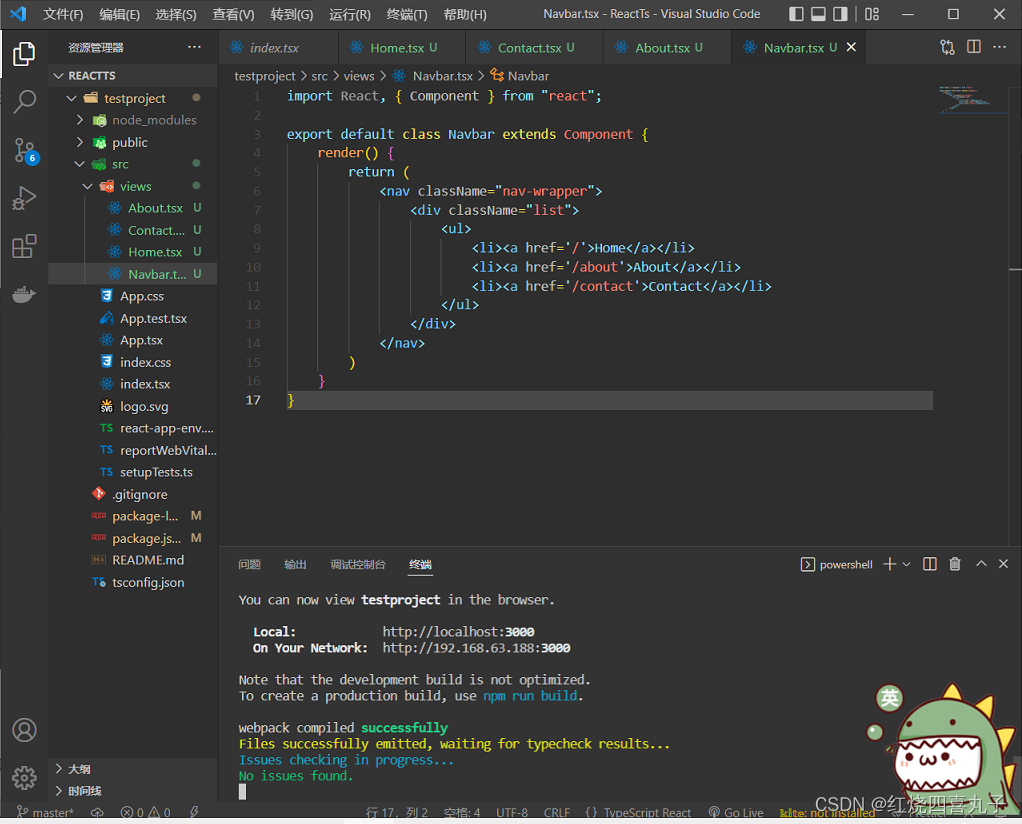
Navbar:
- import React, { Component } from "react";
- export default class Navbar extends Component {
- render() {
- return (
- <nav className="nav-wrapper">
- <div className="list">
- <ul>
- <li><a href='/'>Home</a></li>
- <li><a href='/about'>About</a></li>
- <li><a href='/contact'>Contact</a></li>
- </ul>
- </div>
- </nav>
- )
- }
- }

创建完成后
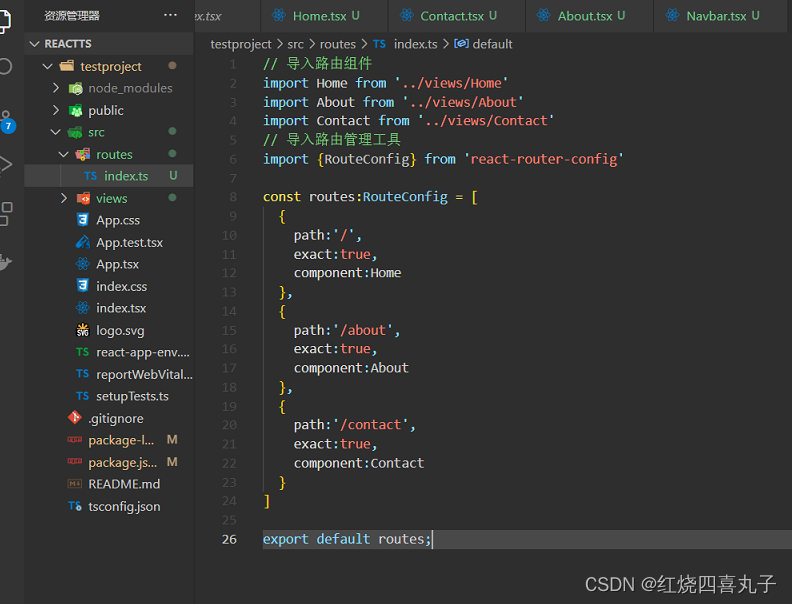
src目录下创建routes文件夹,同时创建index.ts,使用RouteConfig对路由进行统一管理
- // 导入路由组件
- import Home from '../views/Home'
- import About from '../views/About'
- import Contact from '../views/Contact'
- // 导入路由管理工具
- import {RouteConfig} from 'react-router-config'
- const routes:RouteConfig = [
- {
- path:'/',
- exact:true,
- component:Home
- },
- {
- path:'/about',
- exact:true,
- component:About
- },
- {
- path:'/contact',
- exact:true,
- component:Contact
- }
- ]
- export default routes;
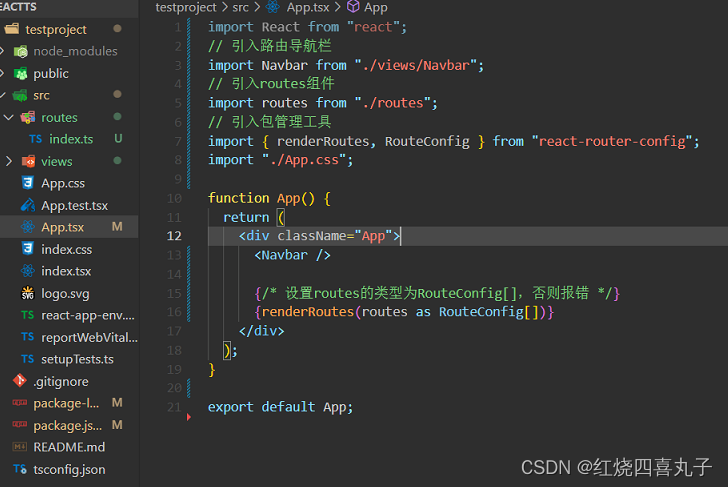
App.tsx中引入Routes,Navbar和路由管理工具
- import React from "react";
- // 引入路由导航栏
- import Navbar from "./views/Navbar";
- // 引入routes组件
- import routes from "./routes";
- // 引入包管理工具
- import { renderRoutes, RouteConfig } from "react-router-config";
- import "./App.css";
- function App() {
- return (
- <div className="App">
- <Navbar />
- {/* 设置routes的类型为RouteConfig[],否则报错 */}
- {renderRoutes(routes as RouteConfig[])}
- </div>
- );
- }
- export default App;
根目录index.tsx中这样定义
- import React from "react";
- import ReactDOM from "react-dom";
- import "./index.css";
- import App from "./App";
- import reportWebVitals from "./reportWebVitals";
- import { BrowserRouter as Router } from "react-router-dom";
- ReactDOM.render(
- <React.StrictMode>
- <Router>
- <App />
- </Router>
- </React.StrictMode>,
- document.getElementById("root")
- );
- // If you want to start measuring performance in your app, pass a function
- // to log results (for example: reportWebVitals(console.log))
- // or send to an analytics endpoint. Learn more: https://bit.ly/CRA-vitals
- reportWebVitals();

路由配置完成启动项目
如果启动出现这种报错的话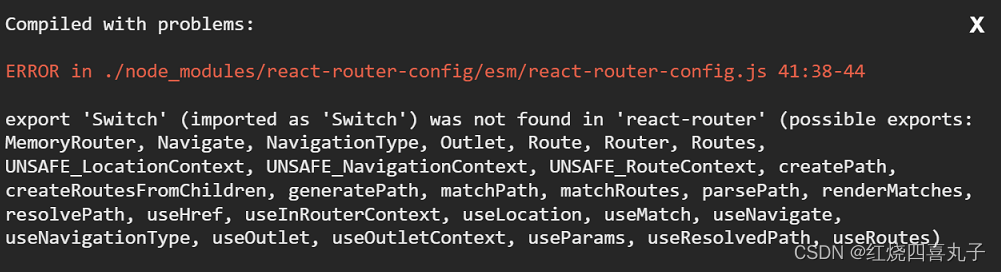
运行命令
npm i [email protected] -s再次重启项目
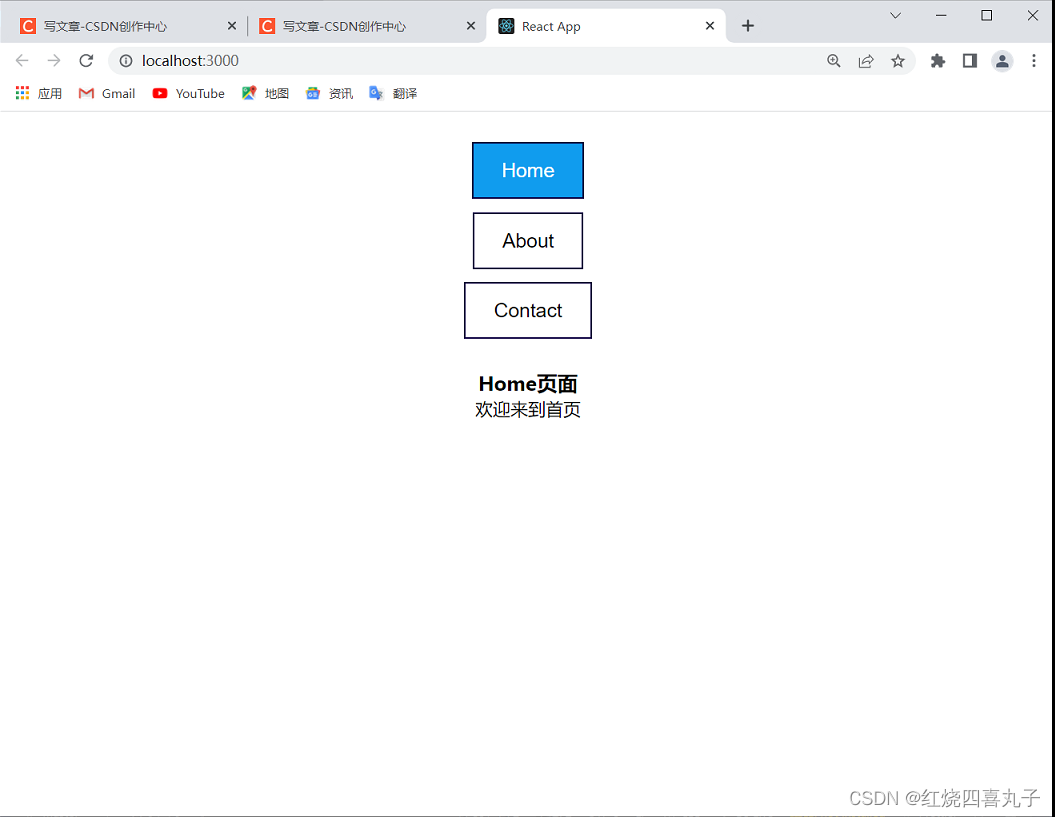
给页面加点样
在App.css里面添加样式
- * {
- padding: 0;
- margin: 0;
- }
- h1 {
- text-align: center;
- font-size: 45px;
- font-family: Arial, Helvetica, sans-serif;
- color: rgb(6, 0, 32);
- padding: 40px;
- }
- .list {
- display: flex;
- justify-content: center;
- width: 100%;
- }
- .list ul li {
- list-style: none;
- margin: 42px;
- text-align: center;
- }
- a {
- text-decoration: none;
- color: rgb(0, 0, 0);
- font-size: 18px;
- font-family: Arial, Helvetica, sans-serif;
- padding: 14px 25px;
- background-color: transparent;
- border: 2px solid rgb(12, 0, 66);
- }
- a:hover {
- background-color: rgb(12, 0, 66);
- color: rgb(255, 255, 255);
- }
三、配置less
暴露配置方式
因为有git 所以 需要依次输入以下三条命令
- git add .
- git commit -m '暴露'
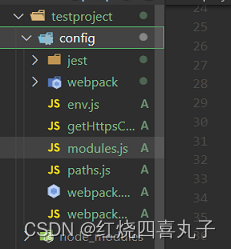
- npm run eject
此时项目多出了config文件夹
安装less和less-loader
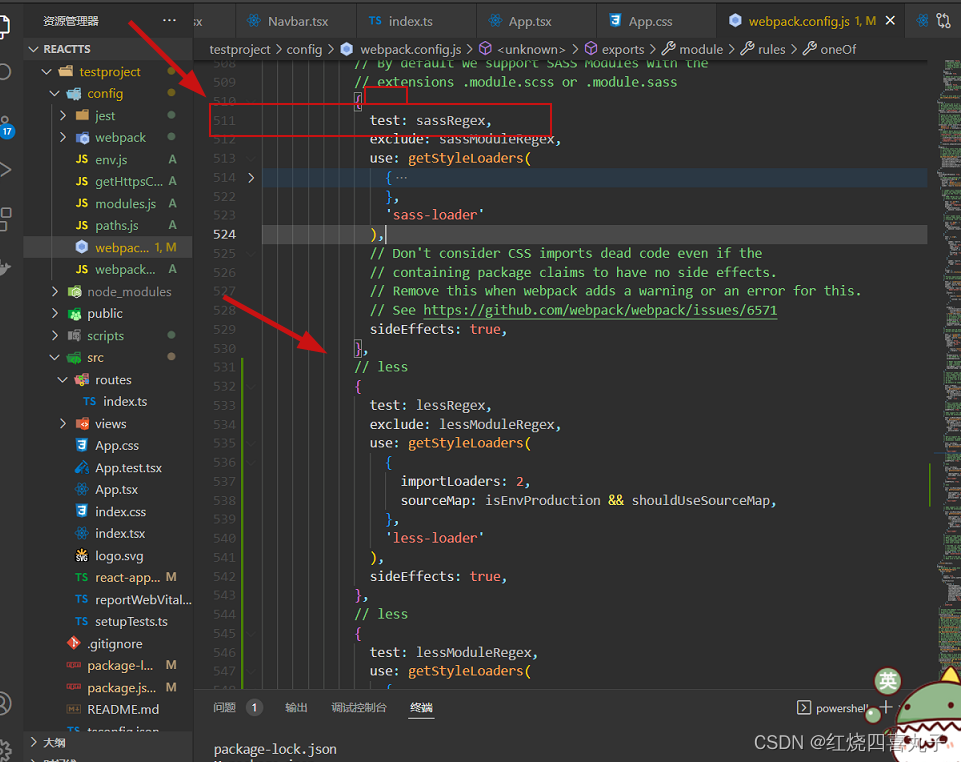
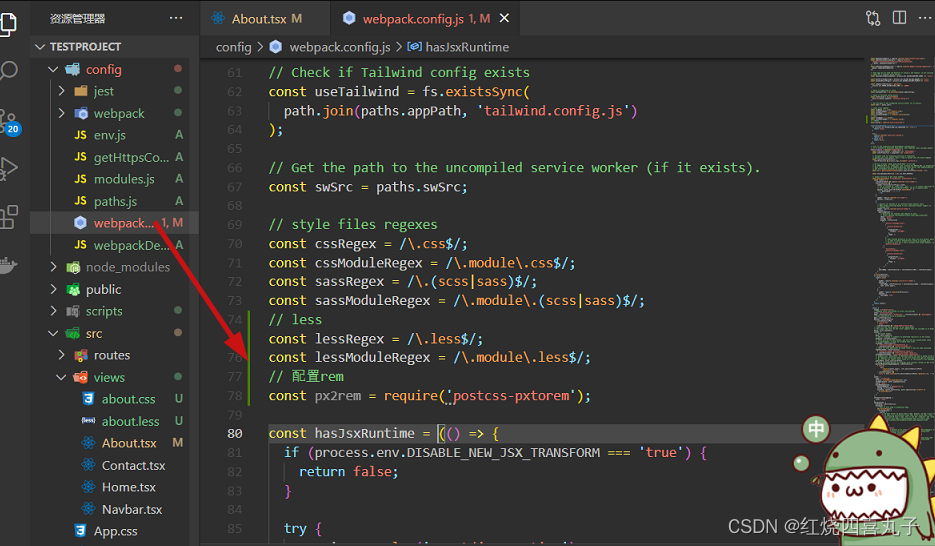
npm i less less-loader -S找到config目录下的webpack.config.js文件,在50-70行之间有个cssRegex,在此处添加
- // less
- const lessRegex = /\.less$/;
- const lessModuleRegex = /\.module\.less$/;

在webpack.config.js文件500多行有个sassRegex,模仿写对应的lessRegex
- // less
- {
- test: lessRegex,
- exclude: lessModuleRegex,
- use: getStyleLoaders(
- {
- importLoaders: 2,
- sourceMap: isEnvProduction && shouldUseSourceMap,
- },
- 'less-loader'
- ),
- sideEffects: true,
- },
- // less
- {
- test: lessModuleRegex,
- use: getStyleLoaders(
- {
- importLoaders: 2,
- sourceMap: isEnvProduction && shouldUseSourceMap,
- modules: true,
- getLocalIdent: getCSSModuleLocalIdent,
- },
- 'less-loader'
- ),
- },
重新启动项目npm start,在views中创建less文件并引入
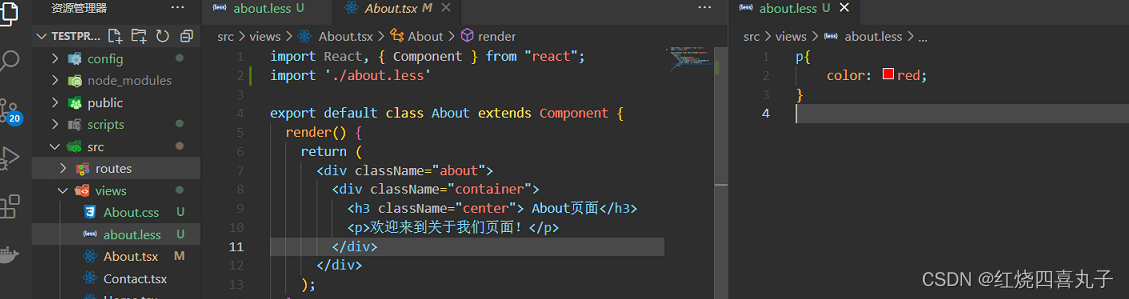
附:如果出现报错

说明react版本是18的版本 所以我们要降低版本
npm install [email protected] [email protected] --save
四、配置sass(选配)
通过create-react-app创建的react项目,其实是默认已经配置好sass的,所以我们先尝试在项目中引入sass文件
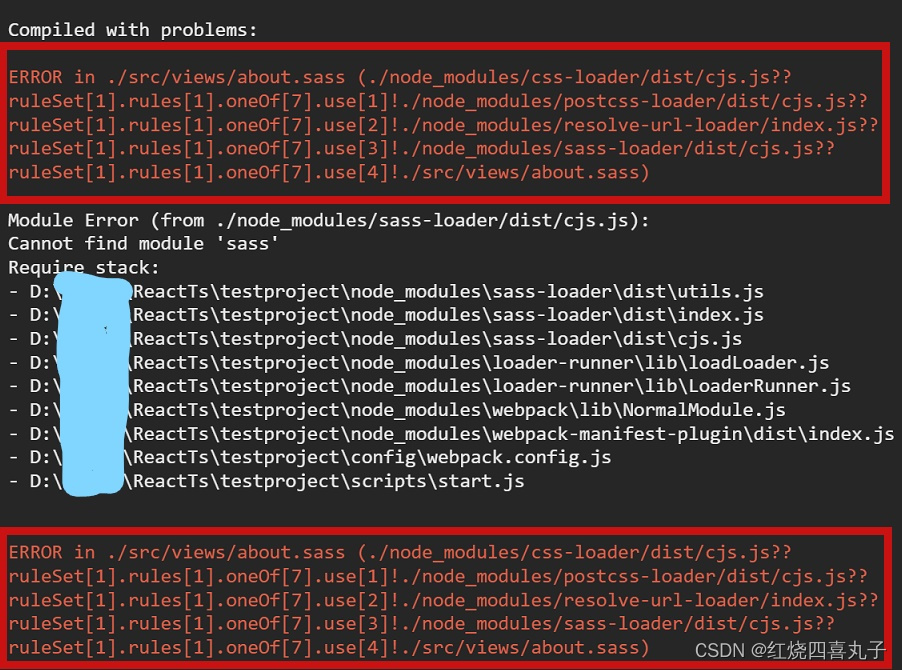
跟着步骤会出现两个错误
红色区域是两个样式撞了 所以less和sass二选一 (之后找到解决方法会解决)
中间区域一般报的是
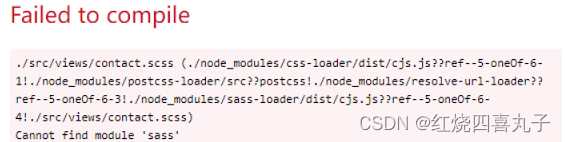
解决方法:执行下面的命令 之后重启项目即可
npm i sass -s
五、配置px2rem自适应
暴露config方式
1. 安装lib-flexible、pxtorem,postcss
npm i lib-flexible postcss-pxtorem postcss postcss-loader postcss-preset-env postcss-flexbugs-fixes -s2.配置config/webpack.config.js,在config目录下找到webpack.config.js文件,
加上配置的内容
- // 配置rem
- const px2rem = require('postcss-pxtorem');
然后再下面代码中加入这行代码(里面大小可以自行调配 如你常用375的设计图就将
rootValue: 75 => rootValue: 37.5 (根据个人喜好))
找到当前页面下的128行左右 或者篮框下面
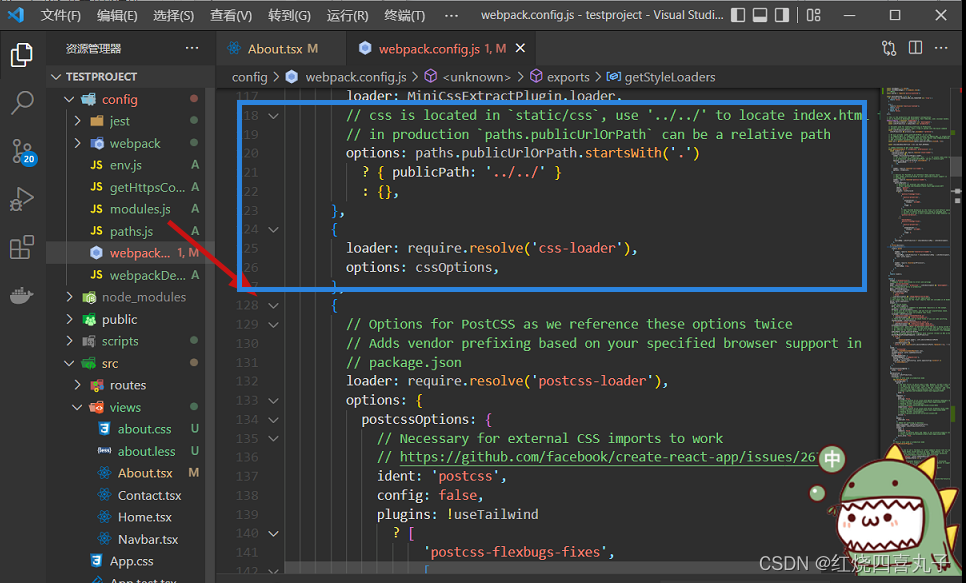
750 设计图代码
- {
- // Options for PostCSS as we reference these options twice
- // Adds vendor prefixing based on your specified browser support in
- // package.json
- loader: require.resolve('postcss-loader'),
- options: {
- postcssOptions: {
- // Necessary for external CSS imports to work
- // https://github.com/facebook/create-react-app/issues/2677
- ident: 'postcss',
- config: false,
- plugins: !useTailwind
- ? [
- 'postcss-nested',
- 'postcss-flexbugs-fixes',
- [
- 'postcss-preset-env',
- {
- autoprefixer: {
- flexbox: 'no-2009',
- },
- stage: 3
- },
- ],
- // Adds PostCSS Normalize as the reset css with default options,
- // so that it honors browserslist config in package.json
- // which in turn let's users customize the target behavior as per their needs.
- px2rem({
- rootValue: 75, //设计稿宽/10
- selectorBlackList : [], //过滤
- propList : ['*'],
- minPixelValue: 2,
- exclude: /node_modules/i
- }), //设计稿根据750px(iphone6)
- 'postcss-normalize',
- ]
- : [
- 'tailwindcss',
- 'postcss-flexbugs-fixes',
- [
- 'postcss-preset-env',
- {
- autoprefixer: {
- flexbox: 'no-2009',
- },
- stage: 3,
- },
- ],
- px2rem({
- rootValue: 75,//设计稿宽/10
- selectorBlackList : [], //过滤
- propList : ['*'],
- minPixelValue: 2,
- exclude: /node_modules/i
- }), //设计稿根据750px(iphone6)
- ],
- },
- sourceMap: isEnvProduction ? shouldUseSourceMap : isEnvDevelopment,
- },
- },
375设计稿
- {
- // Options for PostCSS as we reference these options twice
- // Adds vendor prefixing based on your specified browser support in
- // package.json
- loader: require.resolve('postcss-loader'),
- options: {
- postcssOptions: {
- // Necessary for external CSS imports to work
- // https://github.com/facebook/create-react-app/issues/2677
- ident: 'postcss',
- config: false,
- plugins: !useTailwind
- ? [
- 'postcss-nested',
- 'postcss-flexbugs-fixes',
- [
- 'postcss-preset-env',
- {
- autoprefixer: {
- flexbox: 'no-2009',
- },
- stage: 3
- },
- ],
- // Adds PostCSS Normalize as the reset css with default options,
- // so that it honors browserslist config in package.json
- // which in turn let's users customize the target behavior as per their needs.
- px2rem({
- rootValue: 37.5, //设计稿宽/10
- selectorBlackList : [], //过滤
- propList : ['*'],
- minPixelValue: 2,
- exclude: /node_modules/i
- }), //设计稿根据750px(iphone6)
- 'postcss-normalize',
- ]
- : [
- 'tailwindcss',
- 'postcss-flexbugs-fixes',
- [
- 'postcss-preset-env',
- {
- autoprefixer: {
- flexbox: 'no-2009',
- },
- stage: 3,
- },
- ],
- px2rem({
- rootValue: 37.5,//设计稿宽/10
- selectorBlackList : [], //过滤
- propList : ['*'],
- minPixelValue: 2,
- exclude: /node_modules/i
- }), //设计稿根据750px(iphone6)
- ],
- },
- sourceMap: isEnvProduction ? shouldUseSourceMap : isEnvDevelopment,
- },
- },
src目录下找到index入口文件,在文件上面加入
import 'lib-flexible';
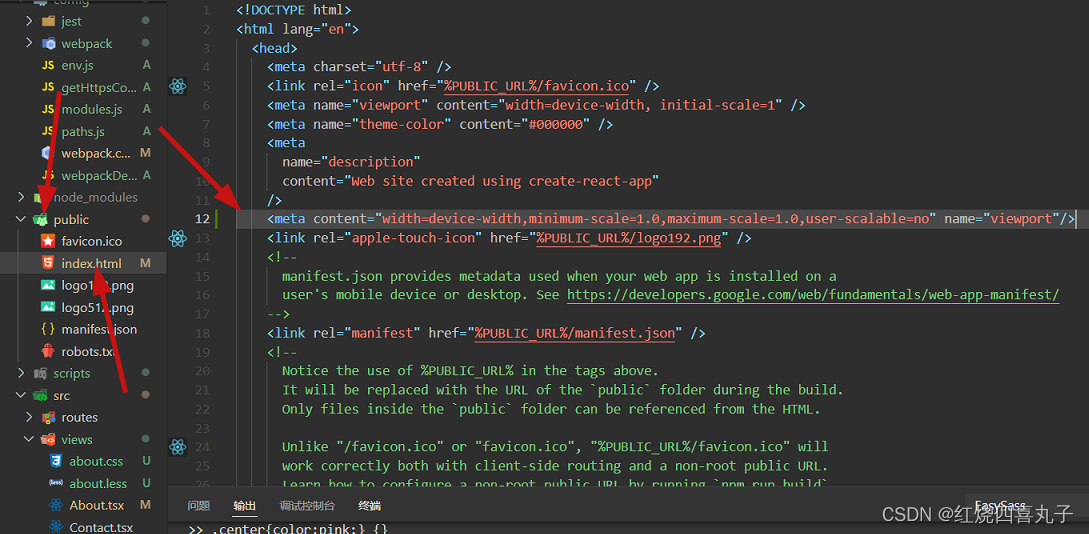
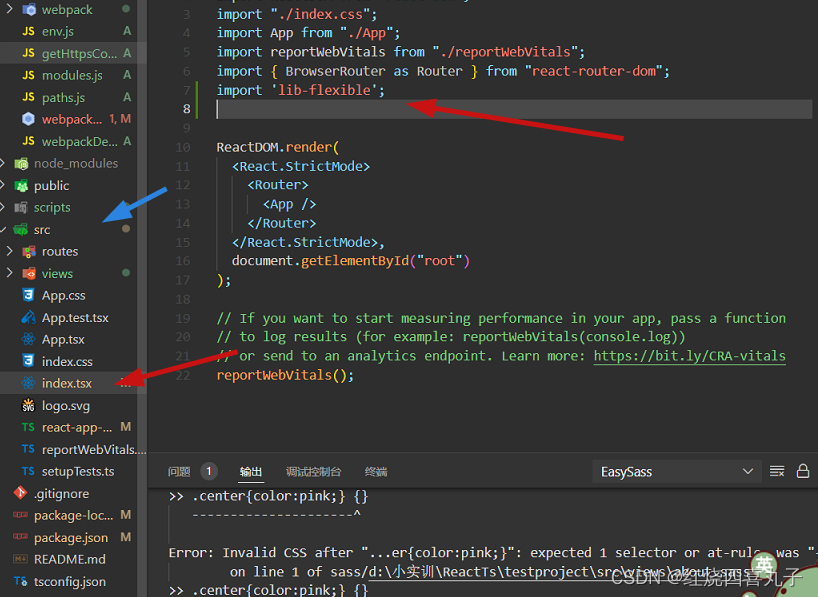 找到public/index.html文件,替换如下代码:
<meta content="width=device-width,minimum-scale=1.0,maximum-scale=1.0,user-scalable=no" name="viewport"/>
重新运行项目,一般就可以看到px转rem了
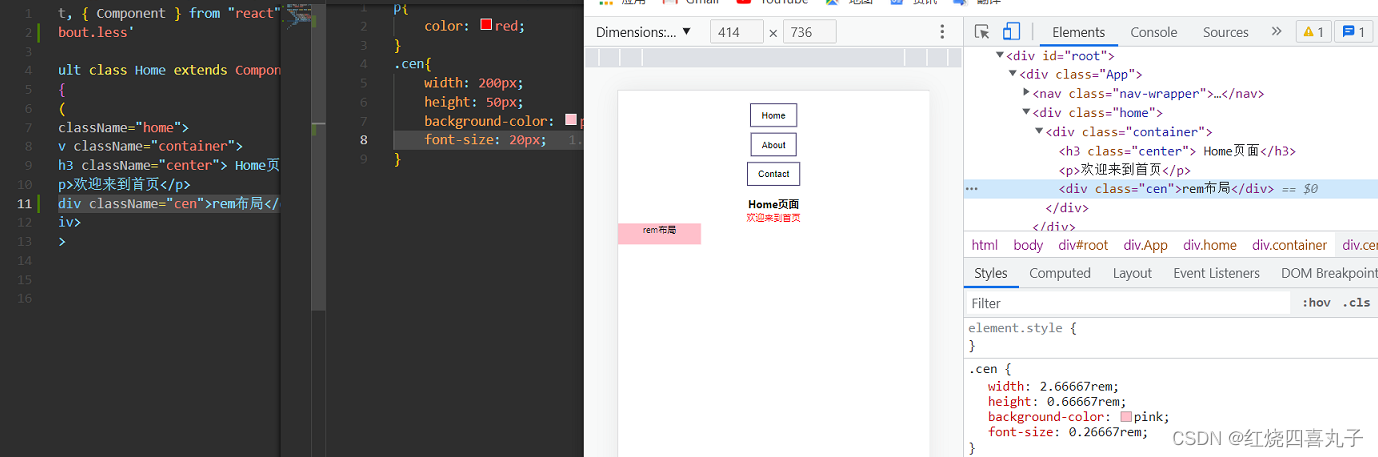
存在问题:当设备宽度超过540后,样式就固定在540不再改变了
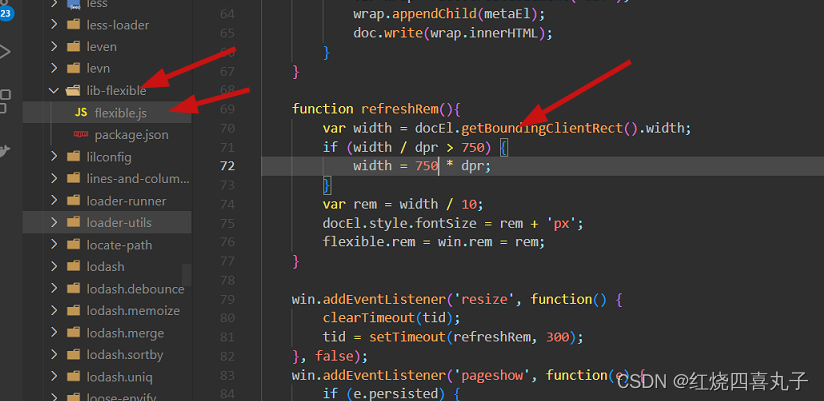
解决方法:在node-modules => lib-flexible => flexible.js中找到refreshRem修改其中的width值为设计稿宽度即可
六、配置axios和反向代理
1. 安装axios 和 http-proxy-middleware(后面反向代理会用到)
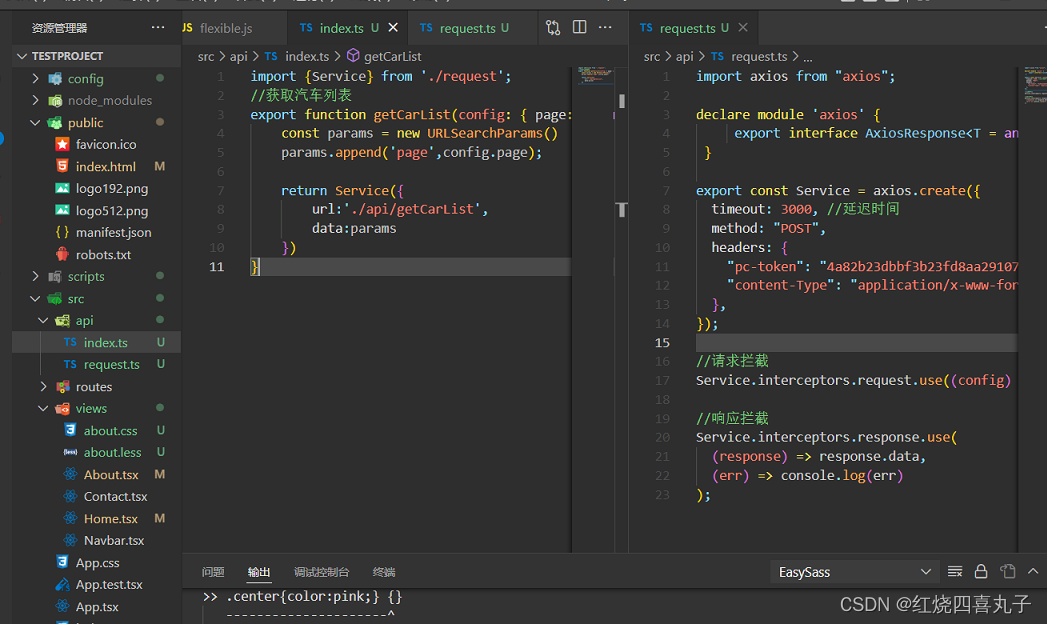
npm i axios http-proxy-middleware -s2.在src目录下创建api文件夹,然后创建 index.ts 和 request.ts 文件
index.ts
- import {Service} from './request';
- //获取汽车列表
- export function getCarList(config: { page: string; }){
- const params = new URLSearchParams()
- params.append('page',config.page);
- return Service({
- url:'./api/getCarList',
- data:params
- })
- }
request.ts
- import axios from "axios";
- declare module 'axios' {
- export interface AxiosResponse<T = any> extends Promise<T> {}
- }
- export const Service = axios.create({
- timeout: 3000, //延迟时间
- method: "POST",
- headers: {
- "pc-token": "4a82b23dbbf3b23fd8aa291076e660ec",
- "content-Type": "application/x-www-form-urlencoded",
- },
- });
- //请求拦截
- Service.interceptors.request.use((config) => config);
- //响应拦截
- Service.interceptors.response.use(
- (response) => response.data,
- (err) => console.log(err)
- );
 3. 配置代理,可以访问到后台的服务器地址
在src文件夹中创建setupProxy.js内容配置如下
- const {createProxyMiddleware} = require('http-proxy-middleware');
- module.exports = function(app) {
- app.use('/api', createProxyMiddleware({
- target: 'http://www.ibugthree.com/oldcar/',//后台服务器地址
- changeOrigin: true,
- pathRewrite: {
- '^/api': '',
- },}))
- };


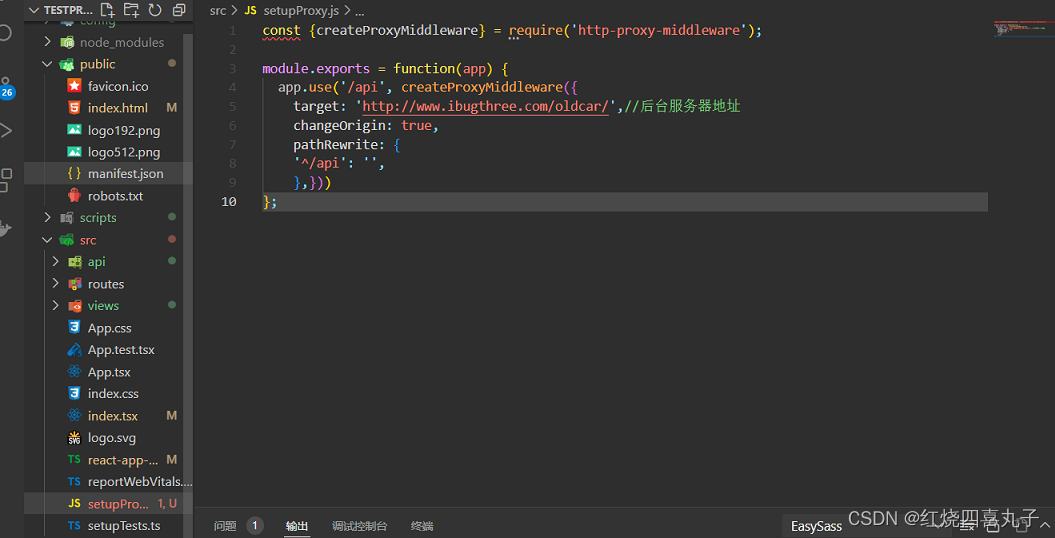
在新版本中已经默认设置代理的文件夹名为setupProxy.js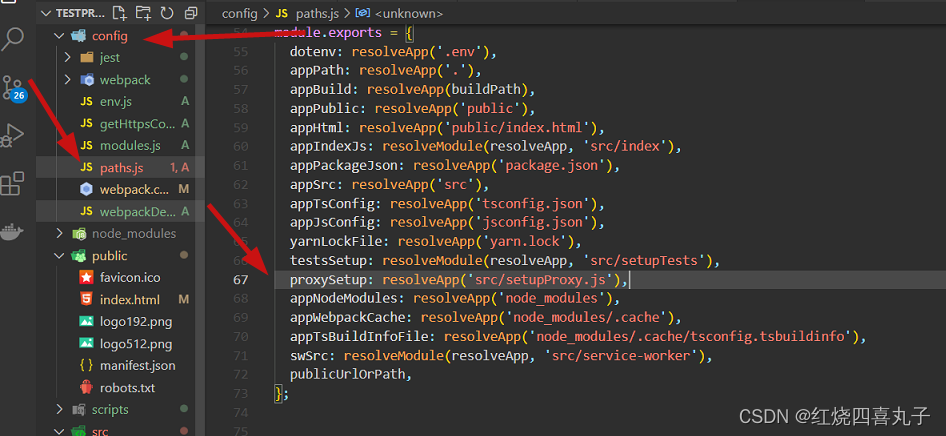
到这里所有配置就基本完成,在组件中调用即可
Contact.tsx:
- import React, { Component } from "react";
- import "./contact.scss";
- //导入要使用的接口
- import { getCarList } from "../api/index";
- export default class Contact extends Component {
- // 定义方法
- getList() {
- getCarList({ page: "1" }).then((res) => console.log(res));
- }
- render() {
- return (
- <div className="contact">
- <div className="container">
- <h3 className="center"> Contact页面</h3>
- <p>欢迎来到联系我们页面!</p>
- {/* 点击事件调用 */}
- <button onClick={this.getList}>获取数据</button>
- </div>
- </div>
- );
- }
- }
配完重启项目即可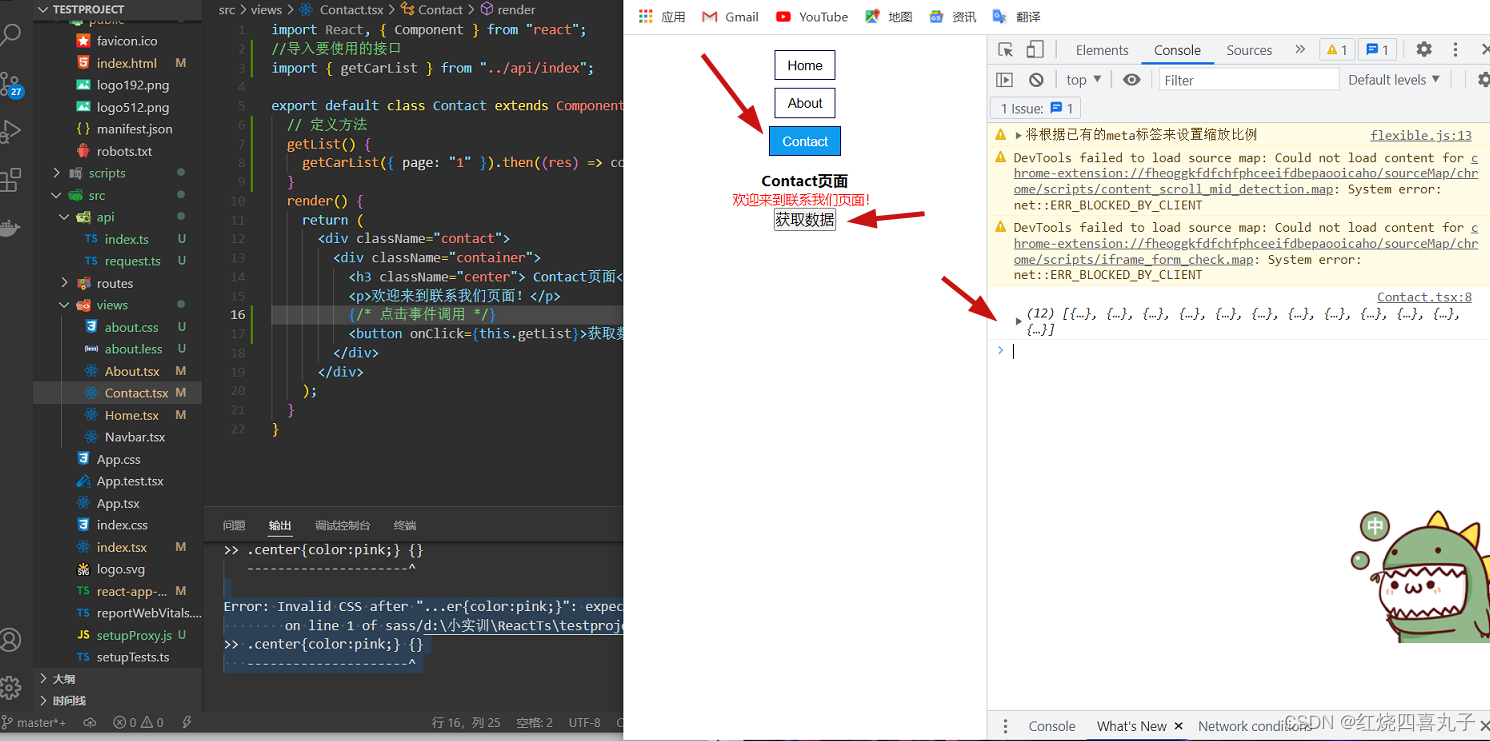
七、配置redux
1.安装redux
npm i redux react-redux -s在src路径下创建store文件夹,文件假中创建两个文件action.ts和index.ts两个文件
action中定义type,然后返回设置状态的type和函数
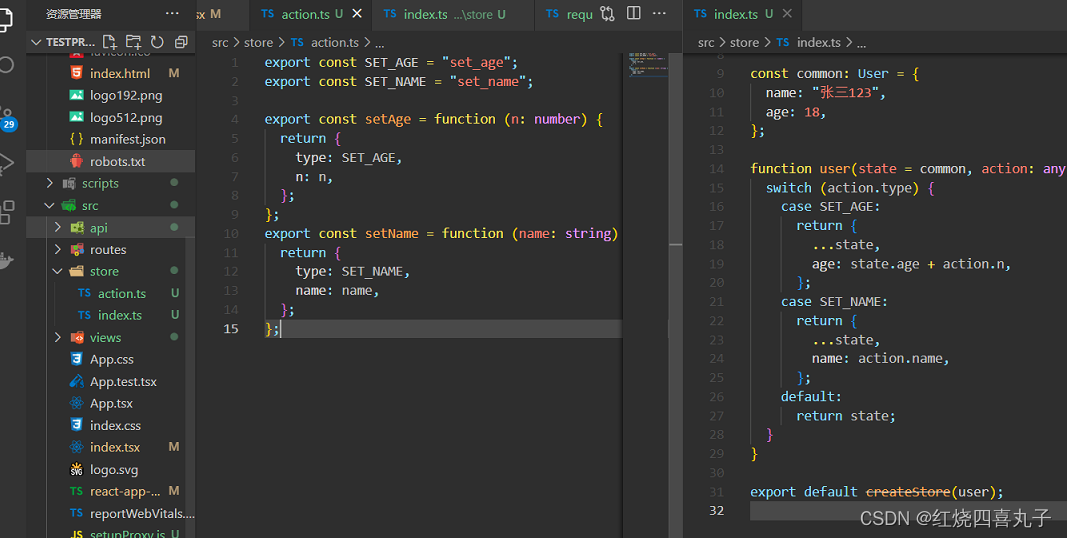
action.ts
- export const SET_AGE = "set_age";
- export const SET_NAME = "set_name";
- export const setAge = function (n: number) {
- return {
- type: SET_AGE,
- n: n,
- };
- };
- export const setName = function (name: string) {
- return {
- type: SET_NAME,
- name: name,
- };
- };
index文件中取出redux中的createStore,以及action中的type,最后需要将createStore返回出去,并且需要传递一个函数,定义这个函数时有两个参数,一个是状态,一个是action,使用switch判断action中的type,当所有条件都不成立时,将所有的状态返回,有条件成立时,就通过扩展运算符将state展开,并且对age进行操作(...state);
index.ts
- import { createStore } from "redux";
- import { SET_AGE, SET_NAME } from "./action";
- interface User {
- name: string;
- age: number;
- }
- const common: User = {
- name: "张三123",
- age: 18,
- };
- function user(state = common, action: any) {
- switch (action.type) {
- case SET_AGE:
- return {
- ...state,
- age: state.age + action.n,
- };
- case SET_NAME:
- return {
- ...state,
- name: action.name,
- };
- default:
- return state;
- }
- }
- export default createStore(user);
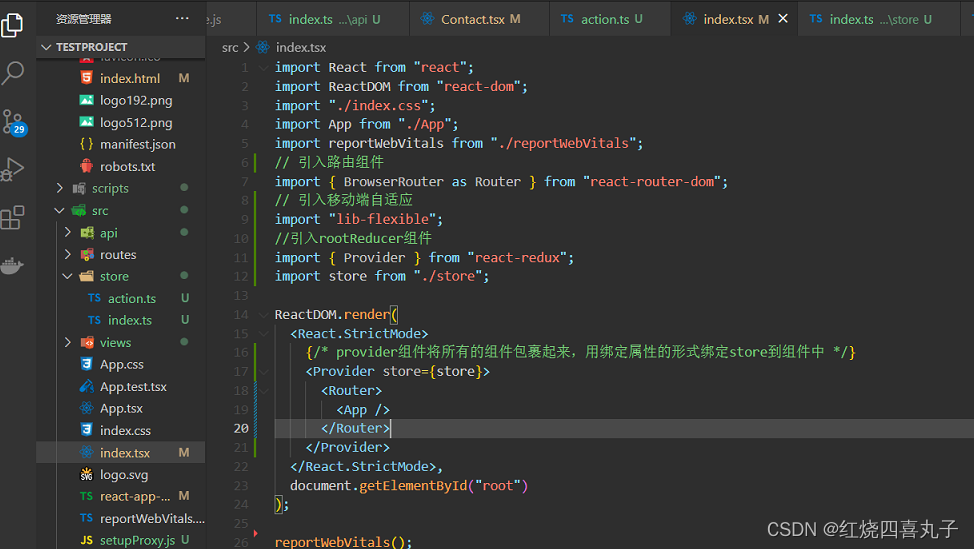
在主入口文件index.tsx中进行redux的连接和store的引用
- import React from "react";
- import ReactDOM from "react-dom";
- import "./index.css";
- import App from "./App";
- import reportWebVitals from "./reportWebVitals";
- // 引入路由组件
- import { BrowserRouter as Router } from "react-router-dom";
- // 引入移动端自适应
- import "lib-flexible";
- //引入rootReducer组件
- import { Provider } from "react-redux";
- import store from "./store";
- ReactDOM.render(
- <React.StrictMode>
- {/* provider组件将所有的组件包裹起来,用绑定属性的形式绑定store到组件中 */}
- <Provider store={store}>
- <Router>
- <App />
- </Router>
- </Provider>
- </React.StrictMode>,
- document.getElementById("root")
- );
- reportWebVitals();
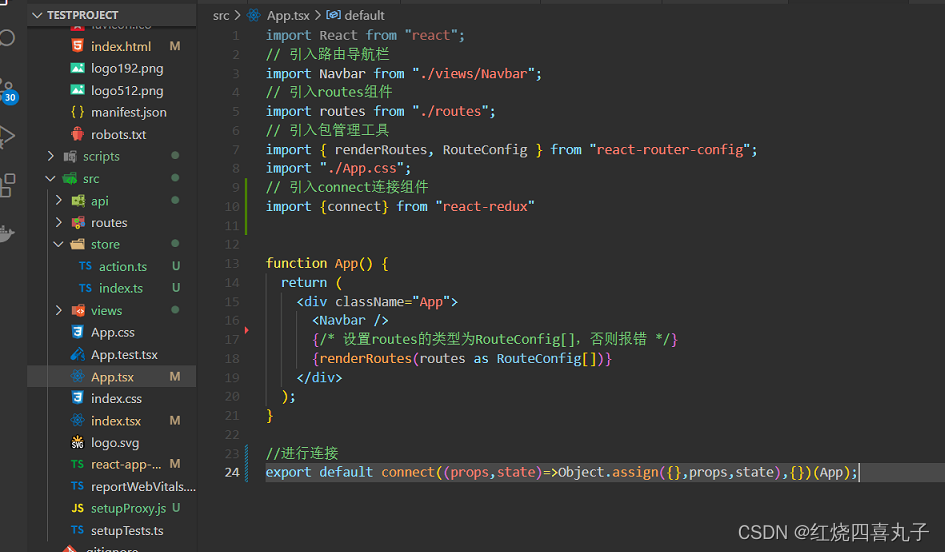
在App中进行配置
- import React from "react";
- // 引入路由导航栏
- import Navbar from "./views/Navbar";
- // 引入routes组件
- import routes from "./routes";
- // 引入包管理工具
- import { renderRoutes, RouteConfig } from "react-router-config";
- import "./App.css";
- // 引入connect连接组件
- import {connect} from "react-redux"
- function App() {
- return (
- <div className="App">
- <Navbar />
- {/* 设置routes的类型为RouteConfig[],否则报错 */}
- {renderRoutes(routes as RouteConfig[])}
- </div>
- );
- }
- //进行连接
- export default connect((props,state)=>Object.assign({},props,state),{})(App);
组件中使用redux
-
引入connect和action中的方法
-
定义props和state类型
-
修改render中的html结构,定义属性和方法调用
-
connect连接属性并导出
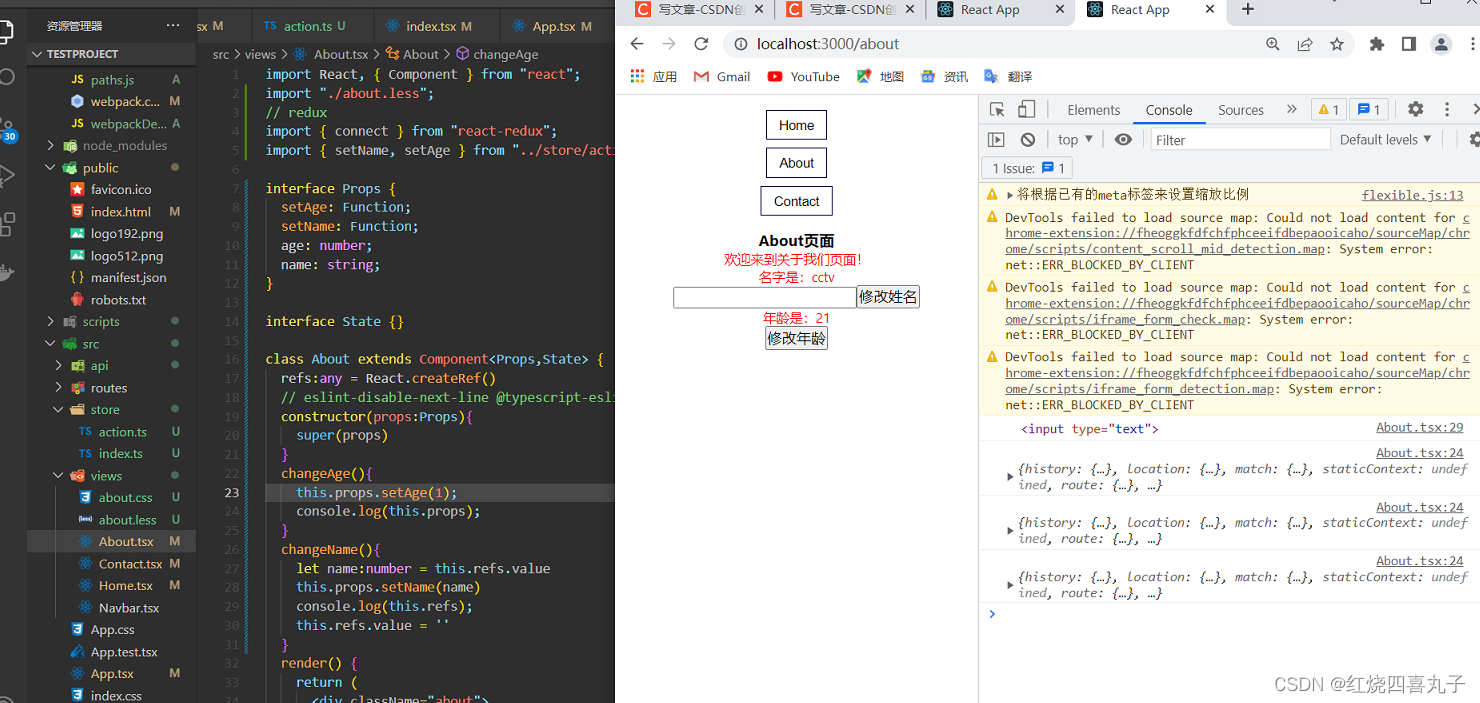
About.tsx:
- import React, { Component } from "react";
- import "./about.less";
- // redux
- import { connect } from "react-redux";
- import { setName, setAge } from "../store/action";
- interface Props {
- setAge: Function;
- setName: Function;
- age: number;
- name: string;
- }
- interface State {}
- class About extends Component<Props,State> {
- refs:any = React.createRef()
- // eslint-disable-next-line @typescript-eslint/no-useless-constructor
- constructor(props:Props){
- super(props)
- }
- changeAge(){
- this.props.setAge(1);
- console.log(this.props);
- }
- changeName(){
- let name:number = this.refs.value
- this.props.setName(name)
- console.log(this.refs);
- this.refs.value = ''
- }
- render() {
- return (
- <div className="about">
- <div className="container">
- <h3 className="center"> About页面</h3>
- <p>欢迎来到关于我们页面!</p>
- </div>
- <div>
- <p>名字是:{this.props.name}</p>
- <input ref={(input: HTMLInputElement) => this.refs = input} type="text" />
- <button onClick={this.changeName.bind(this)}>修改姓名</button>
- <p>年龄是:{this.props.age}</p>
- <button onClick={this.changeAge.bind(this)}>修改年龄</button>
- </div>
- </div>
- );
- }
- }
- export default connect((props,state)=>Object.assign({},props,state),{
- setAge,setName
- })(About);
八、配置别名(选配)
打开 config 文件夹下的 webpack.config.js 文件
ctrl + f 搜索alias,替换这个alias,代码如下:
- alias: {
- // Support React Native Web
- // https://www.smashingmagazine.com/2016/08/a-glimpse-into-the-future-with-react-native-for-web/
- 'react-native': 'react-native-web',
- // Allows for better profiling with ReactDevTools
- ...(isEnvProductionProfile && {
- 'react-dom$': 'react-dom/profiling',
- 'scheduler/tracing': 'scheduler/tracing-profiling',
- }),
- ...(modules.webpackAliases || {}),
- // 文件路径别名
- '@': path.resolve(__dirname, '../src'),
- '@view': path.resolve(__dirname, '../src/view'),
- },
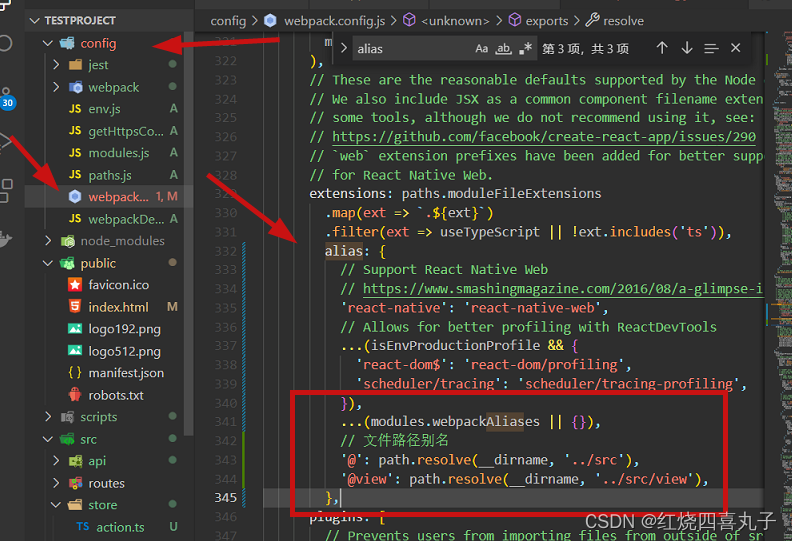
需要特别注意的是: webpack配置进行改动后,都需要重新启动项目,不然不生效
九、配置antd-mobile (选配)
1.安装antd-mobile ui组件库类似于element-ui
- npm install antd-mobile
- //或
- yarn add antd-mobile
2.在项目中Home.tsx文件中导入要使用的组件
Home.tsx:
- import React, { Component } from "react";
- //使用组件直接在组件中进行使用即可
- import { Button } from 'antd-mobile';
- export default class Home extends Component {
- render() {
- return (
- <div className="home">
- <div className="container">
- <h3 className="center"> Home页面</h3>
- <p>欢迎来到首页</p>
- <Button color='primary'>按钮</Button>
- </div>
- </div>
- );
- }
- }
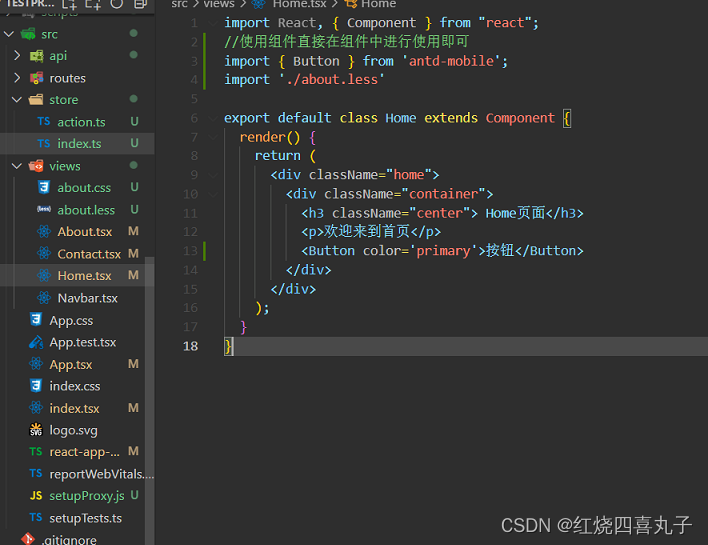
完成之后,你就能在react项目使用antd-mobile的样式文件进行构建自己的页面了
以上就是react+typescript+router+redux+less+px2rem自适应+sass+axios反向代理+别名@+Antd-mobile配置的所有详细步骤