前言
今天子川就给大家带来就是的利用Python制作表白神器,让这个寒冷的冬天变得格外温馨,到了年底依然能热情拥抱,也见证了两人情意如昔;记得发给自己的心仪对象,废话不多说直接开整~

开发工具
Python版本: 3.6
相关模块:
random模块
pygame模块
cfg模块
sys模块
tkinter模块
环境搭建
安装Python并添加到环境变量,pip安装需要的相关模块即可。
文中图片素材实战教程,评论留言获取。
.

代码实现
import sys
import cfg
import random
import pygame
from tkinter import Tk, messagebox

class Button(pygame.sprite.Sprite):
	def __init__(self, x, y, width, height, text, fontpath, fontsize, fontcolor, bgcolors, edgecolor, edgesize=1, is_want_to_be_selected=True, screensize=None, **kwargs):
		pygame.sprite.Sprite.__init__(self)
		self.rect = pygame.Rect(x, y, width, height)
		self.text = text
		self.font = pygame.font.Font(fontpath, fontsize)
		self.fontcolor = fontcolor
		self.bgcolors = bgcolors
		self.edgecolor = edgecolor
		self.edgesize = edgesize
		self.is_want_tobe_selected = is_want_to_be_selected
		self.screensize = screensize
	#自动根据各种情况将按钮绑定到屏幕
	def draw(self, screen, mouse_pos):
		# 鼠标在按钮范围内
		if self.rect.collidepoint(mouse_pos):
			# --不想被选中
			if not self.is_want_tobe_selected:
				while self.rect.collidepoint(mouse_pos):
					self.rect.left, self.rect.top = random.randint(0, self.screensize[0]-self.rect.width), random.randint(0, self.screensize[1]-self.rect.height)
			pygame.draw.rect(screen, self.bgcolors[0], self.rect, 0)
			pygame.draw.rect(screen, self.edgecolor, self.rect, self.edgesize)
		# 鼠标不在按钮范围内
		else:
			pygame.draw.rect(screen, self.bgcolors[1], self.rect, 0)
			pygame.draw.rect(screen, self.edgecolor, self.rect, self.edgesize)
		text_render = self.font.render(self.text, True, self.fontcolor)
		fontsize = self.font.size(self.text)
		screen.blit(text_render, (self.rect.x+(self.rect.width-fontsize[0])/2, self.rect.y+(self.rect.height-fontsize[1])/2))


#在指定位置显示文字'
def showText(screen, text, position, fontpath, fontsize, fontcolor, is_bold=False):
	font = pygame.font.Font(fontpath, fontsize)
	font.set_bold(is_bold)
	text_render = font.render(text, True, fontcolor)
	screen.blit(text_render, position)
剩余代码
'''主函数'''
def main():
# 初始化
pygame.init()
screen = pygame.display.set_mode(cfg.SCREENSIZE, 0, 32)
pygame.display.set_icon(pygame.image.load(cfg.ICON_IMAGE_PATH))
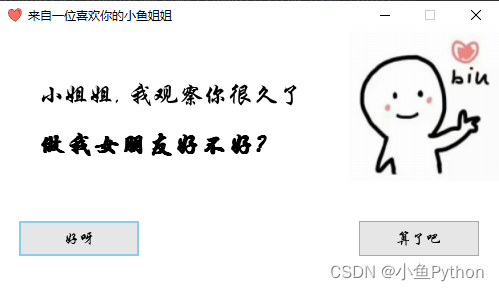
pygame.display.set_caption('来自一位喜欢你的小哥哥')
# 背景音乐
pygame.mixer.music.load(cfg.BGM_PATH)
pygame.mixer.music.play(-1, 30.0)
# biu爱心那个背景图片
bg_image = pygame.image.load(cfg.BG_IMAGE_PATH)
bg_image = pygame.transform.smoothscale(bg_image, (150, 150))
# 实例化两个按钮
button_yes = Button(x=20, y=cfg.SCREENSIZE[1]-70, width=120, height=35,
text='好呀', fontpath=cfg.FONT_PATH, fontsize=15, fontcolor=cfg.BLACK, edgecolor=cfg.SKYBLUE,
edgesize=2, bgcolors=[cfg.DARKGRAY, cfg.GAINSBORO], is_want_to_be_selected=True, screensize=cfg.SCREENSIZE)
button_no = Button(x=cfg.SCREENSIZE[0]-140, y=cfg.SCREENSIZE[1]-70, width=120, height=35,
text='算了吧', fontpath=cfg.FONT_PATH, fontsize=15, fontcolor=cfg.BLACK, edgecolor=cfg.DARKGRAY,
edgesize=1, bgcolors=[cfg.DARKGRAY, cfg.GAINSBORO], is_want_to_be_selected=False, screensize=cfg.SCREENSIZE)
# 是否点击了好呀按钮
is_agree = False
# 主循环
clock = pygame.time.Clock()
while True:
# --背景图片
screen.fill(cfg.WHITE)
screen.blit(bg_image, (cfg.SCREENSIZE[0]-bg_image.get_height(), 0))
# --鼠标事件捕获
for event in pygame.event.get():
if event.type == pygame.QUIT:
# ----没有点击好呀按钮之前不许退出程序
if is_agree:
pygame.quit()
sys.exit()
elif event.type == pygame.MOUSEBUTTONDOWN and event.button:
if button_yes.rect.collidepoint(pygame.mouse.get_pos()):
button_yes.is_selected = True
root = Tk()
root.withdraw()
messagebox.showinfo('', '❤❤❤么么哒❤❤❤')
root.destroy()
is_agree = True
# --显示文字
showText(screen=screen, text='小姐姐, 我观察你很久了', position=(40, 50),
fontpath=cfg.FONT_PATH, fontsize=25, fontcolor=cfg.BLACK, is_bold=False)
showText(screen=screen, text='做我女朋友好不好?', position=(40, 100),
fontpath=cfg.FONT_PATH, fontsize=25, fontcolor=cfg.BLACK, is_bold=True)
# --显示按钮
button_yes.draw(screen, pygame.mouse.get_pos())
button_no.draw(screen, pygame.mouse.get_pos())
# --刷新
pygame.display.update()
clock.tick(60)
#run
if __name__ == '__main__':
main()
效果展示
最后
今天的分享到这里就结束了 ,感兴趣的朋友也可以去试试哈
对文章有问题的,或者有其他关于python的问题,可以在评论区留言或者私信我哦
觉得我分享的文章不错的话,可以关注一下我,或者给文章点赞(/≧▽≦)/
标签:Python,cfg,self,源码,text,pygame,90%,screen,rect From: https://www.cnblogs.com/guzichuan/p/17005046.html