一、下发二层流表
1、下载Apifox
在Windows物理机中下载并安装Apifox。
2、创建topo
mn --topo=single,2 --controller=remote,ip=127.0.0.1,port=6633
测试连通性,pingall

清空流表
sh ovs-ofctl del-flows s1

查看流表
sh ovs-ofctl dump-flows s1

3、发送get请求后获取node id
http://192.168.66.52:8181/restconf/config/opendaylight-inventory:nodes/node/openflow:1
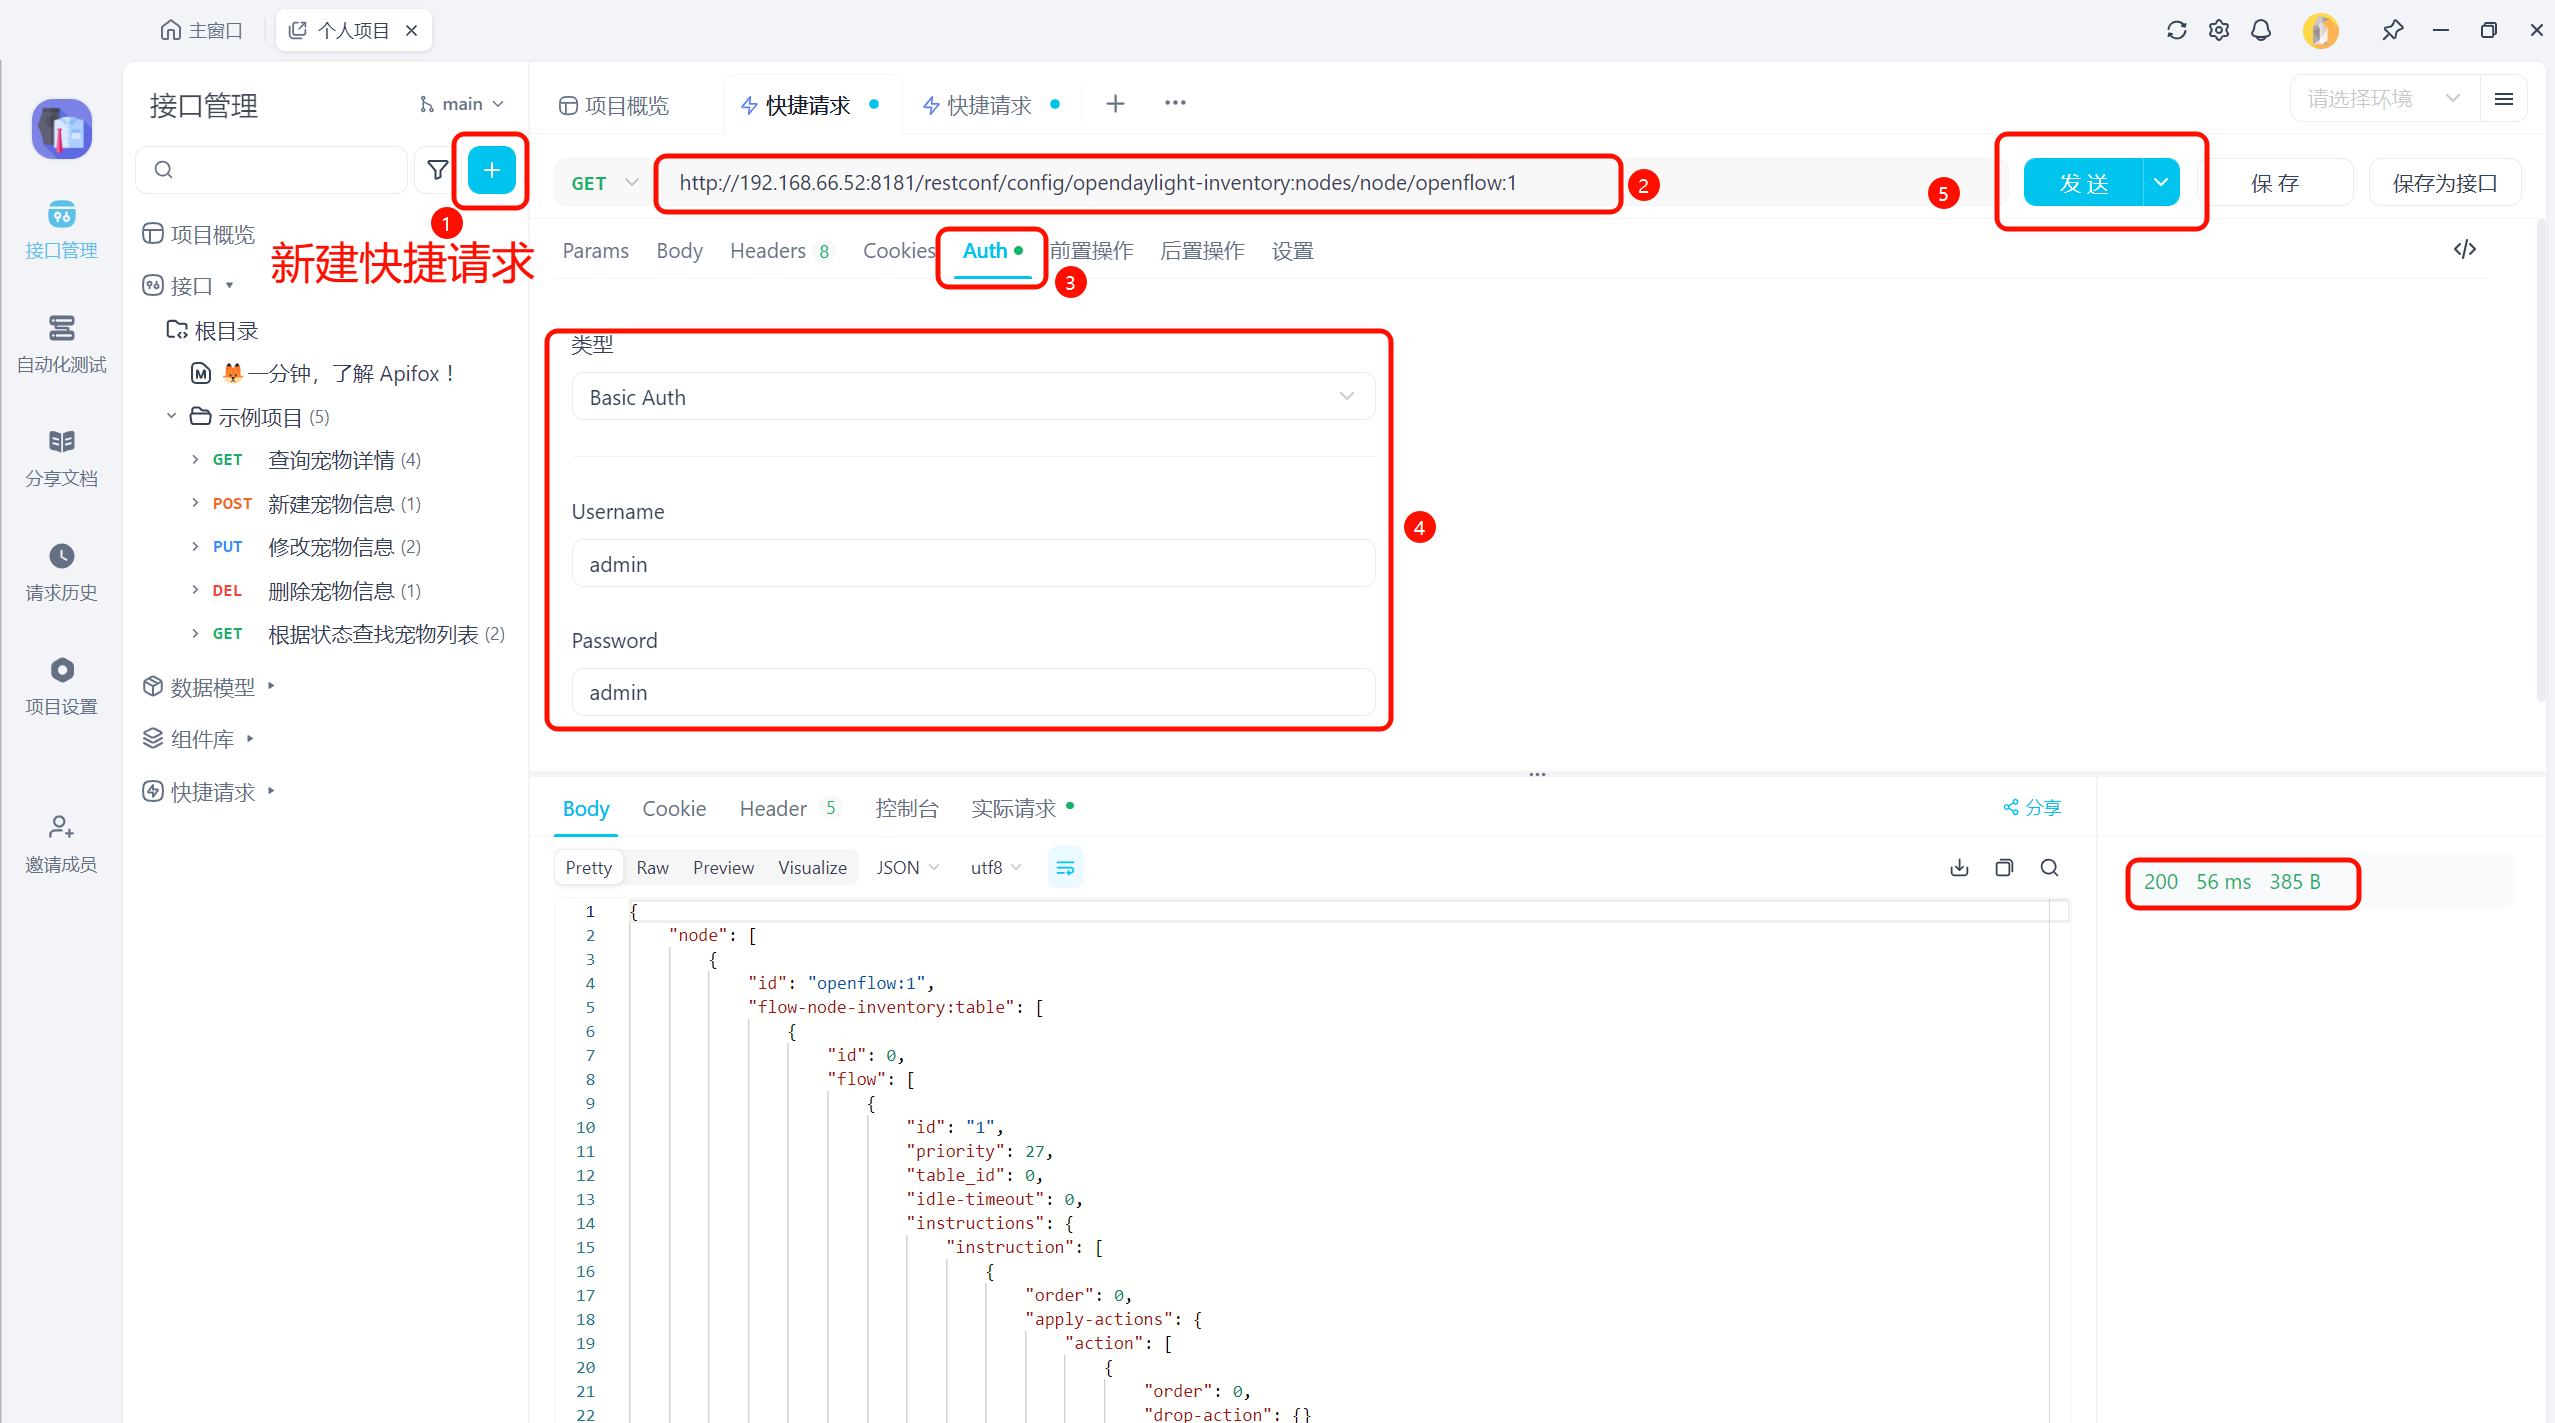
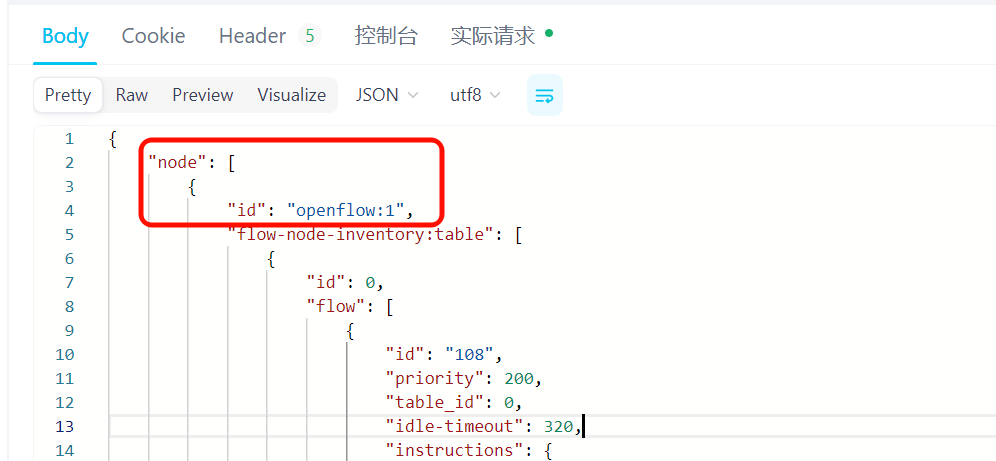
根据返回结果可知node id为
openflow:1
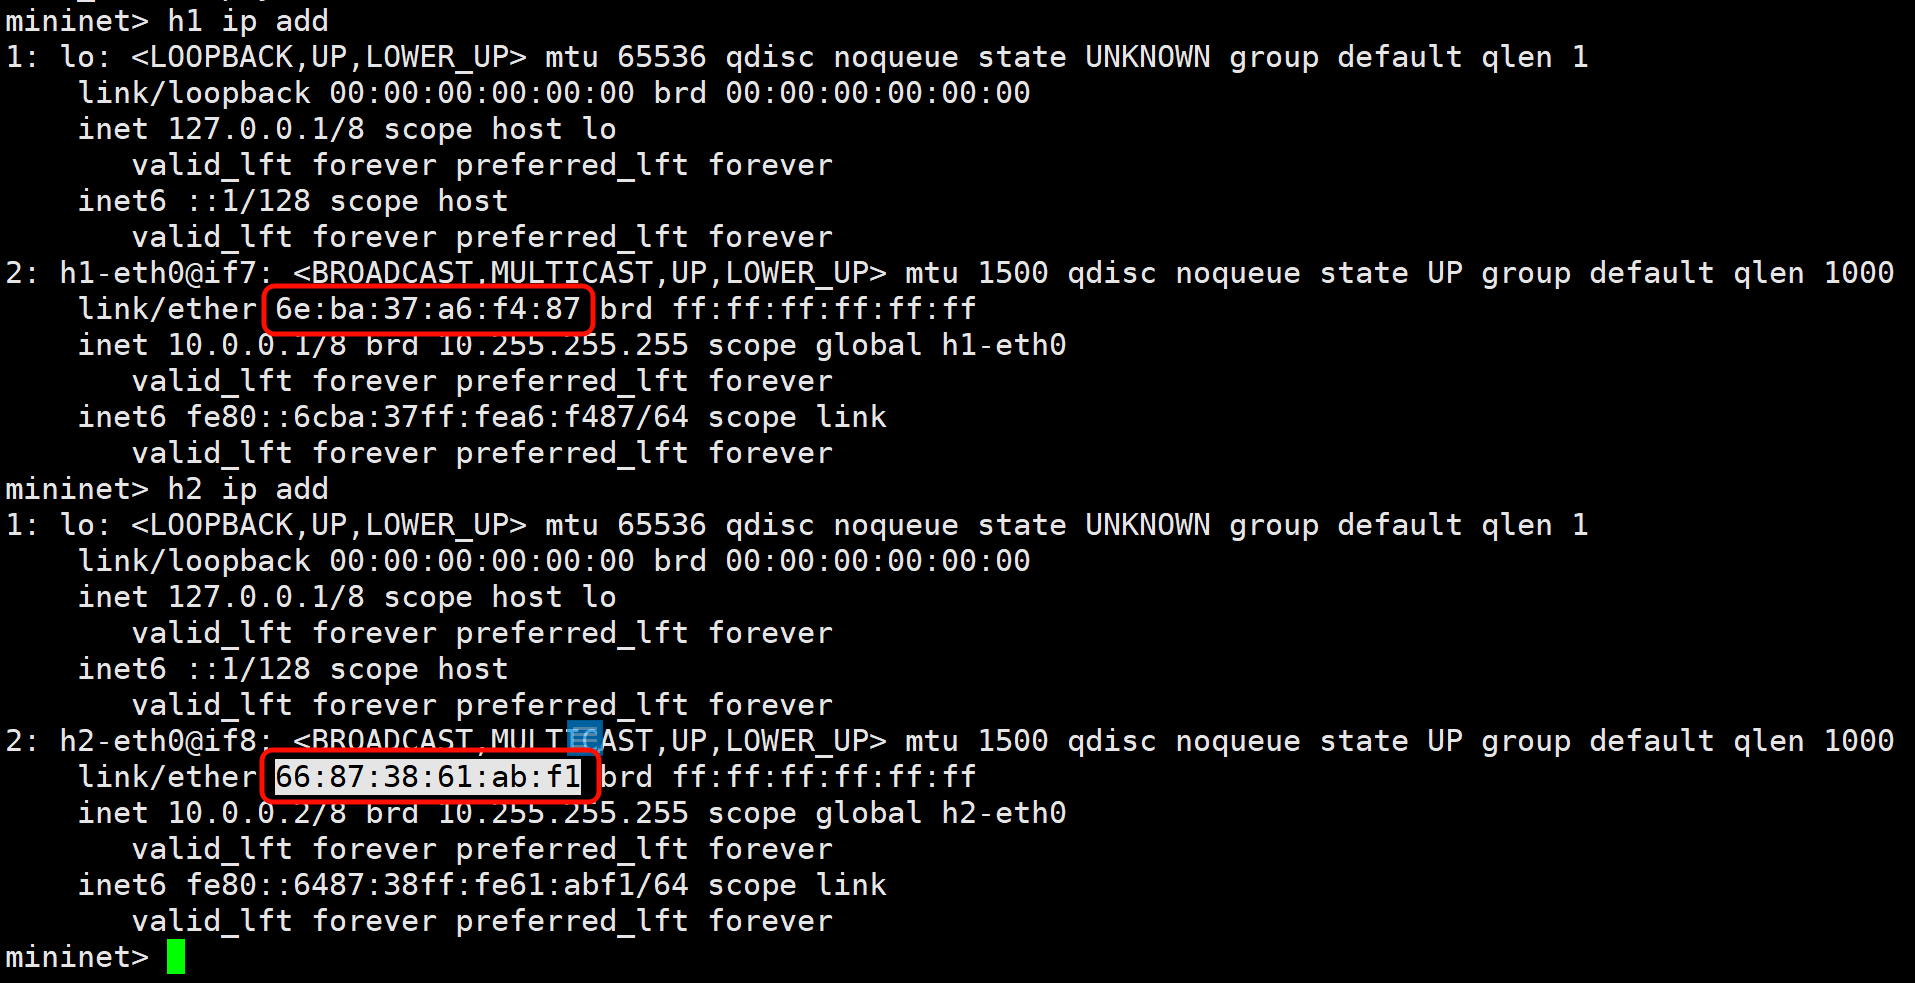
4、查看h1和h2的mac地址
注意:每次做实验时,mac地址都可能不一样,都需要重新获取。
# 在mininet中
h1 ip add
h2 ip add

# 获取到h1和h2的mac
6e:ba:37:a6:f4:87
66:87:38:61:ab:f1
5、下发流表
# 模板
http://{controller-ip}:8080/restconf/config/opendaylight-inventory:nodes/node/{node-id}/table/{table-id}/flow/{flow-id}
# 示例
http://192.168.66.52:8080/restconf/config/opendaylight-inventory:nodes/node/openflow:1/table/0/flow/107
- {node-id}:节点id。刚才通过get请求获取到的node-id
- {table-id}:表id。由于是单流表,所以h1->h2和h2->h1的流,table-id都为0
- {flow-id}:流id。本实验中,h1->h2的流id为107,h2->h1的流id为108.
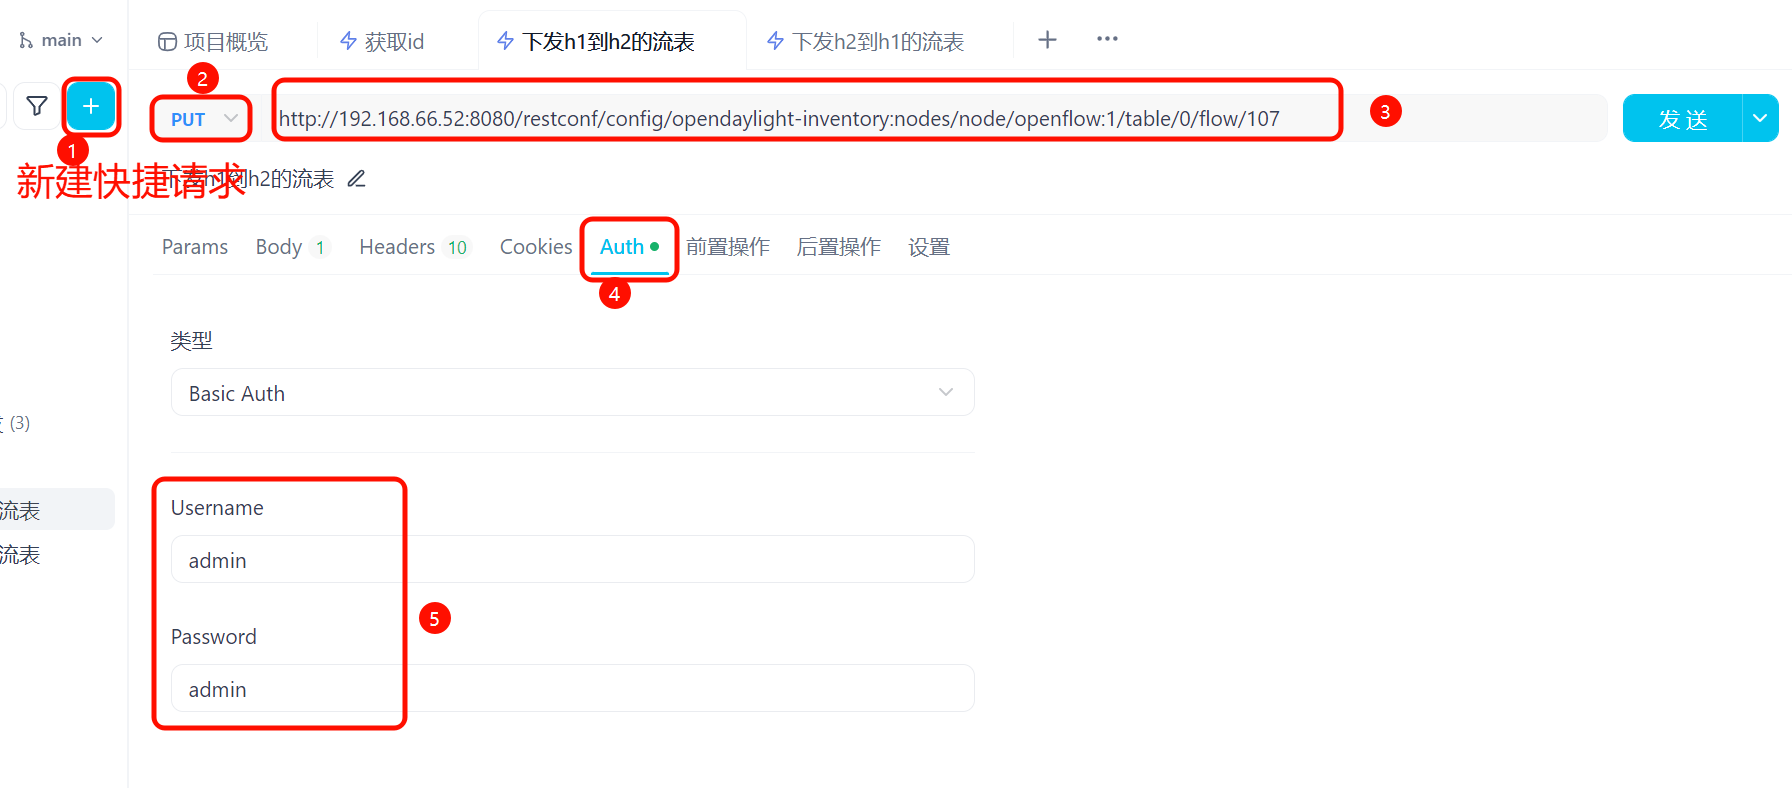
下发h1到h2的流表
建议把两个超时时间都设置的长一些,不然下发第二条流表的时候,第一条可能已经失效了。
# url
http://192.168.66.52:8080/restconf/config/opendaylight-inventory:nodes/node/openflow:1/table/0/flow/107
# 注意,url中的flow-id时107
使用账号密码认证
设置并下发流表内容
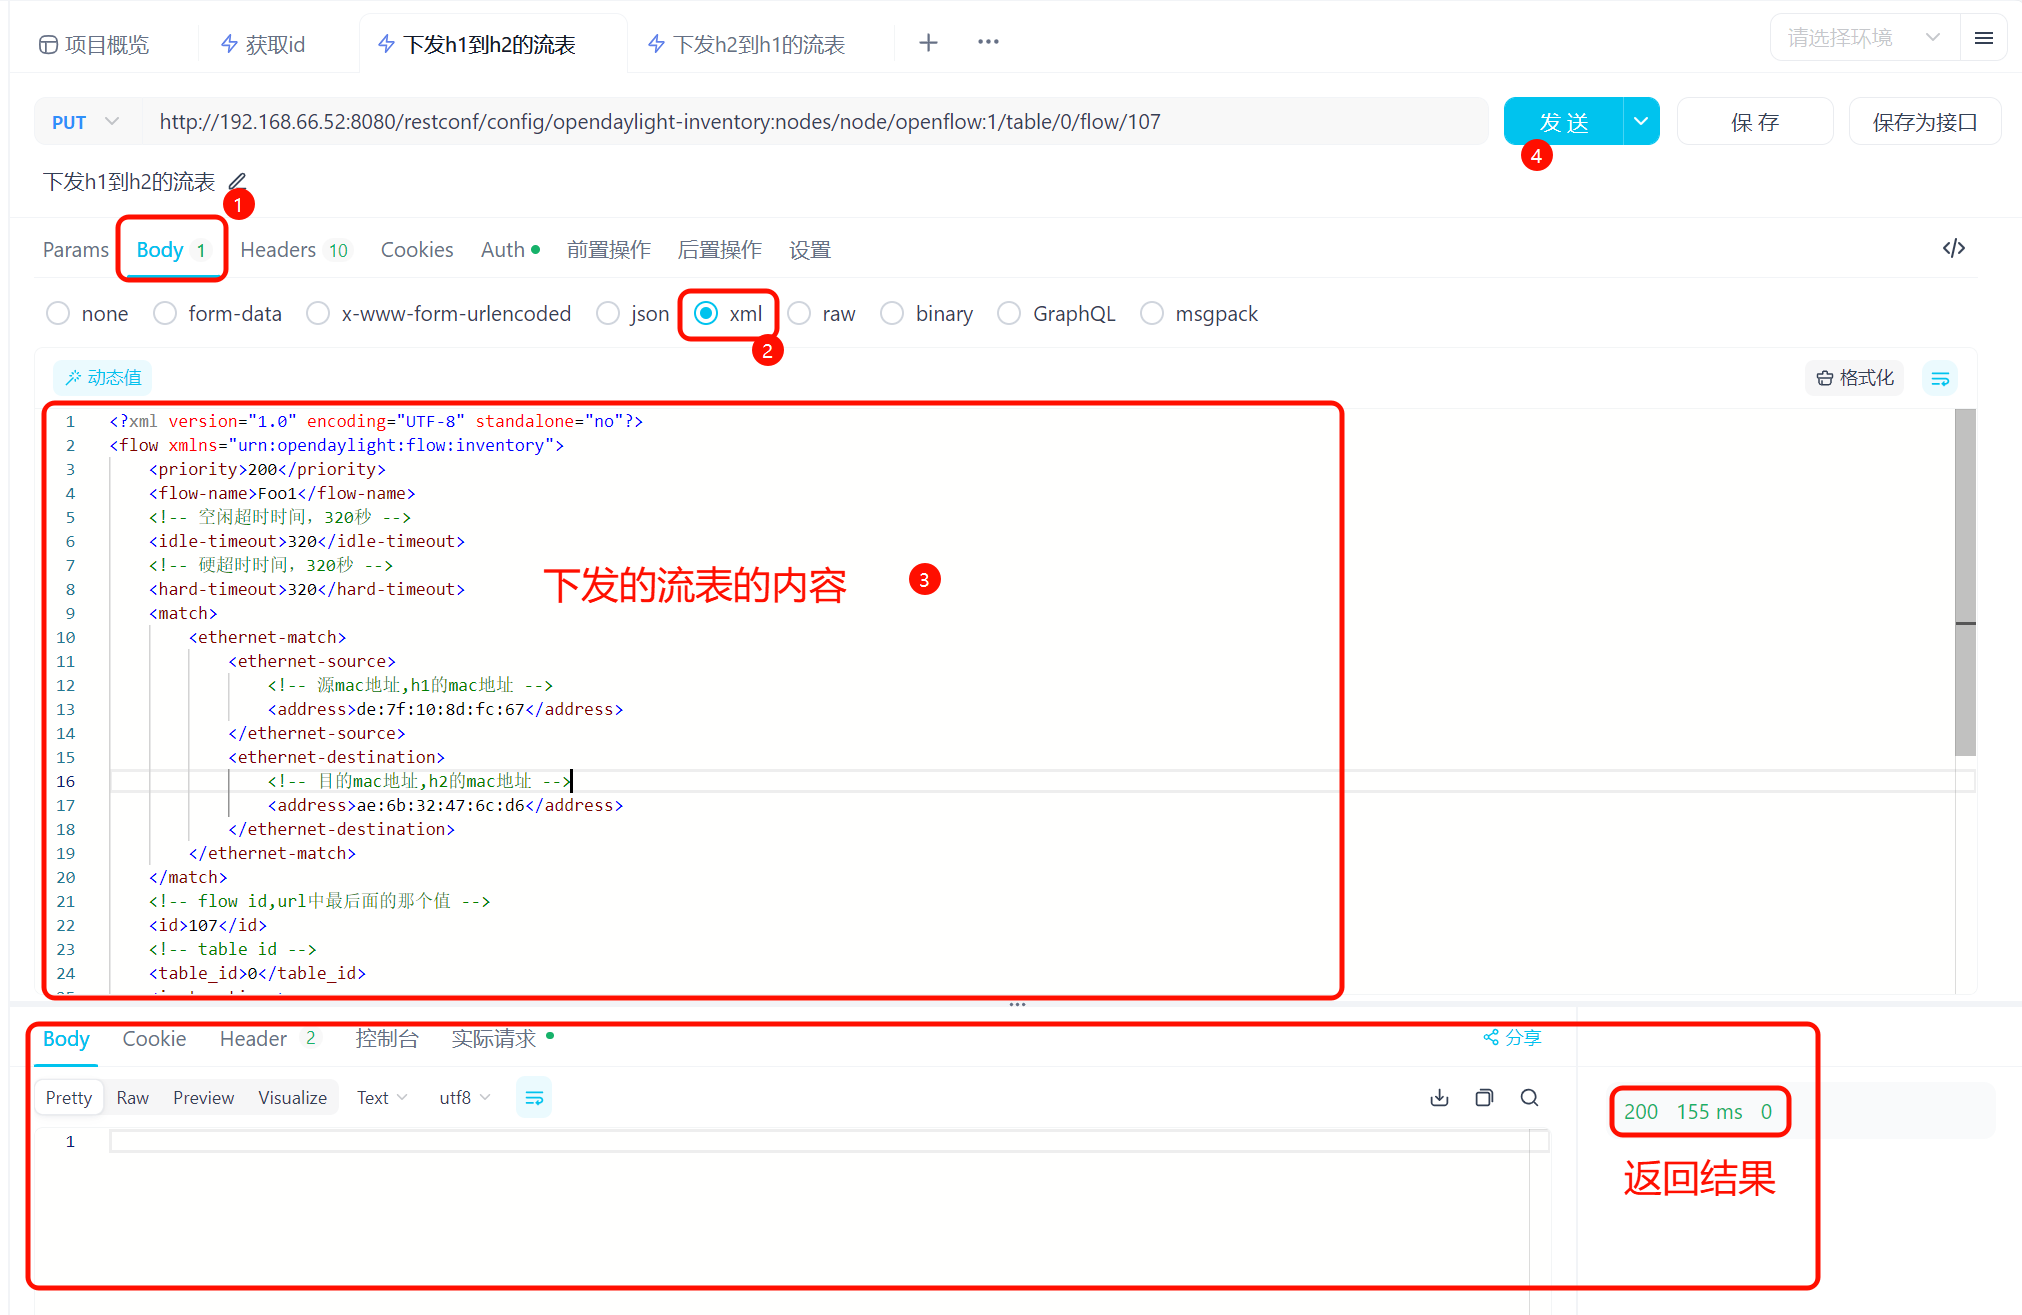
下发的流表的内容
<?xml version="1.0" encoding="UTF-8" standalone="no"?>
<flow xmlns="urn:opendaylight:flow:inventory">
    <priority>200</priority>
    <flow-name>Foo1</flow-name>
    <!-- 空闲超时时间,320秒 -->
    <idle-timeout>320</idle-timeout>
    <!-- 硬超时时间,320秒 -->
    <hard-timeout>320</hard-timeout>
    <match>
        <ethernet-match>
            <ethernet-source>
                <!-- 源mac地址,h1的mac地址 -->
                <address>6e:ba:37:a6:f4:87</address>
            </ethernet-source>
            <ethernet-destination>
                <!-- 目的mac地址,h2的mac地址 -->
                <address>66:87:38:61:ab:f1</address>
            </ethernet-destination>
        </ethernet-match>
    </match>
    <!-- flow id 注意与url中的flow-id对应 -->
    <id>107</id>
    <!-- table id -->
    <table_id>0</table_id>
    <instructions>
        <instruction>
            <order>0</order>
            <apply-actions>
                <action>
                    <order>0</order>
                    <output-action>
                        <!-- 出端口 -->
                        <!-- s1的端口1连接h1,端口2连接h2.h1到h2的流量冲1端口进,2端口出 -->
                        <!-- 所以出端口为2 -->
                        <output-node-connector>2</output-node-connector>
                    </output-action>
                </action>
            </apply-actions>
        </instruction>
    </instructions>
</flow>
查看下发的流表
sh ovs-ofctl dump-flows sq

下发h2到h1的流表
注意,流表超时时间为320秒,如果下发第二条流表的时间比较晚,可能第一条已经失效,需要重新下发一下。
# url
http://192.168.66.52:8080/restconf/config/opendaylight-inventory:nodes/node/openflow:1/table/0/flow/108
# flow-id为108
下发的流表的内容
<?xml version="1.0" encoding="UTF-8" standalone="no"?>
<flow xmlns="urn:opendaylight:flow:inventory">
    <priority>200</priority>
    <flow-name>Foo1</flow-name>
    <idle-timeout>320</idle-timeout>
    <hard-timeout>320</hard-timeout>
    <match>
        <ethernet-match>
            <ethernet-source>
                <!-- h2的mac地址 -->
                <address>22:98:30:4a:3d:0d</address>
            </ethernet-source>
            <ethernet-destination>
                <!-- h1的mac地址 -->
                <address>0a:ff:94:24:16:10</address>
            </ethernet-destination>
        </ethernet-match>
    </match>
    <!-- 改为108 -->
    <id>108</id>
    <table_id>0</table_id>
    <instructions>
        <instruction>
            <order>0</order>
            <apply-actions>
                <action>
                    <order>0</order>
                    <output-action>
                        <!-- 出端口为1 -->
                        <output-node-connector>1</output-node-connector>
                    </output-action>
                </action>
            </apply-actions>
        </instruction>
    </instructions>
</flow>
查看流表,并测试连通性
sh ovs-ofctl dump-flows sq

h1与h2之间能互通,流表生效。
二、下发三层流表
继续使用一、中的topo,将流表清空。
sh ovs-ofctl del-flows s1

与二层流表的区别在于

- h1到h2的流表中,h1为源地址。
- h2到h1的流表中,h2为源地址。
下发流表过程与二层流表类似
h1到h2的流表
# url
http://192.168.66.52:8080/restconf/config/opendaylight-inventory:nodes/node/openflow:1/table/0/flow/111
# flow-id为111
<?xml version="1.0" encoding="UTF-8" standalone="no"?>
<flow xmlns="urn:opendaylight:flow:inventory">
    <priority>200</priority>
    <flow-name>Foo1</flow-name>
    <!-- 空闲超时时间,320秒 -->
    <idle-timeout>320</idle-timeout>
    <!-- 硬超时时间,320秒 -->
    <hard-timeout>320</hard-timeout>
    <match>
        <ethernet-match>
            <ethernet-type>
                <!-- 以太网type字段,2048表示上层协议为IP协议 -->
                <type>2048</type>
            </ethernet-type>
        </ethernet-match>
        <!-- 源IP,h1的IP地址 -->
        <ipv4-source>10.0.0.1/32</ipv4-source>
    </match>
    <!-- flow id,url中最后面的那个值 -->
    <id>111</id>
    <!-- table id -->
    <table_id>0</table_id>
    <instructions>
        <instruction>
            <order>0</order>
            <apply-actions>
                <action>
                    <order>0</order>
                    <output-action>
                        <!-- 出端口 -->
                        <!-- s1的端口1连接h1,端口2连接h2.h1到h2的流量从1端口进,2端口出 -->
                        <!-- 所以出端口为2 -->
                        <output-node-connector>2</output-node-connector>
                    </output-action>
                </action>
            </apply-actions>
        </instruction>
    </instructions>
</flow>
h2到h2的流表
# url
http://192.168.66.52:8080/restconf/config/opendaylight-inventory:nodes/node/openflow:1/table/0/flow/112
# flow-id为112
<?xml version="1.0" encoding="UTF-8" standalone="no"?>
<flow xmlns="urn:opendaylight:flow:inventory">
    <priority>200</priority>
    <flow-name>Foo1</flow-name>
    <idle-timeout>320</idle-timeout>
    <hard-timeout>320</hard-timeout>
    <match>
        <ethernet-match>
            <ethernet-type>
                <type>2048</type>
            </ethernet-type>
        </ethernet-match>
        <!-- 源IP,h2的IP地址 -->
        <ipv4-source>10.0.0.2/32</ipv4-source>
    </match>
    <!-- flow-id,112 -->
    <id>112</id>
    <table_id>0</table_id>
    <instructions>
        <instruction>
            <order>0</order>
            <apply-actions>
                <action>
                    <order>0</order>
                    <output-action>
                        <!-- 出端口为1 -->
                        <output-node-connector>1</output-node-connector>
                    </output-action>
                </action>
            </apply-actions>
        </instruction>
    </instructions>
</flow>
查看流表,并测试连通性
sh ovs-ofctl dump-flows s1
pingall

h1与h2能够互通,流表生效。
三、下发四层流表
关闭二、中的topo,并清除缓存重新创建一个重新创建topo。
四层流表需要下层的的支持,也就是要保证h1与h2能够ping得通。所以,继续保留三、的流表,进行实验。
如果三、中的流表已经被删除,或者是重新创建了topo,那需要保证h1与h2之间能够ping通。
# 创建topo
mn --controller=remote,ip=127.0.0.1,port=6633 --topo=single,2
# 测试连通性
pinall
# 清空流表
sh ovs-ofctl del-flows s1
# 查看流表
sh ovs-ofctl dump-flows s1

1、下发h1到h2流表
http://{controller_ip}:8080/restconf/config/opendaylight-inventory:nodes/node/openflow:1/table/0/flow/114

# 我的
http://192.168.66.52:8080/restconf/config/opendaylight-inventory:nodes/node/openflow:1/table/0/flow/114
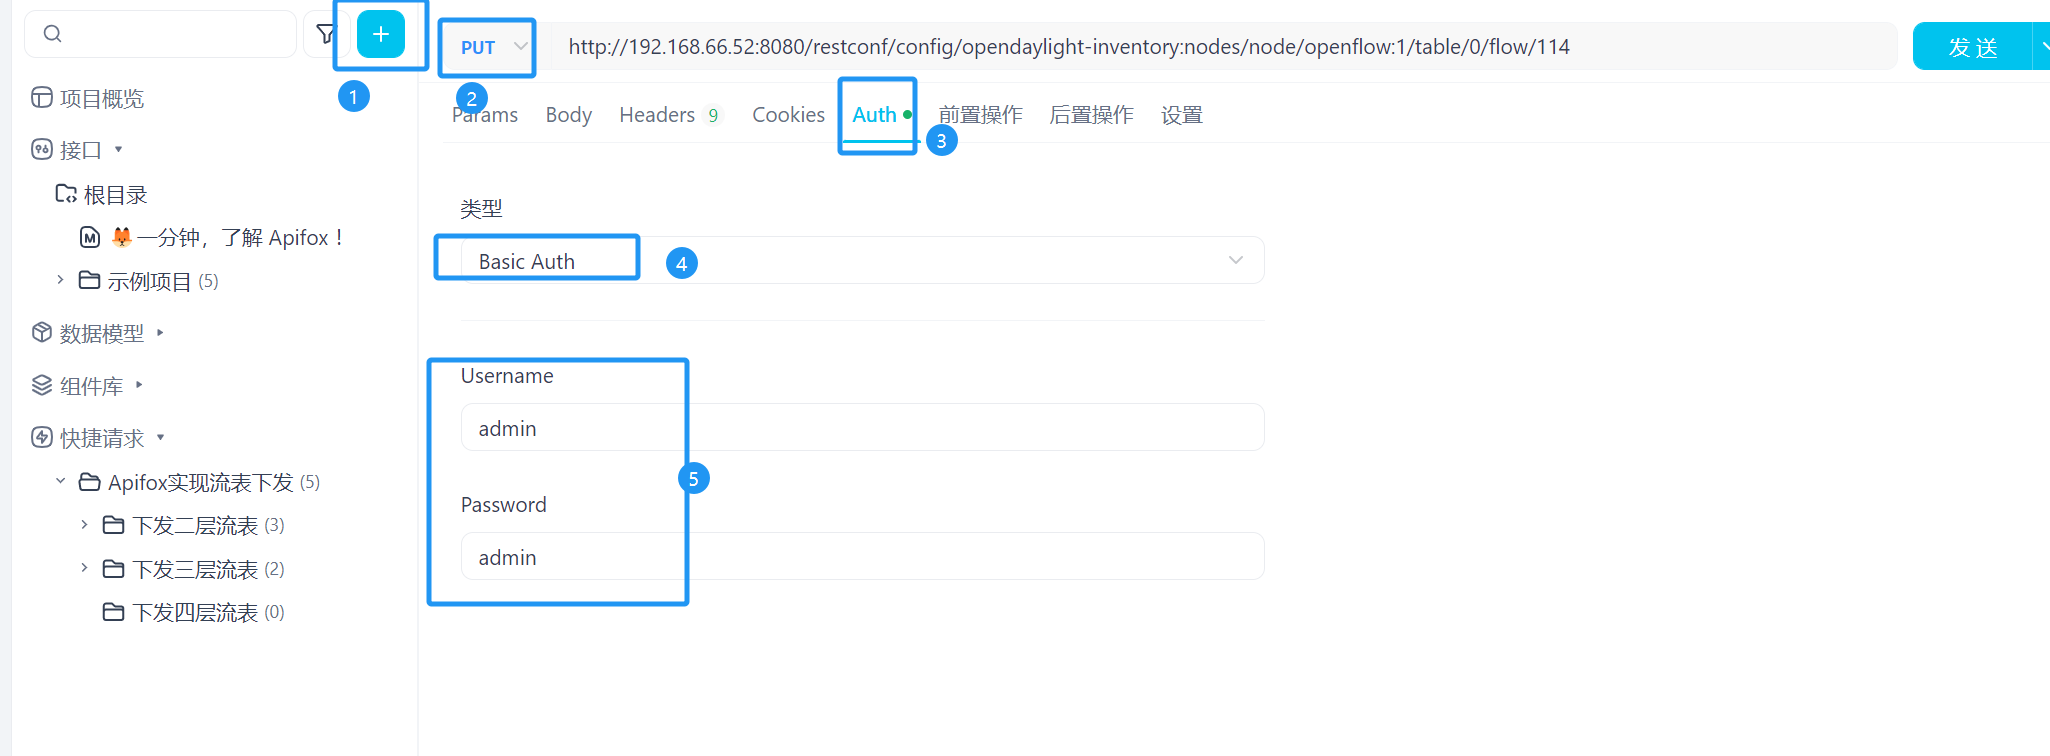
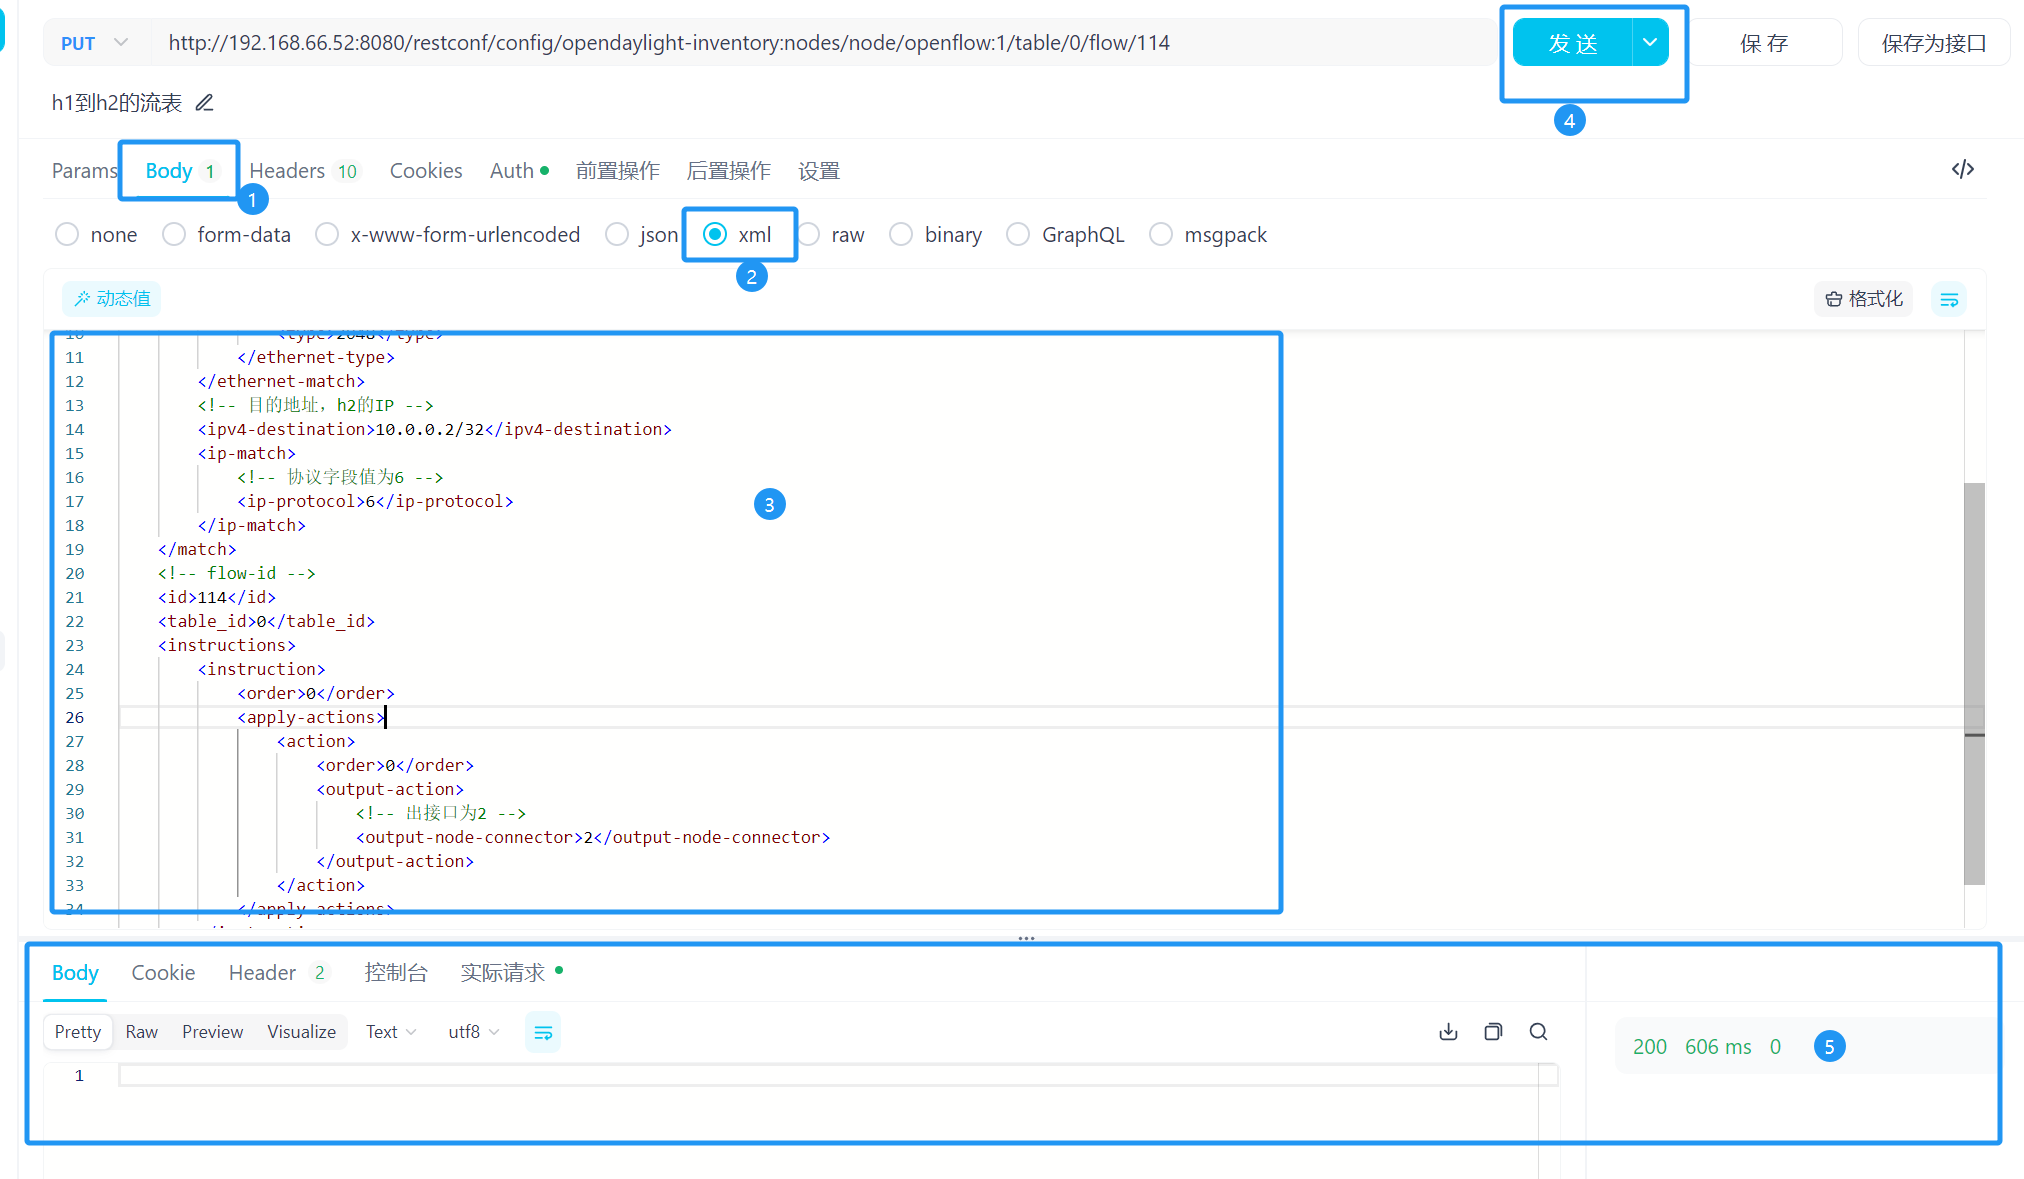
- 目的地址为h2的IP,
- 协议字段值为6,表示上层(传输层)使用的是TCP协议
- flow-id为114
- table-id为0
- 出接口为2
<?xml version="1.0" encoding="UTF-8" standalone="no"?>
<flow xmlns="urn:opendaylight:flow:inventory">
    <priority>200</priority>
    <flow-name>Foo1</flow-name>
    <idle-timeout>320</idle-timeout>
    <hard-timeout>320</hard-timeout>
    <match>
        <ethernet-match>
            <ethernet-type>
                <type>2048</type>
            </ethernet-type>
        </ethernet-match>
        <!-- 目的地址,h2的IP -->
        <ipv4-destination>10.0.0.2/32</ipv4-destination>
        <ip-match>
            <!-- 协议字段值为6 -->
            <ip-protocol>6</ip-protocol>
        </ip-match>
    </match>
    <!-- flow-id -->
    <id>114</id>
    <table_id>0</table_id>
    <instructions>
        <instruction>
            <order>0</order>
            <apply-actions>
                <action>
                    <order>0</order>
                    <output-action>
                        <!-- 出接口为2 -->
                        <output-node-connector>2</output-node-connector>
                    </output-action>
                </action>
            </apply-actions>
        </instruction>
    </instructions>
</flow>
查看流表
sh ovs-ofctl dump-flows s1

2、下发h2到h1的流表
http://{controller_ip}:8080/restconf/config/opendaylight-inventory:nodes/node/openflow:1/table/0/flow/115

# 我的
http://192.168.66.52:8080/restconf/config/opendaylight-inventory:nodes/node/openflow:1/table/0/flow/115
- 目的地址为h1的IP,
- 协议字段值为6,表示上层(传输层)使用的是TCP协议
- flow-id为115
- table-id为0
- 出接口为1
<?xml version="1.0" encoding="UTF-8" standalone="no"?>
<flow xmlns="urn:opendaylight:flow:inventory">
    <priority>200</priority>
    <flow-name>Foo1</flow-name>
    <idle-timeout>320</idle-timeout>
    <hard-timeout>320</hard-timeout>
    <match>
        <ethernet-match>
            <ethernet-type>
                <type>2048</type>
            </ethernet-type>
        </ethernet-match>
        <!-- 目的地址,h1的IP -->
        <ipv4-destination>10.0.0.1/32</ipv4-destination>
        <ip-match>
            <!-- 协议字段值为6 -->
            <ip-protocol>6</ip-protocol>
        </ip-match>
    </match>
    <!-- flow-id -->
    <id>115</id>
    <table_id>0</table_id>
    <instructions>
        <instruction>
            <order>0</order>
            <apply-actions>
                <action>
                    <order>0</order>
                    <output-action>
                        <!-- 出接口为1 -->
                        <output-node-connector>1</output-node-connector>
                    </output-action>
                </action>
            </apply-actions>
        </instruction>
    </instructions>
</flow>
查看流表
sh ovs-ofctl dump-flows s1

着重关注 n_packets=0, n_bytes=0这两个参数
目前数据包和字节数都为0。

接下来需要使用iperf来产生h1与h2之间的流量。不能使用ping,因为ping命令使用的是icmp协议,是三层协议。
3、产生流量测试流表是否生效
按照书上的方法,接下来的操作需要在虚拟机中进行。因为xshell中使用xterm命令需要Xmanager软件支持。
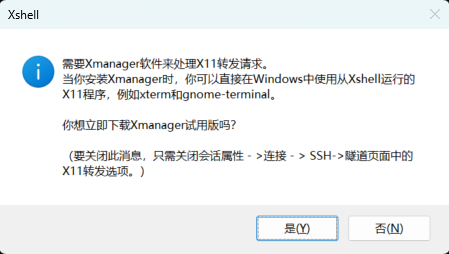
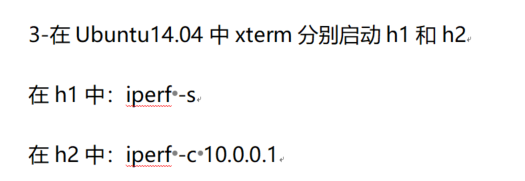
如果要在xshell中,也可以。
# 在h1上启动iperf服务器,并使其在后台运行,方便执行下一个命令
h1 iperf -s &
# 在h2上启动iperf客户端,连接到h1的iperf服务器
h2 iperf -c 10.0.0.1
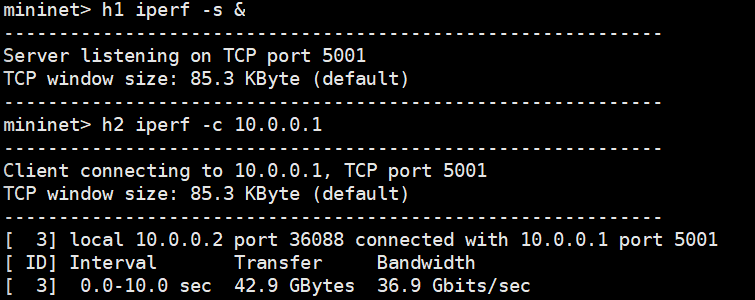
如果执行
h2 iperf -c 10.0.0.1时提示connect failed:No route to host,可能是因为h1与h2之间三层都不能互通(使用ping测试),需要保证h1与h2之间能够互通,iperf才能建立tcp连接,将数据发送出去。
再次查看流表,可以看到,两条流表匹配并进行了处理的数据包已经由0变为了很多。说明流表生效了。
sh ovs-ofctl dump-flows s1
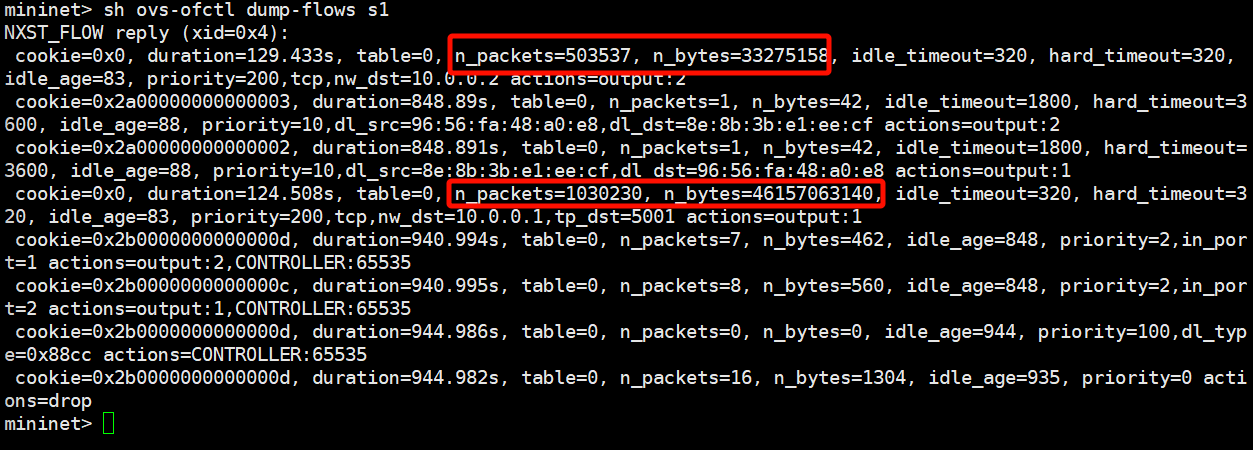
问题
1、执行iperf时提示无法到达服务器
检查发现,时刚才下发的流表失效了,因为刚才下发的流表超时时间是320秒。
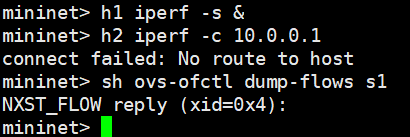
重新下发流表后,又出现了,下面这样。还是不通。

原因:需要三层互通才行。第一次实验时,把流表清空了,就只保留了两条四层流表。后来再三层互通的情况下实验,就没问题了。
2、删除指定流表
需要使用范围指定cookie
sh ovs-ofctl del-flows s1 "cookie=0xb/0xffffffff"

3、天坑:ODL自动下发以前做实验时下发的流表
做apifox实验的时候,发现“odl下发流表实验”中下发的流表都还在。都已经用mn -c清除了mininet的缓存,而且虚拟机重启过了,odl也重启了。mininet的topo也是新创建的,但是上次实验的流表仍然存在。
而且,再mininet中,使用命令直接删除流表也是没用的。重新创建topo后,odl又会自动下发这个流表,即使你是新创建的topo,这条流表仍然会存在。
# 无论是直接删除该条流表,
sh ovs-ofctl del-flows s1 "cookie=0xb/0xffffffff"
# 还是清空流表
sh ovs-ofctl del-flows s1
# 该条流表仍然还是会下发下来

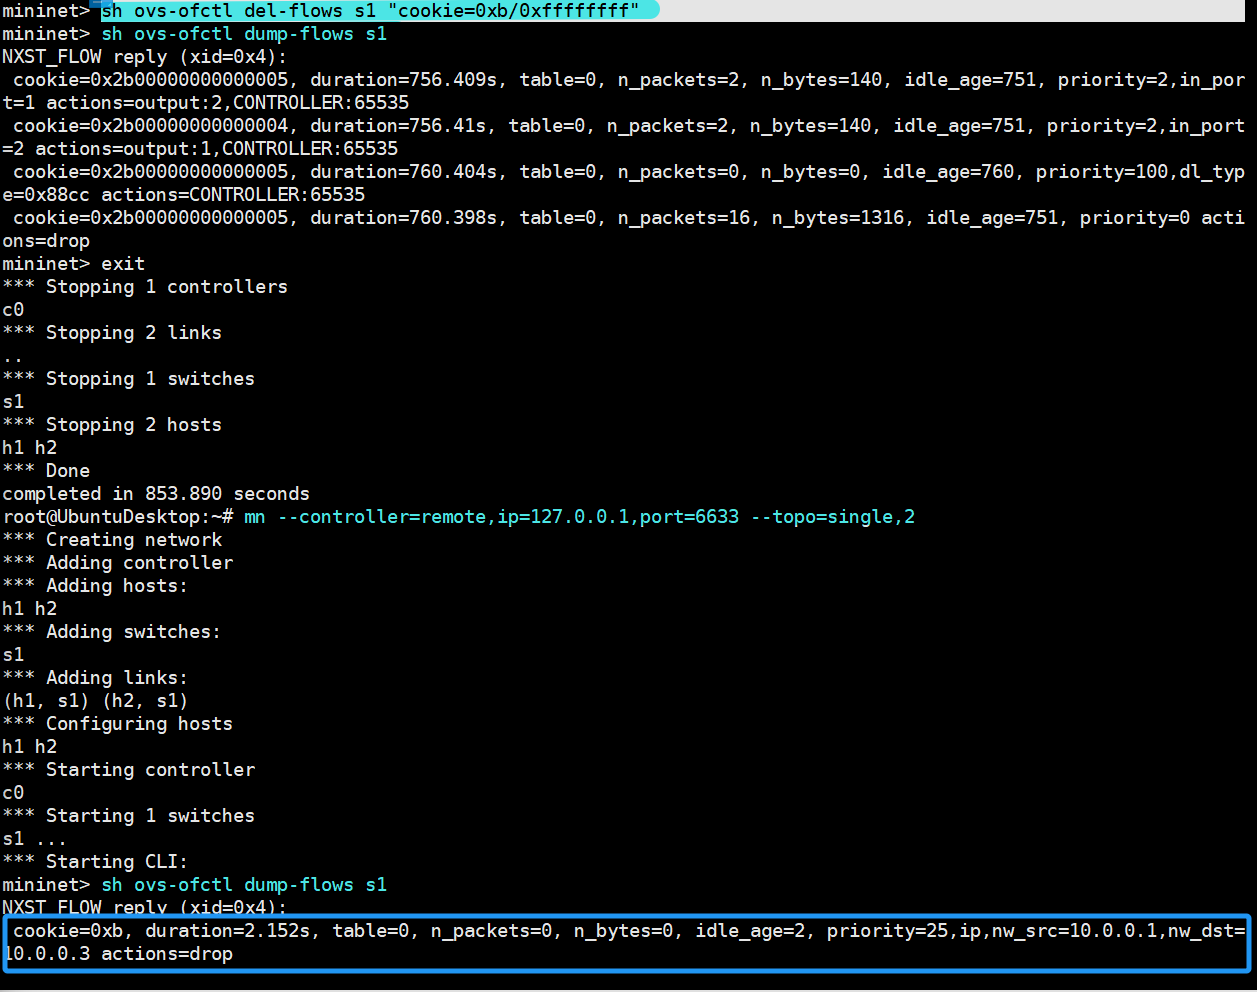
解决方法是,通过odl的web端来删除流表,这样它就不会自动下发了(当然,也可以通过apifox来实现,url是一样的)。
与下发流表时一样。要删除哪条流表,那么前面url的内容(比如node-id、tableid)就与该条流表的url相同。将请求方式改为DELETE,下发的请求体内容不需要填写。点击Send发送请求删除流表。
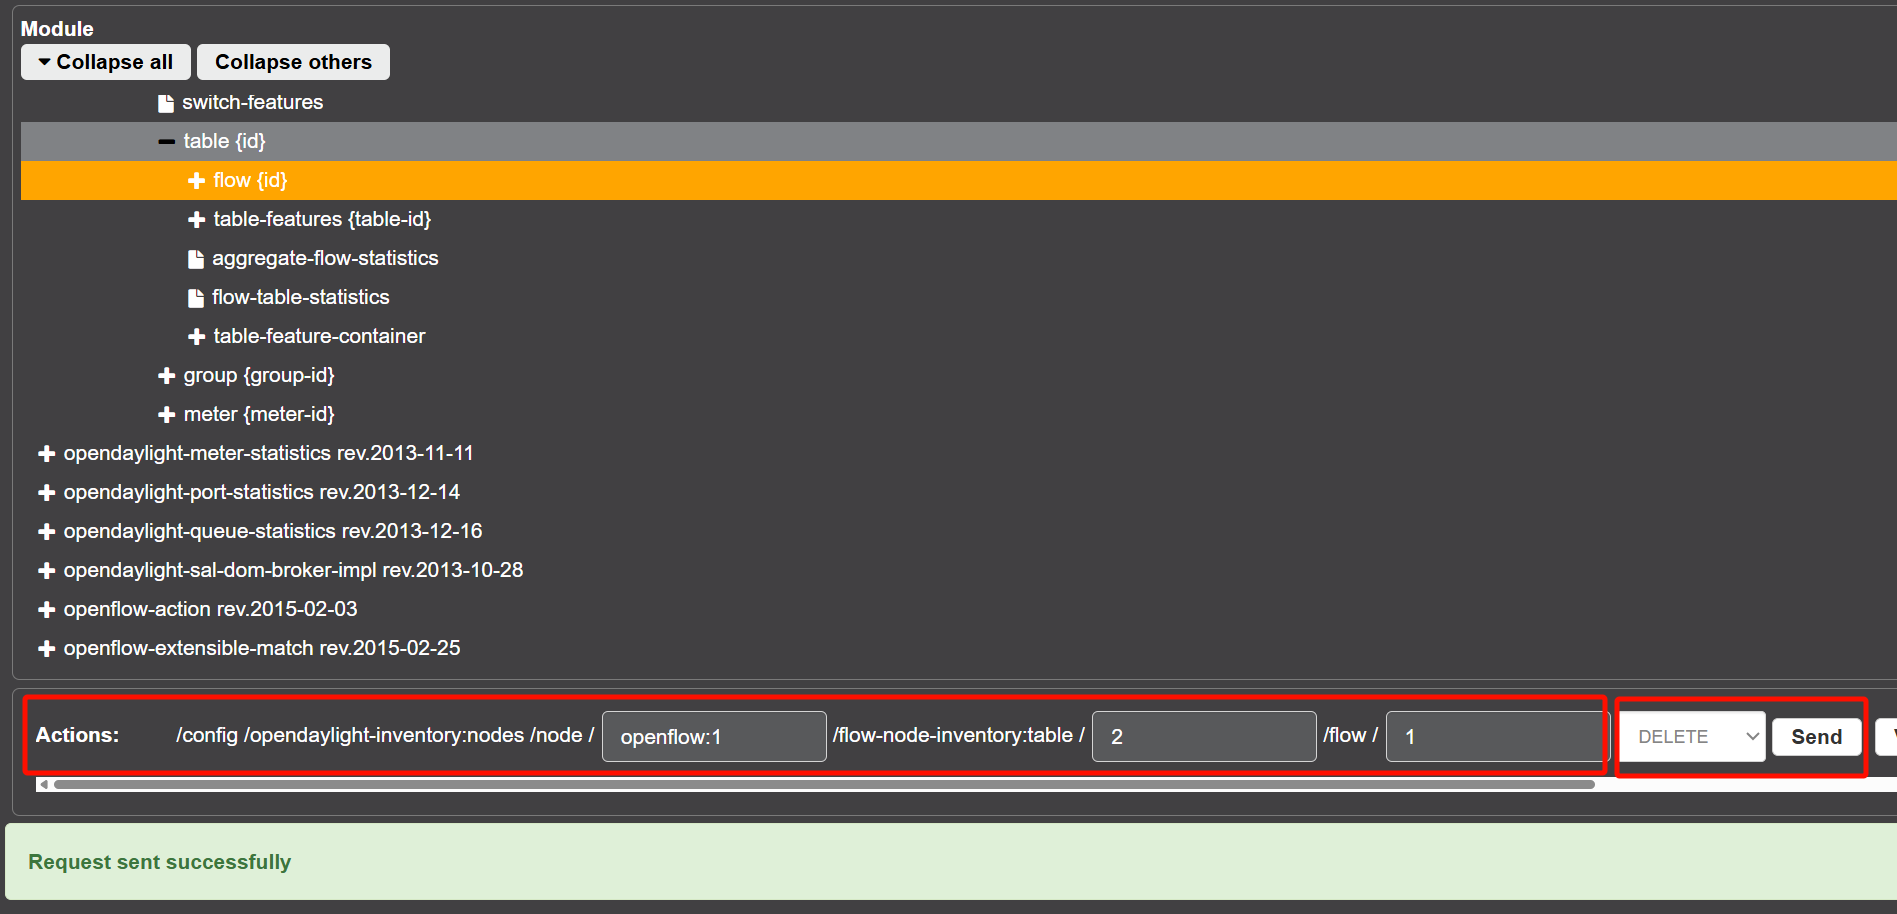
如果table-id之类的填错了,会导致找不到匹配的流表项,下方会给出提示。

使用odl的web端删除流表后,再到mininet中查看流表,流表已被删除
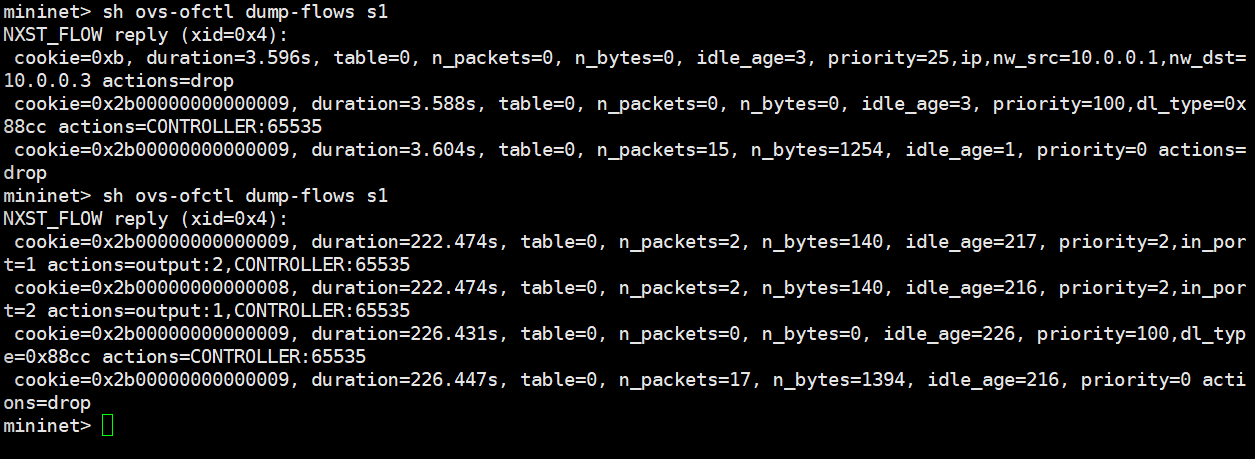
关闭topo,清除mininet缓存,重新创建topo,查看流表,没有再次出现。
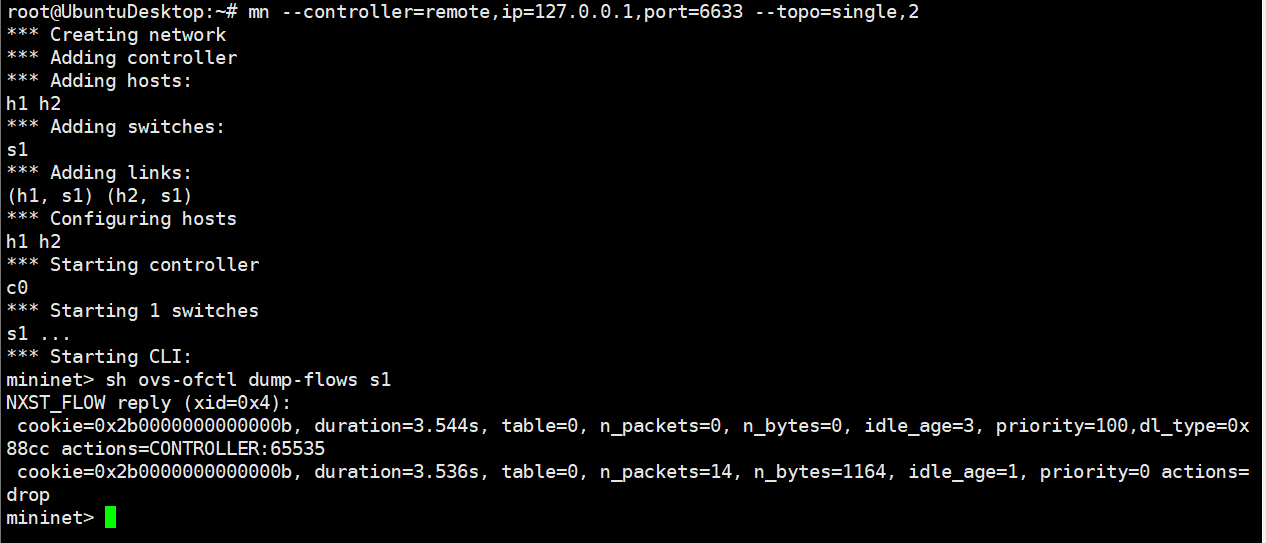
使用apifox下发的也会出现,重启环境后仍然存在。
后来仔细想了想,之所以odl的web端下发的流表这么顽强一直存在,是因为下发的时候,照着书上的来,把两个超时时间都设置为了0,也就是永久生效。导致我后面做实验时,odl仍然自动下发了流表。
用apifox下发的流表,超时时间都是320秒,虽然会出现第二个流表下发的比较晚,第一个流表已经超时了,需要重新下发一次的情况。不过因为是使用的apifox,能狗将快捷请求保存下来,重新下发流表也就是点一下的事不麻烦,所以没有将超时时间设置的太长。(如果是用的odlweb界面,下发个流表,一层层的点开,再输入流表内容,麻烦得很)
再apifox中删除流表就比较简单了,和下发流表的快捷请求一样,甚至可以直接用下发流表的那个快捷请求。
只需要将请求方式改为DELETE,就可以将对应的流表删除。
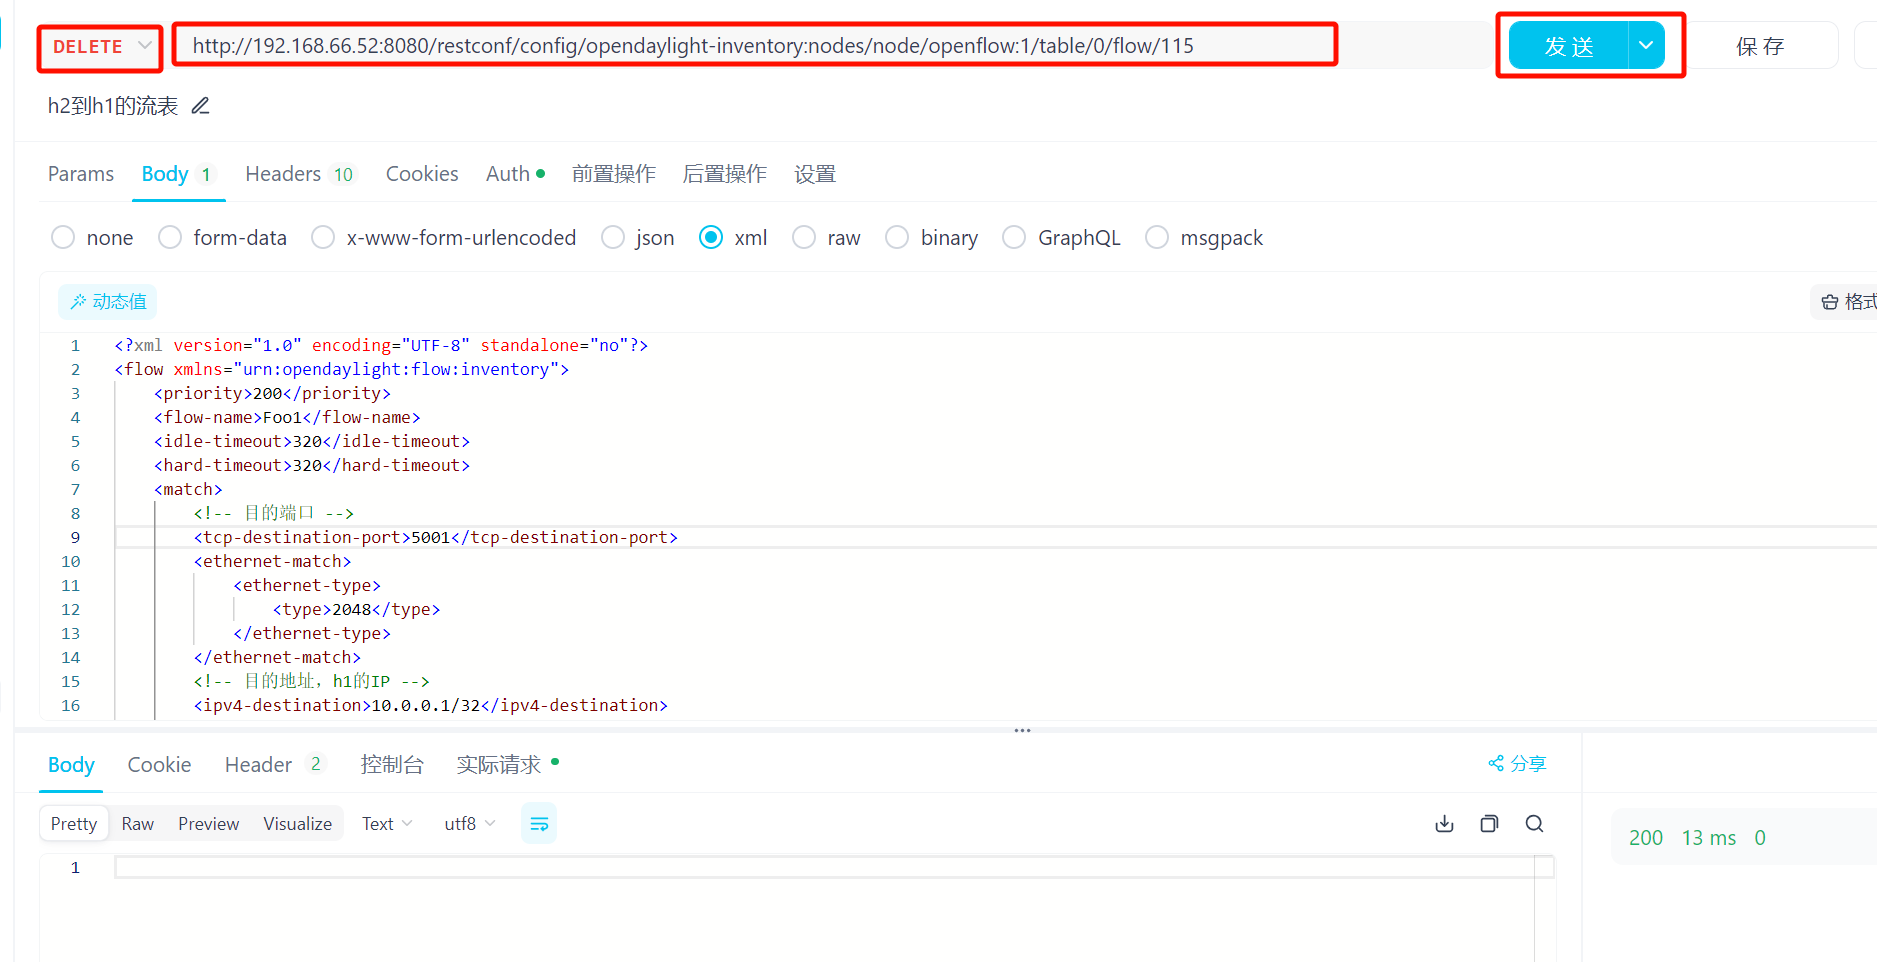
同意的,使用odlweb端下发的流表也是可以通过apifox来删除的,只需要把对应的url复制过来,发送delete请求就行。
ODL无法登录
原因:启动的比较慢,多等一会就好了。即使出现了odl的交互界面,但是还需要再等一会。

多等一会儿再访问web和创建topo。
还有,mininet创建topo时连接不上odl也可能是因为刚刚启动
标签:h2,流表,h1,flow,下发,Apifox,id From: https://www.cnblogs.com/chuangblog/p/18607982