CLIP

欢迎来到 OpenAI 的开源实现夹子(对比语言-图像预训练)。
利用此代码库,我们在各种数据源和计算预算上训练了多个模型,包括小规模实验更大规模的运行,包括在以下数据集上训练的模型LAION-400M,拉伊奥-2B和数据压缩-1B.本文详细研究了我们的许多模型及其缩放特性对比语言图像学习的可重复缩放定律。下面显示了我们训练过的一些最佳模型及其零样本 ImageNet-1k 准确率,以及由 OpenAI 和其他最先进的开源替代方案训练的 ViT-L 模型(所有模型都可以通过 OpenCLIP 加载)。我们提供了有关我们完整的预训练模型集合的更多详细信息这里以及 38 个数据集的零样本结果这里。
.
| Model | Training data | Resolution | # of samples seen | ImageNet zero-shot acc. |
|---|---|---|---|---|
| ConvNext-Base | LAION-2B | 256px | 13B | 71.5% |
| ConvNext-Large | LAION-2B | 320px | 29B | 76.9% |
| ConvNext-XXLarge | LAION-2B | 256px | 34B | 79.5% |
| ViT-B/32 | DataComp-1B | 256px | 34B | 72.8% |
| ViT-B/16 | DataComp-1B | 224px | 13B | 73.5% |
| ViT-L/14 | LAION-2B | 224px | 32B | 75.3% |
| ViT-H/14 | LAION-2B | 224px | 32B | 78.0% |
| ViT-L/14 | DataComp-1B | 224px | 13B | 79.2% |
| ViT-G/14 | LAION-2B | 224px | 34B | 80.1% |
| ViT-L/14 (Original CLIP) | WIT | 224px | 13B | 75.5% |
| ViT-SO400M/14 (SigLIP) | WebLI | 224px | 45B | 82.0% |
| ViT-SO400M-14-SigLIP-384 (SigLIP) | WebLI | 384px | 45B | 83.1% |
| ViT-H/14-quickgelu (DFN) | DFN-5B | 224px | 39B | 83.4% |
| ViT-H-14-378-quickgelu (DFN) | DFN-5B | 378px | 44B | 84.4% |
M
| 模型 | 训练数据 | 解决 | 已查看的样本数量 | ImageNet 零样本估计 |
|---|---|---|---|---|
| ConvNext 基础 | 拉伊奥-2B | 256像素 | 13B | 71.5% |
| ConvNext-大型 | 拉伊奥-2B | 320像素 | 29B | 76.9% |
| ConvNext-XXLarge | 拉伊奥-2B | 256像素 | 34B | 79.5% |
| 维特-B/32 | 数据压缩-1B | 256像素 | 34B | 72.8% |
| 维生素-B/16 | 数据压缩-1B | 224像素 | 13B | 73.5% |
| 维特-L/14 | 拉伊奥-2B | 224像素 | 32B | 75.3% |
| 维生素 H/14 | 拉伊奥-2B | 224像素 | 32B | 78.0% |
| 维特-L/14 | 数据压缩-1B | 224像素 | 13B | 79.2% |
| 维特-G/14 | 拉伊奥-2B | 224像素 | 34B | 80.1% |
| 维特-L/14(原始片段) | 智慧教育 | 224像素 | 13B | 75.5% |
| ViT-SO400M/14(信号) | 网页式语言 | 224像素 | 45B | 82.0% |
| ViT-SO400M-14-SigLIP-384(信号) | 网页式语言 | 384像素 | 45B | 83.1% |
| ViT-H/14-快速凝胶(DFN) | DFN-5B | 224像素 | 39B | 83.4% |
| ViT-H-14-378-快速凝胶(DFN) | DFN-5B | 378像素 | 44B | 84.4% |
可以在 Hugging Face Hub 的 OpenCLIP 库标签下找到带有其他模型特定细节的模型卡:https://huggingface.co/models?library=open_clip。
如果你发现这个存储库有用,请考虑引用。如果您有任何其他要求或建议,我们欢迎任何人提交问题或发送电子邮件。
请注意,部分src/open_clip/建模和标记器代码改编自 OpenAI 官方存储库。
方法
|
|
|---|
| 图片来源:GitHub - openai/CLIP: CLIP (Contrastive Language-Image Pretraining), Predict the most relevant text snippet given an image |
用法
<span style="background-color:var(--bgColor-muted, var(--color-canvas-subtle))"><span style="color:#1f2328"><span style="color:var(--fgColor-default, var(--color-fg-default))"><span style="background-color:var(--bgColor-muted, var(--color-canvas-subtle))"><code>pip install open_clip_torch
</code></span></span></span></span>
import torch
from PIL import Image
import open_clip
model, _, preprocess = open_clip.create_model_and_transforms('ViT-B-32', pretrained='laion2b_s34b_b79k')
model.eval() # model in train mode by default, impacts some models with BatchNorm or stochastic depth active
tokenizer = open_clip.get_tokenizer('ViT-B-32')
image = preprocess(Image.open("docs/CLIP.png")).unsqueeze(0)
text = tokenizer(["a diagram", "a dog", "a cat"])
with torch.no_grad(), torch.cuda.amp.autocast():
image_features = model.encode_image(image)
text_features = model.encode_text(text)
image_features /= image_features.norm(dim=-1, keepdim=True)
text_features /= text_features.norm(dim=-1, keepdim=True)
text_probs = (100.0 * image_features @ text_features.T).softmax(dim=-1)
print("Label probs:", text_probs) # prints: [[1., 0., 0.]]
另请参阅[剪辑合作实验室]。
为了高效计算数十亿个嵌入,你可以使用片段检索它具有 openclip 支持。
预训练模型
我们提供一个简单的模型接口来实例化预训练和未训练的模型。要查看哪些预训练模型可用,请使用以下代码片段。有关我们的预训练模型的更多详细信息,请访问这里。
>>> import open_clip >>> open_clip.list_pretrained()
您可以在以下位置找到有关我们支持的模型的更多信息(例如参数数量、FLOP)这张桌子。
注意:许多现有检查点使用原始 OpenAI 模型中的 QuickGELU 激活。这种激活实际上比 PyTorch 最新版本中的原生 torch.nn.GELU 效率低。模型默认值现在是 nn.GELU,因此应该-quickgelu对 OpenCLIP 预训练权重使用带后缀的模型定义。所有 OpenAI 预训练权重将始终默认为 QuickGELU。也可以使用-quickgeluQuickGELU 将非模型定义与预训练权重一起使用,但精度会下降,因为微调可能会在较长的运行中消失。未来训练的模型将使用 nn.GELU。
加载模型
可以使用 加载模型open_clip.create_model_and_transforms,如下例所示。模型名称和对应的pretrained键与 的输出兼容open_clip.list_pretrained()。
该pretrained参数还接受本地路径,例如/path/to/my/b32.pt。您也可以通过这种方式从 huggingface 加载检查点。为此,请下载文件open_clip_pytorch_model.bin(例如,https://huggingface.co/laion/CLIP-ViT-L-14-DataComp.XL-s13B-b90K/tree/main),并使用pretrained=/path/to/open_clip_pytorch_model.bin。
# pretrained also accepts local paths
model, _, preprocess = open_clip.create_model_and_transforms('ViT-B-32', pretrained='laion2b_s34b_b79k')
分类任务的微调
此存储库专注于训练 CLIP 模型。若要在下游分类任务(如 ImageNet)上微调经过训练的零样本模型,请参阅我们的其他存储库:WiSE-FT。 这WiSE-FT 存储库包含我们论文的代码零样本模型的稳健微调,其中我们介绍了一种用于微调零样本模型同时在分布转变下保持稳健性的技术。
数据
要将数据集下载为 webdataset,我们建议img2数据集。
概念性标题
YFCC 和其他数据集
除了上面提到的通过 CSV 文件指定训练数据之外,我们的代码库还支持网络数据集,建议用于较大规模的数据集。预期格式是一系列.tar文件。每个.tar文件都应包含每个训练示例的两个文件,一个用于图像,一个用于相应的文本。两个文件应具有相同的名称,但扩展名不同。例如,shard_001.tar可以包含诸如abc.jpg和之类的文件。您可以在以下位置abc.txt了解更多信息webdatasetGitHub - webdataset/webdataset: A high-performance Python-based I/O system for large (and small) deep learning problems, with strong support for PyTorch.我们使用.tar每个包含 1,000 个数据点的文件,这些文件是使用篷布。
您可以从以下网址下载 YFCC 数据集多媒体共享。与 OpenAI 类似,我们使用 YFCC 的一个子集来达到上述准确率。该子集中图像的索引为OpenAI 的 CLIP 存储库。
培训 CLIP
安装
我们建议您首先创建一个虚拟环境:
<span style="background-color:var(--bgColor-muted, var(--color-canvas-subtle))"><span style="color:#1f2328"><span style="color:var(--fgColor-default, var(--color-fg-default))"><span style="background-color:var(--bgColor-muted, var(--color-canvas-subtle))"><code>python3 -m venv .env
source .env/bin/activate
pip install -U pip
</code></span></span></span></span>然后您可以安装 openclip 进行训练pip install 'open_clip_torch[training]'。
发展
如果您想进行更改以贡献代码,您可以克隆 openclip 然后make install在 openclip 文件夹中运行(创建虚拟环境后)
按照以下说明安装 pip PyTorchStart Locally | PyTorch
您可以运行make install-training安装培训部门
测试
make install-test然后就可以运行测试了make test
python -m pytest -x -s -v tests -k "training"运行特定测试
针对特定的 git 修订版或标签运行回归测试:
-
生成测试数据
python tests/util_test.py --model RN50 RN101 --save_model_list models.txt --git_revision 9d31b2ec4df6d8228f370ff20c8267ec6ba39383
警告:这将调用 git 并修改您的工作树,但在生成数据后会将其重置为当前状态!以
这种方式生成测试数据时,请勿修改您的工作树。 -
运行回归测试
OPEN_CLIP_TEST_REG_MODELS=models.txt python -m pytest -x -s -v -m regression_test
单进程运行代码示例:
python -m open_clip_train.main \
--save-frequency 1 \
--zeroshot-frequency 1 \
--report-to tensorboard \
--train-data="/path/to/train_data.csv" \
--val-data="/path/to/validation_data.csv" \
--csv-img-key filepath \
--csv-caption-key title \
--imagenet-val=/path/to/imagenet/root/val/ \
--warmup 10000 \
--batch-size=128 \
--lr=1e-3 \
--wd=0.1 \
--epochs=30 \
--workers=8 \
--model RN50
注意:是用于零样本评估的 ImageNet验证imagenet-val集的路径,而不是训练集!如果您不想在整个训练过程中对 ImageNet 进行零样本评估,可以删除此参数。请注意,该文件夹应包含子文件夹。如果没有,请使用val这个脚本。
多 GPU 及其他
此代码已在多达 1024 个 A100 上进行了实战测试,并提供了多种分布式训练解决方案。我们为 SLURM 集群提供原生支持。
随着用于训练的设备数量的增加,logit 矩阵的空间复杂度也会增加。使用简单的全聚集方案,空间复杂度将为 O(n^2)。相反,如果使用标志 --gather-with-grad和,复杂度可能会变得有效线性--local-loss。这种改变导致与简单方法一一对应的数值结果。
纪元
对于较大的数据集(例如 Laion2B),我们建议将其设置--train-num-samples为低于完整 epoch 的值,例如--train-num-samples 135646078设置为 epoch 的 1/16,并结合--dataset-resampled进行替换采样。这样可以更频繁地设置检查点以进行评估。
补丁丢失
最近的研究研究表明,可以删除一半到四分之三的视觉标记,从而使训练速度提高 2 到 3 倍,且不会损失准确性。
您可以使用键在可视化变换器配置上进行设置patch_dropout。
在论文中,他们最后还进行了微调,没有使用 patch dropout。你可以使用命令行参数执行此操作--force-patch-dropout 0.
多种数据源
OpenCLIP 支持使用多个数据源,通过使用 来分离不同的数据路径::。例如,要在 CC12M 和 LAION 上进行训练,可以使用--train-data "/data/cc12m/cc12m-train-{0000..2175}.tar::/data/LAION-400M/{00000..41455}.tar"。--dataset-resampled对于这些情况,建议使用 。
默认情况下,模型预期看到来自每个源的样本的次数与源的大小成正比。例如,当在一个大小为 400M 的数据源和一个大小为 10M 的数据源上进行训练时,来自第一个源的样本在预期中出现的可能性要高出 40 倍。
我们还支持使用标志对数据源进行不同的权重分配--train-data-upsampling-factors。例如,--train-data-upsampling-factors=1::1在上面的场景中使用相当于不使用该标志,--train-data-upsampling-factors=1::2相当于对第二个数据源进行两次上采样。如果要以相同的频率从数据源采样,则上采样因子应与数据源的大小成反比。例如,如果数据集A有 1000 个样本,数据集B有 100 个样本,则可以使用--train-data-upsampling-factors=0.001::0.01(或类似地,--train-data-upsampling-factors=1::10)。
单节点
我们利用torchrun来启动分布式作业。以下是在 4 个 GPU 节点上启动作业:
cd open_clip/src
torchrun --nproc_per_node 4 -m open_clip_train.main \
--train-data '/data/cc12m/cc12m-train-{0000..2175}.tar' \
--train-num-samples 10968539 \
--dataset-type webdataset \
--batch-size 320 \
--precision amp \
--workers 4 \
--imagenet-val /data/imagenet/validation/
多节点
只要用户包含有关节点数和主机节点的信息,上述相同的脚本就可以工作。
cd open_clip/src
torchrun --nproc_per_node=4 \
--rdzv_endpoint=$HOSTE_NODE_ADDR \
-m open_clip_train.main \
--train-data '/data/cc12m/cc12m-train-{0000..2175}.tar' \
--train-num-samples 10968539 \
--dataset-type webdataset \
--batch-size 320 \
--precision amp \
--workers 4 \
--imagenet-val /data/imagenet/validation/
斯拉普
这可能是最容易使用的解决方案。以下脚本用于训练我们最大的模型:
#!/bin/bash -x
#SBATCH --nodes=32
#SBATCH --gres=gpu:4
#SBATCH --ntasks-per-node=4
#SBATCH --cpus-per-task=6
#SBATCH --wait-all-nodes=1
#SBATCH --job-name=open_clip
#SBATCH --account=ACCOUNT_NAME
#SBATCH --partition PARTITION_NAME
eval "$(/path/to/conda/bin/conda shell.bash hook)" # init conda
conda activate open_clip
export CUDA_VISIBLE_DEVICES=0,1,2,3
export MASTER_PORT=12802
master_addr=$(scontrol show hostnames "$SLURM_JOB_NODELIST" | head -n 1)
export MASTER_ADDR=$master_addr
cd /shared/open_clip
export PYTHONPATH="$PYTHONPATH:$PWD/src"
srun --cpu_bind=v --accel-bind=gn python -u src/open_clip_train/main.py \
--save-frequency 1 \
--report-to tensorboard \
--train-data="/data/LAION-400M/{00000..41455}.tar" \
--warmup 2000 \
--batch-size=256 \
--epochs=32 \
--workers=8 \
--model ViT-B-32 \
--name "ViT-B-32-Vanilla" \
--seed 0 \
--local-loss \
--gather-with-grad
从检查点恢复:
python -m open_clip_train.main \
--train-data="/path/to/train_data.csv" \
--val-data="/path/to/validation_data.csv" \
--resume /path/to/checkpoints/epoch_K.pt
培训 CoCa:
训练科卡通过使用训练脚本的参数指定 CoCa 配置来启用模型--model。当前可用的配置是“coca_base”、“coca_ViT-B-32”和“coca_roberta-ViT-B-32”(使用 RoBERTa 作为文本编码器)。CoCa 配置与 CLIP 配置不同,因为它们有一个额外的“multimodal_cfg”组件,用于指定多模态文本解码器的参数。以下是 coca_ViT-B-32 配置的一个示例:
"multimodal_cfg": {
"context_length": 76,
"vocab_size": 49408,
"width": 512,
"heads": 8,
"layers": 12,
"latent_dim": 512,
"attn_pooler_heads": 8
}
致谢卢西德兰斯为了初始代码,格普切将代码适配到 open_clip,以及iejMac用于训练模型。
使用 CoCa 生成文本
import open_clip
import torch
from PIL import Image
model, _, transform = open_clip.create_model_and_transforms(
model_name="coca_ViT-L-14",
pretrained="mscoco_finetuned_laion2B-s13B-b90k"
)
im = Image.open("cat.jpg").convert("RGB")
im = transform(im).unsqueeze(0)
with torch.no_grad(), torch.cuda.amp.autocast():
generated = model.generate(im)
print(open_clip.decode(generated[0]).split("<end_of_text>")[0].replace("<start_of_text>", ""))
另请参阅[可口可乐]
微调 CoCa
要在 mscoco 上微调 coca,首先要创建数据集,一种方法是使用 csvdataset,也许最简单的方法是使用CLIP_基准进而使用pycoco工具(也可单独使用)。
from clip_benchmark.datasets.builder import build_dataset
import pandas as pd
import os
root_path = "path/to/data/dir" # set this to smth meaningful
ds = build_dataset("mscoco_captions", root=root_path, split="train", task="captioning") # this downloads the dataset if it is not there already
coco = ds.coco
imgs = coco.loadImgs(coco.getImgIds())
future_df = {"filepath":[], "title":[]}
for img in imgs:
caps = coco.imgToAnns[img["id"]]
for cap in caps:
future_df["filepath"].append(img["file_name"])
future_df["title"].append(cap["caption"])
pd.DataFrame.from_dict(future_df).to_csv(
os.path.join(root_path, "train2014.csv"), index=False, sep="\t"
)
这将创建一个 csv 数据集,可以使用 open_clip 对 coca 进行微调
python -m open_clip_train.main \
--dataset-type "csv" \
--train-data "path/to/data/dir/train2014.csv" \
--warmup 1000 \
--batch-size 128 \
--lr 1e-5 \
--wd 0.1 \
--epochs 1 \
--workers 3 \
--model "coca_ViT-L-14" \
--report-to "wandb" \
--coca-contrastive-loss-weight 0 \
--coca-caption-loss-weight 1 \
--log-every-n-steps 100
这是一个通用设置,open_clip 有非常多可以设置的参数,python -m open_clip_train.main --help应该展示出来。与预训练相比,唯一相关的变化是两个参数
--coca-contrastive-loss-weight 0 --coca-caption-loss-weight 1
这使得模型仅训练生成端。
使用预先训练的语言模型作为文本编码器进行训练:
如果您希望使用不同的语言模型作为 CLIP 的文本编码器,您可以通过使用 Hugging Face 模型配置之一src/open_clip/model_configs并分别将其标记器作为--model和--hf-tokenizer-name参数传入来实现。目前我们仅支持 RoBERTa(“test-roberta”配置),但添加新模型应该很简单。您还可以使用参数确定从末尾开始有多少层未冻结--lock-text-unlocked-layers。这是一个使用 RoBERTa LM 训练 CLIP 的示例命令,其最后 10 层未冻结:
python -m open_clip_train.main \
--train-data="pipe:aws s3 cp s3://s-mas/cc3m/{00000..00329}.tar -" \
--train-num-samples 3000000 \
--val-data="pipe:aws s3 cp s3://s-mas/cc3m/{00330..00331}.tar -" \
--val-num-samples 10000 \
--dataset-type webdataset \
--batch-size 256 \
--warmup 2000 \
--epochs 10 \
--lr 5e-4 \
--precision amp \
--workers 6 \
--model "roberta-ViT-B-32" \
--lock-text \
--lock-text-unlocked-layers 10 \
--name "10_unfrozen" \
--report-to "tensorboard" \
损失曲线
当在具有 8 个 GPU 的机器上运行时,该命令应为概念字幕生成以下训练曲线:
概念标题的更详细曲线请参见/docs/clip_conceptual_captions.md。
lr=5e-4在 YFCC 上训练 RN50 时,使用与上述相同的超参数,但和除外epochs=32。
请注意,要使用其他模型,如ViT-B/32或RN50x4或RN50x16或ViT-B/16,请指定--model RN50x4。
日志记录
对于 tensorboard 日志记录,运行:
tensorboard --logdir=logs/tensorboard/ --port=7777
对于 wandb 日志记录,我们建议查看step变量而不是Step,因为后者在此代码库的早期版本中未正确设置。对于使用之前训练过的模型的较早运行第613章,Step则应忽略该变量。对于较新的运行,在该 PR 之后,这两个变量是相同的。
评估/零样本
我们建议GitHub - LAION-AI/CLIP_benchmark: CLIP-like model evaluation对 40 个数据集进行系统评估。
评估本地检查点:
python -m open_clip_train.main \
--val-data="/path/to/validation_data.csv" \
--model RN101 \
--pretrained /path/to/checkpoints/epoch_K.pt
评估 ImageNet 零样本预测中托管的预训练检查点:
python -m open_clip_train.main \
--imagenet-val /path/to/imagenet/validation \
--model ViT-B-32-quickgelu \
--pretrained laion400m_e32
模型蒸馏
您可以使用 和 来从预训练模型中进行提取--distill-model,--distill-pretrained以指定要从中进行提取的模型。例如,要从 OpenAI ViT-L/14 中进行提取,请使用--distill-model ViT-L-14 --distill-pretrained openai。
梯度累积
要模拟更大的批次,请使用--accum-freq k。如果每个 GPU 批次大小--batch-size为m,则有效批次大小将为k * m * num_gpus。
当从默认值 1 增加时--accum-freq,样本/秒将保持大致恒定(批次大小将加倍,每批次时间也将加倍)。建议在--grad-checkpointing --local-loss --gather-with-grad增加之前使用其他功能来减少批次大小--accum-freq。--accum-freq除了这些功能外,还可以使用。
现在,每个示例有 2 次前向传递,而不是 1 次。不过,第一次是用 完成的torch.no_grad。
需要一些额外的 GPU 内存——所有m批次的特征和数据都存储在内存中。
还有m损失计算,而不是通常的 1。
更多信息请参阅 Cui 等人(https://arxiv.org/abs/2112.09331)或 Pham 等人(https://arxiv.org/abs/2111.10050)。
Int8 支持
我们对 int8 训练和推理提供测试版支持。您可以使用--use-bnb-linear SwitchBackLinearGlobal或启用 int8 训练--use-bnb-linear SwitchBackLinearGlobalMemEfficient。请参阅 bitsandbytes 库以了解这些层的定义。对于 CLIP VIT-Huge,这目前应相当于 10% 的训练加速,且准确度不会降低。当注意力层被重构,线性层也可以在那里被替换时,速度会进一步提高。
查看教程open_clip/tutorials/int8_tutorial.ipynb at main · mlfoundations/open_clip · GitHub或者纸。
支持远程加载/训练
始终可以直接从远程文件(例如,s3 存储桶中的文件)恢复。只需设置--resume s3://<path-to-checkpoint> 。这将适用于 支持的任何文件系统fsspec。
还可以open_clip在持续备份到 s3 的同时训练模型。这有助于避免本地文件系统缓慢。
假设你的节点有一个本地 ssd /scratch,一个 s3 存储桶s3://<path-to-bucket>。
在这种情况下,设置--logs /scratch和--remote-sync s3://<path-to-bucket>。然后,后台进程将同步/scratch/<run-name>到s3://<path-to-bucket>/<run-name>。同步后,后台进程将休眠几--remote-sync-frequency秒钟,默认为 5 分钟。
还实验性地支持同步到其他远程文件系统,而不仅仅是 s3。为此,请指定--remote-sync-protocol fsspec。但是,目前这非常慢,不推荐。
此外,为了避免在使用这些功能时在本地保存过多的检查点,您可以使用--delete-previous-checkpoint在保存新检查点后删除前一个检查点的功能。
注意:如果您将此功能与 一起使用--resume latest,则需要注意以下几点。首先,--save-most-recent不支持使用 。其次,仅s3支持 。最后,由于同步是在后台进行的,因此最近的检查点可能尚未完成与远程的同步。
将模型推送至 Hugging Face Hub
该模块open_clip.push_to_hf_hub包括用于将模型/w 权重和配置推送到 HF Hub 的助手。
该工具可以从命令行运行,例如: python -m open_clip.push_to_hf_hub --model convnext_large_d_320 --pretrained /train/checkpoints/epoch_12.pt --repo-id laion/CLIP-convnext_large_d_320.laion2B-s29B-b131K-ft
致谢
我们非常感谢高斯超级计算中心 (www.gauss-centre.eu) 通过位于于利希超级计算中心 (JSC) 的 GCS 超级计算机 JUWELS Booster 上的约翰·冯·诺依曼计算研究所 (NIC) 提供计算时间,为这部分工作提供资金。
OpenCLIP
[Paper] [Citations] [Clip Colab] [Coca Colab]

Welcome to an open source implementation of OpenAI's CLIP (Contrastive Language-Image Pre-training).
Using this codebase, we have trained several models on a variety of data sources and compute budgets, ranging from small-scale experiments to larger runs including models trained on datasets such as LAION-400M, LAION-2B and DataComp-1B. Many of our models and their scaling properties are studied in detail in the paper reproducible scaling laws for contrastive language-image learning. Some of the best models we've trained and their zero-shot ImageNet-1k accuracy are shown below, along with the ViT-L model trained by OpenAI and other state-of-the-art open source alternatives (all can be loaded via OpenCLIP). We provide more details about our full collection of pretrained models here, and zero-shot results for 38 datasets here.
| Model | Training data | Resolution | # of samples seen | ImageNet zero-shot acc. |
|---|---|---|---|---|
| ConvNext-Base | LAION-2B | 256px | 13B | 71.5% |
| ConvNext-Large | LAION-2B | 320px | 29B | 76.9% |
| ConvNext-XXLarge | LAION-2B | 256px | 34B | 79.5% |
| ViT-B/32 | DataComp-1B | 256px | 34B | 72.8% |
| ViT-B/16 | DataComp-1B | 224px | 13B | 73.5% |
| ViT-L/14 | LAION-2B | 224px | 32B | 75.3% |
| ViT-H/14 | LAION-2B | 224px | 32B | 78.0% |
| ViT-L/14 | DataComp-1B | 224px | 13B | 79.2% |
| ViT-G/14 | LAION-2B | 224px | 34B | 80.1% |
| ViT-L/14 (Original CLIP) | WIT | 224px | 13B | 75.5% |
| ViT-SO400M/14 (SigLIP) | WebLI | 224px | 45B | 82.0% |
| ViT-SO400M-14-SigLIP-384 (SigLIP) | WebLI | 384px | 45B | 83.1% |
| ViT-H/14-quickgelu (DFN) | DFN-5B | 224px | 39B | 83.4% |
| ViT-H-14-378-quickgelu (DFN) | DFN-5B | 378px | 44B | 84.4% |
Model cards with additional model specific details can be found on the Hugging Face Hub under the OpenCLIP library tag: https://huggingface.co/models?library=open_clip.
If you found this repository useful, please consider citing. We welcome anyone to submit an issue or send an email if you have any other requests or suggestions.
Note that portions of src/open_clip/ modelling and tokenizer code are adaptations of OpenAI's official repository.
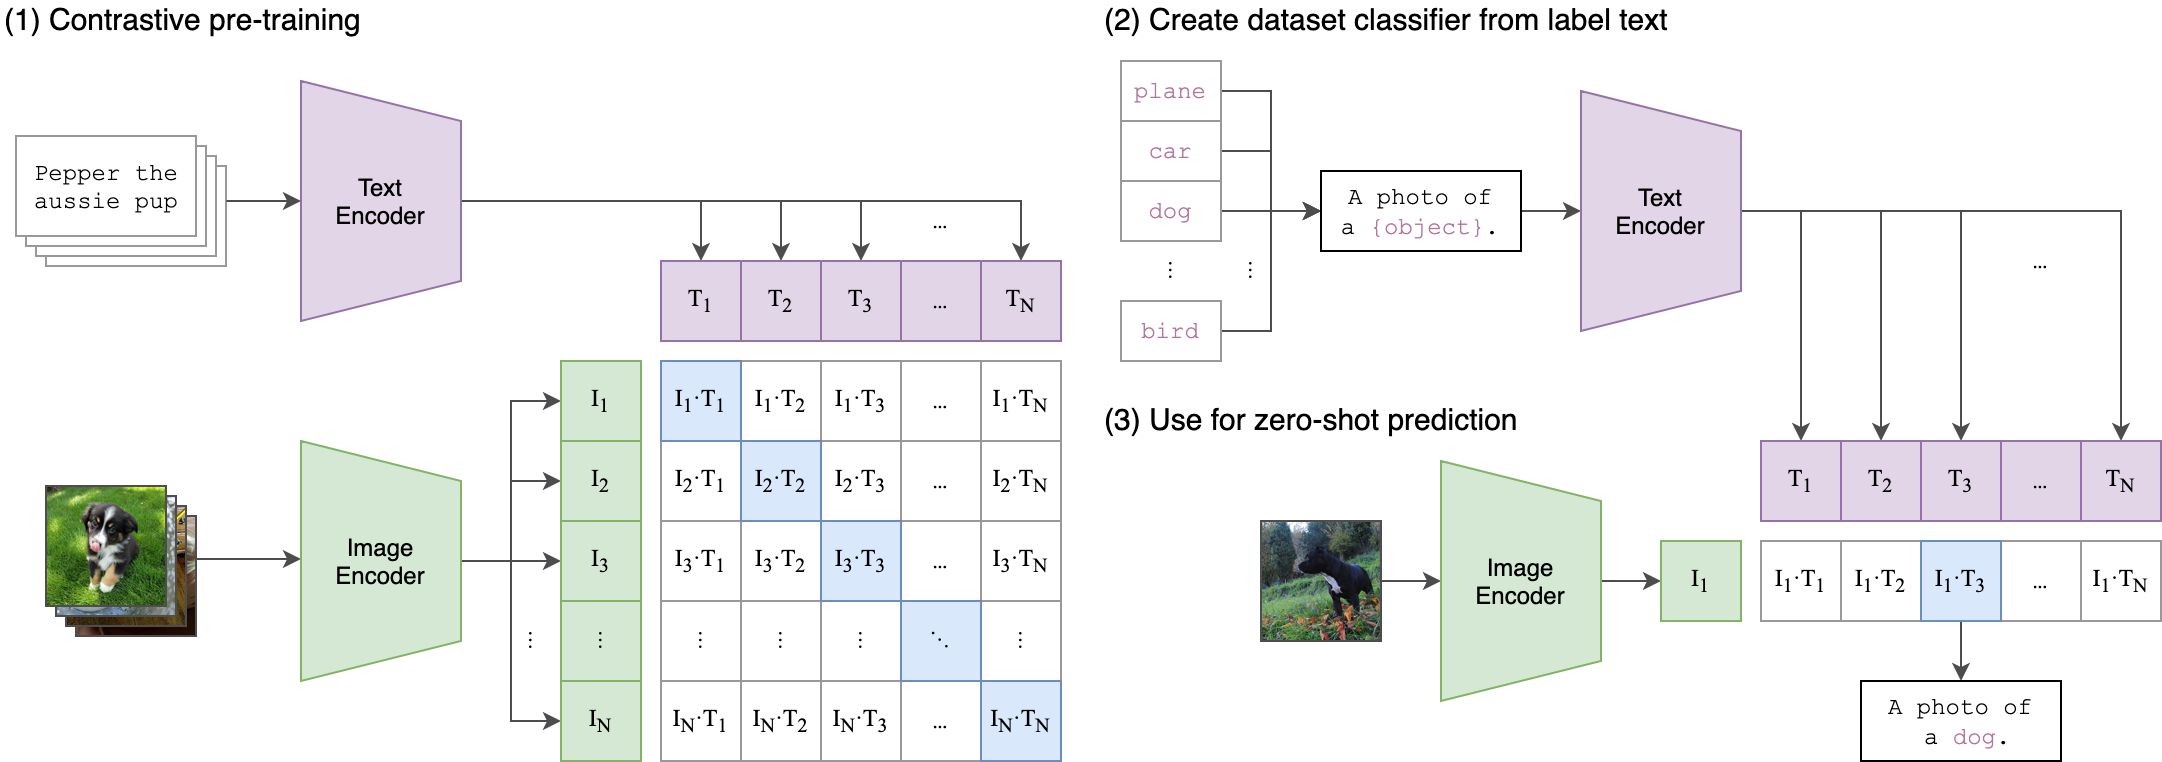
Approach
|
|
|---|
| Image Credit: GitHub - openai/CLIP: CLIP (Contrastive Language-Image Pretraining), Predict the most relevant text snippet given an image |
Usage
pip install open_clip_torch
import torch
from PIL import Image
import open_clip

model, _, preprocess = open_clip.create_model_and_transforms('ViT-B-32', pretrained='laion2b_s34b_b79k')
model.eval()  # model in train mode by default, impacts some models with BatchNorm or stochastic depth active
tokenizer = open_clip.get_tokenizer('ViT-B-32')

image = preprocess(Image.open("docs/CLIP.png")).unsqueeze(0)
text = tokenizer(["a diagram", "a dog", "a cat"])

with torch.no_grad(), torch.cuda.amp.autocast():
    image_features = model.encode_image(image)
    text_features = model.encode_text(text)
    image_features /= image_features.norm(dim=-1, keepdim=True)
    text_features /= text_features.norm(dim=-1, keepdim=True)

    text_probs = (100.0 * image_features @ text_features.T).softmax(dim=-1)

print("Label probs:", text_probs)  # prints: [[1., 0., 0.]]
See also this [Clip Colab].
To compute billions of embeddings efficiently, you can use clip-retrieval which has openclip support.
Pretrained models
We offer a simple model interface to instantiate both pre-trained and untrained models. To see which pretrained models are available, use the following code snippet. More details about our pretrained models are available here.
>>> import open_clip
>>> open_clip.list_pretrained()
You can find more about the models we support (e.g. number of parameters, FLOPs) in this table.
NOTE: Many existing checkpoints use the QuickGELU activation from the original OpenAI models. This activation is actually less efficient than native torch.nn.GELU in recent versions of PyTorch. The model defaults are now nn.GELU, so one should use model definitions with -quickgelu postfix for the OpenCLIP pretrained weights. All OpenAI pretrained weights will always default to QuickGELU. One can also use the non -quickgelu model definitions with pretrained weights using QuickGELU but there will be an accuracy drop, for fine-tune that will likely vanish for longer runs. Future trained models will use nn.GELU.
Loading models
Models can be loaded with open_clip.create_model_and_transforms, as shown in the example below. The model name and corresponding pretrained keys are compatible with the outputs of open_clip.list_pretrained().
The pretrained argument also accepts local paths, for example /path/to/my/b32.pt. You can also load checkpoints from huggingface this way. To do so, download the open_clip_pytorch_model.bin file (for example, https://huggingface.co/laion/CLIP-ViT-L-14-DataComp.XL-s13B-b90K/tree/main), and use pretrained=/path/to/open_clip_pytorch_model.bin.
# pretrained also accepts local paths
model, _, preprocess = open_clip.create_model_and_transforms('ViT-B-32', pretrained='laion2b_s34b_b79k')
Fine-tuning on classification tasks
This repository is focused on training CLIP models. To fine-tune a trained zero-shot model on a downstream classification task such as ImageNet, please see our other repository: WiSE-FT. The WiSE-FT repository contains code for our paper on Robust Fine-tuning of Zero-shot Models, in which we introduce a technique for fine-tuning zero-shot models while preserving robustness under distribution shift.
Data
To download datasets as webdataset, we recommend img2dataset.
Conceptual Captions
YFCC and other datasets
In addition to specifying the training data via CSV files as mentioned above, our codebase also supports webdataset, which is recommended for larger scale datasets. The expected format is a series of .tar files. Each of these .tar files should contain two files for each training example, one for the image and one for the corresponding text. Both files should have the same name but different extensions. For instance, shard_001.tar could contain files such as abc.jpg and abc.txt. You can learn more about webdataset at GitHub - webdataset/webdataset: A high-performance Python-based I/O system for large (and small) deep learning problems, with strong support for PyTorch.. We use .tar files with 1,000 data points each, which we create using tarp.
You can download the YFCC dataset from Multimedia Commons. Similar to OpenAI, we used a subset of YFCC to reach the aforementioned accuracy numbers. The indices of images in this subset are in OpenAI's CLIP repository.
Training CLIP
Install
We advise you first create a virtual environment with:
python3 -m venv .env
source .env/bin/activate
pip install -U pip
You can then install openclip for training with pip install 'open_clip_torch[training]'.
Development
If you want to make changes to contribute code, you can clone openclip then run make install in openclip folder (after creating a virtualenv)
Install pip PyTorch as per Start Locally | PyTorch
You may run make install-training to install training deps
Testing
Test can be run with make install-test then make test
python -m pytest -x -s -v tests -k "training" to run a specific test
Running regression tests against a specific git revision or tag:
-
Generate testing data
python tests/util_test.py --model RN50 RN101 --save_model_list models.txt --git_revision 9d31b2ec4df6d8228f370ff20c8267ec6ba39383
WARNING: This will invoke git and modify your working tree, but will reset it to the current state after data has been generated!
Don't modify your working tree while test data is being generated this way. -
Run regression tests
OPEN_CLIP_TEST_REG_MODELS=models.txt python -m pytest -x -s -v -m regression_test
Sample single-process running code:
python -m open_clip_train.main \
    --save-frequency 1 \
    --zeroshot-frequency 1 \
    --report-to tensorboard \
    --train-data="/path/to/train_data.csv"  \
    --val-data="/path/to/validation_data.csv"  \
    --csv-img-key filepath \
    --csv-caption-key title \
    --imagenet-val=/path/to/imagenet/root/val/ \
    --warmup 10000 \
    --batch-size=128 \
    --lr=1e-3 \
    --wd=0.1 \
    --epochs=30 \
    --workers=8 \
    --model RN50
Note: imagenet-val is the path to the validation set of ImageNet for zero-shot evaluation, not the training set! You can remove this argument if you do not want to perform zero-shot evaluation on ImageNet throughout training. Note that the val folder should contain subfolders. If it does not, please use this script.
Multi-GPU and Beyond
This code has been battle tested up to 1024 A100s and offers a variety of solutions for distributed training. We include native support for SLURM clusters.
As the number of devices used to train increases, so does the space complexity of the the logit matrix. Using a naïve all-gather scheme, space complexity will be O(n^2). Instead, complexity may become effectively linear if the flags --gather-with-grad and --local-loss are used. This alteration results in one-to-one numerical results as the naïve method.
Epochs
For larger datasets (eg Laion2B), we recommend setting --train-num-samples to a lower value than the full epoch, for example --train-num-samples 135646078 to 1/16 of an epoch in conjunction with --dataset-resampled to do sampling with replacement. This allows having frequent checkpoints to evaluate more often.
Patch Dropout
Recent research has shown that one can dropout half to three-quarters of the visual tokens, leading to up to 2-3x training speeds without loss of accuracy.
You can set this on your visual transformer config with the key patch_dropout.
In the paper, they also finetuned without the patch dropout at the end. You can do this with the command-line argument --force-patch-dropout 0.
Multiple data sources
OpenCLIP supports using multiple data sources, by separating different data paths with ::. For instance, to train on CC12M and on LAION, one might use --train-data "/data/cc12m/cc12m-train-{0000..2175}.tar::/data/LAION-400M/{00000..41455}.tar". Using --dataset-resampled is recommended for these cases.
By default, on expectation the amount of times the model will see a sample from each source is proportional to the size of the source. For instance, when training on one data source with size 400M and one with size 10M, samples from the first source are 40x more likely to be seen in expectation.
We also support different weighting of the data sources, by using the --train-data-upsampling-factors flag. For instance, using --train-data-upsampling-factors=1::1 in the above scenario is equivalent to not using the flag, and --train-data-upsampling-factors=1::2 is equivalent to upsampling the second data source twice. If you want to sample from data sources with the same frequency, the upsampling factors should be inversely proportional to the sizes of the data sources. For instance, if dataset A has 1000 samples and dataset B has 100 samples, you can use --train-data-upsampling-factors=0.001::0.01 (or analogously, --train-data-upsampling-factors=1::10).
Single-Node
We make use of torchrun to launch distributed jobs. The following launches a a job on a node of 4 GPUs:
cd open_clip/src
torchrun --nproc_per_node 4 -m open_clip_train.main \
    --train-data '/data/cc12m/cc12m-train-{0000..2175}.tar' \
    --train-num-samples 10968539 \
    --dataset-type webdataset \
    --batch-size 320 \
    --precision amp \
    --workers 4 \
    --imagenet-val /data/imagenet/validation/
Multi-Node
The same script above works, so long as users include information about the number of nodes and host node.
cd open_clip/src
torchrun --nproc_per_node=4 \
    --rdzv_endpoint=$HOSTE_NODE_ADDR \
    -m open_clip_train.main \
    --train-data '/data/cc12m/cc12m-train-{0000..2175}.tar' \
    --train-num-samples 10968539 \
    --dataset-type webdataset \
    --batch-size 320 \
    --precision amp \
    --workers 4 \
    --imagenet-val /data/imagenet/validation/
SLURM
This is likely the easiest solution to utilize. The following script was used to train our largest models:
#!/bin/bash -x
#SBATCH --nodes=32
#SBATCH --gres=gpu:4
#SBATCH --ntasks-per-node=4
#SBATCH --cpus-per-task=6
#SBATCH --wait-all-nodes=1
#SBATCH --job-name=open_clip
#SBATCH --account=ACCOUNT_NAME
#SBATCH --partition PARTITION_NAME

eval "$(/path/to/conda/bin/conda shell.bash hook)" # init conda
conda activate open_clip
export CUDA_VISIBLE_DEVICES=0,1,2,3
export MASTER_PORT=12802

master_addr=$(scontrol show hostnames "$SLURM_JOB_NODELIST" | head -n 1)
export MASTER_ADDR=$master_addr

cd /shared/open_clip
export PYTHONPATH="$PYTHONPATH:$PWD/src"
srun --cpu_bind=v --accel-bind=gn python -u src/open_clip_train/main.py \
    --save-frequency 1 \
    --report-to tensorboard \
    --train-data="/data/LAION-400M/{00000..41455}.tar" \
    --warmup 2000 \
    --batch-size=256 \
    --epochs=32 \
    --workers=8 \
    --model ViT-B-32 \
    --name "ViT-B-32-Vanilla" \
    --seed 0 \
    --local-loss \
    --gather-with-grad
Resuming from a checkpoint:
python -m open_clip_train.main \
    --train-data="/path/to/train_data.csv" \
    --val-data="/path/to/validation_data.csv"  \
    --resume /path/to/checkpoints/epoch_K.pt
Training CoCa:
Training CoCa models is enabled through specifying a CoCa config using the --model parameter of the training script. Currently available configs are "coca_base", "coca_ViT-B-32", and "coca_roberta-ViT-B-32" (which uses RoBERTa as the text encoder). CoCa configs are different from CLIP configs because they have an additional "multimodal_cfg" component which specifies parameters for the multimodal text decoder. Here's an example from the coca_ViT-B-32 config:
"multimodal_cfg": {
	"context_length": 76,
	"vocab_size": 49408,
	"width": 512,
	"heads": 8,
	"layers": 12,
	"latent_dim": 512,
	"attn_pooler_heads": 8
}
Credit to lucidrains for initial code, gpucce for adapting the code to open_clip, and iejMac for training the models.
Generating text with CoCa
import open_clip
import torch
from PIL import Image

model, _, transform = open_clip.create_model_and_transforms(
  model_name="coca_ViT-L-14",
  pretrained="mscoco_finetuned_laion2B-s13B-b90k"
)

im = Image.open("cat.jpg").convert("RGB")
im = transform(im).unsqueeze(0)

with torch.no_grad(), torch.cuda.amp.autocast():
  generated = model.generate(im)

print(open_clip.decode(generated[0]).split("<end_of_text>")[0].replace("<start_of_text>", ""))
See also this [Coca Colab]
Fine Tuning CoCa
To fine-tune coca on mscoco, first create the dataset, one way is using a csvdataset and perhaps the simplest way to do it is using CLIP_benchmark which in turn uses pycocotools (that can be used also by itself).
from clip_benchmark.datasets.builder import build_dataset
import pandas as pd
import os

root_path = "path/to/data/dir" # set this to smth meaningful
ds = build_dataset("mscoco_captions", root=root_path, split="train", task="captioning") # this downloads the dataset if it is not there already
coco = ds.coco
imgs = coco.loadImgs(coco.getImgIds())
future_df = {"filepath":[], "title":[]}
for img in imgs:
    caps = coco.imgToAnns[img["id"]]
    for cap in caps:
        future_df["filepath"].append(img["file_name"])
        future_df["title"].append(cap["caption"])
pd.DataFrame.from_dict(future_df).to_csv(
  os.path.join(root_path, "train2014.csv"), index=False, sep="\t"
)
This should create a csv dataset that one can use to fine-tune coca with open_clip
python -m open_clip_train.main \
    --dataset-type "csv" \
    --train-data "path/to/data/dir/train2014.csv" \
    --warmup 1000 \
    --batch-size 128 \
    --lr 1e-5 \
    --wd 0.1 \
    --epochs 1 \
    --workers 3 \
    --model "coca_ViT-L-14" \
    --report-to "wandb" \
    --coca-contrastive-loss-weight 0 \
    --coca-caption-loss-weight 1 \
    --log-every-n-steps 100
This is a general setting, open_clip has very parameters that can be set, python -m open_clip_train.main --help should show them. The only relevant change compared to pre-training are the two arguments
--coca-contrastive-loss-weight 0
--coca-caption-loss-weight 1
which make the model only train the generative side.
Training with pre-trained language models as text encoder:
If you wish to use different language models as the text encoder for CLIP you can do so by using one of the Hugging Face model configs in src/open_clip/model_configs and passing in it's tokenizer as the --model and --hf-tokenizer-name parameters respectively. Currently we only support RoBERTa ("test-roberta" config), however adding new models should be trivial. You can also determine how many layers, from the end, to leave unfrozen with the --lock-text-unlocked-layers parameter. Here's an example command to train CLIP with the RoBERTa LM that has it's last 10 layers unfrozen:
python -m open_clip_train.main \
         --train-data="pipe:aws s3 cp s3://s-mas/cc3m/{00000..00329}.tar -" \
         --train-num-samples 3000000 \
         --val-data="pipe:aws s3 cp s3://s-mas/cc3m/{00330..00331}.tar -" \
         --val-num-samples 10000 \
         --dataset-type webdataset \
         --batch-size 256 \
         --warmup 2000 \
         --epochs 10 \
         --lr 5e-4 \
         --precision amp \
         --workers 6 \
         --model "roberta-ViT-B-32" \
         --lock-text \
         --lock-text-unlocked-layers 10 \
         --name "10_unfrozen" \
         --report-to "tensorboard" \
Loss Curves
When run on a machine with 8 GPUs the command should produce the following training curve for Conceptual Captions:
More detailed curves for Conceptual Captions are given at /docs/clip_conceptual_captions.md.
When training a RN50 on YFCC the same hyperparameters as above are used, with the exception of lr=5e-4 and epochs=32.
Note that to use another model, like ViT-B/32 or RN50x4 or RN50x16 or ViT-B/16, specify with --model RN50x4.
Logging
For tensorboard logging, run:
tensorboard --logdir=logs/tensorboard/ --port=7777
For wandb logging, we recommend looking at the step variable instead of Step, since the later was not properly set in earlier versions of this codebase. For older runs with models trained before #613, the Step variable should be ignored. For newer runs, after that PR, the two variables are the same.
Evaluation / Zero-Shot
We recommend GitHub - LAION-AI/CLIP_benchmark: CLIP-like model evaluation for systematic evaluation on 40 datasets.
Evaluating local checkpoint:
python -m open_clip_train.main \
    --val-data="/path/to/validation_data.csv"  \
    --model RN101 \
    --pretrained /path/to/checkpoints/epoch_K.pt
Evaluating hosted pretrained checkpoint on ImageNet zero-shot prediction:
python -m open_clip_train.main \
    --imagenet-val /path/to/imagenet/validation \
    --model ViT-B-32-quickgelu \
    --pretrained laion400m_e32
Model distillation
You can distill from a pre-trained by using --distill-model and --distill-pretrained to specify the model you'd like to distill from. For instance, to distill from OpenAI ViT-L/14 use --distill-model ViT-L-14 --distill-pretrained openai.
Gradient accumulation
To simulate larger batches use --accum-freq k. If per gpu batch size, --batch-size, is m, then the effective batch size will be k * m * num_gpus.
When increasing --accum-freq from its default of 1, samples/s will remain approximately constant (batch size will double, as will time-per-batch). It is recommended to use other features to reduce batch size such as --grad-checkpointing --local-loss --gather-with-grad before increasing --accum-freq. --accum-freq can be used in addition to these features.
Instead of 1 forward pass per example, there are now 2 forward passes per-example. However, the first is done with torch.no_grad.
There is some additional GPU memory required --- the features and data from all m batches are stored in memory.
There are also m loss computations instead of the usual 1.
For more information see Cui et al. (https://arxiv.org/abs/2112.09331) or Pham et al. (https://arxiv.org/abs/2111.10050).
Int8 Support
We have beta support for int8 training and inference. You can enable int8 training with --use-bnb-linear SwitchBackLinearGlobal or --use-bnb-linear SwitchBackLinearGlobalMemEfficient. Please see the bitsandbytes library for definitions for these layers. For CLIP VIT-Huge this should currently correspond to a 10% training speedup with no accuracy loss. More speedups comin when the attention layer is refactored so that linear layers man be replaced there, too.
See the tutorial open_clip/tutorials/int8_tutorial.ipynb at main · mlfoundations/open_clip · GitHub or paper.
Support for remote loading/training
It is always possible to resume directly from a remote file, e.g., a file in an s3 bucket. Just set --resume s3://<path-to-checkpoint> . This will work with any filesystem supported by fsspec.
It is also possible to train open_clip models while continuously backing up to s3. This can help to avoid slow local file systems.
Say that your node has a local ssd /scratch, an s3 bucket s3://<path-to-bucket>.
In that case, set --logs /scratch and --remote-sync s3://<path-to-bucket>. Then, a background process will sync /scratch/<run-name> to s3://<path-to-bucket>/<run-name>. After syncing, the background process will sleep for --remote-sync-frequency seconds, which defaults to 5 minutes.
There is also experimental support for syncing to other remote file systems, not just s3. To do so, specify --remote-sync-protocol fsspec. However, this is currently very slow and not recommended.
Also, to optionally avoid saving too many checkpoints locally when using these features, you can use --delete-previous-checkpoint which deletes the previous checkpoint after saving a new one.
Note: if you are using this feature with --resume latest, there are a few warnings. First, use with --save-most-recent is not supported. Second, only s3 is supported. Finally, since the sync happens in the background, it is possible that the most recent checkpoint may not be finished syncing to the remote.
Pushing Models to Hugging Face Hub
The module open_clip.push_to_hf_hub includes helpers for pushing models /w weights and config to the HF Hub.
The tool can be run from command line, ex: python -m open_clip.push_to_hf_hub --model convnext_large_d_320 --pretrained /train/checkpoints/epoch_12.pt --repo-id laion/CLIP-convnext_large_d_320.laion2B-s29B-b131K-ft
Acknowledgments
We gratefully acknowledge the Gauss Centre for Supercomputing e.V. (www.gauss-centre.eu) for funding this part of work by providing computing time through the John von Neumann Institute for Computing (NIC) on the GCS Supercomputer JUWELS Booster at Jülich Supercomputing Centre (JSC).
The Team
Current development of this repository is led by Ross Wightman, Romain Beaumont, Cade Gordon, and Vaishaal Shankar.
The original version of this repository is from a group of researchers at UW, Google, Stanford, Amazon, Columbia, and Berkeley.
Gabriel Ilharco*, Mitchell Wortsman*, Nicholas Carlini, Rohan Taori, Achal Dave, Vaishaal Shankar, John Miller, Hongseok Namkoong, Hannaneh Hajishirzi, Ali Farhadi, Ludwig Schmidt
Special thanks to Jong Wook Kim and Alec Radford for help with reproducing CLIP!
Citing
If you found this repository useful, please consider citing:
@software{ilharco_gabriel_2021_5143773,
  author       = {Ilharco, Gabriel and
                  Wortsman, Mitchell and
                  Wightman, Ross and
                  Gordon, Cade and
                  Carlini, Nicholas and
                  Taori, Rohan and
                  Dave, Achal and
                  Shankar, Vaishaal and
                  Namkoong, Hongseok and
                  Miller, John and
                  Hajishirzi, Hannaneh and
                  Farhadi, Ali and
                  Schmidt, Ludwig},
  title        = {OpenCLIP},
  month        = jul,
  year         = 2021,
  note         = {If you use this software, please cite it as below.},
  publisher    = {Zenodo},
  version      = {0.1},
  doi          = {10.5281/zenodo.5143773},
  url          = {https://doi.org/10.5281/zenodo.5143773}
}
@inproceedings{cherti2023reproducible,
  title={Reproducible scaling laws for contrastive language-image learning},
  author={Cherti, Mehdi and Beaumont, Romain and Wightman, Ross and Wortsman, Mitchell and Ilharco, Gabriel and Gordon, Cade and Schuhmann, Christoph and Schmidt, Ludwig and Jitsev, Jenia},
  booktitle={Proceedings of the IEEE/CVF Conference on Computer Vision and Pattern Recognition},
  pages={2818--2829},
  year={2023}
}
@inproceedings{Radford2021LearningTV,
  title={Learning Transferable Visual Models From Natural Language Supervision},
  author={Alec Radford and Jong Wook Kim and Chris Hallacy and A. Ramesh and Gabriel Goh and Sandhini Agarwal and Girish Sastry and Amanda Askell and Pamela Mishkin and Jack Clark and Gretchen Krueger and Ilya Sutskever},
  booktitle={ICML},
  year={2021}
}
@inproceedings{schuhmann2022laionb,
  title={{LAION}-5B: An open large-scale dataset for training next generation image-text models},
  author={Christoph Schuhmann and
          Romain Beaumont and
          Richard Vencu and
          Cade W Gordon and
          Ross Wightman and
          Mehdi Cherti and
          Theo Coombes and
团队
该存储库的当前开发由以下人员领导罗斯·怀特曼,罗曼·博蒙特,凯德·戈登, 和维沙尔·尚卡尔。
该存储库的原始版本来自华盛顿大学、谷歌、斯坦福大学、亚马逊、哥伦比亚大学和伯克利分校的一组研究人员。
加布里埃尔·伊尔哈科*,米切尔·沃茨曼*,尼古拉斯·卡里尼,罗汉·陶里,阿查尔·戴夫,维沙尔·尚卡尔,约翰·米勒,洪石南宫,汉娜内·哈吉什尔齐,阿里·法哈蒂,路德维希·施密特
引用
如果您发现此存储库有用,请考虑引用:
@software{ilharco_gabriel_2021_5143773,
  author       = {Ilharco, Gabriel and
                  Wortsman, Mitchell and
                  Wightman, Ross and
                  Gordon, Cade and
                  Carlini, Nicholas and
                  Taori, Rohan and
                  Dave, Achal and
                  Shankar, Vaishaal and
                  Namkoong, Hongseok and
                  Miller, John and
                  Hajishirzi, Hannaneh and
                  Farhadi, Ali and
                  Schmidt, Ludwig},
  title        = {OpenCLIP},
  month        = jul,
  year         = 2021,
  note         = {If you use this software, please cite it as below.},
  publisher    = {Zenodo},
  version      = {0.1},
  doi          = {10.5281/zenodo.5143773},
  url          = {https://doi.org/10.5281/zenodo.5143773}
}
@inproceedings{cherti2023reproducible,
  title={Reproducible scaling laws for contrastive language-image learning},
  author={Cherti, Mehdi and Beaumont, Romain and Wightman, Ross and Wortsman, Mitchell and Ilharco, Gabriel and Gordon, Cade and Schuhmann, Christoph and Schmidt, Ludwig and Jitsev, Jenia},
  booktitle={Proceedings of the IEEE/CVF Conference on Computer Vision and Pattern Recognition},
  pages={2818--2829},
  year={2023}
}
标签:CLIP,clip,--,Open,data,train,model,open
From: https://blog.csdn.net/sinat_37574187/article/details/142142340