第五章 GateWay网关
在上一章结尾,我们拆分了微服务:
-
商品服务 8081
-
购物车服务 8082
-
用户服务 8083
-
交易服务 8084
-
支付服务 8085
在最后进行前后端联调时,Nginx的配置:
    server {
        listen       18080;
        server_name  localhost;
        # 指定前端项目所在的位置
        location / {
            root html/hmall-portal;
        }

        error_page   500 502 503 504  /50x.html;
        location = /50x.html {
            root   html;
        }

        location /api/orders {
            rewrite /api/(.*)  /$1 break;
            proxy_pass http://localhost:8084;
        }
        location /api/users {
            rewrite /api/(.*)  /$1 break;
            proxy_pass http://localhost:8083;
        }
        location /api/addresses {
            rewrite /api/(.*)  /$1 break;
            proxy_pass http://localhost:8083;
        }
        location /api/carts {
            rewrite /api/(.*)  /$1 break;
            proxy_pass http://localhost:8082;
        }
        location /api/items {
            rewrite /api/(.*)  /$1 break;
            proxy_pass http://localhost:8181;
        }
        location /api/search {
            rewrite /api/(.*)  /$1 break;
            proxy_pass http://localhost:8181;
        }
        location /api/pay-orders {
            rewrite /api/(.*)  /$1 break;
            proxy_pass http://localhost:8085;
        }

    }
问题是:
-
请求不同的微服务,就需要在配置文件中新增一个location配置项,维护微服务的入口地址,太麻烦
-
location指定了微服务的入口地址,但是不能实时更新微服务列表(可以负载均衡,但是不能请求Nacos服务发现)
并且在单体架构时,只需要进行一次用户登录,登录后在每次请求时对用户身份进行校验即可(身份校验拦截器只需要写一次),就可以在所有业务中获取到用户的身份信息,而在微服务拆分后,每个微服务独立部署,问题是:
-
每个微服务都要定义登录校验拦截器获取用户信息吗?
-
微服务远程调用,如何传递用户的信息?
可以通过网关功能解决上述问题:
-
网关路由,所有请求发向网关服务,解决前端请求入口的问题。
-
网关鉴权,统一登录拦截校验,获取用户信息。
[!NOTE] Nginx集群
为了避免Nginx单点故障,实际上会将Ngxin进行集群部署,并通过keepalived虚拟出vip供浏览器访问
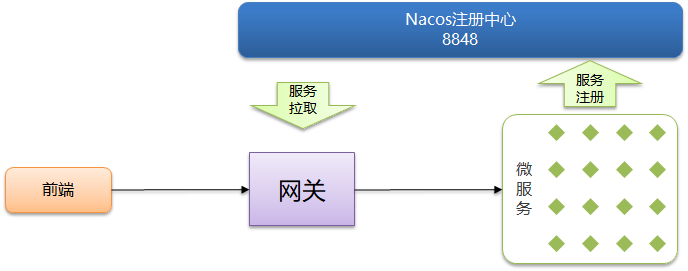
网关概述
网关:网络的关口,网关是整个系统唯一对外的入口,介于客户端和服务器之间,对请求进行鉴权、限流、路由、监控等。
微服务网关也是相同的作用,前端请求不直接访问微服务,请求网关服务,在网关服务中:
-
在网关服务中进行安全控制,也就是登录身份的校验,校验通过才能放行微服务。
-
校验通过后,网关再根据路由判断请求应该访问哪个微服务,进行请求转发(也是经过LoadBalancer进行负载均衡的)
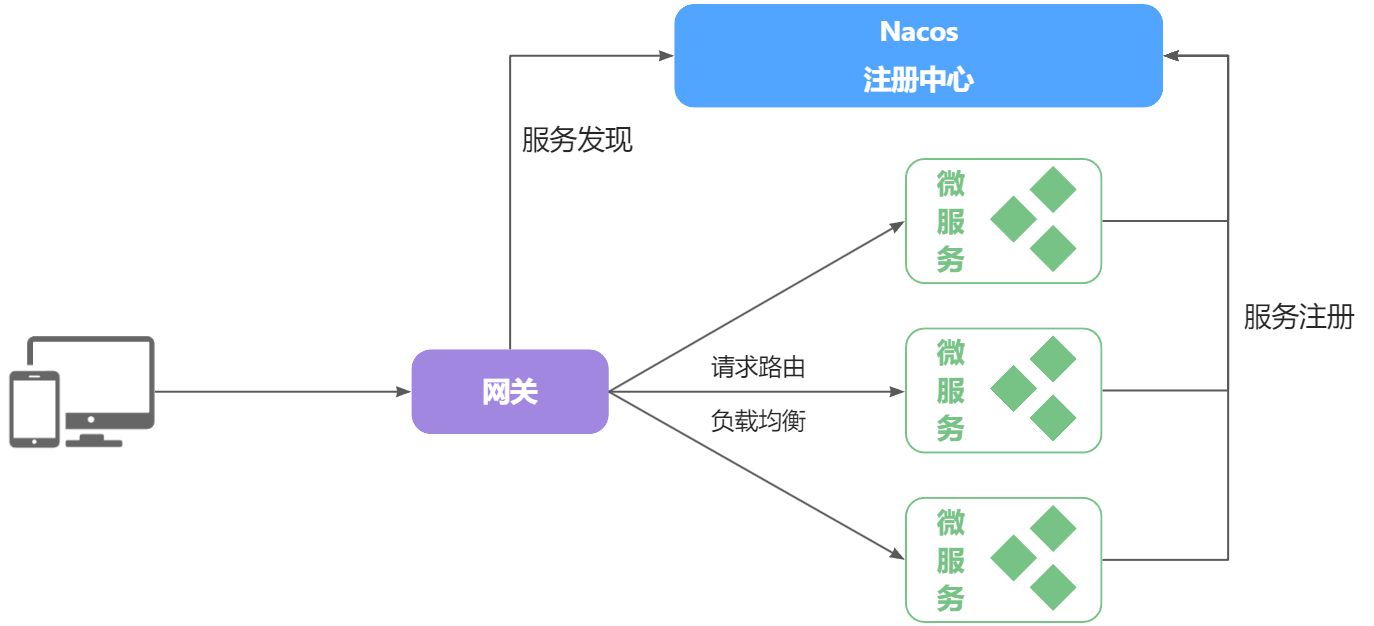
所有的微服务都是注册在Nacos中的,在网关中拉取服务列表,在请求经过验证后负载均衡路由转发到对应的微服务。
Spring Cloud中,提供了两种网关实现方案:
-
Netflix Zuul:基于Servlet的阻塞式编程,早期实现,已经淘汰。
-
Spring Cloud Gateway:基于Spring的WebFlux技术,完全支持响应式编程,吞吐能力更强。
Spring Cloud Gateway
Spring Cloud Gateway: 提供了一个建立在Spring生态系统之上的API网关,包括:Spring 6、Spring Boot 3 和 project Reactor(响应式编程)。Spring Cloud Gateway旨在提供一种简单有效的方法路由到api,并为它们提供跨领域的关注点,例如:安全性、 监控/度量和弹性。
How to Include Spring Cloud Gateway:
To include Spring Cloud Gateway in your project, use the starter with a group ID of org.springframework.cloud and an artifact ID of spring-cloud-starter-gateway. See the Spring Cloud Project page for details on setting up your build system with the current Spring Cloud Release Train.
If you include the starter, but you do not want the gateway to be enabled, set spring.cloud.gateway.enabled=false.
[!important] Important
Spring Cloud Gateway is built on Spring Boot, Spring WebFlux, and Project Reactor. As a consequence, many of the familiar synchronous libraries (Spring Data and Spring Security, for example) and patterns you know may not apply when you use Spring Cloud Gateway. If you are unfamiliar with these projects, we suggest you begin by reading their documentation to familiarize yourself with some new concepts before working with Spring Cloud Gateway.
[!IMPORTANT] Important
Spring Cloud Gateway requires the Netty runtime provided by Spring Boot and Spring Webflux. It does not work in a traditional Servlet Container or when built as a WAR.
注意:
-
Spring Cloud Gateway需要Netty运行时环境,也就是Gateway进行请求转发使用的是Netty
-
不能工作在传统的Servlet容器或被构建为war包时
Reactor
响应式编程
响应式编程 Reactive Programming,是一种新的编程范式、编程思想。RxJava、RxJava2、Reactor是三种不同的响应式编程库。
RxJava
响应式编程最早由.Net平台的 Reactive eXtensions(RX)库实现的,后续迁移到Java平台产生了著名的RxJava,但是RxJava不太好用,后来又产生了 Reactive Streams 规范,Reactor 是一种完全基于 Reactive Streams 规范的,全新的库。
Reactive Streams
Reactive Streams是响应式编程的规范,定义了响应式编程的相关接口,只要符合该规范的库,就被称为Reactive响应式编程库。
RxJava并不是Reactive响应式编程库。
RxJava2
RxJava2是一个响应式编程库,产生于Reactive Streams规范之后,遵循Reactice Streams规范。但是由于是基于RxJava进行开发,在设计时不仅遵循了Reactive Streams规范,同时为了兼容RxJava,使得RxJava2在使用时非常不便,于是就出现了Reactor。
Reactor
Reactor是一种全新的响应式编程库,完全遵循Reactive Streams规范,和RxJava没有任何关系。使用时非常方便直观。
Zuul
Zuul是Netflix的开源API网关,Zuul是基于Servlet的,使用同步阻塞IO模型,不支持长连接,效率较低。Zuul是Spring Cloud生态的一员。
Spring Cloud Gateway的底层是Netty,支持长连接。
Zuul 2.x 底层也是使用 Netty 实现了异步非阻塞IO,支持长连接。但是未整合到Spring Cloud中(解决了Zuul的问题,但是闭源)。
Zuul 2.x 宣布闭源后Spring Cloud开始开发Spring Cloud Gateway,在未开发完毕时Zuul 2.x 又宣布开源,但是已经为时已晚,再加上Netflix对很多开源产品都不维护,Spring Cloud最终开发完毕Spring Cloud Gateway。
可以参照 Github的issue#2951
Gateway 重要概念
route 路由
路由是网关的最基本组成,路由的组成:
-
一个路由id
-
一个目标地址url
-
一组断言工厂
-
一组filter
如果断言为true,请求经过filter被路由到目标url,目标url可以被nacos服务发现并负载均衡访问
predicate 断言
断言就是一个条件判断,根据当前的HTTP请求进行指定规则的匹配。例如HTTP请求头、请求时间等。
只有当匹配上某个规则时,断言才为true,此时请求才会被直接路由到目标地址(目标服务器),或先路由到某过滤器链,经过过滤器链的层层处理后,再路由到相应的目标地址(目标服务器)。
filter 过滤器
过滤器就是对请求或响应进行处理的逻辑部分。当请求的断言为true时,会被路由到设置好的过滤器链,对请求或响应进行处理。
例如:可以为请求添加一个请求参数,或对请求URI进行修改,或为响应添加header等。
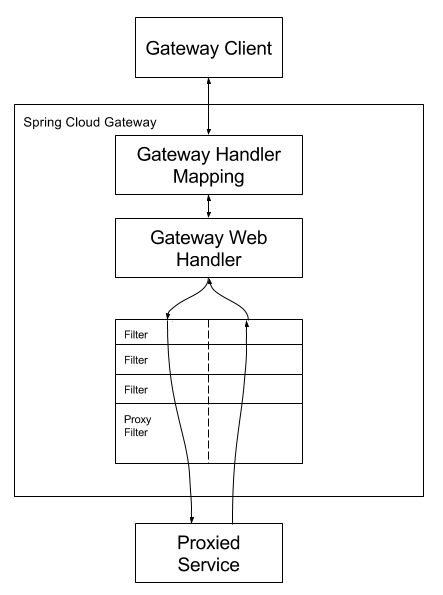
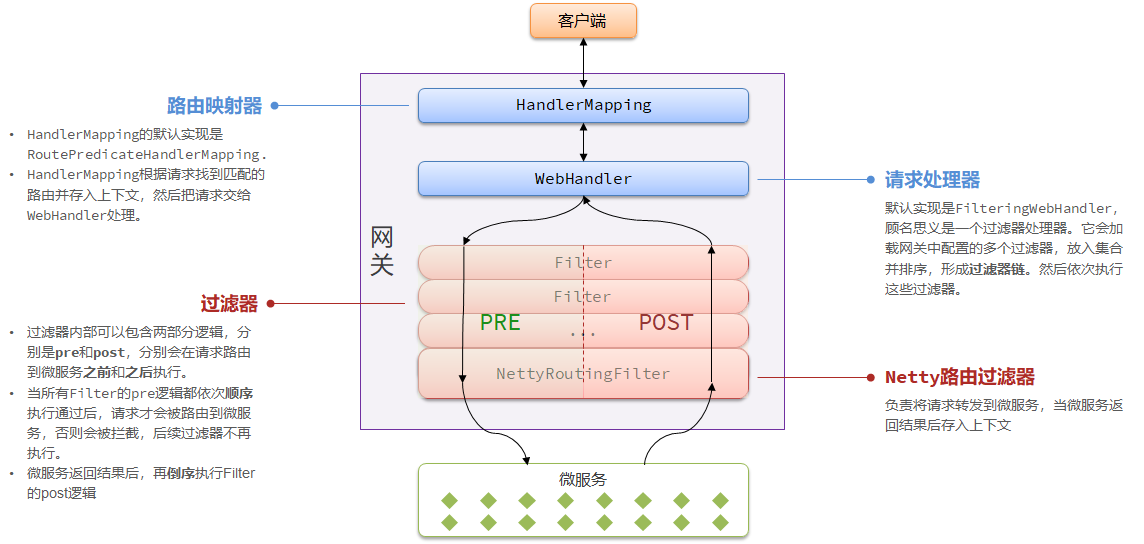
Gateway 工作原理
-
请求由Gateway Client(浏览器)发出后,经过Dispatcher Handler分发到Gateway Handler Mapping,实际上是Route Predicate Handler Mapping(路由断言处理器映射器)
-
断言为true进入Gateway Web Handler,为false直接返回404给客户端。Gateway Web Handler实际上是Filtering Web Handler,进入Filter过滤器链。
-
经过Filter链的pre阶段(对请求进行逻辑处理),到达目标服务器。
-
目标服务器处理结束后逆序执行Filter过滤器链的post阶段,最终返回到客户端。
入门案例:路由到百度
配置式gateway
05-gateway-config-9000模块
参照How to Include Spring Cloud Gateway引入依赖:
To include Spring Cloud Gateway in your project, use the starter with a group ID of org.springframework.cloud and an artifact ID of spring-cloud-starter-gateway. See the Spring Cloud Project page for details on setting up your build system with the current Spring Cloud Release Train.
[!IMPORTANT] Important
Spring Cloud Gateway requires the Netty runtime provided by Spring Boot and Spring Webflux. It does not work in a traditional Servlet Container or when built as a WAR.
<dependency>
    <groupId>org.springframework.cloud</groupId>
    <artifactId>spring-cloud-starter-gateway</artifactId>
</dependency>
注意:Spring Cloud Gateway requires the Netty runtime provided by Spring Boot and Spring Webflux. It does not work in a traditional Servlet Container
Spring Cloud Gateway不能在传统Servlet容器的环境下工作,必须删除spring-boot-starter-web依赖。
反之,启动会报错:
***************************
APPLICATION FAILED TO START
***************************

Description:

Spring MVC found on classpath, which is incompatible with Spring Cloud Gateway.

Action:

Please set spring.main.web-application-type=reactive or remove spring-boot-starter-web dependency.
参照configuring-route-predicate-factories-and-filter-factories进行配置:
Shortcut Configuration
spring:
  cloud:
    gateway:
      routes:
      - id: after_route
        uri: https://example.org
        predicates:
        - Cookie=mycookie,mycookievalue
注意:断言工厂predicates中指定的Cookie首字母是大写,中间用 = 连接
application.yml
server:
  port: 9000
spring:
  cloud:
    gateway:
      routes:
        - id: after_route
          uri: https://baidu.com
          predicates:
            - Path=/**
拦截请求路径为/**的请求(所有请求),最终请求到百度
测试:
- 访问localhost:9000,跳转到https://baidu.com
- 访问localhost:9000/test,跳转到https://baidu.com/test
API式gateway
05-gateway-api-9001模块
@Configuration
public class GatewayConfig {

    /**
     * API方式构建Gateway路由
     *
     * @param builder 路由定位器构建器
     * @return RouteLocator 路由定位器
     */
    @Bean
    public RouteLocator bdRouteLocator(RouteLocatorBuilder builder) {
        return builder
                .routes()
                .route("baidu_route",
                        ps -> ps.path("/**")
                                .uri("https://baidu.com"))
                .build();
    }
}
需要通过RouteLocatorBuilder构建RouteLocator,其中route方法有两个重载的方法:
public Builder route(String id, Function<PredicateSpec, Buildable<Route>> fn) {
    Buildable<Route> routeBuilder = (Buildable)fn.apply((new RouteSpec(this)).id(id));
    this.add(routeBuilder);
    return this;
}

public Builder route(Function<PredicateSpec, Buildable<Route>> fn) {
    Buildable<Route> routeBuilder = (Buildable)fn.apply((new RouteSpec(this)).randomId());
    this.add(routeBuilder);
    return this;
}
其中的核心是函数式接口Function的参数 Function<PredicateSpec, Buildable<Route>> fn
接收一个PredicateSpec类型的参数,转换为Buildable<Route>对象
route相关类
在定义路由时:
spring:
  cloud:
    gateway:
      routes:
        - id: item
          uri: lb://item-service
          predicates:
            - Path=/items/**,/search/**
gateway配置项对应的类:
package org.springframework.cloud.gateway.config;

@ConfigurationProperties("spring.cloud.gateway")
@Validated
public class GatewayProperties {
    public static final String PREFIX = "spring.cloud.gateway";
    private final Log logger = LogFactory.getLog(this.getClass());
    //路由集合
    private @NotNull @Valid List<RouteDefinition> routes = new ArrayList();
    private List<FilterDefinition> defaultFilters = new ArrayList();
    private List<MediaType> streamingMediaTypes;
    private boolean failOnRouteDefinitionError;
}
RouteDefinition:
@Validated
public class RouteDefinition {
    private String id;
    private @NotEmpty @Valid List<PredicateDefinition> predicates = new ArrayList();
    private @Valid List<FilterDefinition> filters = new ArrayList();
    private @NotNull URI uri;
    private Map<String, Object> metadata = new HashMap();
    private int order = 0;
}
对应了四个概念:
-
一个路由id
-
一个目标uri
-
一组路由断言工厂predicates
-
一组路由过滤器filters
路由断言工厂详解
内置路由断言工厂
Spring Cloud Gateway提供了12种路由断言工厂 RoutePredicateFactory的实现:
| 名称 | 说明 | 示例 |
|---|---|---|
| After | 是某个时间点后的请求 | - After=2037-01-20T17:42:47.789-07:00[America/Denver] |
| Before | 是某个时间点之前的请求 | - Before=2031-04-13T15:14:47.433+08:00[Asia/Shanghai] |
| Between | 是某两个时间点之前的请求 | - Between=2037-01-20T17:42:47.789-07:00[America/Denver], 2037-01-21T17:42:47.789-07:00[America/Denver] |
| Cookie | 请求必须包含某些cookie | - Cookie=chocolate, ch.p |
| Header | 请求必须包含某些header | - Header=X-Request-Id, \d+ |
| Host | 请求必须是访问某个host(域名) | - Host=.somehost.org,.anotherhost.org |
| Method | 请求方式必须是指定方式 | - Method=GET,POST |
| Path | 请求路径必须符合指定规则 | - Path=/red/{segment},/blue/** |
| Query | 请求参数必须包含指定参数 | - Query=name, Jack或者- Query=name |
| RemoteAddr | 请求者的ip必须是指定范围 | - RemoteAddr=192.168.1.1/24 |
| weight | 权重处理 | - Weight=group1,2 |
在路由 PredicateDefintion类中,根据 = 拆分
@Validated
public class PredicateDefinition {

    @NotNull
    private String name;

    private Map<String, String> args = new LinkedHashMap<>();

    public PredicateDefinition() {
    }

    public PredicateDefinition(String text) {
       int eqIdx = text.indexOf('=');
       if (eqIdx <= 0) {
          throw new ValidationException(
                "Unable to parse PredicateDefinition text '" + text + "'" + ", must be of the form name=value");
       }
       setName(text.substring(0, eqIdx));

       String[] args = tokenizeToStringArray(text.substring(eqIdx + 1), ",");

       for (int i = 0; i < args.length; i++) {
          this.args.put(NameUtils.generateName(i), args[i]);
       }
    }
}
以01-provider-8089为例,参照官网对12种路由工厂进行测试
After和Before断言工厂
After:在指定时间之后则断言为true
配置式:
server:
  port: 9000
spring:
  cloud:
    gateway:
      routes:
        - id: after_route
          uri: http://localhost:8089
          predicates:
            - After=2017-01-20T17:42:47.789-07:00
访问:http://localhost:9000/provider/depart/2,可以正常访问
API式:
@Bean
public RouteLocator afterRouteLocator(RouteLocatorBuilder builder){
    return builder.routes()
            .route("afterRouter"
                    ,ps -> ps.after(LocalDateTime.now().minusDays(1).atZone(ZoneId.of("Asia/Shanghai")))
                            .uri("http://localhost:8089"))
            .build();
}
访问:http://localhost:9001/provider/depart/2,可以正常访问
Before:在指定时间之前则为true
配置式:
server:
  port: 9000
spring:
  cloud:
    gateway:
      routes:
        - id: after_route
          uri: http://localhost:8089
          predicates:
            - Before=2017-01-20T17:42:47.789-07:00[America/Denver]
访问:http://localhost:9000/provider/depart/2,不能访问,出现404错误(predicate为false)
API式:略
应用场景
- 12306抢票:在指定时间之后才能进行抢票。
Between断言工厂
配置式:
server:
  port: 9000
spring:
  cloud:
    gateway:
      routes:
      - id: between_route
        uri: https://example.org
        predicates:
        - Between=2017-01-20T17:42:47.789-07:00[America/Denver], 2017-01-21T17:42:47.789-07:00[America/Denver]
访问:http://localhost:9000/provider/depart/2,可以访问
API式:
@Bean
public RouteLocator betweenRouterLocator(RouteLocatorBuilder builder){
    ZonedDateTime begin = LocalDateTime.now().minusDays(10).atZone(ZoneId.systemDefault());
    ZonedDateTime end = LocalDateTime.now().plusDays(10).atZone(ZoneId.systemDefault());
    return builder.routes()
            .route("betweenRoute",ps -> ps.between(begin,end).uri("http://localhost:8089"))
            .build();
}
访问:http://localhost:9001/provider/depart/2,可以访问
Cookie断言工厂
配置式:
server:
  port: 9000
spring:
  cloud:
    gateway:
      routes:
        - id: between_route
          uri: http://localhost:8089
          predicates:
            - Cookie=City,beijing
API式:
@Bean
public RouteLocator cookieRouterLocator(RouteLocatorBuilder builder){
    return builder.routes()
            .route("cookieRouter",ps -> ps.cookie("City","beijing").uri("http://localhost:8089"))
            .build();
}
需要使用Apifox进行测试。
Header断言工厂
配置式:
server:
  port: 9000
spring:
  cloud:
    gateway:
      routes:
        - id: between_route
          uri: http://localhost:8089
          predicates:
            - Header=X-Request-Id, \d+
            - Header=Color, gr.+
\d+ : 匹配一到多个数字
gr.+ : 以gr开头即可
此时的含义是这两个请求头要同时存在。
API式:
@Bean
public RouteLocator headerRouterLocator(RouteLocatorBuilder builder){
    return builder.routes()
            .route("headerRouter",
                    ps -> ps.header("X-Request-Id","\\d+")
                            .and()
                            .header("Color","gr.+")
                            .uri("http://localhost:8089"))
            .build();
}
在API式配置中表达与的关系需要使用and(),表达 或 需要使用or()
在配置式中表达 或:
server:
  port: 9000
spring:
  cloud:
    gateway:
      routes:
        - id: header_route
          uri: http://localhost:8089
          predicates:
            - Header=X-Request-Id, \d+
        - id: header_route2
          uri: http://localhost:8089
          predicates:
            - Header=Color, gr.+
配置两个route,就表达了或的关系
路由断言工厂也是可以组合的,例如:
配置式:
server:
  port: 9000
spring:
  cloud:
    gateway:
      routes:
        - id: header_route
          uri: http://localhost:8089
          predicates:
            - Header=X-Request-Id, \d+
            - Cookie=city, beijing
请求头和Cookie必须同时存在才能访问成功
API式:
@Bean
public RouteLocator headerRouterLocator(RouteLocatorBuilder builder){
    return builder.routes()
            .route("headerRouter",
                    ps -> ps.header("X-Request-Id","\\d+")
                            .and()
                            .cookie("city","beijing")
                            .uri("http://localhost:8089"))
            .build();
}
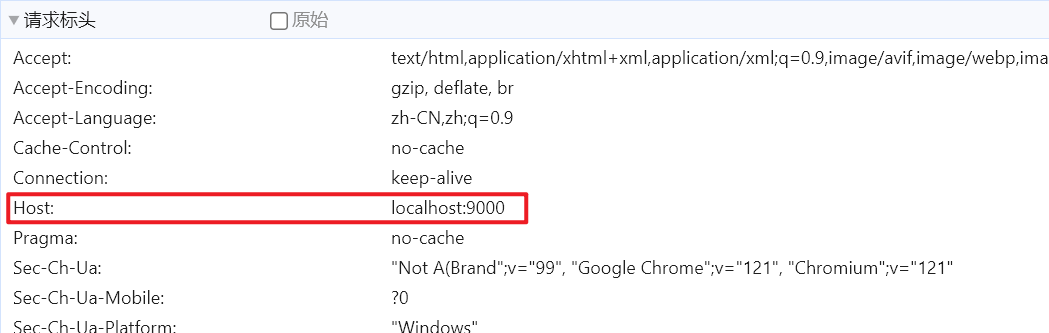
Host断言工厂
Host断言工厂针对请求头的Host进行断言,当前访问请求头Host:
spring:
  cloud:
    gateway:
      routes:
      - id: host_route
        uri: https://example.org
        predicates:
        - Host=aaa.com:9000, bbb.com:9000
修改host文件:
127.0.0.1 aaa.com
127.0.0.1 bbb.com
127.0.0.1 abc.com
访问:http://aaa.com/provider/depart/2,访问可以通过
访问:http://bbb.com/provider/depart/2,访问可以通过
访问:http://localhost:9000/provider/depart/2,不能访问通过
应用场景
服务器一个IP可能对应多个域名,可以用来对不同的用户设置不同的权限:同一个系统的不同模块为不同的用户提供不同的域名,aaa组用户只能访问aaa.com 对应了 aaa模块,bbb组的用户只能访问bbb.com 对应了 bbb模块。
Method断言工厂
Method指的是请求提交的方式
配置式:
server:
  port: 9000
spring:
  cloud:
    gateway:
      routes:
        - id: method_route
          uri: http://localhost:8089
          predicates:
            - Method=GET,POST
API式:
@Bean
public RouteLocator methodRouterLocator(RouteLocatorBuilder builder){
    return builder.routes()
            .route("methodRouter",
                    ps -> ps.method(HttpMethod.GET,HttpMethod.POST)
                            .uri("http://localhost:8089"))
            .build();
}
测试:
以GET方式访问http://localhost:9000/provider/depart/2 正常访问
以POST方式访问http://localhost:9000/provider/depart/2 405 方法不允许,也是通过断言
以DELETE等方式访问http://localhost:9000/provider/depart/2 出现自定义异常信息,没有通过断言
Path断言工厂
server:
  port: 9000
spring:
  cloud:
    gateway:
      routes:
        - id: provider_route
          uri: http://localhost:8089
          predicates:
            - Path=/provider/**
        - id: consumer_route
          uri: http://localhost:8080
          predicates:
            - Path=/consumer/**
路由断言工厂变量
The Path Route Predicate Factory takes two parameters: a list of Spring PathMatcher patterns and an optional flag called matchTrailingSlash (defaults to true). The following example configures a path route predicate:
application.yml
spring:
  cloud:
    gateway:
      routes:
      - id: path_route
        uri: https://example.org
        predicates:
        - Path=/red/{segment},/blue/{segment}
This route matches if the request path was, for example: /red/1 or /red/1/ or /red/blue or /blue/green.
If matchTrailingSlash is set to false, then request path /red/1/ will not be matched.
This predicate extracts the URI template variables (such as segment, defined in the preceding example) as a map of names and values and places it in the ServerWebExchange.getAttributes() with a key defined in ServerWebExchangeUtils.URI_TEMPLATE_VARIABLES_ATTRIBUTE. Those values are then available for use by GatewayFilter factories
A utility method (called get) is available to make access to these variables easier. The following example shows how to use the get method:
可以使用如下方法获取到路由中定义的变量:
Map<String, String> uriVariables = ServerWebExchangeUtils.getUriTemplateVariables(exchange);

String segment = uriVariables.get("segment");
Query断言工厂
Query断言是对请求参数进行断言
server:
  port: 9000
spring:
  cloud:
    gateway:
      routes:
        - id: provider_route
          uri: http://localhost:8089
          predicates:
            - Query=color, gr.+
            - Query=size
Weight断言工厂
server:
  port: 9000
spring:
  cloud:
    gateway:
      routes:
        - id: tb_route
          uri: http://taobao.com
          predicates:
            - Weight=ecommerce, 2
        - id: jd_route
          uri: http://jd.com
          predicates:
            - Weight=ecommerce, 8
Weight相同的分为一组,此时访问localhost:9000,20%跳转到taobao,80%跳转到jd
应用场景
灰度发布,上线新版本控制流量先较少走向新版本,慢慢提高比例。
配置式和API式的优先级
在gateway中同时存在配置式和API式的route:
server:
  port: 9000
spring:
  cloud:
    gateway:
      routes:
        - id: header_route
          uri: http://localhost:8089
          predicates:
            - Header=X-Request-Id,\d+
@Bean
public RouteLocator headerRouteLocator(RouteLocatorBuilder builder){
    return builder.routes()
            .route("header_route",
                    ps -> ps.header("X-Request-Id","abc").uri("http://localhost:8089"))
            .build();
}
注意id是相同的。
请求头值为abc或数字都能访问成功,说明此处的配置是 或 关系
自定义路由断言工厂
Auth认证
Auth路由断言工厂的特点:2个值
请求头携带有用户名和密码的key-value对(root=123),并且用户名、密码和配置文件中Auth路由断言工厂指定的username、password都相同 才能访问系统。
定义Factory:类名由两部分组成:前面为功能前缀,后面为RoutePredicateFactory,前缀要在配置文件中配置。
public class AuthRoutePredicateFactory extends AbstractRoutePredicateFactory<AuthRoutePredicateFactory.Config> {

    public static class Config {
        private String username;
        private String password;
    }
}
继承AbstractRoutePredicateFactory,并且指定泛型为AuthRoutePredicateFactory的静态内部类Config,该类是要读取的配置文件中属性的类
@Component
public class AuthRoutePredicateFactory extends AbstractRoutePredicateFactory<AuthRoutePredicateFactory.Config> {
   /**
	* 将Config字节码传递给父类,父类帮我们读取yaml配置
	*/
    public AuthRoutePredicateFactory() {
        super(Config.class);
    }

    @Data
    public static class Config {
        private String username;
        private String password;
    }

    /**
     * 指定配置文件属性值读取的顺序
     * @return
     */    @Override
    public List<String> shortcutFieldOrder() {
        return Arrays.asList("username","password");
    }

    /**
     * 路由断言逻辑
     * @param config
     * @return
     */    @Override
    public Predicate<ServerWebExchange> apply(Config config) {
        return new Predicate<ServerWebExchange>() {
            @Override
            public boolean test(ServerWebExchange serverWebExchange) {

		        String username = config.getUsername();
		        HttpHeaders headers = serverWebExchange.getRequest().getHeaders();
		        String authPassword = headers.getFirst(username);

		        return Objects.equals(authPassword,config.getPassword());
            }
        };
    }
}
在路由断言逻辑中,apply方法返回值是Predicate函数式接口,接收一个ServerWebExchange类型的入参,返回Boolean类型,所以此处可以写为:
/**
 * 路由断言逻辑
 * @param config
 * @return
 */
@Override
public Predicate<ServerWebExchange> apply(Config config) {
    return exchange -> {
        String username = config.getUsername();
        HttpHeaders headers = exchange.getRequest().getHeaders();
        String authPassword = headers.getFirst(username);

        return Objects.equals(authPassword,config.getPassword());
    };
}
application.yml:
server:
  port: 9000
spring:
  cloud:
    gateway:
      routes:
        - id: header_route
          uri: http://localhost:8089
          predicates:
            - Auth=root,123
测试:
-
添加请求头:root=123,访问成功
-
添加请求头:root=123,root=abc:

访问成功,因为我们是getFirst获取的header
Token认证
Token路由断言工厂:1个值,要求该值包含在请求参数中,apply方法的核心逻辑就是获取请求参数判断该值是否存在
@Component
public class TokenRoutePredicateFactory extends AbstractRoutePredicateFactory<TokenRoutePredicateFactory.Config> {

    public TokenRoutePredicateFactory() {
        super(Config.class);
    }

    @Data
    public static class Config {
        private String token;
    }

    @Override
    public List<String> shortcutFieldOrder() {
        return List.of("token");
    }

    @Override
    public Predicate<ServerWebExchange> apply(Config config) {
        return exchange -> {
            //多值Map
            MultiValueMap<String, String> queryParams = exchange.getRequest().getQueryParams();

        };
    }
}
MultiValueMap<String, String>是多值Map:
public interface MultiValueMap<K, V> extends Map<K, List<V>>{}
第二个泛型String指的是List中元素类型为String
@Override
public Predicate<ServerWebExchange> apply(Config config) {
    return exchange -> {
        //多值Map,请求的所有参数
        MultiValueMap<String, String> params = exchange.getRequest().getQueryParams();
        List<String> token = params.get("token");

        return !Objects.isNull(token) && token.contains(config.getToken());
    };
}
测试:
访问http://localhost:9000/provider/depart/2?token=123,请求成功
自定义异常处理器
在之前的Gateway工作原理中提到:
请求经过Dispatcher handler分发到Route Predicate Handler Mapping中,断言为true进入Filtering Web Handler,断言为false返回404。
实际上断言失败是由DefaultErrorWebExceptionHandler处理的:
public class DefaultErrorWebExceptionHandler extends AbstractErrorWebExceptionHandler {

	@Override
	protected RouterFunction<ServerResponse> getRoutingFunction(ErrorAttributes errorAttributes) {

        return RouterFunctions.route(this.acceptsTextHtml(), this::renderErrorView)
						      .andRoute(RequestPredicates.all(), this::renderErrorResponse);
    }

	protected Mono<ServerResponse> renderErrorView(ServerRequest request) {
		Map<String, Object> error = this.getErrorAttributes(request,
														this.getErrorAttributeOptions(request, MediaType.TEXT_HTML));

		int errorStatus = this.getHttpStatus(error);
		ServerResponse.BodyBuilder responseBody = ServerResponse.status(errorStatus).contentType(TEXT_HTML_UTF8);

		return Flux.just((String[])this.getData(errorStatus).toArray(new String[0])).flatMap((viewName) -> {
			return this.renderErrorView(viewName, responseBody, error);
		}).switchIfEmpty(this.errorProperties.getWhitelabel().isEnabled()
					? this.renderDefaultErrorView(responseBody, error) : Mono.error(this.getError(request))).next();
    }
}
参照该类进行自定义异常处理器:
@Component
@Order(-1)
public class CustomerErrorWebExceptionHandler extends AbstractErrorWebExceptionHandler {

    public CustomerErrorWebExceptionHandler(ErrorAttributes errorAttributes,
                                            ApplicationContext applicationContext,
                                            ServerCodecConfigurer serverCodecConfigurer) {
        super(errorAttributes, new WebProperties.Resources(), applicationContext);
        super.setMessageWriters(serverCodecConfigurer.getWriters());
        super.setMessageReaders(serverCodecConfigurer.getReaders());
    }

    @Override
    protected RouterFunction<ServerResponse> getRoutingFunction(ErrorAttributes errorAttributes) {
        return RouterFunctions.route(RequestPredicates.all(),this::renderErrorResponse);
    }

    private Mono<ServerResponse> renderErrorResponse(ServerRequest serverRequest) {
        //获取异常信息
        Map<String, Object> error = getErrorAttributes(serverRequest, ErrorAttributeOptions.defaults());
        //构建异常返回值
        return ServerResponse.status(HttpStatus.NOT_FOUND)
                .contentType(MediaType.APPLICATION_JSON)
                .body(BodyInserters.fromValue(error));
    }
}
这样显示的信息是:
{

    "timestamp": "2024-02-15T04:00:24.210+00:00",

    "path": "/provider/depart/2",

    "status": 404,

    "error": "Not Found",

    "message": null,

    "requestId": "0672a99c-1"

}
和原先是相同的,因为返回的信息是通过renderErrorResponse()#getErrorAttributes()构建的
最终会调用到DefaultErrorAttributes#getErrorAttributes()方法,这个类所在的包:
package org.springframework.boot.web.reactive.error;

public class DefaultErrorAttributes implements ErrorAttributes {

	private Map<String, Object> getErrorAttributes(ServerRequest request, boolean includeStackTrace) {
	    Map<String, Object> errorAttributes = new LinkedHashMap();
	    errorAttributes.put("timestamp", new Date());
	    errorAttributes.put("path", request.path());
	    Throwable error = this.getError(request);
	    MergedAnnotation<ResponseStatus> responseStatusAnnotation = MergedAnnotations
				    .from(error.getClass(), SearchStrategy.TYPE_HIERARCHY).get(ResponseStatus.class);
	    HttpStatus errorStatus = this.determineHttpStatus(error, responseStatusAnnotation);
	    errorAttributes.put("status", errorStatus.value());
	    errorAttributes.put("error", errorStatus.getReasonPhrase());
	    errorAttributes.put("message", this.determineMessage(error, responseStatusAnnotation));
	    errorAttributes.put("requestId", request.exchange().getRequest().getId());
	    this.handleException(errorAttributes, this.determineException(error), includeStackTrace);
	    return errorAttributes;
	}
}
自定义类,继承该类:
package com.euneir.handler;

import org.springframework.boot.web.error.ErrorAttributeOptions;
import org.springframework.boot.web.reactive.error.DefaultErrorAttributes;
import org.springframework.http.HttpStatus;
import org.springframework.stereotype.Component;
import org.springframework.web.reactive.function.server.ServerRequest;

import java.util.HashMap;
import java.util.Map;

@Component
public class CustomerErrorAttributes extends DefaultErrorAttributes {

    @Override
    public Map<String, Object> getErrorAttributes(ServerRequest request, ErrorAttributeOptions options) {
        //Map<String, Object> map = super.getErrorAttributes(request, options);
        HashMap<String, Object> hashMap = new HashMap<>(){{
            put("status", HttpStatus.NOT_FOUND);
            put("message","未找到需要的资源");
        }};
        return hashMap;
    }
}
此时返回的异常信息:
{

    "message": "未找到需要的资源",

    "status": "NOT_FOUND"

}
网关登录校验
上文中我们已经解决了请求访问网关的问题,在单体架构中,我们只需要完成一次用户登录、身份校验,就可以在所有业务中获取用户信息。而拆分微服务后,每个微服务都是独立部署,不再共享数据,每个微服务都要进行登录校验吗?
如果每个微服务都进行登录校验,这显然是存在问题的:
- JWT的解密需要密钥,如果每个微服务都知道密钥,这显然是不安全的。
- 每个微服务都重复编写登录校验的代码/权限校验的代码,不符合编码规范。
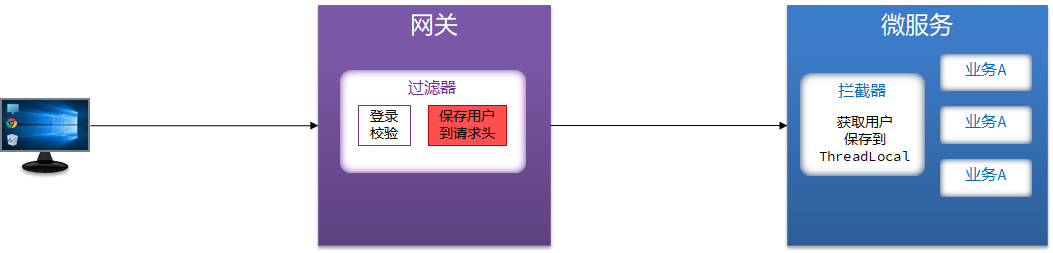
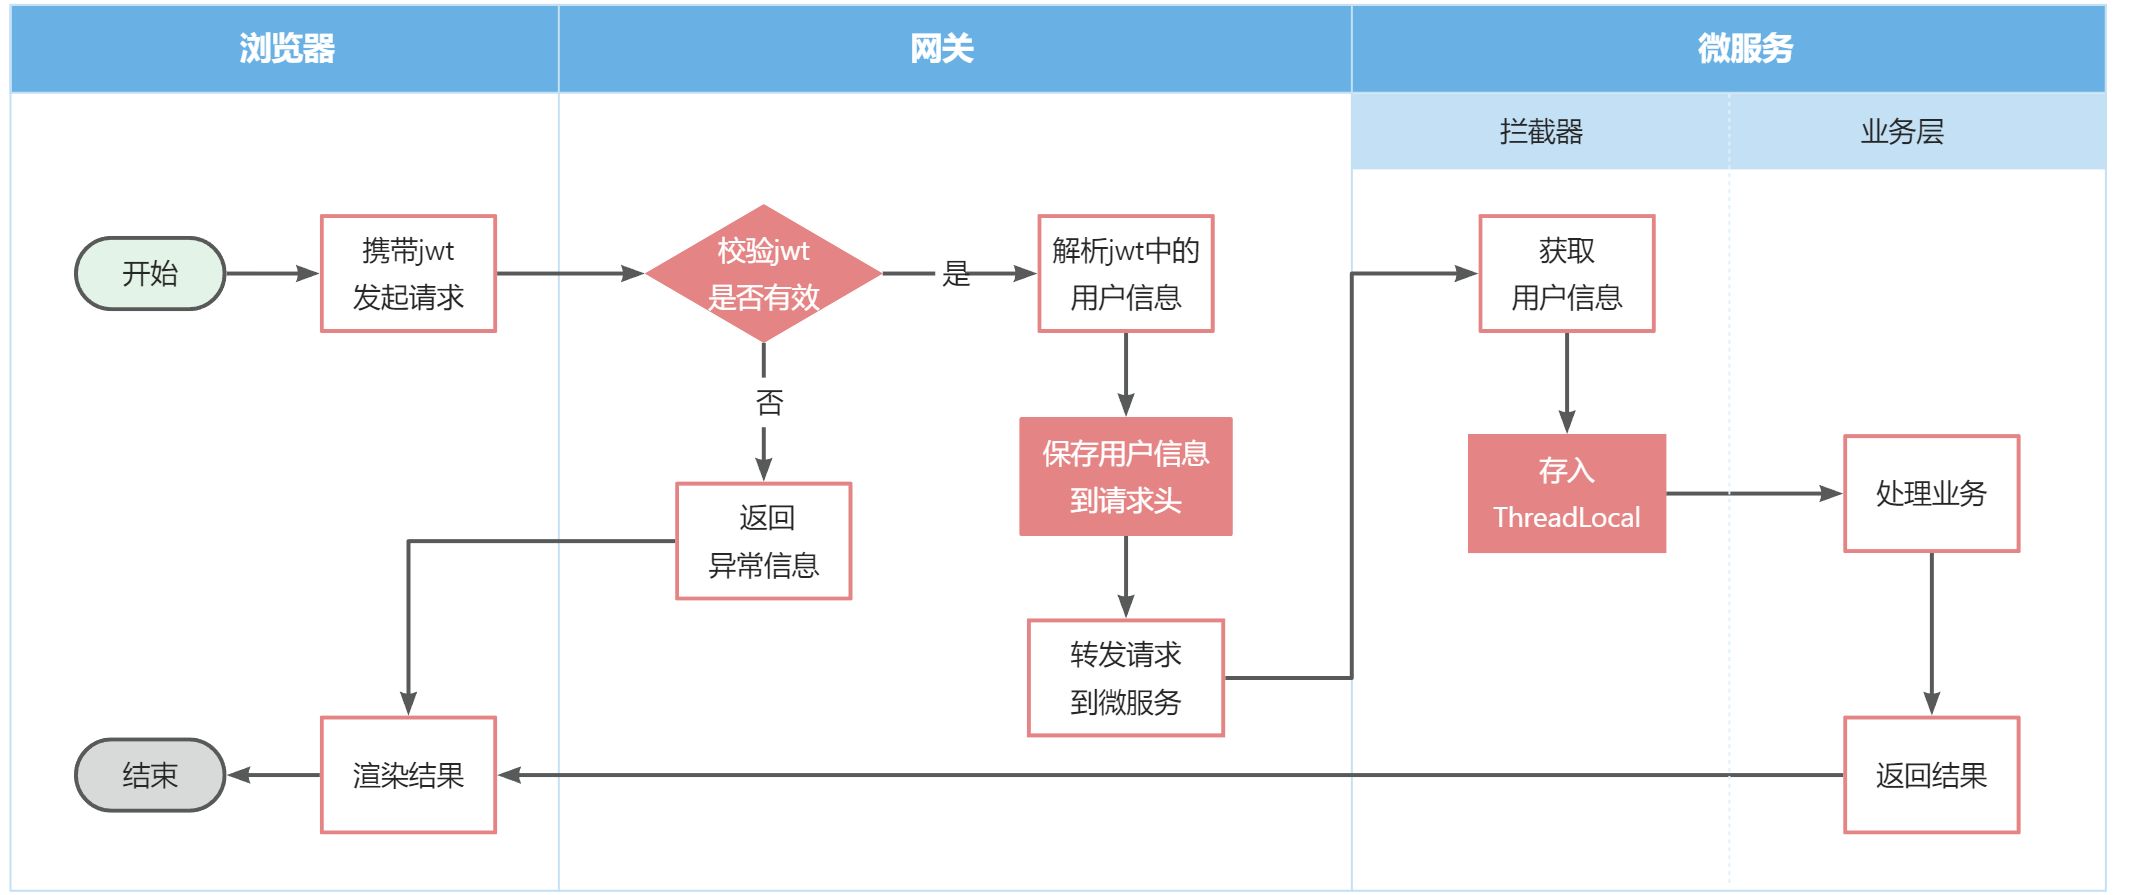
既然网关是所有微服务的入口,一切请求都经过网关,我们完全可以在网关中进行登录校验:
- 在网关和用户服务中保存密钥
- 在网关中进行登录校验,登录校验后用户信息存入请求头,避免在每个微服务中都需要解密JWT获取用户信息
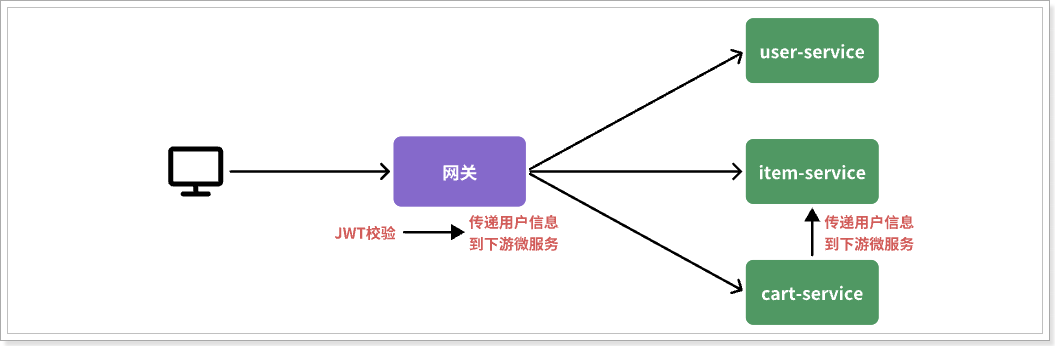
此时需要解决的问题:
-
如何在网关转发请求之前执行我们代码,进行登录校验?
-
网关校验后,通过Netty远程调用,如何将用户信息加入请求头?
-
微服务和微服务之间也需要远程调用,cart-service也需要远程调用item-service的方法,这个调用是不经过网关的,如何传递用户信息?
我们先解决前两个问题,第三个问题在OpenFeign拦截器小节再解决。
网关过滤器
上文中提到Gateway工作原理:
-
客户端请求进入网关后,Dispatcher Handler将请求分发到Route Predicate Handler Mapping,断言为true进入Filtering Web Handler,断言失败进入DefaultErrorWebExceptionHandler
-
Filtering Web Handler分为pre逻辑和post逻辑,分别在请求路由到目标服务器的之前和之后执行。
-
只有在所有Filter的pre逻辑都通过,请求才会被NettyRouteFilter路由到目标服务器
-
目标服务器返回结果,再倒序执行post阶段逻辑。
-
返回响应结果到客户端。
请求最终通过NettyRouteFilter转发到微服务,如果我们定义一个过滤器,在其中实现登录校验逻辑,并且将过滤器的执行顺序定义在NettyRouteFilter之前,这样就符合我们的要求了。
问题是:如何实现网关过滤器?
网关过滤器可以分为两种:
-
GlobalFilter:全局过滤器,作用范围是所有路由,默认直接生效。
-
GatewayFilter:局部过滤器,作用范围是指定路由,需要配置才生效。
其实GatewayFilter和GlobalFilter的方法签名完全一致:
/**
 * 处理请求并将其传递给下一个过滤器
 * @param exchange 当前请求的上下文,其中包含request、response等各种数据
 * @param chain 过滤器链,基于它向下传递请求
 * @return 根据返回值标记当前请求是否被完成或拦截,chain.filter(exchange)就放行了。
 */
Mono<Void> filter(ServerWebExchange exchange, GatewayFilterChain chain);
-
exchange:当前请求的上下文
-
chain:过滤器链,向下传递请求
FilteringWebHandler在处理请求时,会将GlobalFilter装饰为GatewayFilter放在过滤器链中,排序后依次执行
Spring Cloud Gateway提供了33种路由过滤器:
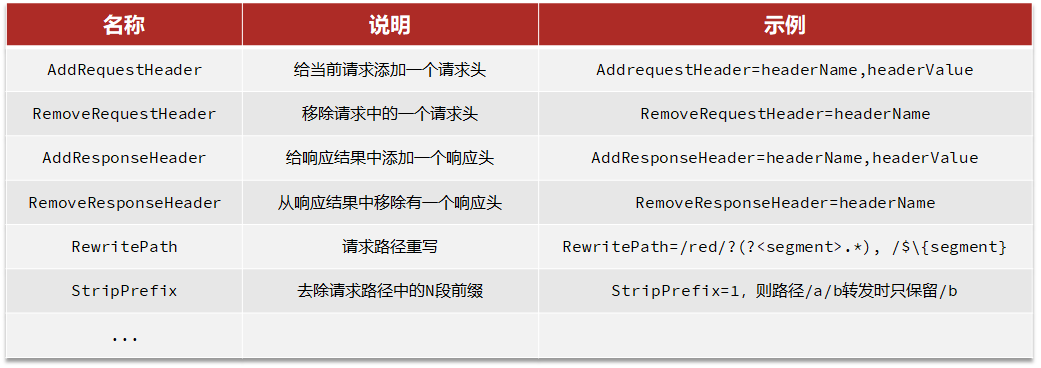
注意是XxxGatewayFilterFactory,也就是默认都是局部过滤器
内置的过滤器使用非常简单,只需要在yml文件中配置即可,所用范围灵活,配置在哪个route下就作用于这个route
例如:过滤器AddRequestHeaderGatewayFilterFactory用来给请求添加请求头。
使用时只需要配置:
spring:
	cloud:
		gateway:
			routes:
				- id: test_route
				  uri: lb://test-service
				  predicates:
					  - Path=/test/**
				  filters:
					  - AddRequestHeader=key,value # 请求头,值
这样就指定了AddRequestHeaderGatewayFilterFactory对test_route是生效的。
如果要配置为全局过滤器,需要这样配置:
spring:
	cloud:
		gateway:
			default-filters: # default-filters下配置的过滤器对所有路由均生效
			- AddRequestHeader=key,value
			routes:
				- id: test_route
				  uri: lb://test-service
				  predicates:
					  - Path=/test/**
如果全局过滤器和局部过滤器都配置了同一类,局部过滤器优先。
内置GatewayFilterFactory
AddRequestHeaderGatewayFilterFactory
AddRequestHeaderGatewayFilterFactory一次只能添加一个请求头,如果要添加多个请求头就需要配置多个
spring:
  cloud:
    gateway:
      routes:
      - id: add_request_header_route
        uri: http://localhost:8089
        predicates:
        - Path=/**
        filters:
        - AddRequestHeader=X-Request-Color, blue
        - AddRequestHeader=X-Request-Color, red
测试访问的是/provider/depart/{id},在这个controller方法中获取请求头:
@GetMapping("/{id}")
public ResponseResult<Depart> getHandler(@PathVariable Long id,
										 @RequestHeader(required = false,name = "X-Request-Color") String header){
    Depart depart = departService.getById(id);
    depart.setName(depart.getName() + " this provider port:" + port + " header:" + header);
    return ResponseResult.success(depart);
}
如果不加required = false,没有这个请求头就会报错404
测试:
- 访问http://localhost:9000/provider/depart/2(经由网关),得到的信息输出了请求头信息 header:blue,red
结论:在多个AddRequestHeaderGatewayFilterFactory中添加同一个请求头,这些值都会被保留
- 访问http://localhost:8089/provider/depart/2(不经由网关,直接访问微服务提供者),得到的信息没有输出请求头信息
API式:
@Bean
public RouteLocator routeLocator(RouteLocatorBuilder builder){
    return builder.routes()
            .route("my_route",
                    ps -> ps.path("/**")
                            .filters(fs -> fs.addRequestHeader("X-Request-Color","black")
                                            .addRequestHeader("X-Request-Color","red")
                                            .addRequestHeader("X-Request-Color","blue"))
                            .uri("http://localhost:8089"))
            .build();
}
访问http://localhost:9001/provider/depart/2,测试也是能通过的。
AddRequestHeadersIfNotPresentGatewayFilterFactory
AddRequestHeadersIfNotPresentGatewayFilterFactory一次可以添加多个请求头,但是只能在该请求头没有出现过时添加
spring:
  cloud:
    gateway:
      routes:
        - id: add_request_header_route
          uri: http://localhost:8089
          predicates:
            - Path=/**
          filters:
            - AddRequestHeadersIfNotPresent=X-Request-Color:blue,X-Request-Color:green
            - AddRequestHeadersIfNotPresent=X-Request-Color:red,X-Request-Color:yellow
注意:该过滤器配置中,请求头=属性值,, 用来分隔多个请求头
测试:
访问http://localhost:9000/provider/depart/2,输出的请求头信息:header:blue,green
也就是说:
- 在同一个AddRequestHeadersIfNotPresentGatewayFilterFactory中,一个请求头可以添加多个值
- 在多个AddRequestHeadersIfNotPresentGatewayFilterFactory中,同一个请求头仅会被添加一次
API式:
@Bean
public RouteLocator routeLocator(RouteLocatorBuilder builder){
    return builder.routes()
            .route("my_route",
                    ps -> ps.path("/**")
                            .filters(fs -> fs
                                    .addRequestHeadersIfNotPresent("X-Request-Color:black",
                                                                   "X-Request-Color:red",
                                                                   "X-Request-Color:blue"))
                            .uri("http://localhost:8089"))
            .build();
}
AddRequestParamGatewayFilterFactory
spring:
  cloud:
    gateway:
      routes:
        - id: add_request_header_route
          uri: http://localhost:8089
          predicates:
            - Path=/**
          filters:
            - AddRequestParameter=color, blue
            - AddRequestParameter=color, red
            - AddRequestParameter=color, yellow
            - AddRequestParameter=city, beijing
测试:
@GetMapping("/{id}")
public ResponseResult<Depart> getHandler(@PathVariable Long id,
                                         @RequestHeader(required = false,name = "X-Request-Color") String header,
                                         @RequestParam(required = false) String color,
                                         @RequestParam(required = false) String city){
    Depart depart = departService.getById(id);
    depart.setName("color: " + color + " city: " + city);
    return ResponseResult.success(depart);
}
访问http://localhost:9000/provider/depart/2,得到结果:"color: blue,red,yellow city: beijing"
或者以数组/集合方式接收:
@GetMapping("/{id}")
public ResponseResult<Depart> getHandler(@PathVariable Long id,
                                         @RequestHeader(required = false,name = "X-Request-Color") String header,
                                         @RequestParam(required = false) List<String> color,
                                         @RequestParam(required = false) List<String> city){
    Depart depart = departService.getById(id);
    depart.setName(depart.getName() + " this provider port:" + port + " header:" + header);
    depart.setName("color: " + color + " city: " + city);
    return ResponseResult.success(depart);
}
再次访问,得到结果:"color: [blue, red, yellow] city: [beijing]"
AddResponseHeaderGatewayFilterFactory
为响应添加响应头:
这个过滤器是在post阶段执行的,在目标服务器处理时是看不到这个响应头的,只有在客户端浏览器才能看到
CircuitBreakerGatewayFilterFactory
CircuitBreaker:熔断器
参照官网:
The Spring Cloud CircuitBreaker GatewayFilter factory uses the Spring Cloud CircuitBreaker APIs to wrap Gateway routes in a circuit breaker. Spring Cloud CircuitBreaker supports multiple libraries that can be used with Spring Cloud Gateway. Spring Cloud supports Resilience4J out of the box.
To enable the Spring Cloud CircuitBreaker filter, you need to place spring-cloud-starter-circuitbreaker-reactor-resilience4j on the classpath:
<dependency>
    <groupId>org.springframework.cloud</groupId>
    <artifactId>spring-cloud-starter-circuitbreaker-reactor-resilience4j</artifactId>
</dependency>
The following example configures a Spring Cloud CircuitBreaker GatewayFilter:
spring:
  cloud:
    gateway:
      routes:
        - id: circuit_breaker_route
          uri: http://localhost:8089
          predicates:
            - Path=/**
	      filters:
	        - name: CircuitBreaker # CircuitBreakerGatewayFilterFactory
	          args:
	            name: myCircuitBreaker # 熔断器名称
	            fallbackUri: forward:/fallback # 服务降级地址
	        - RewritePath=/consumingServiceEndpoint, /backingServiceEndpoint
fallbackUri: forward:/fallback,发生熔断后服务降级的地址 /fallback
首先定义处理服务降级的逻辑:
// 定义在05-gatewat-config-9000中

package com.euneir.controller;

@RestController
public class FallbackController {
    @GetMapping("/fallback")
    public String back(){
        return "this is fallback message";
    }
}
测试:启动gateway-config,不启动provider,测试降级。
访问http://localhost:9000/provider/depart/2,得到结果:this is fallback message
API式:
@Bean
public RouteLocator routeLocator(RouteLocatorBuilder builder){
    return builder.routes()
            .route("my_route",
                    ps -> ps.path("/**")
                            .filters(fs -> fs.circuitBreaker(config -> {
                                config.setName("myCircuitBreaker");
                                config.setFallbackUri("forward:/fallback");
                            }))
                            .uri("http://localhost:8089"))
            .build();
}
PrefixPathGatewayFilterFactory
spring:
  cloud:
    gateway:
      routes:
        - id: add_request_header_route
          uri: http://localhost:8089
          predicates:
            - Path=/**
          filters:
			- PrefixPath=/mypath
为请求URI自动添加前缀
请求URL:http://localhost:9000/provider/depart/2,对应的请求URI:/provider/depart/2
添加前缀后变为/mypath/provider/depart/2,最终访问的就是http://localhost:8089/mypath/provider/depart/2,也就是404
测试:
spring:
  cloud:
    gateway:
      routes:
        - id: add_request_header_route
          uri: http://localhost:8089
          predicates:
            - Path=/depart/**
          filters:
			- PrefixPath=/provider
访问:http://localhost:9000/depart/2,也能访问到目标服务器
API式:
@Bean
public RouteLocator routeLocator(RouteLocatorBuilder builder){
    return builder.routes()
            .route("my_route",
                    ps -> ps.path("/depart/**")
                            .filters(fs -> fs.prefixPath("/depart"))
                            .uri("http://localhost:8089"))
            .build();
}
StripPrefixGatewayFilterFactory
删除请求URI的前缀
spring:
  cloud:
    gateway:
      routes:
      - id: nameRoot
        uri: https://nameservice
        predicates:
        - Path=/name/**
        filters:
        - StripPrefix=2
请求URI是/name/blue/red,处理后就变为/red
server:
  port: 9000
spring:
  cloud:
    gateway:
      routes:
        - id: add_request_header_route
          uri: http://localhost:8089
          predicates:
            - Path=/*/*/provider/depart/**
          filters:
            - StripPrefix=2
访问http://localhost:9000/abc/def/provider/depart/2,可以访问成功
RewritePathGatewayFilterFactory
重写请求路径
server:
  port: 9000
spring:
  cloud:
    gateway:
      routes:
        - id: add_request_header_route
          uri: http://localhost:8089
          predicates:
            - Path=/red/blue/**
          filters:
            - RewritePath=/red/blue,/provider/depart
访问http://localhost:9000/red/blue/2,可以访问到目标服务器
官网上的示例:
spring:
  cloud:
    gateway:
      routes:
      - id: rewritepath_route
        uri: https://example.org
        predicates:
        - Path=/red/**
        filters:
        - RewritePath=/red/?(?<segment>.*), /$\{segment}
/red/?(?<segment>.*), /$\{segment}
-
/red/?:匹配最多一个 /
-
(?<segment>.*):
.*匹配任意多个的任意字符,存入<segment>中 -
/$\{segment}:原本应该是 /${segment},在yaml语法中 $ 需要被替换为 $\
RequestRateLimiterGatewayFilterFactory
请求限流过滤器,参照官网:
The RequestRateLimiter GatewayFilter factory uses a RateLimiter implementation to determine if the current request is allowed to proceed. If it is not, a status of HTTP 429 - Too Many Requests (by default) is returned.
请求限流过滤器通过请求限流决定当前请求能否被访问,如果不能,返回429
采用Redis实现限流:
The Redis implementation is based on work done at Stripe. It requires the use of the spring-boot-starter-data-redis-reactive Spring Boot starter.
The algorithm used is the Token Bucket Algorithm.
限流使用的是令牌桶算法。
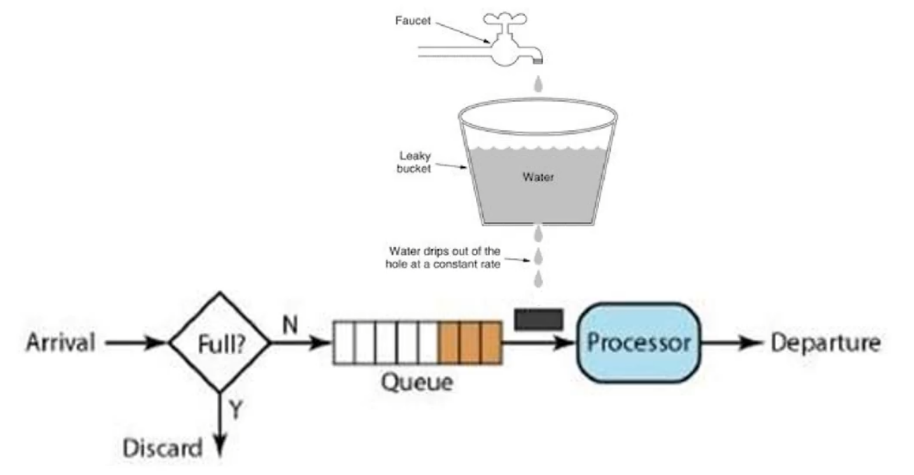
限流算法
令牌桶算法
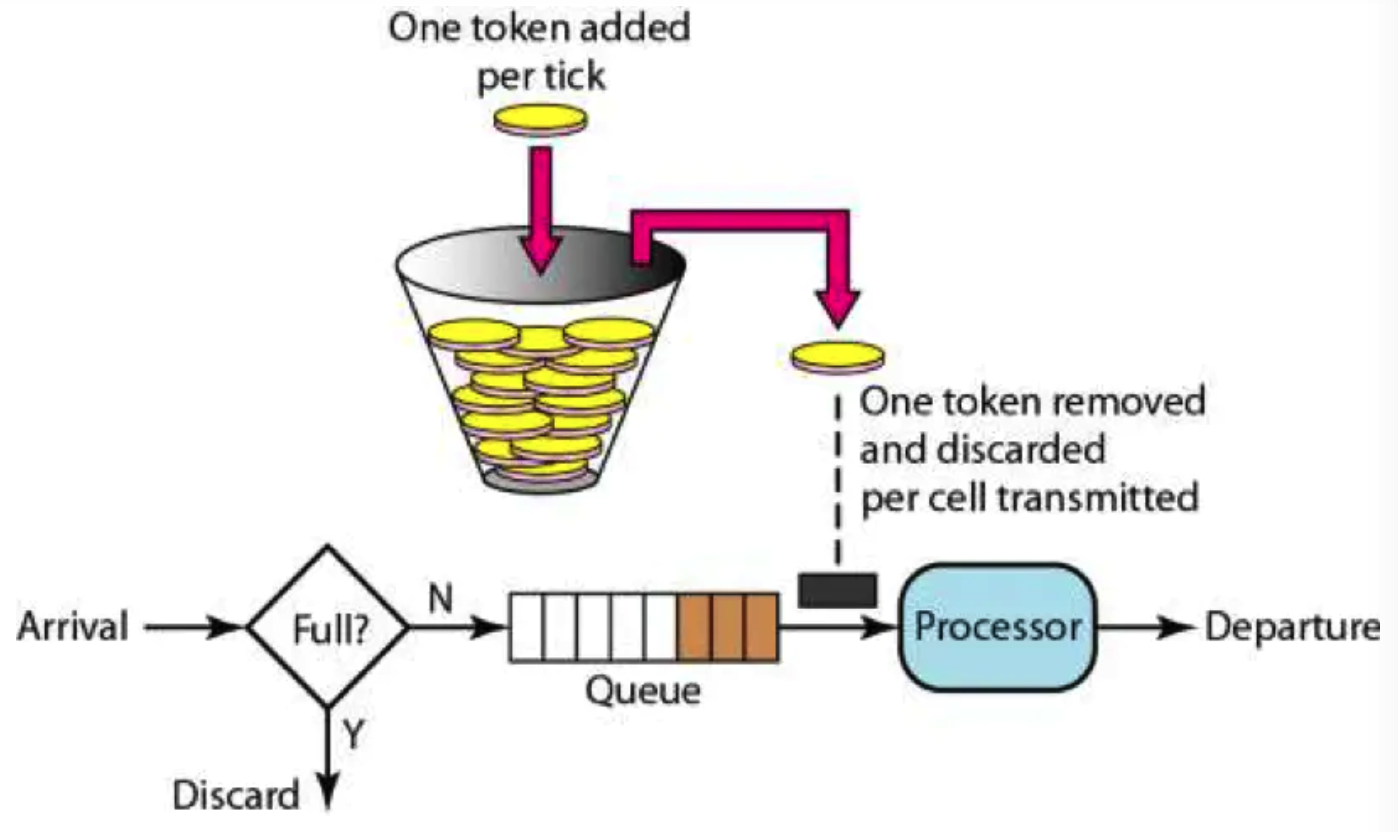
-
每时间单位向令牌桶中存储n个令牌(n = 1)
-
请求到达后,判断queue是否已满,未满加入queue;已满丢弃该请求
-
queue中的请求(cell)尝试获取令牌,如果获取到令牌从令牌桶中移除该令牌,并被处理器处理
-
如果请求获取不到令牌,在queue中等待
限流:如果每时间单位存入10个令牌,但是每时间单位有100个请求,也就是令牌生成速率小于请求的速率,令牌桶很快就被耗尽,获取不到令牌时请求都在queue中等待,queue满了新的请求就被丢弃。此时就做到了限流:令牌桶生成令牌的速率控制了请求的速率
漏斗算法
-
请求需要获取到水滴才能被处理。
-
水滴以恒定的速率下落,如果并发量高queue很快就满了,也就是很快请求就开始被丢弃
漏斗下滴的速率控制了流量。
对比
对于突发流量的情况,令牌桶可以处理。
因为请求变多从令牌桶中获取的数量也就变多,但是水滴的速率是恒定的,是不会随着请求的数量改变的。
使用请求限流过滤器
先添加Redis依赖:
<dependency>
    <groupId>org.springframework.boot</groupId>
    <artifactId>spring-boot-starter-data-redis-reactive</artifactId>
</dependency>
参照官网使用:
This filter takes an optional keyResolver parameter and parameters specific to the rate limiter (described later in this section).
keyResolver is a bean that implements the KeyResolver interface. In configuration, reference the bean by name using SpEL. #{@myKeyResolver} is a SpEL expression that references a bean named myKeyResolver. The following listing shows the KeyResolver interface:
KeyResolver.java
public interface KeyResolver {
	Mono<String> resolve(ServerWebExchange exchange);
}
The default implementation of KeyResolver is the PrincipalNameKeyResolver, which retrieves the Principal from the ServerWebExchange and calls Principal.getName().
需要一个限流键解析器,作为限流的依据,需要使用SpEL在配置文件中定义,已经提供了样例:
@Bean
KeyResolver userKeyResolver() {
    return exchange -> Mono.just(exchange.getRequest().getQueryParams().getFirst("user"));
}
配置限流键解析器:使用请求参数作为限流键,对某个请求参数进行限流
	/**
	 * 将请求参数user作为限流键
	 * @return
	 */@Bean
	KeyResolver userKeyResolver() {
	    return exchange -> Mono.just(exchange.getRequest().getQueryParams().getFirst("user"));
	}

	/**
	 * 将请求主机作为限流键
	 * @return
	 */
	/*
	@Bean
	KeyResolver hostKeyResolver() {
	    return exchange -> Mono.just(exchange.getRequest().getRemoteAddress().getHostName());
	}*/

	/**
	 * 将请求路径作为限流键
	 * @return
	 */

	/*
	@Bean
	KeyResolver pathKeyResolver() {
	    return exchange -> Mono.just(exchange.getRequest().getPath().value());
	}
	*/
配置文件:
server:
  port: 9000
spring:
  data:
    redis:
      host: 192.168.52.168
      port: 6379
  cloud:
    gateway:
      routes:
        - id: add_request_header_route
          uri: http://localhost:8089
          predicates:
            - Path=/**
          filters:
            - name: RequestRateLimiter
              args:
                key-resolver: "#{@userKeyResolver}"  # SpEL表达式指定使用哪个限流键解析器
                redis-rate-limiter.replenishRate: 2  # 填充率:令牌桶生成令牌的速率 2 pre second
                redis-rate-limiter.burstCapacity: 5  # 遇到突发流量填充率增加 5 5 + 2 = 7
                redis-rate-limiter.requestedTokens: 1  # 每个请求需要获取多少令牌
启动服务,测试:
- 访问http://localhost:9000/provider/depart/1,报错:404
因为我们指定请求参数user作为限流键,必须添加该请求参数
- 访问http://localhost:9000/provider/depart/1?user=root,访问成功
快速访问就出现429
使用请求的主机名作为限流键,对某个主机进行限流
/**
 * 将请求参数user作为限流键
 * @return
 *///@Bean
//KeyResolver userKeyResolver() {
//    return exchange -> Mono.just(exchange.getRequest().getQueryParams().getFirst("user"));
//}

/**
 * 将请求主机作为限流键
 * @return
 */
@Bean
KeyResolver hostKeyResolver() {
    return exchange -> Mono.just(exchange.getRequest().getRemoteAddress().getHostName());
}

/**
 * 将请求路径作为限流键
 * @return
 *///@Bean
//KeyResolver pathKeyResolver() {
//    return exchange -> Mono.just(exchange.getRequest().getPath().value());
//}
server:
  port: 9000
spring:
  data:
    redis:
      host: 192.168.52.168
      port: 6379
  cloud:
    gateway:
      routes:
        - id: add_request_header_route
          uri: http://localhost:8089
          predicates:
            - Path=/**
          filters:
            - name: RequestRateLimiter
              args:
                key-resolver: "#{@hostKeyResolver}"  # SpEL表达式指定使用哪个限流键解析器
                redis-rate-limiter.replenishRate: 2  # 填充率:令牌桶生成令牌的速率 2 pre second
                redis-rate-limiter.burstCapacity: 5  # 遇到突发流量填充率增加 5 5 + 2 = 7
                redis-rate-limiter.requestedTokens: 1  # 每个请求需要获取多少令牌
内置GlobalFilter
Spring Cloud Gateway提供了10种全局过滤器
When a request matches a route, the filtering web handler adds all instances of GlobalFilter and all route-specific instances of GatewayFilter to a filter chain. This combined filter chain is sorted by the org.springframework.core.Ordered interface, which you can set by implementing the getOrder() method.
全局过滤器无需任何配置,在符合应用条件时就生效。
例如:如果存在spring-cloud-starter-loadbalancer依赖,全局过滤器ReactiveLoadBalancerClientFilter就是生效的。
ReactiveLoadBalancerClientFilter
Spring Cloud Gateway对目标服务器集群也是可以负载均衡调用的,负载均衡调用的前提就是能够通过nacos服务发现,所以需要nacos依赖和loadbalancer依赖。
If the URL has a lb scheme (such as lb://myservice), it uses the Spring Cloud ReactorLoadBalancer to resolve the name (myservice in this example) to an actual host and port and replaces the URI in the same attribute. The unmodified original URL is appended to the list in the ServerWebExchangeUtils.GATEWAY_ORIGINAL_REQUEST_URL_ATTR attribute. The filter also looks in the ServerWebExchangeUtils.GATEWAY_SCHEME_PREFIX_ATTR attribute to see if it equals lb. If so, the same rules apply. The following listing configures a ReactiveLoadBalancerClientFilter:
如果URL有lb标记,会使用ReactorLoadBalancer解析服务名称得到真实的主机名和端口号,例如:
application.yml
spring:
  cloud:
    gateway:
      routes:
        - id: item
          uri: lb://item-service
          predicates:
            - Path=/items/**,/search/**
By default, when a service instance cannot be found by the ReactorLoadBalancer, a 503 is returned. You can configure the gateway to return a 404 by setting spring.cloud.gateway.loadbalancer.use404=true.
如果ReactorLoadBalancer找不到服务实例,会返回503,可以通过spring.cloud.gateway.loadbalancer.use404=true返回404
必须引入nacos和loadbalancer依赖:
<!--负载均衡-->
<dependency>
    <groupId>org.springframework.cloud</groupId>
    <artifactId>spring-cloud-starter-loadbalancer</artifactId>
</dependency>

<!--服务发现-->
<dependency>
    <groupId>com.alibaba.cloud</groupId>
    <artifactId>spring-cloud-starter-alibaba-nacos-discovery</artifactId>
</dependency>
server:
  port: 9000
spring:
  application:
    name: depart-gateway
  cloud:
    nacos:
      discovery:
        server-addr: 127.0.0.1:8848
    gateway:
      # 开启gateway在注册中心进行服务发现的功能
      discovery:
        locator:
          enabled: true
      routes:
        - id: add_request_header_route
          uri: lb://depart-consumer
          predicates:
            - Path=/**
-
引入nacos服务发现后要指定nacos地址和application.name
-
需要开启gateway在注册中心进行服务发现的功能
-
通过uri指定采用lb协议进行负载均衡访问
测试:当前是gateway访问consumer,consumer通过OpenFeign访问provider
-
如果provider宕机,返回500
-
如果consumer宕机,返回503
自定义网关过滤器
在hmall项目中,我们的目的是:请求最终通过NettyRouteFilter转发到微服务,如果我们定义一个过滤器,在其中实现登录校验逻辑,并且将过滤器的执行顺序定义在NettyRouteFilter之前,这样就符合我们的要求了。
定义一个自定义的过滤器,在请求转发之前验证用户的身份。
GatewayFilter和GlobalFilter都支持自定义,只是编码和使用方式略有差别
GatewayFilter和GlobalFilter的方法签名完全一致:
/**
 * 处理请求并将其传递给下一个过滤器
 * @param exchange 当前请求的上下文,其中包含request、response等各种数据
 * @param chain 过滤器链,基于它向下传递请求
 * @return 根据返回值标记当前请求是否被完成或拦截,chain.filter(exchange)就放行了。
 */
Mono<Void> filter(ServerWebExchange exchange, GatewayFilterChain chain);
自定义GlobalFilter
自定义GlobalFilter需要实现GlobalFilter、Ordered两个接口,GlobalFilter#filter()方法主要处理过滤逻辑,上文中提到,GlobalFilter经过FilteringWebHandler处理后被装饰为GatewayFilter放入过滤器链中,顺序就是Ordered#getOrder()指定的。
注意:全局过滤器实现接口后不需要在配置文件中指定,直接生效
@Component
@Slf4j
public class MyGlobalFilter implements GlobalFilter, Ordered {

    @Override
    public Mono<Void> filter(ServerWebExchange exchange, GatewayFilterChain chain) {
        String path = exchange.getRequest().getPath().value();

        log.info("自定义全局过滤器pre阶段执行,请求路径:" + path);

        return chain.filter(exchange).then(Mono.fromRunnable(() -> {
            log.info("自定义全局过滤器post阶段执行");
        }));
    }


    @Override
    public int getOrder() {
        return 0;
    }
}
- chain.filter(exchange):过滤器链向下执行,继续.then()里的就是过滤器的post阶段
对于登录校验过滤器来说,需要设置为全局过滤器,顺序设置为第一个,如果未登录后续都没必要执行。
需求:定义全局过滤器,判断请求头是否包含指定参数
@Component
public class HeaderGlobalFilter implements GlobalFilter, Ordered {
    @Override
    public Mono<Void> filter(ServerWebExchange exchange, GatewayFilterChain chain) {
        String token = exchange.getRequest().getHeaders().getFirst("token");

        if (!StringUtils.hasText(token)) {
            exchange.getResponse().setStatusCode(HttpStatus.UNAUTHORIZED);
            return exchange.getResponse().setComplete();
        }
        return chain.filter(exchange);
    }

    @Override
    public int getOrder() {
        return Ordered.HIGHEST_PRECEDENCE;
    }
}
自定义GatewayFilter
自定义GatewayFilter需要实现AbstractGatewayFilterFactory,和自定义断言工厂类似。
最简单的方式:
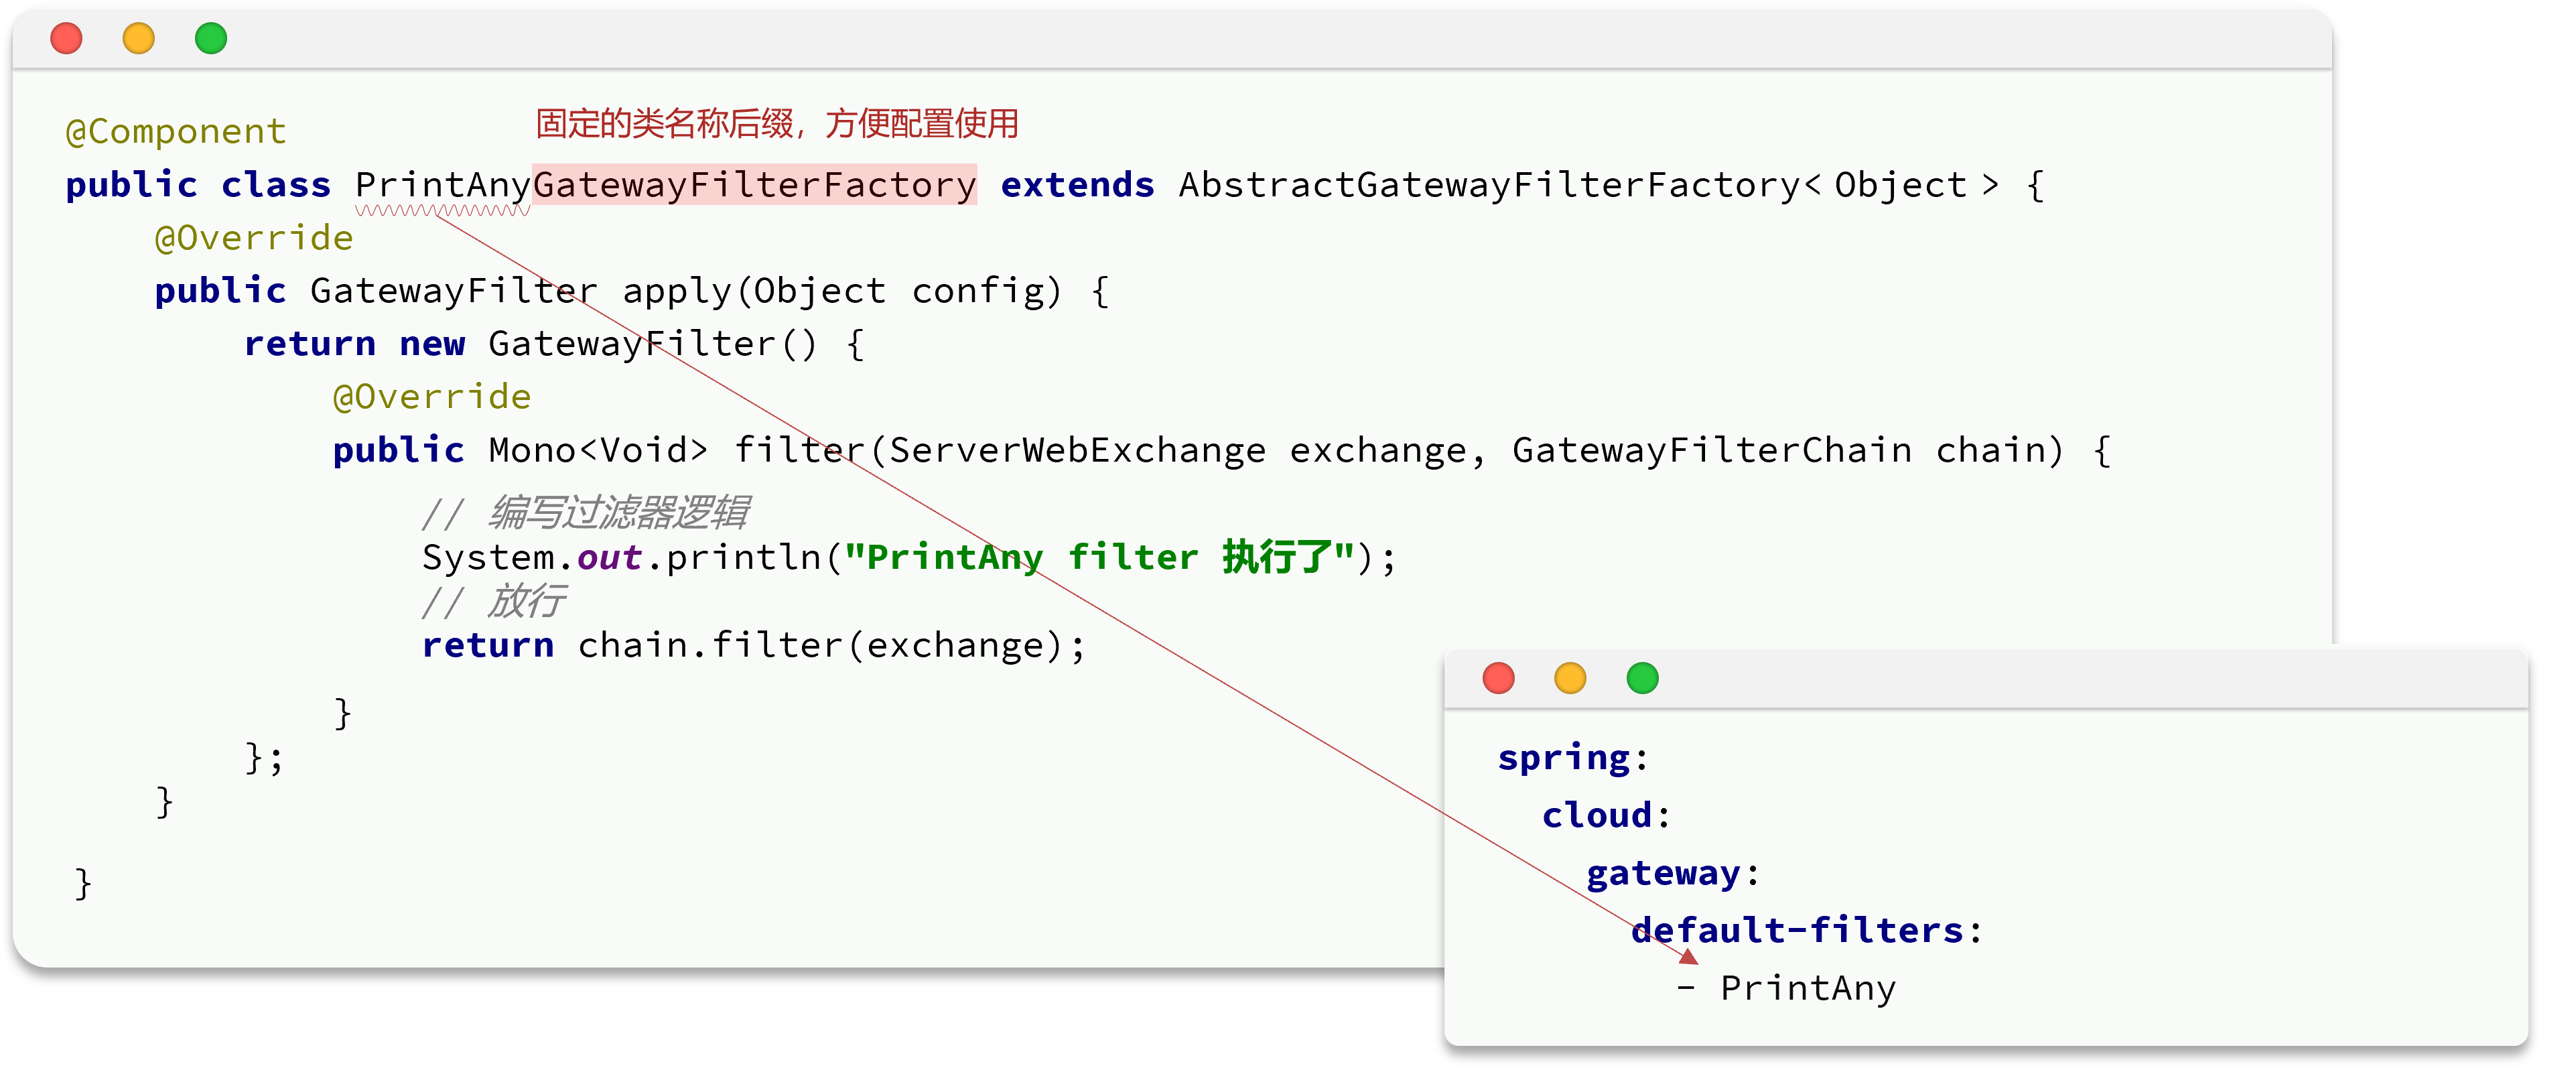
类名必须以GatewayFilterFactory为后缀
server:
  port: 8080
spring:
  application:
    name: gateway-service
  cloud:
    nacos:
      server-addr: 192.168.52.129:8848
    gateway:
      routes:
        - id: item # 路由规则ID,自定义,唯一
          uri: lb://item-service # 路由的目标服务,lb代表负载均衡,会从注册中心拉取服务列表
          predicates: # 路由断言,判断请求是否符合当前规则,符合则路由到目标服务
            - Path=/items/**,/search/** # Path为路由断言,判断请求路径是否符合规则
          filters:
            - PrintAny
也可以作为全局过滤器:
server:
  port: 8080
spring:
  application:
    name: gateway-service
  cloud:
    nacos:
      server-addr: 192.168.52.129:8848
    gateway:
      routes:
        - id: item # 路由规则ID,自定义,唯一
          uri: lb://item-service # 路由的目标服务,lb代表负载均衡,会从注册中心拉取服务列表
          predicates: # 路由断言,判断请求是否符合当前规则,符合则路由到目标服务
            - Path=/items/**,/search/** # Path为路由断言,判断请求路径是否符合规则
	  default-filters:
		- AddRequestHeader=myHeader,header value set by AddRequestHeaderFilterFactory
		- PrintAny
指定Config
如果自定义过滤器要携带参数,类似于AddRequestHeaderGatewayFilter:
server:
  port: 8080
spring:
  application:
    name: gateway-service
  cloud:
    nacos:
      server-addr: 192.168.52.129:8848
    gateway:
      routes:
        - id: item # 路由规则ID,自定义,唯一
          uri: lb://item-service # 路由的目标服务,lb代表负载均衡,会从注册中心拉取服务列表
          predicates: # 路由断言,判断请求是否符合当前规则,符合则路由到目标服务
            - Path=/items/**,/search/** # Path为路由断言,判断请求路径是否符合规则
	  default-filters:
		- AddRequestHeader=myHeader,header value set by AddRequestHeaderFilterFactory
这个过程和自定义路由断言工厂类似:
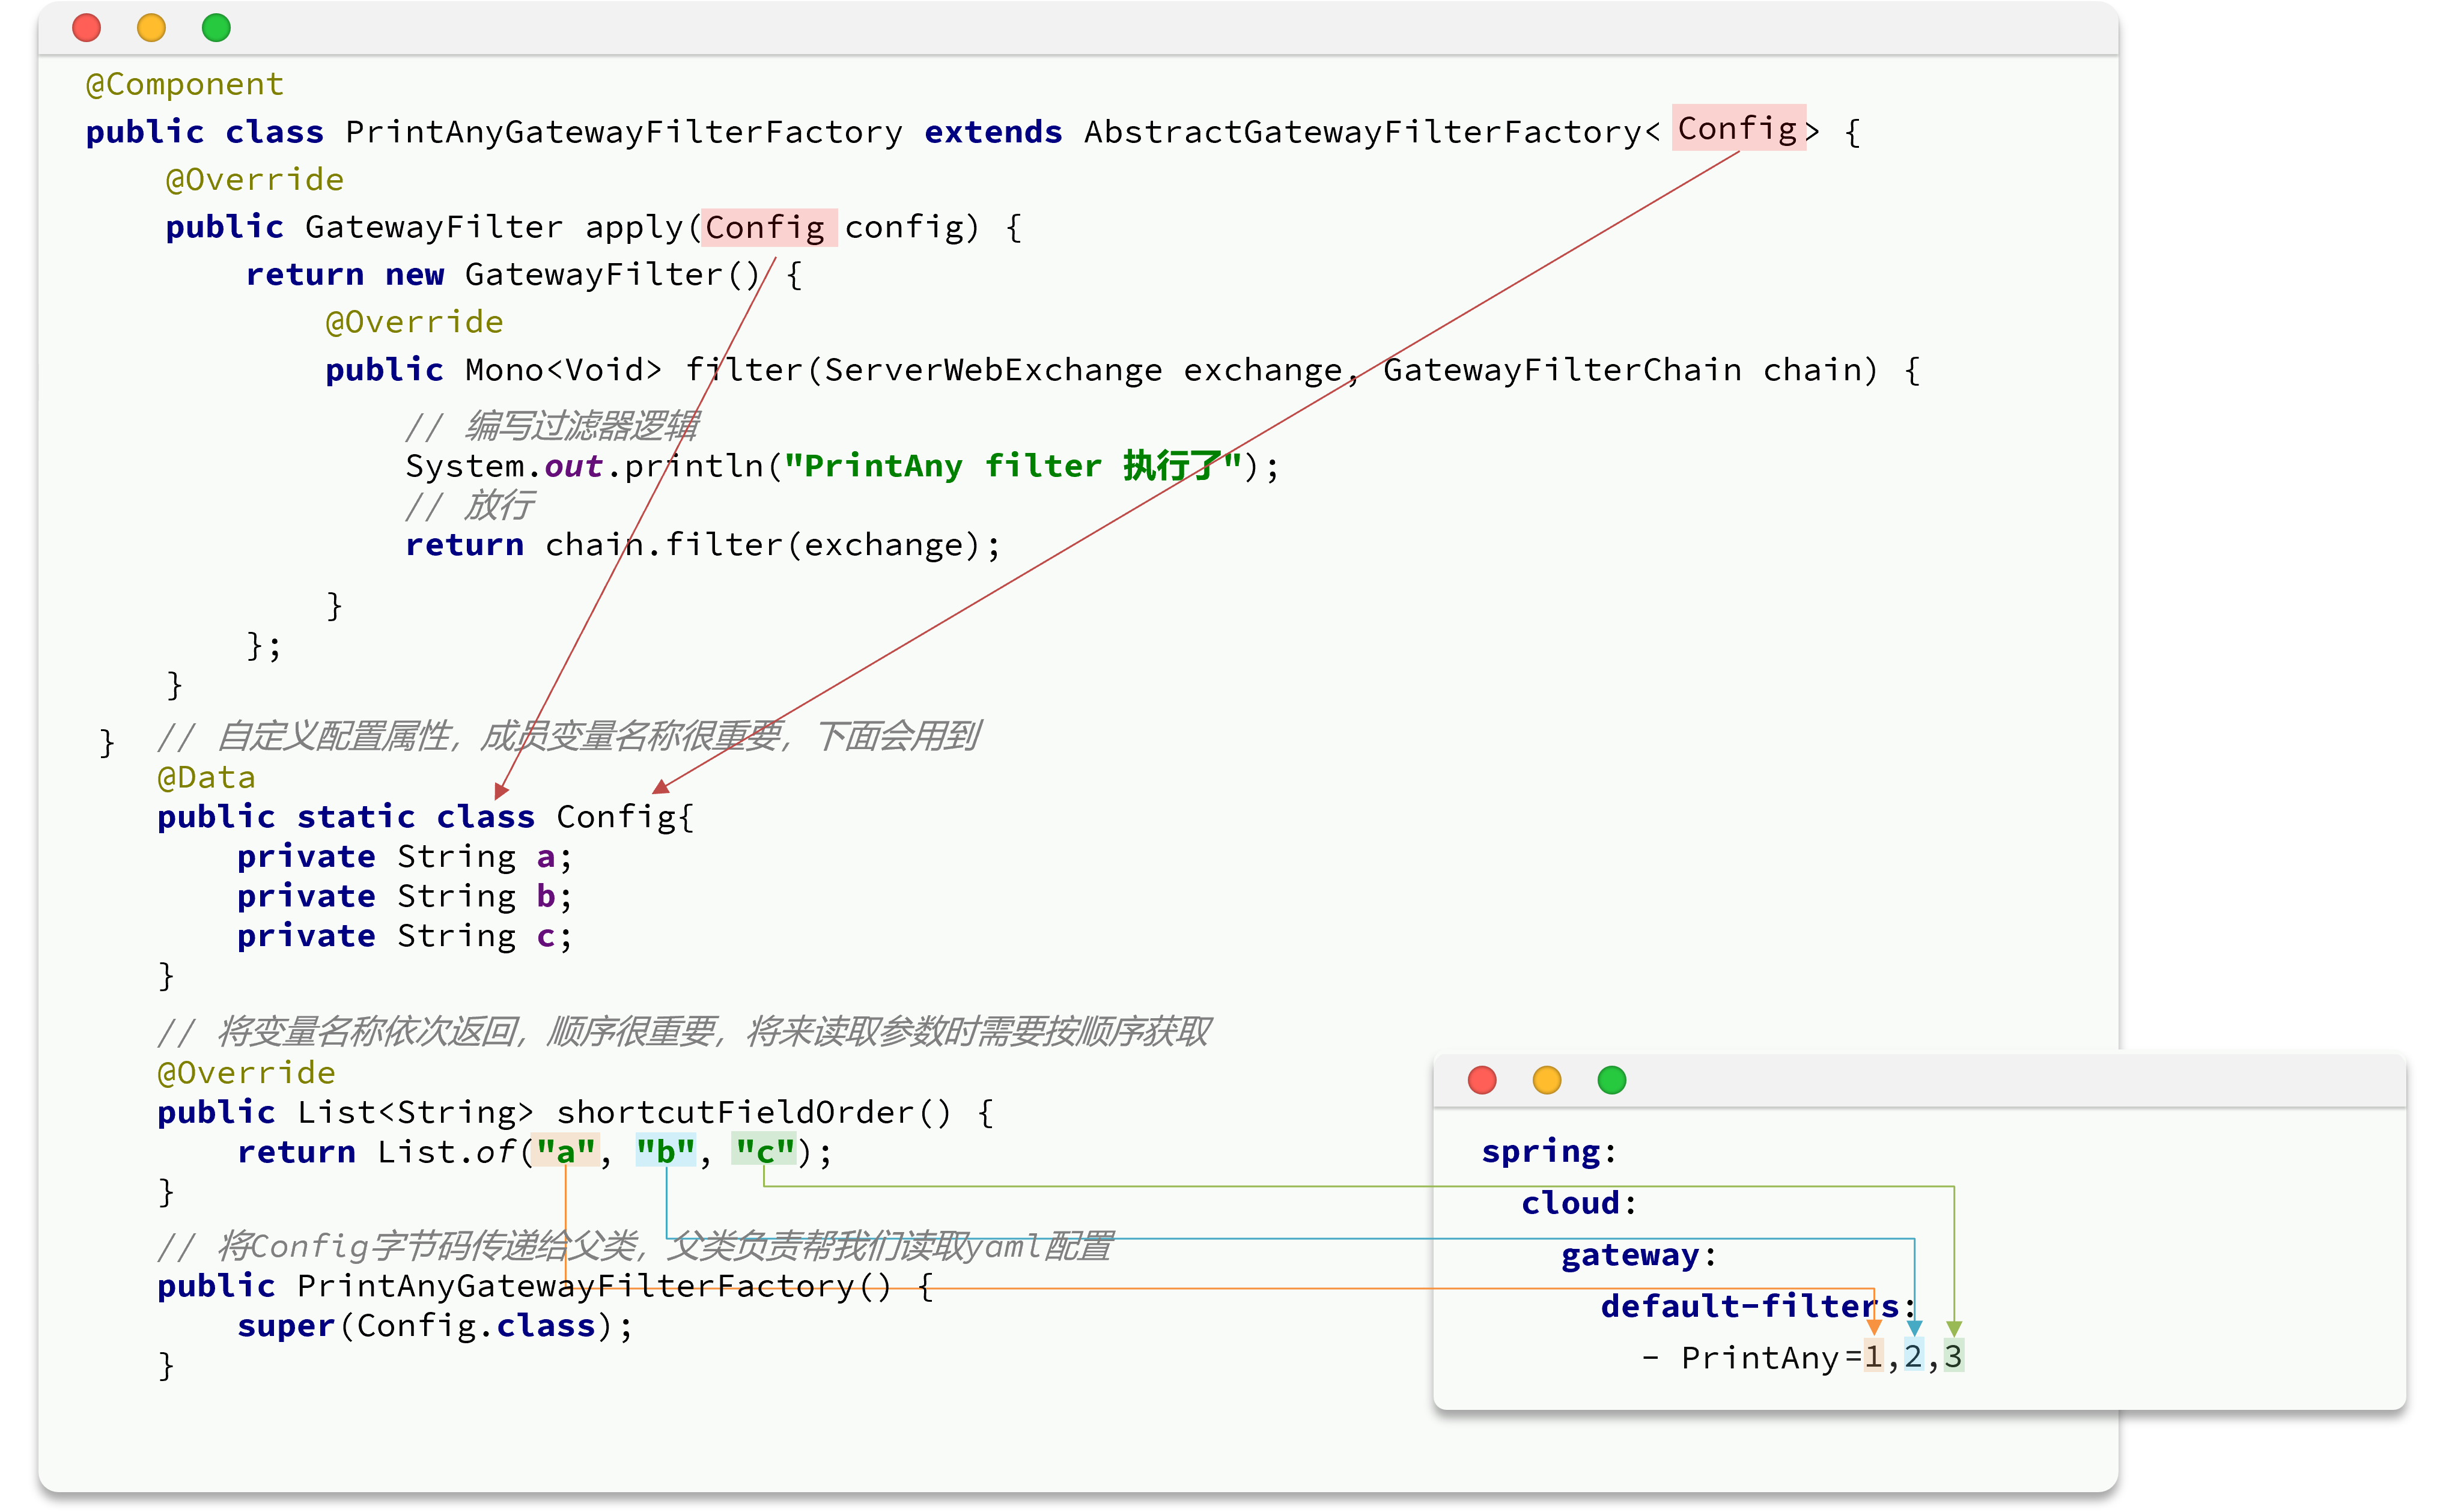
@Component
@Slf4j
public class PrintAnyGatewayFilterFactory extends AbstractGatewayFilterFactory<PrintAnyGatewayFilterFactory.Config> {
    /**
     * Config字节码传递给父类,父类读取yml配置
     */
    public PrintAnyGatewayFilterFactory() {
        super(Config.class);
    }

    /**
     * 定义内部配置类,包含过滤器的自定义属性
     */
    @Data
    public static class Config {
        private String username;
        private String password;
    }

    /**
     * 将变量名按顺序依次返回
     * @return
     */    @Override
    public List<String> shortcutFieldOrder() {
        return List.of("username","password");
    }

    /**
     * 过滤器核心逻辑
     * @param config
     * @return
     */
     @Override
    public GatewayFilter apply(Config config) {
        return new OrderedGatewayFilter(new GatewayFilter() {
            @Override
            public Mono<Void> filter(ServerWebExchange exchange, GatewayFilterChain chain) {
                //获取配置的属性值
                String username = config.getUsername();
                String password = config.getPassword();

                log.info("pre阶段开始");
                log.info("username:{}",username);
                log.info("password:{}",password);
                log.info("pre阶段结束");
                return chain.filter(exchange).then(Mono.fromRunnable(() -> {
                    log.info("post阶段执行");
                }));
            }
        },0);
    }
}
apply()方法返回值需要一个GatewayFilter,我们返回的是可排序的OrderedGatewayFilter,其中的GatewayFilter:
public interface GatewayFilter extends ShortcutConfigurable {
    String NAME_KEY = "name";
    String VALUE_KEY = "value";

    Mono<Void> filter(ServerWebExchange exchange, GatewayFilterChain chain);
}
是一个函数式接口,可以简化:
/**
 * 过滤器核心逻辑
 * @param config
 * @return
 */@Override
public GatewayFilter apply(Config config) {
    return new OrderedGatewayFilter(((exchange, chain) -> {
        String username = config.getUsername();
        String password = config.getPassword();
        log.info("pre阶段:username = {}",username);
        log.info("pre阶段:password = {}",password);
        return chain.filter(exchange).then(Mono.fromRunnable(() -> {
            log.info("post阶段");
        }));
    }), 0);
}
server:
  port: 9000
spring:
  data:
    redis:
      host: 192.168.52.168
      port: 6379
  cloud:
    gateway:
      routes:
        - id: add_request_header_route
          uri: http://localhost:8089
          predicates:
            - Path=/**
          filters:
            - name: RequestRateLimiter
              args:
                key-resolver: "#{@hostKeyResolver}"  # SpEL表达式指定使用哪个限流键解析器
                redis-rate-limiter.replenishRate: 2  # 填充率:令牌桶生成令牌的速率 2 pre second
                redis-rate-limiter.burstCapacity: 5  # 遇到突发流量填充率增加 5 5 + 2 = 7
                redis-rate-limiter.requestedTokens: 1  # 每个请求需要获取多少令牌
            # 自定义过滤器
			- PrintAny=root,123

logging:
  level:
    root: debug
继承Config
参照AddRequestHeaderGatewayFilterFactory:
public class AddRequestHeaderGatewayFilterFactory extends AbstractNameValueGatewayFilterFactory {
    public AddRequestHeaderGatewayFilterFactory() {
    }

    public GatewayFilter apply(final AbstractNameValueGatewayFilterFactory.NameValueConfig config) {
        return new GatewayFilter() {
            public Mono<Void> filter(ServerWebExchange exchange, GatewayFilterChain chain) {
                String value = ServerWebExchangeUtils.expand(exchange, config.getValue());
                ServerHttpRequest request = exchange.getRequest().mutate().headers((httpHeaders) -> {
                    httpHeaders.add(config.getName(), value);
                }).build();
                return chain.filter(exchange.mutate().request(request).build());
            }

            public String toString() {
                return GatewayToStringStyler.filterToStringCreator(AddRequestHeaderGatewayFilterFactory.this)
				                .append(config.getName(), config.getValue()).toString();
            }
        };
    }
}
-
添加请求头需要修改原始请求信息,此处通过exchange.getRequest().mutate()构建新的request,再传递给后续过滤器
-
没有指定Config,但是添加请求头是需要从配置文件中读取信息的,查找父类AbstractNameValueGatewayFilterFactory:
public abstract class AbstractNameValueGatewayFilterFactory extends AbstractGatewayFilterFactory<NameValueConfig> {
    public AbstractNameValueGatewayFilterFactory() {
        super(NameValueConfig.class);
    }

    public List<String> shortcutFieldOrder() {
        return Arrays.asList("name", "value");
    }

    @Validated
    public static class NameValueConfig {
        protected @NotEmpty String name;
        protected @NotEmpty String value;

        public NameValueConfig() {
        }

        public String getName() {
            return this.name;
        }

        public NameValueConfig setName(String name) {
            this.name = name;
            return this;
        }

        public String getValue() {
            return this.value;
        }

        public NameValueConfig setValue(String value) {
            this.value = value;
            return this;
        }

        public String toString() {
            return (new ToStringCreator(this)).append("name", this.name).append("value", this.value).toString();
        }
    }
}
Config在这里以NameConfig的形式指定了,在配置文件中指定的两个值分别赋值给name和value,也就是帮我们进行了指定泛型的操作:
public abstract class AbstractNameValueGatewayFilterFactory extends AbstractGatewayFilterFactory<NameValueConfig> {
    public AbstractNameValueGatewayFilterFactory() {
        super(NameValueConfig.class);
    }
}
我们可以参照这个类实现我们自定义的AddRequestGatewayFilter:
@Component
public class AddRequestGatewayFilterFactory extends AbstractNameValueGatewayFilterFactory {

    @Override
    public GatewayFilter apply(NameValueConfig config) {
        return (exchange, chain) -> {
            String name = config.getName();
            String value = config.getValue();

            //参照AddRequestHeaderGatewayFilterFactory添加请求头
            //得到的就是发生了变化的request
            ServerHttpRequest request = exchange.getRequest().mutate()
                    .headers(httpHeaders -> httpHeaders.add(name, value)).build();

            return chain.filter(exchange.mutate().request(request).build());
        };
    }
}
- exchange.getRequest().mutate():获取到请求,对请求进行变更(添加请求头)
- exchange.mutate().request():对exchange进行变更,改变request
- 最终只需要将变更过的exchange传递到过滤器链即可。
跨域配置
浏览器的同源策略禁止从一个域名请求另外一个域名的资源。
同源:协议、域名、端口号都一致才是同源的,只要有一个不同就是跨源的请求。
CORS:Cross-Origin Resource Sharing,跨域资源共享,是一种允许当前域的资源被其他域的脚本请求访问的机制。
Spring Cloud Gateway提供的跨域解决方案:
- 全局配置
spring:
  cloud:
    gateway:
      globalcors:
        cors-configurations:
          '[/**]':
            allowedOrigins: "*"
            allowedMethods:
            - GET
- 局部配置
spring:
  cloud:
    gateway:
      routes:
      - id: cors_route
        uri: https://example.org
        predicates:
        - Path=/service/**
        metadata:
          cors
            allowedOrigins: '*'
            allowedMethods:
              - GET
              - POST
            allowedHeaders: '*'
            maxAge: 30
案例:黑马商城
网关配置
网关本身也是一个服务,需要创建一个模块开发功能,需要的依赖:
<project xmlns="http://maven.apache.org/POM/4.0.0" xmlns:xsi="http://www.w3.org/2001/XMLSchema-instance"
         xsi:schemaLocation="http://maven.apache.org/POM/4.0.0 http://maven.apache.org/xsd/maven-4.0.0.xsd">
    <modelVersion>4.0.0</modelVersion>
    <parent>
        <groupId>com.heima</groupId>
        <artifactId>hmall</artifactId>
        <version>1.0.0</version>
    </parent>

    <artifactId>hm-gateway</artifactId>
    <properties>
        <maven.compiler.source>11</maven.compiler.source>
        <maven.compiler.target>11</maven.compiler.target>
    </properties>

    <dependencies>
        <!--common-->
        <dependency>
            <groupId>com.heima</groupId>
            <artifactId>hm-common</artifactId>
            <version>1.0.0</version>
        </dependency>
        <dependency>
            <groupId>org.springframework.cloud</groupId>
            <artifactId>spring-cloud-starter-gateway</artifactId>
        </dependency>

        <!--nacos 服务注册发现-->
        <dependency>
            <groupId>com.alibaba.cloud</groupId>
            <artifactId>spring-cloud-starter-alibaba-nacos-discovery</artifactId>
        </dependency>

        <!--负载均衡-->
        <dependency>
            <groupId>org.springframework.cloud</groupId>
            <artifactId>spring-cloud-starter-loadbalancer</artifactId>
        </dependency>
        <!--完成SpringMVC自动装配-->
        <dependency>
            <groupId>org.springframework</groupId>
            <artifactId>spring-webmvc</artifactId>
        </dependency>

    </dependencies>
    <build>
        <finalName>${project.artifactId}</finalName>
        <plugins>
            <plugin>
                <groupId>org.springframework.boot</groupId>
                <artifactId>spring-boot-maven-plugin</artifactId>
            </plugin>
        </plugins>
    </build>
</project>
hmall项目已经拆分了微服务,并且使用nacos完成了服务治理,我们在配置网关时就可以使用微服务的方式进行访问。
application.yml:
server:
  port: 8080
spring:
  application:
    name: gateway
  cloud:
    nacos:
      discovery:
        server-addr: 192.168.52.168:8848
    gateway:
      discovery:
        locator:
          enabled: true
      routes:
        - id: item # 路由规则ID,自定义,唯一
          uri: lb://item-service # 路由的目标服务,lb代表负载均衡,会从注册中心拉取服务列表
          predicates: # 路由断言,判断请求是否符合当前规则,符合则路由到目标服务
            - Path=/items/**,/search/** # Path为路由断言,判断请求路径是否符合规则
        - id: cart
          uri: lb://cart-service
          predicates:
            - Path=/carts/**
        - id: user
          uri: lb://user-service
          predicates:
            - Path=/users/**,/addresses/**
        - id: trade
          uri: lb://trade-service
          predicates:
            - Path=/orders/**
        - id: pay
          uri: lb://pay-service
          predicates:
            - Path=/pay-orders/**
启动 GatewayApplication 以及 ItemApplication,以 http://localhost:8080 拼接微服务接口路径来测试。例如:
http://localhost:8080/items/page?pageNo=1&pageSize=1
此时,启动UserApplication、CartApplication,然后打开前端页面 http://localhost:18080 ,发现相关功能都可以正常访问了。
前端的请求都经过网关进行转发,也就是前端的请求只需要访问8080端口就可以了
登录校验过滤器
-
如何在网关转发请求之前执行我们代码,进行登录校验?
-
网关校验后,通过Netty远程调用,如何将用户信息加入请求头?
-
微服务和微服务之间也需要远程调用,cart-service也需要远程调用item-service的方法,这个调用是不经过网关的,如何传递用户信息?
定义AuthGlobalFilter完成登录校验。
接下来,我们就可以自定义GlobalFilter完成登录校验:
登录校验需要使用JWT工具,直接拷贝:
@Component
@EnableConfigurationProperties(AuthProperties.class)
public class AuthGlobalFilter implements GlobalFilter, Ordered {

    @Autowired
    private AntPathMatcher antPathMatcher;
    @Autowired
    private AuthProperties authProperties;
    @Autowired
    private JwtTool jwtTool;

    @Override
    public Mono<Void> filter(ServerWebExchange exchange, GatewayFilterChain chain) {

        //1. 获取请求路径
        ServerHttpRequest request = exchange.getRequest();

        String path = request.getPath().toString();
        //2. 判断是否拦截路径
        if (isExclude(path)){
            //排除路径,放行
            return chain.filter(exchange);
        }
        //3. 拦截。获取请求头Authorization并校验
        String authorization = request.getHeaders().getFirst("Authorization");

        try {
              /* if (StrUtil.isEmpty(authorization)){
                throw new RuntimeException("登录过期");
            }*/
            Long userId = jwtTool.parseToken(authorization);
            //TODO 登录成功后保存用户信息到请求头中
	        //4. 校验通过,将用户信息存储到请求头

	        //5. 放行
	        return chain.filter(exchange);

        } catch (Exception e) {
            e.printStackTrace();
            //校验失败,返回401
            ServerHttpResponse response = exchange.getResponse();
            response.setStatusCode(HttpStatus.UNAUTHORIZED);
            return response.setComplete();
        }
    }

    private boolean isExclude(String path) {
        for (String excludePath : authProperties.getExcludePaths()) {
            if (antPathMatcher.match(excludePath,path)){
                return true;
            }
        }
        return false;
    }

    @Override
    public int getOrder() {
        return 0;
    }
}
- 排除的路径放在AuthProperties中
@Data
@ConfigurationProperties(prefix = "hm.auth")
public class AuthProperties {
    private List<String> includePaths;
    private List<String> excludePaths;

    @Bean
    public AntPathMatcher antPathMatcher(){
        return new AntPathMatcher();
    }
}
但是此处没有@Component标识,未被注入,在AuthGlobalFilter中使用了@EnableConfigurationProperties(AuthProperties.class)注入AuthProperties类
-
解析JWT之前没有进行判空,因为判空的操作放在JwtTool#parseToken(authorization)方法中了
-
校验失败的处理逻辑:
//校验失败,返回401
ServerHttpResponse response = exchange.getResponse();
response.setStatusCode(HttpStatus.UNAUTHORIZED);
return response.setComplete();
保存用户信息到请求头
校验成功获取userId后,此时需要完成将用户信息存储到请求头中,转发到下游微服务
在微服务的很多业务中都可能使用到用户信息,需要先存储到ThreadLocal中
- 要修改网关转发到微服务的请求,需要使用ServerWebExchange类提供的Api:

@Override
public Mono<Void> filter(ServerWebExchange exchange, GatewayFilterChain chain) {

    //1. 获取请求路径
    ServerHttpRequest request = exchange.getRequest();

    String path = request.getPath().toString();
    //2. 判断是否拦截路径
    if (isExclude(path)){
        //排除路径,放行
        return chain.filter(exchange);
    }
    //3. 拦截。获取请求头Authorization并校验
    String authorization = request.getHeaders().getFirst("Authorization");

    ServerHttpResponse response = exchange.getResponse();

    try {
		Long userId = jwtTool.parseToken(authorization);
        if (userId == null){
            response.setStatusCode(HttpStatus.UNAUTHORIZED);
            return response.setComplete();
        }
        //4. 校验通过,将用户信息存储到请求头
        ServerWebExchange webExchange = exchange.mutate()
                .request(builder -> builder.header("user-info", userId.toString()))
                .build();
        //5. 放行
        return chain.filter(webExchange);
    } catch (Exception e) {
        e.printStackTrace();
        //校验失败,返回401
        response.setStatusCode(HttpStatus.UNAUTHORIZED);
        return response.setComplete();
    }
}
package com.hmall.gateway.filter;

@Component
@Slf4j
@EnableConfigurationProperties(AuthProperties.class)
public class AuthGlobalFilter implements GlobalFilter, Ordered {

    @Autowired
    private AntPathMatcher antPathMatcher;
    @Autowired
    private AuthProperties authProperties;
    @Autowired
    private JwtTool jwtTool;

    @Override
    public Mono<Void> filter(ServerWebExchange exchange, GatewayFilterChain chain) {
        ServerHttpRequest request = exchange.getRequest();
        // 1. 判断是否是要排除的路径
        String path = request.getPath().value();
        if (isExclude(path)){
            return chain.filter(exchange);
        }

        // 2. 获取请求头
        String authorization = request.getHeaders().getFirst("Authorization");

        if (!StringUtils.hasText(authorization)){
            exchange.getResponse().setStatusCode(HttpStatus.UNAUTHORIZED);
            return exchange.getResponse().setComplete();
        }

        try {
            Long userId = jwtTool.parseToken(authorization);
            if (userId == null){
                exchange.getResponse().setStatusCode(HttpStatus.UNAUTHORIZED);
                return exchange.getResponse().setComplete();
            }
            ServerHttpRequest changedRequest = exchange.getRequest().mutate()
                    .headers(httpHeaders -> httpHeaders.add("user-info", userId.toString())).build();
            return chain.filter(exchange.mutate().request(changedRequest).build());
        }catch (Exception e){
            e.printStackTrace();
            exchange.getResponse().setStatusCode(HttpStatus.UNAUTHORIZED);
            return exchange.getResponse().setComplete();
        }

    }

    private boolean isExclude(String path) {
        for (String excludePath : authProperties.getExcludePaths()) {
            if (antPathMatcher.match(excludePath,path)){
                return true;
            }
        }
        return false;
    }

    @Override
    public int getOrder() {
        return Ordered.HIGHEST_PRECEDENCE;
    }
}
此时,我们就完成了网关进行登录验证,并且将用户信息传递到下游微服务
下游微服务获取用户信息
网关将请求转发到微服务时,微服务如何获取用户身份呢?
网关转发的请求依然是HTTP请求,用户信息存储在请求头user-info中,在下游微服务中可以使用拦截器获取用户信息存入ThreadLocal中
但是下游的微服务基本都需要这样获取用户信息,这段程序不能在每个微服务中都写一次,每个微服务都会引入hm-common模块,我们可以将拦截器定义在hm-common中,并且在hm-common中配置好自动装配,这样每个微服务引入hm-common就具备了这个拦截器的功能。
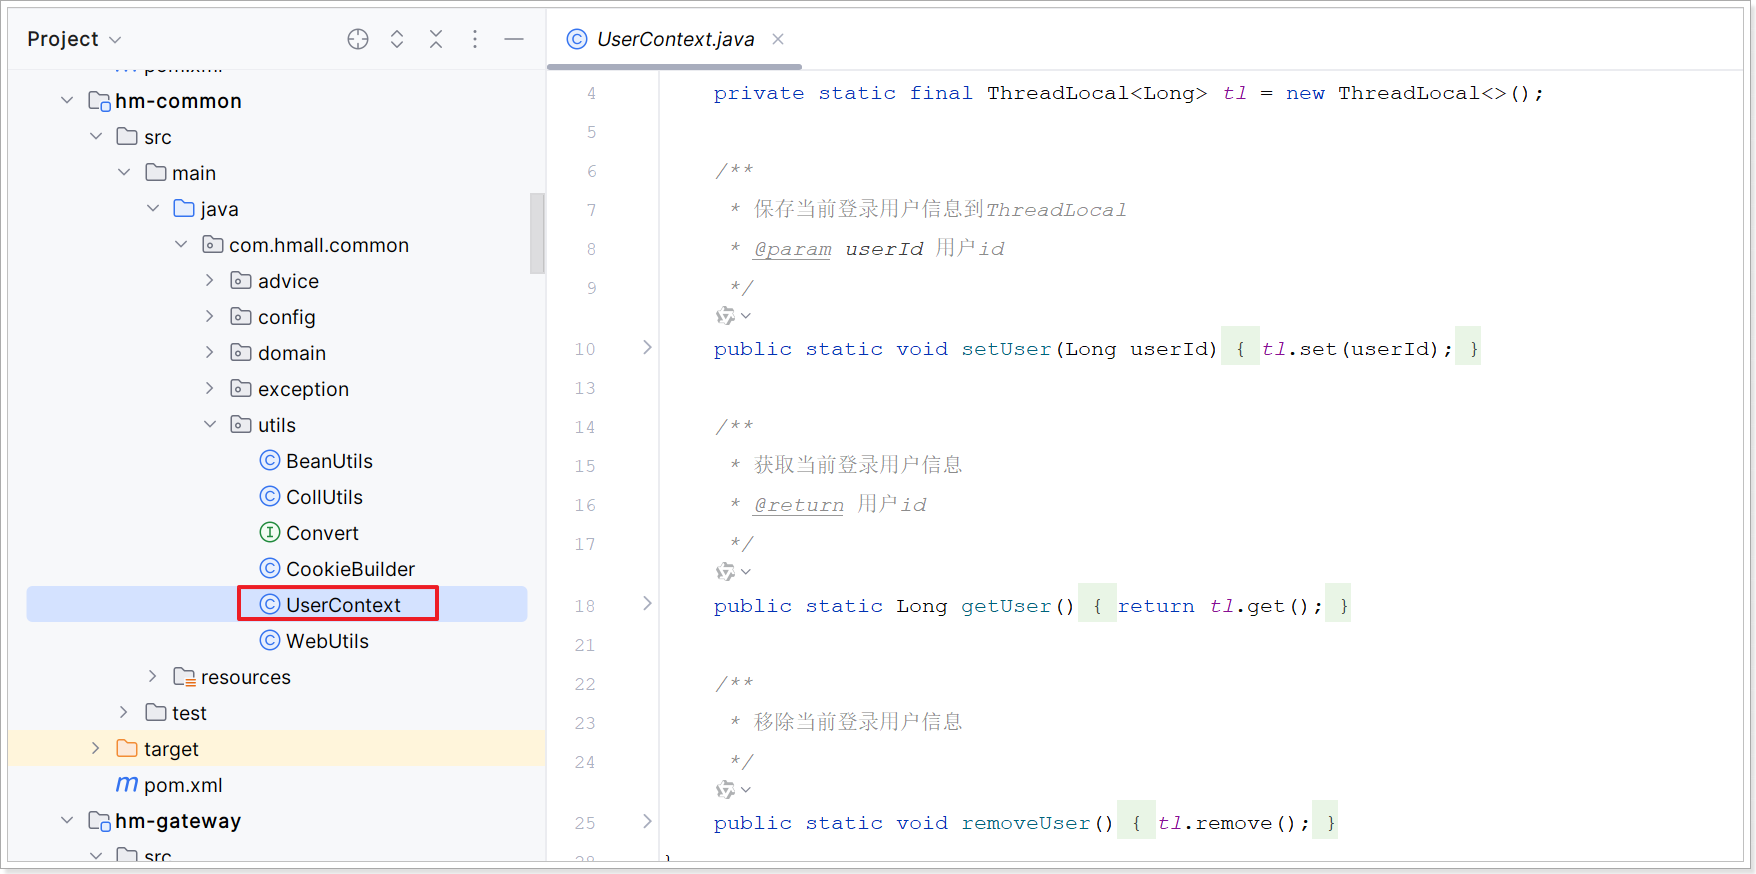
在hm-common中已经有一个用于保存登录用户的 ThreadLocal 工具:其中已经提供了保存和获取用户的方法:
实现步骤:
-
hm-common中定义UserInfoInterceptor拦截器
-
MvcConfig配置拦截器
-
spring.factories自动装配
-
恢复购物车代码
-
测试访问我的购物车
-
hm-common中定义UserInfoInterceptor拦截器
package com.hmall.common.interceptor;

/**
 * 获取用户信息存入ThreadLocal
 * @author EUNEIR */
@Component
public class UserInfoInterceptor implements HandlerInterceptor {
    @Override
    public boolean preHandle(HttpServletRequest request, HttpServletResponse response, Object handler)
															    throws Exception {

        String userInfo = request.getHeader("user-info");

		//注意需要判空
        if (StrUtil.isNotEmpty(userInfo)){
            UserContext.setUser(Long.valueOf(userInfo));
        }
        return true;
    }

    @Override
    public void afterCompletion(HttpServletRequest request, HttpServletResponse response,
														     Object handler, Exception ex) throws Exception {
        //请求处理结束后从线程变量中移除用户信息
        UserContext.removeUser();
    }
}
注意:在存入UserContext前一定要进行判空
- MvcConfig配置拦截器
package com.hmall.common.config;

@Configuration
public class MvcConfig implements WebMvcConfigurer {

    @Autowired
    private UserInfoInterceptor userInfoInterceptor;

    @Override
    public void addInterceptors(InterceptorRegistry registry) {
        registry.addInterceptor(userInfoInterceptor);
    }
}
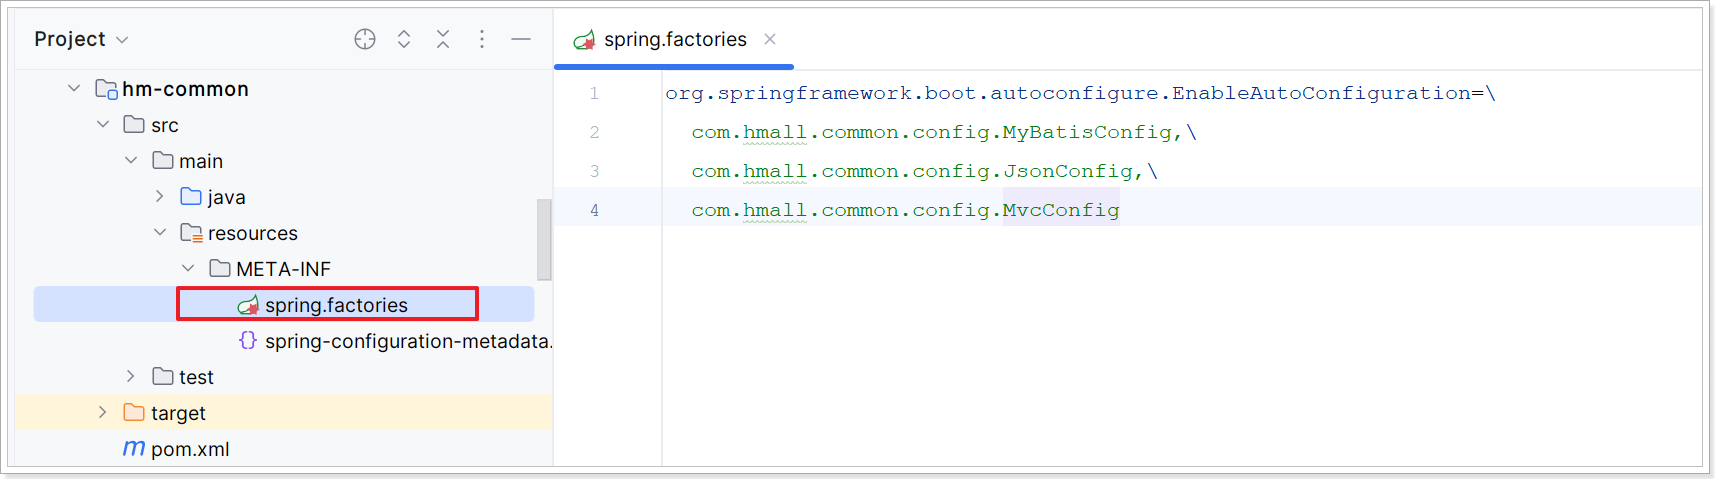
- spring.factories自动装配
此时配置的拦截器还不能生效,因为此时的包是com.hmall.common.config,在cart-service中扫描的默认路径是com.hmall.cart,无法被扫描到
使用自动装配机制,将其添加到resources目录下的META-INF/spring.factories文件中:
- 恢复购物车代码
@Override
public List<CartVO> queryMyCarts() {
    // 1.查询我的购物车列表
    //TODO 获取登录用户信息
    //List<Cart> carts = lambdaQuery().eq(Cart::getUserId, UserContext.getUser()).list();
    //写死用户id
    List<Cart> carts = lambdaQuery().eq(Cart::getUserId, UserContext.getUser()).list();

    if (CollUtils.isEmpty(carts)) {
        return CollUtils.emptyList();
    }

    // 2.转换VO
    List<CartVO> vos = BeanUtils.copyList(carts, CartVO.class);


    // 3.处理VO中的商品信息
    handleCartItems(vos);

    // 4.返回
    return vos;
}
测试
访问我的购物车
此时启动,所有微服务会报错:
***************************
APPLICATION FAILED TO START
***************************

Description:

Field userInfoInterceptor in com.hmall.common.config.MvcConfig required a bean of type 'com.hmall.common.interceptor.UserInfoInterceptor'
that could not be found.


Action:

Consider defining a bean of type 'com.hmall.common.interceptor.UserInfoInterceptor' in your configuration.
还是因为包扫描不到hm-common下的com.hmall.common.interceptor.UserInfoInterceptor,尝试自动装配:
org.springframework.boot.autoconfigure.EnableAutoConfiguration=\
  com.hmall.common.config.MyBatisConfig,\
  com.hmall.common.config.JsonConfig,\
  com.hmall.common.config.MvcConfig,\
  com.hmall.common.interceptor.UserInfoInterceptor
启动程序,只有网关微服务会报错:
Caused by: org.springframework.beans.factory.BeanCreationException: Error creating bean with name
'com.hmall.common.interceptor.UserInfoInterceptor': Lookup method resolution failed; nested exception is java.lang.IllegalStateException: Failed to introspect Class [com.hmall.common.interceptor.UserInfoInterceptor] from ClassLoader [jdk.internal.loader.ClassLoaders$AppClassLoader@2437c6dc]
为什么?
解决办法是将MvcConfig中使用new的方式创建,并且取消UserInfoInterceptor的自动装配:
@Configuration
public class MvcConfig implements WebMvcConfigurer {
    @Override
    public void addInterceptors(InterceptorRegistry registry) {
        registry.addInterceptor(new UserInfoInterceptor());
    }
}
public class UserInfoInterceptor implements HandlerInterceptor {
    @Override
    public boolean preHandle(HttpServletRequest request, HttpServletResponse response, Object handler) throws Exception {

        String userInfo = request.getHeader("user-info");

        if (StrUtil.isNotEmpty(userInfo)){
            UserContext.setUser(Long.valueOf(userInfo));
        }

        return true;
    }

    @Override
    public void afterCompletion(HttpServletRequest request, HttpServletResponse response, Object handler, Exception ex) throws Exception {
        UserContext.removeUser();
    }
}
OpenFeign转发传递用户信息
在最开始我们的问题:
-
如何在网关转发请求之前执行我们的代码:通过自定义GlobalFilter拦截器
-
网关校验后,通过Netty远程调用对应的微服务,如何传递用户的信息:通过exchange.xxx自定义请求头
-
在微服务和微服务之间也会进行远程调用,比如cart-service远程调用item-service的方法,这个调用是不经过网关的,如何传递用户信息?
在某些微服务中也会调用其他的微服务,比如下单业务:
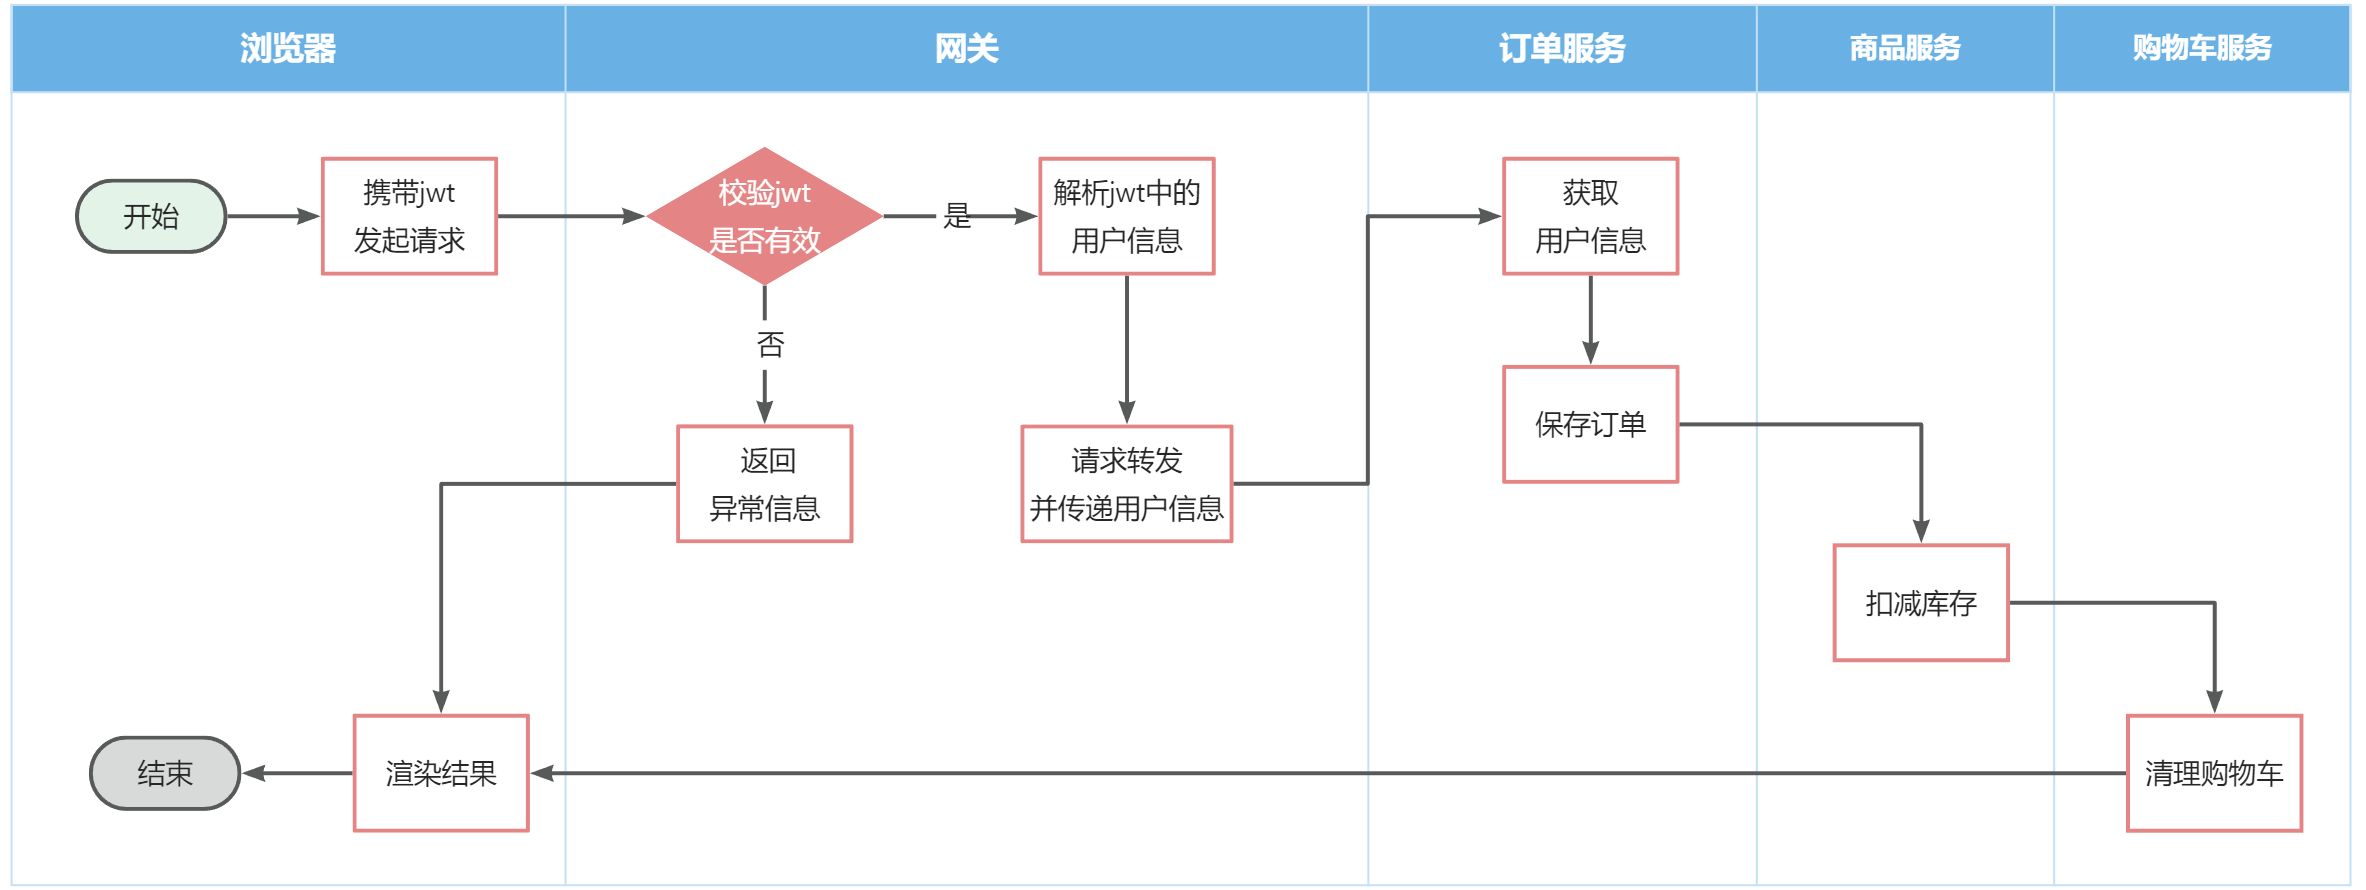
下单的过程中,需要调用商品服务扣减库存,扣减库存后需要清理用户的购物车,此时必须知道当前登录用户的身份。但是,订单调用购物车服务是没有传递用户信息的。购物车不知道当前的用户身份。
网关将请求路由到目标服务器时,目标微服务通过hm-common中的拦截器获取用户信息,如果我们要实现微服务之间的信息传递,就需要在微服务发起远程调用时将用户信息存入请求头中。
微服务发起远程调用是OpenFeign实现的,如何让OpenFeign发起的每一个请求都携带登录的用户信息?
OpenFeign提供了拦截器接口:feign.RequestInterceptor,Feign的请求拦截器:
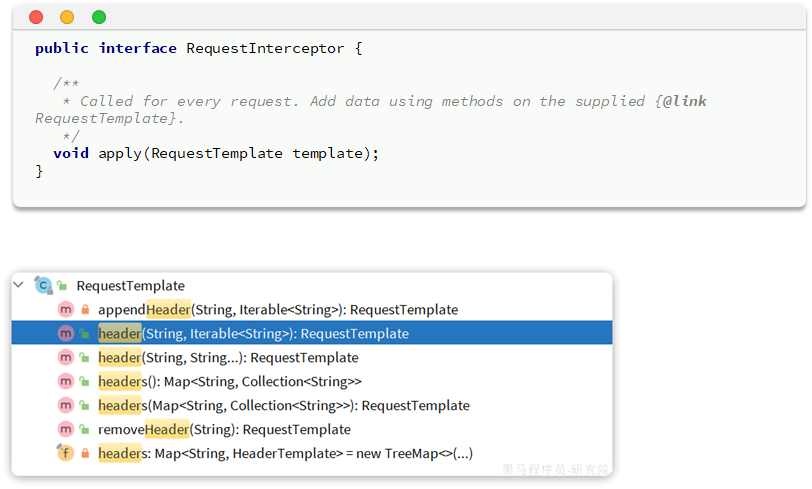
RequestInterceptor#apply(RequestTemplate)方法会在每一次请求发起时调用
如果要获取用户的信息,需要通过UserContext获取,这个类在hm-common中,我们的模块都引入了hm-common。
我们之前使用DefaultFeignConfig指定Feign的日志级别,此时还需要在该类中定义Feign的请求拦截器:
public class DefaultFeignConfig {
    @Bean
    public Logger.Level feignLoggerLevel(){
        return Logger.Level.FULL;
    }
    @Bean
    public RequestInterceptor requestInterceptor(){
        return requestTemplate -> {
            Long userId = UserContext.getUser();
            if (ObjectUtil.isNull(userId)){
                return;
            }
            requestTemplate.header("user-info",userId.toString());
        };
    }
}
必须在启动类上指定该配置才能生效
@EnableFeignClients(basePackages = "com.hmall.api.client",defaultConfiguration = DefaultFeignConfig.class)
因为我们的Feign客户端是微服务自身提供的,我们只能将这个类定义在各个需要发起远程调用的类中了。
标签:网关,return,请求,exchange,Gateway,第五章,http,public,localhost From: https://www.cnblogs.com/euneirophran/p/18073903