onnx模型导出
目录环境准备
# 环境依赖
torch                      1.13.0+cu116
torchvision                0.14.0+cu116
onnx                       1.13.1
onnxruntime-gpu            1.15.0
简介介绍
ONNX(Open Neural Network Exchange)是 Facebook 和微软在 2017 年共同发布的,用于标准描述计算图的一种格式。
ONNX 已经对接了多种深度学习框架和多种推理引擎。因此,ONNX 被当成了深度学习框架到推理引擎的桥梁,就像编译器的中间语言一样。目前官方支持加载ONNX模型并进行推理的深度学习框架有: Caffe2, PyTorch, MXNet,ML.NET,TensorRT
onnx定义了一种可扩展的计算图模型\一系列内置的运算(op)和标准数据类型.每一个计算流图都定义为由节点组成的列表,并构建有向无环图
torch.onnx.export
def export(model, args, f, export_params=True, verbose=False, training=TrainingMode.EVAL,
           input_names=None, output_names=None, operator_export_type=None,
           opset_version=None, _retain_param_name=None, do_constant_folding=True,
           example_outputs=None, strip_doc_string=None, dynamic_axes=None,
           keep_initializers_as_inputs=None, custom_opsets=None, enable_onnx_checker=None,
           use_external_data_format=None)
参数解析
| 可选 | 参数 | 说明 |
|---|---|---|
| 必填 | model | 需要转换的模型 |
| 必填 | args | 模型的输入,torch.Tensor |
| 必填 | f | onnx模型导出的路径 |
| 必填 | input_names | 按顺序定义onnx模型输入张量名称,不设置的话,自动分配 |
| 可选 | output_names | 按顺序定义onnx模型输出张量名称,不设置的话,自动分配 |
| 可选 | export_params=True | 模型中是否存储模型权重,onnx是用同一个文件表示记录模型结构和权重,默认为True |
| 可选 | opset_version | onnx 的 opset版本 |
| 可选 | dynamic_axes | 动态维度设置,指定输入输出张量的哪些维度是动态 |
| 可选 | verbose=False | 是否打印导出过程中的详细信息 |
dynamic_axes 为了追求效率,ONNX 默认所有参与运算的张量都是静态的(张量的形状不发生改变)。但在实际应用中,我们又希望模型的输入张量是动态的,尤其是本来就没有形状限制的全卷积模型。因此,我们需要显式地指明输入输出张量的哪几个维度的大小是可变的。
onnx导出步骤
1. 定义创建模型
2. 加载模型权重
3. 定义模型输入参数
4. 定义模型输入名称和输出名称 (输入节点-输出节点)
5. 使用torch.onnx.export()函数导出onnx
6. 自定义标签
单输入导出示例
定义并准备模型
import numpy as np
import cv2
import torch
import torch.nn as nn
import torchvision
import onnx
import onnxruntime

print(torch.__version__)
print(torchvision.__version__)
# 1.13.0+cu116
# 0.14.0+cu116

device = torch.device("cuda" if torch.cuda.is_available() else "cpu")

class SRNNnet(nn.Module):
    def __init__(self, upscale_factor=3):
        super().__init__()
        self.upscale_factor = upscale_factor
        self.img_upsampler = nn.Upsample(
            scale_factor=self.upscale_factor,
            mode='bicubic',
            align_corners=False)

        self.conv1 = nn.Conv2d(3,64,kernel_size=9,padding=4)
        self.conv2 = nn.Conv2d(64,32,kernel_size=1,padding=0)
        self.conv3 = nn.Conv2d(32,3,kernel_size=5,padding=2)

        self.relu = nn.ReLU()

    def forward(self, x):
        x = self.img_upsampler(x)
        out = self.relu(self.conv1(x))
        out = self.relu(self.conv2(out))
        out = self.conv3(out)
        return out
print(SRNNnet())
# ------------------------------------------------------------------------
SRNNnet(
  (img_upsampler): Upsample(scale_factor=3.0, mode=bicubic)
  (conv1): Conv2d(3, 64, kernel_size=(9, 9), stride=(1, 1), padding=(4, 4))
  (conv2): Conv2d(64, 32, kernel_size=(1, 1), stride=(1, 1))
  (conv3): Conv2d(32, 3, kernel_size=(5, 5), stride=(1, 1), padding=(2, 2))
  (relu): ReLU()
)
加载权重并测试
def print_state_dict(state_dict):
    print(len(state_dict))
    for layer in state_dict:
        print(layer, '\t', state_dict[layer].shape)


def init_torch_model():
    torch_model = SRNNnet(upscale_factor=3)

    state_dict = torch.load('assets/srcnn.pth')['state_dict']
    print_state_dict(state_dict)

    # Adapt the checkpoint
    for old_key in list(state_dict.keys()):
        new_key = '.'.join(old_key.split('.')[1:])
        state_dict[new_key] = state_dict.pop(old_key)

    torch_model.load_state_dict(state_dict)
    torch_model.eval()
    print("init_torch_model success")
    return torch_model


def test_mode():

    torch_model = init_torch_model()

    input_img = cv2.imread('assets/dog.jpg').astype(np.float32)
    input_img = cv2.resize(input_img,(256,256))
    # 固定图像大小为256x256
    # HWC to NCHW
    input_img = np.transpose(input_img, [2, 0, 1])
    input_img = np.expand_dims(input_img, 0)

    print(input_img.shape)
    torch_output = torch_model(torch.from_numpy(input_img)).detach().numpy()
    # NCHW to HWC
    torch_output = np.squeeze(torch_output, 0)
    torch_output = np.clip(torch_output, 0, 255)
    torch_output = np.transpose(torch_output, [1, 2, 0]).astype(np.uint8)
    cv2.imwrite("assets/out.jpg", torch_output)

test_mode()

# ------------------------------------------------------------
6
generator.conv1.weight   torch.Size([64, 3, 9, 9])
generator.conv1.bias     torch.Size([64])
generator.conv2.weight   torch.Size([32, 64, 1, 1])
generator.conv2.bias     torch.Size([32])
generator.conv3.weight   torch.Size([3, 32, 5, 5])
generator.conv3.bias     torch.Size([3])
init_torch_model success
(1, 3, 256, 256)
onnx导出和验证
onnx导出后,需要进行检查,
检查onnx模型节点,
如果onnx算子不支持转engine时,方便定位节点,找到不支持的算子进行修改
def mode_export_onnx():

    model=init_torch_model()
    x = torch.randn(1, 3, 256, 256)

    input_names = ["input"]        # 定义onnx 输入节点名称
    output_names = ["output"]      # 定义onnx 输出节点名称

    with torch.no_grad():
        torch.onnx.export(
            model,
            x,
            "assets/srcnn.onnx",
            input_names=input_names,
            output_names=output_names,
            opset_version=11
            )

    print("mode_export_onnx success")

def test_onnx():

    onnx_model = onnx.load("assets/srcnn.onnx")
    try:
        onnx.checker.check_model(onnx_model)
     	print(onnx.helper.printable_graph(onnx_model.graph))
        graph = onnx_model.graph
        print(graph.input)
        print(graph.output)
    except Exception:
        print("Model incorrect")
    else:
        print("Model correct")

# ----------------------------------------------------------------------0=--
[name: "input"
type {
  tensor_type {
    elem_type: 1
    shape {
      dim {
        dim_value: 1
      }
      dim {
        dim_value: 3
      }
      dim {
        dim_value: 256
      }
      dim {
        dim_value: 256
      }
    }
  }
}
]
[name: "output"
type {
  tensor_type {
    elem_type: 1
    shape {
      dim {
        dim_value: 1
      }
      dim {
        dim_value: 3
      }
      dim {
        dim_value: 768
      }
      dim {
        dim_value: 768
      }
    }
  }
}
]
onnx check_model success
Netron可视化
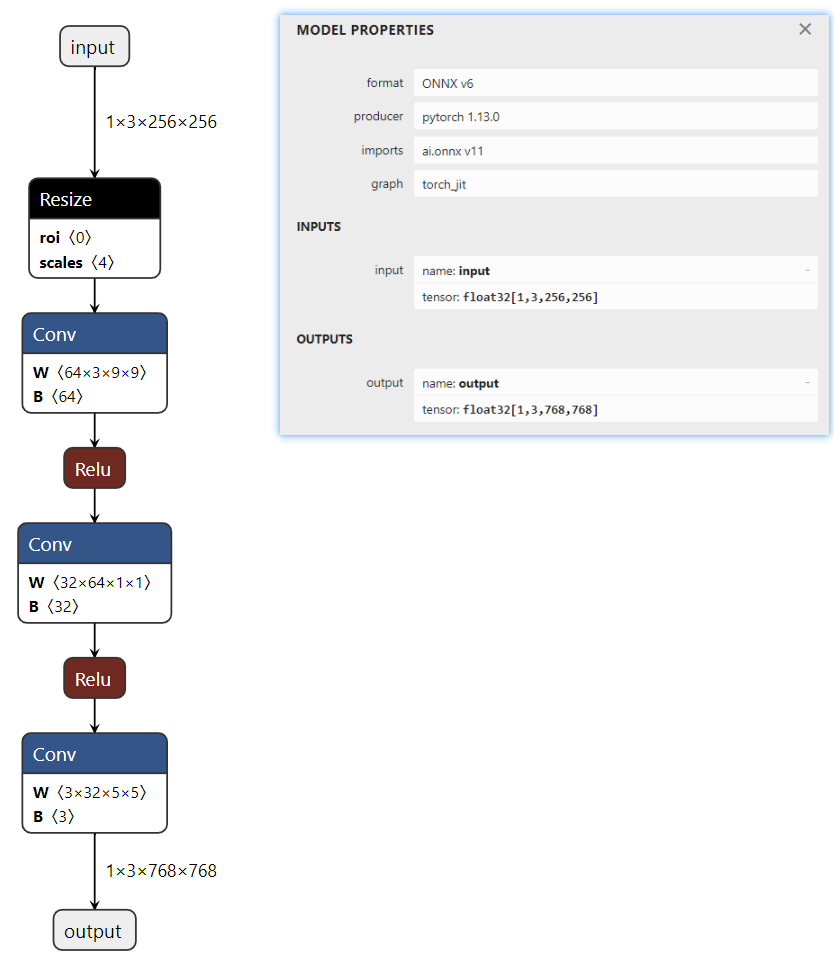
Netron 是一个开源的模型可视化工具,用于可视化深度学习模型的结构和参数。它可以加载和显示多种框架和模型格式,包括ONNX(Open Neural Network Exchange)、TensorFlow、Keras、Caffe、Core ML 等。通过图形界面,用户可以直观地查看模型的网络结构、层级关系、参数等信息
在线使用

之前定义的模型输入为 256x256
模型的输入 input=[1,3,256,256]
代码可视化
pip install netron
# 针对有网络模型,但还没有训练保存 .pth 文件的情况
import netron
import torch.onnx

netron.start(onnx_path)  # 输出网络结构

# http://localhost:8080
onnx模型推理
推理onnx模型,查看输出是否一致
def inter_onnx():
    input_img = cv2.imread('assets/dog.jpg').astype(np.float32)
    input_img = cv2.resize(input_img,(256,256))
    # HWC to NCHW
    input_img = np.transpose(input_img, [2, 0, 1])
    input_img = np.expand_dims(input_img, 0)

    ort_session = onnxruntime.InferenceSession("assets/srcnn.onnx",
                                               providers=['CPUExecutionProvider']
                                               )

    ort_inputs = {'input': input_img}
    ort_output = ort_session.run(['output'], ort_inputs)[0]

    ort_output = np.squeeze(ort_output, 0)
    ort_output = np.clip(ort_output, 0, 255)
    ort_output = np.transpose(ort_output, [1, 2, 0]).astype(np.uint8)
    cv2.imwrite("assets/out.jpg", ort_output)


mode_export_onnx()
test_onnx()
inter_onnx()
补充细节
添加自定义标签
model_onnx = onnx.load(f)  # load onnx model
onnx.checker.check_model(model_onnx)  # check onnx model

d={1:"person",2:"car",3:"dog"}
for k, v in d.items():
    meta = model_onnx.metadata_props.add()
    meta.key, meta.value = k, str(v)
onnx.save(model_onnx, f)
读取自定义标签
onnxmodel = onnx.load(f)  # load onnx model
meta = onnxmodel.get_modelmeta().custom_metadata_map
print( meta)
{1:"person",2:"car",3:"dog"}
导出注意
Pytorch模型在执行时是动态推导的,在运行之前并不知道整个推理的流程,ONNX模型是静态的,在推理时整个图已经构建完成。
动态的模型是数据边走边计算,静态的模型是在推理时先构建了一个图,然后数据从输入节点开始,按照拓扑关系一直流向输出节点。
这就导致在采用jit.trace(jit.script模式不讨论)方法进行模型导出时,遇到分支语句,Pytorch只会记录走过的路径,其他的路径将会直接被丢弃,
遇到while循环语句,Pytorch只会记录当前转模型的固定循环次数。换句话说,如果构成网络结构的某个循环次数是依赖与输入变量的,则循环的次数不可预期。
比如RNN网络,输入序列是不一样的,在解码的过程中,不知道要经过多少次循环,这时只能将RNN拆成一个个的小的单元,在外部根据实际情况对单元模块进行循环调用。
参考资料
知乎-OpenMMLab-模型部署入门教程(一):模型部署简介
知乎-OpenMMLab-模型部署入门教程(三):PyTorch 转 ONNX 详解
onnxsim
https://www.python100.com/html/89RQ4H08DH6S.html
https://www.python100.com/html/D0Q71A1IQ25I.html
标签:onnx,模型,torch,导出,output,input,model From: https://www.cnblogs.com/tian777/p/17995359