目录
推荐使用方法二
方法一:通过npm 安装插件
1,安装 npm install vue-print-nb --save
2,引入 安装好以后在main.js文件中引入
| 1 |
import Print from 'vue-print-nb'
|
Vue.use(Print); //注册
3,现在就可以使用了
| 1 2 3 4 5 |
div id="printTest" >
<p>明月照于山间</p>
<p>清风来于江上 </p>
</div>
<button v-print="'#printTest'">打印</button>
|
4.如需通过链接地址打印:window.location.href = airway_bill; airway_bill为链接地址。
5.如果内容打印不全,在打印操作时点击更多设置,然后设置缩放。
方法一使用时可能会遇到内容只有一页,但是点击打印会打印2张的情况。解决办法:查看定义的元素高度是否有被设置为100%,或html高度被设置成100%,如果有去掉即可。
方法二:手动下载插件到本地
插件地址:https://github.com/xyl66/vuePlugs_printjs
1.在src下新建文件夹plugs,将下载好的print.js放入plugs文件夹下
2.在main.js中引入
print.js 里的代码
| 1 2 3 4 5 6 7 8 9 10 11 12 13 14 15 16 17 18 19 20 21 22 23 24 25 26 27 28 29 30 31 32 33 34 35 36 37 38 39 40 41 42 43 44 45 46 47 48 49 50 51 52 53 54 55 56 57 58 59 60 61 62 63 64 65 66 67 68 69 70 71 72 73 74 75 76 77 78 79 80 81 82 83 84 85 86 87 88 89 90 91 92 93 94 95 96 97 98 99 100 101 102 103 104 105 106 107 108 109 110 111 112 113 114 115 116 117 118 119 120 121 122 123 124 125 126 127 |
//print.js 里的代码
// 打印类属性、方法定义
/* eslint-disable */
const Print =function(dom, options) {
if (!(this instanceof Print)) return new Print(dom, options);
this.options = this.extend({
'noPrint': '.no-print'
}, options);
if ((typeof dom) === "string") {
this.dom = document.querySelector(dom);
} else {
this.dom = dom;
}
this.init();
};
Print.prototype = {
init: function () {
var content = this.getStyle() + this.getHtml();
this.writeIframe(content);
},
extend: function (obj, obj2) {
for (var k in obj2) {
obj[k] = obj2[k];
}
return obj;
},
getStyle: function () {
var str = "",
styles = document.querySelectorAll('style,link');
for (var i = 0; i < styles.length; i++) {
str += styles[i].outerHTML;
}
str += "<style>" + (this.options.noPrint ? this.options.noPrint : '.no-print') + "{display:none;}</style>";
return str;
},
getHtml: function () {
var inputs = document.querySelectorAll('input');
var textareas = document.querySelectorAll('textarea');
var selects = document.querySelectorAll('select');
for (var k in inputs) {
if (inputs[k].type == "checkbox" || inputs[k].type == "radio") {
if (inputs[k].checked == true) {
inputs[k].setAttribute('checked', "checked")
} else {
inputs[k].removeAttribute('checked')
}
} else if (inputs[k].type == "text") {
inputs[k].setAttribute('value', inputs[k].value)
}
}
for (var k2 in textareas) {
if (textareas[k2].type == 'textarea') {
textareas[k2].innerHTML = textareas[k2].value
}
}
for (var k3 in selects) {
if (selects[k3].type == 'select-one') {
var child = selects[k3].children;
for (var i in child) {
if (child[i].tagName == 'OPTION') {
if (child[i].selected == true) {
child[i].setAttribute('selected', "selected")
} else {
child[i].removeAttribute('selected')
}
}
}
}
}
return this.dom.outerHTML;
},
writeIframe: function (content) {
var w, doc, iframe = document.createElement('iframe'),
f = document.body.appendChild(iframe);
iframe.id = "myIframe";
iframe.style = "position:absolute;width:0;height:0;top:-10px;left:-10px;";
w = f.contentWindow || f.contentDocument;
doc = f.contentDocument || f.contentWindow.document;
doc.open();
doc.write(content);
doc.close();
this.toPrint(w);
setTimeout(function () {
document.body.removeChild(iframe)
}, 100)
},
toPrint: function (frameWindow) {
try {
setTimeout(function () {
frameWindow.focus();
try {
if (!frameWindow.document.execCommand('print', false, null)) {
frameWindow.print();
}
} catch (e) {
frameWindow.print();
}
frameWindow.close();
}, 10);
} catch (err) {
console.log('err', err);
}
}
};
const MyPlugin = {}
MyPlugin.install = function (Vue, options) {
Vue.prototype.$print = Print
}
export default MyPlugin
|
main.js里引入
| 1 2 |
import Print from './plugs/print'
Vue.use(Print)
|
使用
| 1 2 3 4 5 6 7 8 9 10 11 12 13 14 15 16 17 18 19 20 21 22 23 24 25 26 27 28 29 |
<template>
<div>
<!-- 点击按钮打印 -->
<el-button type="primary" @click="printDemo">点击打印</el-button>
<!-- <div ref="print">
<h1>这里是打印内容</h1>
</div>-->
<img class="printsrcclass" ref='print' :src="printsrc"/>
</div>
</template>
<script>
export default {
data(){
return {}
},
methods: {
// 点击打印
printDemo(){
setTimeout(() => {
this.$print(this.$refs.print)
}, 100);
}
},
mounted() {
}
}
|
4.注意事项 需使用ref获取dom节点,若直接通过id或class获取则webpack打包部署后打印内容为空
5.指定不打印区域
方法1. 添加no-print样式类
不要打印我
方法2. 自定义类名
不要打印我
| 1 |
this. print (this . print(this. print(this.refs.print,{‘no-print':‘.do-not-print-me-xxx'}) // 使用
|
如果图片出不来 打印出不来 等情况
参考下面代码
| 1 2 3 4 5 6 7 8 9 10 11 12 |
const res2 = await fnApi(orderId);
let myBlob = new Blob([res2.data], { type: 'image/jpeg'});
var href = URL.createObjectURL(myBlob); // 创建对象超链接
// 此时拿到图片地址 href,后面直接使用该地址即可
let img = new Image();
img.src = href;
img.onload = () => {
this.printsrc = href;
this.$nextTick(() => {
this.mypirntFN();
})
}
|
接口别忘了加类型
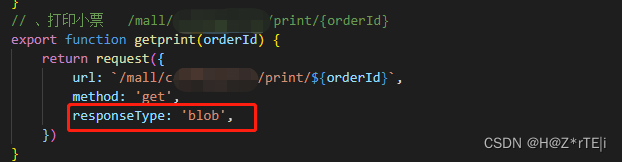
Ps:
一,可能遇到的问题及解决方案
①图片占位置 ---------让它脱离文档流( position: absolute; 不要用fixed 这样内容多的时候只打印第一页)
②页面不想展示打印内容 只打印;------- 给它 z-index:-1 (display:none 的话打印内容也没有)
目前解决不了 跳过打印预览直接打印功能
总结
到此这篇关于vue打印浏览器页面功能的两种实现方法的文章就介绍到这了,更多相关vue打印浏览器页面功能内容请搜索脚本之家以前的文章或继续浏览下面的相关文章希望大家以后多多支持脚本之家!
标签:function,inputs,vue,浏览器,打印,var,print,document,页面 From: https://www.cnblogs.com/yelanggu/p/17790652.html