【一】表单参数
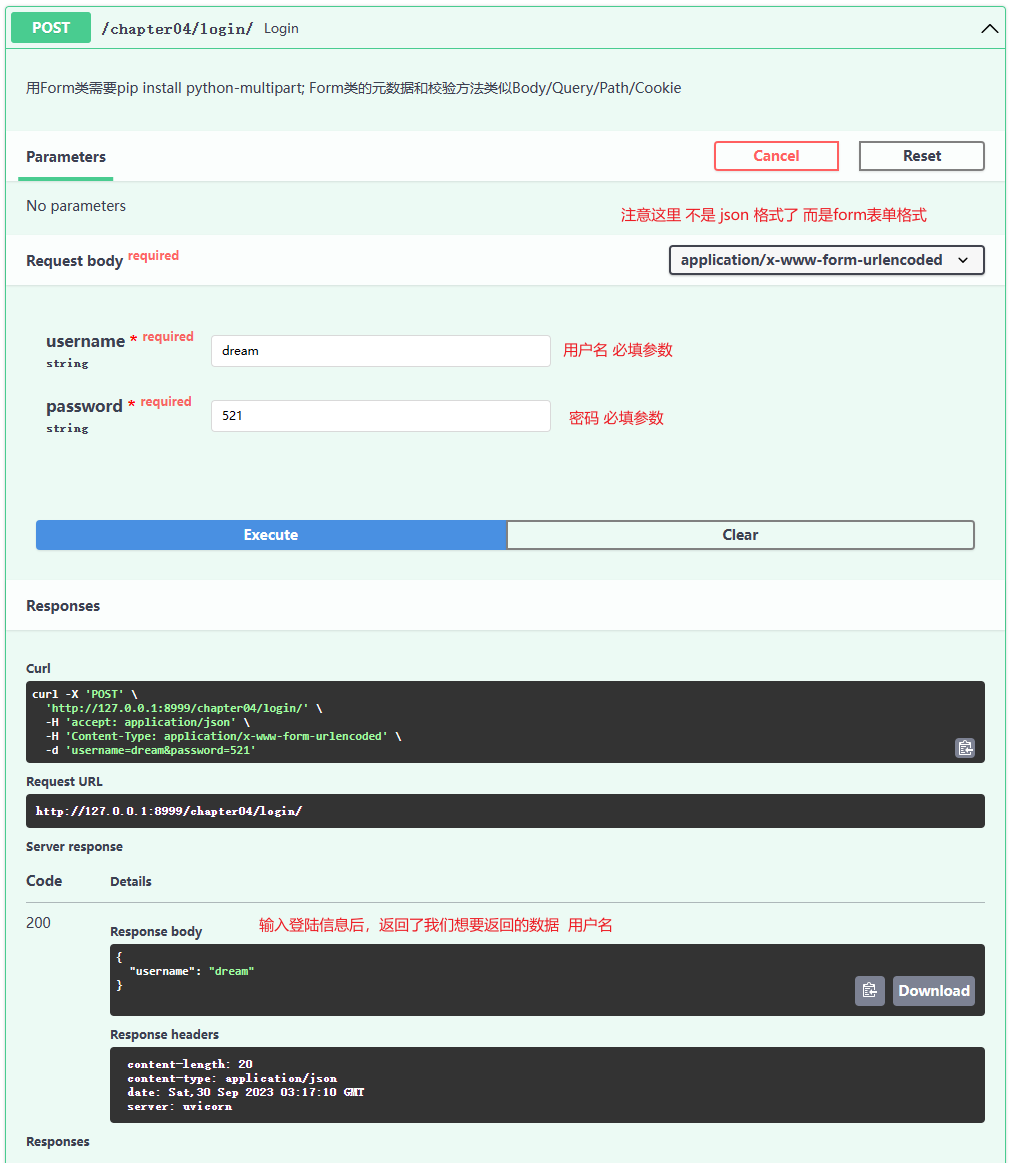
【1】定义视图
from fastapi import APIRouter, status, Form
from pydantic import BaseModel, EmailStr
from typing import Optional, Union, List

app04 = APIRouter()

### 表单数据处理
@app04.post("/login/")
async def login(
        # username 用户名  str 字符串类型 必填 通过表单验证 下同
        username: str = Form(...), password: str = Form(...)):  # 定义表单参数
    """用Form类需要pip install python-multipart;
    Form类的元数据和校验方法类似Body/Query/Path/Cookie"""
    return {"username": username}
【2】发起请求
【二】单文件/多文件上传
【1】定义视图
from fastapi import APIRouter, status, Form, File, UploadFile
from pydantic import BaseModel, EmailStr
from typing import Optional, Union, List

app04 = APIRouter()


"""Request Files 单文件、多文件上传及参数详解"""


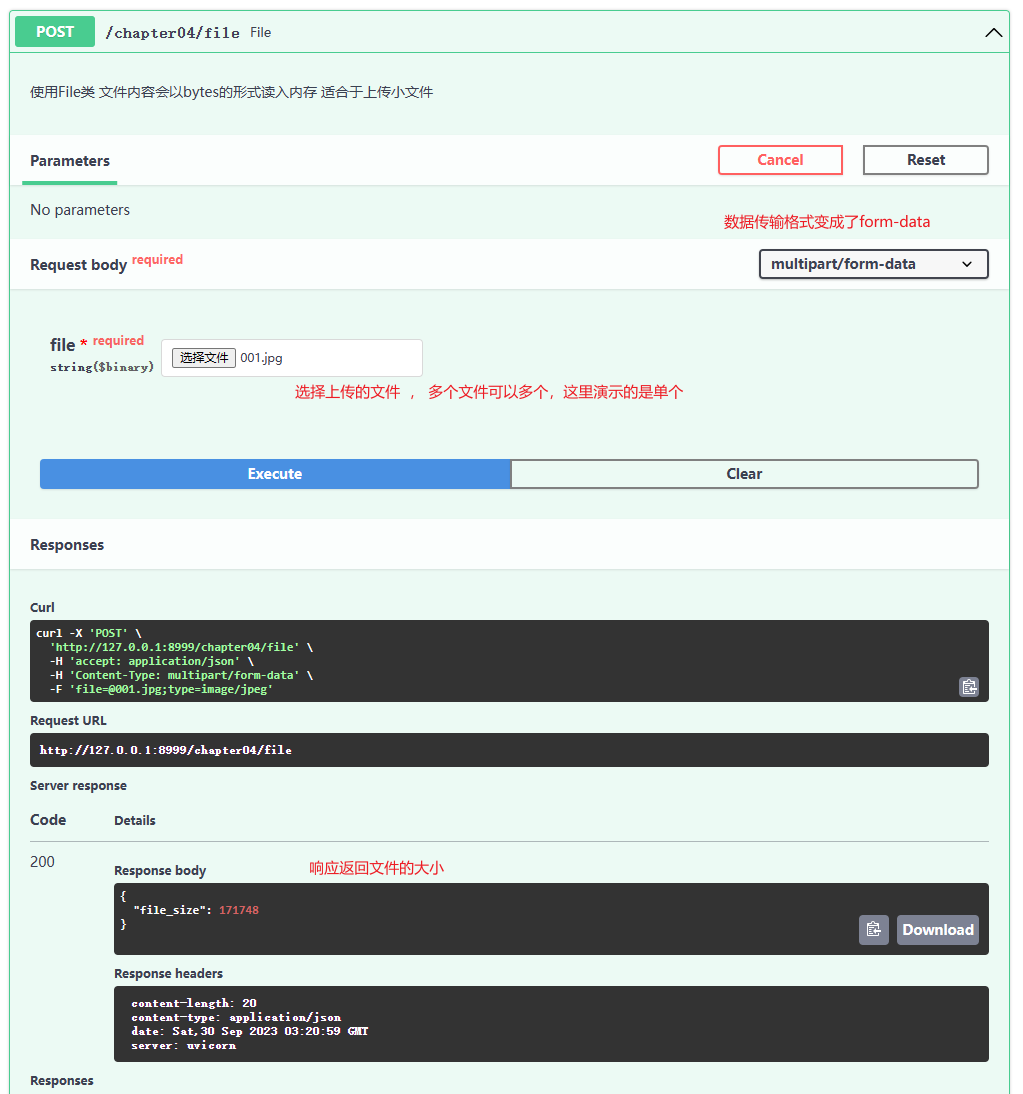
@app04.post("/file")
async def file_(file: bytes = File(...)):  # 如果要上传多个文件 files: List[bytes] = File(...)
    """使用File类 文件内容会以bytes的形式读入内存 适合于上传小文件"""
    return {"file_size": len(file)}


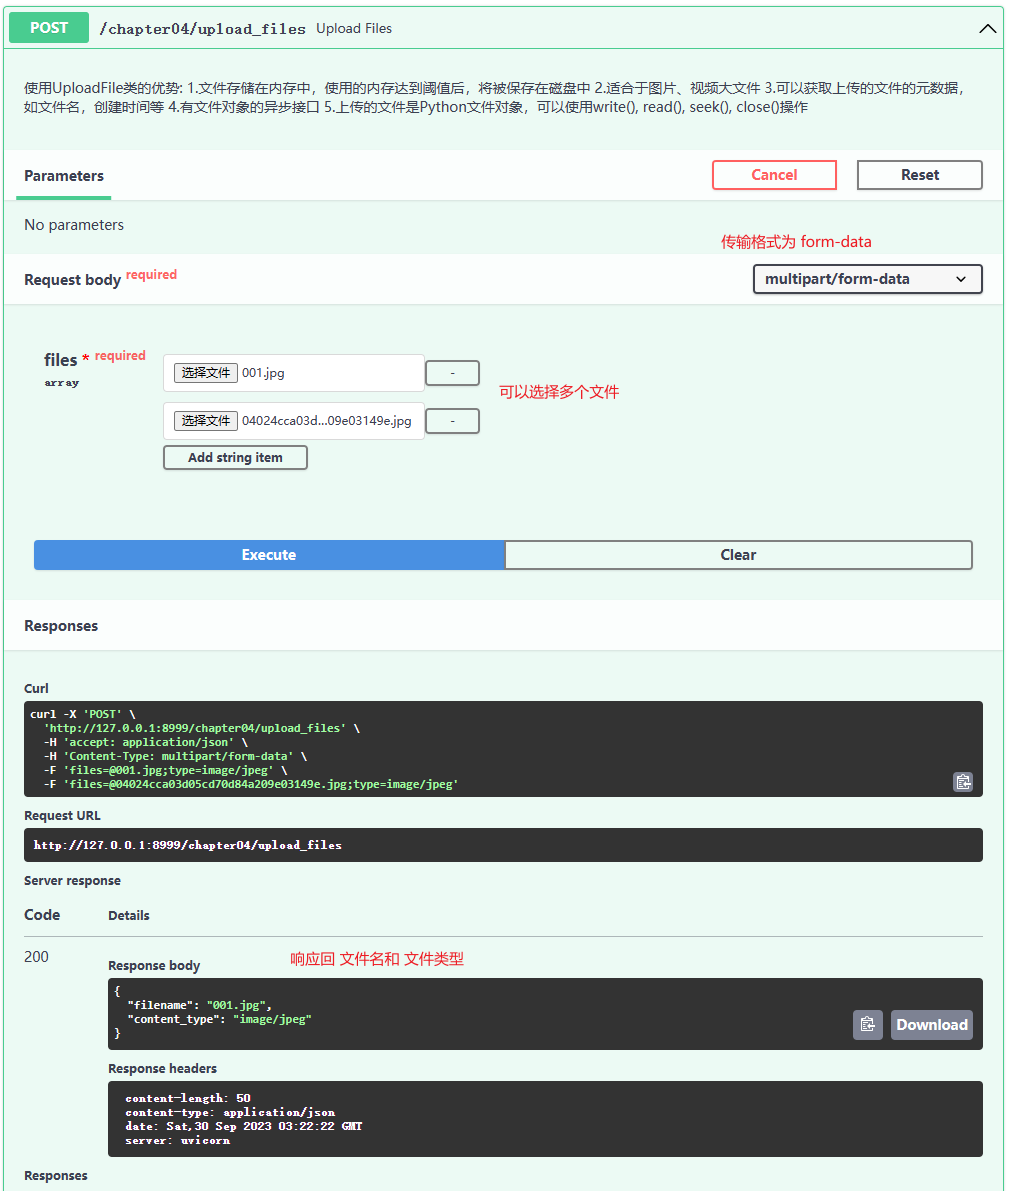
@app04.post("/upload_files")
async def upload_files(files: List[UploadFile] = File(...)):  # 如果要上传单个文件 file: UploadFile = File(...)
    """
    使用UploadFile类的优势:
    1.文件存储在内存中,使用的内存达到阈值后,将被保存在磁盘中
    2.适合于图片、视频大文件
    3.可以获取上传的文件的元数据,如文件名,创建时间等
    4.有文件对象的异步接口
    5.上传的文件是Python文件对象,可以使用write(), read(), seek(), close()操作
    """
    for file in files:
        contents = await file.read()
        print(contents)
    return {"filename": files[0].filename, "content_type": files[0].content_type}
【二】发起请求
- 小文件上传 / file
- 使用 uploadfile
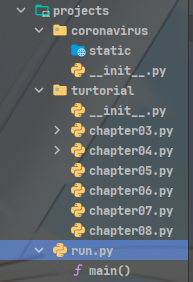
【三】静态文件配置
projects\run.py
from fastapi import FastAPI
from fastapi.staticfiles import StaticFiles
import uvicorn
from turtorial import app03, app04, app05, app06, app07, app08

app = FastAPI()

# mount表示将某个目录下一个完全独立的应用挂载过来,这个不会在API交互文档中显示
# .mount()不要在分路由APIRouter().mount()调用,模板会报错
# path 访问路由
# app 挂载文件对象 StaticFiles from fastapi.staticfiles import StaticFiles
# directory 指定具体的文件目录
# name 别名
app.mount(path='/static', app=StaticFiles(directory='./coronavirus/static'), name='static')

# 将其他app添加到主路由下
# app03 : app名字
# prefix :自定义路由地址
# tags :自定义路由标题 (默认是default)

app.include_router(app03, prefix='/chapter03', tags=['第三章 请求参数和验证'])
app.include_router(app04, prefix='/chapter04', tags=['第四章 响应处理和FastAPI配置'])
app.include_router(app05, prefix='/chapter05', tags=['第五章 FastAPI的依赖注入系统'])
app.include_router(app06, prefix='/chapter06', tags=['第六章 安全、认证和授权'])
app.include_router(app07, prefix='/chapter07', tags=['第七章 FastAPI的数据库操作和多应用的目录结构设计'])
app.include_router(app08, prefix='/chapter08', tags=['第八章 中间件、CORS、后台任务、测试用例'])


def main():
    # run:app : 启动文件:app名字
    # host :IP
    # port : 端口
    # reload : 自动重启
    # debug :debug 模式
    # worker : 开启的进程数
    uvicorn.run('run:app', host='127.0.0.1', port=8999, reload=True, debug=True, workers=1)


if __name__ == '__main__':
    main()
【四】路径操作配置
【1】定义视图
from fastapi import APIRouter, status, Form, File, UploadFile
from pydantic import BaseModel, EmailStr
from typing import Optional, Union, List

app04 = APIRouter()

# 定义用户响应信息类
class UserOut(UserBase):
    # 返回信息 不需要将用户的密码作为响应数据返回
    ...

"""【见run.py】FastAPI项目的静态文件配置"""

"""Path Operation Configuration 路径操作配置"""


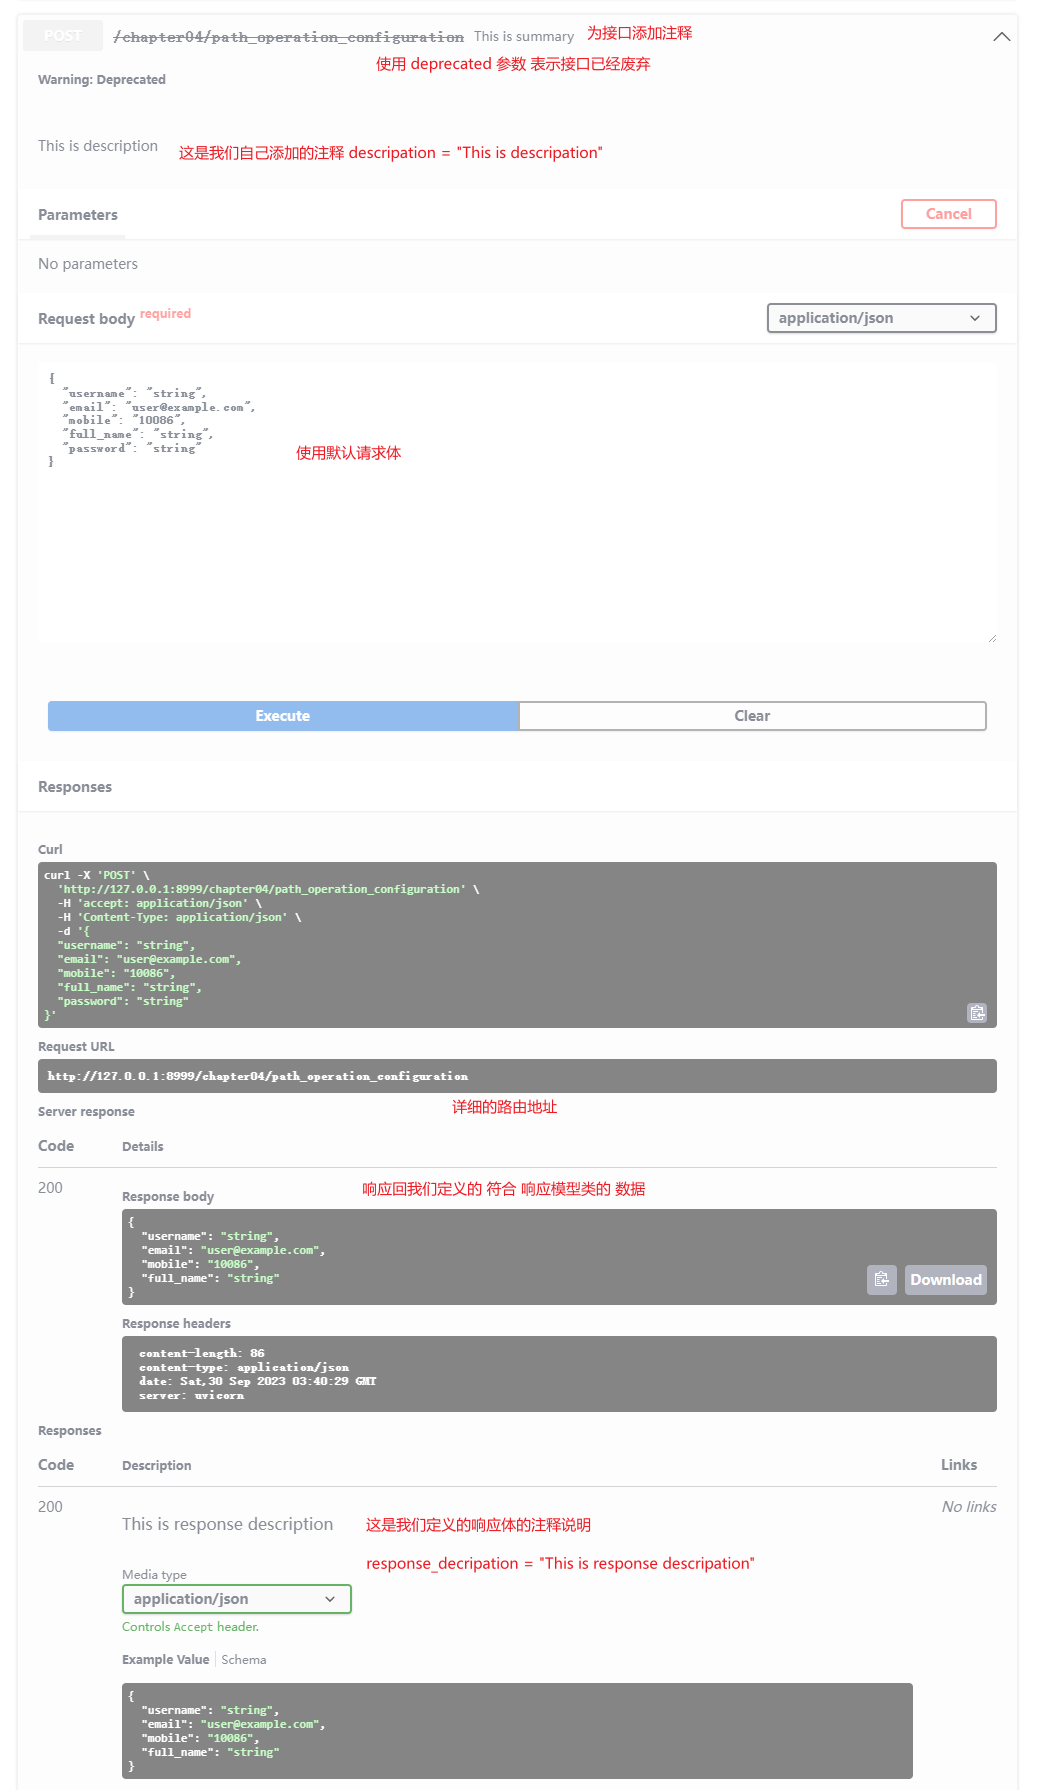
@app04.post(
    "/path_operation_configuration",
    response_model=UserOut,
    # tags=["Path", "Operation", "Configuration"],
    summary="This is summary",
    description="This is description",
    response_description="This is response description",
    deprecated=True,
    status_code=status.HTTP_200_OK
)
async def path_operation_configuration(user: UserIn):
    """
    Path Operation Configuration 路径操作配置
    :param user: 用户信息
    :return: 返回结果
    """
    return user.dict()
【2】发起请求
- 使用 tags 时
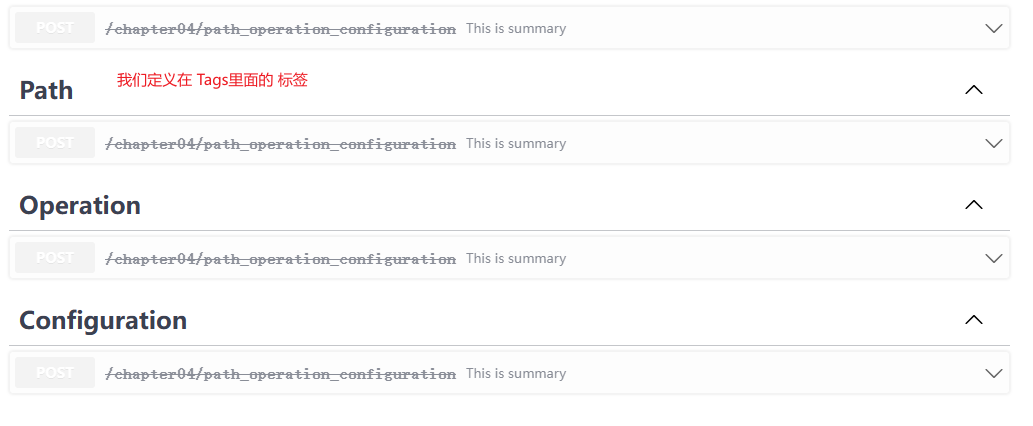
- 不使用 tags时 不会有这些参数
【五】FastAPI 应用的常见配置项
【1】配置参数
projects\run.py
from fastapi import FastAPI
from fastapi.staticfiles import StaticFiles
import uvicorn
from turtorial import app03, app04, app05, app06, app07, app08

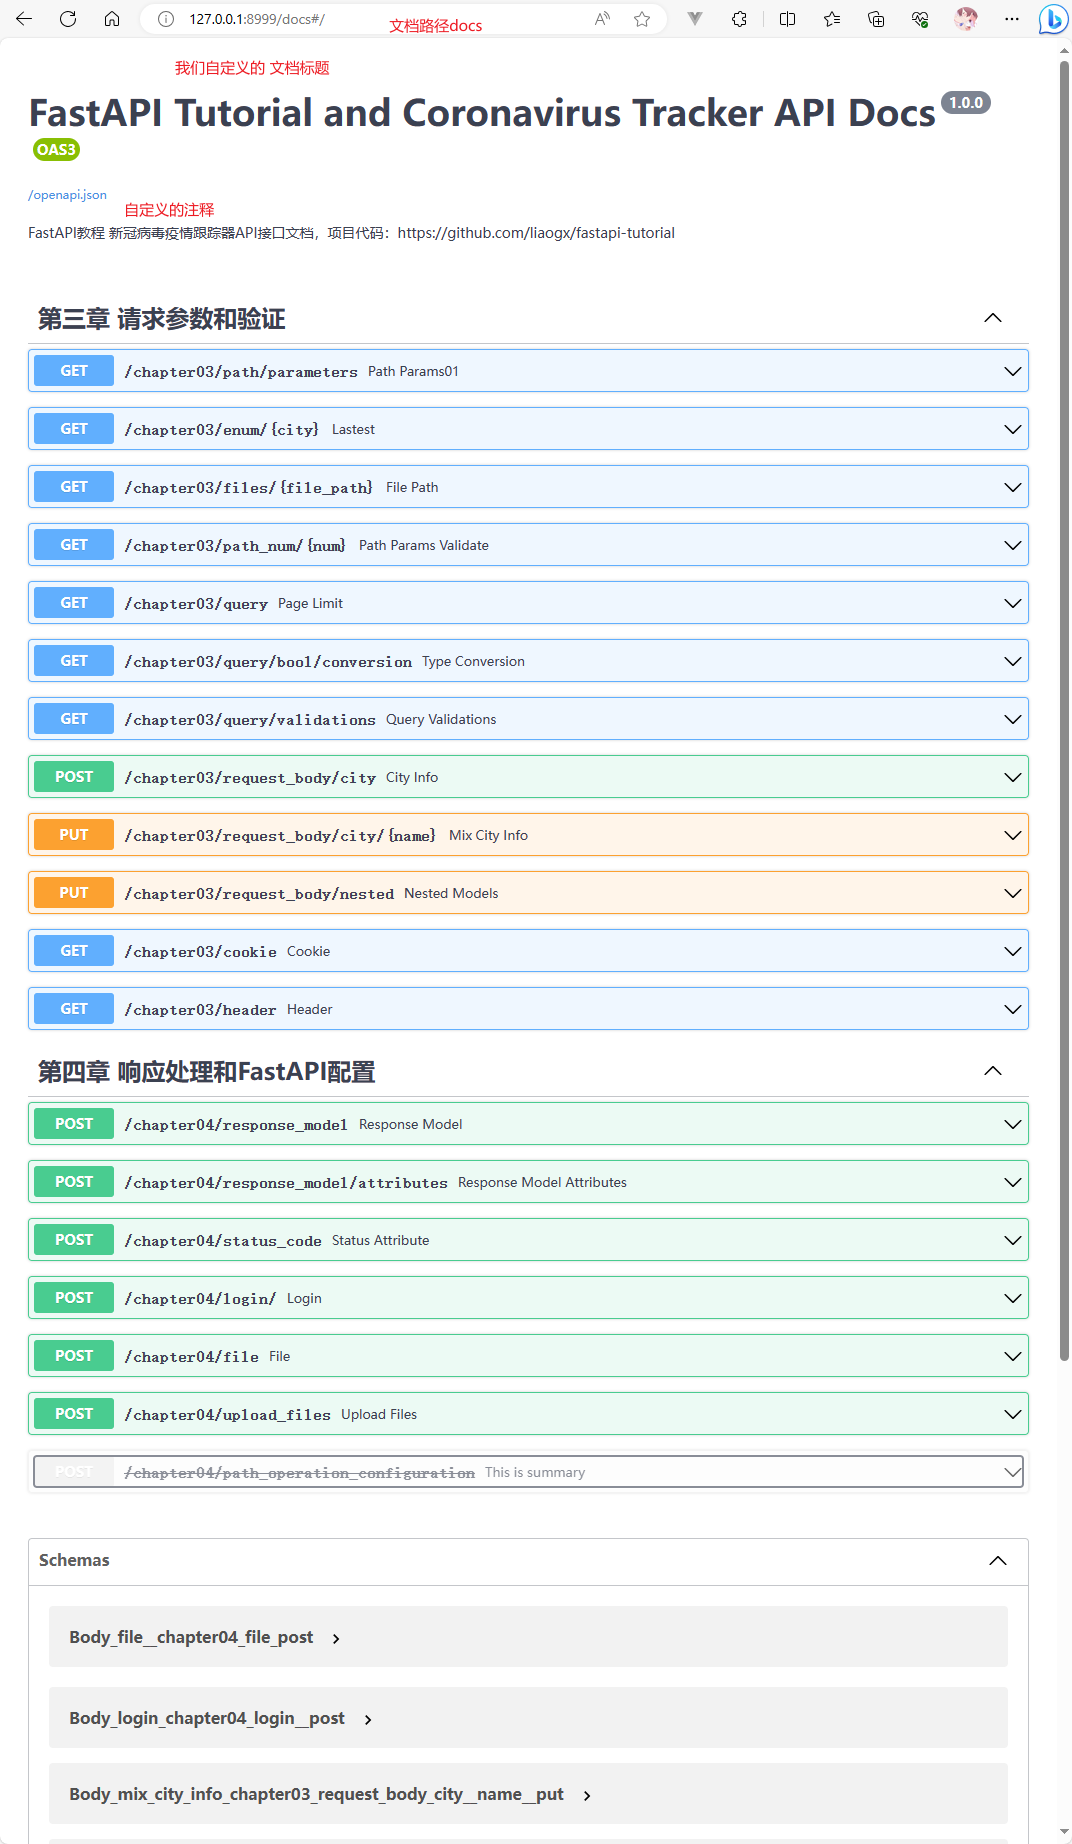
app = FastAPI(
    title='FastAPI Tutorial and Coronavirus Tracker API Docs',
    description='FastAPI教程 新冠病毒疫情跟踪器API接口文档,项目代码:https://github.com/liaogx/fastapi-tutorial',
    version='1.0.0',
    docs_url='/docs',
    redoc_url='/redocs',
)

# mount表示将某个目录下一个完全独立的应用挂载过来,这个不会在API交互文档中显示
# .mount()不要在分路由APIRouter().mount()调用,模板会报错
# path 访问路由
# app 挂载文件对象 StaticFiles from fastapi.staticfiles import StaticFiles
# directory 指定具体的文件目录
# name 别名
app.mount(path='/static', app=StaticFiles(directory='./coronavirus/static'), name='static')

# 将其他app添加到主路由下
# app03 : app名字
# prefix :自定义路由地址
# tags :自定义路由标题 (默认是default)

app.include_router(app03, prefix='/chapter03', tags=['第三章 请求参数和验证'])
app.include_router(app04, prefix='/chapter04', tags=['第四章 响应处理和FastAPI配置'])
app.include_router(app05, prefix='/chapter05', tags=['第五章 FastAPI的依赖注入系统'])
app.include_router(app06, prefix='/chapter06', tags=['第六章 安全、认证和授权'])
app.include_router(app07, prefix='/chapter07', tags=['第七章 FastAPI的数据库操作和多应用的目录结构设计'])
app.include_router(app08, prefix='/chapter08', tags=['第八章 中间件、CORS、后台任务、测试用例'])


def main():
    # run:app : 启动文件:app名字
    # host :IP
    # port : 端口
    # reload : 自动重启
    # debug :debug 模式
    # worker : 开启的进程数
    uvicorn.run('run:app', host='127.0.0.1', port=8999, reload=True, debug=True, workers=1)


if __name__ == '__main__':
    main()
【2】页面效果
【六】Fastapi 异常处理
【1】定义视图
from fastapi import APIRouter, status, Form, File, UploadFile, HTTPException
from pydantic import BaseModel, EmailStr
from typing import Optional, Union, List

app04 = APIRouter()


"""Handling Errors 错误处理"""

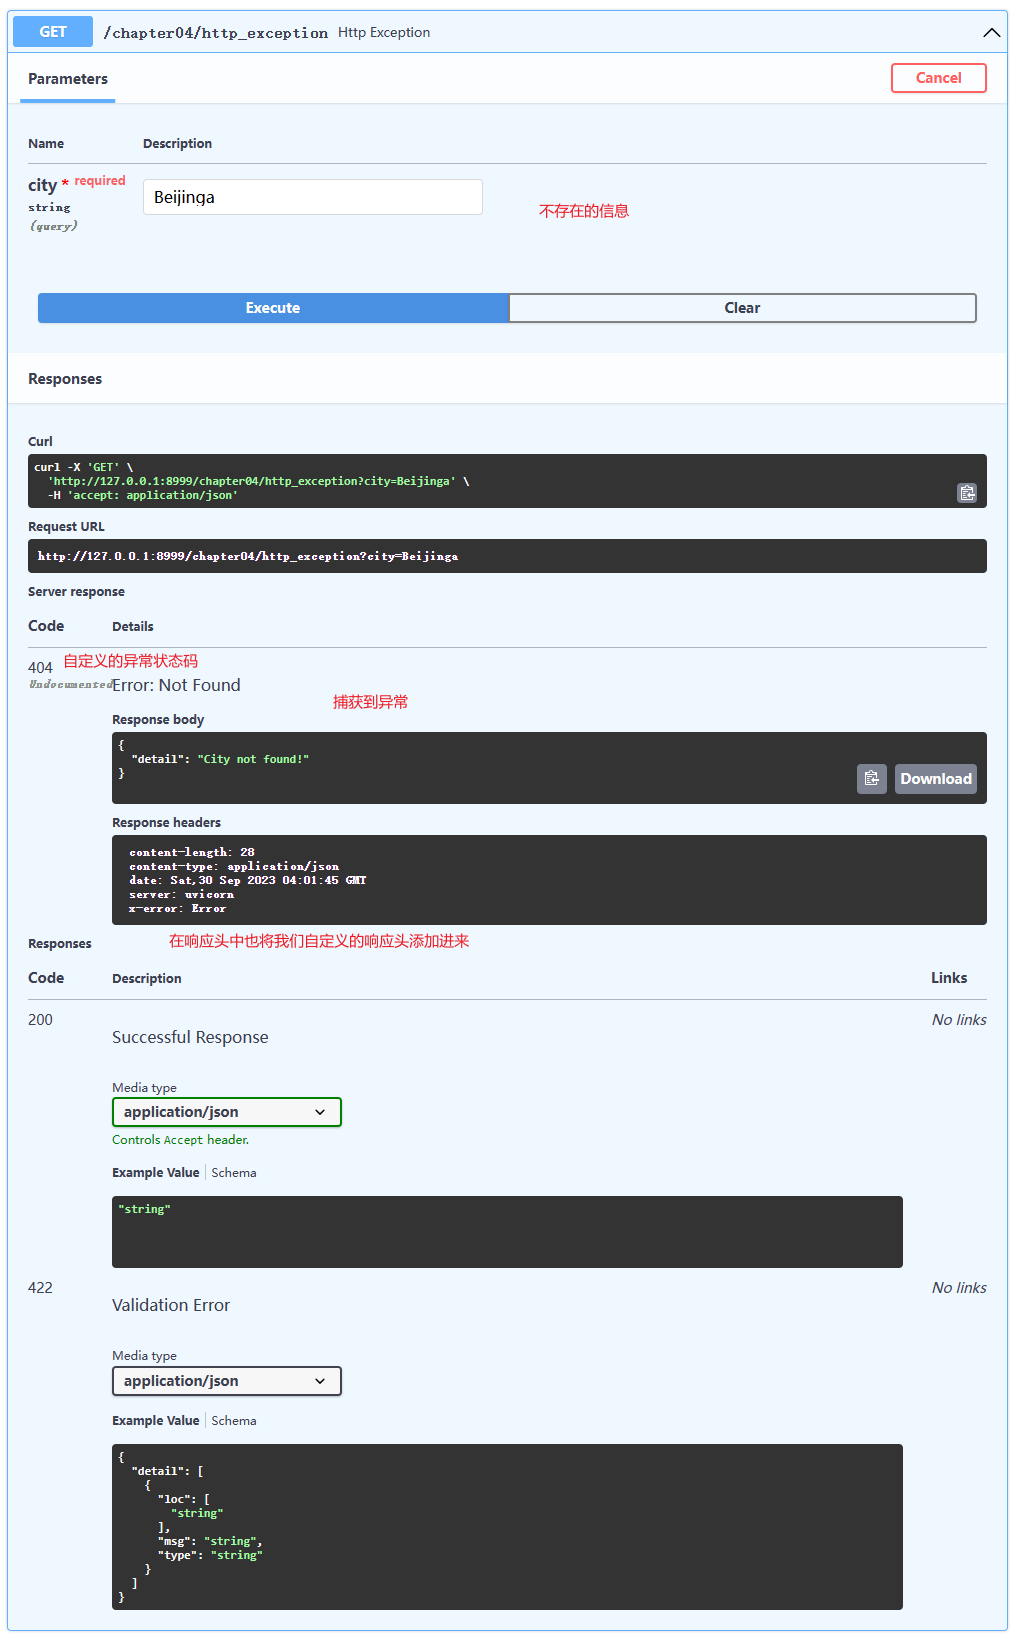
@app04.get("/http_exception")
async def http_exception(city: str):
    if city != "Beijing":
        raise HTTPException(
            # 状态码
            status_code=404,
            # 错误的详细信息
            detail="City not found!",
            # 响应的 响应头
            headers={"X-Error": "Error"})
    return {"city": city}

# 重写错误异常方法
@app04.get("/http_exception/{city_id}")
async def override_http_exception(city_id: int):
    if city_id == 1:
        raise HTTPException(
            # 同上
            status_code=418,
            detail="Nope! I don't like 1.")
    return {"city_id": city_id}
【2】发起请求
- 正常访问
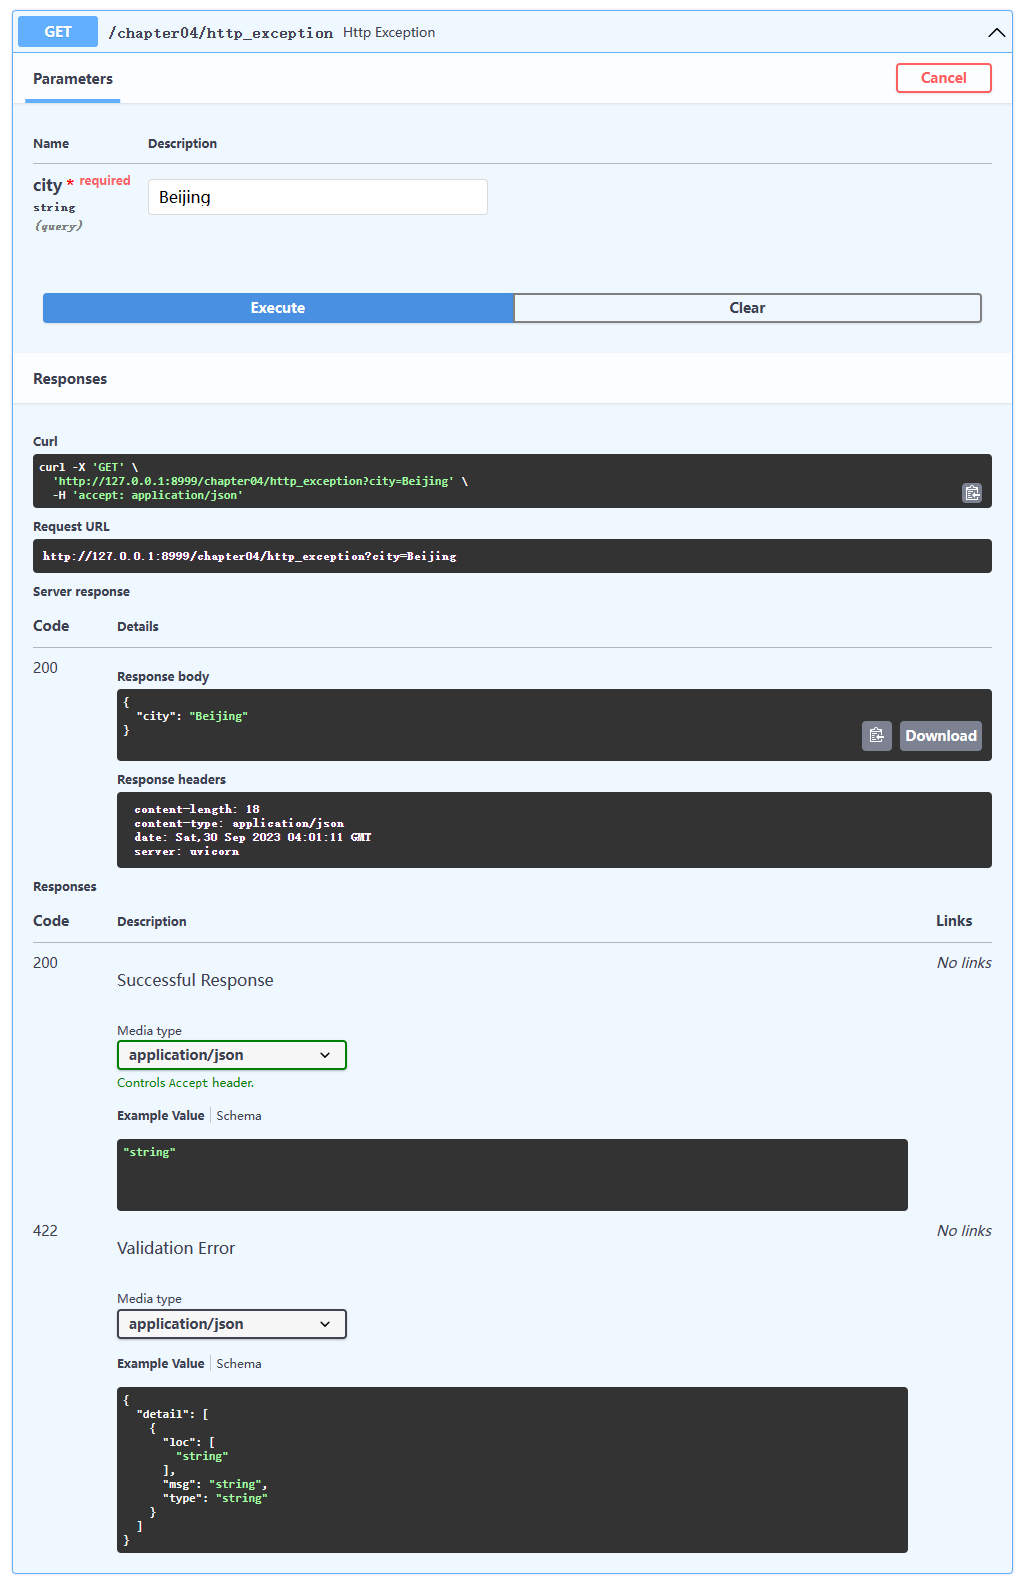
- 主动抛异常
【七】自定义全局异常处理
【1】定义视图函数
projects\run.py
from fastapi import FastAPI
from fastapi.staticfiles import StaticFiles
import uvicorn
from turtorial import app03, app04, app05, app06, app07, app08

from fastapi.exceptions import RequestValidationError
from fastapi.responses import PlainTextResponse
from starlette.exceptions import HTTPException as StarletteHTTPException

app = FastAPI(
    title='FastAPI Tutorial and Coronavirus Tracker API Docs',
    description='FastAPI教程 新冠病毒疫情跟踪器API接口文档,项目代码:https://github.com/liaogx/fastapi-tutorial',
    version='1.0.0',
    docs_url='/docs',
    redoc_url='/redocs',
)

# mount表示将某个目录下一个完全独立的应用挂载过来,这个不会在API交互文档中显示
# .mount()不要在分路由APIRouter().mount()调用,模板会报错
# path 访问路由
# app 挂载文件对象 StaticFiles from fastapi.staticfiles import StaticFiles
# directory 指定具体的文件目录
# name 别名
app.mount(path='/static', app=StaticFiles(directory='./coronavirus/static'), name='static')


# 重写HTTPException异常处理器
@app.exception_handler(StarletteHTTPException)
async def http_exception_handler(request, exc):
    """
    :param request: 这个参数不能省
    :param exc:
    :return:
    """
    return PlainTextResponse(str(exc.detail), status_code=exc.status_code)

# 重写请求验证异常处理器
@app.exception_handler(RequestValidationError)
async def validation_exception_handler(request, exc):
    """
    :param request: 这个参数不能省
    :param exc:
    :return:
    """
    return PlainTextResponse(str(exc), status_code=400)


# 将其他app添加到主路由下
# app03 : app名字
# prefix :自定义路由地址
# tags :自定义路由标题 (默认是default)


app.include_router(app03, prefix='/chapter03', tags=['第三章 请求参数和验证'])
app.include_router(app04, prefix='/chapter04', tags=['第四章 响应处理和FastAPI配置'])
app.include_router(app05, prefix='/chapter05', tags=['第五章 FastAPI的依赖注入系统'])
app.include_router(app06, prefix='/chapter06', tags=['第六章 安全、认证和授权'])
app.include_router(app07, prefix='/chapter07', tags=['第七章 FastAPI的数据库操作和多应用的目录结构设计'])
app.include_router(app08, prefix='/chapter08', tags=['第八章 中间件、CORS、后台任务、测试用例'])


def main():
    # run:app : 启动文件:app名字
    # host :IP
    # port : 端口
    # reload : 自动重启
    # debug :debug 模式
    # worker : 开启的进程数
    uvicorn.run('run:app', host='127.0.0.1', port=8999, reload=True, debug=True, workers=1)


if __name__ == '__main__':
    main()
- ``
from fastapi import APIRouter, status, Form, File, UploadFile, HTTPException
from pydantic import BaseModel, EmailStr
from typing import Optional, Union, List

app04 = APIRouter()


@app04.get("/http_exception/{city_id}")
async def override_http_exception(city_id: int):
    if city_id == 1:
        raise HTTPException(
            # 同上
            status_code=418,
            detail="Nope! I don't like 1.")
    return {"city_id": city_id}
【2】发起请求
- 正常访问
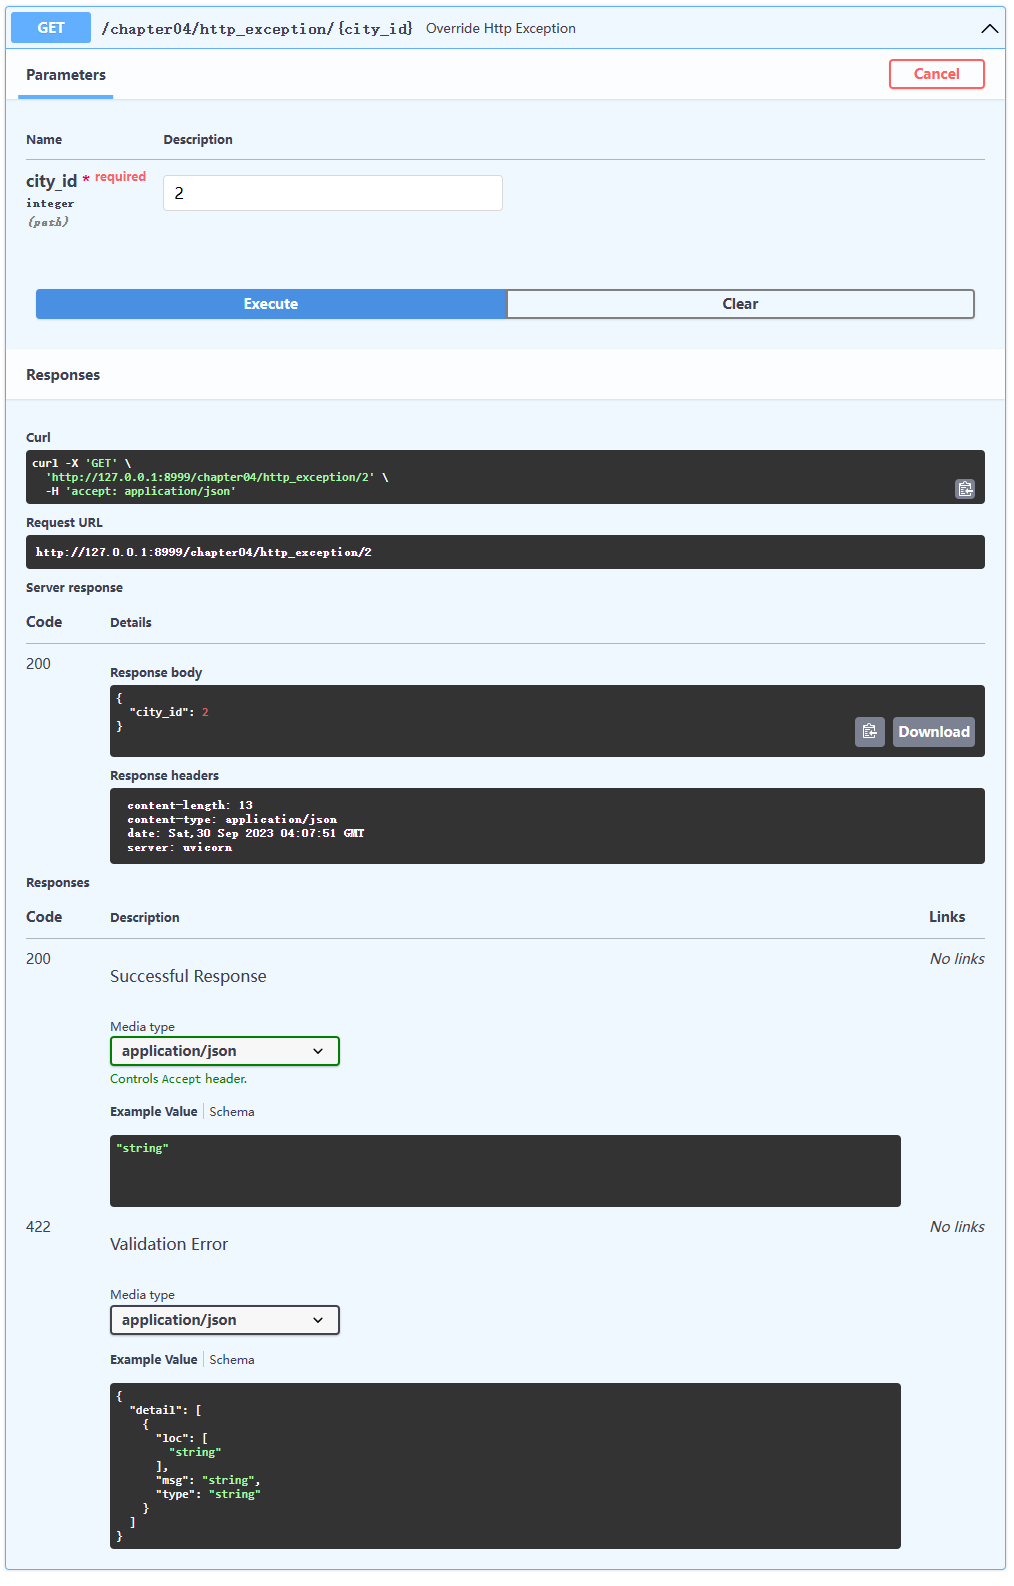
- 主动抛出异常
- 视图函数的错误异常
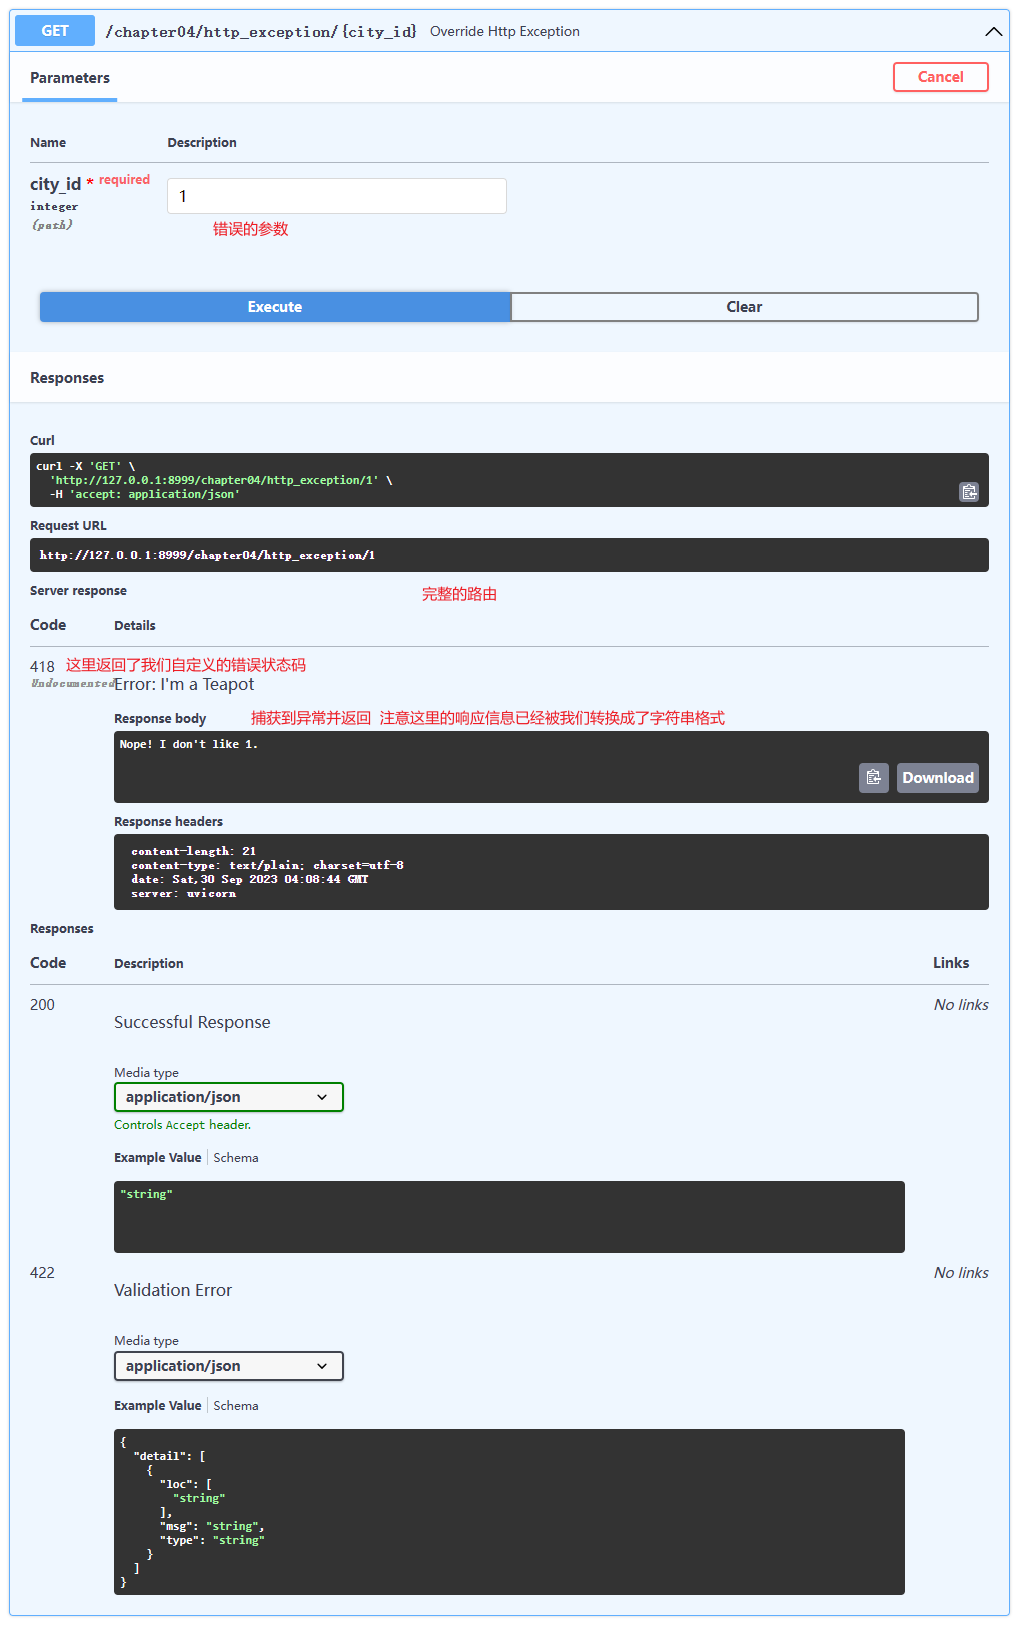
-
全局的异常处理
-
在校验布尔类型的参数时
-
不启用全局异常处理

- 启用我们自定义的全局异常处理
- 我们自定义的处理返回数据格式是文本,所以在这里返回的就是文本格式了

-