1. PO 设计模式简介
什么是 PO 模式?
PO(PageObject)设计模式将某个页面的所有元素对象定位和对元素对象的操作封装成一个 Page 类,并以页面为单位来写测试用例,实现页面对象和测试用例的分离。
PO 模式的设计思想与面向对象相似,能让测试代码变得可读性更好,可维护性高,复用性高。

PO 模式可以把一个页面分为三个层级:对象库层、操作层、业务层。
-
对象库层:封装定位元素的方法。
-
操作层:封装对元素的操作。
-
业务层:将一个或多个操作组合起来完成一个业务功能。
一条测试用例可能需要多个步骤操作元素,将每一个步骤单独封装成一个方法,在执行测试用例时调用封装好的方法进行操作。
PO 模式的优点
-
通过页面分层,将测试代码和被测试页面的页面元素及其操作方法进行分离,降低代码冗余。
-
页面对象与用例分离,业务代码与测试代码分离,降低耦合性。
-
不同层级分属不同用途,降低维护成本。
-
代码可阅读性增强,整体流程更为清晰。
2. 工程结构简介
工程结构
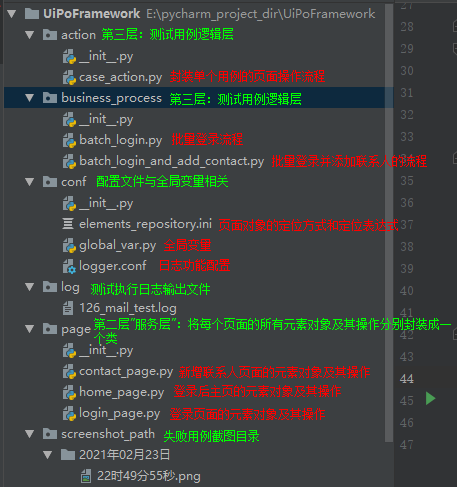
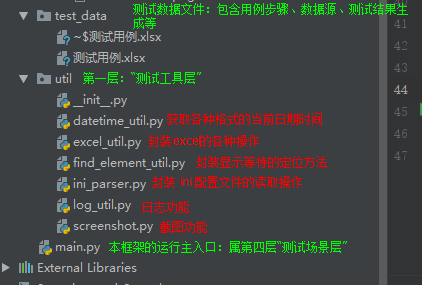
整个测试框架分为四层,通过分层的方式,测试代码更容易理解,维护起来较为方便。
第一层是“测试工具层”:
- util 包:用于实现测试过程中调用的工具类方法,例如读取配置文件、页面元素的操作方法、操作Excel文件等。
- conf 包:配置文件及全局变量。
- test_data 目录:Excel 数据文件,包含测试数据输入、测试结果输出。
- log 目录:日志输出文件。
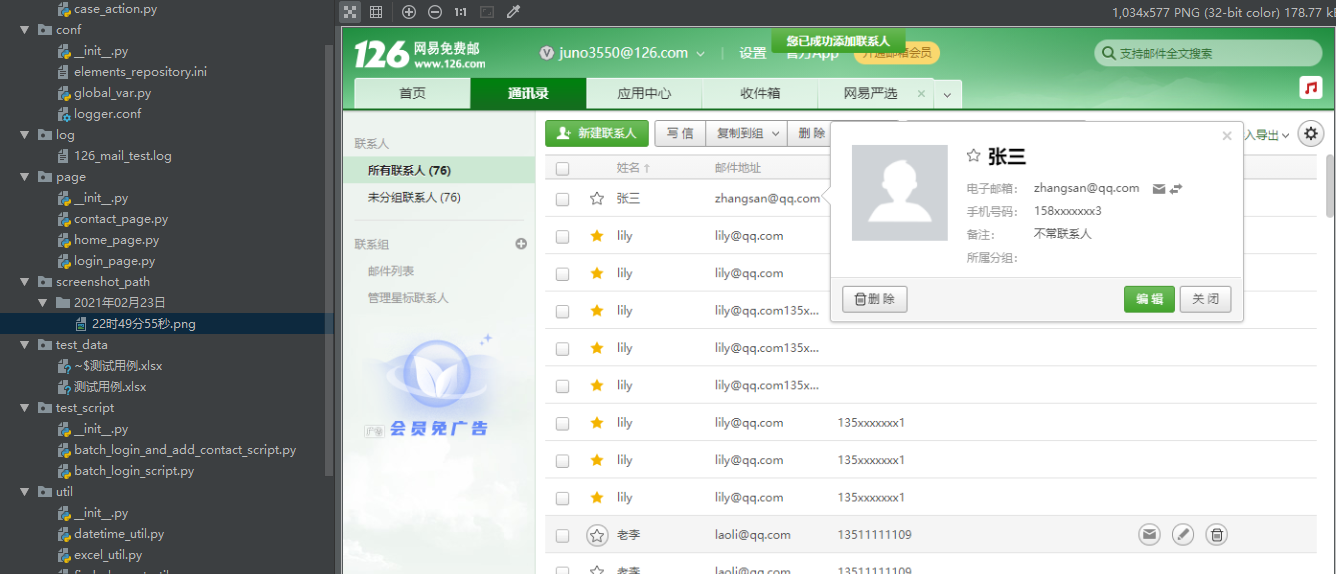
- screenshot_path 目录:异常截图保存目录。
第二层是“服务层”,相当于对测试对象的一个业务封装。对于接口测试,是对远程方法的一个实现;对于页面测试,是对页面元素或操作的一个封装。
- page 包:对象库层及操作层,将所有页面的元素对象定位及其操作分别封装成一个类。
第三层是“测试用例逻辑层”,该层主要是将服务层封装好的各个业务对象,组织成测试逻辑,进行校验。
-
action 包:组装单个用例的流程。
-
business_process 包:基于业务层和测试数据文件,执行测试用例集合。
-
test_data 目录:Excel 数据文件,包含测试数据输入、测试结果输出。
第四层是“测试场景层”,将测试用例组织成测试场景,实现各种级别 cases 的管理、冒烟,回归等测试场景。 -
main.py:本 PO 框架的运行主入口。
框架特点
- 通过配置文件,实现页面元素定位方式和测试代码的分离。
- 使用 PO 模式,封装了网页中的页面元素,方便测试代码调用,也实现了一处维护全局生效的目标。
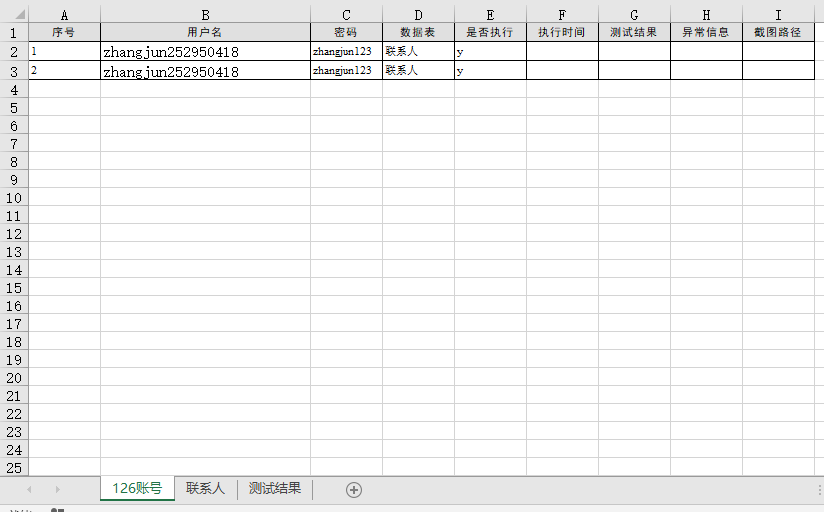
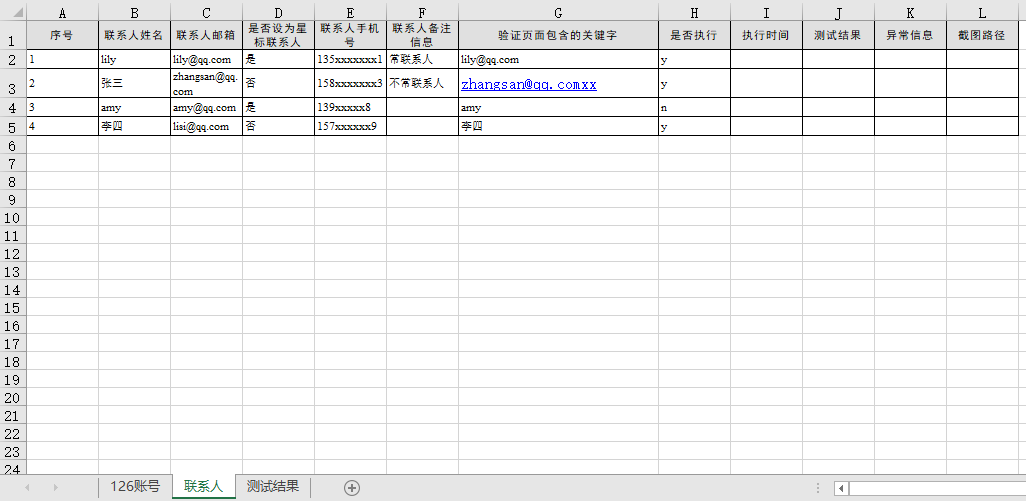
- 在 excel 文件中定义多组测试数据,每个登录用户都一一对应一个存放联系人数据的 sheet,测试框架可自动调用测试数据完成数据驱动测试。
- 实现了测试执行过程中的日志记录功能,可以通过日志文件分析测试脚本执行的情况。
- 在 excel 数据文件中,通过设定“测试数据是否执行”列的内容为 y 或 n,自定义选择测试数据,测试执行结束后会在"测试结果列"中显示测试执行的时间和结果,方便测试人员查看。
3. 工程代码示例
page 包
对象库层及操作层,将所有页面的元素对象定位及其操作分别封装成一个类。
login_page.py
from conf.global_var import *
from util.ini_parser import IniParser
from util.find_element_util import *


# 登录页面元素定位及操作
class LoginPage:

    def __init__(self, driver):
        self.driver = driver
        # 初始化跳转登录页面
        self.driver.get(LOGIN_URL)
        # 初始化指定ini配置文件及指定分组
        self.cf = IniParser(ELEMENT_FILE_PATH, "126mail_loginPage")

    # 获取frame元素对象
    def get_frame_obj(self):
        locate_method, locate_exp = self.cf.get_value("loginPage.frame").split(">")
        return find_element(self.driver, locate_method, locate_exp)

    # 切换frame
    def switch_frame(self):
        self.driver.switch_to.frame(self.get_frame_obj())

    # 获取用户名输入框元素对象
    def get_username_input_obj(self):
        locate_method, locate_exp = self.cf.get_value("loginPage.username").split(">")
        return find_element(self.driver, locate_method, locate_exp)

    # 清空用户名输入框操作
    def clear_username(self):
        self.get_username_input_obj().clear()

    # 输入用户名操作
    def input_username(self, value):
        self.get_username_input_obj().send_keys(value)

    # 获取密码输入框元素对象
    def get_pwd_input_obj(self):
        locate_method, locate_exp = self.cf.get_value("loginPage.password").split(">")
        return find_element(self.driver, locate_method, locate_exp)

    # 输入密码操作
    def input_pwd(self, value):
        self.get_pwd_input_obj().send_keys(value)

    # 获取登录按钮对象
    def get_login_buttion_obj(self):
        locate_method, locate_exp = self.cf.get_value("loginPage.loginbutton").split(">")
        return find_element(self.driver, locate_method, locate_exp)

    # 点击登录按钮操作
    def click_login_button(self):
        self.get_login_buttion_obj().click()
home_page.py
from conf.global_var import *
from util.ini_parser import IniParser
from util.find_element_util import *


# 登录后主页元素定位及操作
class HomePage:

    def __init__(self, driver):
        self.driver = driver
        # 初始化指定ini配置文件及指定分组
        self.cf = IniParser(ELEMENT_FILE_PATH, "126mail_homePage")

    # 获取“通讯录”按钮对象
    def get_contact_button_obj(self):
        locate_method, locate_exp = self.cf.get_value("homePage.addressLink").split(">")
        return find_element(self.driver, locate_method, locate_exp)

    # 点击“通讯录”按钮
    def click_contact_button(self):
        self.get_contact_button_obj().click()
contact_page.py
from conf.global_var import *
from util.ini_parser import IniParser
from util.find_element_util import *


# 通讯录页面元素定位及操作
class ContactPage:

    def __init__(self, driver):
        self.driver = driver
        # 初始化指定ini配置文件及指定分组
        self.cf = IniParser(ELEMENT_FILE_PATH, "126mail_contactPersonPage")

    # 获取新建联系人按钮对象
    def get_contact_create_button_obj(self):
        locate_method, locate_exp = self.cf.get_value("contactPersonPage.createButton").split(">")
        return find_element(self.driver, locate_method, locate_exp)

    # 点击新建联系人按钮
    def click_contact_creat_button(self):
        self.get_contact_create_button_obj().click()

    # 获取姓名输入框对象
    def get_name_input_obj(self):
        locate_method, locate_exp = self.cf.get_value("contactPersonPage.name").split(">")
        return find_element(self.driver, locate_method, locate_exp)

    # 输入姓名操作
    def input_name(self, value):
        self.get_name_input_obj().send_keys(value)

    # 获取邮箱输入框对象
    def get_email_input_obj(self):
        locate_method, locate_exp = self.cf.get_value("contactPersonPage.email").split(">")
        return find_element(self.driver, locate_method, locate_exp)

    # 输入邮箱操作
    def input_email(self, value):
        self.get_email_input_obj().send_keys(value)

    # 获取星标联系人单选框对象
    def get_star_button_obj(self):
        locate_method, locate_exp = self.cf.get_value("contactPersonPage.starContacts").split(">")
        return find_element(self.driver, locate_method, locate_exp)

    # 点击星标联系人操作
    def click_star_button(self):
        self.get_star_button_obj().click()

    # 获取手机输入框对象
    def get_phone_input_obj(self):
        locate_method, locate_exp = self.cf.get_value("contactPersonPage.phone").split(">")
        return find_element(self.driver, locate_method, locate_exp)

    # 输入邮箱操作
    def input_phone(self, value):
        self.get_phone_input_obj().send_keys(value)

    # 获取备注输入框对象
    def get_remark_input_obj(self):
        locate_method, locate_exp = self.cf.get_value("contactPersonPage.otherinfo").split(">")
        return find_element(self.driver, locate_method, locate_exp)

    # 输入邮箱操作
    def input_remark(self, value):
        self.get_remark_input_obj().send_keys(value)

    # 获取确定按钮对象
    def get_confirm_button_obj(self):
        locate_method, locate_exp = self.cf.get_value("contactPersonPage.confirmButton").split(">")
        return find_element(self.driver, locate_method, locate_exp)

    # 点击星标联系人操作
    def click_confirm_button(self):
        self.get_confirm_button_obj().click()
action 包
业务层,将一个或多个操作组合起来完成一个业务功能。
case_action.py
from selenium import webdriver
import traceback
import time
from page.contact_page import ContactPage
from page.home_page import HomePage
from page.login_page import LoginPage
from conf.global_var import *
from util.log_util import *


# 初始化浏览器
def init_browser(browser_name):
    if browser_name.lower() == "chrome":
        driver = webdriver.Chrome(CHROME_DRIVER)
    elif browser_name.lower() == "firefox":
        driver = webdriver.Firefox(FIREFOX_DRIVER)
    elif browser_name.lower() == "ie":
        driver = webdriver.Ie(IE_DRIVER)
    else:
        return "Error browser name!"
    return driver


def assert_word(driver, text):
    assert text in driver.page_source


# 登录流程封装
def login(driver, username, pwd, assert_text):
    login_page = LoginPage(driver)
    login_page.switch_frame()
    login_page.clear_username()
    login_page.input_username(username)
    login_page.input_pwd(pwd)
    login_page.click_login_button()
    time.sleep(1)
    assert_word(driver, assert_text)


# 添加联系人流程封装
def add_contact(driver, name, email, phone, is_star, remark, assert_text):
    home_page = HomePage(driver)
    home_page.click_contact_button()
    contact_page = ContactPage(driver)
    contact_page.click_contact_creat_button()
    contact_page.input_name(name)
    contact_page.input_email(email)
    contact_page.input_phone(phone)
    contact_page.input_remark(remark)
    if is_star == "是":
        contact_page.click_star_button()
    contact_page.click_confirm_button()
    time.sleep(2)
    assert_word(driver, assert_text)


def quit(driver):
    driver.quit()


if __name__ == "__main__":
    driver = init_browser("chrome")
    login(driver, "zhangjun252950418", "zhangjun123", "退出")
    add_contact(driver, "铁蛋", "asfhi@123.com", "12222222222", "是", "这是备注", "铁蛋")
    # quit(driver)
business_process 包
基于业务层和测试文件,实现数据驱动的测试执行脚本。
batch_login_process.py
from action.case_action import *
from util.excel_util import *
from conf.global_var import *
from util.datetime_util import *
from util.screenshot import take_screenshot


# 封装测试数据文件中用例的执行逻辑
# 测试数据文件中的每个登录账号
def batch_login(test_data_file, browser_name, account_sheet_name):
        excel = Excel(test_data_file)
        # 获取登录账号sheet页数据
        excel.change_sheet(account_sheet_name)
        account_all_data = excel.get_all_row_data()
        account_headline_data = account_all_data[0]
        for account_row_data in account_all_data[1:]:
            # 执行登录用例
            account_row_data[ACCOUNT_TEST_TIME_COL] = get_english_datetime()
            if account_row_data[ACCOUNT_IS_EXECUTE_COL].lower() == "n":
                continue
            # 初始化浏览器
            driver = init_browser(browser_name)
            try:
                # 默认以"退出"作为断言关键字
                login(driver, account_row_data[ACCOUNT_USERNAME_COL], account_row_data[ACCOUNT_PWD_COL], "退出")
                info("登录成功【用户名:{}, 密码:{}, 断言关键字:{}】".format(account_row_data[ACCOUNT_USERNAME_COL],
                                                            account_row_data[ACCOUNT_PWD_COL], "退出"))
                account_row_data[ACCOUNT_TEST_RESULT_COL] = "pass"
            except:
                error("登录失败【用户名:{}, 密码:{}, 断言关键字:{}】".format(account_row_data[ACCOUNT_USERNAME_COL],
                                                            account_row_data[ACCOUNT_PWD_COL], "退出"))
                account_row_data[ACCOUNT_TEST_RESULT_COL] = "fail"
                account_row_data[ACCOUNT_TEST_EXCEPTION_INFO_COL] = traceback.format_exc()
                account_row_data[ACCOUNT_SCREENSHOT_COL] = take_screenshot(driver)
            # 写入登录用例的测试结果
            excel.change_sheet("测试结果")
            excel.write_row_data(account_headline_data, "red")
            excel.write_row_data(account_row_data)
            excel.save()

            # 切换另一个账号时需先关闭浏览器,否则会自动登录
            driver.quit()


if __name__ == "__main__":
    batch_login(TEST_DATA_FILE_PATH, "chrome", "126账号")
batch_login_and_add_contact_process.py
from action.case_action import *
from util.excel_util import *
from conf.global_var import *
from util.datetime_util import *
from util.screenshot import take_screenshot


# 封装测试数据文件中用例的执行逻辑
# 测试数据文件中每个登录账号下,添加所有联系人数据
def batch_login_and_add_contact(test_data_file, browser_name, account_sheet_name):
        excel = Excel(test_data_file)
        # 获取登录账号sheet页数据
        excel.change_sheet(account_sheet_name)
        account_all_data = excel.get_all_row_data()
        account_headline_data = account_all_data[0]
        for account_row_data in account_all_data[1:]:
            # 执行登录用例
            account_row_data[ACCOUNT_TEST_TIME_COL] = get_english_datetime()
            if account_row_data[ACCOUNT_IS_EXECUTE_COL].lower() == "n":
                continue
            # 初始化浏览器
            driver = init_browser(browser_name)
            # 获取联系人数据sheet
            contact_data_sheet = account_row_data[ACCOUNT_DATA_SHEET_COL]
            try:
                # 默认以"退出"作为断言关键字
                login(driver, account_row_data[ACCOUNT_USERNAME_COL], account_row_data[ACCOUNT_PWD_COL], "退出")
                info("登录成功【用户名:{}, 密码:{}, 断言关键字:{}】".format(account_row_data[ACCOUNT_USERNAME_COL],
                                                            account_row_data[ACCOUNT_PWD_COL], "退出"))
                account_row_data[ACCOUNT_TEST_RESULT_COL] = "pass"
            except:
                error("登录失败【用户名:{}, 密码:{}, 断言关键字:{}】".format(account_row_data[ACCOUNT_USERNAME_COL],
                                                            account_row_data[ACCOUNT_PWD_COL], "退出"))
                account_row_data[ACCOUNT_TEST_RESULT_COL] = "fail"
                account_row_data[ACCOUNT_TEST_EXCEPTION_INFO_COL] = traceback.format_exc()
                account_row_data[ACCOUNT_SCREENSHOT_COL] = take_screenshot(driver)
            # 写入登录用例的测试结果
            excel.change_sheet("测试结果")
            excel.write_row_data(account_headline_data, "red")
            excel.write_row_data(account_row_data)
            excel.save()

            # 执行添加联系人用例
            excel.change_sheet(contact_data_sheet)
            contact_all_data = excel.get_all_row_data()
            contact_headline_data = contact_all_data[0]
            # 在测试结果中,一个账号下的联系人数据标题行仅写一次
            contact_headline_flag = True
            for contact_row_data in contact_all_data[1:]:
                if contact_row_data[CONTACT_IS_EXECUTE_COL].lower() == "n":
                    continue
                contact_row_data[CONTACT_TEST_TIME_COL] = get_english_datetime()
                try:
                    add_contact(driver, contact_row_data[CONTACT_NAME_COL], contact_row_data[CONTACT_EMAIL_COL],
                                contact_row_data[CONTACT_PHONE_COL], contact_row_data[CONTACT_IS_STAR_COL],
                                contact_row_data[CONTACT_REMARK_COL], contact_row_data[CONTACT_ASSERT_KEYWORD_COL])
                    info("添加联系人成功【姓名:{}, 邮箱:{}, 手机号:{}, 是否星标联系人:{}, "
                         "备注:{}, 断言关键字:{}】".format(contact_row_data[CONTACT_NAME_COL], contact_row_data[CONTACT_EMAIL_COL],
                                                   contact_row_data[CONTACT_PHONE_COL], contact_row_data[CONTACT_IS_STAR_COL],
                                                   contact_row_data[CONTACT_REMARK_COL], contact_row_data[CONTACT_ASSERT_KEYWORD_COL]))
                    contact_row_data[CONTACT_TEST_RESULT_COL] = "pass"
                except:
                    error("添加联系人失败【姓名:{}, 邮箱:{}, 手机号:{}, 是否星标联系人:{}, "
                         "备注:{}, 断言关键字:{}】".format(contact_row_data[CONTACT_NAME_COL], contact_row_data[CONTACT_EMAIL_COL],
                                                   contact_row_data[CONTACT_PHONE_COL], contact_row_data[CONTACT_IS_STAR_COL],
                                                   contact_row_data[CONTACT_REMARK_COL], contact_row_data[CONTACT_ASSERT_KEYWORD_COL]))
                    contact_row_data[CONTACT_TEST_RESULT_COL] = "fail"
                    contact_row_data[CONTACT_TEST_EXCEPTION_INFO_COL] = traceback.format_exc()
                    contact_row_data[CONTACT_SCREENSHOT_COL] = take_screenshot(driver)
                # 写入登录用例的测试结果
                excel.change_sheet("测试结果")
                if contact_headline_flag:
                    excel.write_row_data(contact_headline_data, "red")
                    contact_headline_flag = False
                excel.write_row_data(contact_row_data)
                excel.save()

            # 切换另一个账号时需先关闭浏览器,否则会自动登录
            driver.quit()


if __name__ == "__main__":
    batch_login_and_add_contact(TEST_DATA_FILE_PATH, "chrome", "126账号")
util 包
用于实现测试过程中调用的工具类方法,例如读取配置文件、页面元素的操作方法、操作Excel文件等。
excel_util.py
(openpyxl 版本:3.0.4)
from openpyxl import load_workbook
from openpyxl.styles import PatternFill, Font, Side, Border
import os


class Excel:

    def __init__(self, test_data_file_path):
        # 文件格式校验
        if not os.path.exists(test_data_file_path):
            print("Excel工具类初始化失败:【{}】文件不存在!".format(test_data_file_path))
            return
        if not test_data_file_path.endswith(".xlsx") or not test_data_file_path.endswith(".xlsx"):
            print("Excel工具类初始化失败:【{}】文件非excel文件类型!".format(test_data_file_path))
            return
        # 打开指定excel文件
        self.wb = load_workbook(test_data_file_path)
        # 初始化默认sheet
        self.ws = self.wb.active
        # 保存文件时使用的文件路径
        self.test_data_file_path = test_data_file_path
        # 初始化红、绿色,供样式使用
        self.color_dict = {"red": "FFFF3030", "green": "FF008B00"}

    # 查看所有sheet名称
    def get_sheets(self):
        return self.wb.sheetnames

    # 根据sheet名称切换sheet
    def change_sheet(self, sheet_name):
        if sheet_name not in self.get_sheets():
            print("sheet切换失败:【{}】指定sheet名称不存在!".format(sheet_name))
            return
        self.ws = self.wb.get_sheet_by_name(sheet_name)

    # 返回当前sheet的最大行号
    def max_row_num(self):
        return self.ws.max_row

    # 返回当前sheet的最大列号
    def max_col_num(self):
        return self.ws.max_column

    # 获取指定行数据(设定索引从0开始)
    def get_one_row_data(self, row_no):
        if row_no < 0 or row_no > self.max_row_num()-1:
            print("输入的行号【{}】有误:需在0至最大行数之间!".format(row_no))
            return
        # API的索引从1开始
        return [cell.value for cell in self.ws[row_no+1]]

    # 获取指定列数据
    def get_one_col_data(self, col_no):
        if col_no < 0 or col_no > self.max_col_num()-1:
            print("输入的列号【{}】有误:需在0至最大列数之间!".format(col_no))
            return
        return [cell.value for cell in tuple(self.ws.columns)[col_no+1]]

    # 获取当前sheet的所有行数据
    def get_all_row_data(self):
        result = []
        # # API的索引从1开始
        for row_data in self.ws[1:self.max_row_num()]:
            result.append([cell.value if cell.value is not None else "" for cell in row_data])
        return result

    # 追加一行数据
    def write_row_data(self, data, fill_color=None, font_color=None, border=True):
        if not isinstance(data, (list, tuple)):
            print("追加的数据类型有误:需为列号或元组类型!【{}】".format(data))
            return
        self.ws.append(data)
        # 添加字体颜色
        if font_color:
            if font_color in self.color_dict.keys():
                font_color = self.color_dict[font_color]
            # 需要设置的单元格长度应与数据长度一致,否则默认与之前行的长度一致
        count = 0
        for cell in self.ws[self.max_row_num()]:
            if count > len(data) - 1:
                break
            # cell不为None,才能设置样式
            if cell:
                if cell.value in ["pass", "成功"]:
                    cell.font = Font(color=self.color_dict["green"])
                elif cell.value in ["fail", "失败"]:
                    cell.font = Font(color=self.color_dict["red"])
                else:
                    cell.font = Font(color=font_color)
            count += 1
        # 添加背景颜色
        if fill_color:
            if fill_color in self.color_dict.keys():
                fill_color = self.color_dict[fill_color]
            count = 0
            for cell in self.ws[self.max_row_num()]:
                if count > len(data) - 1:
                    break
                if cell:
                    cell.fill = PatternFill(fill_type="solid", fgColor=fill_color)
                count += 1
        # 添加单元格边框
        if border:
            bd = Side(style="thin", color="000000")
            count = 0
            for cell in self.ws[self.max_row_num()]:
                if count > len(data) - 1:
                    break
                if cell:
                    cell.border = Border(left=bd, right=bd, top=bd, bottom=bd)
                count += 1

    # 保存文件
    def save(self):
        self.wb.save(self.test_data_file_path)


if __name__ == "__main__":
    from conf.global_var import *
    excel = Excel(TEST_DATA_FILE_PATH)
    excel.change_sheet("登录1")
    # print(excel.get_all_row_data())
    excel.write_row_data((1,2,"嘻哈",None,"ddd"), "red", "green")
    excel.save()
find_element_util.py
from selenium.webdriver.support.ui import WebDriverWait


# 显式等待一个对象
def find_element(driver, locate_method, locate_exp):
    # 显式等待对象(最多等10秒,每0.2秒判断一次等待的条件)
    return WebDriverWait(driver, 10, 0.2).until(lambda x: x.find_element(locate_method, locate_exp))


# 显式等待一组对象
def find_elements(driver, locate_method, locate_exp):
    # 显式等待对象(最多等10秒,每0.2秒判断一次等待的条件)
    return WebDriverWait(driver, 10, 0.2).until(lambda x: x.find_elements(locate_method, locate_exp))
ini_parser.py
import configparser


class IniParser:

    # 初始化打开指定ini文件并指定编码
    def __init__(self, file_path, section):
        self.cf = configparser.ConfigParser()
        self.cf.read(file_path, encoding="utf-8")
        self.section = section

    # 获取所有分组名称
    def get_sections(self):
        return self.cf.sections()

    # 获取指定分组的所有键
    def get_options(self):
        return self.cf.options(self.section)

    # 获取指定分组的键值对
    def get_items(self):
        return self.cf.items(self.section)

    # 获取指定分组的指定键的值
    def get_value(self, key):
        return self.cf.get(self.section, key)
datetime_util.py
import time


# 返回中文格式的日期:xxxx年xx月xx日
def get_chinese_date():
    year = time.localtime().tm_year
    if len(str(year)) == 1:
        year = "0" + str(year)
    month = time.localtime().tm_mon
    if len(str(month)) == 1:
        month = "0" + str(month)
    day = time.localtime().tm_mday
    if len(str(day)) == 1:
        day = "0" + str(day)
    return "{}年{}月{}日".format(year, month, day)


# 返回英文格式的日期:xxxx/xx/xx
def get_english_date():
    year = time.localtime().tm_year
    if len(str(year)) == 1:
        year = "0" + str(year)
    month = time.localtime().tm_mon
    if len(str(month)) == 1:
        month = "0" + str(month)
    day = time.localtime().tm_mday
    if len(str(day)) == 1:
        day = "0" + str(day)
    return "{}/{}/{}".format(year, month, day)


# 返回中文格式的时间:xx时xx分xx秒
def get_chinese_time():
    hour = time.localtime().tm_hour
    if len(str(hour)) == 1:
        hour = "0" + str(hour)
    minute = time.localtime().tm_min
    if len(str(minute)) == 1:
        minute = "0" + str(minute)
    second = time.localtime().tm_sec
    if len(str(second)) == 1:
        second = "0" + str(second)
    return "{}时{}分{}秒".format(hour, minute, second)


# 返回英文格式的时间:xx:xx:xx
def get_english_time():
    hour = time.localtime().tm_hour
    if len(str(hour)) == 1:
        hour = "0" + str(hour)
    minute = time.localtime().tm_min
    if len(str(minute)) == 1:
        minute = "0" + str(minute)
    second = time.localtime().tm_sec
    if len(str(second)) == 1:
        second = "0" + str(second)
    return "{}:{}:{}".format(hour, minute, second)


# 返回中文格式的日期时间
def get_chinese_datetime():
    return get_chinese_date() + " " + get_chinese_time()


# 返回英文格式的日期时间
def get_english_datetime():
    return get_english_date() + " " + get_english_time()


if __name__ == "__main__":
    print(get_chinese_datetime())
    print(get_english_datetime())
log_util.py
import logging
import logging.config
from conf.global_var import *


# 日志配置文件:多个logger,每个logger指定不同的handler
# handler:设定了日志输出行的格式
#          以及设定写日志到文件(是否回滚)?还是到屏幕
#          还定了打印日志的级别
logging.config.fileConfig(LOG_CONF_FILE_PATH)
logger = logging.getLogger("example01")


def debug(message):
    logging.debug(message)


def info(message):
    logging.info(message)


def warning(message):
    logging.warning(message)


def error(message):
    logging.error(message)


if __name__ == "__main__":
    debug("hi")
    info("gloryroad")
    warning("hello")
    error("这是一个error日志")
screenshot.py
import traceback
import os
from util.datetime_util import *
from conf.global_var import *


# 截图函数
def take_screenshot(driver):
    # 创建当前日期目录
    dir = os.path.join(SCREENSHOT_PATH, get_chinese_date())
    if not os.path.exists(dir):
        os.makedirs(dir)
    # 以当前时间为文件名
    file_name = get_chinese_time()
    file_path = os.path.join(dir, file_name+".png")
    try:
        driver.get_screenshot_as_file(file_path)
        # 返回截图文件的绝对路径
        return file_path
    except:
        print("截图发生异常【{}】".format(file_path))
        traceback.print_exc()
        return file_path
conf 包
配置文件及全局变量。
elements_repository.ini
[126mail_loginPage]
loginPage.frame=xpath>//iframe[contains(@id,'x-URS-iframe')]
loginPage.username=xpath>//input[@name='email']
loginPage.password=xpath>//input[@name='password']
loginPage.loginbutton=id>dologin

[126mail_homePage]
homePage.addressLink=xpath>//div[text()='通讯录']

[126mail_contactPersonPage]
contactPersonPage.createButton=xpath>//span[text()='新建联系人']
contactPersonPage.name=xpath>//a[@title='编辑详细姓名']/preceding-sibling::div/input
contactPersonPage.email=xpath>//*[@id='iaddress_MAIL_wrap']//input
contactPersonPage.starContacts=xpath>//span[text()='设为星标联系人']/preceding-sibling::span/b
contactPersonPage.phone=xpath>//*[@id='iaddress_TEL_wrap']//dd//input
contactPersonPage.otherinfo=xpath>//textarea
contactPersonPage.confirmButton=xpath>//span[.='确 定']
global_var.py
import os


# 工程根路径
PROJECT_ROOT_PATH = os.path.dirname(os.path.dirname(os.path.abspath(__file__)))

# 元素定位方法的ini配置文件路径
ELEMENT_FILE_PATH = os.path.join(PROJECT_ROOT_PATH, "conf", "elements_repository.ini")

# 驱动路径
CHROME_DRIVER = "E:\\auto_test_driver\\chromedriver.exe"
IE_DRIVER = "E:\\auto_test_driver\\IEDriverServer.exe"
FIREFOX_DRIVER = "E:\\auto_test_driver\\geckodriver.exe"

# 测试使用的浏览器
BROWSER_NAME = "chrome"

# 登录主页
LOGIN_URL = "https://mail.126.com"

# 日志配置文件路径
LOG_CONF_FILE_PATH = os.path.join(PROJECT_ROOT_PATH, "conf", "logger.conf")

# 测试用例文件路径
TEST_DATA_FILE_PATH = os.path.join(PROJECT_ROOT_PATH, "test_data", "测试用例.xlsx")

# 截图保存路径
SCREENSHOT_PATH = os.path.join(PROJECT_ROOT_PATH, "screenshot_path")

# 单元测试报告输出目录
UNITTEST_REPORT_PATH = os.path.join(PROJECT_ROOT_PATH, "report")

# 登录账号sheet页数据列号
ACCOUNT_USERNAME_COL = 1
ACCOUNT_PWD_COL = 2
ACCOUNT_DATA_SHEET_COL = 3
ACCOUNT_IS_EXECUTE_COL = 4
ACCOUNT_TEST_TIME_COL = 5
ACCOUNT_TEST_RESULT_COL = 6
ACCOUNT_TEST_EXCEPTION_INFO_COL = 7
ACCOUNT_SCREENSHOT_COL = 8

# 联系人sheet页数据列号
CONTACT_NAME_COL = 1
CONTACT_EMAIL_COL = 2
CONTACT_IS_STAR_COL = 3
CONTACT_PHONE_COL = 4
CONTACT_REMARK_COL = 5
CONTACT_ASSERT_KEYWORD_COL = 6
CONTACT_IS_EXECUTE_COL = 7
CONTACT_TEST_TIME_COL = 8
CONTACT_TEST_RESULT_COL = 9
CONTACT_TEST_EXCEPTION_INFO_COL = 10
CONTACT_SCREENSHOT_COL = 11


if __name__ == "__main__":
    print(PROJECT_ROOT_PATH)
logger.conf
###############################################
[loggers]
keys=root,example01,example02
[logger_root]
level=DEBUG
handlers=hand01,hand02

[logger_example01]
handlers=hand01,hand02
qualname=example01
propagate=0

[logger_example02]
handlers=hand01,hand03
qualname=example02
propagate=0

###############################################
[handlers]
keys=hand01,hand02,hand03

[handler_hand01]
class=StreamHandler
level=INFO
formatter=form01
args=(sys.stderr,)

[handler_hand02]
class=FileHandler
level=DEBUG
formatter=form01
args=('.\\log\\126_mail_test.log', 'a')

[handler_hand03]
class=handlers.RotatingFileHandler
level=INFO
formatter=form01
args=('.\\log\\126_mail_test.log', 'a', 10*1024*1024, 5)

###############################################
[formatters]
keys=form01,form02

[formatter_form01]
format=%(asctime)s %(filename)s[line:%(lineno)d] %(levelname)s %(message)s
datefmt=%Y-%m-%d %H:%M:%S

[formatter_form02]
format=%(name)-12s: %(levelname)-8s %(message)s
datefmt=%Y-%m-%d %H:%M:%S
test_data 目录
测试用例.xlsx:包含测试数据输入、测试结果输出

log 目录
日志输出文件:126_mail_test.log
...
...
2021-02-23 16:59:15 log_util.py[line:19] INFO 登录成功【用户名:zhangjun252950418, 密码:zhangjun123, 断言关键字:退出】
2021-02-23 16:59:20 log_util.py[line:19] INFO 添加联系人成功【姓名:lily, 邮箱:lily@qq.com, 手机号:135xxxxxxx1, 是否星标联系人:是, 备注:常联系人, 断言关键字:lily@qq.com】
2021-02-23 16:59:24 log_util.py[line:27] ERROR 添加联系人失败【姓名:张三, 邮箱:zhangsan@qq.com, 手机号:158xxxxxxx3, 是否星标联系人:否, 备注:不常联系人, 断言关键字:zhangsan@qq.comxx】
2021-02-23 16:59:27 log_util.py[line:19] INFO 添加联系人成功【姓名:李四, 邮箱:lisi@qq.com, 手机号:157xxxxxx9, 是否星标联系人:否, 备注:, 断言关键字:李四】
...
...
screenshot_path 目录
异常截图保存目录:
main.py
本 PO 框架的运行主入口。
from business_process.batch_login import *
from business_process.batch_login_and_add_contact import *
from conf.global_var import *


# 示例组装:冒烟测试
def smoke_test():
    batch_login(TEST_DATA_FILE_PATH, "chrome", "126账号")


# 示例组装:全量测试
def full_test():
    batch_login_and_add_contact(TEST_DATA_FILE_PATH, "chrome", "126账号")


if __name__ == "__main__":
    # smoke_test()
    full_test()
最后如果你想学习自动化测试,欢迎加入笔者的交流群:735745871,里面会有很多资源和大佬答疑解惑,我们一起交流一起学习!
标签:get,self,COL,UI,自动化,data,PO,def,row From: https://www.cnblogs.com/hebendexiaomao/p/17697986.html