Kubernetes autoscaling basics What is HPA? How does HPA work? Limitations of HPA EKS Example: How to Implement HPA Deploy a sample application Usage and cost reporting with HPA Summary
Scalability is one of the core benefits of Kubernetes (K8s). In order to get the most out of this benefit (and use K8s effectively), you need a solid understanding of how Kubernetes autoscaling works. In our previous post[link], we covered Vertical Pod Autoscaling (VPA). Here, we’ll take a deep dive on the topic of Horizontal Pod Autoscaling (HPA) in Kubernetes. We’ll define HPA, explain how it works, and provide a detailed hands-on tutorial to walk you through a sample project using HPA.
Kubernetes autoscaling basics
Before we go in-depth on HPA, we need to review Kubernetes autoscaling in general. Autoscaling is a method of automatically scaling K8s workloads up or down based on historical resource usage. Autoscaling in Kubernetes has three dimensions:
- Horizontal Pod Autoscaler (HPA):adjusts the number of replicas of an application.
- Cluster Autoscaler:adjusts the number of nodes of a cluster.
- Vertical Pod Autoscaler (VPA):adjusts the resource requests and limits of a container.
The different autoscalers work at one of two Kubernetes layers
- Pod level:The HPA and VPA methods take place at the pod level. Both HPA and VPA will scale the available resources or instances of the container.
- Cluster level:The Cluster Autoscaler falls under the Cluster level, where it scales up or down the number of nodes inside your cluster.
Now that we have summarized the basics, let’s take a closer look at HPA.
What is HPA?
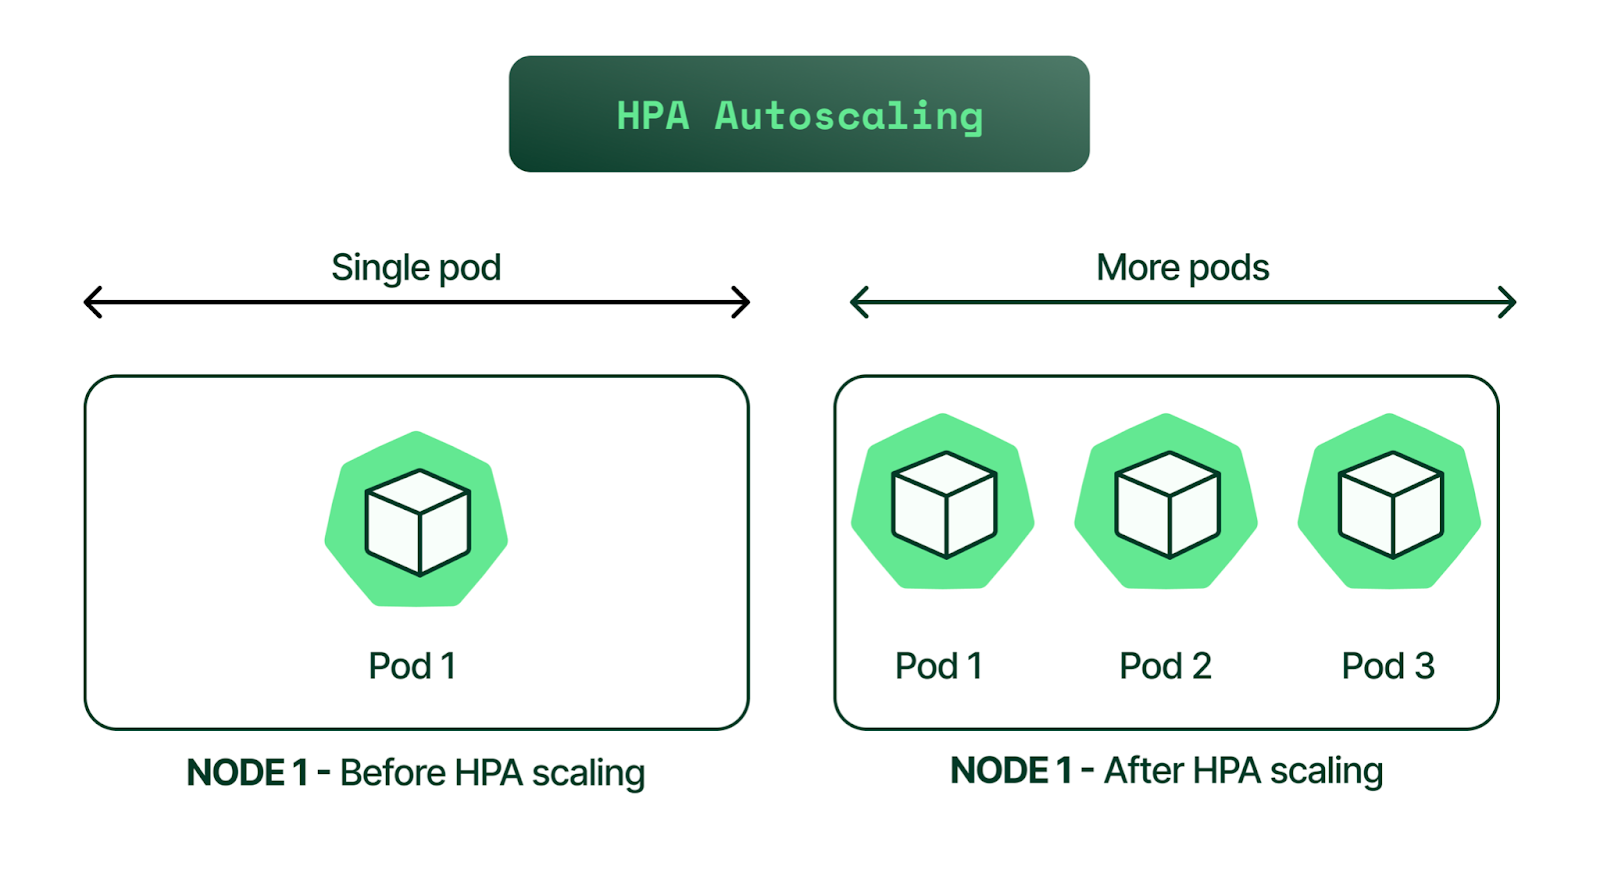
HPA is a form of autoscaling that increases or decreases the number of pods in a replication controller, deployment, replica set, or stateful set based on CPU utilization—the scaling is horizontal because it affects the number of instances rather than the resources allocated to a single container.
HPA can make scaling decisions based on custom or externally provided metrics and works automatically after initial configuration. All you need to do is define the MIN and MAX number of replicas.
Once configured, the Horizontal Pod Autoscaler controller is in charge of checking the metrics and then scaling your replicas up or down accordingly. By default, HPA checks metrics every 15 seconds.
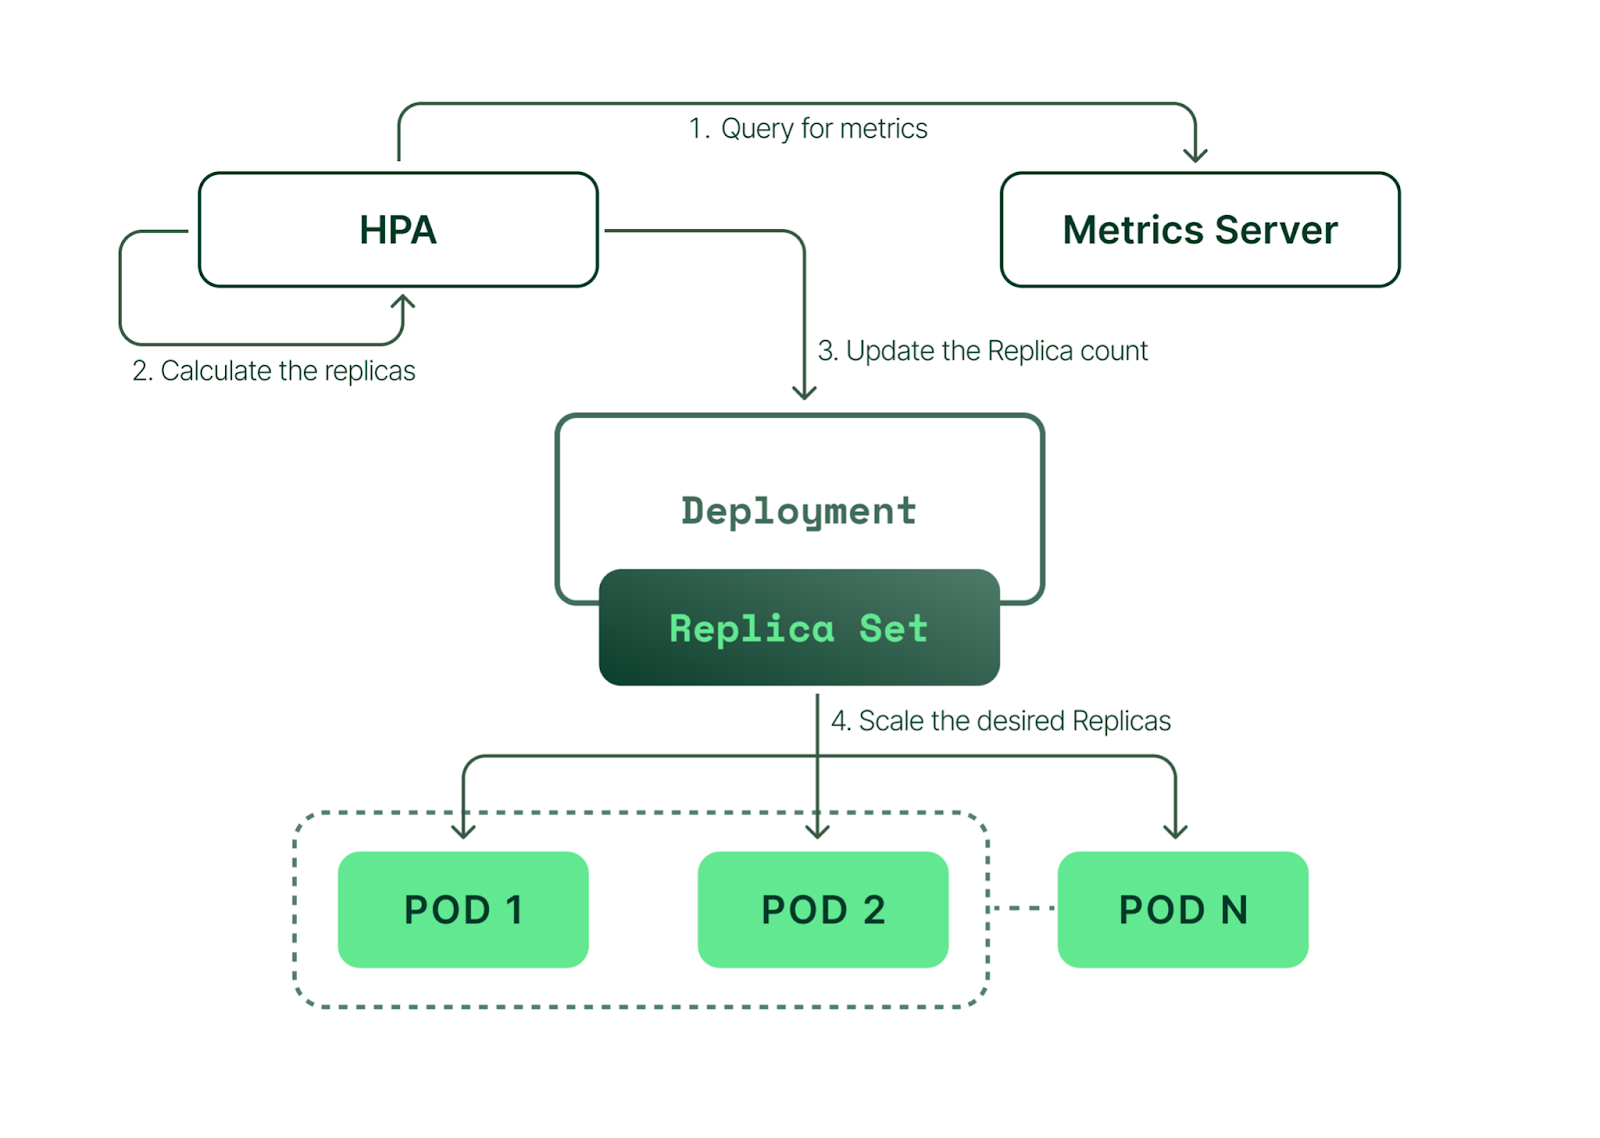
To check metrics, HPA depends on another Kubernetes resource known as the Metrics Server. The Metrics Server provides standard resource usage measurement data by capturing data from “kubernetes.summary_api” such as CPU and memory usage for nodes and pods. It can also provide access to custom metrics (that can be collected from an external source) like the number of active sessions on a load balancer indicating traffic volume.
While the HPA scaling process is automatic, you can also help account for predictable load fluctuations in some cases. For example, you can:
- Adjust replica count based on the time of the day.
- Set different capacity requirements for weekends or off-peak hours.
- Implement an event-based replica capacity schedule (such as increasing capacity upon a code release).
How does HPA work?
Overview of HPA
In simple terms, HPA works in a “check, update, check again” style loop. Here’s how each of the steps in that loop work.
- HPA continuously monitors the metrics server for resource usage.
- Based on the collected resource usage, HPA will calculate the desired number of replicas required.
- Then, HPA decides to scale up the application to the desired number of replicas.
- Finally, HPA changes the desired number of replicas.
- Since HPA is continuously monitoring, the process repeats from Step 1.
Limitations of HPA
While HPA is a powerful tool, it’s not ideal for every use case and can’t address every cluster resource issue. Here are the most common examples:
- One of HPA’s most well-known limitations is that it does not work with DaemonSets.
- If you don’t efficiently set CPU and memory limits on pods, your pods may terminate frequently or, on the other end of the spectrum, you’ll waste resources.
- If the cluster is out of capacity, HPA can’t scale up until new nodes are added to the cluster. Cluster Autoscaler (CA) can automate this process. We have an article dedicated to CA; however, below is a quick contextual explanation.
Cluster Autoscaler (CA) automatically adds or removes nodes in a cluster based on resource requests from pods. Unlike HPA, Cluster Autoscaler doesn't look at memory or CPU available when it triggers the autoscaling. Instead, Cluster Autoscaler reacts to events and checks for any unscheduled pods every 10 seconds.
EKS Example: How to Implement HPA
To help you get started with HPA, let’s walk through some practical examples. We’ll work through the following steps one-by-one:
- Create an EKS cluster
- Install the Metrics Server
- Deploy a sample application
- Install Horizontal Pod Autoscaler
- Monitor HPA events
- Decrease the load
Step 1: create an EKS cluster
For this step, we will use AWS EKS (Amazon's managed Kubernetes service), so make sure you have access to your AWS account. We’ll use eksctl, a simple CLI tool for creating and managing clusters on EKS. It is written in Go and uses CloudFormation in the background.
The EKS cluster kubeconfig file will be stored in the local directory (of your workstation or laptop), and if the command is successful, you will see a ready status. To begin, we’ll run the eksctl create cluster command below (using Kubernetes version 1.20 in this example).
$ eksctl create cluster  --name example-hpa-autoscaling  --version 1.20  --region us-west-2  --nodegroup-name hpa-worker-instances  --node-type c5.large  --nodes 1
2021-08-30 12:52:24 [ℹ]  eksctl version 0.60.0
2021-08-30 12:52:24 [ℹ]  using region us-west-2
2021-08-30 12:52:26 [ℹ]  setting availability zones to [us-west-2a us-west-2b us-west-2d]
2021-08-30 12:52:26 [ℹ]  subnets for us-west-2a - public:192.168.0.0/19 private:192.168.96.0/19
2021-08-30 12:52:26 [ℹ]  subnets for us-west-2b - public:192.168.32.0/19 private:192.168.128.0/19
2021-08-30 12:52:26 [ℹ]  subnets for us-west-2d - public:192.168.64.0/19 private:192.168.160.0/19
2021-08-30 12:52:26 [ℹ]  nodegroup "hpa-worker-instances" will use "" [AmazonLinux2/1.20]
2021-08-30 12:52:26 [ℹ]  using Kubernetes version 1.20
2021-08-30 12:52:26 [ℹ]  creating EKS cluster "example-hpa-autoscaling" in "us-west-2" region with managed nodes
...
...
2021-08-30 12:53:29 [ℹ]  waiting for CloudFormation stack
2021-08-30 13:09:00 [ℹ]  deploying stack "eksctl-example-hpa-autoscaling-nodegroup-hpa-worker-instances"
2021-08-30 13:09:00 [ℹ]  waiting for CloudFormation stack
2021-08-30 13:12:11 [ℹ]  waiting for the control plane availability...
2021-08-30 13:12:11 [✔]  saved kubeconfig as "/Users/karthikeyan/.kube/config"
2021-08-30 13:12:11 [ℹ]  no tasks
2021-08-30 13:12:11 [✔]  all EKS cluster resources for "example-hpa-autoscaling" have been created
2021-08-30 13:12:13 [ℹ]  nodegroup "hpa-worker-instances" has 1 node(s)
2021-08-30 13:12:13 [ℹ]  node "ip-192-168-94-150.us-west-2.compute.internal" is ready
2021-08-30 13:12:13 [ℹ]  waiting for at least 1 node(s) to become ready in "hpa-worker-instances"
2021-08-30 13:12:13 [ℹ]  nodegroup "hpa-worker-instances" has 1 node(s)
2021-08-30 13:12:13 [ℹ]  node "ip-192-168-94-150.us-west-2.compute.internal" is ready
2021-08-30 13:14:20 [ℹ]  kubectl command should work with "/Users/karthikeyan/.kube/config", try 'kubectl get nodes'
2021-08-30 13:14:20 [✔]  EKS cluster "example-hpa-autoscaling" in "us-west-2" region is ready
Next, verify the cluster:
$ aws eks describe-cluster --name my-hpa-demo-cluster --region us-west-2You can also check by logging into the AWS console:

To get the cluster context to log in, read your local kubeconfig like below:
$ cat  ~/.kube/config |grep "current-context"
current-context: [email protected]
List the nodes and pods:
$ kubectx [email protected]
Switched to context "[email protected]".

$ kubectl get nodes
NAME                                           STATUS   ROLES    AGE   VERSION
ip-192-168-94-150.us-west-2.compute.internal   Ready       15m   v1.20.4-eks-6b7464


$ kubectl get pods --all-namespaces
NAMESPACE     NAME                       READY   STATUS    RESTARTS   AGE
kube-system   aws-node-f45pg             1/1     Running   0          15m
kube-system   coredns-86d9946576-2h2zk   1/1     Running   0          24m
kube-system   coredns-86d9946576-4cvgk   1/1     Running   0          24m
kube-system   kube-proxy-864g6           1/1     Running   0          15m
kubectx is a tool used to switch between various Kubernetes clusters. Now that we have the EKS cluster up and running, next, we need to deploy the Metrics Server.
Install the Metrics Server
We can check if we have set up the Metrics Server in our EKS cluster by using the following command:
$ kubectl top pods -n kube-system
error: Metrics API not available标签:Kubernetes,demo,30,cluster,deployment,hpa,HPA From: https://www.cnblogs.com/panpanwelcome/p/17482688.html