标签:RapidVideOCR 00 Github Sphinx Read docs rm
引言
- 接上一篇Github + Sphinx+Read the docs 实战入门指南(一),这一篇主要讲解如何自动将指定文档内容部署到Read the docs中。
- 对于文档,一般有以下基本要求:
- 只维护一份,其他地方自动同步更新
- 可以根据代码注释,动态更新维护相应的API文档
- 支持检索
- 多版本之间的API接口动态查看
- 经过一段时间的调研和比较汇总,最终确定了以下技术方案:flowchart LR
A("Github(托管代码和文档)") --> B("Sphinx(渲染文档)") --> C("Read the docs(托管Sphinx渲染的文档)")
Sphinx渲染文档托管到Github
- 经过上一篇博客后,大家可以本地生成Sphinx渲染之后得到的html文档,但是只能本地查看。我们需要将其托管到Github中,便于后续Read the docs部署。
- 下面我将以RapidVideOCR为例,讲解具体做法:
- 克隆RapidVideOCR项目到本地:
git clone [email protected]:SWHL/RapidVideOCR.gitxxx@xxx MINGW64 /g/ProgramFiles/_self/tmp
$ git clone [email protected]:SWHL/RapidVideOCR.git
Cloning into 'RapidVideOCR'...
remote: Enumerating objects: 1703, done.
remote: Counting objects: 100% (262/262), done.
remote: Compressing objects: 100% (183/183), done.
remote: Total 1703 (delta 150), reused 177 (delta 77), pack-reused 1441
Receiving objects: 100% (1703/1703), 12.01 MiB | 334.00 KiB/s, done.
Resolving deltas: 100% (1011/1011), done.
- 新建一个空分支,名称为
docs,用来部署Sphinx渲染之后的文件xxx@xxx MINGW64 /g/ProgramFiles/_self/tmp
$ cd RapidVideOCR/
xxx@xxx MINGW64 /g/ProgramFiles/_self/tmp/RapidVideOCR (main)
$ git checkout --orphan docs
Switched to a new branch 'docs'
xxx@xxx MINGW64 /g/ProgramFiles/_self/tmp/RapidVideOCR (docs)
$ git rm -rf .
rm '.github/FUNDING.yml'
rm '.github/ISSUE_TEMPLATE/bug_report.md'
rm '.github/ISSUE_TEMPLATE/feature_request.md'
rm '.github/workflows/AutoPushToPypi.yml'
rm '.github/workflows/SyncToGitee.yml'
rm '.github/workflows/deploy_docs_to_rtd.yml'
rm '.gitignore'
rm 'LICENSE'
rm 'README.md'
rm 'assets/colab-badge.svg'
rm 'assets/logo.png'
rm 'demo.py'
rm 'docs/FAQ.md'
rm 'docs/README_en.md'
rm 'docs/change_log.md'
rm 'docs/change_log_en.md'
rm 'docs/doc_whl.md'
rm 'rapid_videocr/__init__.py'
rm 'rapid_videocr/rapid_videocr.py'
rm 'rapid_videocr/utils.py'
rm 'requirements.txt'
rm 'setup.py'
rm 'tests/test_files/RGBImages/0_00_00_041__0_00_00_415_0070000000019200080001920.jpeg'
rm 'tests/test_files/RGBImages/0_00_00_416__0_00_01_165_0070000000019200080001920.jpeg'
rm 'tests/test_files/RGBImages/0_00_01_166__0_00_01_540_0070000000019200080001920.jpeg'
rm 'tests/test_files/RGBImages/0_00_01_541__0_00_02_540_0070000000019200080001920.jpeg'
rm 'tests/test_files/TXTImages/0_00_00_041__0_00_00_415_0070000000019200080001920.jpeg'
rm 'tests/test_files/TXTImages/0_00_00_416__0_00_01_165_0070000000019200080001920.jpeg'
rm 'tests/test_files/TXTImages/0_00_01_166__0_00_01_540_0070000000019200080001920.jpeg'
rm 'tests/test_files/TXTImages/0_00_01_541__0_00_02_540_0070000000019200080001920.jpeg'
rm 'tests/test_rapid_videocr.py'
xxx@xxx MINGW64 /g/ProgramFiles/_self/tmp/RapidVideOCR (docs)
- 将在上一篇博客中,本地运行Sphinx渲染之后的文件,拷贝到新的
docs分支,具体文件包括如下:(详情可以参见RapidVideOCR docs)RapidVideOCR
├── LICENSE
├── make.bat
├── Makefile
├── rapid_videocr
│ ├── __init__.py
│ ├── rapid_videocr.py
│ └── utils.py
├── requirements.txt
└── source
├── API
├── conf.py
├── index.rst
├── README.md
└── _static
- 其中
source/API目录为sphinx-apidoc自动生成。
- 将上述新添加的文件提交到远程仓库
$ git add .
$ git commit -m 'Init commit'
$ git push -u origin docs
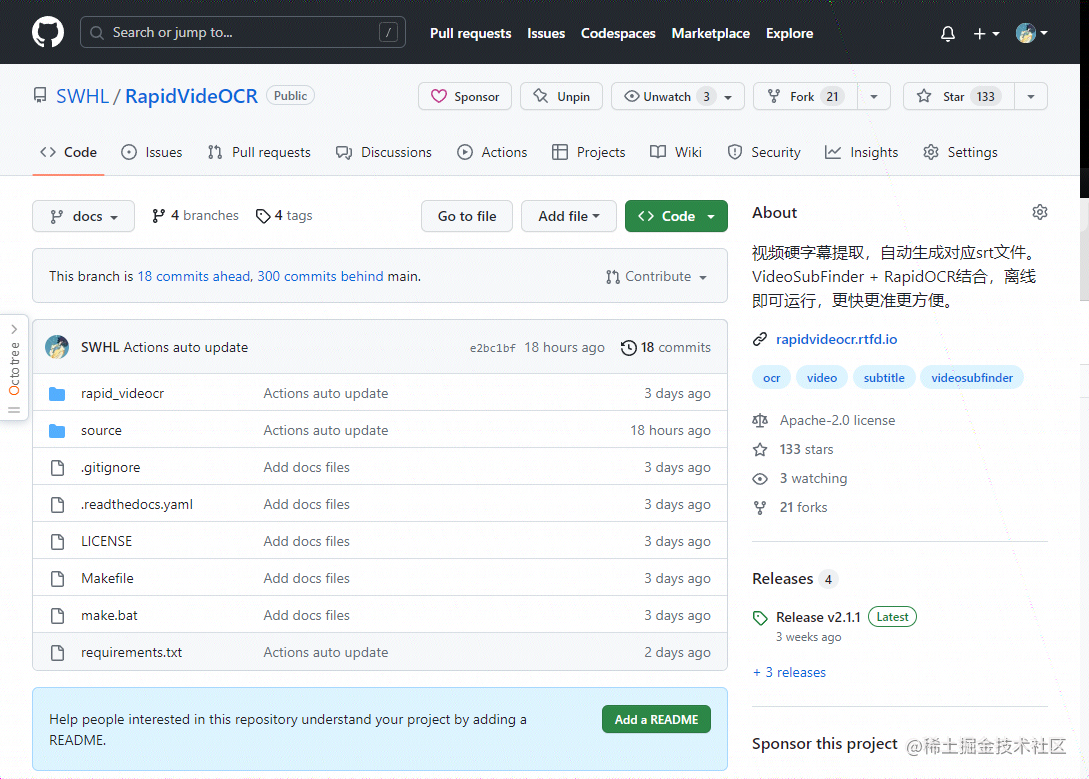
- 去Github界面查看,示例图如下:(详情参见:RapidVideOCR docs)
部署到Read the docs网站
- 目前Sphinx渲染的文件已经托管到Github的docs分支,接下来需要托管到Read the docs网站,便于大家查看和访问。
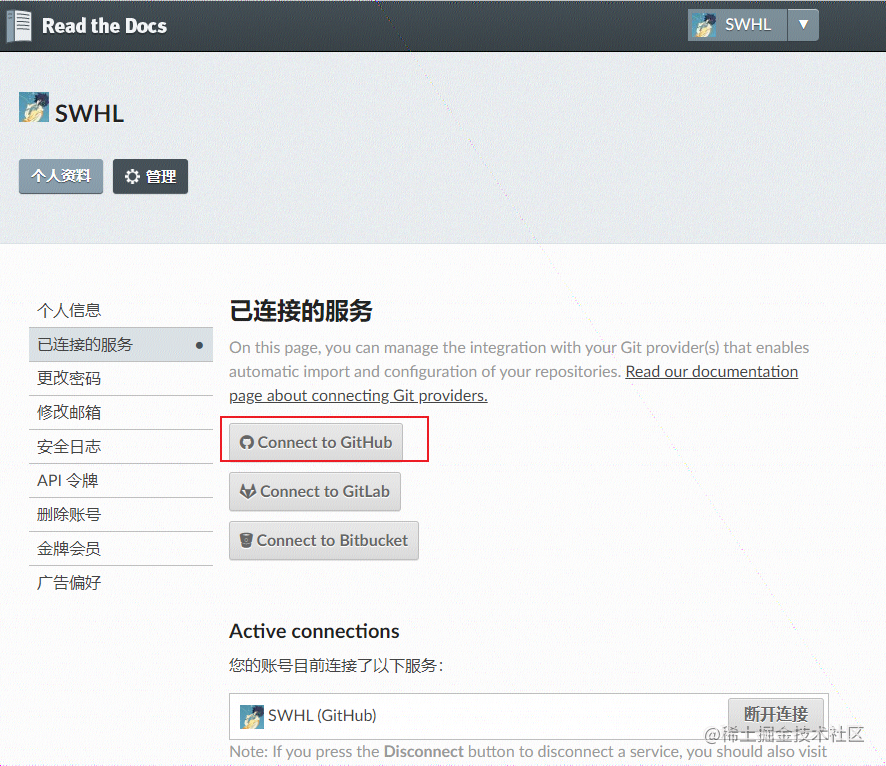
- 注册或登录 Raad the docs
- 连接Github服务。
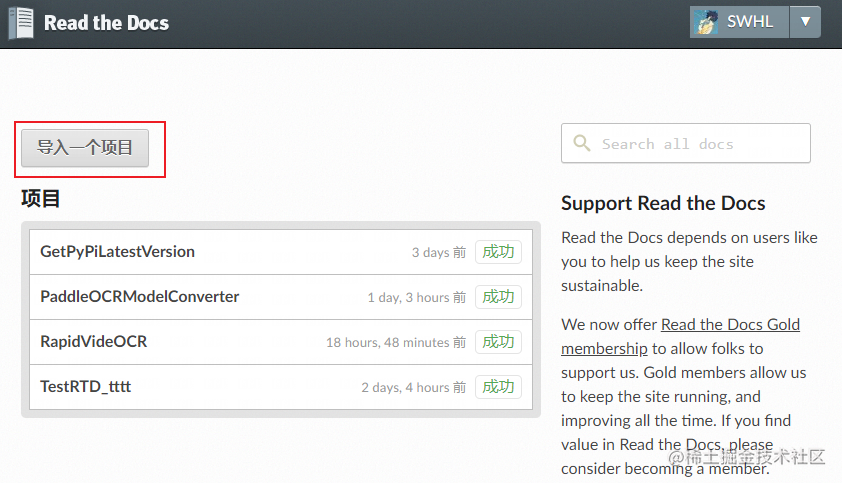
- 点击导入一个项目按钮
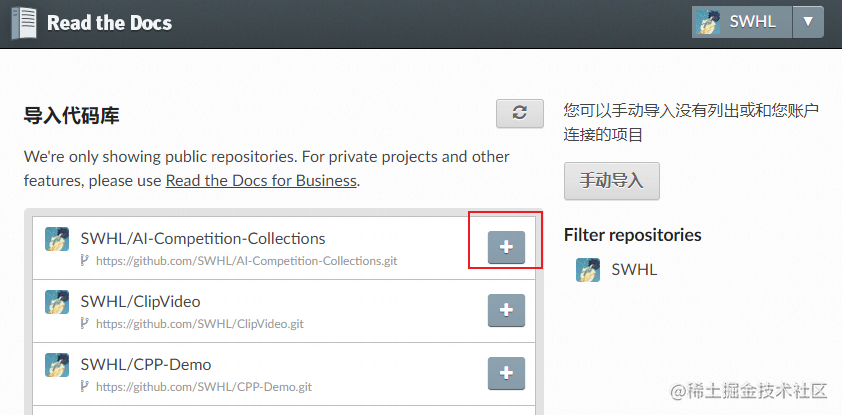
- 选择RapidVideOCR项目
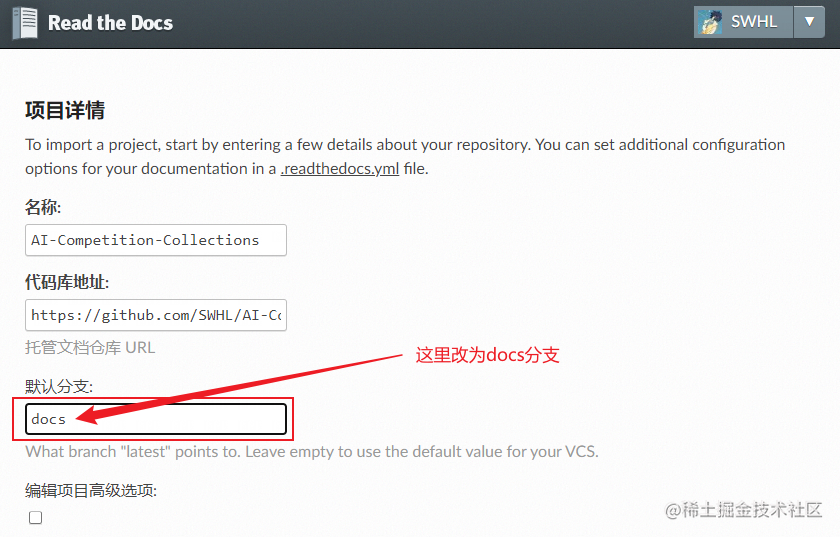
- 注意更改默认分支为docs, 点击下一页即可
- 点击Build version,即可开始构建文档

- 等成功之后,点击右上角的阅读文档,即可查看。

- 至此,整个Sphinx渲染的内容已经成功部署到Read the docs网站了。
继续阅读
标签:RapidVideOCR,
00,
Github,
Sphinx,
Read,
docs,
rm
From: https://www.cnblogs.com/shiwanghualuo/p/17280584.html