Eureka 一词来源于古希腊词汇,是“发现了”的意思。在软件领域,Eureka 是 Netflix 公司开发的一款开源的服务注册与发现组件。
Spring Cloud 将 Eureka 与 Netflix 中的其他开源服务组件(例如 Ribbon、Feign 以及 Hystrix 等)一起整合进 Spring Cloud Netflix 模块中,整合后的组件全称为 Spring Cloud Netflix Eureka。
Eureka 是 Spring Cloud Netflix 模块的子模块,它是 Spring Cloud 对 Netflix Eureka 的二次封装,主要负责 Spring Cloud 的服务注册与发现功能。
Spring Cloud 使用 Spring Boot 思想为 Eureka 增加了自动化配置,开发人员只需要引入相关依赖和注解,就能将 Spring Boot 构建的微服务轻松地与 Eureka 进行整合。
Eureka 两大组件
Eureka 采用 CS(Client/Server,客户端/服务器) 架构,它包括以下两大组件:- Eureka Server:Eureka 服务注册中心,主要用于提供服务注册功能。当微服务启动时,会将自己的服务注册到 Eureka Server。Eureka Server 维护了一个可用服务列表,存储了所有注册到 Eureka Server 的可用服务的信息,这些可用服务可以在 Eureka Server 的管理界面中直观看到。
- Eureka Client:Eureka 客户端,通常指的是微服务系统中各个微服务,主要用于和 Eureka Server 进行交互。在微服务应用启动后,Eureka Client 会向 Eureka Server 发送心跳(默认周期为 30 秒)。若 Eureka Server 在多个心跳周期内没有接收到某个 Eureka Client 的心跳,Eureka Server 将它从可用服务列表中移除(默认 90 秒)。
注:“心跳”指的是一段定时发送的自定义信息,让对方知道自己“存活”,以确保连接的有效性。大部分 CS 架构的应用程序都采用了心跳机制,服务端和客户端都可以发心跳。通常情况下是客户端向服务器端发送心跳包,服务端用于判断客户端是否在线。
Eureka 服务注册与发现
Eureka 实现服务注册与发现的原理,如下图所示。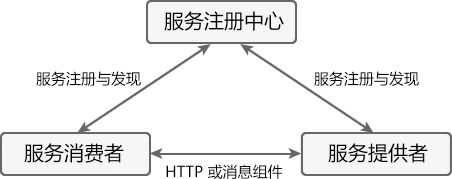
图1:Eureka 原理图
上图中共涉及到以下 3 个角色:
- 服务注册中心(Register Service):它是一个 Eureka Server,用于提供服务注册和发现功能。
- 服务提供者(Provider Service):它是一个 Eureka Client,用于提供服务。它将自己提供的服务注册到服务注册中心,以供服务消费者发现。
- 服务消费者(Consumer Service):它是一个 Eureka Client,用于消费服务。它可以从服务注册中心获取服务列表,调用所需的服务。
Eureka 实现服务注册与发现的流程如下:
- 搭建一个 Eureka Server 作为服务注册中心;
- 服务提供者 Eureka Client 启动时,会把当前服务器的信息以服务名(spring.application.name)的方式注册到服务注册中心;
- 服务消费者 Eureka Client 启动时,也会向服务注册中心注册;
- 服务消费者还会获取一份可用服务列表,该列表中包含了所有注册到服务注册中心的服务信息(包括服务提供者和自身的信息);
- 在获得了可用服务列表后,服务消费者通过 HTTP 或消息中间件远程调用服务提供者提供的服务。
服务注册中心(Eureka Server)所扮演的角色十分重要,它是服务提供者和服务消费者之间的桥梁。服务提供者只有将自己的服务注册到服务注册中心才可能被服务消费者调用,而服务消费者也只有通过服务注册中心获取可用服务列表后,才能调用所需的服务。
示例 1
下面,我们通过一个案例来展示下 Eureka 是如何实现服务注册与发现的。1. 创建主工程(Maven Project)
由于本案例中,会涉及到多个由 Spring Boot 创建的微服务,为了方便管理,这里我们采用 Maven 的多 Module 结构(即一个 Project 包含多个 Module)来构建工程。
创建一个名为 spring-cloud-demo2 的 Maven 主工程 ,然后在该主工程的 pom.xml 中使用 dependencyManagement 来管理 Spring Cloud 的版本,内容如下。
<?xml version="1.0" encoding="UTF-8"?>
<project xmlns="http://maven.apache.org/POM/4.0.0"
         xmlns:xsi="http://www.w3.org/2001/XMLSchema-instance"
         xsi:schemaLocation="http://maven.apache.org/POM/4.0.0 http://maven.apache.org/xsd/maven-4.0.0.xsd">
    <modelVersion>4.0.0</modelVersion>
    <packaging>pom</packaging>
    <modules>
        <module>micro-service-cloud-api</module>
    </modules>
    <parent>
        <groupId>org.springframework.boot</groupId>
        <artifactId>spring-boot-starter-parent</artifactId>
        <version>2.3.6.RELEASE</version>
        <relativePath/> <!-- lookup parent from repository -->
    </parent>
    <groupId>net.biancheng.c</groupId>
    <artifactId>spring-cloud-demo2</artifactId>
    <version>0.0.1-SNAPSHOT</version>
    <properties>
        <maven.compiler.source>8</maven.compiler.source>
        <maven.compiler.target>8</maven.compiler.target>
        <project.build.sourceEncoding>UTF-8</project.build.sourceEncoding>
        <maven.compiler.source>1.8</maven.compiler.source>
        <maven.compiler.target>1.8</maven.compiler.target>
        <junit.version>4.12</junit.version>
        <log4j.version>1.2.17</log4j.version>
        <lombok.version>1.16.18</lombok.version>
    </properties>
    <dependencyManagement>
        <dependencies>
            <!--在主工程中使用 dependencyManagement 声明 Spring Cloud 的版本,
            这样工程内的 Module 中引入 Spring Cloud 组件依赖时,就不必在声明组件的版本信息
            保证 Spring Cloud 各个组件一致性-->
            <dependency>
                <groupId>org.springframework.cloud</groupId>
                <artifactId>spring-cloud-dependencies</artifactId>
                <version>Hoxton.SR12</version>
                <type>pom</type>
                <scope>import</scope>
            </dependency>
        </dependencies>
    </dependencyManagement>
    <build>
        <finalName>microservicecloud</finalName>
        <resources>
            <resource>
                <directory>src/main/resources</directory>
                <filtering>true</filtering>
            </resource>
        </resources>
        <plugins>
            <plugin>
                <groupId>org.apache.maven.plugins</groupId>
                <artifactId>maven-resources-plugin</artifactId>
                <configuration>
                    <delimiters>
                        <delimit>$</delimit>
                    </delimiters>
                </configuration>
            </plugin>
        </plugins>
    </build>
</project>
注:micro-service-cloud-api 是整个工程的公共子模块,它包含了一些其他子模块共有的内容,例如实体类、公共工具类、公共依赖项等。当其他子模块需要使用公共子模块中的内容时,只需要在其 pom.xml 引入公共子模块的依赖即可。
2) 在 micro-service-cloud-api 的 net.biancheng.c.entity 包下,创建一个名为 Dept 的实体类,代码如下。
package net.biancheng.c.entity;
import lombok.Data;
import lombok.NoArgsConstructor;
import lombok.experimental.Accessors;
import java.io.Serializable;
@NoArgsConstructor //无参构造函数
@Data // 提供类的get、set、equals、hashCode、canEqual、toString 方法
@Accessors(chain = true)
public class Dept implements Serializable {
    private Integer deptNo;
    private String deptName;
    private String dbSource;
}
3. 搭建服务注册中心
1) 在主工程下创建一个名为 micro-service-cloud-eureka-7001 的 Spring Boot Module 作为服务注册中心,并在其 pom.xml 中引入以下依赖。
<?xml version="1.0" encoding="UTF-8"?>
<project xmlns="http://maven.apache.org/POM/4.0.0" xmlns:xsi="http://www.w3.org/2001/XMLSchema-instance"
         xsi:schemaLocation="http://maven.apache.org/POM/4.0.0 https://maven.apache.org/xsd/maven-4.0.0.xsd">
    <modelVersion>4.0.0</modelVersion>
    <!--继承主工程的 POM-->
    <parent>
        <artifactId>spring-cloud-demo2</artifactId>
        <groupId>net.biancheng.c</groupId>
        <version>0.0.1-SNAPSHOT</version>
    </parent>
    <groupId>net.biancheng.c</groupId>
    <artifactId>micro-service-cloud-eureka-7001</artifactId>
    <version>0.0.1-SNAPSHOT</version>
    <name>micro-service-cloud-eureka-7001</name>
    <description>Demo project for Spring Boot</description>
    <properties>
        <java.version>1.8</java.version>
    </properties>
    <dependencies>
        <dependency>
            <groupId>org.springframework.boot</groupId>
            <artifactId>spring-boot-starter-web</artifactId>
        </dependency>
        <!--为服务注册中心引入 Eureka Server 的依赖-->
        <dependency>
            <groupId>org.springframework.cloud</groupId>
            <artifactId>spring-cloud-starter-netflix-eureka-server</artifactId>
        </dependency>
        <!--devtools 和 lombok 均为开发辅助模块,根据需求适当选择-->
        <dependency>
            <groupId>org.springframework.boot</groupId>
            <artifactId>spring-boot-devtools</artifactId>
            <scope>runtime</scope>
            <optional>true</optional>
        </dependency>
        <dependency>
            <groupId>org.projectlombok</groupId>
            <artifactId>lombok</artifactId>
            <optional>true</optional>
        </dependency>
        <dependency>
            <groupId>org.springframework.boot</groupId>
            <artifactId>spring-boot-starter-test</artifactId>
            <scope>test</scope>
        </dependency>
    </dependencies>
    <build>
        <plugins>
            <plugin>
                <groupId>org.springframework.boot</groupId>
                <artifactId>spring-boot-maven-plugin</artifactId>
                <configuration>
                    <excludes>
                        <exclude>
                            <groupId>org.projectlombok</groupId>
                            <artifactId>lombok</artifactId>
                        </exclude>
                    </excludes>
                </configuration>
            </plugin>
        </plugins>
    </build>
</project>
2) 在 micro-service-cloud-eureka-7001 的类路径(/resouces 目录)下,添加一个配置文件 application.yml,配置内容如下。
server:
  port: 7001  #该 Module 的端口号
eureka:
  instance:
    hostname: localhost #eureka服务端的实例名称,
  client:
    register-with-eureka: false #false表示不向注册中心注册自己。
    fetch-registry: false #false表示自己端就是注册中心,我的职责就是维护服务实例,并不需要去检索服务
    service-url:
      defaultZone: http://${eureka.instance.hostname}:${server.port}/eureka/ #单机版服务注册中心
3) 在 micro-service-cloud-eureka-7001 的主启动类上使用 @EnableEurekaServer 注解开启服务注册中心功能,接受其他服务的注册,代码如下。
package net.biancheng.c;
import org.springframework.boot.SpringApplication;
import org.springframework.boot.autoconfigure.SpringBootApplication;
import org.springframework.cloud.netflix.eureka.server.EnableEurekaServer;
@SpringBootApplication
@EnableEurekaServer //开启 Eureka server,接受其他微服务的注册
public class MicroServiceCloudEureka7001Application {
    public static void main(String[] args) {
        SpringApplication.run(MicroServiceCloudEureka7001Application.class, args);
    }
}
4) 启动 micro-service-cloud-eureka-7001,使用浏览器访问 Eureka 服务注册中心主页,地址为“http://localhost:7001/”,结果如下图。

4. 搭建服务提供者
1) 在主工程下创建一个名为 micro-service-cloud-provider-dept-8001 的 Spring Boot Module,并在其 pom.xml 中引入以下依赖。
<?xml version="1.0" encoding="UTF-8"?>
<project xmlns="http://maven.apache.org/POM/4.0.0" xmlns:xsi="http://www.w3.org/2001/XMLSchema-instance"
         xsi:schemaLocation="http://maven.apache.org/POM/4.0.0 https://maven.apache.org/xsd/maven-4.0.0.xsd">
    <modelVersion>4.0.0</modelVersion>
    <!--引入父工程pom-->
    <parent>
        <artifactId>spring-cloud-demo2</artifactId>
        <groupId>net.biancheng.c</groupId>
        <version>0.0.1-SNAPSHOT</version>
    </parent>
    <groupId>net.biancheng.c</groupId>
    <artifactId>micro-service-cloud-provider-dept-8001</artifactId>
    <version>0.0.1-SNAPSHOT</version>
    <name>micro-service-cloud-provider-dept-8001</name>
    <description>Demo project for Spring Boot</description>
    <properties>
        <java.version>1.8</java.version>
    </properties>
    <dependencies>
        <!--Spring Boot Web-->
        <dependency>
            <groupId>org.springframework.boot</groupId>
            <artifactId>spring-boot-starter-web</artifactId>
        </dependency>
        <!--devtools 开发工具-->
        <dependency>
            <groupId>org.springframework.boot</groupId>
            <artifactId>spring-boot-devtools</artifactId>
            <scope>runtime</scope>
            <optional>true</optional>
        </dependency>
        <!--Spring Boot 测试-->
        <dependency>
            <groupId>org.springframework.boot</groupId>
            <artifactId>spring-boot-starter-test</artifactId>
            <scope>test</scope>
        </dependency>
        <!--引入公共子模块-->
        <dependency>
            <groupId>net.biancheng.c</groupId>
            <artifactId>micro-service-cloud-api</artifactId>
            <version>${project.version}</version>
        </dependency>
        <!--junit 测试-->
        <dependency>
            <groupId>junit</groupId>
            <artifactId>junit</artifactId>
            <version>4.12</version>
        </dependency>
        <!--mysql 驱动-->
        <dependency>
            <groupId>mysql</groupId>
            <artifactId>mysql-connector-java</artifactId>
            <version>5.1.49</version>
        </dependency>
        <!--logback 日志-->
        <dependency>
            <groupId>ch.qos.logback</groupId>
            <artifactId>logback-core</artifactId>
        </dependency>
        <!--整合 mybatis -->
        <dependency>
            <groupId>org.mybatis.spring.boot</groupId>
            <artifactId>mybatis-spring-boot-starter</artifactId>
            <version>2.2.0</version>
        </dependency>
        <!-- 修改后立即生效,热部署 -->
        <dependency>
            <groupId>org.springframework</groupId>
            <artifactId>springloaded</artifactId>
            <version>1.2.8.RELEASE</version>
        </dependency>
        <!--引入 Eureka Client 的依赖,将服务注册到 Eureka Server-->
        <dependency>
            <groupId>org.springframework.cloud</groupId>
            <artifactId>spring-cloud-starter-netflix-eureka-client</artifactId>
        </dependency>
        <!-- Spring Boot 监控模块-->
        <dependency>
            <groupId>org.springframework.boot</groupId>
            <artifactId>spring-boot-starter-actuator</artifactId>
        </dependency>
    </dependencies>
    <build>
        <plugins>
            <!--mybatis自动生成代码插件-->
            <plugin>
                <groupId>org.mybatis.generator</groupId>
                <artifactId>mybatis-generator-maven-plugin</artifactId>
                <version>1.4.0</version>
                <configuration>
                    <configurationFile>src/main/resources/mybatis-generator/generatorConfig.xml</configurationFile>
                    <verbose>true</verbose>
                    <!-- 是否覆盖,true表示会替换生成的JAVA文件,false则不覆盖 -->
                    <overwrite>true</overwrite>
                </configuration>
                <dependencies>
                    <!--mysql驱动包-->
                    <dependency>
                        <groupId>mysql</groupId>
                        <artifactId>mysql-connector-java</artifactId>
                        <version>5.1.49</version>
                    </dependency>
                    <dependency>
                        <groupId>org.mybatis.generator</groupId>
                        <artifactId>mybatis-generator-core</artifactId>
                        <version>1.4.0</version>
                    </dependency>
                </dependencies>
            </plugin>
            <plugin>
                <groupId>org.springframework.boot</groupId>
                <artifactId>spring-boot-maven-plugin</artifactId>
            </plugin>
        </plugins>
    </build>
</project>
2) 在 micro-service-cloud-provider-dept-8001 类路径(/resources 目录)下,添加配置文件 application.yml,配置内容如下。
server:
  port: 8001 #服务端口号
spring:
  application:
    name: microServiceCloudProviderDept  #微服务名称,对外暴漏的微服务名称,十分重要
################################################## JDBC 通用配置  ##########################################
  datasource:
    username: root        #数据库登陆用户名
    password: root        #数据库登陆密码
    url: jdbc:mysql://127.0.0.1:3306/bianchengbang_jdbc       #数据库url
    driver-class-name: com.mysql.jdbc.Driver                  #数据库驱动
############################### 不检查 spring.config.import=configserver:##################
#  cloud:
#    config:
#      enabled: false
###################################### MyBatis 配置 ######################################
mybatis:
  # 指定 mapper.xml 的位置
  mapper-locations: classpath:mybatis/mapper/*.xml
  #扫描实体类的位置,在此处指明扫描实体类的包,在 mapper.xml 中就可以不写实体类的全路径名
  type-aliases-package: net.biancheng.c.entity
  configuration:
    #默认开启驼峰命名法,可以不用设置该属性
    map-underscore-to-camel-case: true
########################################### Spring cloud 自定义服务名称和 ip 地址###############################################
eureka:
  client: #将客户端注册到 eureka 服务列表内
    service-url:
      defaultZone: http://eureka7001.com:7001/eureka  #这个地址是 7001注册中心在 application.yml 中暴露出来额注册地址 (单机版)
  instance:
    instance-id: spring-cloud-provider-8001 #自定义服务名称信息
    prefer-ip-address: true  #显示访问路径的 ip 地址
########################################## spring cloud 使用 Spring Boot actuator 监控完善信息###################################
# Spring Boot 2.50对 actuator 监控屏蔽了大多数的节点,只暴露了 heath 节点,本段配置(*)就是为了开启所有的节点
management:
  endpoints:
    web:
      exposure:
        include: "*"   # * 在yaml 文件属于关键字,所以需要加引号
info:
  app.name: micro-service-cloud-provider-dept
  company.name: c.biancheng.net
  build.aetifactId: @project.artifactId@
  build.version: @project.version@
3) 在 net.biancheng.c.mapper 包下创建一个名为 DeptMapper 的接口,代码如下。
package net.biancheng.c.mapper;
import net.biancheng.c.entity.Dept;
import org.apache.ibatis.annotations.Mapper;
import java.util.List;
@Mapper
public interface DeptMapper {
    //根据主键获取数据
    Dept selectByPrimaryKey(Integer deptNo);
    //获取表中的全部数据
    List<Dept> GetAll();
}
4) 在 resources/mybatis/mapper/ 目录下,创建一个名为 DeptMapper.xml 的 MyBatis 映射文件,配置内容如下。
<?xml version="1.0" encoding="UTF-8"?>
<!DOCTYPE mapper PUBLIC "-//mybatis.org//DTD Mapper 3.0//EN" "http://mybatis.org/dtd/mybatis-3-mapper.dtd">
<mapper namespace="net.biancheng.c.mapper.DeptMapper">
    <resultMap id="BaseResultMap" type="net.biancheng.c.entity.Dept">
        <id column="dept_no" jdbcType="INTEGER" property="deptNo"/>
        <result column="dept_name" jdbcType="VARCHAR" property="deptName"/>
        <result column="db_source" jdbcType="VARCHAR" property="dbSource"/>
    </resultMap>
    <sql id="Base_Column_List">
        dept_no
        , dept_name, db_source
    </sql>
    <select id="selectByPrimaryKey" parameterType="java.lang.Integer" resultMap="BaseResultMap">
        select
        <include refid="Base_Column_List"/>
        from dept
        where dept_no = #{deptNo,jdbcType=INTEGER}
    </select>
    <select id="GetAll" resultType="net.biancheng.c.entity.Dept">
        select *
        from dept;
    </select>
</mapper>
5) 在 net.biancheng.c.service 包下创建一个名为 DeptService 的接口,代码如下。
package net.biancheng.c.service;
import net.biancheng.c.entity.Dept;
import java.util.List;
public interface DeptService {
    Dept get(Integer deptNo);
    List<Dept> selectAll();
}
6) 在 net.biancheng.c.service.impl 包下创建 DeptService 接口的实现类 DeptServiceImpl,代码如下。
package net.biancheng.c.service.impl;
import net.biancheng.c.entity.Dept;
import net.biancheng.c.mapper.DeptMapper;
import net.biancheng.c.service.DeptService;
import org.springframework.beans.factory.annotation.Autowired;
import org.springframework.stereotype.Service;
import java.util.List;
@Service("deptService")
public class DeptServiceImpl implements DeptService {
    @Autowired
    private DeptMapper deptMapper;
    @Override
    public Dept get(Integer deptNo) {
        return deptMapper.selectByPrimaryKey(deptNo);
    }
    @Override
    public List<Dept> selectAll() {
        return deptMapper.GetAll();
    }
}
7) 在 net.biancheng.c.controller 包下创建一个名为 DeptController 的 Controller 类,代码如下。
package net.biancheng.c.controller;
import lombok.extern.slf4j.Slf4j;
import net.biancheng.c.entity.Dept;
import net.biancheng.c.service.DeptService;
import org.springframework.beans.factory.annotation.Autowired;
import org.springframework.beans.factory.annotation.Value;
import org.springframework.web.bind.annotation.*;
import java.util.List;
/**
* 服务提供者的控制层
* author:c语言中文网 c.biancheng.net
*/
@RestController
@Slf4j
public class DeptController {
    @Autowired
    private DeptService deptService;

    @Value("${server.port}")
    private String serverPort;
    @RequestMapping(value = "/dept/get/{id}", method = RequestMethod.GET)
    public Dept get(@PathVariable("id") int id) {
        return deptService.get(id);
    }
    @RequestMapping(value = "/dept/list", method = RequestMethod.GET)
    public List<Dept> list() {
        return deptService.selectAll();
    }
}
8) 在 micro-service-cloud-provider-dept-8001 的主启动类上,使用 @EnableEurekaClient 注解开启 Eureka 客户端功能,将服务注册到服务注册中心(Eureka Server),代码如下。
package net.biancheng.c;
import org.springframework.boot.SpringApplication;
import org.springframework.boot.autoconfigure.SpringBootApplication;
import org.springframework.cloud.netflix.eureka.EnableEurekaClient;
@SpringBootApplication
@EnableEurekaClient // Spring cloud Eureka 客户端,自动将本服务注册到 Eureka Server 注册中心中
public class MicroServiceCloudProviderDept8001Application {
    public static void main(String[] args) {
        SpringApplication.run(MicroServiceCloudProviderDept8001Application.class, args);
    }
}
9) 依次启动 micro-service-cloud-eureka-7001 和 micro-service-cloud-provider-dept-8001,使用浏览器访再次问 Eureka 服务注册中心主页(http://localhost:7001/),如下图。

标签:服务,SpringCloud,Eureka,注册,import,org,cloud From: https://www.cnblogs.com/handsome-duan/p/17259134.html