目录
Sentinel是什么
官方说明:面向分布式、多语言异构化服务架构的流量治理组件
提供熔断、限流、降级、雪崩等多种能力(停止维护的Hystrix升级版)
安装部署
前提:需要准备JAVA 8+
1.下载
2023-02-23最新版本是1.8.6
2.运行
执行下载的jar
Java -jar sentinel-dashboard-1.8.6.jar
3.访问
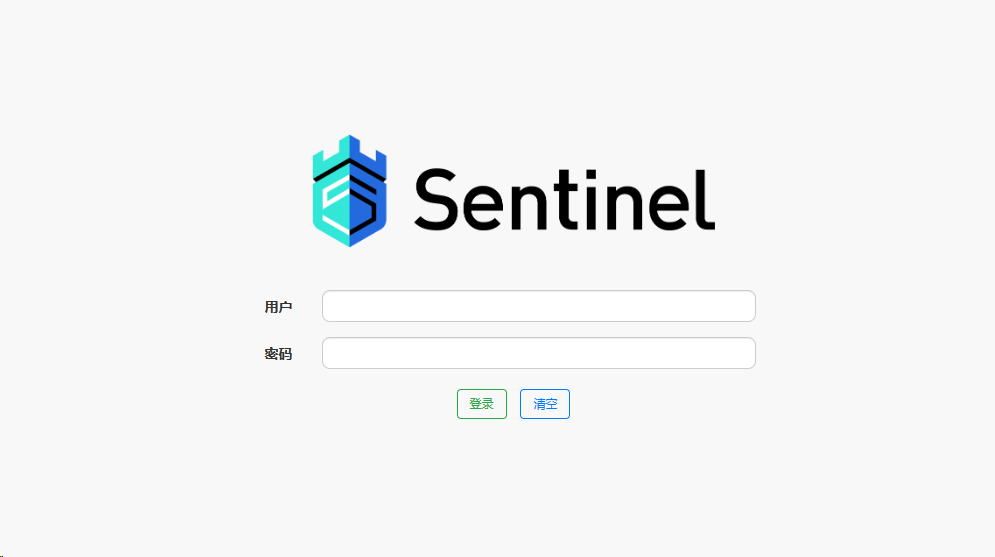
http://127.0.0.1:8080/ 可看到如下页面,帐号密码默认为sentinel
项目连接Sentinel
Sentinel 的使用可以分为两个部分:
- 核心库(Java 客户端):不依赖任何框架/库,能够运行于 Java 8 及以上的版本的运行时环境,同时对 Dubbo / Spring Cloud 等框架也有较好的支持(见 主流框架适配)。
- 控制台(Dashboard):Dashboard 主要负责管理推送规则、监控、管理机器信息等。
新建一个项目
POM
<dependencies>
        <dependency>
            <groupId>org.springframework.boot</groupId>
            <artifactId>spring-boot-starter-web</artifactId>
        </dependency>
        <!-- https://mvnrepository.com/artifact/com.alibaba.cloud/spring-cloud-starter-alibaba-nacos-discovery -->
        <dependency>
            <groupId>com.alibaba.cloud</groupId>
            <artifactId>spring-cloud-starter-alibaba-nacos-discovery</artifactId>
            <version>2.2.6.RELEASE</version>
        </dependency>
        <!-- https://mvnrepository.com/artifact/com.alibaba.csp/sentinel-datasource-nacos -->
        <dependency>
            <groupId>com.alibaba.csp</groupId>
            <artifactId>sentinel-datasource-nacos</artifactId>
            <version>1.8.6</version>
        </dependency>
        <!-- https://mvnrepository.com/artifact/com.alibaba.cloud/spring-cloud-starter-alibaba-sentinel -->
        <dependency>
            <groupId>com.alibaba.cloud</groupId>
            <artifactId>spring-cloud-starter-alibaba-sentinel</artifactId>
            <version>2.2.6.RELEASE</version>
        </dependency>
    </dependencies>
YML
server:
  port: 6060
spring:
  application:
    name: sentinel-project
  cloud:
    nacos:
      discovery:
        #Nacos服务注册中心地址
        server-addr: 10.20.30.227:9999
    sentinel:
      transport:
        #配置Sentinel dashboard地址
        dashboard: 10.20.30.94:8080
        #默认8719端口,假如被占用会自动从8719开始依次+1扫描,直至找到未被占用的端口
        port: 8719
management:
  endpoints:
    web:
      exposure:
        include: '*'
启动类
package com.rb;

import org.springframework.boot.SpringApplication;
import org.springframework.boot.autoconfigure.SpringBootApplication;
import org.springframework.cloud.client.discovery.EnableDiscoveryClient;

@SpringBootApplication
@EnableDiscoveryClient
public class SentinelProjectApplication {
    public static void main(String[] args) {
        SpringApplication.run(SentinelProjectApplication.class,args);
    }
}
Controller
package com.rb.controller;

import org.springframework.web.bind.annotation.GetMapping;
import org.springframework.web.bind.annotation.RestController;

@RestController
public class DemoController {
    @GetMapping("testMethod1")
    public String testMethod1(){
        return "testMethod1";
    }
}
启动项目
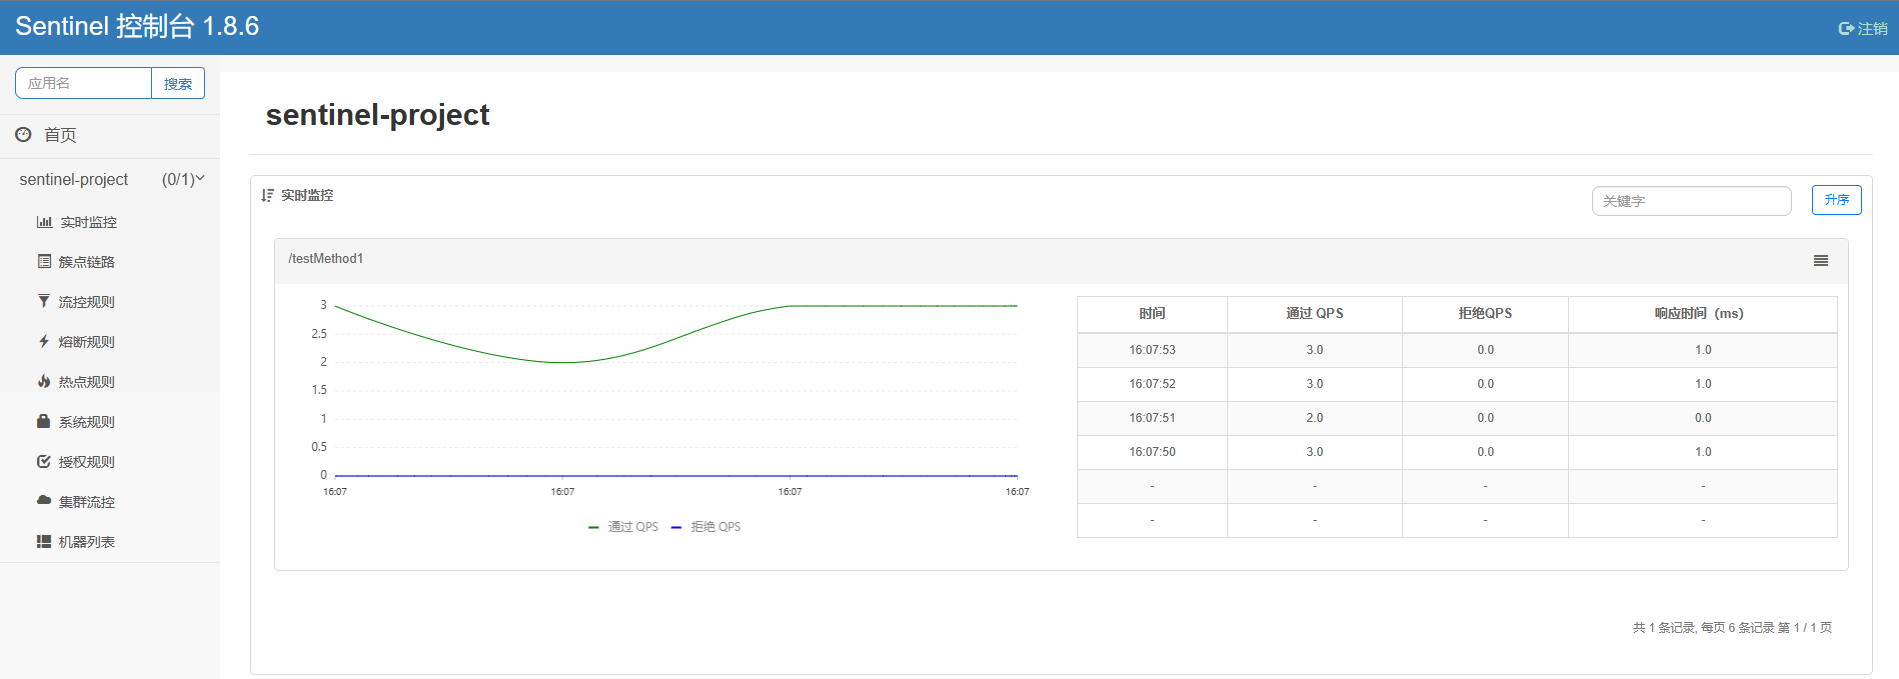
请求testMethod1方法,观察sentinel-dashboard页面,会出现下图信息
注意:不请求方法不会被记录
Sentinel规则配置
流控规则

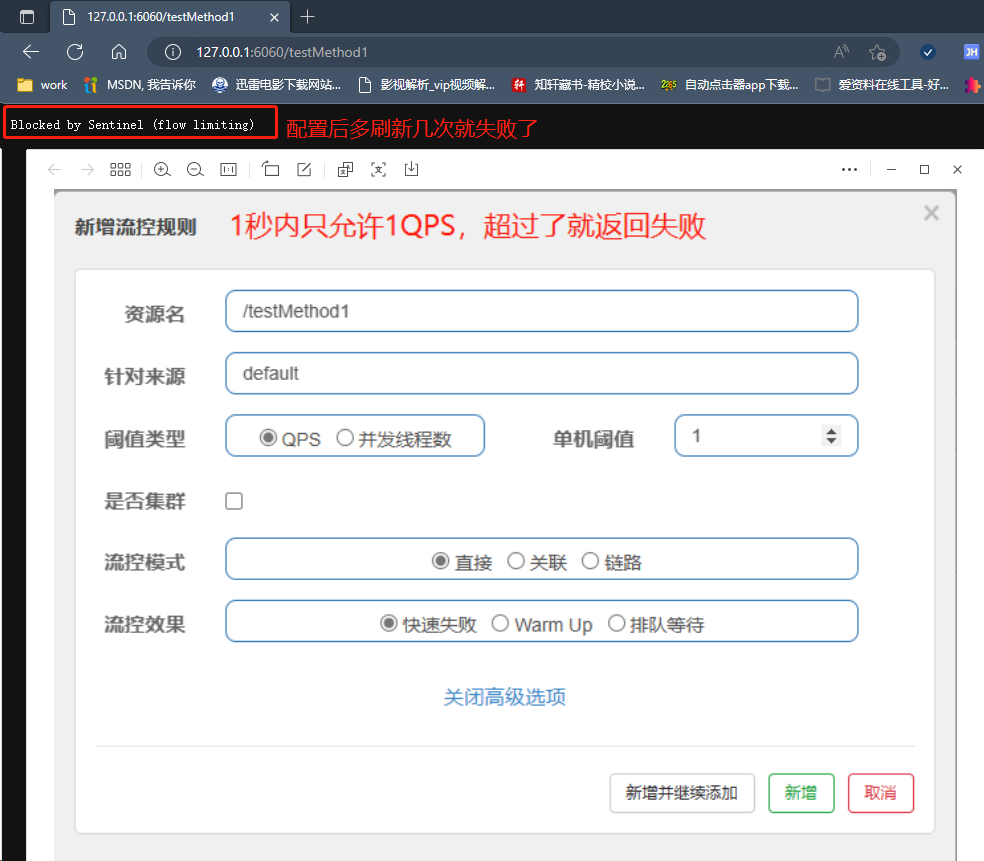
a.直接-快速失败
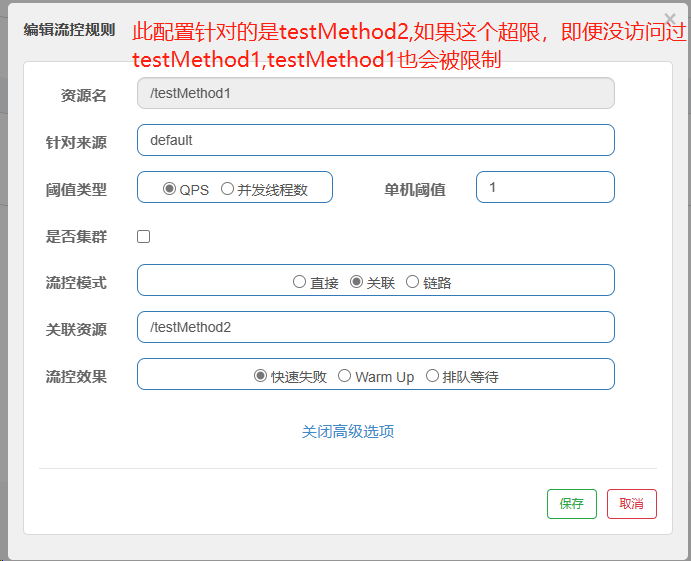
b.关联-快速失败
在上面创建的项目中再添加一个方法
    @GetMapping("testMethod2")
    public String testMethod2(){
        return "testMethod2";
    }
规则配置
验证方式
用各种http请求工具(postMan,postWoman,JMeter等)先对testMethod2发起循环请求,然后请求testMethod1,发现testMethod2被限制了
c.链路-快速失败
我使用1.8.6版sentinel,不能直接在页面配置,直接配置无效,根据网上解决方案,修改项目配置
新增配置类
import com.alibaba.csp.sentinel.adapter.servlet.CommonFilter;
import org.springframework.boot.web.servlet.FilterRegistrationBean;
import org.springframework.context.annotation.Bean;
import org.springframework.context.annotation.Configuration;

@Configuration
public class FilterContextConfig {
    /**
     * @NOTE 在spring-cloud-alibaba v2.1.1.RELEASE及前,sentinel1.7.0及后,关闭URL PATH聚合需要通过该方式,spring-cloud-alibaba v2.1.1.RELEASE后,可以通过配置关闭:spring.cloud.sentinel.web-context-unify=false
     * 手动注入Sentinel的过滤器,关闭Sentinel注入CommonFilter实例,修改配置文件中的 spring.cloud.sentinel.filter.enabled=false
     * 入口资源聚合问题:https://github.com/alibaba/Sentinel/issues/1024 或 https://github.com/alibaba/Sentinel/issues/1213
     * 入口资源聚合问题解决:https://github.com/alibaba/Sentinel/pull/1111
     */
    @Bean
    public FilterRegistrationBean sentinelFilterRegistration() {
        FilterRegistrationBean registration = new FilterRegistrationBean();
        registration.setFilter(new CommonFilter());
        registration.addUrlPatterns("/*");
        // 入口资源关闭聚合
        registration.addInitParameter(CommonFilter.WEB_CONTEXT_UNIFY, "false");
        registration.setName("sentinelFilter");
        registration.setOrder(1);
        return registration;
    }
}
增加Service层
@Service
public class DemoService {
    //SentinelResource定义资源名,fallback为触发限流执行的方法
    @SentinelResource(value = "myResources",fallback = "fallbackMethod")
    public String testMethod2()  {
        return "testMethod2";
    }
    public String fallbackMethod(BlockException ex) {
        return "fallbackMethod";
    }
}
Controller修改如下
import com.rb.service.DemoService;
import org.springframework.beans.factory.annotation.Autowired;
import org.springframework.web.bind.annotation.GetMapping;
import org.springframework.web.bind.annotation.RestController;


@RestController
public class DemoController {
    @Autowired
    DemoService demoService;
    @GetMapping("/testMethod1")
    public String testMethod1(){

        return demoService.testMethod2();
    }
    @GetMapping("/testMethod3")
    public String testMethod3(){

        return demoService.testMethod2();
    }
}
页面配置如下
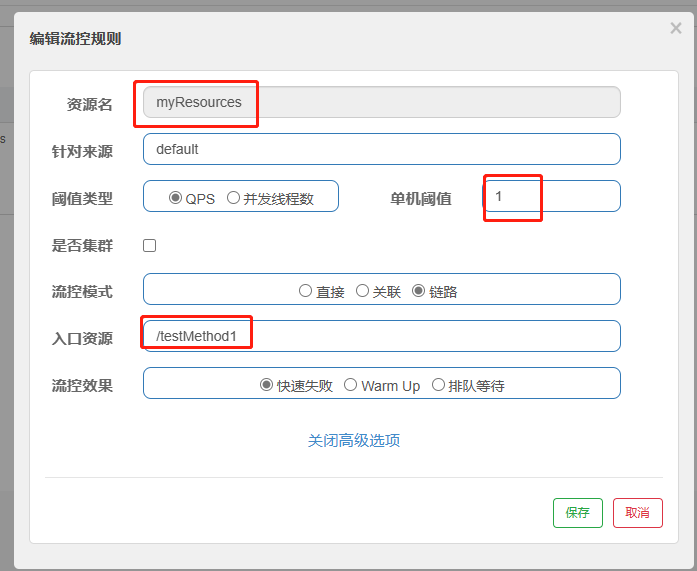
在访问testMethod1方法时,会触发限流,而访问testMethod2不会
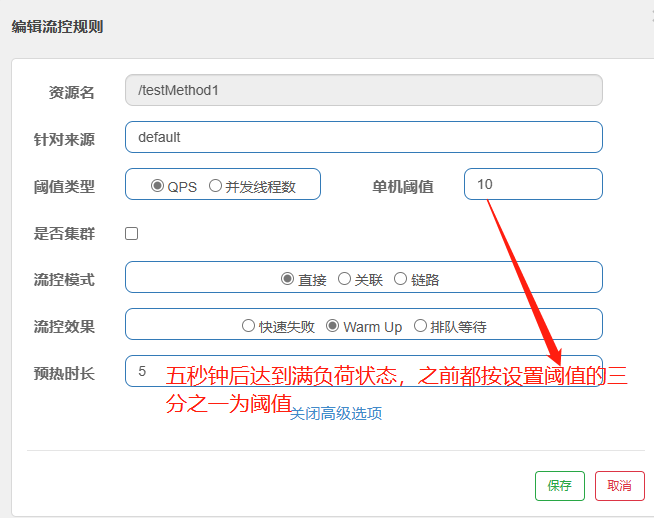
d.WarmUp预热
假设系统最大并发量是10,但不想一上来就到达上限,需要经过一定时间,就需要配置这个
公式:阈值/coldFactor(默认值为3),经过指定的预热时长后才会达到阈值
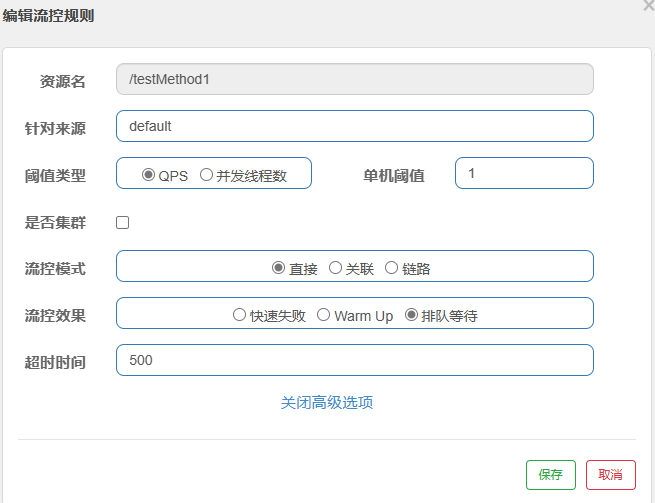
e.排队等待
下图为阈值类型为QPS下,每秒请求1次,超过不拦截,只不过会排队等待,超时时间为500ms,超时后进入流控拦截
f.阈值类型为:并发线程数
大体同通上面的配置
熔断规则
与Hystrix差异为,Sentinel没有半开的状态
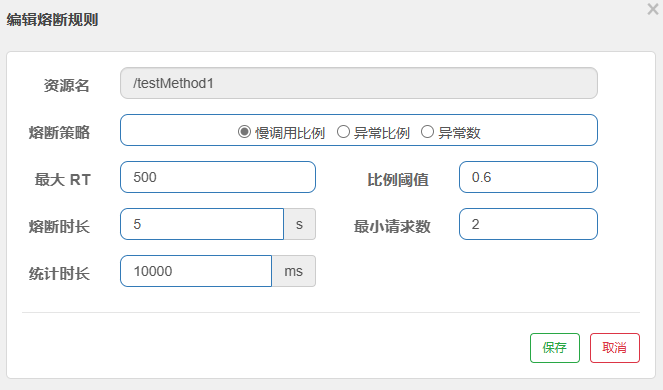
a.慢调用比例
下图设置内容
单次最大请求时间:500MS
比例阈值:0.0~1 代表超时数比例,当前配置为60%,即60%的请求超过单次请求时间
熔断时长:触发熔断规则后熔断5秒
最小请求数:请求数≥2时才做判断,既≥2并且60%的请求超过单次请求时间才触发熔断
统计时长:统计周期10秒内
b.异常比例
大体同慢调用比例
c.异常数
大体同慢调用比例
热点规则
使用
java代码修改
    @GetMapping("/testMethod1")
    @SentinelResource(value = "hotKey")
    public String testMethod1(@RequestParam(value = "parameter1",required = false) String parameter1,
                             @RequestParam(value = "parameter2",required = false) String parameter2,
                             @RequestParam(value = "parameter3",required = false) String parameter3){
        return "testMethod1";
    }
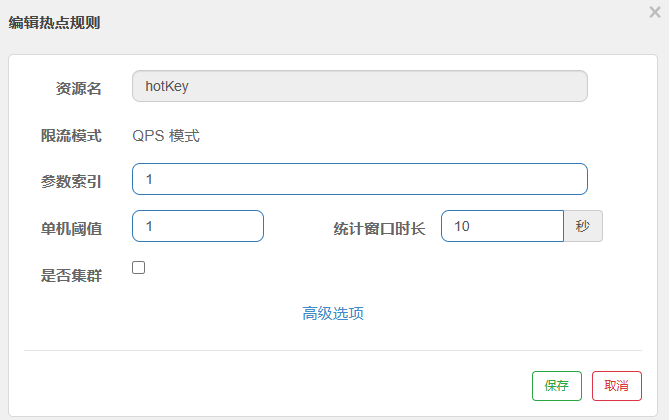
下图配置规则内容:资源为HotKey的请求,如果带有parameter2参数,则实施QPS1的规则监控,统计周期10秒钟,testMethod1方法中参数写的顺序和下图参数索引是一 一对应的
参数例外项
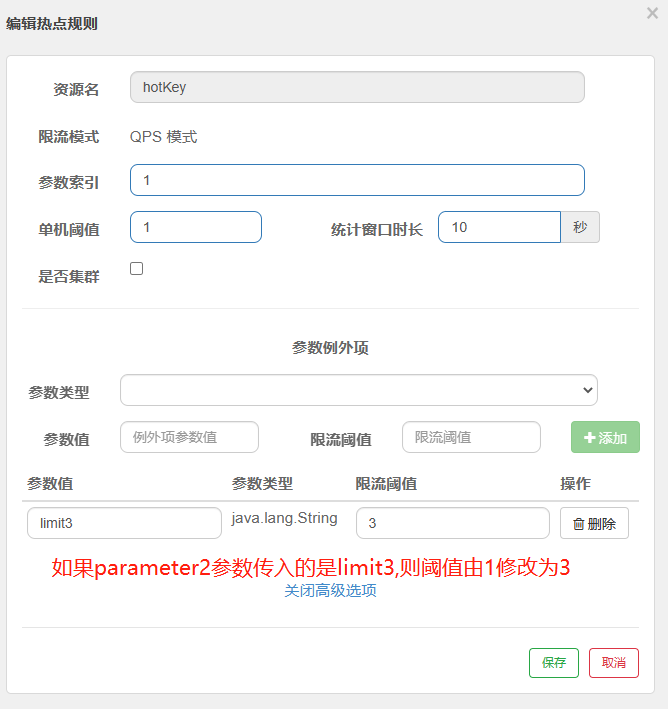
上面的配置只要parameter2传入则进入热点控制规则监控,如果想针对parameter2参数不同的值做限制,可如下配置
自定义兜底方法
上面流控、熔断、热点规则触发后,都会走Sentinel默认的兜底方法,下面来实现自定义的兜底方法
每个资源单独配置兜底方法
修改java代码
    @GetMapping("/testMethod1")
    @SentinelResource(value = "hotKey",blockHandler = "blockHandlerMethod")
    public String testMethod1(@RequestParam(value = "parameter1",required = false) String parameter1,
                              @RequestParam(value = "parameter2",required = false) String parameter2){
        return "testMethod1";
    }
	//触发规则兜底方法
    public String blockHandlerMethod(String parameter1,String parameter2, BlockException exception){
        return "blockHandlerMethod";
    }
系统通用兜底方法
a.添加通用方法
import com.alibaba.csp.sentinel.slots.block.BlockException;

public class BlockHandler {
    //一定要是static方法,并且参数和资源方法参数数量一致
    public static String defaultBlockHandlerMethod(String parameter1,String parameter2, BlockException exception){
        return "defaultBlockHandlerMethod";
    }
}
b.资源方法修改
    @GetMapping("/testMethod1")
    @SentinelResource(value = "defaultBlockHandler",blockHandlerClass = BlockHandler.class,blockHandler = "defaultBlockHandlerMethod")
    public String testMethod1(@RequestParam(value = "parameter1",required = false) String parameter1,
                              @RequestParam(value = "parameter2",required = false) String parameter2){
        return "testMethod1";
    }
程序报错降级配置
a.添加通用方法
public class FallBackHandler {

    public static String defaultFallBackMethod(){
        return "defaultFallBackMethod";
    }
}
b.资源方法修改
	//配置规则和blockHandler一致,什么参数个数啊,通用非通用fallBack啊,都一致
	@GetMapping("/testMethod3")
    @SentinelResource(value = "fallBackHandler",fallback = "fallBackMethod")
    public String testMethod3(){
        int num=1/0;
        return "testMethod3";
    }
    public String fallBackMethod(){
        return "fallBackMethod";
    }
    @GetMapping("/testMethod4")
    @SentinelResource(value = "defaultFallBackHandler",fallback = "defaultFallBackMethod",fallbackClass = FallBackHandler.class)
    public String testMethod4(){
        int num=1/0;
        return "testMethod4";
    }
系统规则
很简单,就是系统总入口的一个限流策略,见官方文档
Sentinel配置持久化
上面的操作,一旦项目重启,配置都会丢失
单一规则配置
POM
<!--添加配置-->
<dependency>
            <groupId>com.alibaba.csp</groupId>
            <artifactId>sentinel-datasource-nacos</artifactId>
            <version>1.8.6</version>
        </dependency>
YML
server:
  port: 6060

spring:
  application:
    name: sentinel-project
  cloud:
    nacos:
      discovery:
        #Nacos服务注册中心地址
        server-addr: 10.20.30.227:9999
    sentinel:
      transport:
        #配置Sentinel dashboard地址
        dashboard: 10.20.30.94:8080
        #默认8719端口,假如被占用会自动从8719开始依次+1扫描,直至找到未被占用的端口
        port: 8719
      datasource: #sentinel持久化配置
        ds1:
          nacos:
            server-addr: 10.20.30.227:9999 #nacos地址
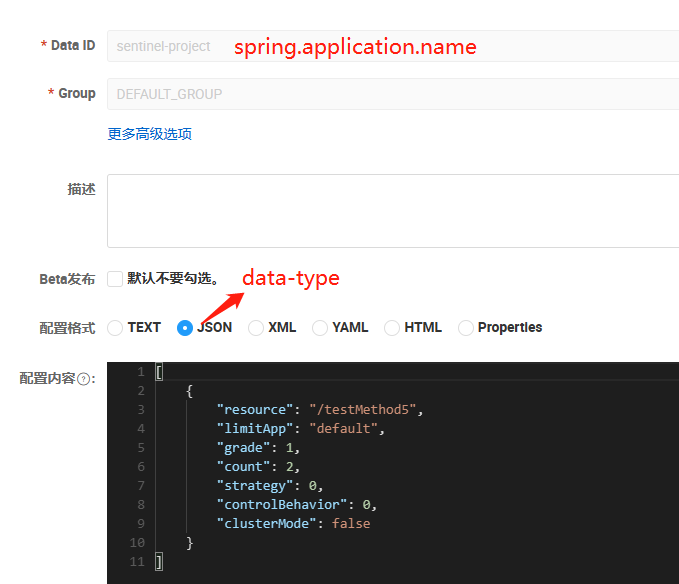
            dataId: ${spring.application.name}
            groupId: DEFAULT_GROUP
            data-type: json
            rule-type: flow
management:
  endpoints:
    web:
      exposure:
        include: '*'
Nacos配置
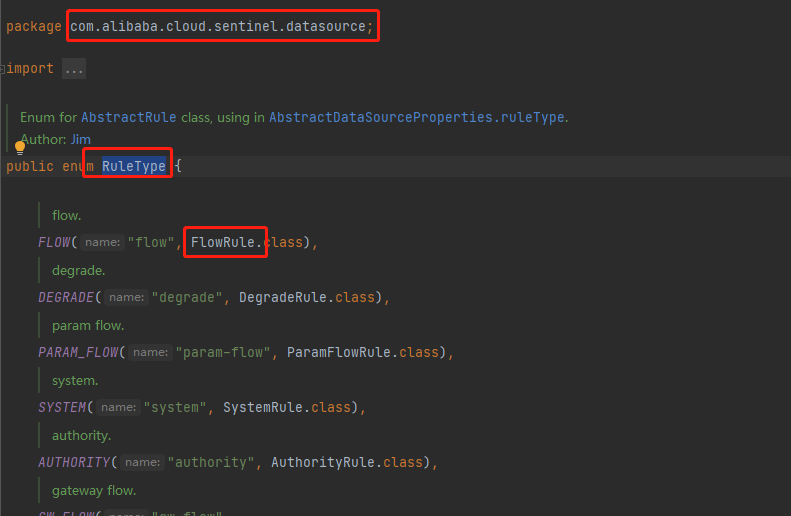
JSON字段含义见官网,或者查询源码(源码见下图)
项目JAVA代码
//此处的testMethod5就是上一步Nacos中的resource,如果通过@SentinelResource指定了资源名,那就写资源名
@GetMapping("/testMethod5")
    public String testMethod5(){
        return "testMethod5";
    }
测试
a.重启服务
b.请求一次testMethod5
c.去Sentinel控制台查看流控规则,发现未通过页面创建,但规则已经生成了,并且服务重启不会丢失
多规则配置
上面配置为指定了一个“流控规则”,如果我想同时配置“流控”和“熔断”呢?上方配置修改如下
YML
server:
  port: 6060

spring:
  application:
    name: sentinel-project
  cloud:
    nacos:
      discovery:
        #Nacos服务注册中心地址
        server-addr: 10.20.30.227:9999
    sentinel:
      transport:
        #配置Sentinel dashboard地址
        dashboard: 10.20.30.94:8080
        #默认8719端口,假如被占用会自动从8719开始依次+1扫描,直至找到未被占用的端口
        port: 8719
      datasource: #sentinel持久化配置
        ds1: #就是自定义Key,也可以叫做限流类型等等
          nacos:
            server-addr: 10.20.30.227:9999 #nacos地址
            dataId: flow #就是nacos配置里面的
            groupId: DEFAULT_GROUP #就是nacos配置里面的
            data-type: json #就是nacos配置里面的
            rule-type: flow #此处为流控规则,具体类型见com.alibaba.cloud.sentinel.datasource.RuleType
        ds2: #就是自定义Key,也可以叫做限流类型等等
          nacos:
            server-addr: 10.20.30.227:9999 #nacos地址
            dataId: degrade
            groupId: DEFAULT_GROUP
            data-type: json
            rule-type: degrade #此处为熔断规则,具体类型见com.alibaba.cloud.sentinel.datasource.RuleType
management:
  endpoints:
    web:
      exposure:
        include: '*'
Nacos
根据上述配置在Nacos控制台中添加相关配置,重启服务,请求一次连接,查看Sentinel控制台,发现规则已经出现
标签:持久,String,配置,sentinel,规则,Sentinel,安装,public From: https://www.cnblogs.com/rb2010/p/17174689.html