目录
上一节讲到了分库分表的的实现原理,本质就是通过先改写sql语句,然后拿到数据库执行完毕再返回
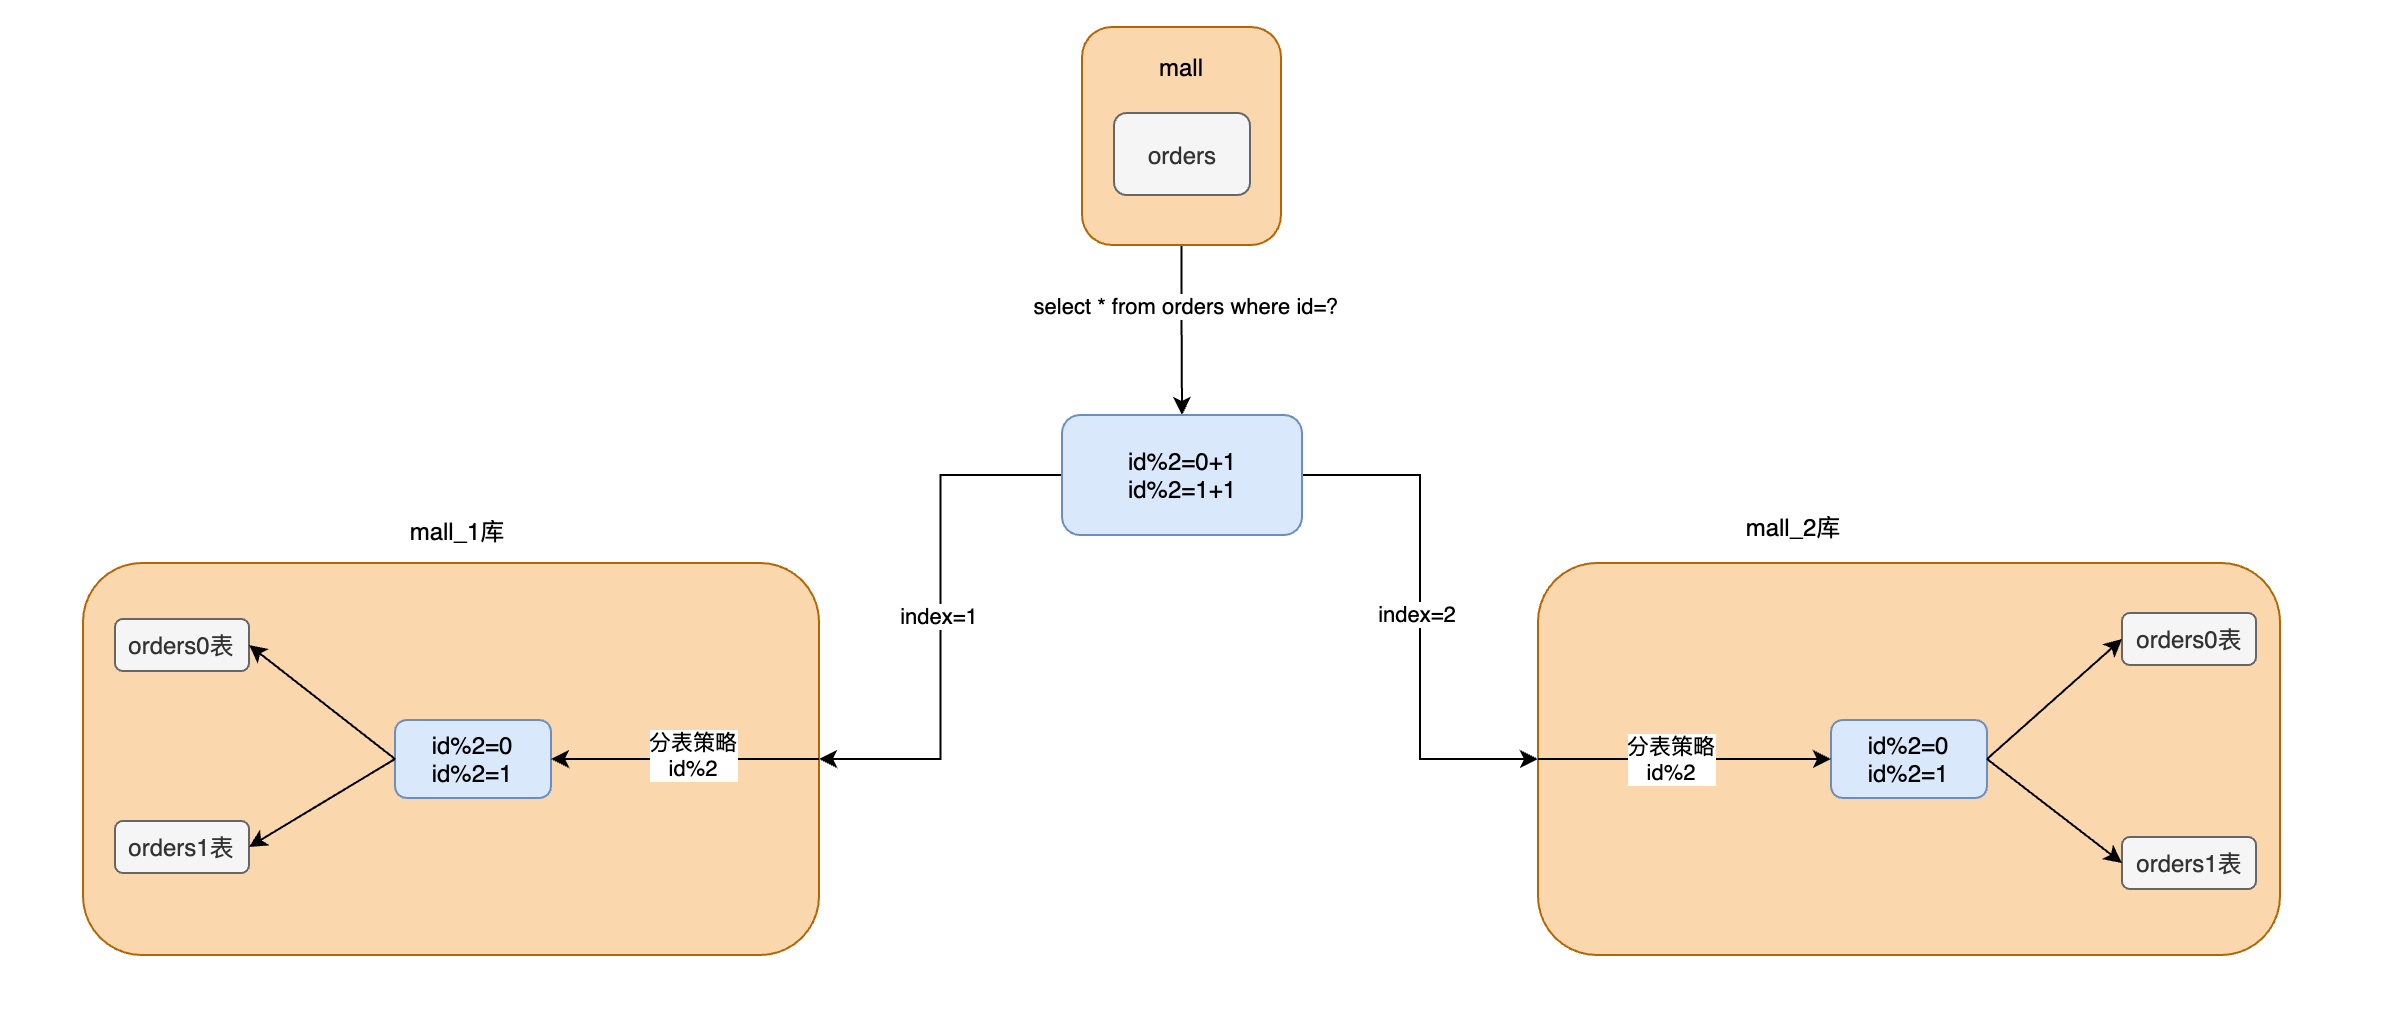
分库分表后,如果根据sql语句找到对应的库和表呢
- 首先在配置文件配置多数据源(多库),获取配置信息注入到系统中
- 通过AOP切面在执行的sql的上面加上自定义注解,还有标注分库、分表的字段
- AOP进行拦截根据路由字段进行计算到具体的数据源,这里涉及到分库分表的算法选择
- 在sql执行的时候通过Mybatis拦截器获取sql语句然后替换表名称
大致步骤明白了,接下来看如何实现吧
分库分表设计概要
水平分库拆分为两个库mall_1、mall_2,每个库2个表orders0、orders1

CREATE DATABASE `mall_1`;

-- mall_1.orders0 definition

CREATE TABLE `orders0` (
  `id` bigint NOT NULL AUTO_INCREMENT,
  `order_number` bigint NOT NULL,
  `create_time` date NOT NULL,
  `creater` varchar(20) NOT NULL,
  `money` decimal(10,0) NOT NULL,
  PRIMARY KEY (`id`)
) ENGINE=InnoDB AUTO_INCREMENT=1553314824824299523 DEFAULT CHARSET=utf8mb4 COLLATE=utf8mb4_0900_ai_ci;


-- mall_1.orders1 definition

CREATE TABLE `orders1` (
  `id` bigint NOT NULL AUTO_INCREMENT,
  `order_number` bigint NOT NULL,
  `create_time` date NOT NULL,
  `creater` varchar(20) NOT NULL,
  `money` decimal(10,0) NOT NULL,
  PRIMARY KEY (`id`)
) ENGINE=InnoDB AUTO_INCREMENT=1553314460645474306 DEFAULT CHARSET=utf8mb4 COLLATE=utf8mb4_0900_ai_ci;

CREATE DATABASE `mall_2`;

CREATE TABLE `orders0` (
  `id` bigint NOT NULL AUTO_INCREMENT,
  `order_number` bigint NOT NULL,
  `create_time` date NOT NULL,
  `creater` varchar(20) NOT NULL,
  `money` decimal(10,0) NOT NULL,
  PRIMARY KEY (`id`)
) ENGINE=InnoDB AUTO_INCREMENT=1553314824824299523 DEFAULT CHARSET=utf8mb4 COLLATE=utf8mb4_0900_ai_ci;


-- mall_1.orders1 definition

CREATE TABLE `orders1` (
  `id` bigint NOT NULL AUTO_INCREMENT,
  `order_number` bigint NOT NULL,
  `create_time` date NOT NULL,
  `creater` varchar(20) NOT NULL,
  `money` decimal(10,0) NOT NULL,
  PRIMARY KEY (`id`)
) ENGINE=InnoDB AUTO_INCREMENT=1553314460645474306 DEFAULT CHARSET=utf8mb4 COLLATE=utf8mb4_0900_ai_ci;
多数据源配置
一个库对应一个数据源,所以需要配置多数据源,然后在程序启动的时候将数据库信息注入进来
server.port=8099
spring.application.name=sub-db-sub-table
spring.profiles.active=dev


#多数据源
#db1
spring.datasource.db0.jdbcUrl=jdbc:mysql://121.43.33.150:3306/mall_1?serverTimezone=GMT%2B8
spring.datasource.db0.username=root
spring.datasource.db0.password=xxx
spring.datasource.db0.driver-class-name=com.mysql.cj.jdbc.Driver

#db2
spring.datasource.db1.jdbcUrl=jdbc:mysql://121.43.33.150:3306/mall_2?serverTimezone=GMT%2B8
spring.datasource.db1.username=root
spring.datasource.db1.password=xxx
spring.datasource.db1.driver-class-name=com.mysql.cj.jdbc.Driver

spring.datasource.db.count=2
spring.datasource.table.count=4

mybatis-plus.configuration.log-impl=org.apache.ibatis.logging.stdout.StdOutImpl
mybatis-plus.mapper-locations=classpath*:mybatis/mapper/*.xml

logging.level.com.ylc.dao=DEBUG
拿到配置文件信息可以通过实现Spring的EnvironmentAware接口,然后通过@Configuration注解把配置信息作为Bean对象加载到Spring容器中
数据源配置关键代码
通过@ConfigurationProperties注解,根据前缀获取到数据库配置
 @Bean("db0")
    @ConfigurationProperties(prefix = "spring.datasource.db0")
    public DataSource db0() {
        return DataSourceBuilder.create().build();
    }

    @Bean("db1")
    @ConfigurationProperties(prefix = "spring.datasource.db1")
    public DataSource db1() {
        return DataSourceBuilder.create().build();
    }

    /**
     * 动态数据源: 通过AOP在不同数据源之间动态切换
     * @return
     */
    @Primary
    @Bean(name = "dynamicDataSource")
    public DataSource dynamicDataSource() {
        DynamicDataSource dynamicDataSource = new DynamicDataSource();
        // 默认数据源
        dynamicDataSource.setDefaultTargetDataSource(db0());
        // 配置多数据源
        Map<Object, Object> dsMap = new HashMap<>(8);
        dsMap.put("db1", db0());
        dsMap.put("db2", db1());
        dynamicDataSource.setTargetDataSources(dsMap);
        return dynamicDataSource;
    }

    @Override
    public void setEnvironment(Environment environment) {
        dbCount = Integer.valueOf(environment.getProperty("spring.datasource.db.count"));
        tableCount = Integer.valueOf(environment.getProperty("spring.datasource.table.count"));
    }
以上演示了获取配置文件的两种方法:实现EnvironmentAware接口、使用@ConfigurationProperties注解
数据源切换
在分库的时候需要切分不同的数据库,可以通过实现AbstractRoutingDataSource类来实现,这个类是DataSource接口的实现类,通过重写determineCurrentLookupKey方法来实现这个效果,实际就是根据之前注入的DynamicDataSource对象来进行路由定位数据源的。
/**
 * 动态数据源获取  能根据key动态切换数据库
 * @author yanglingcong
 */
public class DynamicDataSource extends AbstractRoutingDataSource {
    @Override
    protected Object determineCurrentLookupKey() {
        return "db"+MultiDataSourceHolder.getDataSourceKey();
    }
}
自定义注解+AOP切面实现分库操作
自定义注解
用于存储分表字段的注解
@Documented
@Retention(RetentionPolicy.RUNTIME)
@Target({ElementType.TYPE, ElementType.METHOD})
public @interface DBRouter {

    /** 分库分表字段 */
    String key() default "";
}
AOP切面实现
AOP用于在使用自定义注解的方法上,通过拦截方法获取分片字段还有传入的值,进行数据库路由计算
package com.ylc.ascept;


import com.baomidou.mybatisplus.core.toolkit.StringUtils;
import com.ylc.annotation.DBRouter;
import com.ylc.config.MultiDataSourceHolder;
import com.ylc.strategy.IDBRouterStrategy;
import com.ylc.strategy.impl.DBRouterStrategyHashCode;
import lombok.extern.slf4j.Slf4j;
import org.apache.commons.beanutils.BeanUtils;
import org.aspectj.lang.JoinPoint;
import org.aspectj.lang.ProceedingJoinPoint;
import org.aspectj.lang.Signature;
import org.aspectj.lang.annotation.*;
import org.aspectj.lang.reflect.MethodSignature;
import org.springframework.beans.factory.annotation.Autowired;
import org.springframework.stereotype.Component;

import java.lang.reflect.Method;

/**
 * @author yanglingcong
 */
@Component
@Slf4j
@Aspect
public class AsceptRoute {

    @Autowired
    private IDBRouterStrategy dbRouterStrategy;

    @Pointcut("@annotation(com.ylc.annotation.DBRouter)")
    public void pointCut() {
    }

    @Before("pointCut()")
    public void before(JoinPoint joinPoint) {
    }

    @Around("pointCut()")
    public Object doRouter(ProceedingJoinPoint jp) throws Throwable {
        //获取方法调用名称
        Method method = getInvokeMethod(jp);
        //获取方法指定的注解
        DBRouter router = method.getAnnotation(DBRouter.class);
        //获取指定的路由key
        String dbKey = router.key();
        if (StringUtils.isBlank(dbKey)) {
            throw new RuntimeException("annotation DBRouter key is null!");
        }
        // 获取路由字段属性值
        String dbKeyAttr = getAttrValue(dbKey, jp.getArgs());
        // 路由策略
        dbRouterStrategy.doRouter(dbKeyAttr);
        // 返回结果
        return jp.proceed();
    }

    private Method getInvokeMethod(JoinPoint joinPoint) {
        Signature signature = joinPoint.getSignature();
        MethodSignature methodSignature = (MethodSignature)signature;
        Method targetMethod = methodSignature.getMethod();
        return targetMethod;
    }

    @After("pointCut()")
    public void  methodAfter(JoinPoint joinPoint){
        MultiDataSourceHolder.clearDataSourceKey();
        MultiDataSourceHolder.clearTableIndex();
    }
}
路由策略
    @Override
    public void doRouter(String dbKeyAttr) {
        int size = dataSourseConfig.getDbCount() * dataSourseConfig.getTableCount();
        //扰动函数
        int idx = (size - 1) & (dbKeyAttr.hashCode() ^ (dbKeyAttr.hashCode() >>> 16));
        // 库表索引
        int dbIdx = idx / dataSourseConfig.getTableCount() ;
        int tbIdx = idx - dataSourseConfig.getTableCount() * (dbIdx - 1);
        // 设置到 ThreadLocal
        MultiDataSourceHolder.setdataSourceKey(String.valueOf(dbIdx));
        MultiDataSourceHolder.setTableIndex(String.valueOf(tbIdx));
        log.info("数据库路由 dbIdx:{} tbIdx:{}",  dbIdx, tbIdx);
    }
1、通过AOP拦截获取分片字段还有值
2、拿到信息之后进行,这里使用了HashMap扰动函数、哈希索引进行库表索引的计算,使数据更加分散
3、然后把索引数据存入ThreadLocal中,使得在请求线程中可以获取到相关信息
4、最后调用方法完毕后清理ThreadLocal,为了避免内存泄漏
分库分表算法选择
分库分表要使得数据尽量分散,所以一般采用散列类型的算法
Hash算法
常见于HashMap集合实现:数组+链表+红黑树,为了将元素的位置更加散列用到了扰动函数,在存放元素的时候用到了这样一段代码
static final int hash(Object key) {
    int h;
    return (key == null) ? 0 : (h = key.hashCode()) ^ (h >>> 16);
}
把哈希值右移16位正好是自己的一半,然后通过异或运算增加随机性,减少碰撞
斐波那契数列黄金分割
常见于ThreadLocal数组,它底层是一个类似于链表的结构,也叫拉链存储,里面也用到了Hahs计算不同的是它用的自己实现的算法
  private static final int HASH_INCREMENT = 0x61c88647;

    private static int nextHashCode() {
        return nextHashCode.getAndAdd(HASH_INCREMENT);
    }
每创建一个对象,值就会增长 0x61c88647,为什么是这个值呢,这个值代表的是一个黄金分割树0.6180339887,也叫斐波那契数,就是为了让数据更加分散
Mybatis拦截器实现分表操作
Mybatis支持四种对象拦截Executor、StatementHandler、PameterHandler和ResultSetHandler
- Executor:拦截执行器的方法
- StatementHandler:拦截Sql语法构建的处理
- ParameterHandler:拦截参数的处理
- ResultHandler:拦截结果集的处理
可以基于SQL拦截器StatementHandler,通过拦截SQL语句然后修改SQL信息来达到分库分表的操作
@Intercepts({@Signature(type = StatementHandler.class, method = "prepare", args = {Connection.class, Integer.class})})
public class MybatisInterceptor implements Interceptor {

    //匹配增删改查sql
    //  [\s] 空白
    //  {1,} 匹配最少一个
    //  \w 匹配字母、数字、下划线
    private Pattern pattern = Pattern.compile("(from|into|update)[\\s]{1,}(\\w{1,})", Pattern.CASE_INSENSITIVE);

    @Override
    public Object intercept(Invocation invocation) throws Throwable {
        StatementHandler statementHandler = (StatementHandler) invocation.getTarget();
        //判断是否需要分库分表操作
        MetaObject metaObject = MetaObject.forObject(statementHandler, SystemMetaObject.DEFAULT_OBJECT_FACTORY, SystemMetaObject.DEFAULT_OBJECT_WRAPPER_FACTORY, new DefaultReflectorFactory());
        MappedStatement mappedStatement = (MappedStatement) metaObject.getValue("delegate.mappedStatement");

        // 获取自定义注解判断是否进行分表操作
        String className = mappedStatement.getId();
        String cn= className.substring(0, className.lastIndexOf("."));
        //方法名
        String methodName=className.substring(cn.length()+1);
        Class<?> clazz = Class.forName(cn);
        final Method[] method = clazz.getMethods();
        for (Method me : method) {
            if (me.getName().equals(methodName)&&me.isAnnotationPresent(DBRouter.class)) {
                DBRouter dbRouterStrategy = me.getAnnotation(DBRouter.class);
                if (ObjectUtils.isEmpty(dbRouterStrategy.key())){
                    return invocation.proceed();
                }
            }
        }
        BoundSql boundSql = statementHandler.getBoundSql();
        //参数
        Object obj = boundSql.getParameterObject();
        //sql语句
        String sql = boundSql.getSql();

        //匹配sql
        Matcher matcher = pattern.matcher(sql);
        String tableName = null;
        if (matcher.find()) {
            tableName = matcher.group().trim();
        }
        //替换表名
        String replaceSql = matcher.replaceAll(tableName  + MultiDataSourceHolder.getDataSourceKey());
        // 通过反射修改SQL语句
        Field field = boundSql.getClass().getDeclaredField("sql");
        field.setAccessible(true);
        field.set(boundSql, replaceSql);
        field.setAccessible(false);


        return invocation.proceed();
    }
}
通过实现Interceptor接口,利用正则表达式匹配当前SQL语句,然后替换掉表名修改表信息再设置回 Mybatis 执行 SQL 中,可以达到分表的效果
效果测试
根据id查询几条数据,在方法上加上@DBRouter注解
@Mapper
public interface OrderMapper extends BaseMapper<Orders> {

    @DBRouter(key = "id")
    Orders selectOneByMap(Orders orders);
}
id=10时,路由到了mall_1库,orders1表

id=1时,路由到了mall_0库,orders0表
