简介
安装配置
下文安装是在虚拟机中,操作系统为Centos8
erlang
参考自官网https://www.rabbitmq.com/download.html
注意erlang版本匹配
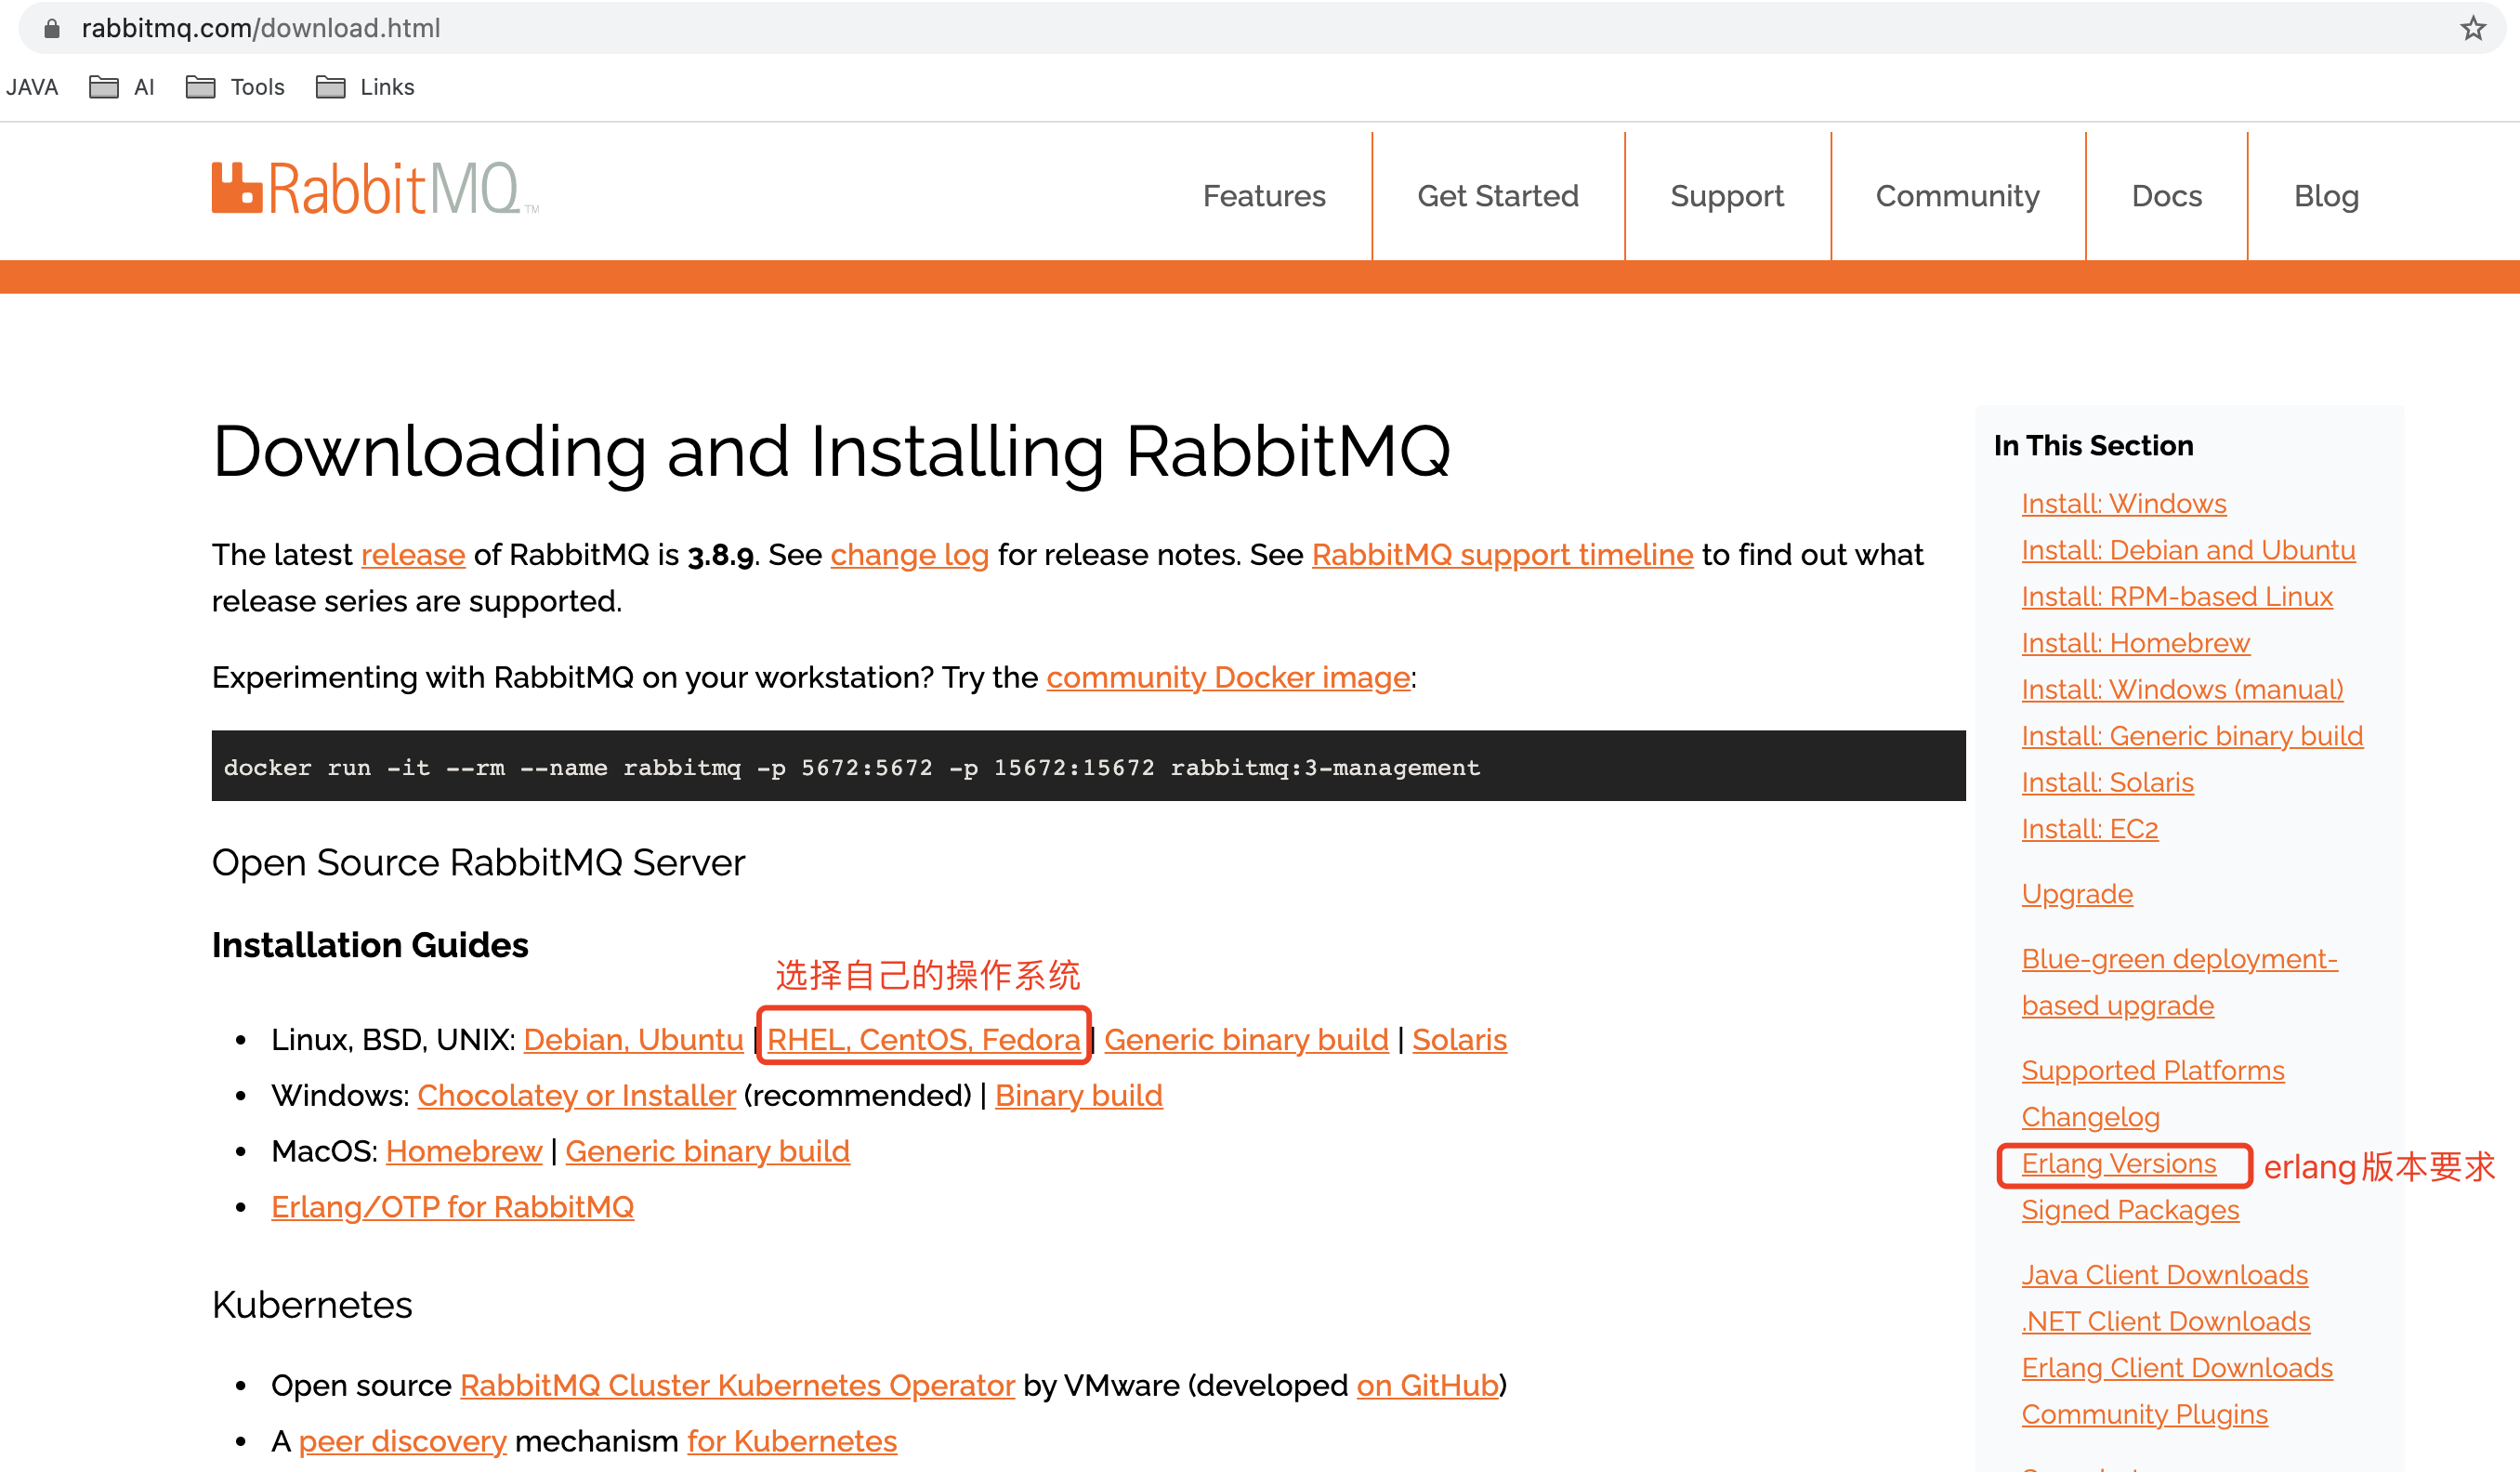
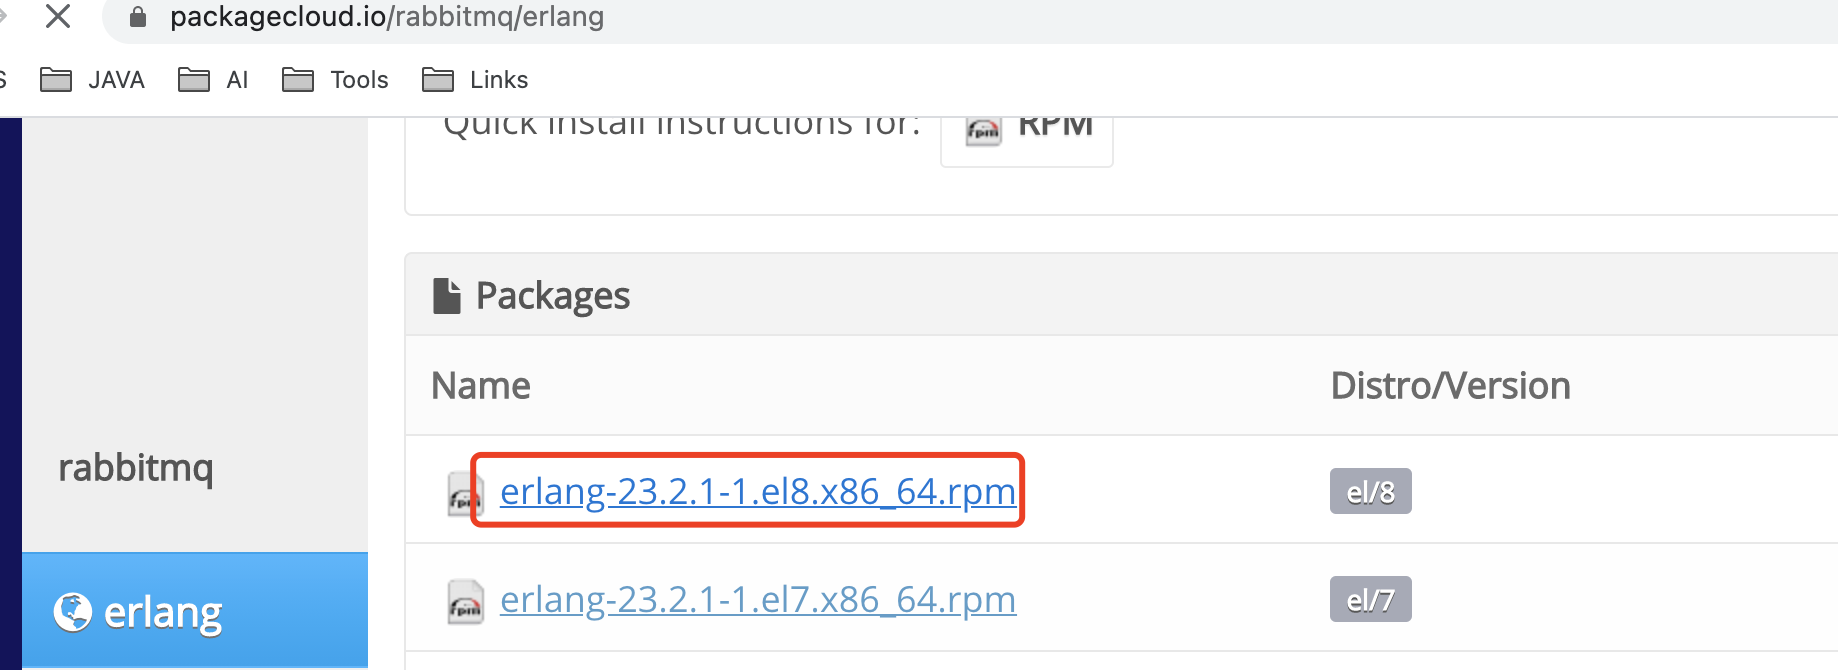
有多种安装源,这里使用匹配rabbitmq的精简版https://packagecloud.io/rabbitmq/erlang
我的系统版本为8,点击这个链接:
执行右侧的两个命令:
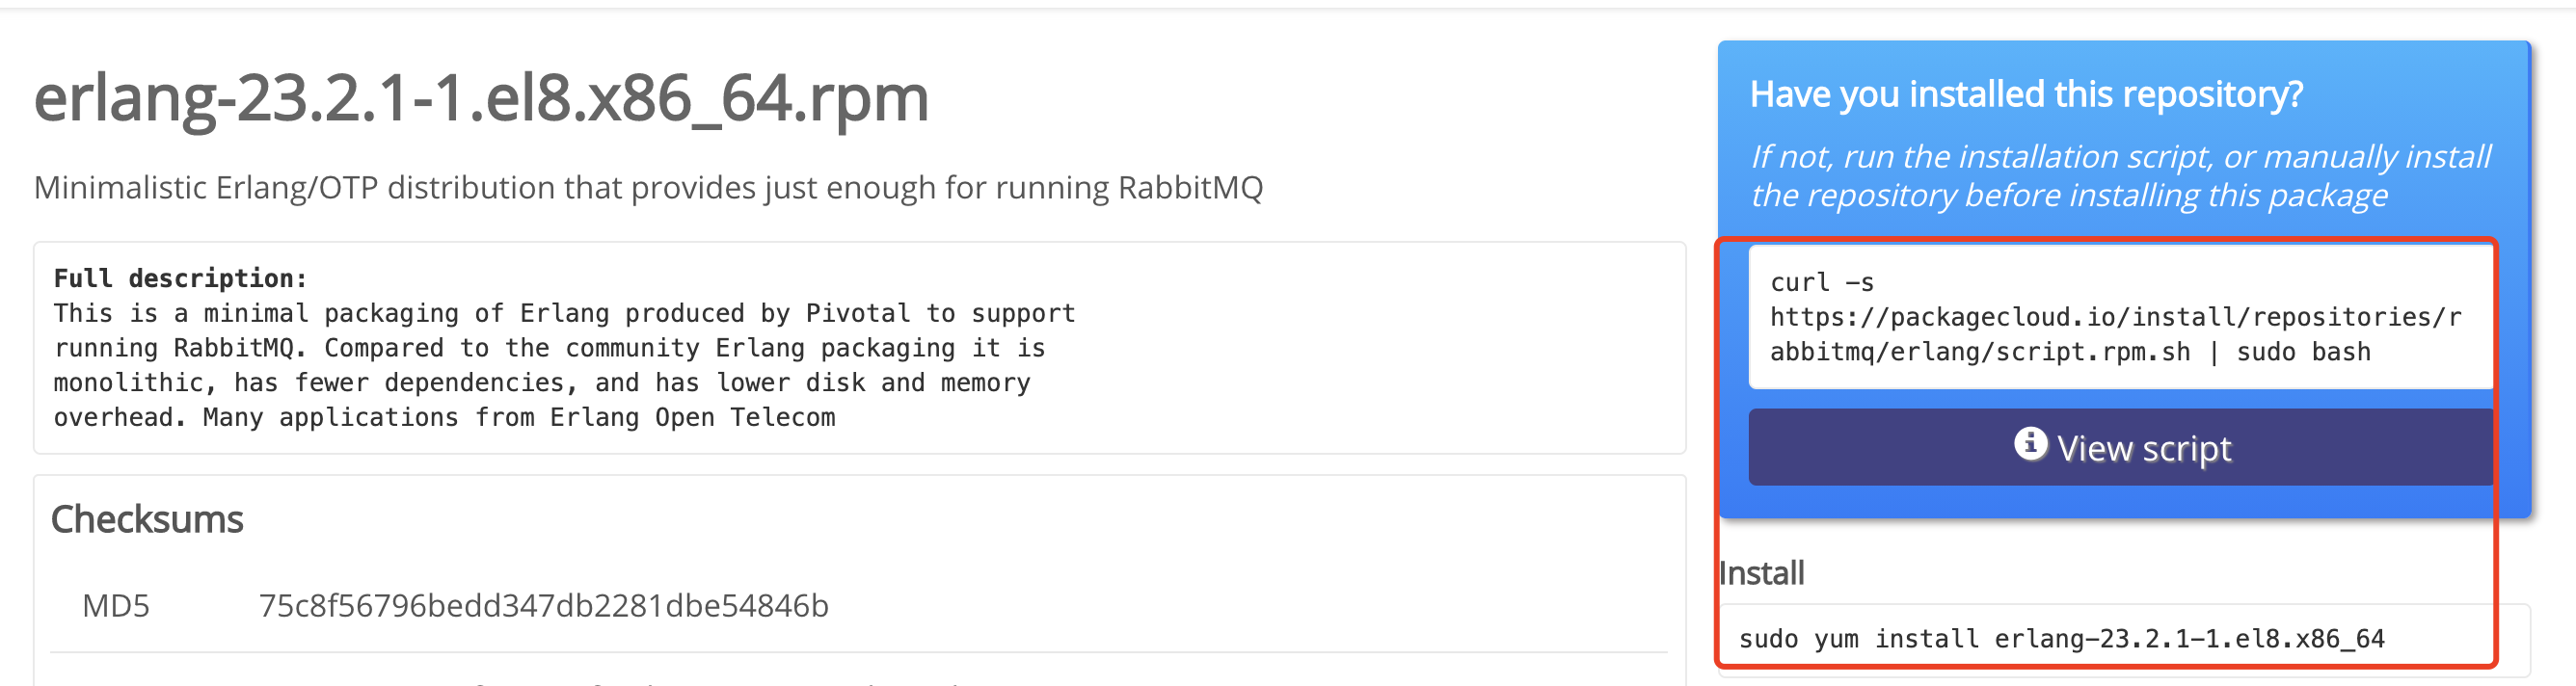
# 安装yum源
curl -s https://packagecloud.io/install/repositories/rabbitmq/erlang/script.rpm.sh | sudo bash

# 安装erlang
yum install erlang
依赖包
rabbitmq还有其他依赖包,直接安装即可: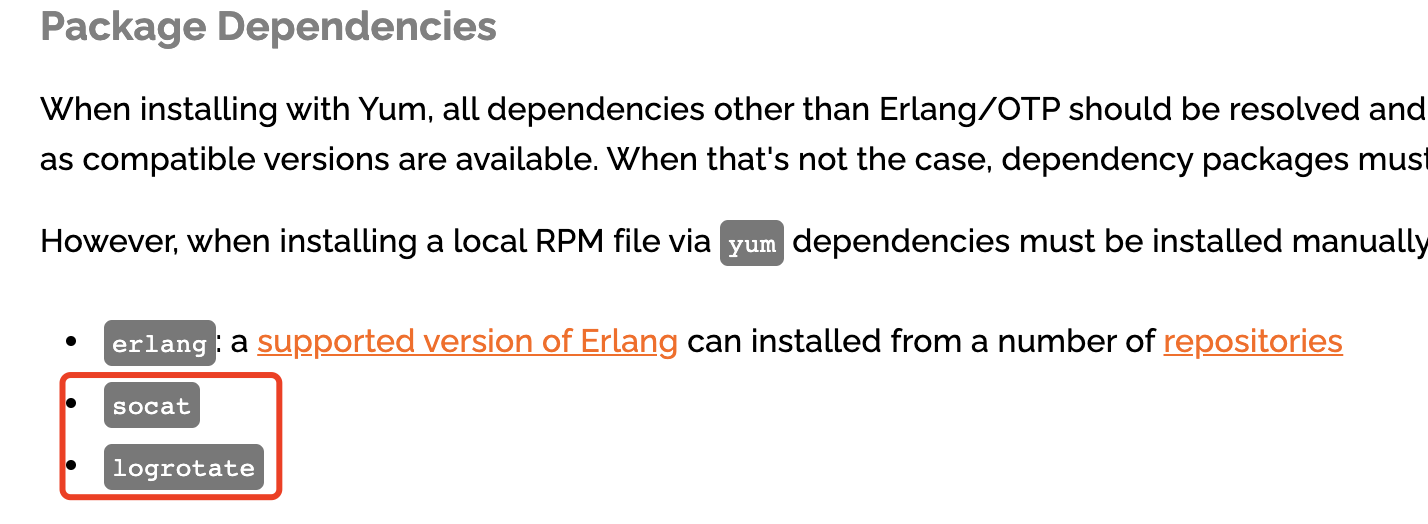
$ yum install socat
$ yum install logrotate
rabbitmq
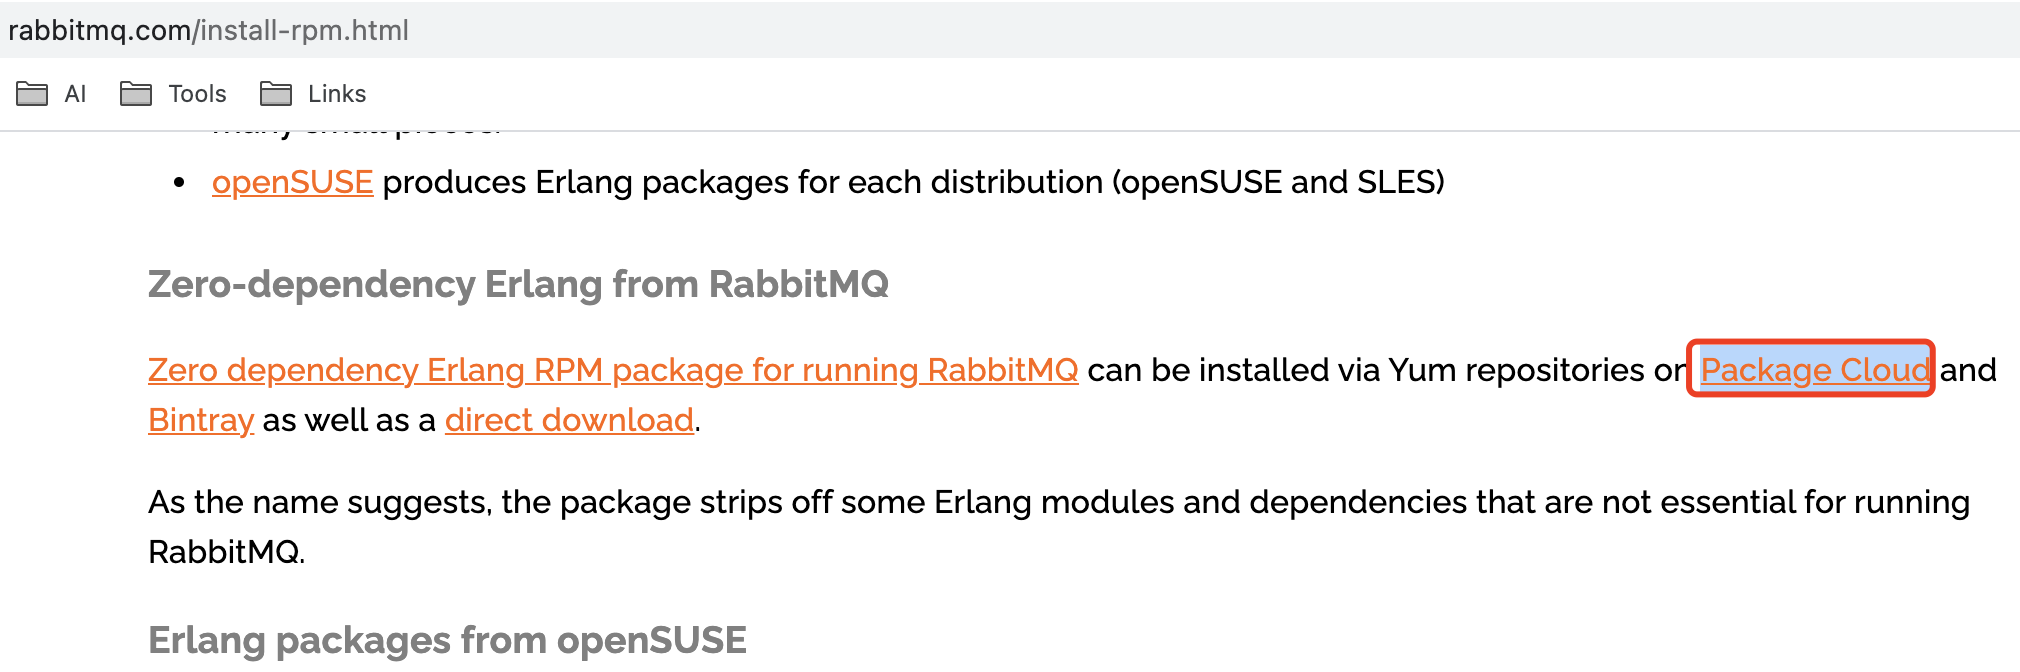
参考自官网https://www.rabbitmq.com/install-rpm.html
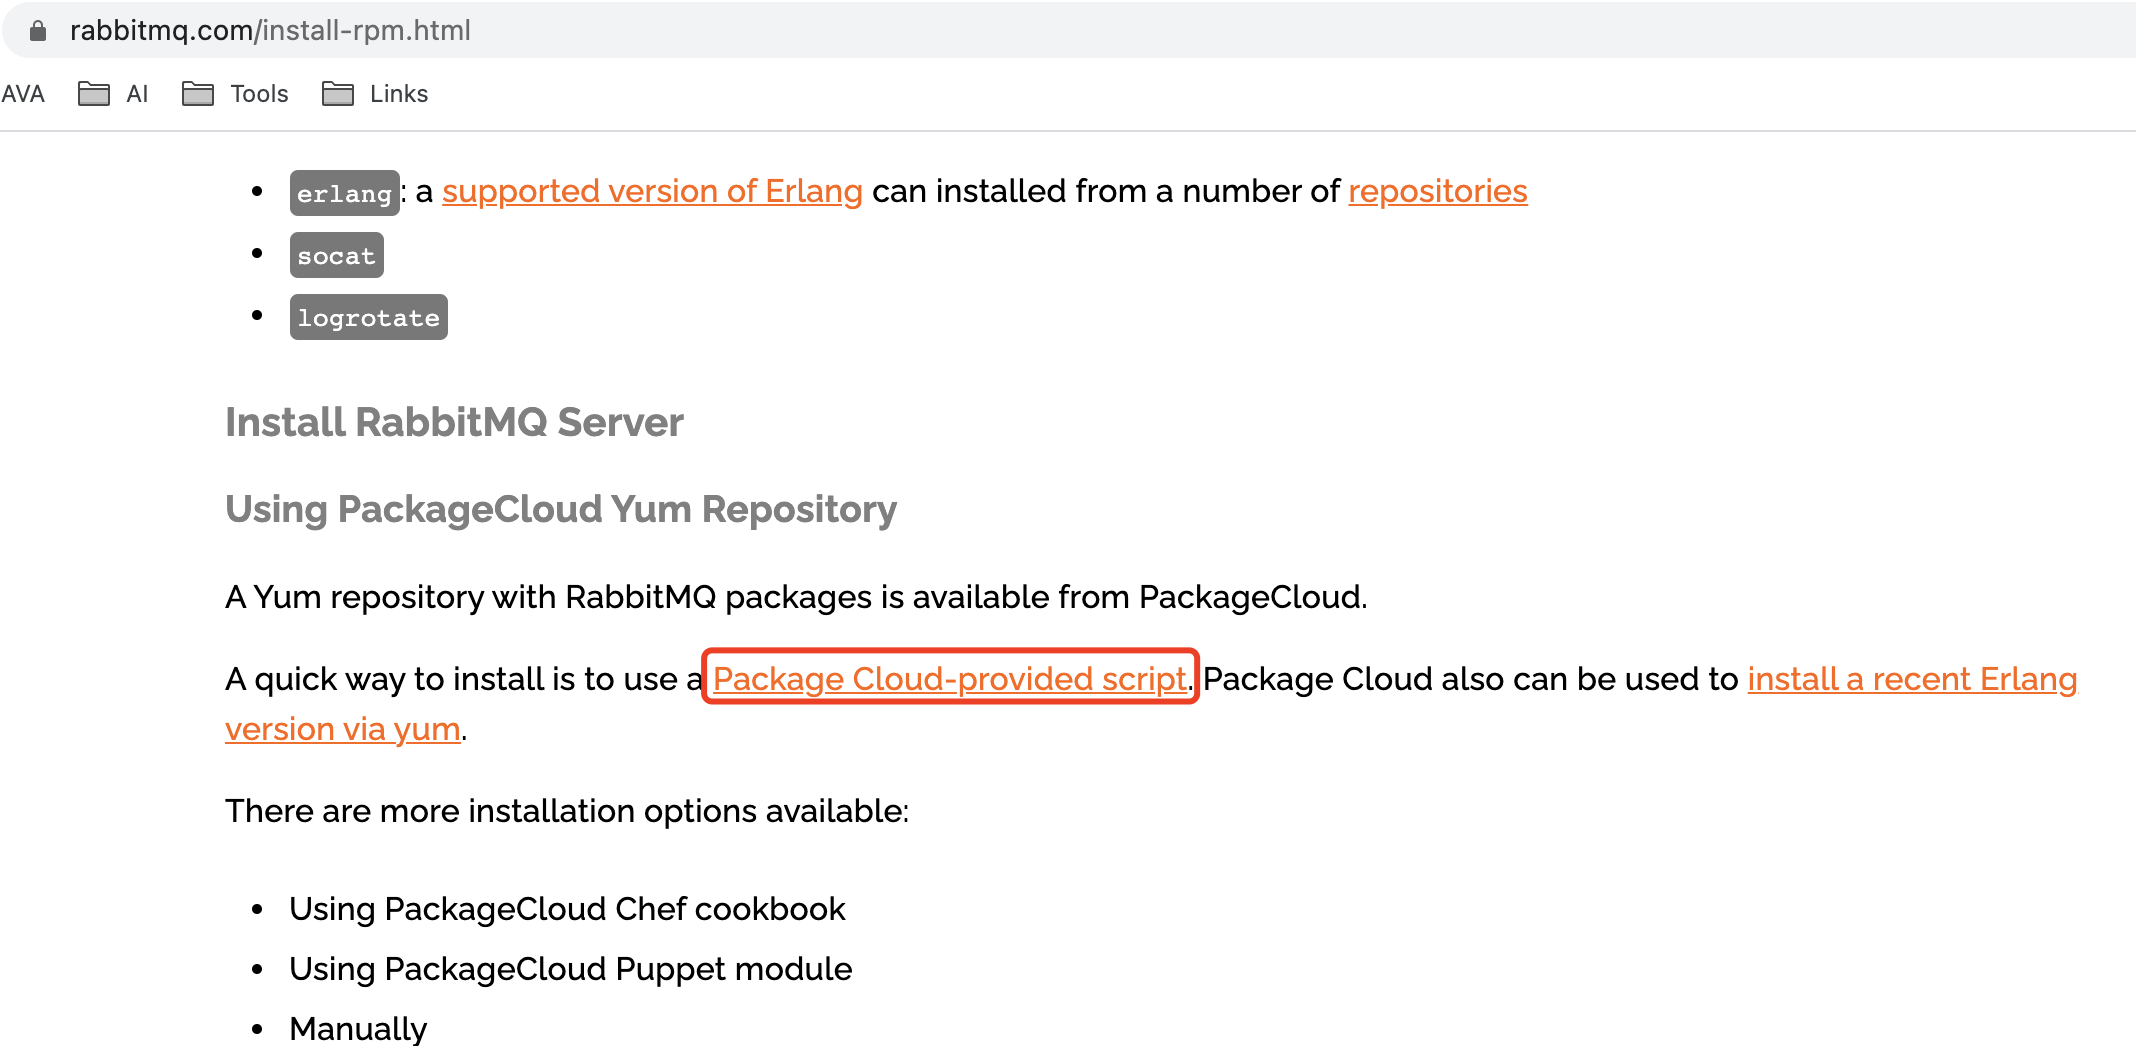
同样地,安装yum源:
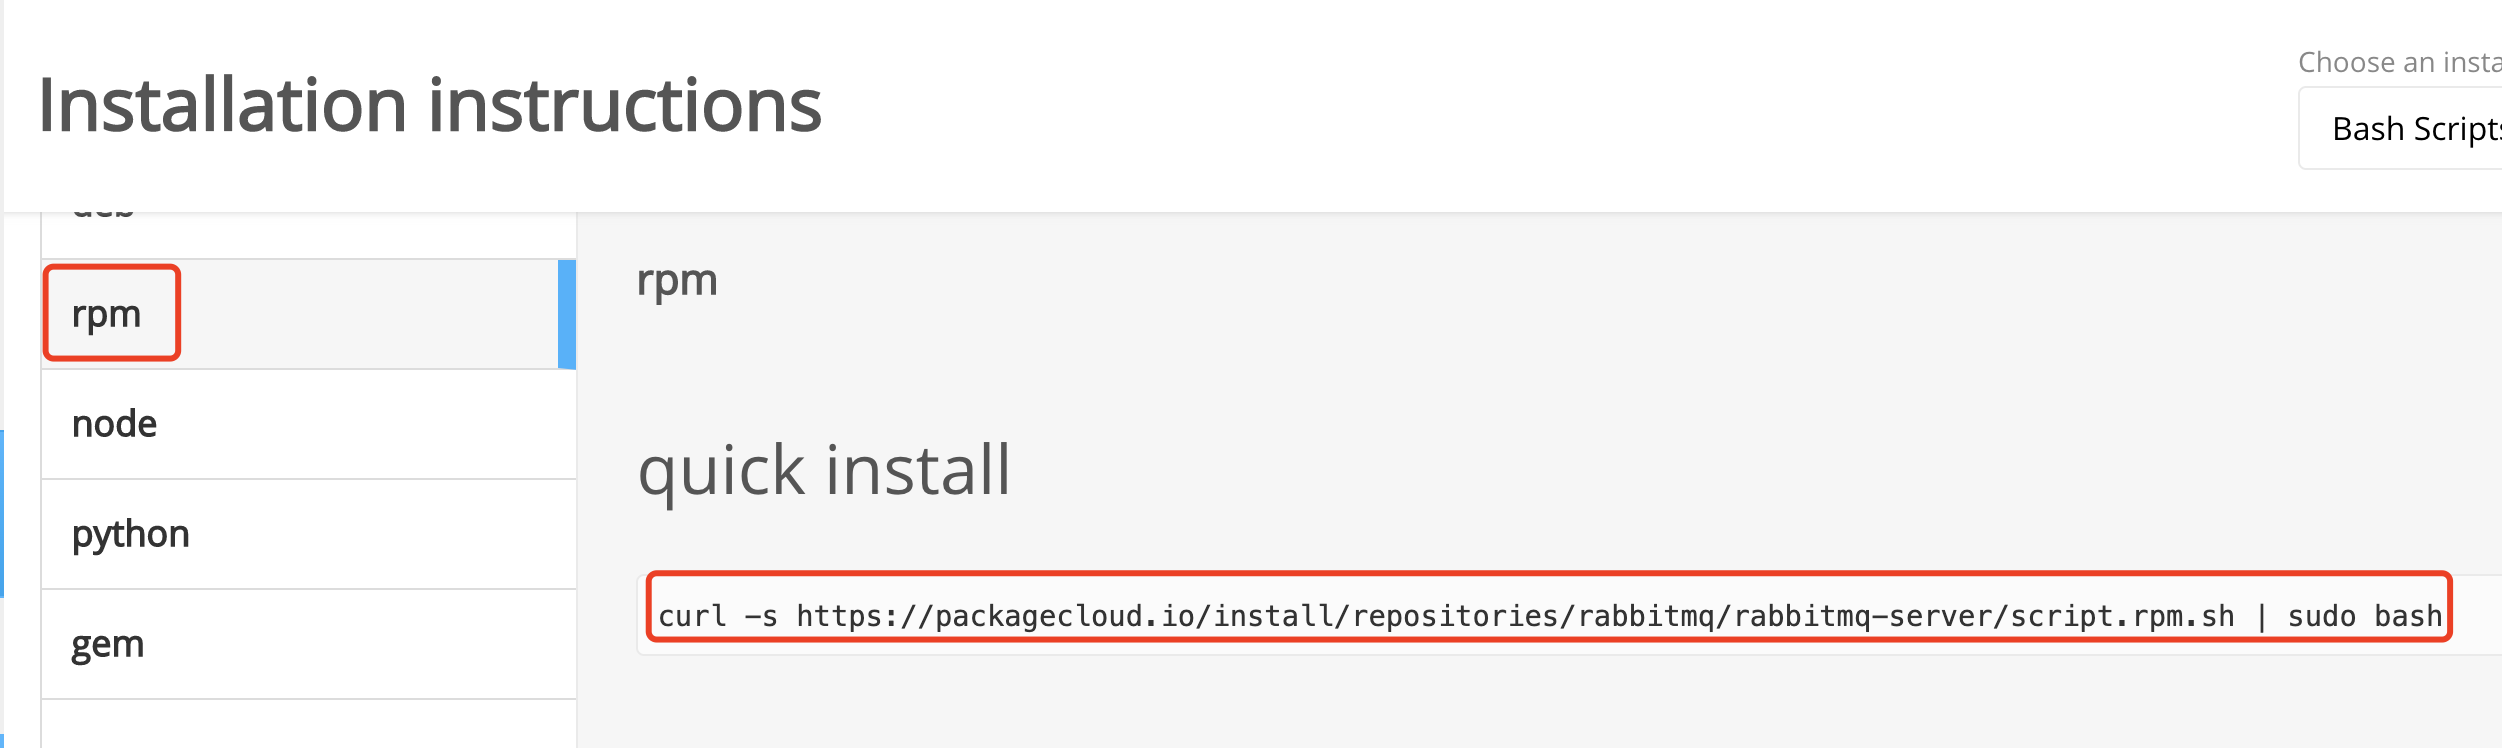
curl -s https://packagecloud.io/install/repositories/rabbitmq/rabbitmq-server/script.rpm.sh | sudo bash
安装server:
$ yum install rabbitmq-server
配置文件
模板文件
自3.7.0版本开始,rabbitmq-server使用新形式的配置文件。
下载模板文件(包含多数的默认配置),参考官网https://www.rabbitmq.com/configure.html:
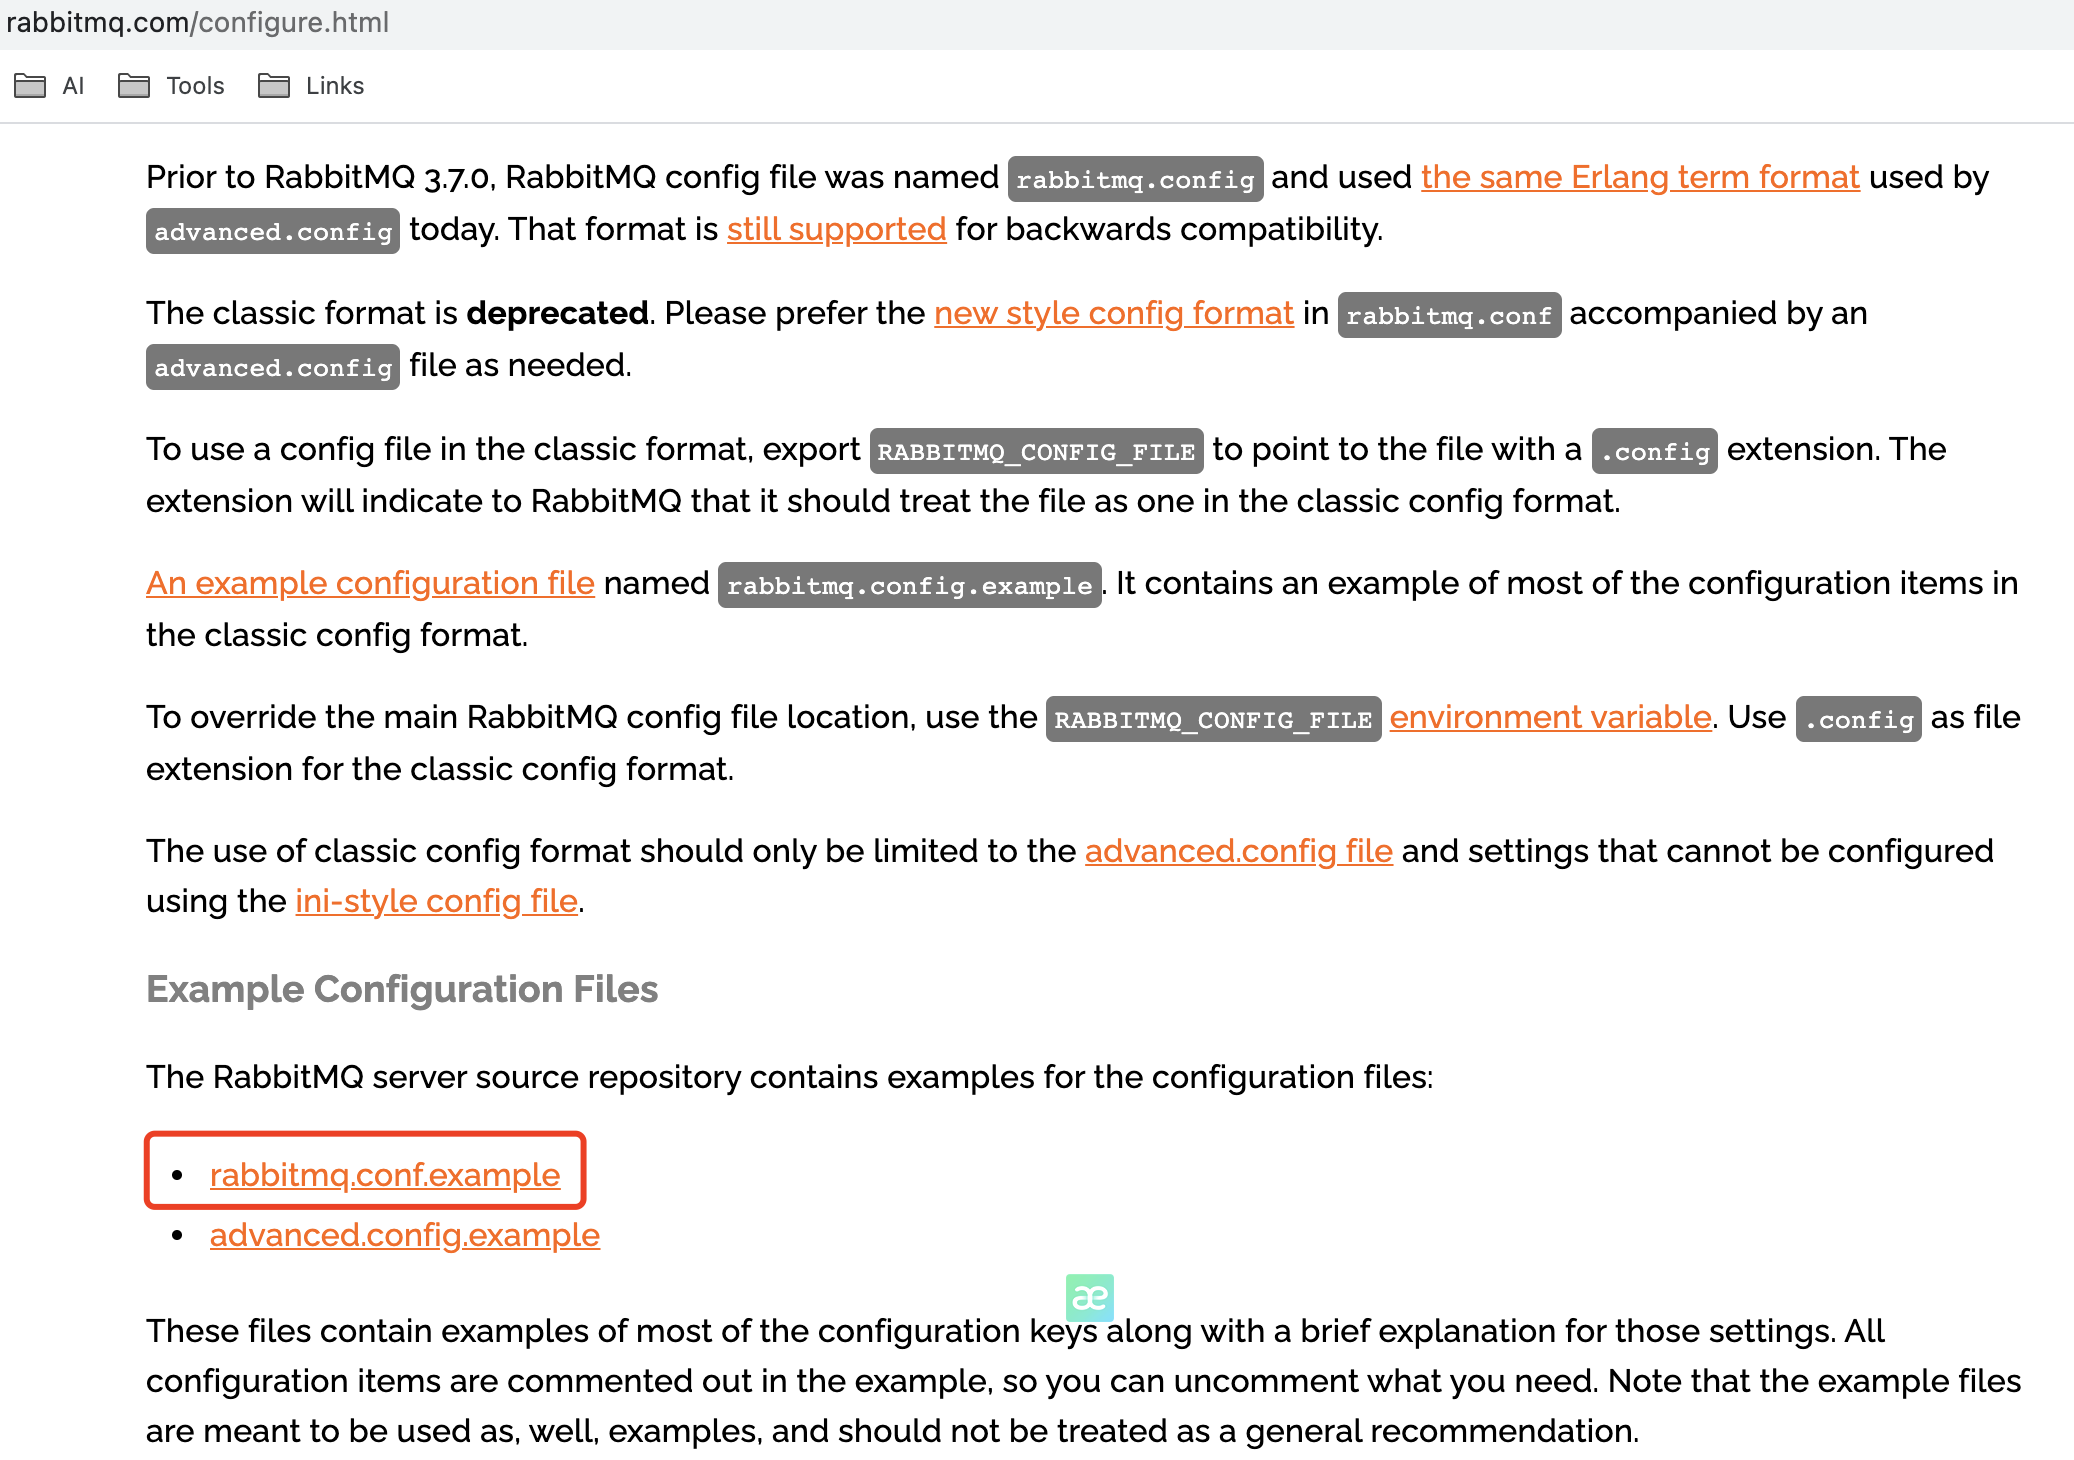
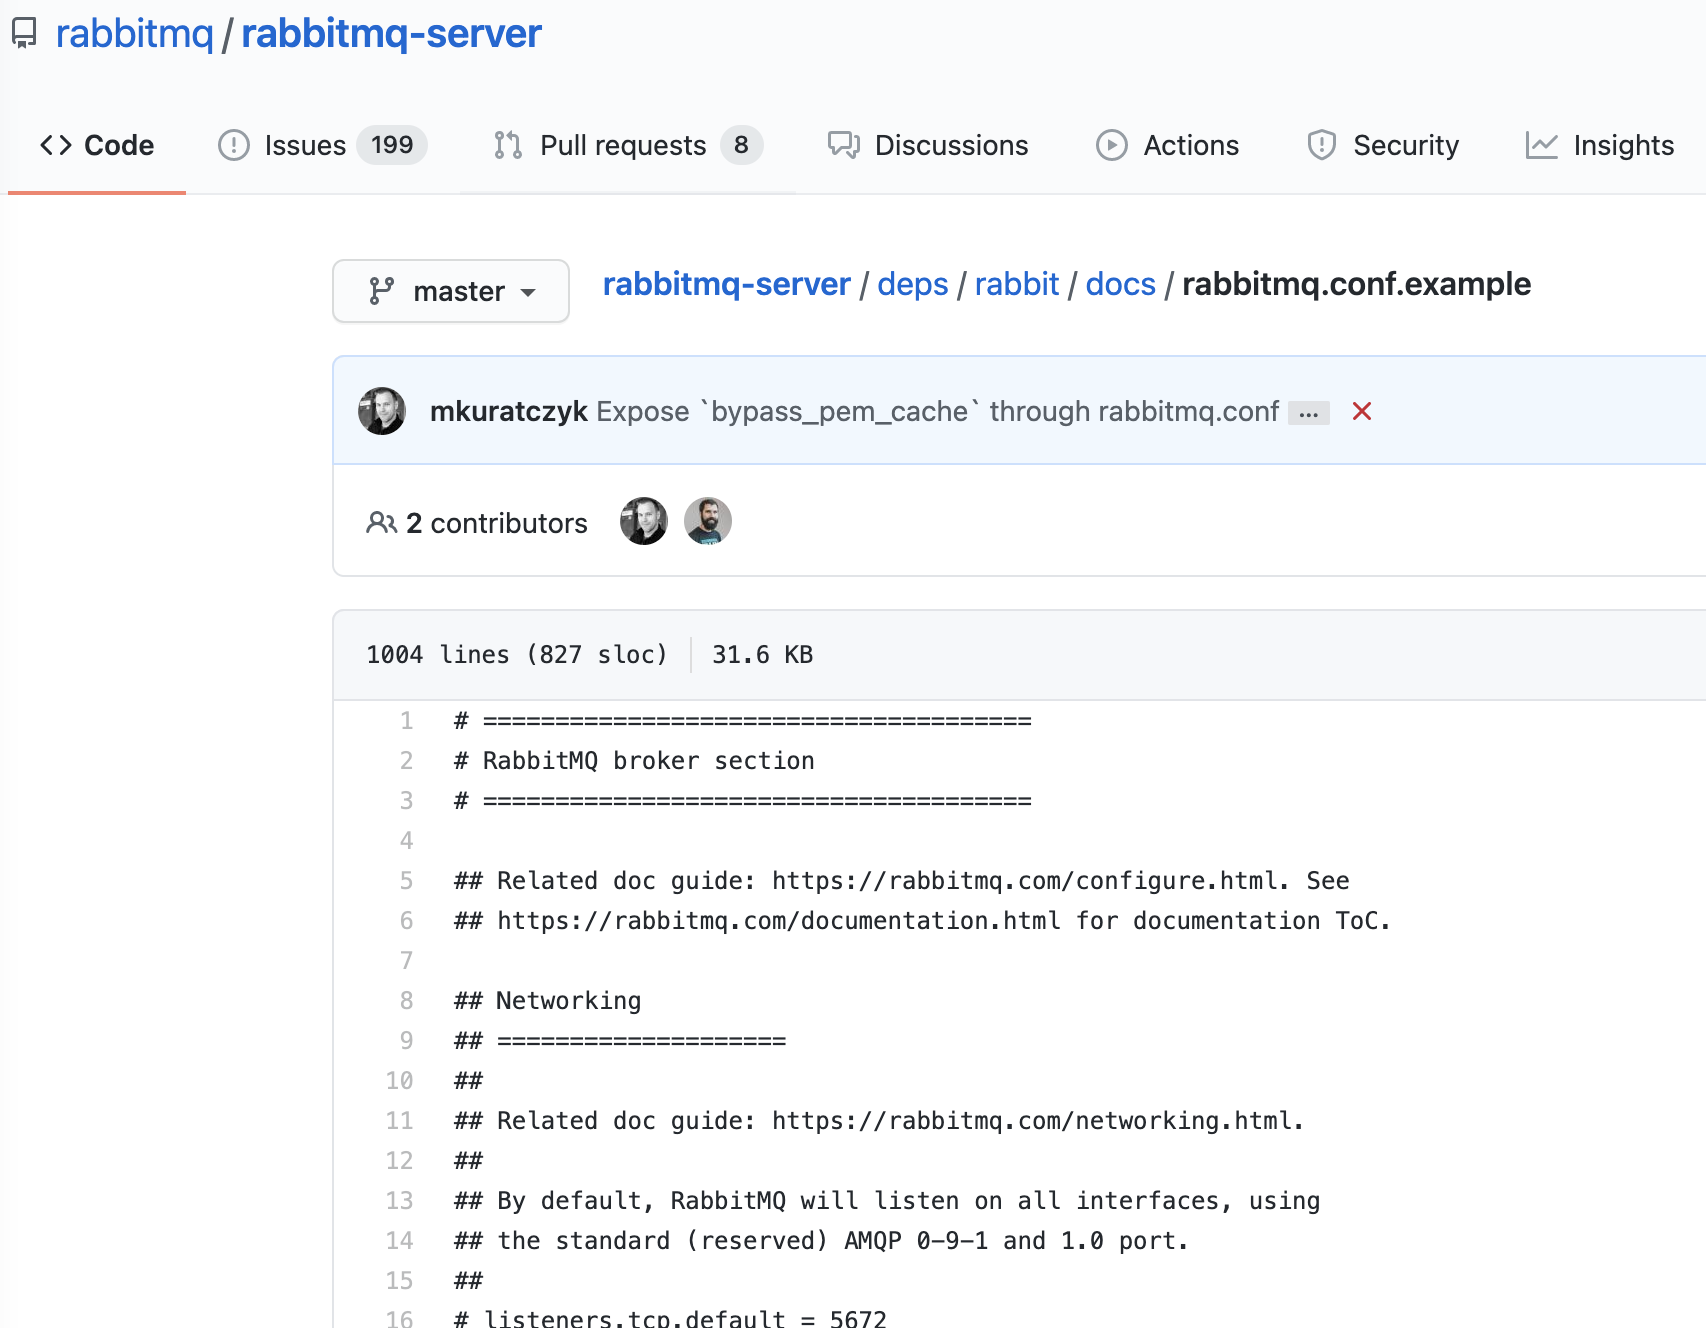
下载路径https://github.com/rabbitmq/rabbitmq-server/blob/master/deps/rabbit/docs/rabbitmq.conf.example:
创建文件
创建文件/etc/rabbitmq/rabbitmq.conf,内容与上面的模板文件一致
修改文件
为启用控制管理台,以图形化界面查看rabbitmq,需要修改/etc/rabbitmq/rabbitmq.conf:
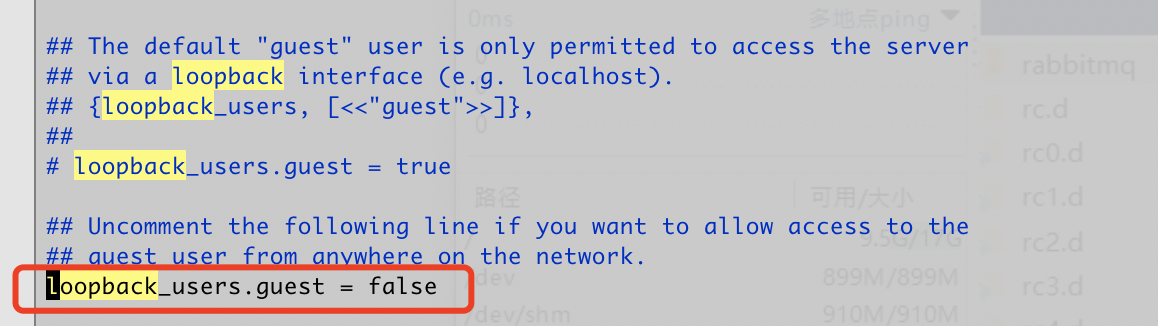
将注释拿掉,允许使用guest用户远程访问。
启用管理
$ rabbitmq-plugins enable rabbitmq_management
启动测试
运行命令:
$ systemctl start rabbitmq-server
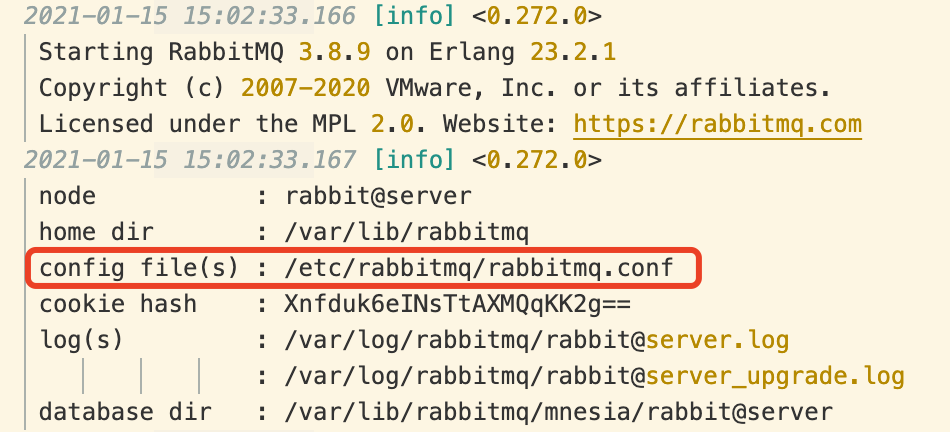
查看日志/var/log/rabbitmq/rabbit@server.log,可以看到配置文件生效:
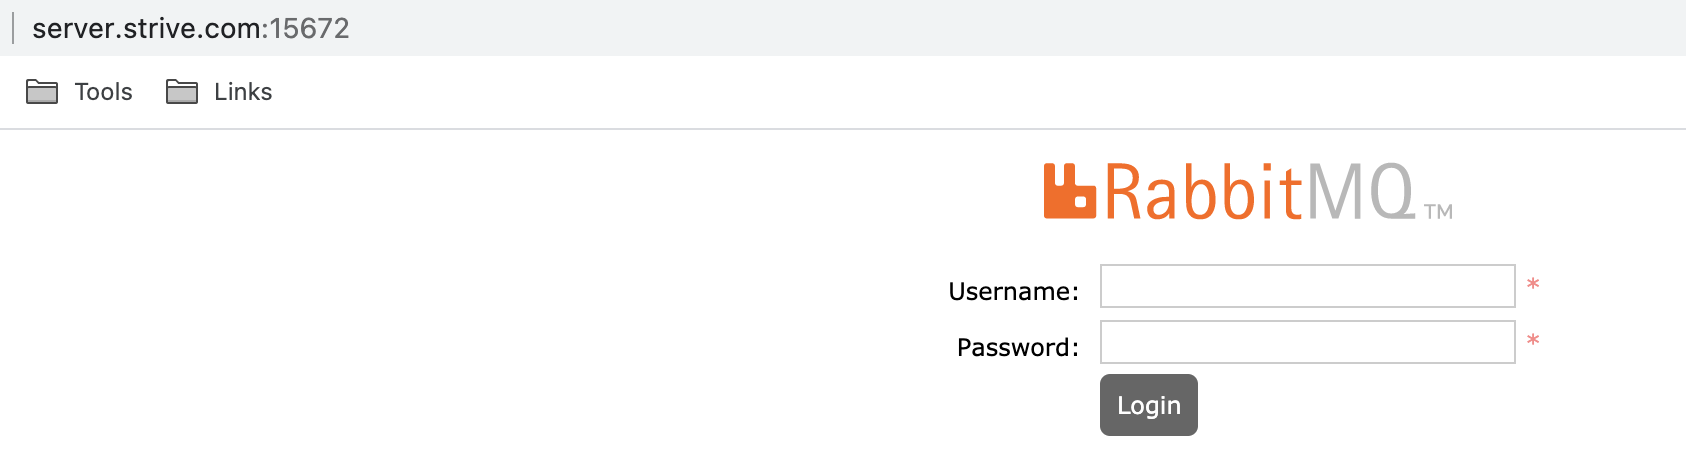
访问: http://
用户
创建用户
创建一个自己的管理用户。当然使用guest也是可以的。
在Admin页签,新建用户:

最后的Tags,是权限设定,我们就选最大的Admin
创建虚拟主机
可以简单地将虚拟主机视作数据库,比如MySql中,一般会对每个业务模块,单独创建一个数据库,而虚拟主机也可以视作业务分离的设定:
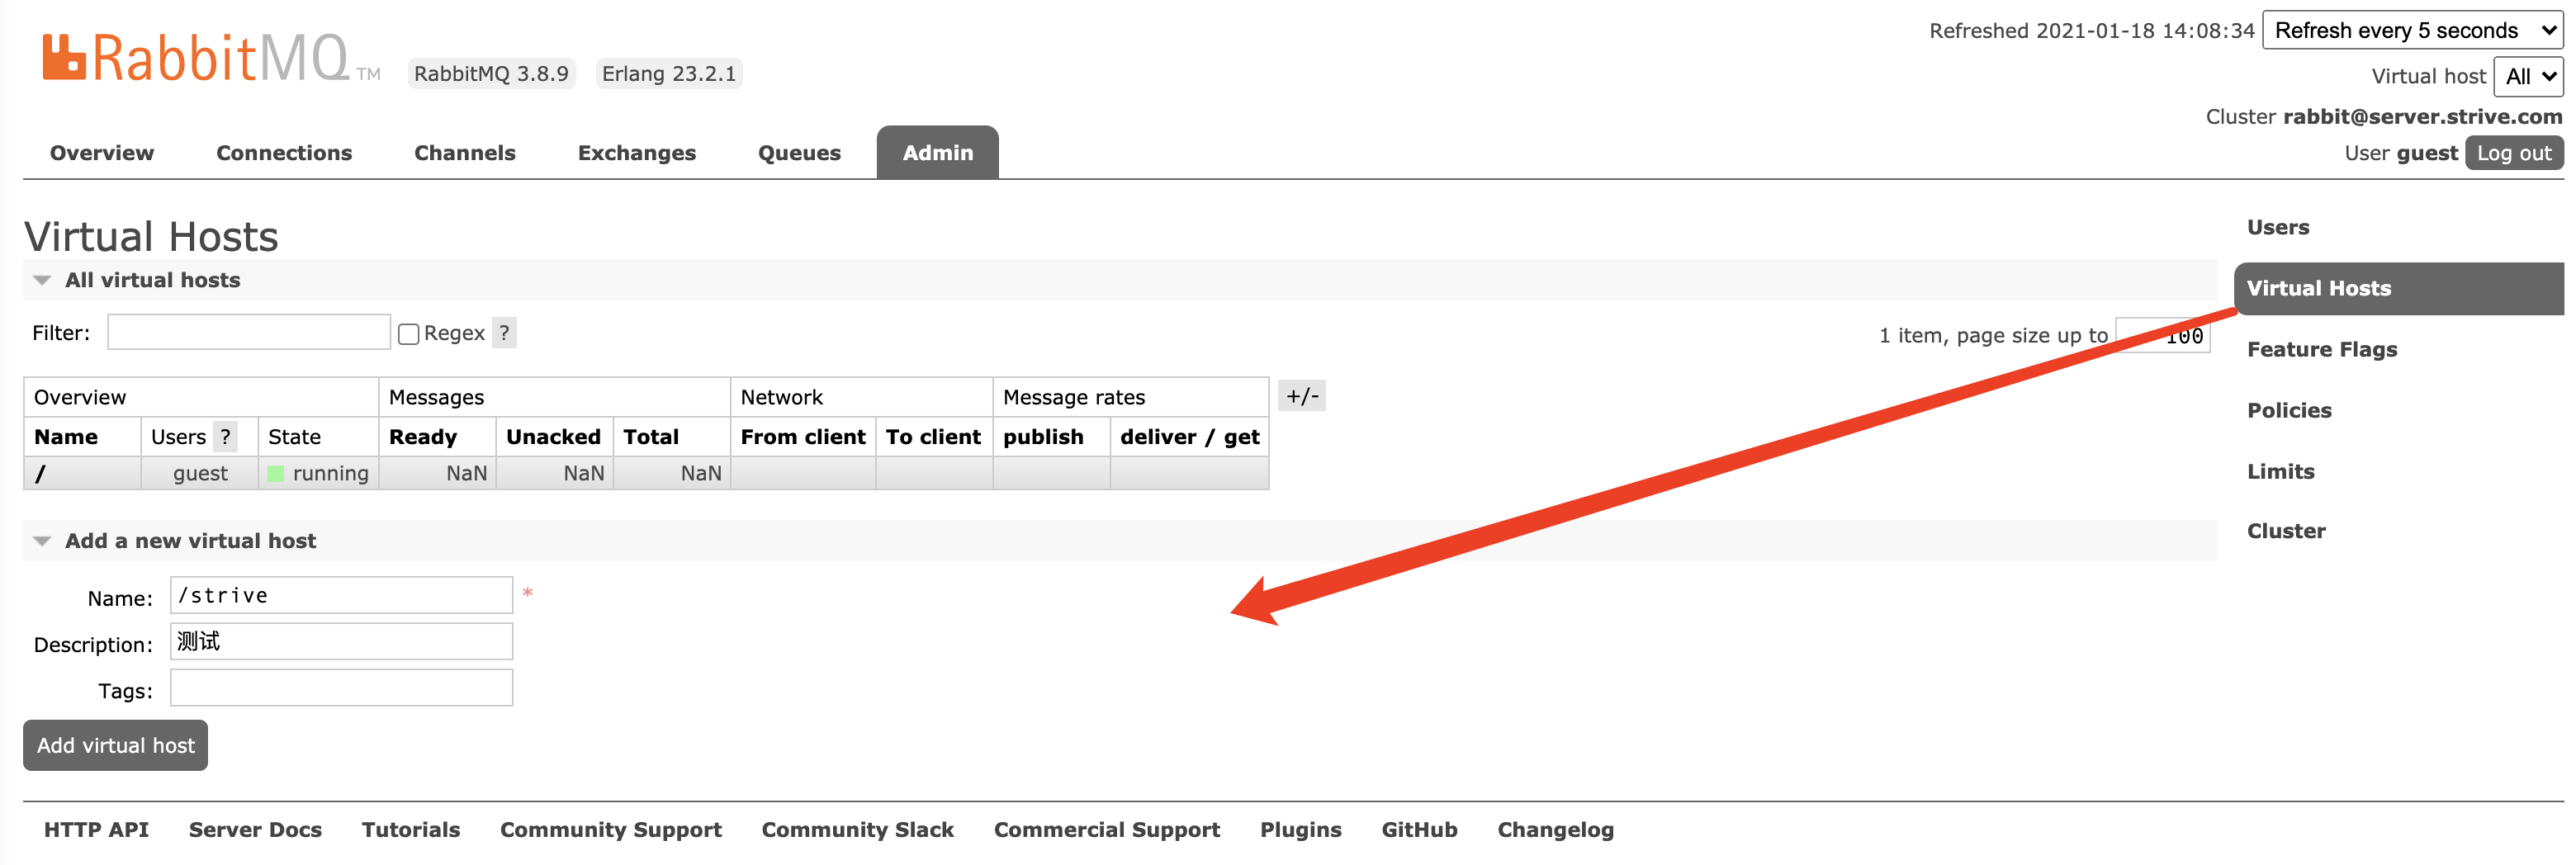
名称一般以"/"开头, 后面接业务模块名。
点击新建好的虚拟主机名:

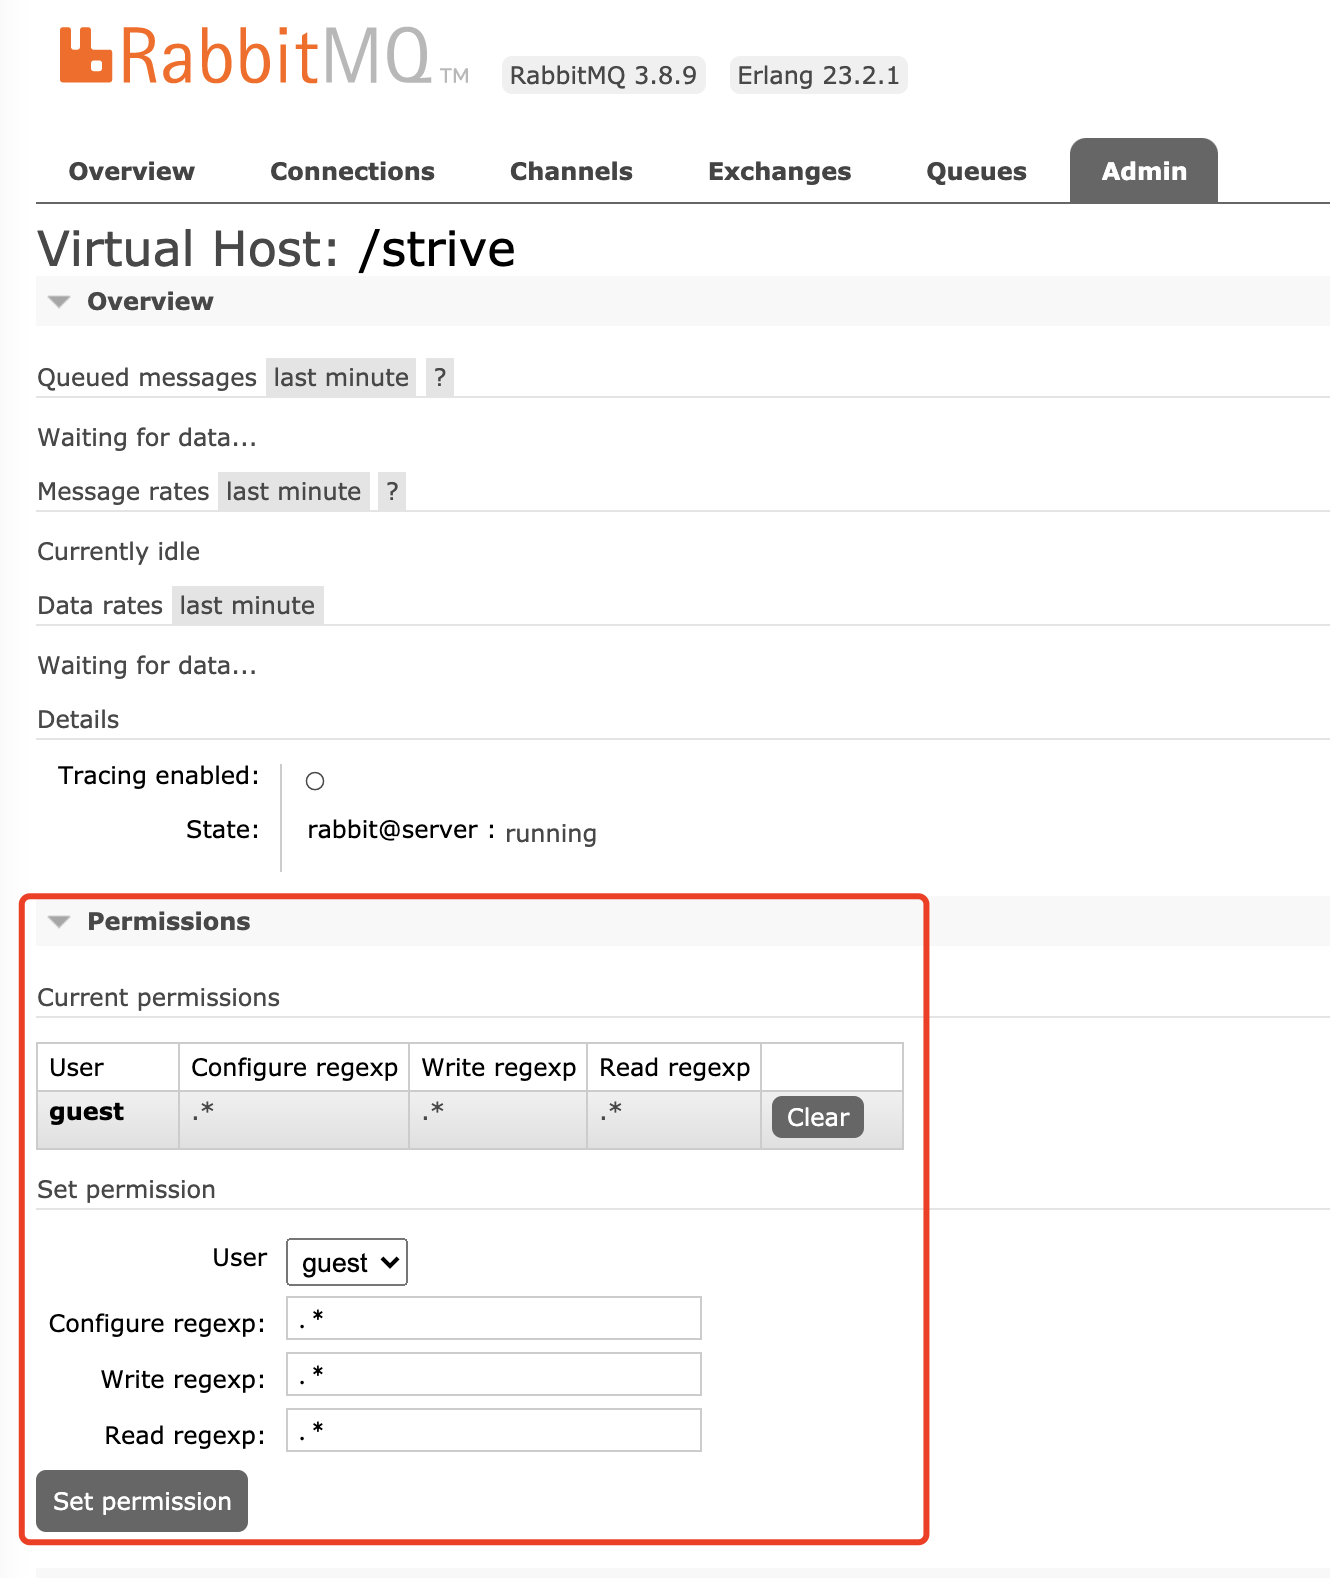
默认是分配给了guest,我们将其清掉,然后新增分配给新建的用户:
开发使用
简单模式
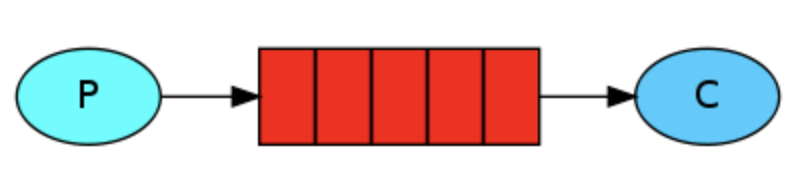
此模式最为精简,一个生产者,一个消费者,一个队列。
新建一个空的maven项目,然后:
生产者
添加依赖
<dependency>
  <groupId>com.rabbitmq</groupId>
  <artifactId>amqp-client</artifactId>
  <version>5.10.0</version>
</dependency>
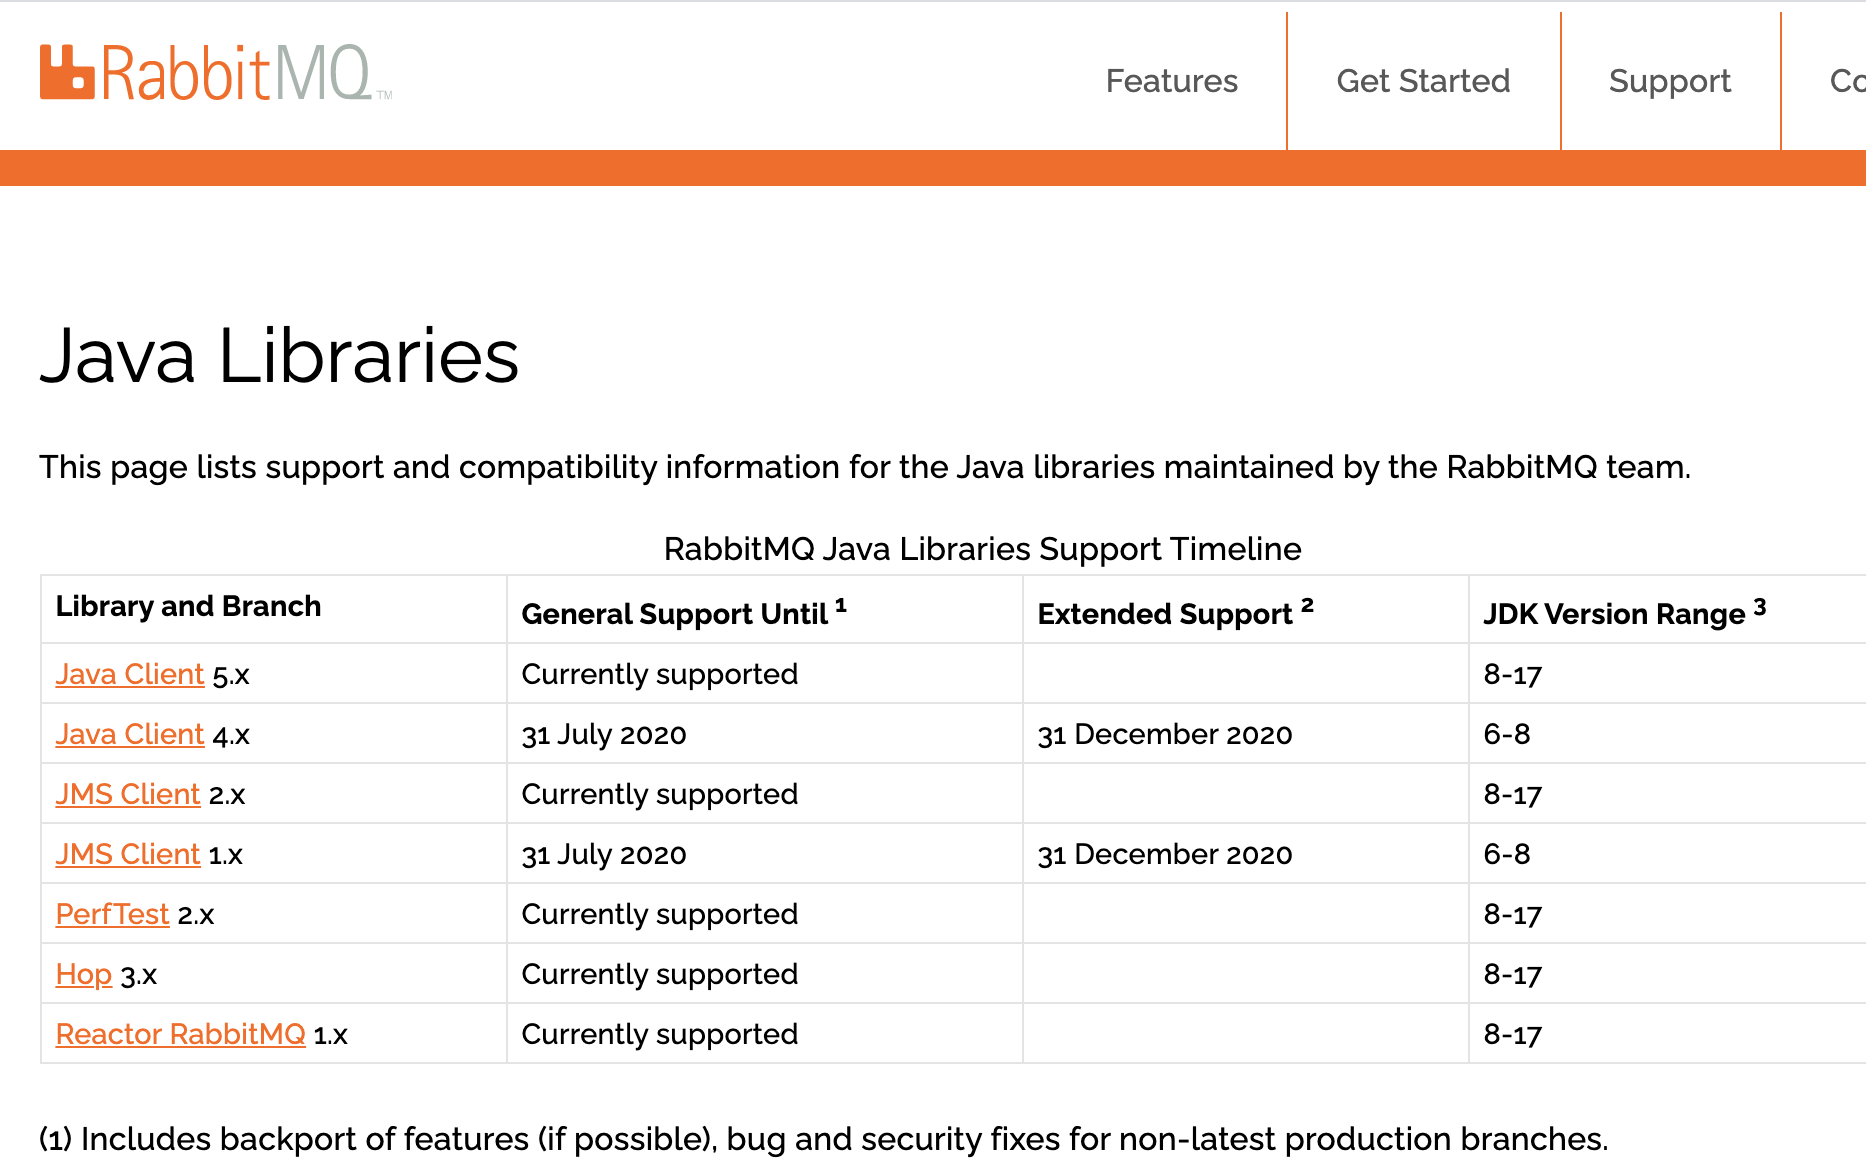
与jdk的版本要求,可参考官网https://www.rabbitmq.com/java-versions.html:
创建连接
package org.strive.simple;

import com.rabbitmq.client.Connection;
import com.rabbitmq.client.ConnectionFactory;

import java.io.IOException;
import java.util.concurrent.TimeoutException;

public class ConnectionUtil {
    public static Connection connection;

    public static Connection getConnection() throws IOException, TimeoutException {
        if (connection != null)
            return connection;

        // 1. 创建连接工厂
        ConnectionFactory connectionFactory = new ConnectionFactory();

        // 配置服务端信息
        // 2.1 设置服务端主机(默认localhost)
        connectionFactory.setHost("server.strive.com");
        // 2.2 设置端口
        connectionFactory.setPort(5672);
        // 2.3 设置用户名(默认guest)
        connectionFactory.setUsername("strive");
        // 2.4 设置密码(默认guest)
        connectionFactory.setPassword("...");
        // 2.5 设置虚拟主机(默认/)
        connectionFactory.setVirtualHost("/strive");

        // 3. 创建连接
        connection = connectionFactory.newConnection();

        return connection;
    }
}
这里的连接信息要正确,例如测试时,端口给错,虚拟主机未设置,就报了EOFException
发布消息
package org.strive.simple;

import com.rabbitmq.client.Channel;
import com.rabbitmq.client.Connection;

import java.io.IOException;
import java.nio.charset.StandardCharsets;
import java.util.concurrent.TimeoutException;

public class Producer {
    static final String QUEUE_NAME = "simple_queue";

    public static void main(String[] args) throws IOException, TimeoutException {
        // 1. 获取连接对象
        Connection connection = ConnectionUtil.getConnection();

        // 2. 创建频道
        Channel channel = connection.createChannel();

        /**
         * 3. 声明队列
         * 参数1: 队列名
         * 参数2: 是否持久化
         * 参数3: 是否独占本连接
         * 参数4: 是否在不使用时删除队列
         * 参数5: 其他参数
         */
        channel.queueDeclare(QUEUE_NAME, true, false, false, null);

        // 5. 发布消息
        String message = "Hello,RabbitMQ!测试ing...";
        channel.basicPublish("", QUEUE_NAME, null, message.getBytes());
        System.out.println("published ...");

        // 6. 释放资源
        channel.close();
        connection.close();
    }
}
队列可以简单视作数据库中的表,发布的消息最终都是存到这里的。
信道
生产者发布时,有个频道(信道)的概念。
一个连接(connection),对应一个TCP连接,其创建、销毁是昂贵的开销。
为应对性能需求,RabbitMQ 采用类似 NIO(Non-blocking I/O)的做法,选择 TCP 连接复用,不仅可以减少性能开销,同时也便于管理。每个线程把持一个信道,所以信道复用了 Connection 的 TCP 连接。
同时 RabbitMQ 可以确保每个线程的私密性,就像拥有独立的连接一样。
当每个信道的流量不是很大时,复用单一的 Connection 可以在产生性能瓶颈的情况下有效地节省 TCP 连接资源。
但是信道本身的流量很大时,这时候多个信道复用一个 Connection 就会产生性能瓶颈,进而使整体的流量被限制了。此时就需要开辟多个 Connection,将这些信道均摊到这些 Connection 中,至于这些相关的调优策略需要根据业务自身的实际情况进行调节
运行测试
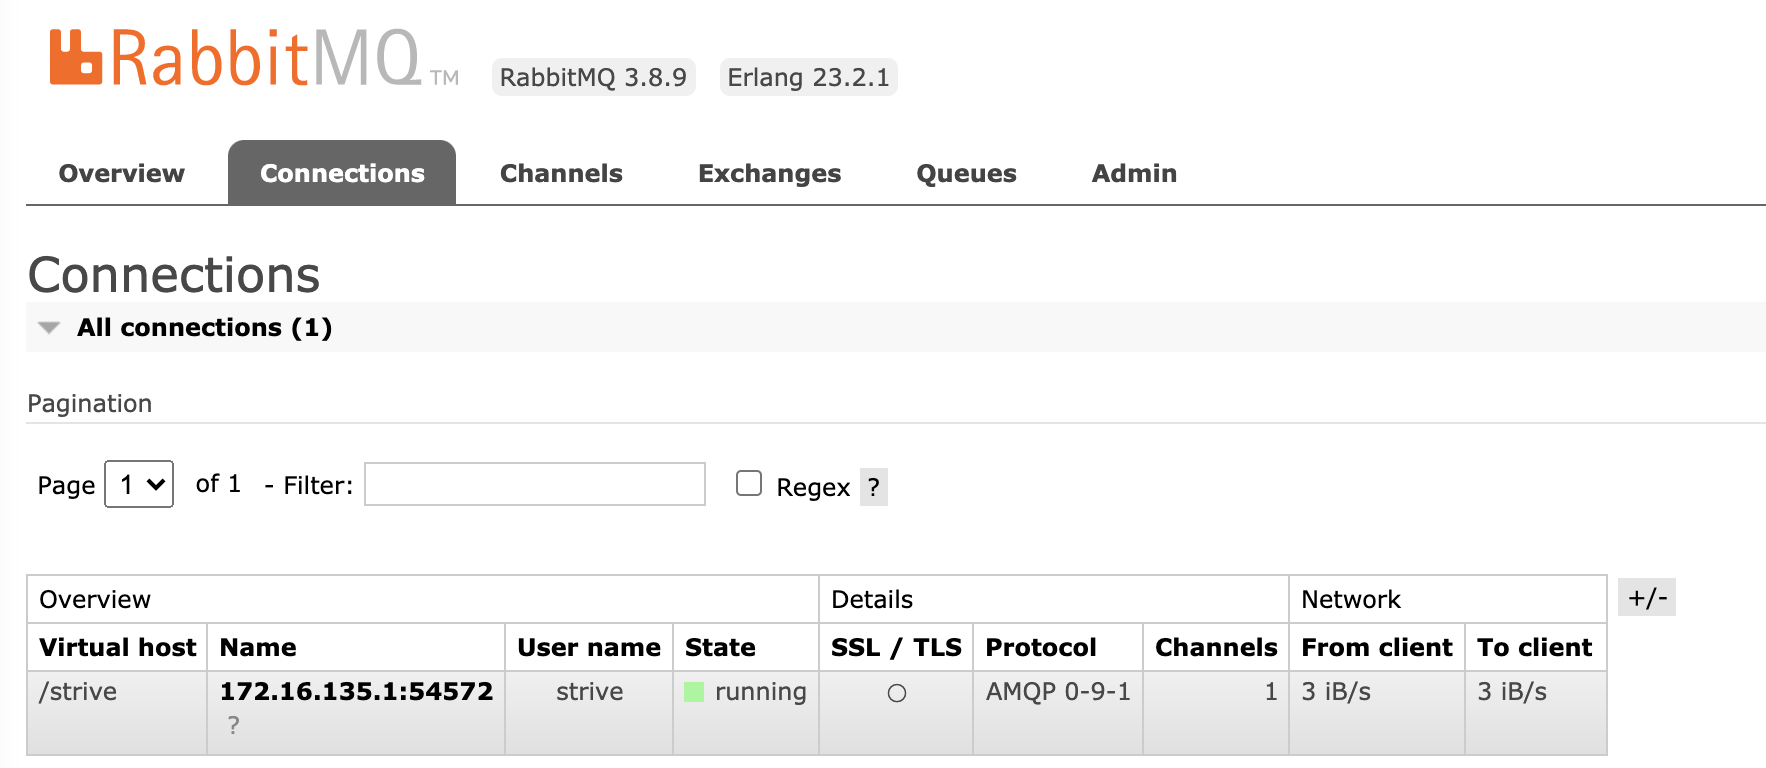
在创建connection处打上断点,以debug方式运行主方法,逐步运行,在管理台查看各步对应的变化。
创建连接后:
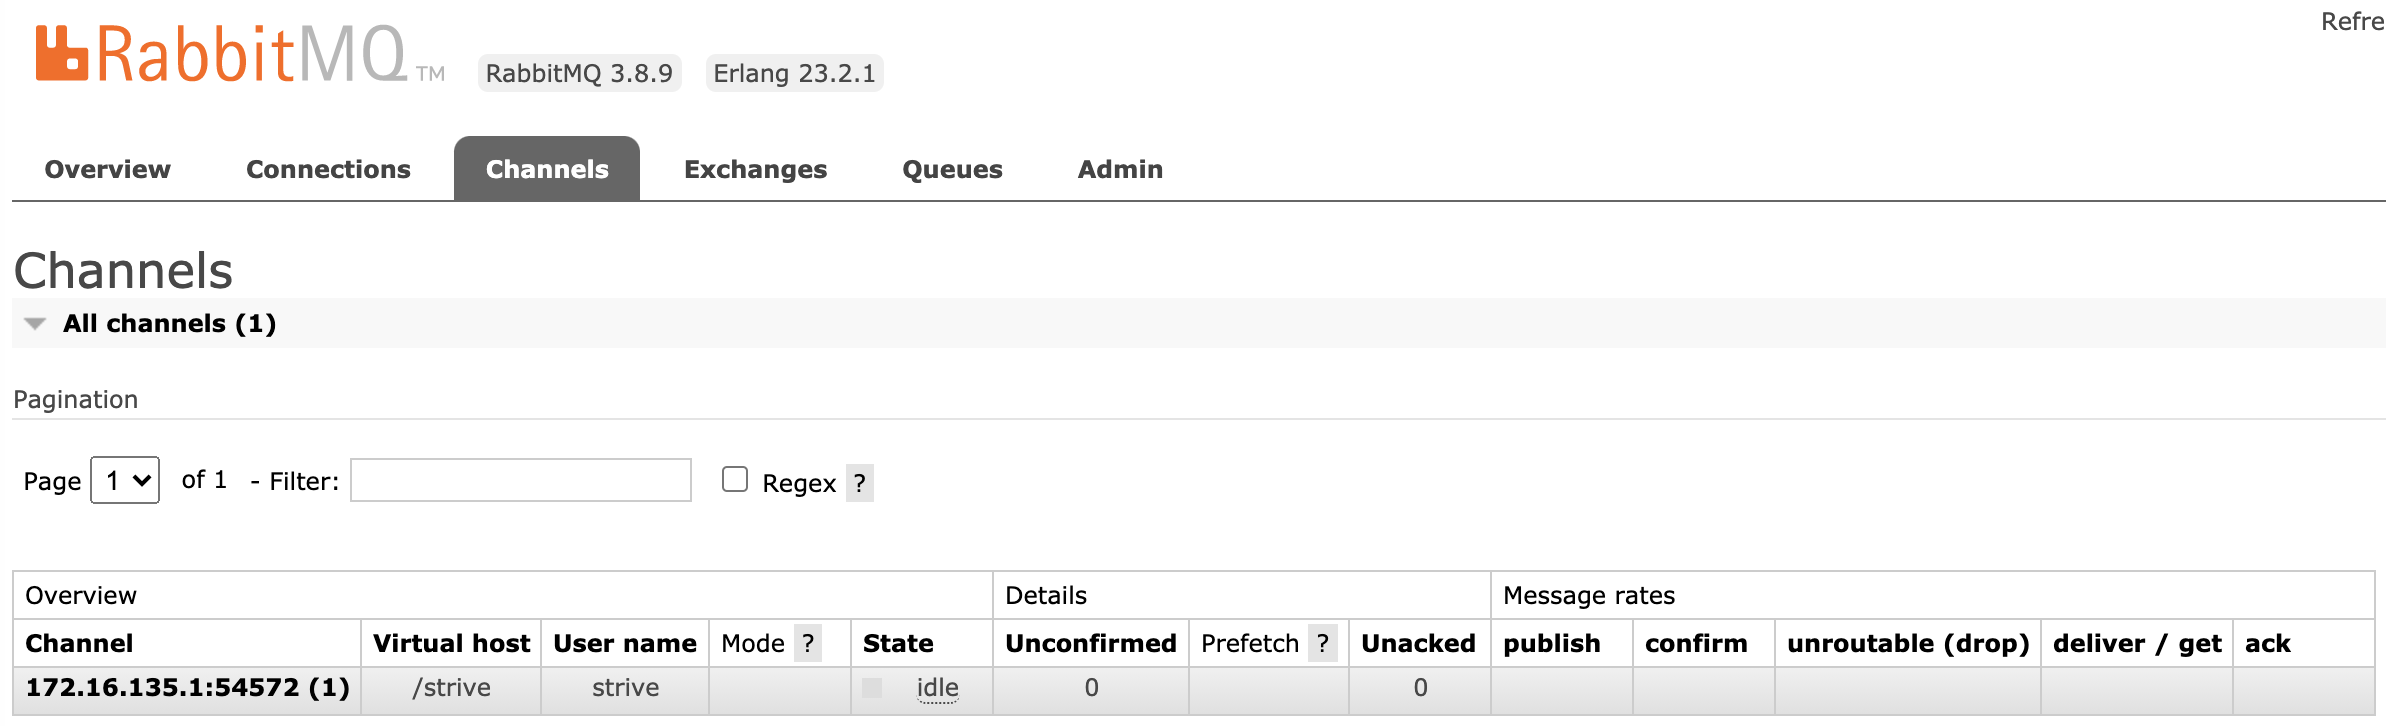
创建频道后:
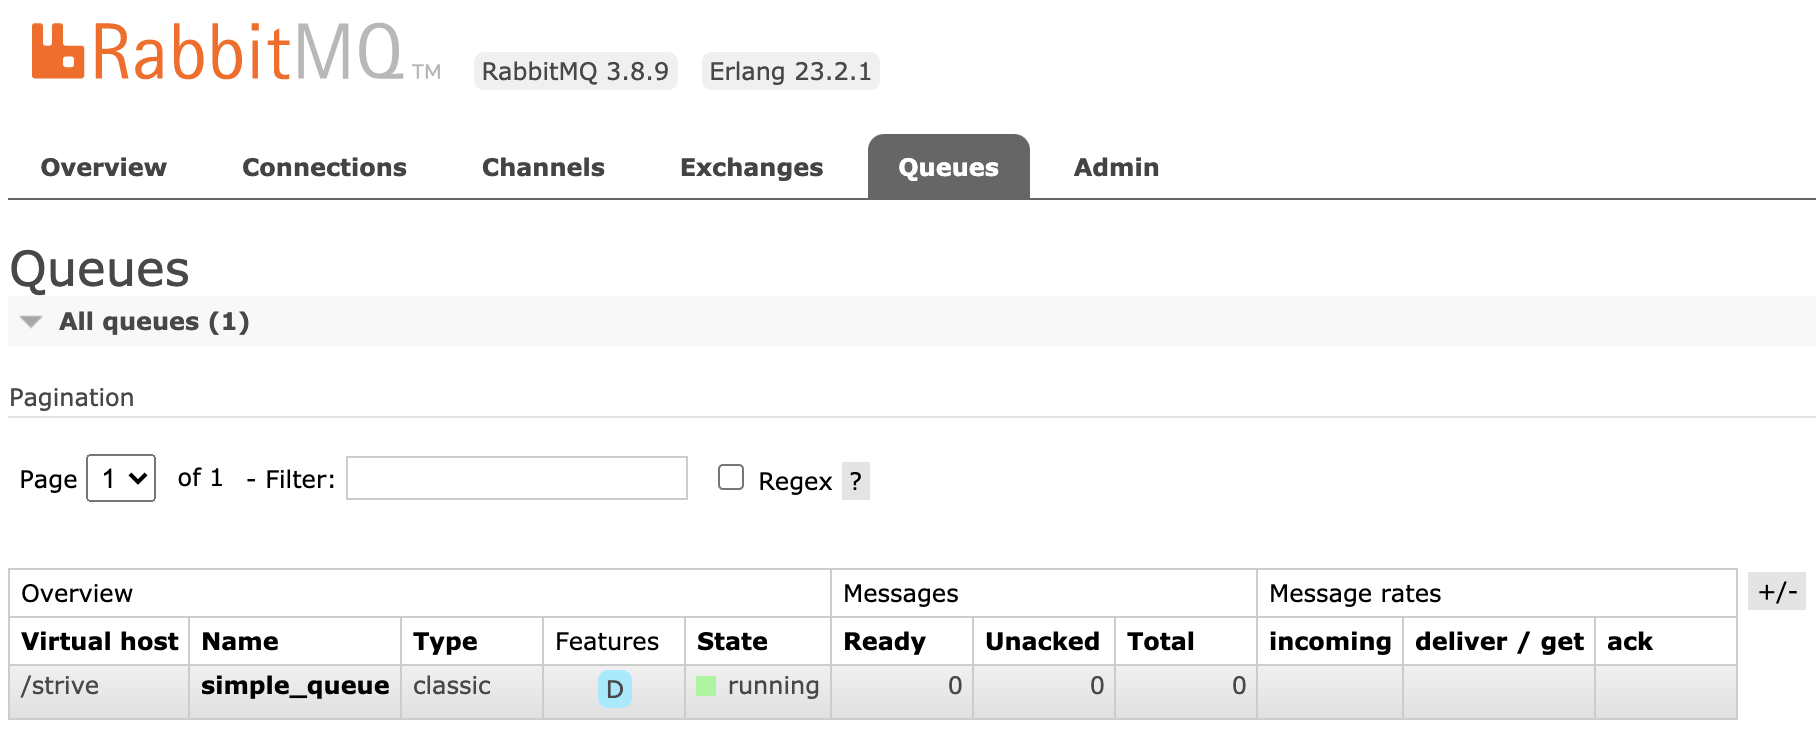
创建队列后:
发布消息后:
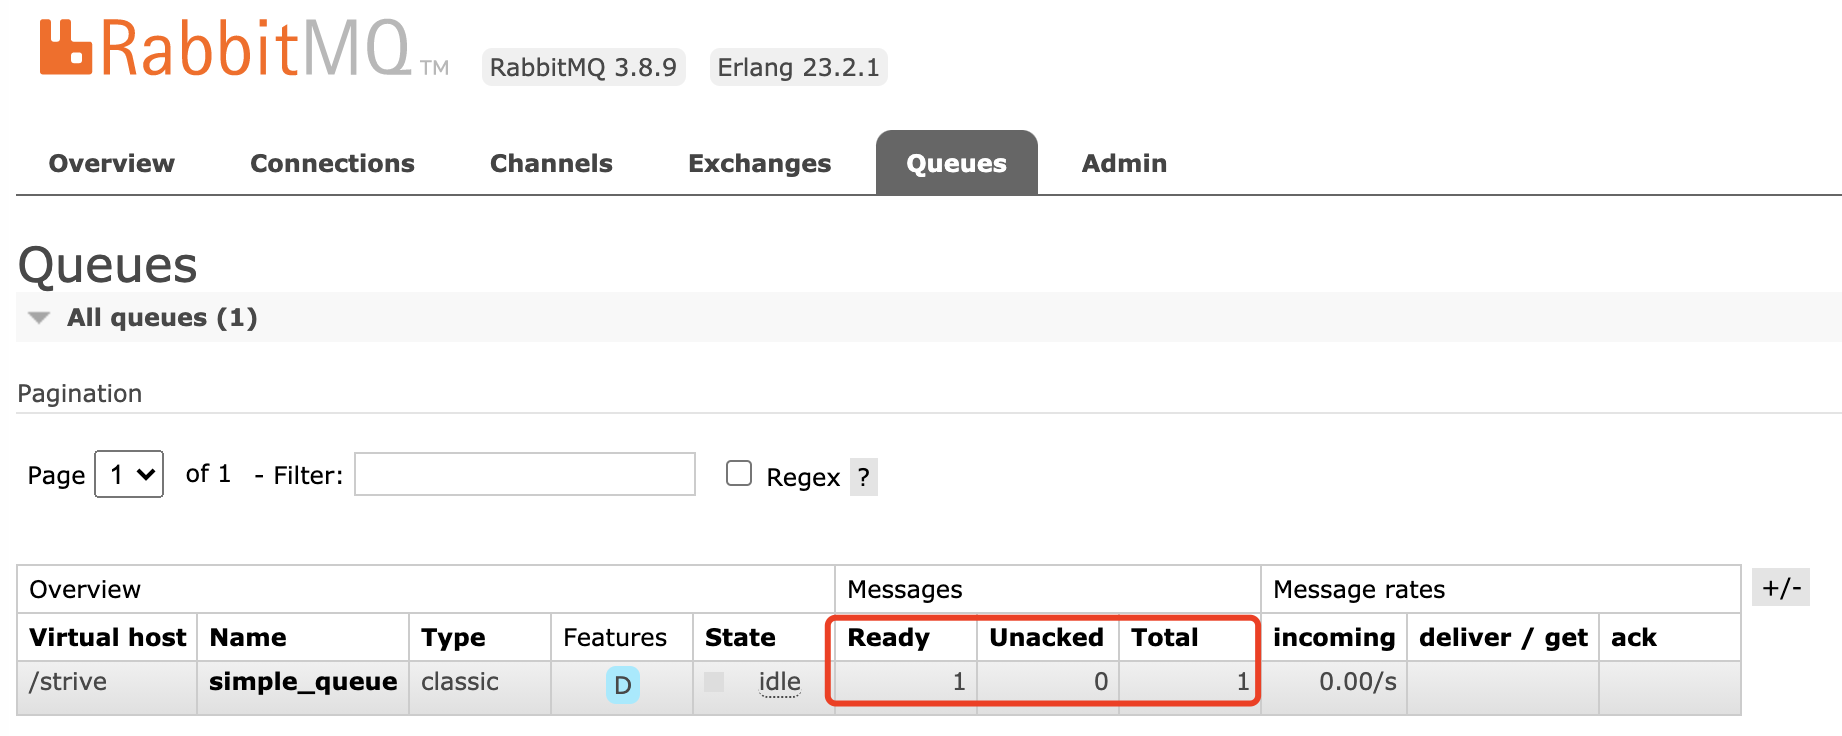
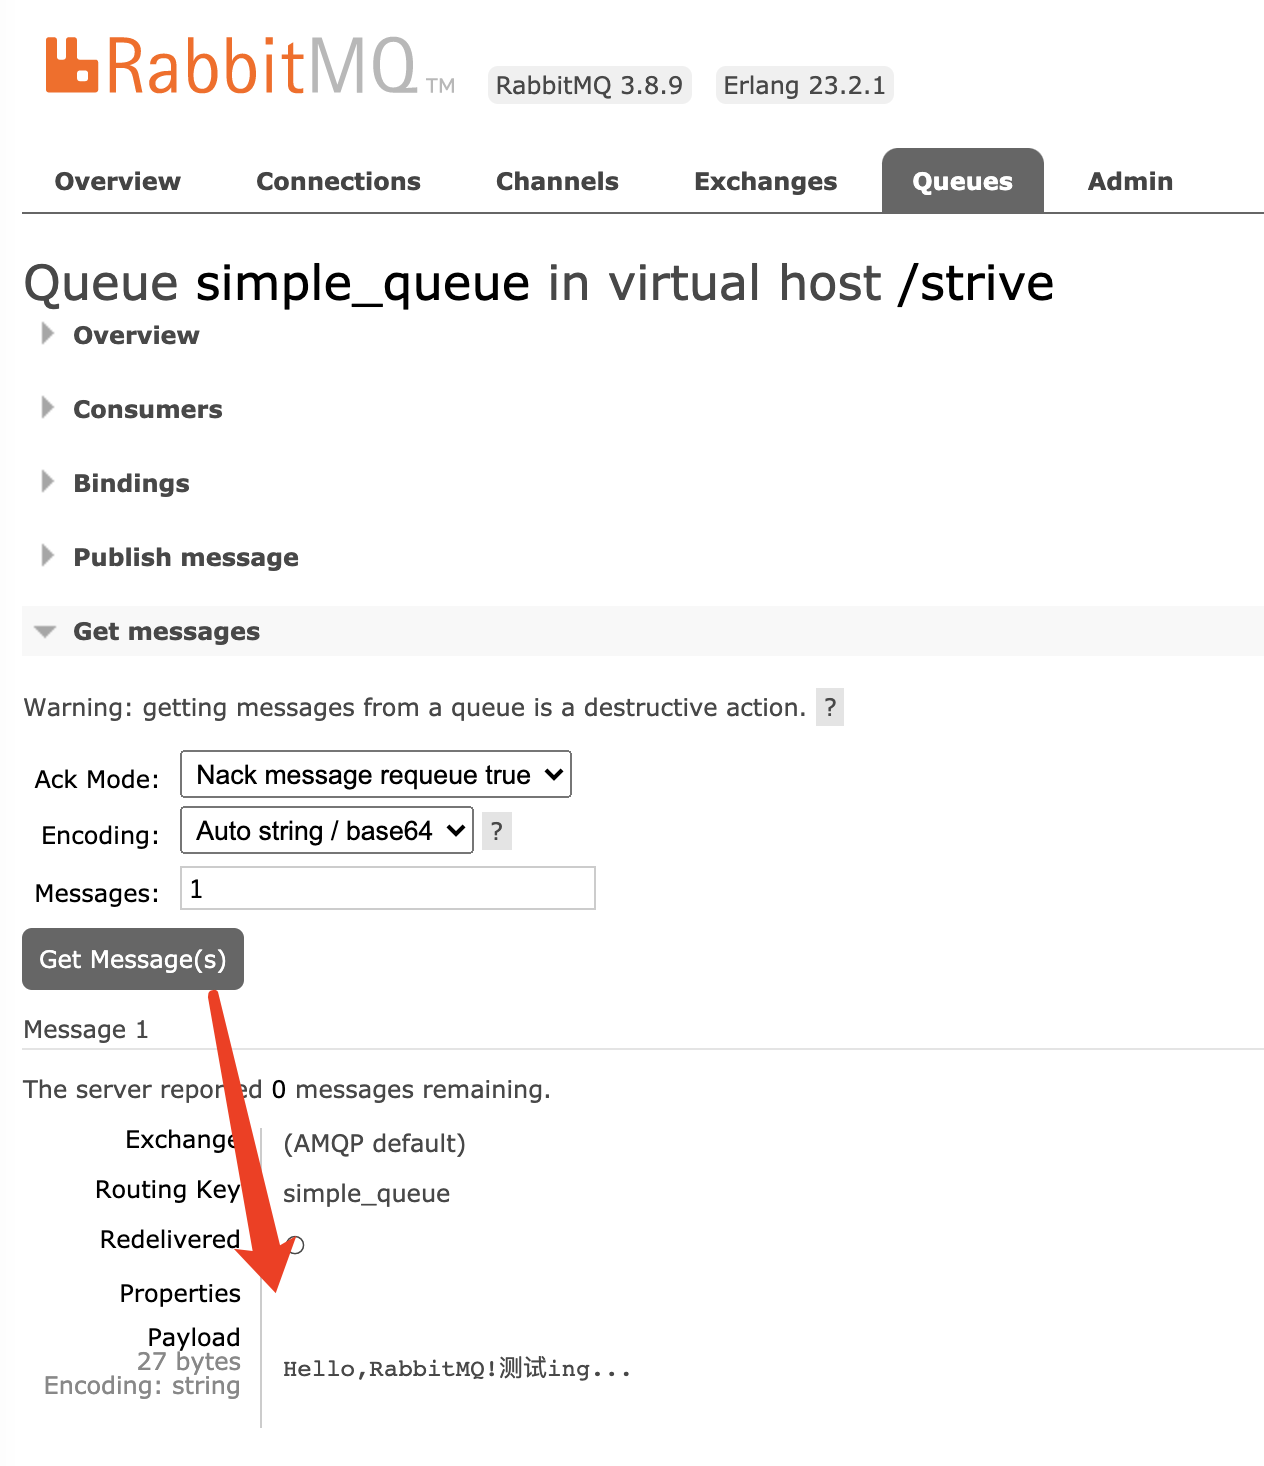
点击上图中的队列名"simple_queue",查看消息内容:
消费者
添加依赖
与生产者相同
创建连接
与生产者相同
消费消息
package org.strive.simple;
import com.rabbitmq.client.*;
import java.io.IOException;
import java.util.concurrent.TimeoutException;
public class Consumer {
public static void main(String[] args) throws IOException, TimeoutException {
// 1. 获取连接
Connection connection = ConnectionUtil.getConnection();
// 2. 创建频道
Channel channel = connection.createChannel();
// 3. 声明队列
channel.queueDeclare(Producer.QUEUE_NAME, true, false, false, null);
// 4.1 创建消息处理对象
DefaultConsumer consumer = new DefaultConsumer(channel) {
/**
* 处理消息
* @param consumerTag 消息者标签,在消费时可指定
* @param envelope 消息包内容,可从中获取消息ID/RoutingKey、交换机、消息、重转标记(收到消息失败时是否重发)
* @param properties 消息属性
* @param body 消息体
* @throws IOException
*/
@Override
public void handleDelivery(String consumerTag,
Envelope envelope,
AMQP.BasicProperties properties,
byte[] body) throws IOException {
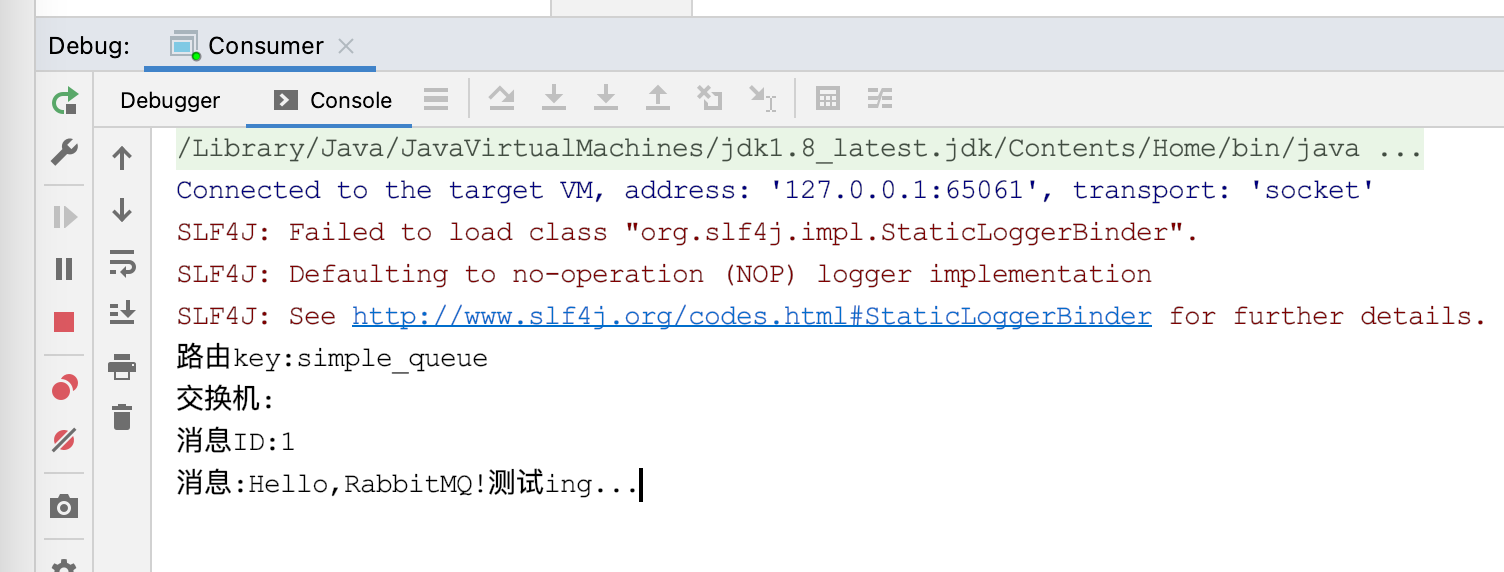
System.out.println("路由key:" + envelope.getRoutingKey());
System.out.println("交换机:" + envelope.getExchange());
System.out.println("消息ID:" + envelope.getDeliveryTag());
System.out.println("消息:" + new String(body, "UTF-8"));
}
};
// 4.2 消费消息
channel.basicConsume(Producer.QUEUE_NAME, true, consumer);
// 正常使用时,不会释放资源,而是一直监听
//channel.close();
//connection.close();
}
}
注意这里的队列声明,要与消费者一致,如生产者会持久化消息,而消费者不持久化,则运行就会报错。
运行测试
控制台输出:
服务管理台查看队列,消息数量将为0了
工作模式
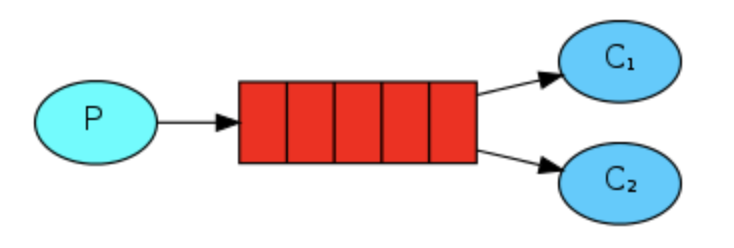
此模式下,有一个生产者,多个消费者,以提高消费效率。
生产者
与简单模式一致,只是修改了队列名,提高了发出的消息数量
public class Producer {
    static final String QUEUE_NAME = "work_queue";

    public static void main(String[] args) throws IOException, TimeoutException {
        // 1. 获取连接对象
        Connection connection = ConnectionUtil.getConnection();

        // 2. 创建频道
        Channel channel = connection.createChannel();

        /**
         * 3. 声明队列
         * 参数1: 队列名
         * 参数2: 是否持久化
         * 参数3: 是否独占本连接
         * 参数4: 是否在不使用时删除队列
         * 参数5: 其他参数
         */
        channel.queueDeclare(QUEUE_NAME, true, false, false, null);

        // 5. 发布消息
        for (int i = 0; i < 20; i++) {
            String message = "RabbitMQ in work mode with seq " + i;
            channel.basicPublish("", QUEUE_NAME, null, message.getBytes());
        }

        // 6. 释放资源
        channel.close();
        connection.close();
    }
}
消费者
与简单模式一致
public class ConsumerOne {
    public static void main(String[] args) throws IOException, TimeoutException {
        // 1. 获取连接
        Connection connection = ConnectionUtil.getConnection();

        // 2. 创建频道
        Channel channel = connection.createChannel();

        // 3. 声明队列
        channel.queueDeclare(Producer.QUEUE_NAME, true, false, false, null);

        // 4.1 创建消息处理对象
        DefaultConsumer consumer = new DefaultConsumer(channel) {
            @Override
            public void handleDelivery(String consumerTag,
                                       Envelope envelope,
                                       AMQP.BasicProperties properties,
                                       byte[] body) throws IOException {
                System.out.println("消息ID:" + envelope.getDeliveryTag());
                System.out.println("消息:" + new String(body, "UTF-8"));
            }
        };
        // 4.2 消费消息
        channel.basicConsume(Producer.QUEUE_NAME, true, consumer);

        // 正常使用时,不会释放资源,而是一直监听
        //channel.close();
        //connection.close();
    }
}
在复制一个ConsumerTwo出来
运行测试
先运行两个消费者,再运行生产者,控制台输出:
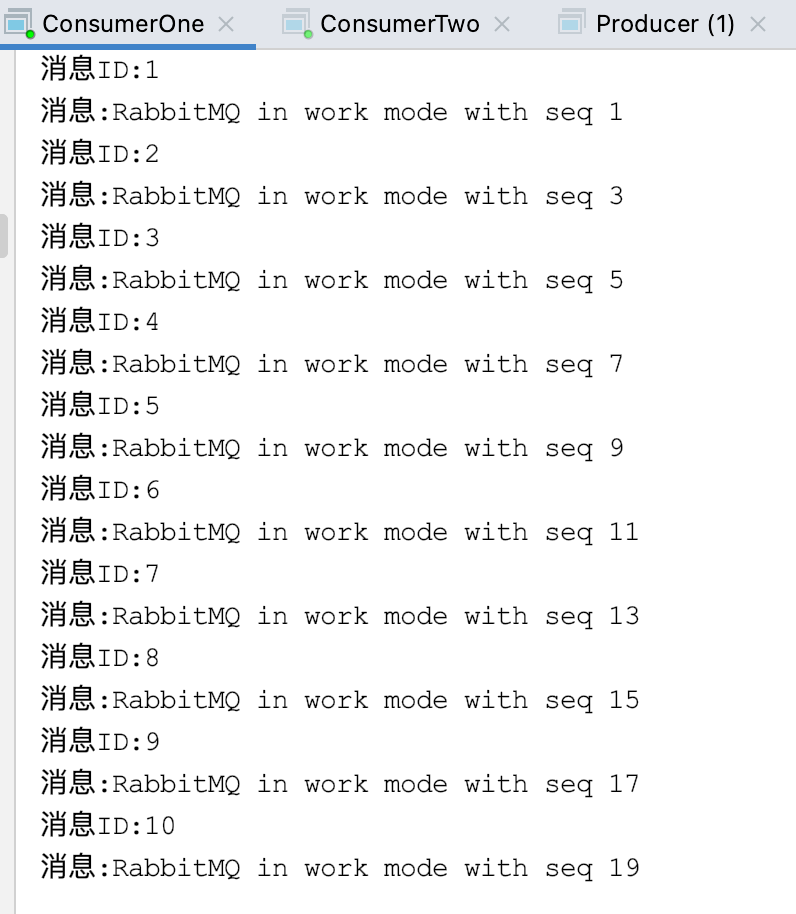
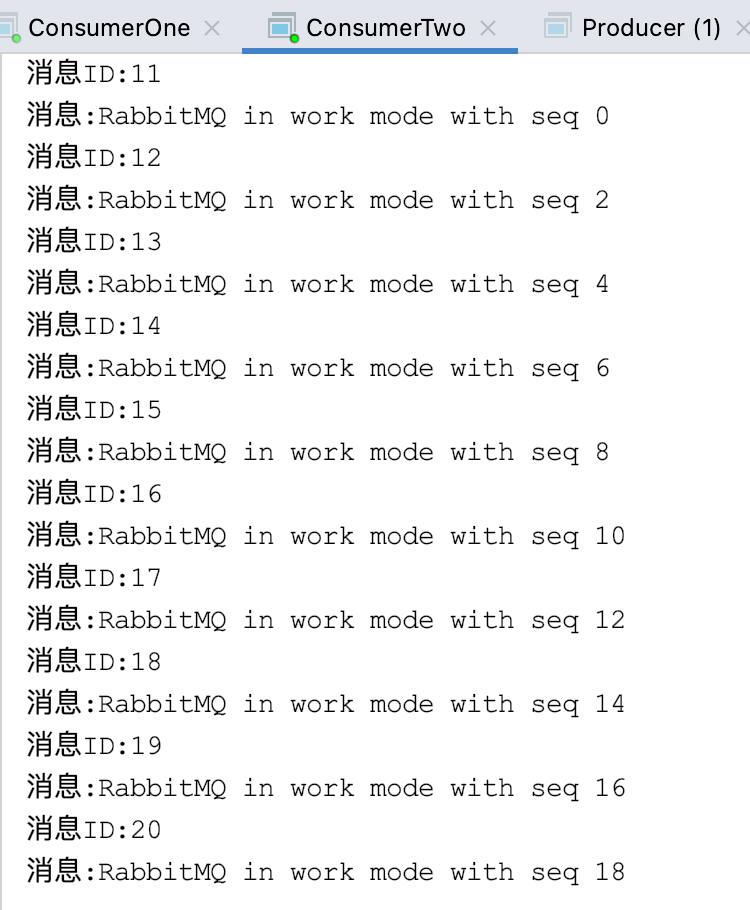
可以看出,两个消费者是轮询访问消息队列的。
发布订阅模式

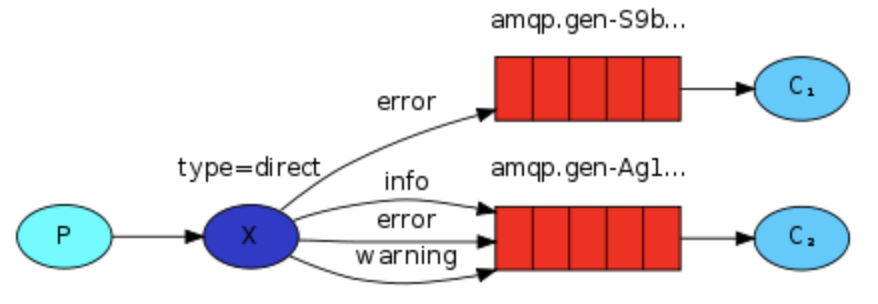
此模式下,引入新的概念:交换机。
生产者将消息发布至交换机,而交换机绑定了多个队列,会自动将消息发到每个队列上。
注意:若交换机无对应队列,则消息就丢失了!
这种适用于生产者的同一份消息,被多个外围系统所需求。每个外围系统(消费者)对应一个队列,消费自己队列的消息即可。
生产者
public class Producer {
    static final String EXCHANGE_NAME = "fanout_exchange";
    static final String QUEUE_NAME1 = "fanout_queue1";
    static final String QUEUE_NAME2 = "fanout_queue2";

    public static void main(String[] args) throws IOException, TimeoutException {
        // 1. 获取连接对象
        Connection connection = ConnectionUtil.getConnection();

        // 2. 创建频道
        Channel channel = connection.createChannel();

        /**
         * 3.1 声明交换机
         * 参数1:交换机名称
         * 参数2:交换机类型,包括 direct, fanout, topic, headers
         */
        channel.exchangeDeclare(EXCHANGE_NAME, BuiltinExchangeType.FANOUT);

        // 3.2 声明队列
        channel.queueDeclare(QUEUE_NAME1, true, false, false, null);
        channel.queueDeclare(QUEUE_NAME2, true, false, false, null);

        /**
         * 4. 绑定队列
         * 参数1: 队列名
         * 参数2: 交换机名
         * 参数3: 路由key,不能为null
         */
        channel.queueBind(QUEUE_NAME1, EXCHANGE_NAME, "");
        channel.queueBind(QUEUE_NAME2, EXCHANGE_NAME, "");

        // 5. 发布消息
        for (int i = 0; i < 10; i++) {
            String message = "RabbitMQ in fanout mode with seq " + i;
            channel.basicPublish(EXCHANGE_NAME, "", null, message.getBytes());
        }

        // 6. 释放资源
        channel.close();
        connection.close();
    }
}
需要声明交换机、队列名,然后绑定,再发布消息到交换机
消费者
public class ConsumerOne {
    public static void main(String[] args) throws IOException, TimeoutException {
        // 1. 获取连接
        Connection connection = ConnectionUtil.getConnection();
        // 2. 创建频道
        Channel channel = connection.createChannel();

        // 3.1 声明交换机
        channel.exchangeDeclare(Producer.EXCHANGE_NAME, BuiltinExchangeType.FANOUT);
        // 3.2 声明队列
        channel.queueDeclare(Producer.QUEUE_NAME1, true, false, false, null);
        // 3.3 绑定交换机与队列
        channel.queueBind(Producer.QUEUE_NAME1, Producer.EXCHANGE_NAME, "");

        // 4.1 创建消息处理对象
        DefaultConsumer consumer = new DefaultConsumer(channel) {
            @Override
            public void handleDelivery(String consumerTag,
                                       Envelope envelope,
                                       AMQP.BasicProperties properties,
                                       byte[] body) throws IOException {
                System.out.println("路由key:" + envelope.getRoutingKey());
                System.out.println("交换机:" + envelope.getExchange());
                System.out.println("消息ID:" + envelope.getDeliveryTag());
                System.out.println("消息:" + new String(body, "UTF-8"));
                System.out.println("-----------------");
            }
        };
        // 4.2 消费消息
        channel.basicConsume(Producer.QUEUE_NAME1, true, consumer);
    }
}
需要声明交换机、自己的队列,并绑定,然后消费自己的队列。
再复制一个ConsumeTwo出来,消费队列2
运行测试
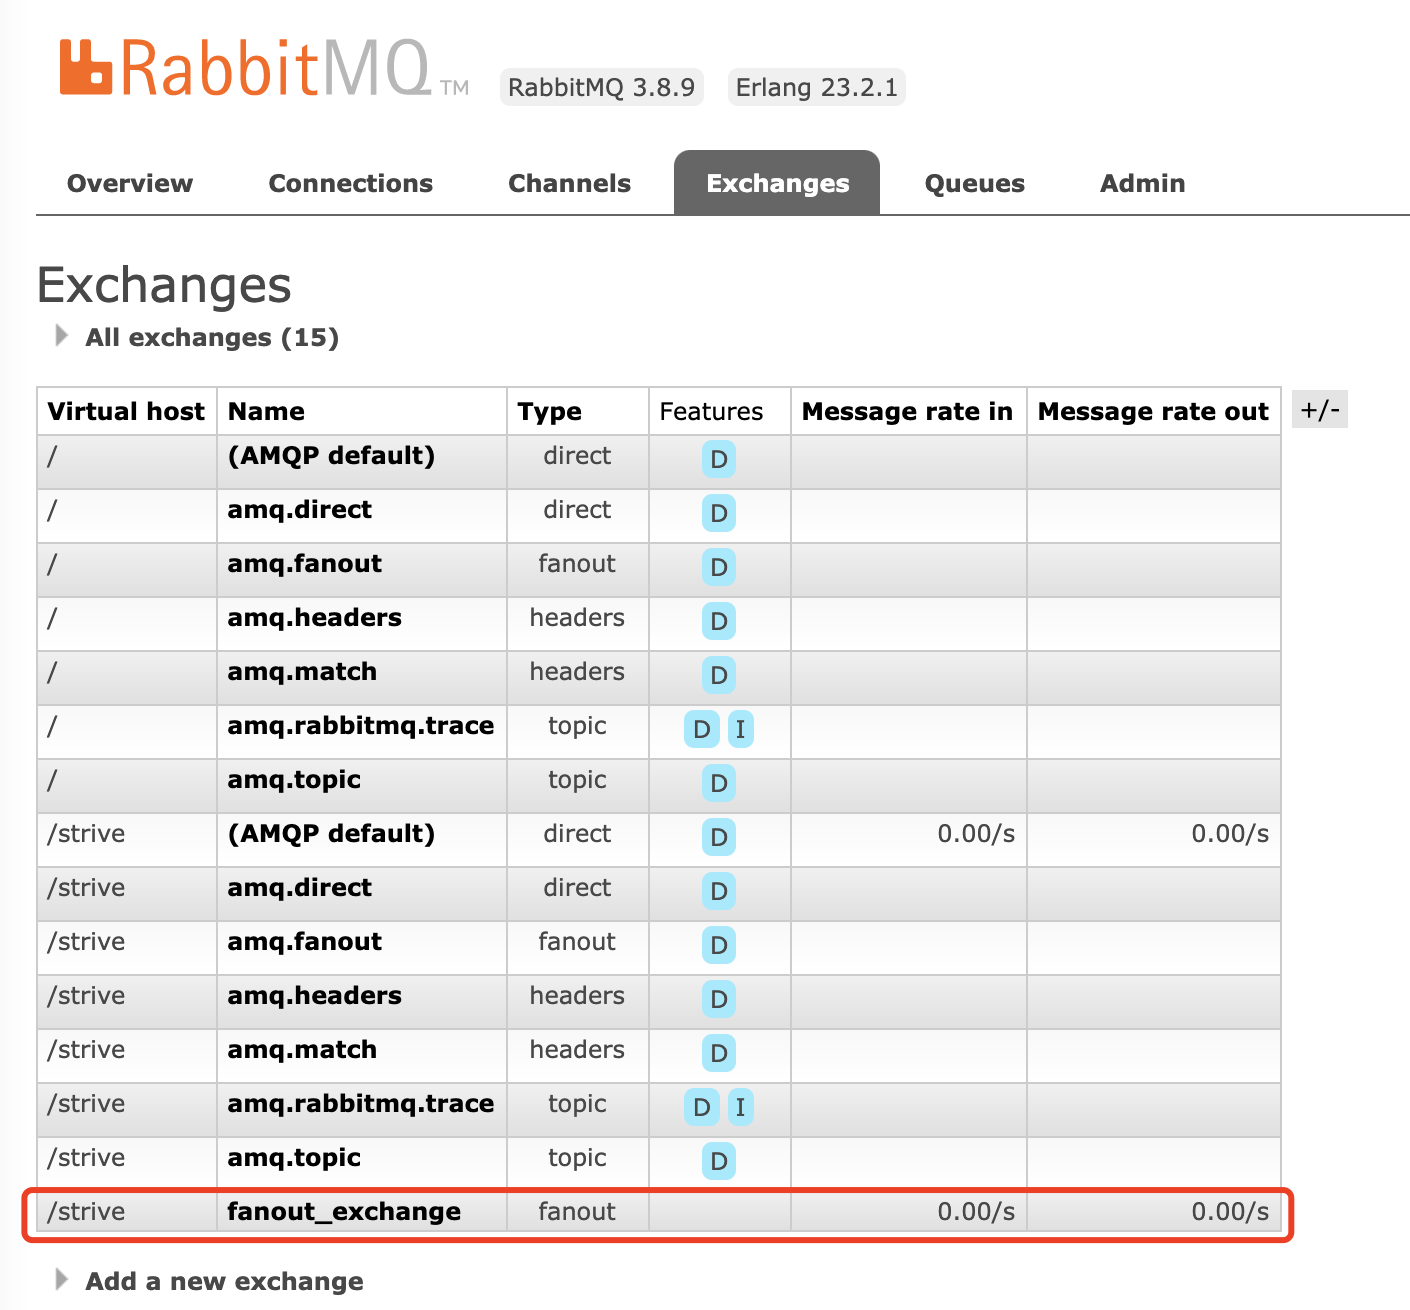
运行生产者,可以看到多了个交换机:
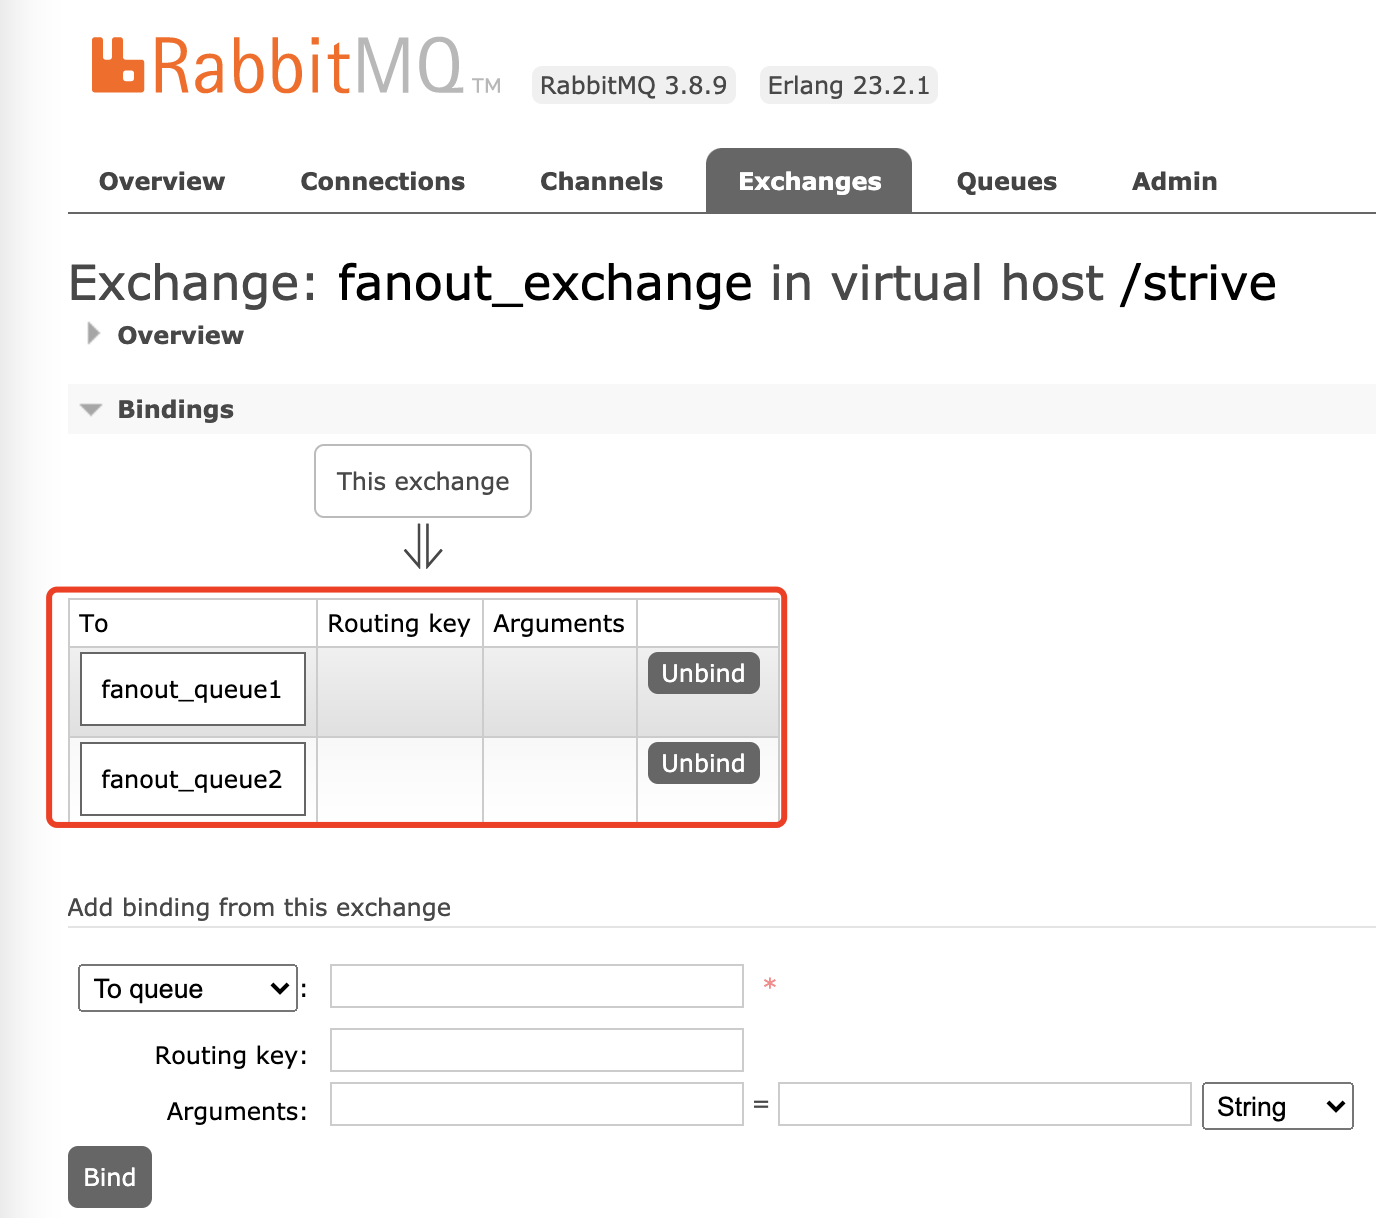
点击名称,可以看到绑定了2个队列:
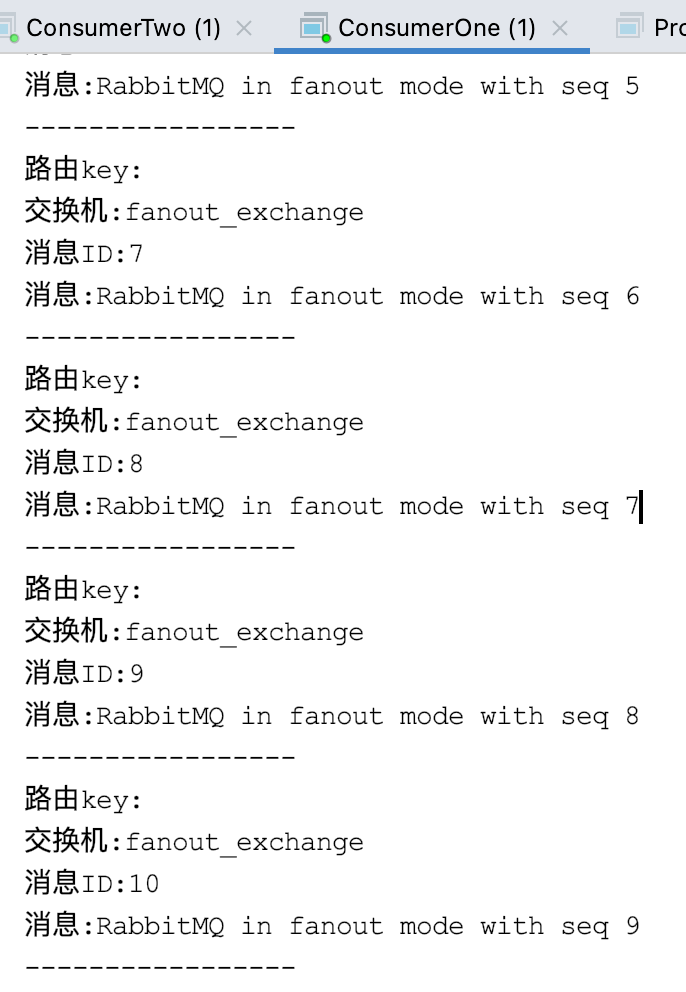
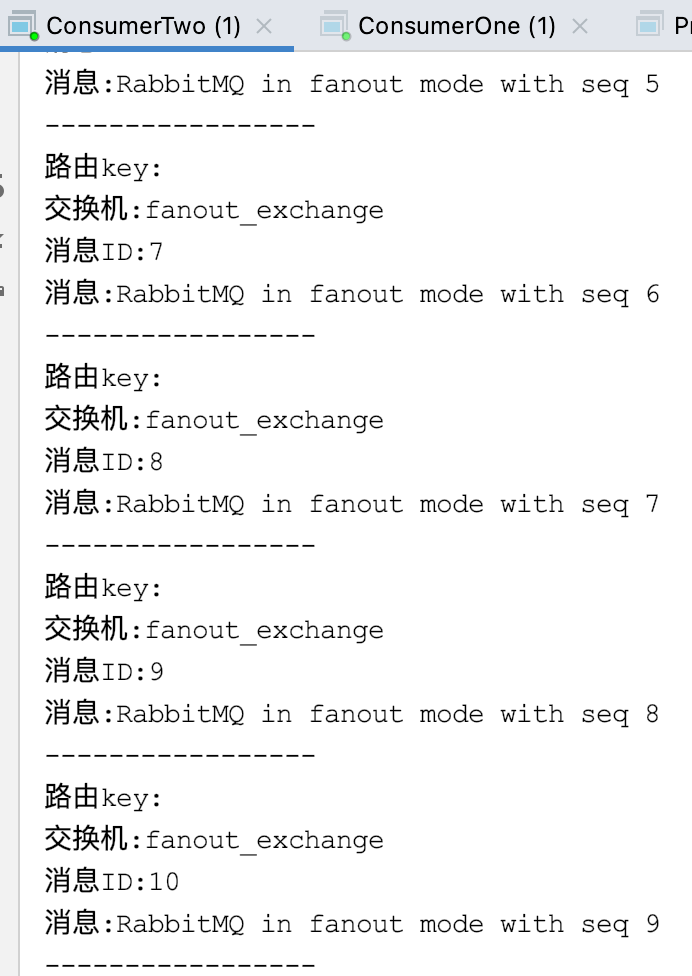
运行两个消费者,可以看到二者得到的内容是一致的:
比较
相对于工作模式来说,发布订阅模式多了个交换机,生产者负责将消息发布至交换机,交换机负责将消息发布至队列。
其实工作模式也使用了交换机,不过是底层使用了默认的交换机,不需在开发时,显式指明。
而发布消息到队列,其实底层也是先转到交换机的。
路由模式
发布订阅模式下,交换机是将每个消息都发送到了每个队列上。
而路由模式下,是可以选择性发布消息到队列的,比如队列1只有错误消息,队列2只有通知消息。
为实现此功能,引入路由key。
生产者
与发布订阅模式基本一致,主要的变化为:
-
交换机、队列名称变更
-
交换机的类型为DIRECT
-
在绑定队列、发布消息时,要显式指定Routing Key
public class Producer {
    static final String EXCHANGE_NAME = "direct_exchange";
    static final String QUEUE_INFO = "direct_queue_info";
    static final String QUEUE_ERR = "direct_queue_err";

    public static void main(String[] args) throws IOException, TimeoutException {
        // 1. 获取连接对象
        Connection connection = ConnectionUtil.getConnection();

        // 2. 创建频道
        Channel channel = connection.createChannel();

        /**
         * 3.1 声明交换机
         * 参数1:交换机名称
         * 参数2:交换机类型,包括direct, fanout, topic, headers
         */
        channel.exchangeDeclare(EXCHANGE_NAME, BuiltinExchangeType.DIRECT);

        // 3.2 声明队列
        channel.queueDeclare(QUEUE_INFO, true, false, false, null);
        channel.queueDeclare(QUEUE_ERR, true, false, false, null);

        // 3.3 绑定队列
        channel.queueBind(QUEUE_INFO, EXCHANGE_NAME, "info");
        channel.queueBind(QUEUE_ERR, EXCHANGE_NAME, "err");

        // 4. 发布消息
        String message = "路由KEY: info";
        channel.basicPublish(EXCHANGE_NAME, "info", null, message.getBytes());
        message = "路由KEY: err";
        channel.basicPublish(EXCHANGE_NAME, "err", null, message.getBytes());

        // 5. 释放资源
        channel.close();
        connection.close();
    }
}
消费者
同样地,在绑定队列时,要指定Routing Key
package org.strive.direct;

import com.rabbitmq.client.*;
import org.strive.util.ConnectionUtil;

import java.io.IOException;
import java.util.concurrent.TimeoutException;

public class ConsumerOne {
    public static void main(String[] args) throws IOException, TimeoutException {
        // 1. 获取连接
        Connection connection = ConnectionUtil.getConnection();
        // 2. 创建频道
        Channel channel = connection.createChannel();

        // 3.1 声明交换机
        channel.exchangeDeclare(Producer.EXCHANGE_NAME, BuiltinExchangeType.DIRECT);
        // 3.2 声明队列
        channel.queueDeclare(Producer.QUEUE_INFO, true, false, false, null);
        // 3.3 绑定交换机与队列
        channel.queueBind(Producer.QUEUE_INFO, Producer.EXCHANGE_NAME, "info");

        // 4.1 创建消息处理对象
        DefaultConsumer consumer = new DefaultConsumer(channel) {
            @Override
            public void handleDelivery(String consumerTag,
                                       Envelope envelope,
                                       AMQP.BasicProperties properties,
                                       byte[] body) throws IOException {
                System.out.println("路由key:" + envelope.getRoutingKey());
                System.out.println("交换机:" + envelope.getExchange());
                System.out.println("消息ID:" + envelope.getDeliveryTag());
                System.out.println("消息:" + new String(body, "UTF-8"));
                System.out.println("-----------------");
            }
        };
        // 4.2 消费消息
        channel.basicConsume(Producer.QUEUE_INFO, true, consumer);
    }
}
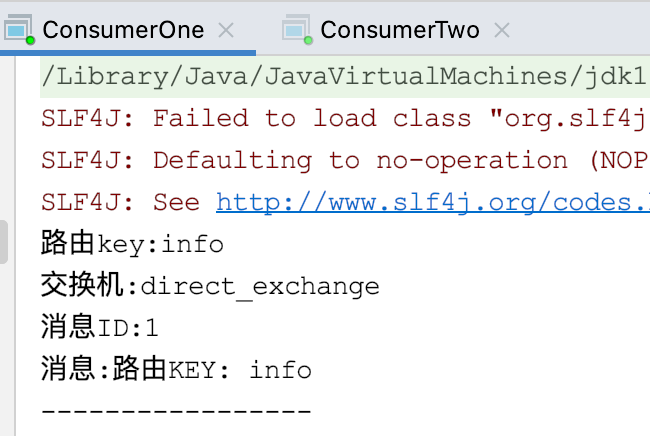
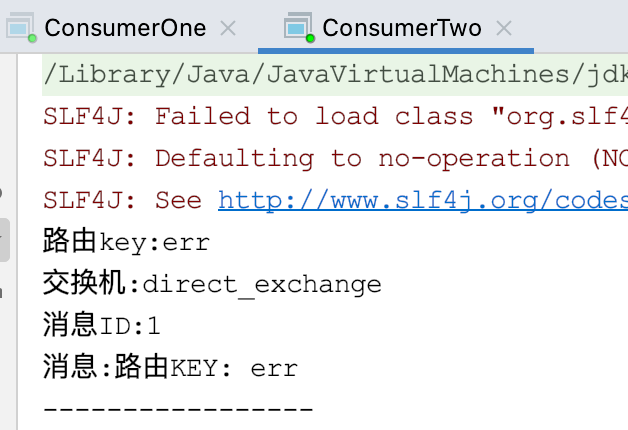
运行测试
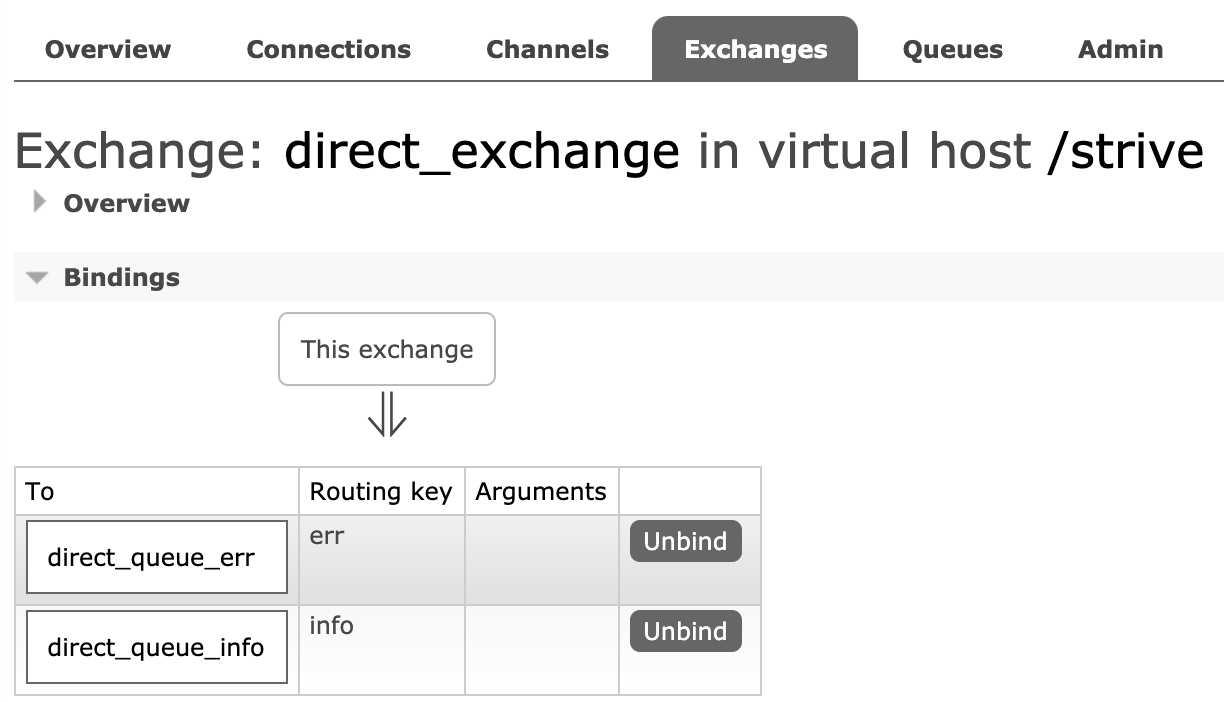
运行生产者,可以在监控平台看到多了个交换机,其绑定了2个队列:
运行两个消费者,查看控制台:
通配符模式
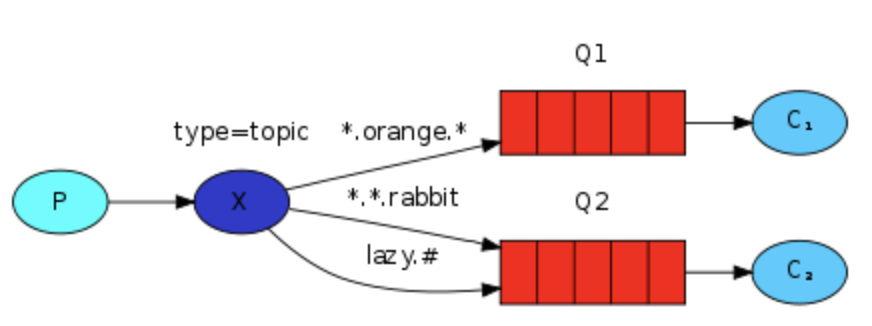
与路由模式类似,不过路由模式的Routing Key为全词匹配,而通配符模式是可以使用通配符的。
在通配符模式中,"."之间的字符串为一个词,共有两个通配符:
-
: 匹配任意多个词
- *: 匹配0或1个词
相较于路由模式的改动:
- 交换机、队列名称变更
- 交换机类型为TOPIC
- 路由Key使用通配符
生产者
public class Producer {
    static final String EXCHANGE_NAME = "topic_exchange";
    static final String QUEUE_INFO = "topic_queue_info";
    static final String QUEUE_ERR = "topic_queue_err";

    public static void main(String[] args) throws IOException, TimeoutException {
        // 1.1 获取连接对象
        Connection connection = ConnectionUtil.getConnection();
        // 1.2 创建信道
        Channel channel = connection.createChannel();

        // 2.1 声明交换机
        channel.exchangeDeclare(EXCHANGE_NAME, BuiltinExchangeType.TOPIC);
        // 2.2 声明队列
        channel.queueDeclare(QUEUE_INFO, true, false, false, null);
        channel.queueDeclare(QUEUE_ERR, true, false, false, null);
        // 2.3 绑定队列
        channel.queueBind(QUEUE_INFO, EXCHANGE_NAME, "info.#");
        channel.queueBind(QUEUE_ERR, EXCHANGE_NAME, "*.err");

        // 5. 发布消息
        String message = "路由KEY: info.rabbitmq.topic";
        channel.basicPublish(EXCHANGE_NAME, "info.rabbitmq.topic", null, message.getBytes());
        message = "路由KEY: info.";
        channel.basicPublish(EXCHANGE_NAME, "info.", null, message.getBytes());
        message = "路由KEY: info.rabbit.err";
        channel.basicPublish(EXCHANGE_NAME, "info.rabbit.err", null, message.getBytes());
        message = "路由KEY: rabbitmq.err";
        channel.basicPublish(EXCHANGE_NAME, "rabbitmq.err", null, message.getBytes());
        message = "路由KEY: rabbitmq.err";
        channel.basicPublish(EXCHANGE_NAME, "rabbitmq.err", null, message.getBytes());
        message = "路由KEY: .err";
        channel.basicPublish(EXCHANGE_NAME, ".err", null, message.getBytes());

        // 6. 释放资源
        channel.close();
        connection.close();
    }
}
这里发布了6条消息:info开头,并后缀2/0/2个词;err结尾,并前缀1/1/0个词
消费者
同样地,变更交换机类型、Routing Key
public class ConsumerOne {
    public static void main(String[] args) throws IOException, TimeoutException {
        // 1.1 获取连接
        Connection connection = ConnectionUtil.getConnection();
        // 1.2 创建信道
        Channel channel = connection.createChannel();

        // 2.1 声明交换机
        channel.exchangeDeclare(Producer.EXCHANGE_NAME, BuiltinExchangeType.TOPIC);
        // 2.2 声明队列
        channel.queueDeclare(Producer.QUEUE_INFO, true, false, false, null);
        // 2.3 绑定交换机与队列
        channel.queueBind(Producer.QUEUE_INFO, Producer.EXCHANGE_NAME, "info.#");

        // 3.1 创建消息处理对象
        DefaultConsumer consumer = new DefaultConsumer(channel) {
            @Override
            public void handleDelivery(String consumerTag,
                                       Envelope envelope,
                                       AMQP.BasicProperties properties,
                                       byte[] body) throws IOException {
                System.out.println("路由key:" + envelope.getRoutingKey());
                System.out.println("交换机:" + envelope.getExchange());
                System.out.println("消息ID:" + envelope.getDeliveryTag());
                System.out.println("消息:" + new String(body, "UTF-8"));
                System.out.println("-----------------");
            }
        };
        // 3.2 消费消息
        channel.basicConsume(Producer.QUEUE_INFO, true, consumer);
    }
}
在复制一个ConsumerTwo出来,消费队列QUEUE_ERR
运行测试
消费者的控制台输出:
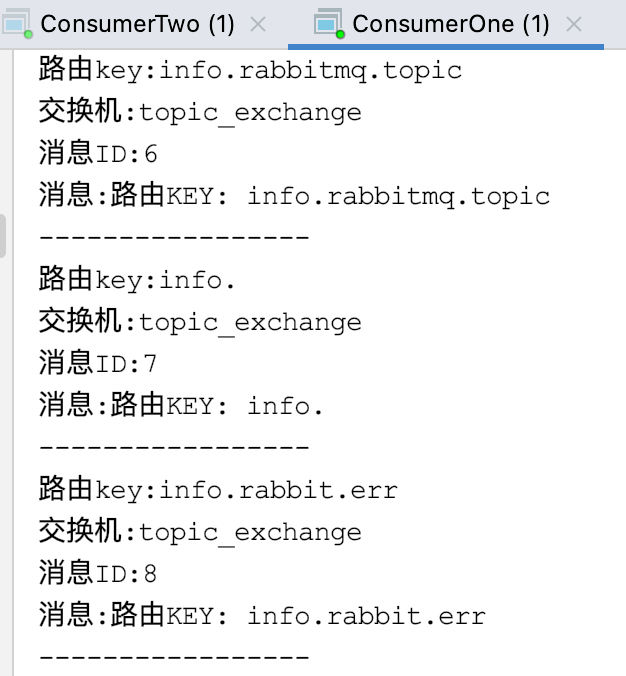
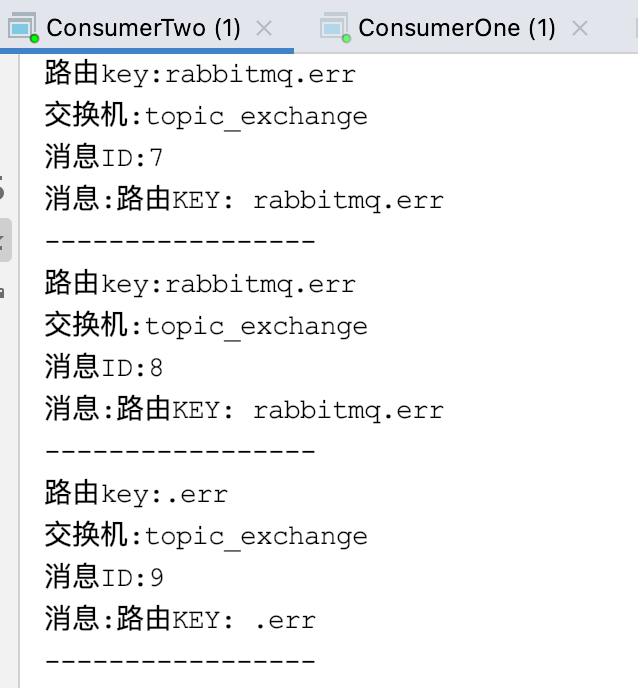
可以看到,info开头的都被ConsumerOne消费掉,而err结尾且前缀只有一个词的被ConsumerTwo消费掉。
还可以看到,Routing Key是允许重复的
SpringBoot集成
本节介绍RabbitMQ与SpringBoot集成的方法。
生产者
大致步骤包括:
- 引用相关依赖
- 设置rabbitmq的配置文件(创建连接的相关信息)
- 创建配置类(声明交换机、队列等)
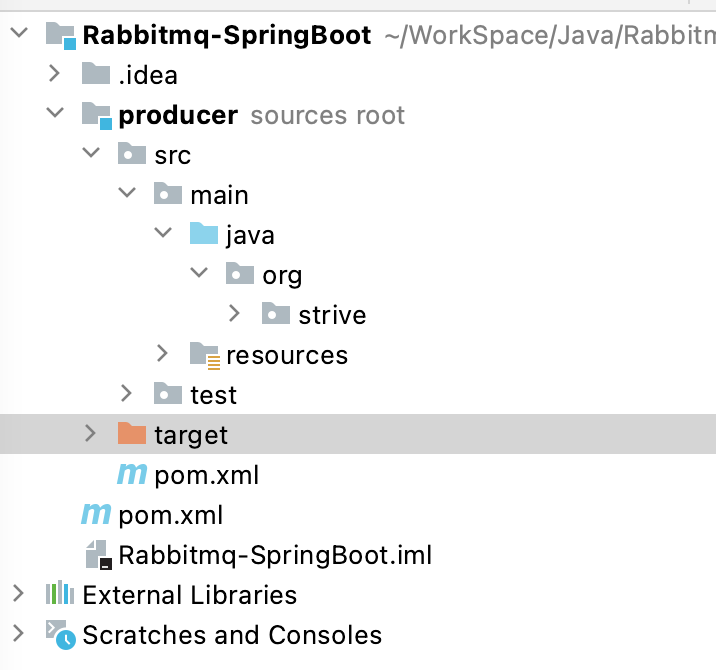
创建项目
创建一个空的maven项目,引入相关依赖
	<parent>
		<groupId>org.springframework.boot</groupId>
		<artifactId>spring-boot-starter-parent</artifactId>
		<version>2.3.7.RELEASE</version>
	</parent>

	<dependencies>
		<dependency>
			<groupId>org.springframework.boot</groupId>
			<artifactId>spring-boot-starter-web</artifactId>
		</dependency>

		<dependency>
			<groupId>org.springframework.boot</groupId>
			<artifactId>spring-boot-starter-amqp</artifactId>
		</dependency>
	</dependencies>
创建一空的module,亦是maven类型,不需引入其他依赖。
项目结构:
启动类
package org.strive;

import org.springframework.boot.SpringApplication;
import org.springframework.boot.autoconfigure.SpringBootApplication;

@SpringBootApplication
public class ProducerApplication {
    public static void main(String[] args) {
        SpringApplication.run(ProducerApplication.class, args);
    }
}
配置文件
在resources文件夹下创建application.yml:
# 访问端口
server:
  port: 8001

# rabbitmq
spring:
  rabbitmq:
    host: server.strive.com
    port: 5672
    virtual-host: /strive
    username: strive
    password: ...
这里rabbitmq的相关设置,全是创建连接所需的基本信息
配置类
package org.strive.config;

import org.springframework.amqp.core.*;
import org.springframework.beans.factory.annotation.Qualifier;
import org.springframework.context.annotation.Bean;
import org.springframework.context.annotation.Configuration;

@Configuration
public class ProducerConfig {
    public static final String EXCHANGE_NAME = "spring-topic-exchange";
    public static final String QUEUE_NAME = "spring-topic-queue";

    // 声明交换机
    @Bean("topicExchange")
    public Exchange getExchange() {
        return ExchangeBuilder.topicExchange(EXCHANGE_NAME).durable(true).build();
    }

    // 声明队列
    @Bean("topicQueue")
    public Queue getQueue() {
        return QueueBuilder.durable(QUEUE_NAME).build();
    }

    // 绑定交换机与队列
    @Bean
    public Binding getBinding(@Qualifier("topicExchange") Exchange exchange,
                              @Qualifier("topicQueue") Queue queue) {
        return BindingBuilder.bind(queue).to(exchange).with("info.#").noargs();
    }
}
控制器
package org.strive.controller;

import org.springframework.amqp.rabbit.core.RabbitTemplate;
import org.springframework.beans.factory.annotation.Autowired;
import org.springframework.web.bind.annotation.GetMapping;
import org.springframework.web.bind.annotation.RequestParam;
import org.springframework.web.bind.annotation.RestController;
import org.strive.config.ProducerConfig;

@RestController
public class PublishMsg {
    @Autowired
    private RabbitTemplate rabbitTemplate;

    @GetMapping("/publish")
    public String publishGetMsg(@RequestParam String key,
                                @RequestParam String message) {
        rabbitTemplate.convertAndSend(ProducerConfig.EXCHANGE_NAME, key, message);
        return "发布成功!";
    }
}
这里发布了一个Get方法,通过RabbitTemplate模板对象,完成消息发布。
运行测试
通过启动类启动,然后通过浏览器访问:
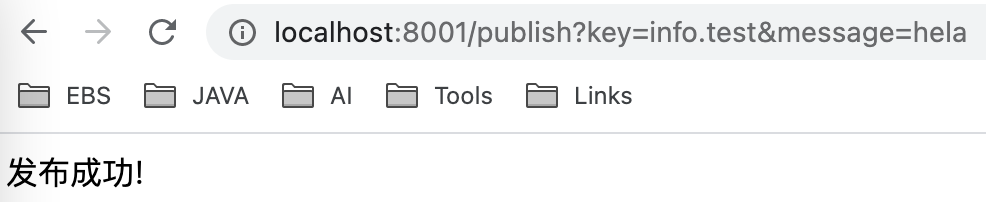
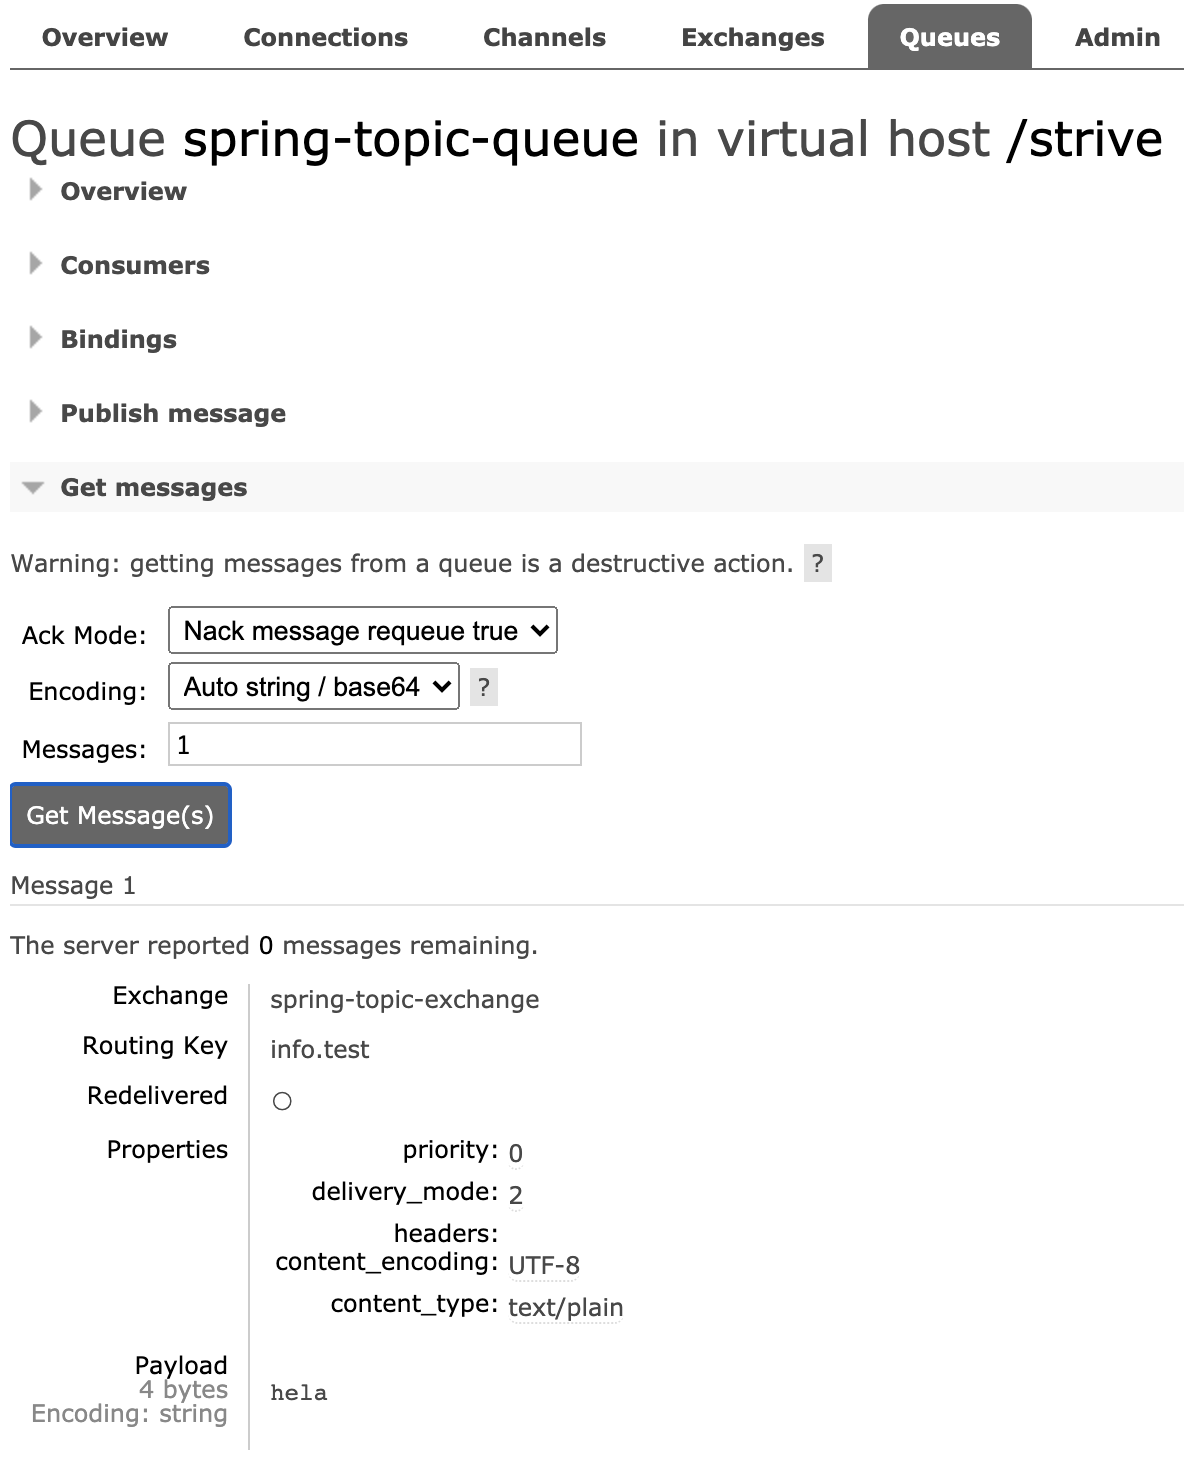
然后查看控制台,可以看到发布成功:
消费者
与生产者类似,不过:
- 不需创建配置类
- 不需创建控制器,而是创建监听器
创建项目
与生产者同一项目下,创建新的module
启动类
package org.strive;

import org.springframework.boot.SpringApplication;
import org.springframework.boot.autoconfigure.SpringBootApplication;

@SpringBootApplication
public class ConsumerApplication {
    public static void main(String[] args) {
        SpringApplication.run(ConsumerApplication.class, args);
    }
}
配置文件
# 访问端口
server:
  port: 9001

# rabbitmq
spring:
  rabbitmq:
    host: server.strive.com
    port: 5672
    virtual-host: /strive
    username: strive
    password: xin773717
与生产者一致,只需改个端口
监听器
package org.strive.listener;

import org.springframework.amqp.rabbit.annotation.RabbitListener;
import org.springframework.stereotype.Component;

@Component
public class MyListener {
    @RabbitListener(queues = {"spring-topic-queue"})
    public void getMessage(String message) {
        System.out.println("消费的消息:" + message);
    }
}
使用@RabbitListener注解,监听指定名称的队列
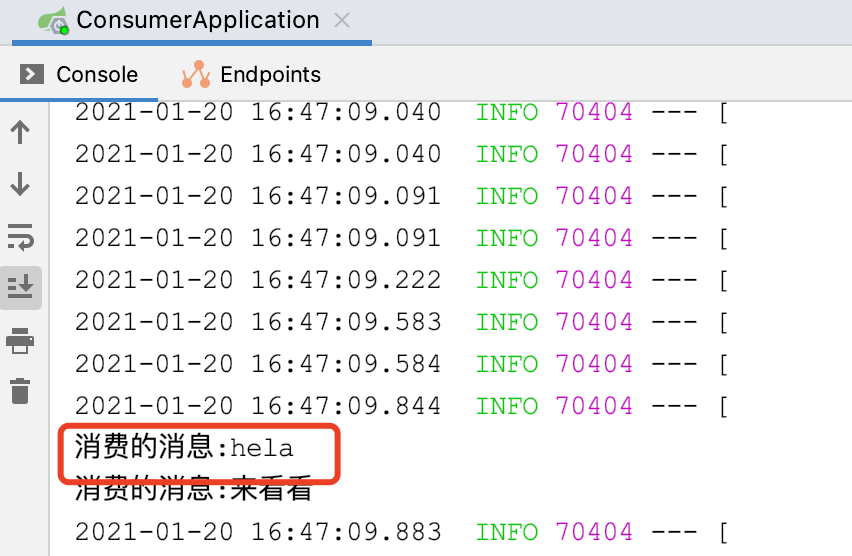
运行测试
启动消费者,可以在控制台查看到前面发布的消息: