前置条件及效果图

条件:
两台服务器,个人是两台腾讯云服务器(其中嫖的朋友一个);
版本:
- rocketmq-version:4.4.0
- rocketmq-console(mq控制台)
- Java:1.8
- maven:3.6.3
集群模式选择:
- 单master
- 这种方式风险较大,一旦Broker重启或者宕机时,会导致整个服务不可用。不建议线上环境使用,可以用于本地测试。
- 多master
- 优点:配置简单,单个Master宕机或重启维护对应用无影响,在磁盘配置为RAID10时,即使机器宕机不可恢复情况下,由于RAID10磁盘非常可靠,消息也不会丢(异步刷盘丢失少量消息,同步刷盘一条不丢),性能最高;
- 缺点:单台机器宕机期间,这台机器上未被消费的消息在机器恢复之前不可订阅,消息实时性会受到影响。
- 多master和多slave(同步)-----本次搭建的模式
- 优点:数据与服务都无单点故障,Master宕机情况下,消息无延迟,服务可用性与数据可用性都非常高;
- 缺点:性能比异步复制模式略低(大约低10%左右),发送单个消息的RT会略高,且目前版本在主节点宕机后,备机不能自动切换为主机。
- 多master和多slave(异步)
- 优点:即使磁盘损坏,消息丢失的非常少,且消息实时性不会受影响,同时Master宕机后,消费者仍然可以从Slave消费,而且此过程对应用透明,不需要人工干预,性能同多Master模式几乎一样;
- 缺点:Master宕机,磁盘损坏情况下会丢失少量消息。
下载地址:
rocketMq下载地址:https://rocketmq.apache.org/download
搭建过程
| 序号 | IP | 角色 | 架构模式 |
|---|---|---|---|
| 1 | xxxx.xxx.246 | nameserver、brokerserver | Master1、Slave2 |
| 2 | xxx.xxx..174 | nameserver、brokerserver | Master2、Slave1 |
配置Nameserver
NameServer是一个几乎无状态节点,可集群部署,节点之间无任何信息同步。
作用:管理Broker;举例:各个邮局的管理机构
vim /etc/hosts
# nameserver
xxx.xxx.xxx.174 rocketmq-nameserver1
xxx.xxx.xxx.246 rocketmq-nameserver2
重启下网卡使得配置生效:
# 查看网卡名字
systemctl list-unit-files | grep -i network
# 根据名字重启
systemctl restart network
关闭防火墙,开放端口号:在腾讯云中我是开放了所有端口。
# 关闭防火墙
systemctl stop firewalld.service
# 查看防火墙的状态
firewall-cmd --state
# 禁止firewall开机启动
systemctl disable firewalld.service
配置环境变量
Java环境配置和maven的配置:https://www.cnblogs.com/xbhog/p/15213838.html
rocketMQ的配置:将下载的包上传至服务器,获得其对应路径,进行配置
vim /etc/profile

#set rocketmq 在profile文件的末尾加入如下命令
ROCKETMQ_HOME=/usr/local/rocketmq/rocketmq-all-4.4.0-bin-release
PATH=$PATH:$ROCKETMQ_HOME/bin
export ROCKETMQ_HOME PATH
配置生效:
source /etc/profile
配置主从节点(xxx.xxx.xxx.246服务器)
保证一主一从:
xxx.xxx.xxx.246服务器修改的配置文件:broker-b.properties,broker-a-s.properties
xxx.xxx.xxx.174服务器修改的配置文件:broker-a.properties,broker-b-s.properties
创建所需要的存储路径:
主节点的文件创建:
mkdir -p /home/ubuntu/rocketmq/store
mkdir /home/ubuntu/rocketmq/store/commitlog
mkdir /home/ubuntu/rocketmq/store/consumequeue
mkdir /home/ubuntu/rocketmq/store/index
从节点的文件创建:
mkdir -p /home/ubuntu/rocketmq/store-s
mkdir /home/ubuntu/rocketmq/store-s/commitlog
mkdir /home/ubuntu/rocketmq/store-s/consumequeue
mkdir /home/ubuntu/rocketmq/store-s/index
注意的是,主节点和从节点使用的文件不能一样,否则启动不了。
进入路径:/rocketmq-all-4.4.0-bin-release/conf/2m-2s-sync(同步配置文件)

主配置文件:broker-b.properties
下面的配置的时候只需要修改以下几点:
- brokerIP1:(配置服务器的外网地址)非常重要,否则启动以后,在mq-console会出现内网地址
- namesrvAddr:配置两台服务器的外网地址加端口号
- brokerRole=SYNC_MASTER(主节点)
- storePathRootDir
- commitLog 存储路径
- storePathConsumeQueue 消费队列存储路径存储路径
- storePathIndex 消息索引存储路径
- storeCheckpoint 文件存储路径
- abort 文件存储路径
#所属集群名字
brokerClusterName=rocketmq-cluster
#broker名字,注意此处不同的配置文件填写的不一样
brokerName=broker-b
#0 表示 Master,>0 表示 Slave
brokerId=0
#非常重要,否则启动以后,在mq-console会出现内网地址
brokerIP1=xxx.xxx.xxx.246
#nameServer地址,分号分割
namesrvAddr=xxx.xxx.xxx.246:9876;xxx.xxx.xxx.174:9876
#在发送消息时,自动创建服务器不存在的topic,默认创建的队列数
defaultTopicQueueNums=4
#是否允许 Broker 自动创建Topic,建议线下开启,线上关闭
autoCreateTopicEnable=true
#是否允许 Broker 自动创建订阅组,建议线下开启,线上关闭
autoCreateSubscriptionGroup=true
#Broker 对外服务的监听端口
listenPort=10911
#删除文件时间点,默认凌晨 4点
deleteWhen=04
#文件保留时间,默认 48 小时
fileReservedTime=120
#commitLog每个文件的大小默认1G
mapedFileSizeCommitLog=1073741824
#ConsumeQueue每个文件默认存30W条,根据业务情况调整
mapedFileSizeConsumeQueue=300000
#检测物理文件磁盘空间
diskMaxUsedSpaceRatio=88
#存储路径
storePathRootDir=/home/ubuntu/rocketmq/store
#commitLog 存储路径
storePathCommitLog=/home/ubuntu/rocketmq/store/commitlog
#消费队列存储路径存储路径
storePathConsumeQueue=/home/ubuntu/rocketmq/store/consumequeue
#消息索引存储路径
storePathIndex=/home/ubuntu/rocketmq/store/index
#checkpoint 文件存储路径
storeCheckpoint=/home/ubuntu/rocketmq/store/checkpoint
#abort 文件存储路径
abortFile=/home/ubuntu/rocketmq/store/abort
#限制的消息大小
maxMessageSize=65536
brokerRole=SYNC_MASTER
#刷盘方式
#- ASYNC_FLUSH 异步刷盘
#- SYNC_FLUSH 同步刷盘
flushDiskType=SYNC_FLUSH
从配置文件:broker-a-s.properties
下面的配置的时候只需要修改以下几点:
- brokerIP1:(配置服务器的外网地址)非常重要,否则启动以后,在mq-console会出现内网地址
- namesrvAddr:配置两台服务器的外网地址加端口号
- brokerRole=SLAVE(从节点)
- storePathRootDir
- commitLog 存储路径
- storePathConsumeQueue 消费队列存储路径存储路径
- storePathIndex 消息索引存储路径
- storeCheckpoint 文件存储路径
- abort 文件存储路径
#所属集群名字
brokerClusterName=rocketmq-cluster
#broker名字,注意此处不同的配置文件填写的不一样
brokerName=broker-a
#0 表示 Master,>0 表示 Slave
brokerId=1
brokerIP1=xxx.xxx.xxx.246
#nameServer地址,分号分割
namesrvAddr=xxx.xxx.xxx.246:9876;xxx.xxx.xxx.174:9876
#在发送消息时,自动创建服务器不存在的topic,默认创建的队列数
defaultTopicQueueNums=4
#是否允许 Broker 自动创建Topic,建议线下开启,线上关闭
autoCreateTopicEnable=true
#是否允许 Broker 自动创建订阅组,建议线下开启,线上关闭
autoCreateSubscriptionGroup=true
#Broker 对外服务的监听端口
listenPort=11011
#删除文件时间点,默认凌晨 4点
deleteWhen=04
#文件保留时间,默认 48 小时
fileReservedTime=120
#commitLog每个文件的大小默认1G
mapedFileSizeCommitLog=1073741824
#ConsumeQueue每个文件默认存30W条,根据业务情况调整
mapedFileSizeConsumeQueue=300000
#检测物理文件磁盘空间
diskMaxUsedSpaceRatio=88
#存储路径
storePathRootDir=/home/ubuntu/rocketmq/store-s
#commitLog 存储路径
storePathCommitLog=/home/ubuntu/rocketmq/store-s/commitlog
#消费队列存储路径存储路径
storePathConsumeQueue=/home/ubuntu/rocketmq/store-s/consumequeue
#消息索引存储路径
storePathIndex=/home/ubuntu/rocketmq/store-s/index
#checkpoint 文件存储路径
storeCheckpoint=/home/ubuntu/rocketmq/store-s/checkpoint
#abort 文件存储路径
abortFile=/home/ubuntu/rocketmq/store-s/abort
#限制的消息大小
maxMessageSize=65536
#- SLAVE
brokerRole=SLAVE
#刷盘方式
#- ASYNC_FLUSH 异步刷盘
#- SYNC_FLUSH 同步刷盘
flushDiskType=ASYNC_FLUSH
启动服务
在xxx.xxx.xxx.246服务器上执行启动操作:
首先需要修改启动脚本文件(runbroker):
cd rocketmq-all-4.4.0-bin-release/bin
vim runbroker.sh
# 替换原来的信息:原来大小是G
#===========================================================================================
# JVM Configuration
#===========================================================================================
JAVA_OPT="${JAVA_OPT} -server -Xms256m -Xmx256m -Xmn128m"
同理修改启动脚本(runserver)
cd rocketmq-all-4.4.0-bin-release/bin
vim runserver.sh
# 替换原来的信息:原来大小是G
#===========================================================================================
# JVM Configuration
#===========================================================================================
JAVA_OPT="${JAVA_OPT} -server -Xms256m -Xmx256m -Xmn128m -XX:MetaspaceSize=128m -XX:MaxMetaspaceSize=320m"
启动nameserve:
cd rocketmq-all-4.4.0-bin-release/bin

nohup sh mqnamesrv &
启动broker,并设置启动日志的存放地址(启动前需要创建日志路径):
nohup sh mqbroker -c ./conf/2m-2s-sync/broker-b.properties >./broker-b.log &
nohup sh mqbroker -c ./conf/2m-2s-sync/broker-a-s.properties >./broker-a-s.log &
查看启动效果(启动成功):
root@VM-4-11-ubuntu:/home/ubuntu/rocketmq-all-4.4.0-bin-release# jps
796522 NamesrvStartup
2081303 BrokerStartup
2080501 BrokerStartup
服务器(xxx.xxx.xxx.174)相关操作如上。
客户端搭建请求集群
集群监控平台搭建
RocketMQ有一个对其扩展的开源项目incubator-rocketmq-externals,这个项目中有一个子模块叫rocketmq-console,这个便是管理控制台项目了,先将incubator-rocketmq-externals拉到本地,因为我们需要自己对rocketmq-console进行编译打包运行。
git clone https://github.com/apache/rocketmq-externals
cd rocketmq-console
mvn clean package -Dmaven.test.skip=true
打包前需要在rocketmq-console中配置下namesrv集群地址,
cd \rocketmq-console\src\main\resources

# 编辑application.properties
server.contextPath=
server.port=8080

### SSL setting
#server.ssl.key-store=classpath:rmqcngkeystore.jks
#server.ssl.key-store-password=rocketmq
#server.ssl.keyStoreType=PKCS12
#server.ssl.keyAlias=rmqcngkey

#spring.application.index=true
spring.application.name=rocketmq-console
spring.http.encoding.charset=UTF-8
spring.http.encoding.enabled=true
spring.http.encoding.force=true
logging.config=classpath:logback.xml
#if this value is empty,use env value rocketmq.config.namesrvAddr  NAMESRV_ADDR | now, you can set it in ops page.default localhost:9876
rocketmq.config.namesrvAddr=xxx.xxx.xxxx.174:9876;xxx.xxx.xxx.246:9876
#if you use rocketmq version < 3.5.8, rocketmq.config.isVIPChannel should be false.default true
rocketmq.config.isVIPChannel=
#rocketmq-console's data path:dashboard/monitor
rocketmq.config.dataPath=/tmp/rocketmq-console/data
#set it false if you don't want use dashboard.default true
rocketmq.config.enableDashBoardCollect=true
#set the message track trace topic if you don't want use the default one
rocketmq.config.msgTrackTopicName=
rocketmq.config.ticketKey=ticket

#Must create userInfo file: ${rocketmq.config.dataPath}/users.properties if the login is required
rocketmq.config.loginRequired=false
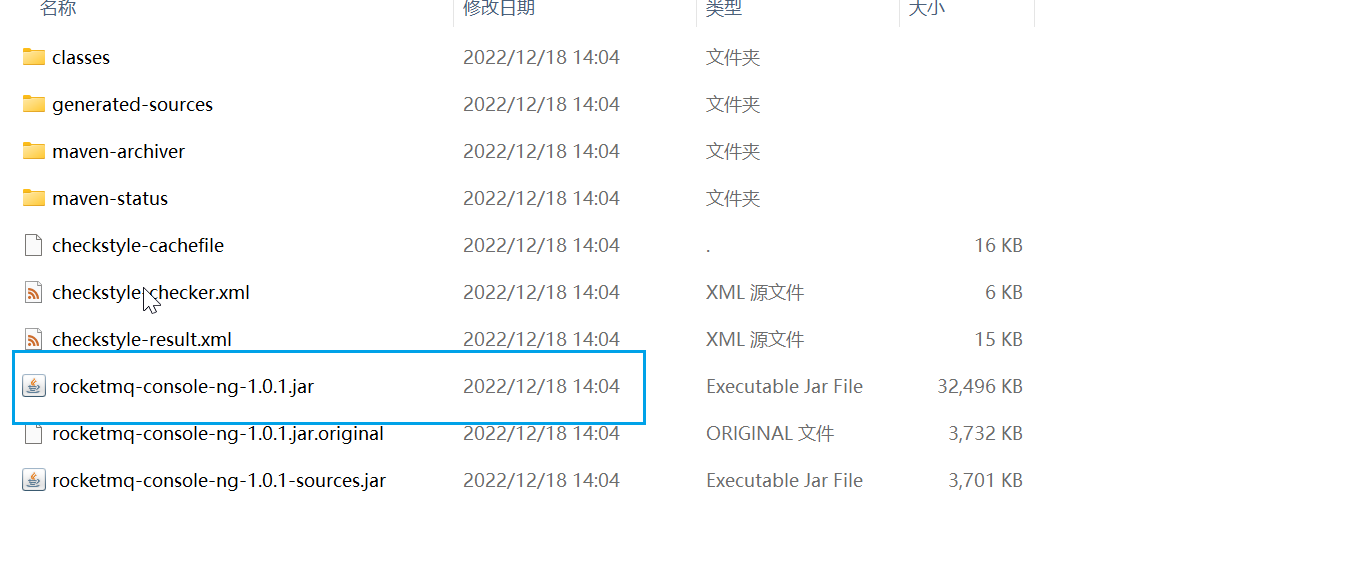
生成jar包,上传服务器,
启动:nohup java -jar rocketmq-console-ng-1.0.1.jar >./rockermq-console.log &

请求地址为:http://xx.xxx.xxx.246:8080/#/cluster
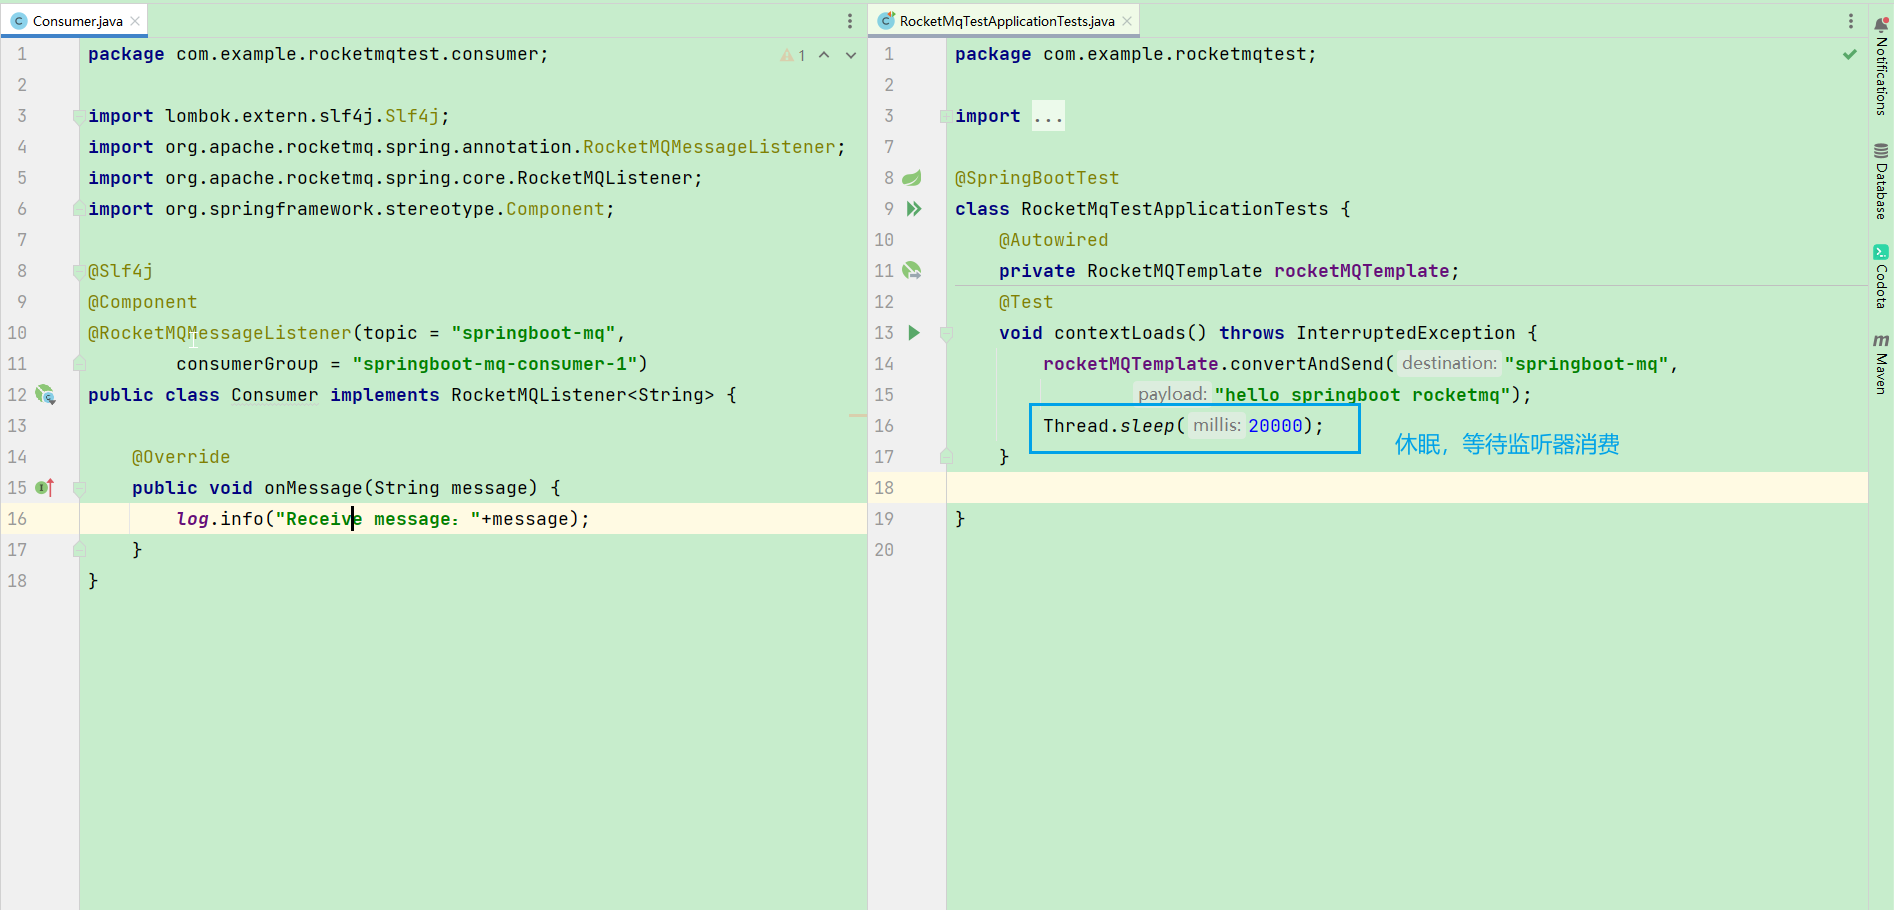
客户端请求
pom.xml配置
<properties>
    <java.version>1.8</java.version>
    <rocketmq-spring-boot-starter-version>2.0.3</rocketmq-spring-boot-starter-version>
</properties>
<dependencies>
    <dependency>
        <groupId>org.springframework.boot</groupId>
        <artifactId>spring-boot-starter-web</artifactId>
    </dependency>

    <dependency>
        <groupId>org.projectlombok</groupId>
        <artifactId>lombok</artifactId>
        <optional>true</optional>
    </dependency>
    <dependency>
        <groupId>org.springframework.boot</groupId>
        <artifactId>spring-boot-starter-test</artifactId>
        <scope>test</scope>
    </dependency>
    <!--rocket-->
    <dependency>
        <groupId>org.apache.rocketmq</groupId>
        <artifactId>rocketmq-client</artifactId>
        <version>4.9.3</version>
    </dependency>
    <dependency>
        <groupId>org.apache.rocketmq</groupId>
        <artifactId>rocketmq-spring-boot-starter</artifactId>
        <version>${rocketmq-spring-boot-starter-version}</version>
    </dependency>
</dependencies>
# application.properties
rocketmq.name-server=xxx.xxx.xxx.174:9876;xxx.xxx.xxx.246:9876
rocketmq.producer.group=my-group

结果:Receive message:hello springboot rocketmq
标签:RocketMQ,路径,xxx,集群,rocketmq,ubuntu,home,store,搭建 From: https://www.cnblogs.com/xbhog/p/17003037.html