转: CentOS7内安装部署Cobbler_炸鸡嘎嘎的博客-CSDN博客_centos7安装cobbler
cobbler简介
Cobbler是一个Linux服务器安装的服务,可以通过网络启动(PXE)的方式来快速安装、重装物理服务器和虚拟机,同时还可以管理DHCP,DNS等。
Cobbler可以使用命令行方式管理,也提供了基于Web的界面管理工具(cobbler-web),还提供了API接口,可以方便二次开发使用。
Cobbler是较早前的kickstart的升级版,优点是比较容易配置,还自带web界面比较易于管理。
Cobbler内置了一个轻量级配置管理系统,但它也支持和其它配置管理系统集成,如Puppet,暂时不支持SaltStack。
cobbler官网
集成的服务
- PXE服务支持
- DHCP服务管理
- DNS服务管理(可选bind,dnsmasq)
电源管理 - Kickstart服务支持
- YUM仓库管理
- TFTP(PXE启动时需要)
- Apache(提供kickstart的安装源,并提供定制化的kickstart配置)
cobbler服务端部署
环境:CentOS7
准备工作
# 配置yum源
rm -rf /etc/yum.repos.d/*
curl -o /etc/yum.repos.d/CentOS-Base.repo https://mirrors.aliyun.com/repo/Centos-7.repo
sed -i -e '/mirrors.cloud.aliyuncs.com/d' -e '/mirrors.aliyuncs.com/d' /etc/yum.repos.d/CentOS-Base.repo
#查看防火墙和SELinux是否关闭
setenforce 0
sed -i 's/^SELINUX=.*/SELINUX=disabled/' /etc/selinux/config
systemctl disable --now firewalld
安装Cobbler及相关软件包
#安装需要的软件
yum -y install epel-release vim dhcp tftp-server xinetd httpd cobbler cobbler-web pykickstart
配置Cobbler
#为httpd和cobbler设置启动和开机自启
systemctl enable --now httpd cobblerde

# 检查配置文件,需要在 cobblerd 和 httpd 启动的情况下检查
[root@localhost ~]# cobbler check
The following are potential configuration items that you may want to fix:

1 : The 'server' field in /etc/cobbler/settings must be set to something other than localhost, or kickstarting features will not work.  This should be a resolvable hostname or IP for the boot server as reachable by all machines that will use it.
2 : For PXE to be functional, the 'next_server' field in /etc/cobbler/settings must be set to something other than 127.0.0.1, and should match the IP of the boot server on the PXE network.
3 : SELinux is enabled. Please review the following wiki page for details on ensuring cobbler works correctly in your SELinux environment:
    https://github.com/cobbler/cobbler/wiki/Selinux
4 : change 'disable' to 'no' in /etc/xinetd.d/tftp
5 : Some network boot-loaders are missing from /var/lib/cobbler/loaders.  If you only want to handle x86/x86_64 netbooting, you may ensure that you have installed a *recent* version of the syslinux package installed and can ignore this message entirely.  Files in this directory, should you want to support all architectures, should include pxelinux.0, menu.c32, elilo.efi, and yaboot.
6 : enable and start rsyncd.service with systemctl
7 : debmirror package is not installed, it will be required to manage debian deployments and repositories
8 : The default password used by the sample templates for newly installed machines (default_password_crypted in /etc/cobbler/settings) is still set to 'cobbler' and should be changed, try: "openssl passwd -1 -salt 'random-phrase-here' 'your-password-here'" to generate new one
9 : fencing tools were not found, and are required to use the (optional) power management features. install cman or fence-agents to use them


# 问题1
sed -i "s#server: 127.0.0.1#server: 192.168.220.40#" /etc/cobbler/settings
grep "^server: " /etc/cobbler/settings
server: 192.168.220.40   //将此处的ip修改为本主机的ip

#问题2
sed -i "s#next_server: 127.0.0.1#next_server: 192.168.220.40#" /etc/cobbler/settings
grep "^next_server: " /etc/cobbler/settings
next_server: 192.168.220.40  //将此处的ip修改为本主机的ip

#问题8
# 防止循环装系统,适用于服务器第一启动项是 PXE 启动
sed -i "s#pxe_just_once: 0#pxe_just_once: 1#" /etc/cobbler/settings
grep "^pxe_just_once: " /etc/cobbler/settings
pxe_just_once: 1

#生成加密的密码
openssl passwd -1 -salt "$RANDOM" '123456789'
$1$32341$bRkv49hx2peVqf1DQBM9x.

# 修改 /etc/cobbler/settings 文件中的 default_password_crypted 参数的值为上面生成的密码串
vim /etc/cobbler/settings
grep 'default_password_crypted:' /etc/cobbler/settings
default_password_crypted: "$1$32341$bRkv49hx2peVqf1DQBM9x."   //修改此处

#问题4
sed -i "/disable/ {s#yes#no#}" /etc/xinetd.d/tftp
grep "disable" /etc/xinetd.d/tftp
        disable                 = no

#问题7 和 Debian 系统相关,不需要
#问题9 fence设备相关,暂不需要

# 上面相关问题配置完后,重启 Cobbler
systemctl restart cobblerd
配置DHCP
sed -i "s#manage_dhcp: 0#manage_dhcp: 1#" /etc/cobbler/settings
grep "^manage_dhcp: " /etc/cobbler/settings
manage_dhcp: 1

vim /etc/cobbler/dhcp.template  // 列出修改过的相关字段
subnet 192.168.220.0 netmask 255.255.255.0 {     //网段
     option routers             192.168.220.2;   //网关
     option domain-name-servers 192.168.220.2;   //dns
     option subnet-mask         255.255.255.0;   //子网掩码
     range dynamic-bootp        192.168.220.200 192.168.220.210;   //范围
     default-lease-time         21600;
     max-lease-time             43200;
     next-server                $next_server;
同步Cobbler配置
#同步最新 Cobbler 配置,它会根据配置自动修改 DHCP 等服务
systemctl restart cobblerd
cobbler sync
....
running shell triggers from /var/lib/cobbler/triggers/change/*
*** TASK COMPLETE ***   //出现TASK COMPLETE为成功
配置开机启动
#再次确认服务都为开机自启
systemctl enable dhcpd xinetd httpd cobblerd
管理distro
-
Cobbler 变得可用的第一步为定义 distro,其可以通过为其指定外部的安装引导内核及 ramdisk 文件的方式实现。
-
如果已经有完成的安装树(如 OS 的安装镜像)则推荐使用 improt 导入的方式进行。
-
导入镜像
# 导入CentOS 7镜像
mount /dev/cdrom /mnt  //# 挂载 CentOS 7 的系统镜像
mount: /dev/sr0 写保护,将以只读方式挂载
cobbler import --path=/mnt/ --name=CentOS-7-x86_64 --arch=x86_64
....
looking for /var/www/cobbler/ks_mirror/CentOS-7-x86_64/repodata/*comps*.xml
Keeping repodata as-is :/var/www/cobbler/ks_mirror/CentOS-7-x86_64/repodata
*** TASK COMPLETE ***   //看到TASK COMPLETE为成功导入

# --path 镜像路径
# --name 为安装源定义一个名字
# --arch 指定安装源是 32 位、64 位、ia64, 目前支持的选项有: x86│x86_64│ia64
# 安装源的唯一标示就是根据 name 参数来定义,本例导入成功后,安装源的唯一标示就是:CentOS-7-x86_64,如果重复,系统会提示导入失败

cobbler distro list  //查看镜像列表
   CentOS-7-x86_64

# 镜像存放目录,Cobbler 会将镜像中的所有安装文件拷贝到本地一份,放在 /var/www/cobbler/ks_mirror 下的 CentOS-7-x86_64目录下。
# 因此 /var/www/cobbler 目录必须具有足够容纳安装文件的空间。
ll /var/www/cobbler/ks_mirror/

cobbler profile list   // 导入 distro 会自动生成 profile
   CentOS-7-x86_64
# 查看安装镜像文件信息
cobbler distro report --name=CentOS-7-x86_64
创建kickstarts自动安装脚本
cat CentOS-7-x86_64.ks    //此文件的可以参考/root/anaconda-ks.cfg文件
auth --enableshadow --passalgo=sha512
bootloader --location=mbr
clearpart --all --initlabel
part /boot --asprimary --fstype="ext4" --size=500
part swap --fstype="swap" --size=4096
part / --fstype="ext4" --grow --size=15000
text
firewall --disabled
firstboot --disable
keyboard us
lang en_US
url --url=http://192.168.220.40/cobbler/ks_mirror/CentOS-7-x86_64  //此处改为主机ip
$yum_repo_stanza
reboot
rootpw --iscrypted $6$xIirl1/bwSCWwuYp$c/CyuQFl45n.NUuz3.MC5jHrHW7arV8PvgUY71g28m/SHNo1mYyCj4sDdgkX4AHpCvCBZ9XDV/JWVblYcNdkL1   //此处密码为当前虚拟机root用户的密码 复制于anaconda-ks.cfg文件内
selinux --disabled
skipx
timezone Asia/Shanghai --isUtc --nontp
install
zerombr

%packages
@^minimal
@core
kexec-tools

%end

%addon com_redhat_kdump --enable --reserve-mb='auto'

%end

%anaconda
pwpolicy root --minlen=6 --minquality=1 --notstrict --nochanges --notempty
pwpolicy user --minlen=6 --minquality=1 --notstrict --nochanges --emptyok
pwpolicy luks --minlen=6 --minquality=1 --notstrict --nochanges --notempty
%end

# 检查ks文件语法是否有误
cobbler validateks
task started: 2022-08-11_192811_validateks
task started (id=Kickstart Validation, time=Thu Aug 11 19:28:11 2022)
----------------------------
osversion: rhel7
checking url: http://192.168.220.40/cblr/svc/op/ks/profile/CentOS-7-x86_64
running: /usr/bin/ksvalidator -v "rhel7" "http://192.168.220.40/cblr/svc/op/ks/profile/CentOS-7-x86_64"
received on stdout:
received on stderr:
*** all kickstarts seem to be ok ***
*** TASK COMPLETE ***


# 查看当前cobbler有哪些配置文件
cobbler profile list
# 修改profile,将我们新建的ks文件设为默认的kickstarts安装文件
cobbler profile edit --name CentOS-7-x86_64 --kickstart=/var/lib/cobbler/kickstarts/CentOS-7-x86_64.ks
#配置网卡名称为传统网卡名称eth0
cobbler profile edit --name CentOS-7-x86_64 --kopts='net.ifnames=0 biosdevname=0
# 检查当前系统cobbler配置文件信息

# 同步cobbler
cobbler sync
....
running shell triggers from /var/lib/cobbler/triggers/change/*
*** TASK COMPLETE ***
# 为避免发生未知问题,先把服务端所有服务重启
systemctl restart xinetd cobblerd httpd安装系统
注:内存必须为2G以上
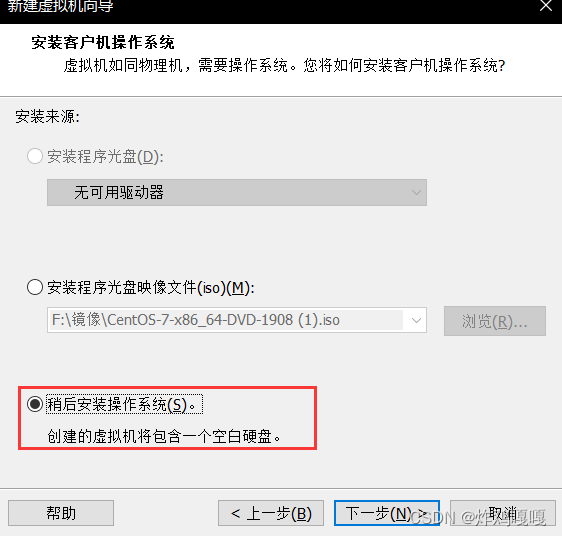
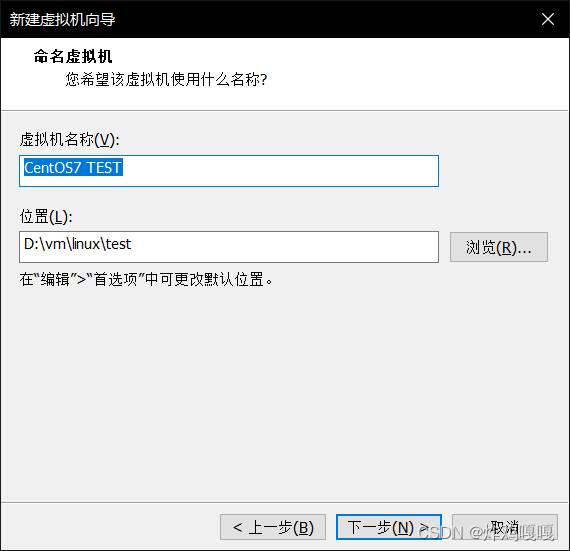
新建一个虚拟机
选择版本
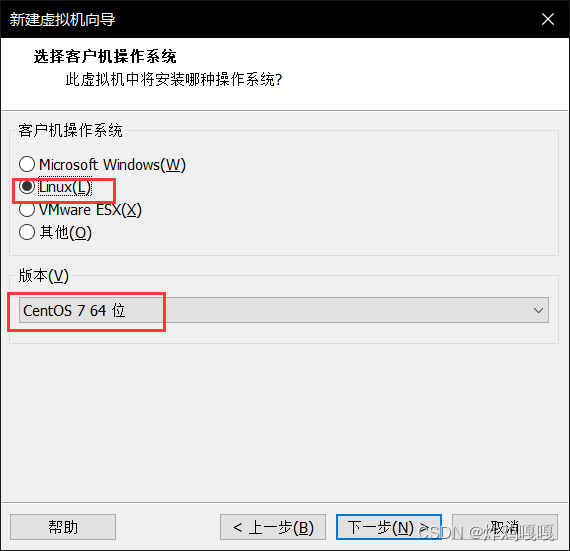
用于测试
剩余选项默认即可
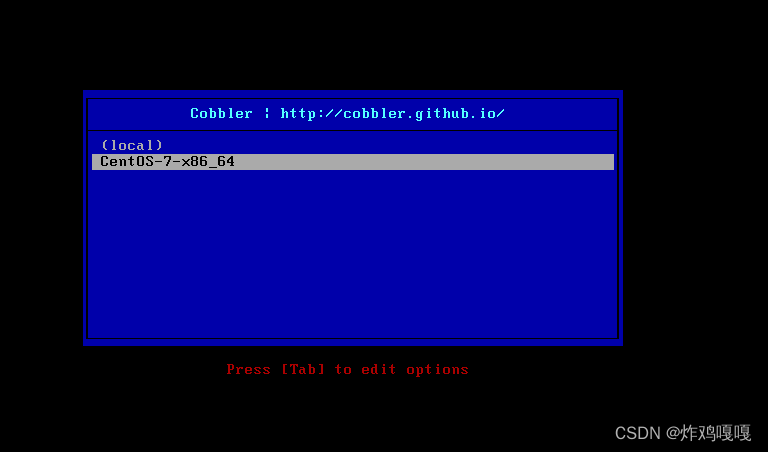
选择第二项