转载地址http://wuhongyi.cn/PKUXIADAQ/en/INSTALL.html
Installation of Software
Installation for this software is requrired by
- CERN ROOT 6
-
-
GCC >= 4.8
-
-
FFTW3
-
OPENSSL
The operating system tested by this program includes CentOS7 / Scientific Linux 7 / CentOS8 / Ubuntu18.04 / Ubuntu20.04
This package uses PLX9054 driver with version 8.23. The operating systems supported by this version of the driver are CentOS 7 / CentOS 8 / Debian 08 / Debian 09 / Debian 10 / Ubuntu 18.04 / Ubuntu 20.04.
危险
Graphical interface programs and non-graphical interface programs cannot run at the same time!
Graphical interface programs and non-graphical interface programs cannot run at the same time!
Graphical interface programs and non-graphical interface programs cannot run at the same time!
The steps for Installation
-
Delete the old version of the PKUXIADAQ folder in your personal directory
-
Extract this package into your personal directory ($HOME)
-
Set up environment variables
-
Compile Plx9054 driver
-
Compile pixie16 driver API (this API has been modified by Hongyi Wu, driven by unofficial standards)
-
Compile graphical acquisition software
-
Compile non-graphical acquisition software
-
Compile online monitor program
-
Compile data converter program
-
Compile event reconstruction program (optional)
## Set up environment variables


# Add the follwing content into .bashrc file
export PLX_SDK_DIR=$HOME/PKUXIADAQ/PlxSdk

# put PKUXIADAQ.tar.gz(or PKUXIADAQ-master.tar.gz) in the personal directory /home, the position ~/

tar -zxvf PKUXIADAQ.tar.gz
or
tar -zxvf PKUXIADAQ-master.tar.gz
mv PKUXIADAQ-master  PKUXIADAQ

# Acquire PKUXIADAQ directory
## Compile Plx9054 driver

# Open a new terminal
cd ~
cd PKUXIADAQ/
#Delete the undeleted driver that may exist. If there is no such directory, you do not need to execute the command.
rm -rf PlxSdk
tar -xvf PlxSdk823.tar
cd PlxSdk/PlxApi/
make clean
make
# If it succeeds,you will see Library "Library/PlxApi.a" built successfully


cd ../Samples/ApiTest/
make clean
make
#if it succeeds,you will see Application "App/ApiTest" built successfully

# If an error is reported, find the corresponding solution according to the operating system
cd ../../Driver/
./builddriver 9054

# If it succeeds,you will see Driver "Plx9054/Plx9054.ko" built sucessfully
## Compile pixie16

cd ~
cd PKUXIADAQ/software/
make clean
make

# As long as no error is reported, the libPixie16App.a libPixie16Sys.a will be generated in the folder
# Modify settings parameters
cd ~
cd PKUXIADAQ/parset/


# Modify cfgPixie16.txt file。
# The value after CrateID indicates the chassis number, and the value is allowed to be 0-15. If there is only a chassis, the parameter is set freely (usually the default 0 is used). If multiple chassis are running synchronously, make sure that the number of each chassis is set to a different value.
# SettingPars Following is the parameter setting file and write the parameter configuration file to be used.
# ModuleSlot The first value number indicates the number of plugins, and if there are 3 plugins, it is 3. The following numbers are for each plug-in in the slot position of the chassis (the slot position is counted from 2), and there are three plugins followed by 2 3 4 respectively.
#AutoRunModeTimes The following values are the time for automatic switching in automatic operation mode.
# Parameter ModuleSampingRate and ModuleBits only take effect in offline mode. When the main interface is initialized in Offline mode, this parameter is read.


# Modify the Run.config file, the first line in the file is the original data storage path, and the second is the file name.
# Modify the RunNumber file, the value in this file is the run number of the actual run.
## Compile graphical acquisition software

cd ~
cd PKUXIADAQ/GUI/
make clean
make
## Compile non-graphical acquisition software

cd ~
cd PKUXIADAQ/NOGUI/
make clean
make
## Compile online monitor program

cd ~
cd PKUXIADAQ/OnlineStattics/

make clean
make
## Compile data converter program

cd ~
cd PKUXIADAQ/DecodeAndSortAll/

# Modify UserDefine.hh according to the instructions in the program.

make clean
make
## Compile event reconstruction program

cd ~
cd PKUXIADAQ/EventBuilder/

# Modify UserDefine.hh according to the instructions in the program.

make clean
make
Instruction for use
-
Restart the computer after booting the chassis (the computer must be open later than the chassis)
-
Load Plx9054 driver under ROOT permission after opening the chassis
-
Normal acquisition
## Load Plx9054 driver under ROOT permission


cd ~
cd PKUXIADAQ/PlxSdk/Bin/

## CENTOS
su # input ROOT password
./Plx_load 9054
## Ubuntu
## The 18th line of the file Plx_load needs to be modified:  export PLX_SDK_DIR=/home/[user name]/PKUXIADAQ/PlxSdk
sudo ./Plx_load 9054

# You Will see a prompt to load successfully
## CENTOS
exit  #Exit ROOT permission
## Start the graphical interface program

cd ~
cd ~/PKUXIADAQ/GUI
./gddaq

# The graphical interface will pop up.
# You can choose Online/Offline Mode then press Boot to initialize.
# After waiting for initialization, you can modify the output data file path, file name, and run number. Press the Complete button to confirm.
# The LSRunStart button becomes operational at this time. You can start pressing Start and then press Stop for the second time.
# Online Statistics option selections mean sending online statistics
# Update Energy Monitor: Each time you select it, the energy spectrum information is read from the plug-in and sent to the online program (frequent select
## Start the non-graphical interface program

cd ~
cd ~/PKUXIADAQ/NOGUI
./gddaq
## Start online monitor program


cd ~
cd PKUXIADAQ/OnlineStattics/
./online

# The graphical interface will pop up.
# Press RunStart to start monitoring and update the input rate and output rate of each channel every 3 seconds. (The first time you enable the program after opening the chassis, you need to enable it after the acquisition is turned on)
# In the lower right corner of the monitoring interface, there is monitoring of the amount of hard disk usage for writing data.


# EnergyMonitor page is used to view the spectrum. Due to the internal register size limitations of the plug-in, this energy spectrum differs from the actual spectrum in channel range.
## execute data converter program


cd ~
cd PKUXIADAQ/DecodeAndSortAll/

# After the last run of acquisition, we can convert the previous run of data to ROOT format file.

./decodeandsort xxx1 [... xxx2 xxx3 ...]
#xxx indicates Run Number in different ceate
Common installation errors
Ubuntu 22.04
Not tested
Ubuntu 20.04
for file Driver/Source.Plx9000/Driver.c
// add the following 3 lines at the begining of file:
#ifndef INCLUDE_VERMAGIC
#define INCLUDE_VERMAGIC
#endif
for file Driver/Source.Plx9000/SuppFunc.c
// Line 956 is modified as follows:
down_read( ¤t->mm->mmap_lock );
// Line 969 is modified as follows:
up_read( ¤t->mm->mmap_lock );
// Comment line 402-410
// if (request_mem_region(
// pdx->PciBar[BarIndex].Properties.Physical,
// pdx->PciBar[BarIndex].Properties.Size,
// PLX_DRIVER_NAME
// ) == NULL)
// {
// return (-ENOMEM);
// }
// else
Ubuntu 18.04
The soon-to-be launched upgrade
for file Driver/Source.Plx9000/Driver.c
for file Driver/Source.Plx9000/SuppFunc.c
CentOS8
For CentOS 8, the wrong solution for installing PLX9054 driver:
// Modify Include/Plx_sysdep.h line 153
#if (LINUX_VERSION_CODE < KERNEL_VERSION(4,0,0))
CentOS7
For CentOS / scientific Linux 7.6 / 7.7, the wrong solution for installing PLX9054 driver:
./builddriver 9054
Build: Plx9054

- PLA: CentOS Linux release 7.6.1810 (Core)
- KER: 3.10.0-957.12.2.el7.x86_64
- INC: /lib/modules/3.10.0-957.12.2.el7.x86_64/build/include
- CPU: x86_64 (64-bit Little Endian)
- CMP: Gcc
- TYP: Driver
- PLX: 9054
- CFG: Release

make[1]: Entering directory '/usr/src/kernels/3.10.0-957.12.2.el7.x86_64'
arch/x86/Makefile:166: *** CONFIG_RETPOLINE=y, but not supported by the compiler. Compiler update recommended.。 Stop.
make[1]: Leaving directory '/usr/src/kernels/3.10.0-957.12.2.el7.x86_64'
make: *** [BuildDriver] Error 2
The above is the output prompt when the error occurs.
At this point, the user can modify the file /usr/src/kernels/3.10.0-957.12.2.el7.x86_64/arch/x86/Makefile to avoid this error by cancel the following code.
ifneq ($(RETPOLINE_CFLAGS),)
    KBUILD_CFLAGS += $(RETPOLINE_CFLAGS) -DRETPOLINE
else
    $(error CONFIG_RETPOLINE=y, but not supported by the compiler. Compiler update recommended.)
endif
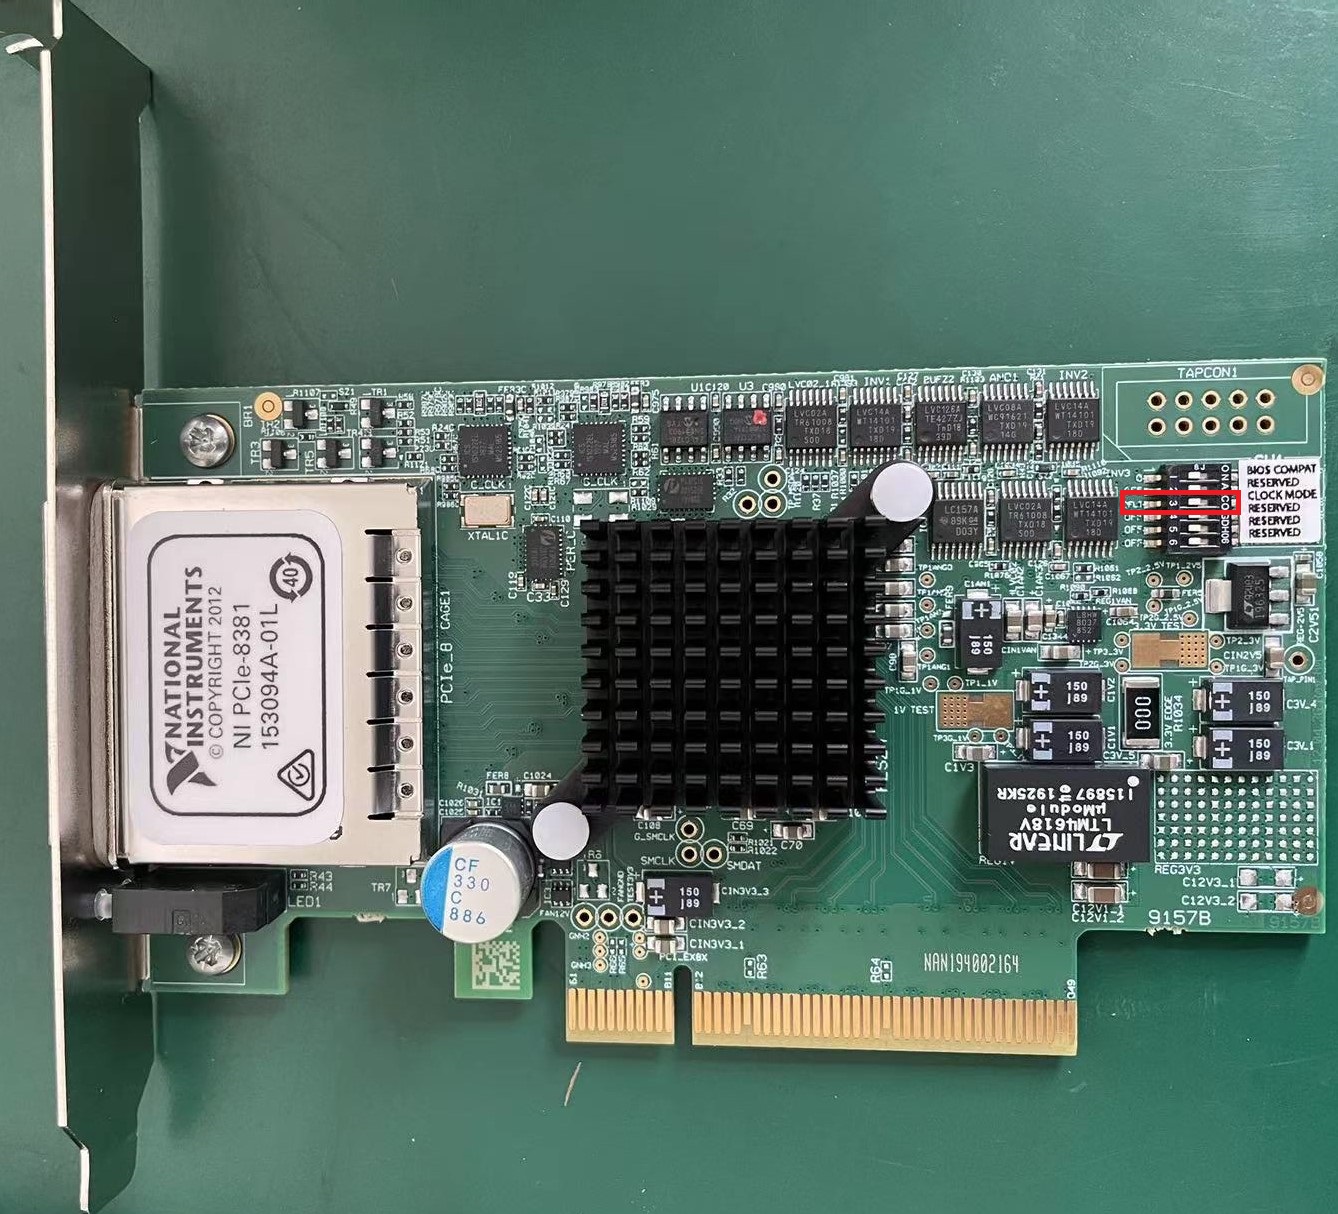
9054 driver loading error
If you use NI PCIe-8381 and the driver cannot be loaded, as shown in the following figure, check whether the dial CLOCK MODE is ON.