一、框架简介
1.1、简介
Scrapy框架是用纯Python实现的一个为了爬取网站数据、提取结构性数据而编写的可扩展的开源应用框架,只需要少量代码就能够快速地实现数据爬取。往往手写一个爬虫需要进行发送网络请求、数据解析、数据存储、反反扒机制、异步请求等步骤,如果都从零开始写是比较浪费时间的,同时会降低开发的效率。Scrapy框架已经帮我们把这些基础的东西都进行了封装,只需要按照模板编写自己的爬虫模块和逻辑就可以轻松实现一个爬虫,进而提高爬虫和开发的工作效率。
二、Scrapy架构与流程
2.1、架构图及组件功能
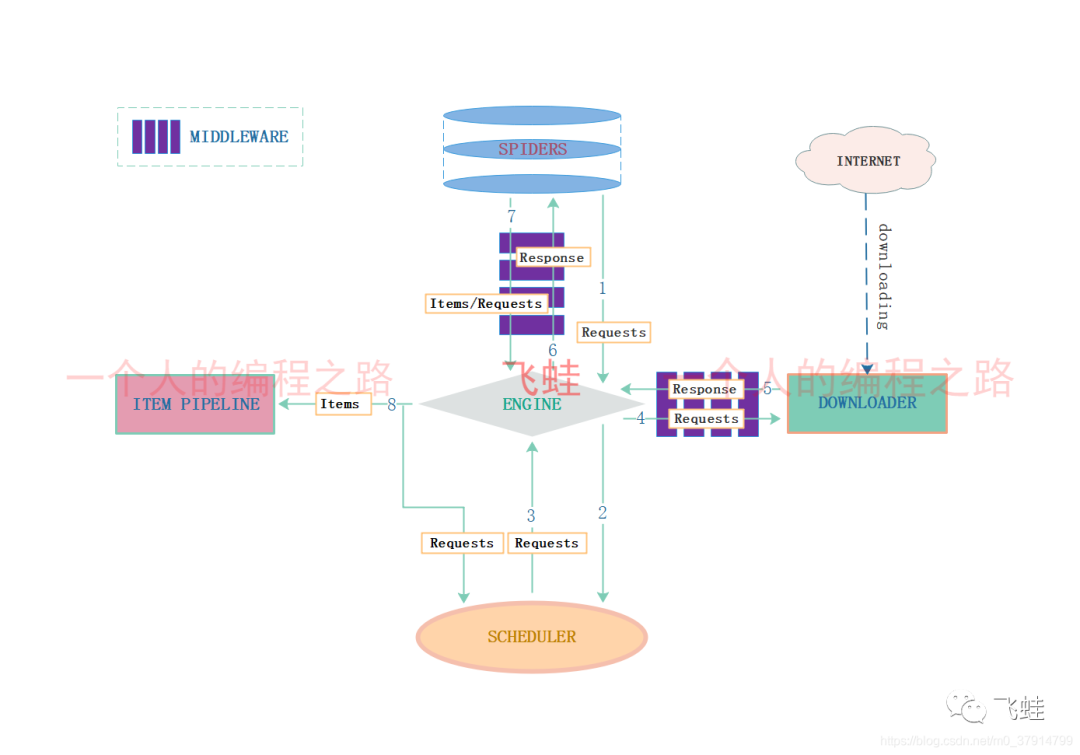
2.1.1、架构图

2.1.2、组件功能
-
Spiders:爬虫,负责处理所有的Responses,从中分析并提取数据(Item字段需要的数据),同时将需要继续跟进的URL提交给引擎,再次进入调度器。Engine:引擎,负责爬虫、管道、下载器、调度器中间的通信、信号以及数据的传递等,是框架的核心,用来触发事务和处理整个系统的数据流。
-
Scheduler:调度器,接收引擎发送的请求,对发送的请求进行去重,并按照一定方式进行整理、排列、入队,当引擎需要时返回队列当中的请求给引擎。
-
Downloader:下载器,负责下载引擎发送的请求对应的网页的内容,将请求结果交给引擎,由引擎交给爬虫处理。
-
ItemPipeline:管道,主要负责处理爬虫中获取到的Item,并进行后期处理(分析、过滤、存储)。
-
Downloader Middlewares:下载中间件,介于引擎和下载器之间,主要处理引擎与下载器之间的请求及响应。
-
Spider Middlewares:爬虫中间件,介于引擎和爬虫之间,主要工作是处理爬虫的响应输入和请求输出(如进入Spider的Responses和从Spider出去的Requests)。
2.2、流程图及流程描述
2.2.1、流程图

2.2.2、流程描述
1、爬虫将需要发送的请求提交给引擎。
2、引擎把从爬虫获取到的请求传递给调度器。
3、调度器接收引擎发来的请求,并进行整理、排列、入队生成Request交还给引擎。
4、引擎拿到从调度器中传递过来的Request,通过MIDDLEWARE进行层层过滤后发送给下载器。
5、下载器去互联网中下载并获取Response数据,通过MIDDLEWARE层层过滤后将Response数据返回给引擎。
6、引擎获取到下载器返回的Response数据传递给爬虫。
7、爬虫获取到Response数据,通过parse()方法提取Items数据和Requests并返回给引擎。
8、引擎接收到Items和Requests,将Items传递给Piplines进行分析过滤、存储,把Requests继续传给调度器,直到调度器不存在任何Requests了,整个程序停止,对于失败的URL也会进行重新下载。
三、Scrapy的使用
3.1、Scrapy的安装
pip install scrapy
3.2、Scrapy的相关命令
创建项目
scrapy startproject [项目名称]

创建爬虫
scrapy genspider [爬虫名称] [域名]

3.3、Scrapy项目结构及文件作用
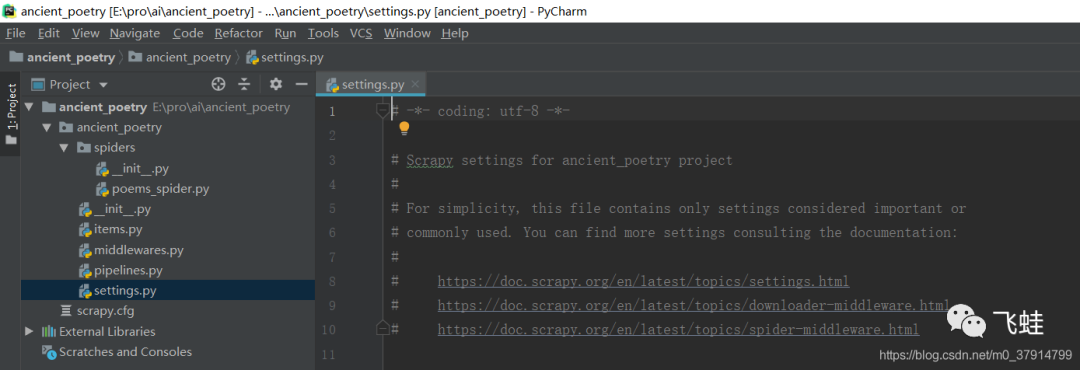
3.3.1、项目结构图

3.3.2、项目文件作用
1.items.py:用来存放爬虫爬取下来的数据的模型
2.middlewares.py:用来存放各种中间的文件
3.pipelines:用来将items的模型存储到本地磁盘中
4.settings.py:爬虫的一些配置信息(如请求头、多久发送一次请求、ip代理)
5.scrapy.cfg:项目的配置文件
6.spiders:存放所有的爬虫文件
3.3.3、开始一个爬虫
1、配置爬虫
打开settings修改配置如下
# 将遵守机器人协议改成False,否则有些会爬取不到内容
ROBOTSTXT_OBEY = False
# 设置默认请求头
DEFAULT_REQUEST_HEADERS = {
'Accept': 'text/html,application/xhtml+xml,application/xml;q=0.9,image/avif,image/webp,image/apng,*/*;q=0.8,application/signed-exchange;v=b3;q=0.9',
'Accept-Language': 'zh-CN,zh;q=0.9',
'User-Agent': 'Mozilla/5.0 (Windows NT 10.0; Win64; x64) AppleWebKit/537.36 (KHTML, like Gecko) Chrome/85.0.4183.102 Safari/537.36',
'cookie': 'ASP.NET_SessionId=22da5okb1anxk5a3iezvbsuw; Hm_lvt_9007fab6814e892d3020a64454da5a55=1600827557,1601015578,1601015610,1601190738; codeyzgswso=e488b2230b94cd65; gsw2017user=1292023%7cE3869858693238EAC1DDA4FEC499C6DF; login=flase; wxopenid=defoaltid; gswZhanghao=18397716181; gswPhone=18397716181; Hm_lpvt_9007fab6814e892d3020a64454da5a55=1601190860',
}
# 设置MySql数据库
DB_SETTINGS = {
'db1': {
'host': '127.0.0.1',
'db': 'ancient_poetry',
'user': 'root',
'password': 'root',
'port': 3306,
'cursorclass': pymysql.cursors.DictCursor,  # 指定cursor类型,
},
}
# 激活pipelines,需要添加才能够使用pipelines
ITEM_PIPELINES = {
'ancient_poetry.pipelines.AnsynchroDBPipeline': 300,
}
2、新建item
新建一个PoemsItem继承scrapy的Item,定义数据字段。
class PoemsItem(scrapy.Item):
    title = scrapy.Field()  # 标题
    author = scrapy.Field()  # 作者
    dynasty = scrapy.Field()  # 作者所属朝代
    content = scrapy.Field()  # 诗歌正文
3、创建编写爬虫
切换到项目根路径ancient_poetry,使用命令scrapy genspider poems_spider www.gushiwen.org创建一个爬虫或者手动在spiders文件夹下创建爬虫,编写爬虫逻辑。
# -*- coding: utf-8 -*-
import scrapy
from ancient_poetry.items import PoemsItem

class PoemsSpiderSpider(scrapy.Spider):
    name = 'poems_spider'
    allowed_domains = ['www.gushiwen.org']
    start_urls = ['http://www.gushiwen.org/']
    url = 'https://www.gushiwen.cn/'

# 每个爬虫的自定义pipeline设置
    custom_settings = {
'ITEM_PIPELINES': {
'ancient_poetry.pipelines.AncientPoetryPipeline': 500,
},
}

def start_requests(self):
yield scrapy.Request(url=self.url, method='GET', callback=self.parse)

def parse(self, response):
        item = PoemsItem()
for x in response.xpath('//div[@class="main3"]//div[@class="left"]//div[@class="cont"]'):
            title = x.xpath('./p//b//text()').get()
            item['title'] = title
            dynasty_author = x.xpath('.//p[@class="source"]/a/text()').getall()
if len(dynasty_author) == 2:
                item['dynasty'] = dynasty_author[0]
                item['author'] = dynasty_author[1]
            content = x.xpath('./div[@class="contson"]/text()').extract()
            item['content'] = ''.join(content)
yield item
4、编写pipeline
在pipelines.py中新增AncientPoetryPipeline,用来处理Item传过来的数据。
class AncientPoetryPipeline(object):
def __init__(self):
        self.fp = open('ancient_poetry.json', 'wb')
        self.exporter = JsonItemExporter(self.fp, ensure_ascii=False, encoding='utf-8')

def open_spider(self, spider):
        self.exporter.start_exporting()
print("爬虫开始...")

def process_item(self, item, spider):
        self.exporter.export_item(item)
return item

def close_spider(self, spider):
        self.exporter.finish_exporting()
        self.fp.close()
print('爬虫结束!')
5、运行爬虫
在spiders的同级目录下创建一个main.py文件,运行main.py执行爬虫,最终会在spiders的同级目录下生成一个ancient_poetry.json文件
"""

作者:彭三青
日期:2020/1/21 21:32
描述:运行爬虫程序

"""
import os
import sys

from scrapy.cmdline import execute

if __name__ == '__main__':
    sys.path.append(os.path.dirname(os.path.abspath(__file__)))
# 执行爬虫程序
    execute(['scrapy', 'crawl', 'poems_spider'])
6、JsonItemExporter和JsonLinesItemExporter:
保存json数据的时候可以使用这两个类,让操作变得简单。
1.JsonItemExporter:每次把数据添加到内存中,最后统一写入到磁盘,优点是存储的数据是一个满足json规则的数据,但是当数据量较大时所有的数据都存在内存中,比较耗内存。
"""
当数据量大时比较耗内存export_item以列表的形式存储到内存当中,当finish_exporting时写入到文件当中
"""
class AncientPoetryPipeline(object):
def __init__(self):
        self.fp = open('ancient_poetry.json', 'wb')
        self.exporter = JsonItemExporter(self.fp, ensure_ascii=False, encoding='utf-8')

def open_spider(self, spider):
        self.exporter.start_exporting()
print("爬虫开始...")

def process_item(self, item, spider):
        self.exporter.export_item(item)
return item

def close_spider(self, spider):
        self.exporter.finish_exporting()
        self.fp.close()
print('爬虫结束!')
2.JsonLinesItemExporter:每次调用export_item的时候就把这个item存储到硬盘中,每次处理的数据直接存放到硬盘中,比较节省内存,同时数据也比较安全,但是存储的数据每个字典是一行,整个文件不满足Json格式文件
class AncientPoetryPipeline2(object):
def __init__(self):
        self.fp = open("ancient_poetry2.json", "wb")
        self.exporter = JsonLinesItemExporter(self.fp, ensure_ascii=False, encoding='utf-8')

def open_spider(self, spider):
print("爬虫开始了!")

def process_item(self, item, spider):
        self.exporter.export_item(item)
return item

def close_spider(self, spider):
        self.fp.close()
print("爬虫结束了...")
3.3.4、爬虫笔记
1.reponse是一个scrapy.http.response.html.HtmlReponse对象,可以通过xpath和css语法来提取数据。通过xpath提取出来的数据是一个Selector或SelectorList对象,可以通过执行getall()、get()、extract()、extract_first()方法来获取其中的字符串。
2.getall()和extract()获取Selector中所有的文本返回的是一个列表,get()和extract_first()获取Selector中第一个文本返回的是一个str。
3.解析得到的数据可以通过yield逐条返回,或者收集所有的item最后统一使用return返回给pipeline处理。
4.一般在items.py中定义好模型,将数据存储在item中(不再使用字典)。
5.pipeline专门用来保存数据,其中有三个方法是经常使用的。
open_spider(self, spider):当爬虫被打开的时候执行。
process_item(self, item, spider):当爬虫有item传过来的时候被调用。
close_spider(self, spider):当爬虫关闭的时候会被调用。
要激活pipeline,要在settings.py中设置ITEM_PIPLINES或者爬虫里面设置custom_settings。
四、数据存储到MySQL
4.1、修改item
修改item增加table_name和table_fields
class PoemsItem(scrapy.Item):
    title = scrapy.Field()  # 标题
    author = scrapy.Field()  # 作者
    dynasty = scrapy.Field()  # 作者所属朝代
    content = scrapy.Field()  # 诗歌正文
    table_fields = scrapy.Field()  # 字段名称
    table_name = scrapy.Field()  # 插入表的名称
4.2、同步插入和异步插入
1、同步插入pipeline
class SynchroDBPipeline(object):
"""
    同步插入数据库
    """
def __init__(self, host, db, port, user, password):
        self.host = host
        self.db = db
        self.port = port
        self.user = user
        self.password = password
        self.connect = pymysql.connect(self.host, self.user, self.password, self.db, port=self.port, charset='utf8')
        self.cursor = self.connect.cursor()
        logging.info('数据库连接成功 => %s' + '主机:', self.host + ' 端口:' + self.db)

    @classmethod
def from_crawler(cls, crawler):
        db_name = crawler.settings.get('DB_SETTINGS')
        db_params = db_name.get('db1')
return cls(
            host=db_params.get('host'),
            db=db_params.get('db'),
            user=db_params.get('user'),
            password=db_params.get('password'),
            port=db_params.get('port'),
)

def process_item(self, item, spider):
        table_fields = item.get('table_fields')
        table_name = item.get('table_name')
if table_fields is None or table_name is None:
raise Exception('必须要传表名table_name和字段名table_fields,表名或者字段名不能为空')
        values_params = '%s, ' * (len(table_fields) - 1) + '%s'
        keys = ', '.join(table_fields)
        values = ['%s' % str(item.get(i, '')) for i in table_fields]
        insert_sql = 'insert into %s (%s) values (%s)' % (table_name, keys, values_params)
try:
            self.cursor.execute(insert_sql, tuple(values))
            logging.info("数据插入成功 => " + '1')
except Exception as e:
            logging.error("执行sql异常 => " + str(e))
pass
finally:
# 要提交,不提交无法保存到数据库
            self.connect.commit()
return item

def close_spider(self, spider):
        self.connect.close()
        self.cursor.close()
2、异步插入pipeline
class AnsynchroDBPipeline(object):
"""
   	异步插入
    """
def __init__(self, db_pool):
        self.db_pool = db_pool

    @classmethod
def from_settings(cls, settings):
"""
        建立数据库的连接
        :param settings:
        :return: db_pool数据库连接池
        """
# 获取数据库配置参数
        db_name = settings.get('DB_SETTINGS')
        db_params = db_name.get('db1')
# 连接数据池ConnectionPool,使用pymysql,连接需要添加charset='utf8',否则中文显示乱码
        db_pool = adbapi.ConnectionPool('pymysql', **db_params, charset='utf8')
return cls(db_pool)

def process_item(self, item, spider):
"""
        使用twisted将MySQL插入变成异步执行。通过连接池执行具体的sql操作,返回一个对象
        :param item:
        :param spider:
        :return:
        """
        self.db_pool.runInteraction(self.do_insert, item)

    @staticmethod
def do_insert(cursor, item):
        table_fields = item.get('table_fields')
        table_name = item.get('table_name')
if table_fields is None or table_name is None:
raise ParamException('必须要传表名table_name和字段名table_fields,表名或者字段名不能为空')
        values_params = '%s, ' * (len(table_fields) - 1) + '%s'
        keys = ', '.join(table_fields)
        values = ['%s' % str(item.get(i)) for i in table_fields]
# 对数据库进行插入操作,并不需要commit,twisted会自动commit
        insert_sql = 'insert into %s (%s) values (%s)' % (table_name, keys, values_params)
try:
            cursor.execute(insert_sql, tuple(values))
            logging.info("数据插入成功 => " + '1')
except Exception as e:
            logging.error("执行sql异常 => " + str(e))
pass
4.3、编写ancient_spider文件
class PoemsSpiderSpider(scrapy.Spider):
    name = 'poems_spider'
    allowed_domains = ['www.gushiwen.org']
    start_urls = ['http://www.gushiwen.org/']
    url = 'https://www.gushiwen.cn/'

# 每个爬虫的自定义pipeline设置
    custom_settings = {
# 此处修改不同的pipeline进行测试
'ITEM_PIPELINES': {
'ancient_poetry.pipelines.AnsynchroDBPipeline': 500,
},
}

def __init__(self):
        self.table_name = 'ancient_poetry'
        self.table_fields = ['title', 'author', 'dynasty', 'content', 'update_time']

def start_requests(self):
yield scrapy.Request(url=self.url, method='GET', callback=self.parse)

def parse(self, response):
        item = PoemsItem()
        item['table_fields'] = self.table_fields
        item['table_name'] = self.table_name
        current_date = datetime.datetime.now().strftime('%F %T')
        item['update_time'] = current_date
for x in response.xpath('//div[@class="main3"]//div[@class="left"]//div[@class="cont"]'):
            title = x.xpath('./p//b//text()').extract_first()
            item['title'] = title
            dynasty_author = x.xpath('.//p[@class="source"]/a/text()').extract()
if len(dynasty_author) == 2:
                item['dynasty'] = dynasty_author[0]
                item['author'] = dynasty_author[1]
            content = x.xpath('./div[@class="contson"]/text()').extract()
            item['content'] = ''.join(content)
yield item
4.4、创建ancient_poetry表
CREATE TABLE `ancient_poetry` (
`sid` int(20) NOT NULL AUTO_INCREMENT,
`title` varchar(255) CHARACTER SET utf8 COLLATE utf8_general_ci NULL DEFAULT NULL,
`author` varchar(255) CHARACTER SET utf8 COLLATE utf8_general_ci NULL DEFAULT NULL,
`dynasty` varchar(255) CHARACTER SET utf8 COLLATE utf8_general_ci NULL DEFAULT NULL,
`content` varchar(255) CHARACTER SET utf8 COLLATE utf8_general_ci NULL DEFAULT NULL,
`update_time` varchar(50) CHARACTER SET utf8 COLLATE utf8_general_ci NULL DEFAULT NULL,
PRIMARY KEY (`sid`) USING BTREE
)
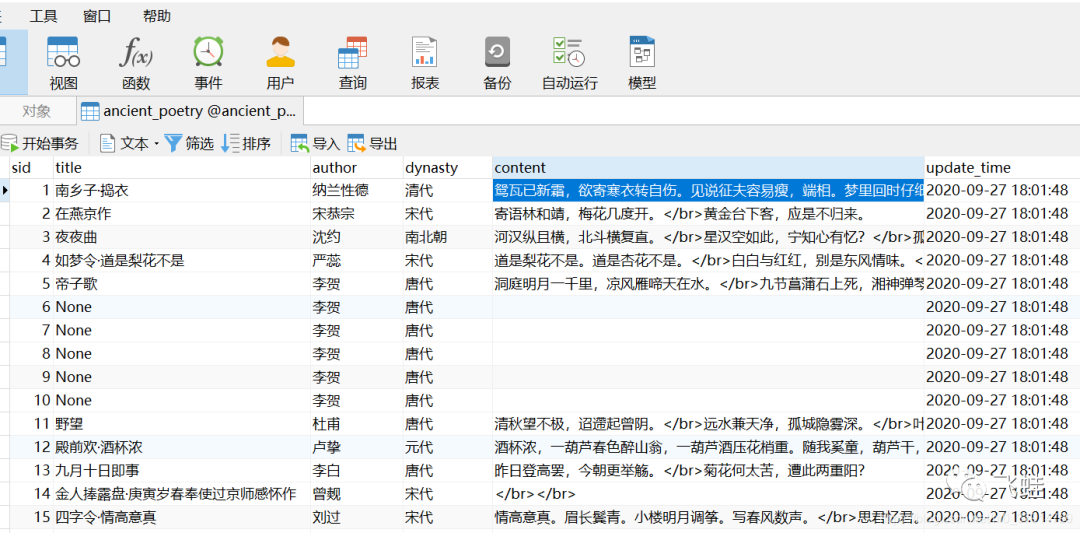
4.5运行结果

标签:self,db,爬虫,spider,item,Scrapy,MySQL,table,存到 From: https://www.cnblogs.com/shanhubei/p/17921911.html