页面预览
首页

医院详情
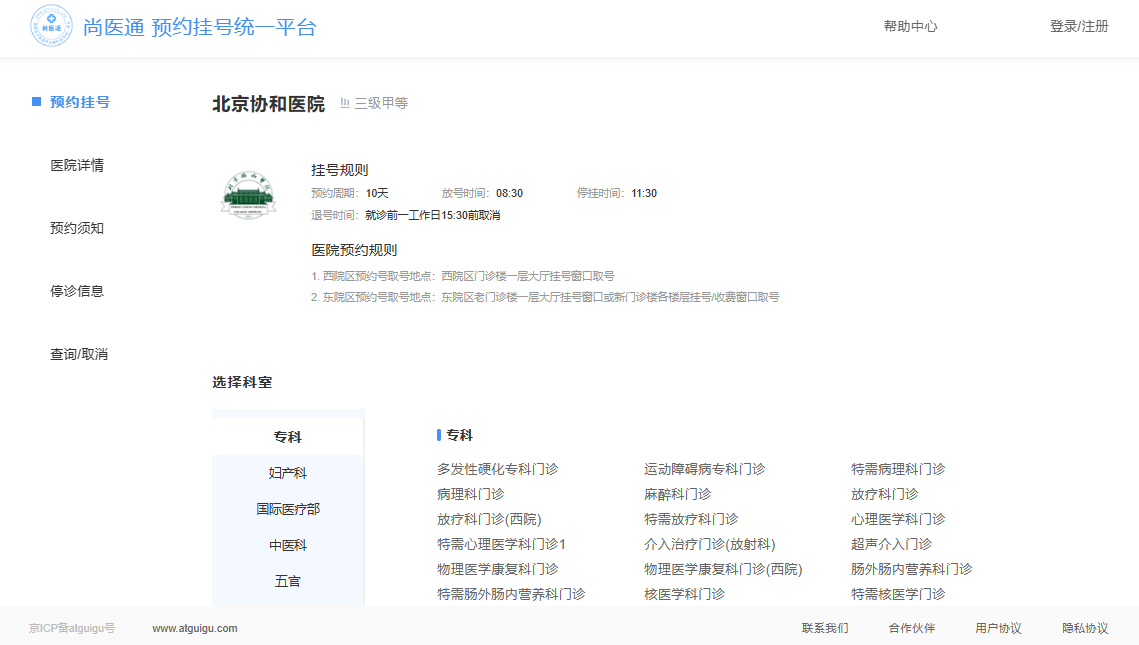
第01章-服务器端渲染和客户端渲染
1、搜索引擎优化
1.1、什么是搜索引擎优化

SEO 是网站为了获得更多的流量,对网站的结构及内容进行调整和优化,以便搜索引擎 (百度,google等)更好抓取到网站的内容,提高自已的网站排名。
1.2、搜索引擎工作流程
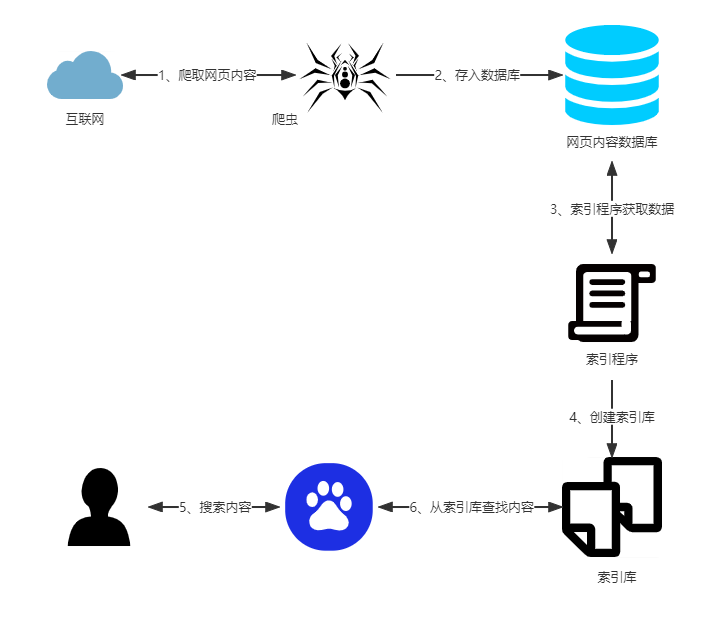
1.3、简单的SEO方法
- keywords和description的meta标签
- title标签
- html的语义化标签,如h1-h6,a标签,p标签等
注意:spider对javascript支持不好,ajax获取的JSON数据无法被spider爬取
2、服务端渲染和客户端渲染
2.1、服务端渲染
服务端渲染又称SSR (Server Side Render):是在服务端完成页面的内容渲染。
浏览器请求页面URL,然后服务器接收到请求之后,到数据库查询数据,将数据丢到后端的页面模板(jsp、Thymeleaf 等)中,并组装成完整的HTML页面,最后返回给浏览器。
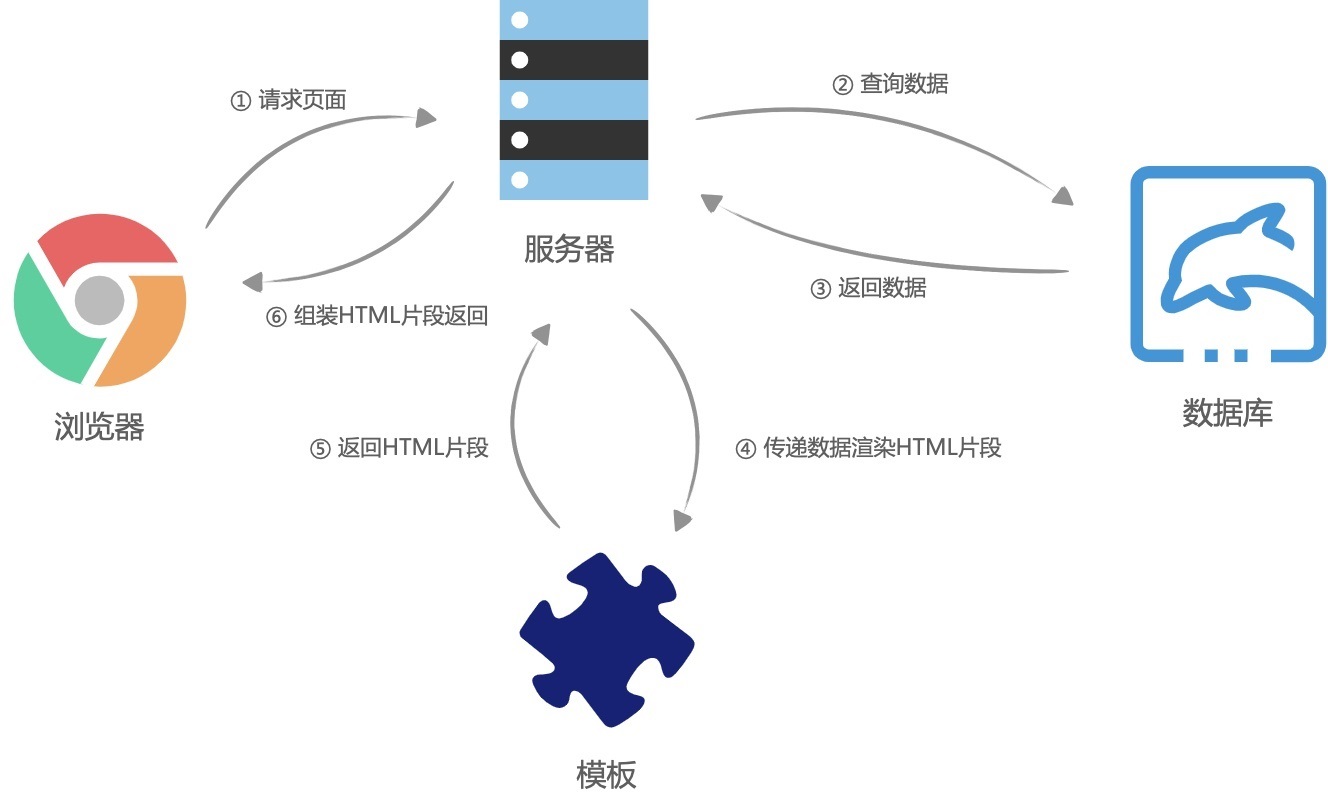
特点:
- 在服务端生成html网页
- 客户端(浏览器)只负责显示网页内容
优点:
有利于SEO
缺点:
开发效率低
适用场景:
对SEO有要求的系统,比如:门户首页、商品详情页面等。
2.2、客户端渲染
客户端渲染又称CSR (Client Side Render):是在客户端(浏览器)完成页面的内容渲染。这是一个前后端分离的渲染模式
浏览器请求URL,前端服务器直接返回一个静态HTML文件,这个HTML文件中加载了很多渲染页面需要的 JavaScript 脚本和 CSS 样式表,浏览器拿到 HTML 文件后开始加载脚本和样式表,并且执行脚本,这个时候脚本请求后端服务提供的API,获取数据,获取完成后将数据通过JavaScript脚本动态的渲染到页面中,完成页面显示。
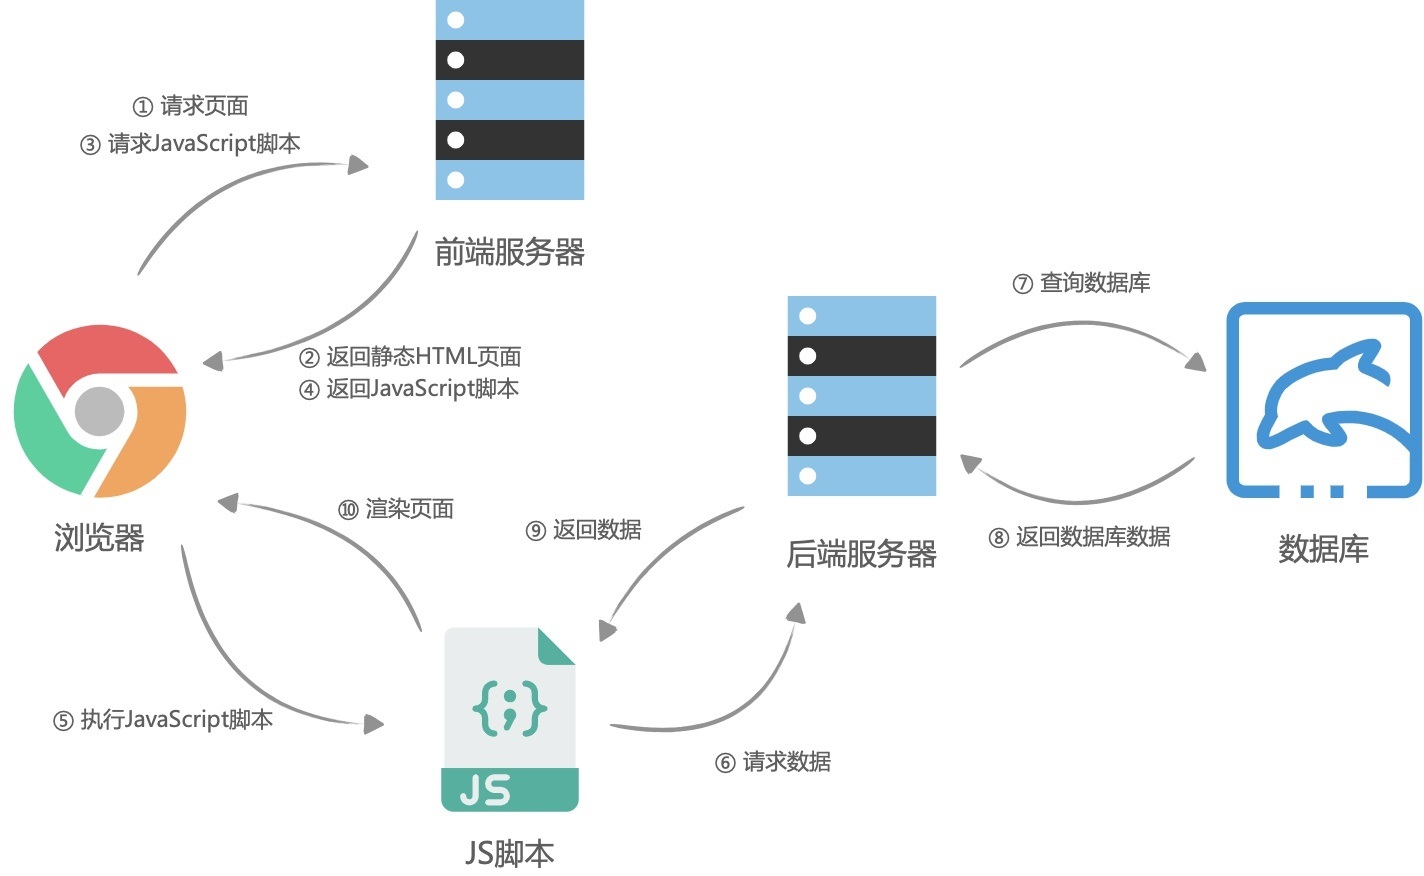
特点:
- 服务端只给客户端响应数据,而不是html网页
- 客户端(浏览器)负责获取服务端的数据并在客户端生成完整的html网页元素
缺点:
不利于网站进行SEO,因为网站大量使用javascript技术,不利于搜索引擎抓取网页。
优点:
客户端负责渲染,用户体验性好,服务端只提供数据,不用关心用户界面的内容,有利于提高服务端的开发效率。
适用场景:
对SEO没有要求的系统,比如后台管理类的系统。
2.3、Node.js服务器端渲染
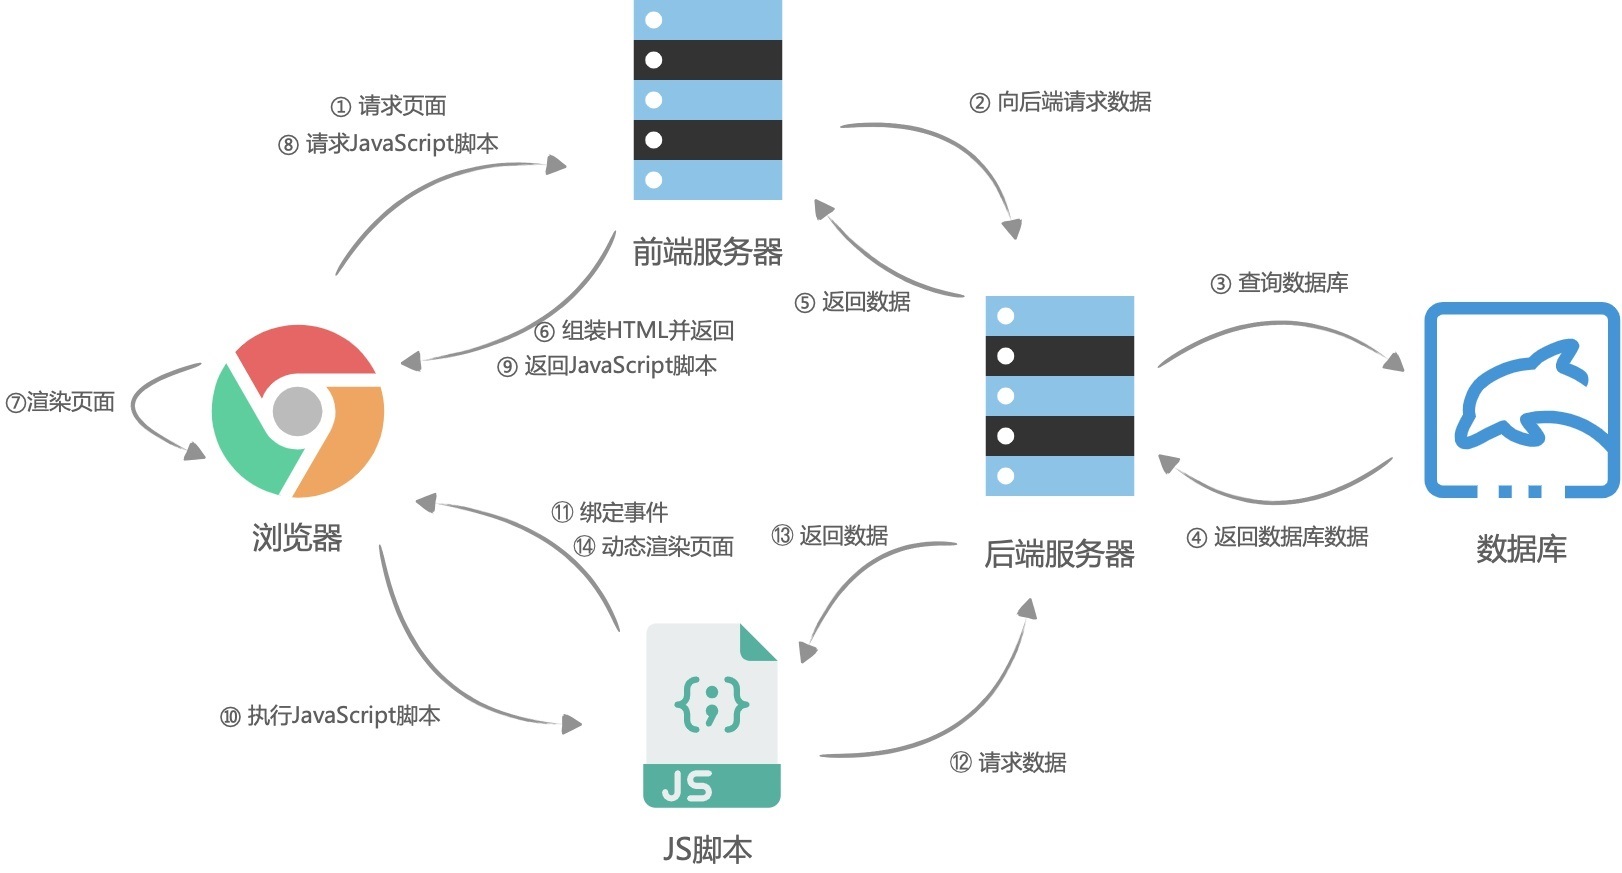
首先是浏览器请求URL,前端服务器接收到URL请求之后,根据不同的URL,前端服务器向后端服务器请求数据,请求完成后,前端服务器会组装一个携带了具体数据的HTML文本,并且返回给浏览器,浏览器得到HTML之后开始渲染页面,同时,浏览器加载并执行 JavaScript 脚本,给页面上的元素绑定事件,让页面变得可交互,当用户与浏览器页面进行交互,如跳转到下一个页面时,浏览器会执行 JavaScript 脚本,向后端服务器请求数据,获取完数据之后再次执行 JavaScript 代码动态渲染页面。
3、Nuxt.js
移动互联网的兴起促进了web前后端分离开发模式的发展,服务端只专注业务,前端只专注用户体验,比如流行的vue.js实现了功能强大的前端渲染。 但是,对于有SEO需求的网页如果使用前端渲染技术去开发就不利于SEO了,有没有一种即使用vue.js 的前端技术也实现服务端渲染的技术呢?
Nuxt.js 是一个基于 Vue.js 的轻量级应用框架,可以用来创建服务端渲染 (SSR) 应用。
第02章-用户系统前端
1、项目的安装和运行
1.1、解压
解压 guigu-syt-site.zip
资料:资料>用户系统前端>guigu-syt-site.zip
1.2、端口修改
项目默认3000端口启动,如果想要修改Nuxt.js的启动端口,则可以在package.json文件中添加如下配置
"config": {
  "nuxt": {
    "host": "127.0.0.1",
    "port": "3333"
  }
}
1.3、安装依赖
npm cache clear --force
npm install
1.4、运行项目
npm run dev
2、页面布局结构说明
2.1、布局

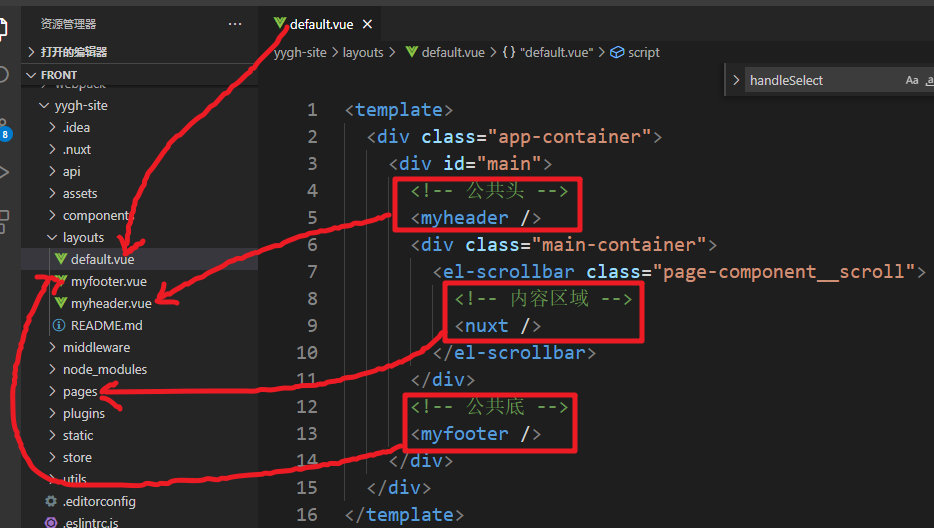
2.2、布局文件
layouts目录下default.vue
2.3、首页面
pages/index.vue,默认使用layouts目录下default.vue布局文件
index.vue中的页面内容会被自动嵌入到模板文件的
第03章-医院列表
1、医院列表接口
1.1、配置Swagger
在service-util的Knife4jConfig类中添加如下@Bean配置:在Swagger配置中添加front路径相关配置
@Bean
public Docket docketFront() {
    //指定使用Swagger2规范
    Docket docket = new Docket(DocumentationType.SWAGGER_2)
        .apiInfo(new ApiInfoBuilder()
                 .description("尚医通 APIs")
                 .description("本文档描述了尚医通网站系统接口")
                 .contact("[email protected]")
                 .version("1.0")
                 .build())
        //分组名称
        .groupName("尚医通网站")
        .select()
        .paths(PathSelectors.regex("/front/.*"))
        .build();
    return docket;
}
1.2、排除front路径的授权校验
修改spring-security的WebSecurityConfig类,配置授权校验排除front路径
/**
     * 配置哪些请求不拦截
     * 排除swagger相关请求
     * @param web
     * @throws Exception
     */
    @Override
    public void configure(WebSecurity web) throws Exception {
        web.ignoring().antMatchers("/api/**","/inner/**","/front/**","/favicon.ico","/swagger-resources/**", "/webjars/**", "/v2/**", "/swagger-ui.html/**", "/doc.html");
    }
1.3、Controller
在service-hosp中创建front包,创建FrontHospitalController
package com.atguigu.syt.hosp.controller.front;

@Api(tags = "医院接口")
@RestController
@RequestMapping("/front/hosp/hospital")
public class FrontHospitalController {

    @Resource
    private HospitalService hospitalService;

    @ApiOperation(value = "根据医院名称、级别和区域查询医院列表")
    @ApiImplicitParams({
            @ApiImplicitParam(name = "hosname",value = "医院名称"),
            @ApiImplicitParam(name = "hostype",value = "医院类型"),
            @ApiImplicitParam(name = "districtCode",value = "医院地区")})
    @GetMapping("/list")
    public Result<List<Hospital>> list(String hosname, String hostype, String districtCode) {
        List<Hospital> list = hospitalService.selectList(hosname, hostype, districtCode);
        return Result.ok(list);
    }
}
1.4、Service
接口:HospitalService
/**
     * 医院列表查询
     * @param hosname
     * @param hostype
     * @param districtCode
     * @return
     */
List<Hospital> selectList(String hosname, String hostype, String districtCode);
实现:HospitalServiceImpl
/**
     * 根据条件查询医院列表
     * @param hosname 医院名称:模糊匹配
     * @param hostype:医院级别:精确匹配
     * @param districtCode:医院地区:精确匹配
     * @return
     */
@Override
public List<Hospital> selectList(String hosname, String hostype, String districtCode) {

    Sort sort = Sort.by(Sort.Direction.ASC, "hoscode");
    //List<Hospital> list = hospitalRepository.findByHosnameLikeAndHostypeAndDistrictCodeAndStatus(hosname, hostype, districtCode, 1, sort);

    //创建条件匹配器
    ExampleMatcher matcher = ExampleMatcher.matching() //构建对象
        .withMatcher("hosname", ExampleMatcher.GenericPropertyMatchers.contains()) //模糊查询
        .withMatcher("hostype", ExampleMatcher.GenericPropertyMatchers.exact()) //精确查询
        .withMatcher("districtCode", ExampleMatcher.GenericPropertyMatchers.exact()); //精确查询
    //创建查询对象
    Hospital hospital = new Hospital();
    hospital.setHosname(hosname);
    hospital.setHostype(hostype);
    hospital.setDistrictCode(districtCode);
    hospital.setStatus(1); //已上线
    Example<Hospital> example = Example.of(hospital, matcher);
    //执行查询
    List<Hospital> list = hospitalRepository.findAll(example, sort);

    //封装医院等级数据
    list.forEach(this::packHospital);
    return list;
}
2、医院等级列表接口
2.1、Controller
在service-cmn中创建front包,创建FrontDictController
package com.atguigu.syt.cmn.controller.front;

@Api(tags = "数据字典接口")
@RestController
@RequestMapping("/front/cmn/dict")
public class FrontDictController {

    @Resource
    private DictService dictService;

    @ApiOperation(value = "根据数据字典类型id获取数据列表")
    @ApiImplicitParam(name = "dictTypeId", value = "类型id", required = true)
    @GetMapping(value = "/findDictList/{dictTypeId}")
    public Result<List<Dict>> findDictList(@PathVariable Long dictTypeId) {
        List<Dict> list = dictService.findDictListByDictTypeId(dictTypeId);
        return Result.ok(list);
    }
}
2.2、Service
接口:DictService
/**
     * 根据数据字典类别和字典值获取字典列表
     * @param dictTypeId
     * @return
     */
List<Dict> findDictListByDictTypeId(Long dictTypeId);
实现:DictServiceImpl
@Override
public List<Dict> findDictListByDictTypeId(Long dictTypeId) {
    LambdaQueryWrapper<Dict> queryWrapper = new LambdaQueryWrapper<>();
    queryWrapper.eq(Dict::getDictTypeId, dictTypeId);
    return this.list(queryWrapper);
}
3、医院地区列表接口
3.1、Controller
在service-cmn,创建FrontRegionController
package com.atguigu.syt.cmn.controller.front;

@Api(tags = "地区接口")
@RestController
@RequestMapping("/front/cmn/region")
public class FrontRegionController {

    @Resource
    private RegionService regionService;

    @ApiOperation(value = "根据上级code获取子节点数据列表")
    @ApiImplicitParam(name = "parentCode", value = "上级节点code", required = true)
    @GetMapping(value = "/findRegionList/{parentCode}")
    public Result<List<Region>> findRegionList(@PathVariable String parentCode) {
        List<Region> list = regionService.findRegionListByParentCode(parentCode);
        return Result.ok(list);
    }
}
3.2、Service
使用之前的service
4、前端客户端渲染
4.1、api
在api目录中创建hosp.js
import request from '~/utils/request'
export default {
    hospList(searchObj) {
        return request({
            url: `/front/hosp/hospital/list`,
            method: 'get',
            params: searchObj
        })
    },
}
在api目录中创建cmn.js
import request from '~/utils/request'

export default {

  dictList(dictTypeId) {
    return request({
        url: `/front/cmn/dict/findDictList/${dictTypeId}`,
        method: 'get'
    })
  },

  regionList(parentCode) {
      return request({
          url: `/front/cmn/region/findRegionList/${parentCode}`,
          method: 'get'
      })
  }
}
4.2、页面组件
pages/index.vue
脚本
<!-- 客户端渲染实例 -->
<script>
import cmnApi from '~/api/cmn'
export default {
  data() {
    return {
      searchObj:{}, //查询对象
      hostypeList: [], //医院类型列表
    }
  },
  created() {
    cmnApi.dictList(1).then((response) => {
      this.hostypeList = response.data
    })
  },
}
</script>
页面渲染
<span class="item v-link clickable" v-for="item in hostypeList" :key="item.id">
  {{item.name}}
</span>
4.3、跨域问题
在浏览器中测试首页医院等级列表的显示:浏览器控制台显示如下错误
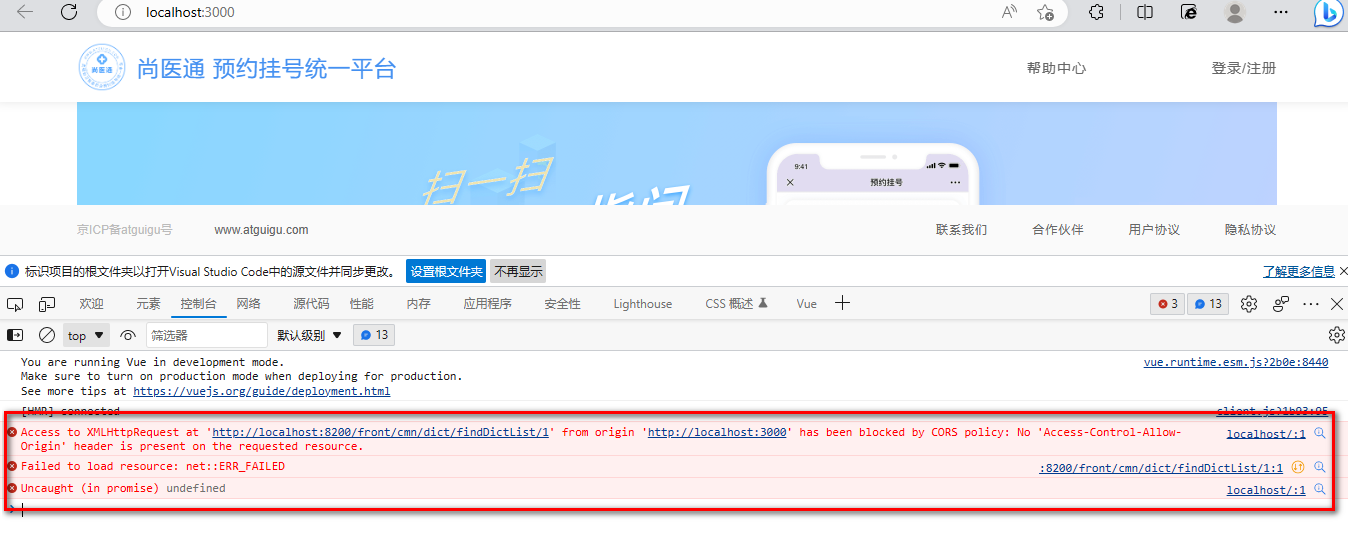
原因:
浏览器从一个域名的网页去请求另一个域名的资源时,域名、端口、协议任一不同,都是跨域 。
前后端分离开发中,需要考虑ajax跨域的问题。
这里我们可以从服务端解决这个问题:在相关的Controller类上添加注解
@CrossOrigin //跨域
5、配置网关跨域
5.1、创建配置类
也可以在server-gateway中创建配置文件CorsConfig
package com.atguigu.syt.gateway.config;

@Configuration
public class CorsConfig {

    @Bean
    public CorsWebFilter corsFilter() {
        CorsConfiguration config = new CorsConfiguration();
        config.addAllowedOrigin("*"); //所有源服务器
        config.addAllowedHeader("*"); //所有请求头
        config.addAllowedMethod("*"); //所有方法:GET、POST、PUT、DElETE
        config.setAllowCredentials(true);//cookie可跨域

        UrlBasedCorsConfigurationSource source = new UrlBasedCorsConfigurationSource(new PathPatternParser());
        source.registerCorsConfiguration("/**", config); //所有路径
        // cors过滤器

        return new CorsWebFilter(source);
    }
}
5.2、删除Controller的跨域配置
目前我们已经在网关做了跨域处理,那么service服务就不需要再做跨域处理了,将之前在controller类上添加过@CrossOrigin标签去掉,并重启对应的微服务
6、服务器端渲染异步数据获取
pages/index.vue
脚本
<!-- 服务端渲染实例 -->
<script>
import cmnApi from '~/api/cmn'
export default {
  asyncData() {
    return cmnApi.dictList(1).then((response) => {
      const hostypeList = response.data
      return {
        hostypeList
      }
    })
  },

  data() {
    return {
      searchObj:{}, //查询对象
    }
  },
}

</script>
7、服务器端渲染同步数据获取
上面异步调用方式不能同时调用后端的两个接口(例如同时获取级别和地区列表),因此这里我们使用同步调用写法。
使用 async 和 await 关键字
<!-- 服务器端渲染,同步数据获取实例 -->
<script>
import hospApi from '~/api/hosp'
import cmnApi from '~/api/cmn'

export default {
  async asyncData() {
    //获取等级
    const hostypeResponse = await cmnApi.dictList(1)
    //获取地区
    const areaResponse = await cmnApi.regionList('110100')
    //获取医院
    const hospitalResponse = await hospApi.hospList()
    return {
      hostypeList: hostypeResponse.data,
      areaList: areaResponse.data,
      hospitalList: hospitalResponse.data
    }
  },

  data() {
    return {
      searchObj:{}, //查询对象
    }
  },
}
</script>
8、页面渲染后的完整代码
<template>
<div class="home page-component">
<el-carousel indicator-position="outside">
<el-carousel-item>
<img src="~assets/images/web-banner1.png" alt="" />
</el-carousel-item>
</el-carousel>
<!-- 搜索 -->
<div class="search-container">
<div class="search-wrapper">
<div class="hospital-search">
<el-input
class="search-input"
v-model="searchObj.hosname"
prefix-icon="el-icon-search"
placeholder="输入医院名称"
>
<span
@click="fetchData()"
slot="suffix"
class="search-btn v-link highlight clickable selected"
>搜索
</span>
</el-input>
</div>
</div>
</div>
<!-- bottom -->
<div class="bottom">
<div class="left">
<div class="home-filter-wrapper">
<div class="title">医院</div>
<div>
<div class="filter-wrapper">
<span class="label">等级:</span>
<div class="condition-wrapper">
<span
class="item v-link clickable"
:class="hostypeActiveIndex == -1 ? 'selected' : ''"
@click="hostypeSelect(undefined, -1)"
>
全部
</span>
<span
class="item v-link clickable"
:class="hostypeActiveIndex == index ? 'selected' : ''"
v-for="(item, index) in hostypeList"
:key="item.id"
@click="hostypeSelect(item.value, index)"
>
{{ item.name }}
</span>
</div>
</div>
<div class="filter-wrapper">
<span class="label">地区:</span>
<div class="condition-wrapper">
<span
class="item v-link clickable"
:class="areaActiveIndex == -1 ? 'selected' : ''"
@click="areaSelect(undefined, -1)"
>
全部 </span
><span
class="item v-link clickable"
:class="areaActiveIndex == index ? 'selected' : ''"
v-for="(item, index) in areaList"
:key="item.id"
@click="areaSelect(item.code, index)"
>
{{ item.name }}
</span>
</div>
</div>
</div>
</div>
<div class="v-scroll-list hospital-list">
<div
v-for="item in hospitalList"
:key="item.hoscode"
class="v-card clickable list-item"
>
<div class="">
<div
@click="show(item.hoscode)"
class="hospital-list-item hos-item"
index="0"
>
<div class="wrapper">
<div class="hospital-title">{{ item.hosname }}</div>
<div class="bottom-container">
<div class="icon-wrapper">
<span class="iconfont"></span>
{{ item.param.hostypeString }}
</div>
<div class="icon-wrapper">
<span class="iconfont"></span>
每天{{ item.bookingRule.releaseTime }}放号
</div>
</div>
</div>
<img
:src="'data:image/jpeg;base64,' + item.logoData"
:alt="item.hosname"
class="hospital-img"
/>
</div>
</div>
</div>
</div>
</div>
<div class="right">
<div class="common-dept">
<div class="header-wrapper">
<div class="title">常见科室</div>
<div class="all-wrapper">
<span>全部</span>
<span class="iconfont icon"></span>
</div>
</div>
<div class="content-wrapper">
<span class="item v-link clickable dark">神经内科 </span>
<span class="item v-link clickable dark">消化内科 </span>
<span class="item v-link clickable dark">呼吸内科 </span>
<span class="item v-link clickable dark">内科 </span>
<span class="item v-link clickable dark">神经外科 </span>
<span class="item v-link clickable dark">妇科 </span>
<span class="item v-link clickable dark"> 产科 </span>
<span class="item v-link clickable dark">儿科 </span>
</div>
</div>
<div class="space">
<div class="header-wrapper">
<div class="title-wrapper">
<div class="icon-wrapper">
<span class="iconfont title-icon"></span>
</div>
<span class="title">平台公告</span>
</div>
<div class="all-wrapper">
<span>全部</span>
<span class="iconfont icon"></span>
</div>
</div>
<div class="content-wrapper">
<div class="notice-wrapper">
<div class="point"></div>
<span class="notice v-link clickable dark"
>关于延长北京大学国际医院放假的通知
</span>
</div>
<div class="notice-wrapper">
<div class="point"></div>
<span class="notice v-link clickable dark"
>北京中医药大学东方医院部分科室医生门诊医
</span>
</div>
<div class="notice-wrapper">
<div class="point"></div>
<span class="notice v-link clickable dark">
武警总医院号源暂停更新通知
</span>
</div>
</div>
</div>
<div class="suspend-notice-list space">
<div class="header-wrapper">
<div class="title-wrapper">
<div class="icon-wrapper">
<span class="iconfont title-icon"></span>
</div>
<span class="title">停诊公告</span>
</div>
<div class="all-wrapper">
<span>全部</span>
<span class="iconfont icon"></span>
</div>
</div>
<div class="content-wrapper">
<div class="notice-wrapper">
<div class="point"></div>
<span class="notice v-link clickable dark">
中国人民解放军总医院第六医学中心(原海军总医院)呼吸内科门诊停诊公告
</span>
</div>
<div class="notice-wrapper">
<div class="point"></div>
<span class="notice v-link clickable dark">
首都医科大学附属北京潞河医院老年医学科门诊停诊公告
</span>
</div>
<div class="notice-wrapper">
<div class="point"></div>
<span class="notice v-link clickable dark"
>中日友好医院中西医结合心内科门诊停诊公告
</span>
</div>
</div>
</div>
</div>
</div>
</div>
</template>
<!-- 服务器端渲染,异步数据获取实例 -->
<script>
import hospApi from '~/api/hosp'
import cmnApi from '~/api/cmn'
export default {
async asyncData() {
//获取等级
const hostypeResponse = await cmnApi.dictList(1)
//获取地区
const areaResponse = await cmnApi.regionList('110100')
//获取医院
const hospitalResponse = await hospApi.hospList()
return {
hostypeList: hostypeResponse.data,
areaList: areaResponse.data,
hospitalList: hospitalResponse.data
}
},
data() {
return {
hostypeActiveIndex: -1, //类别高亮索引
areaActiveIndex: -1, //地区高亮索引
searchObj: {}, //查询条件
}
},
methods: {
//根据医院等级查询
hostypeSelect(hostype, index) {
this.hostypeActiveIndex = index
this.searchObj.hostype = hostype
this.fetchData()
},
//根据地区查询
areaSelect(districtCode, index) {
this.areaActiveIndex = index
this.searchObj.districtCode = districtCode
this.fetchData()
},
//查询医院数据
fetchData() {
hospApi.hospList(this.searchObj).then((response) => {
this.hospitalList = response.data
})
},
//点击某个医院名称,跳转到详情页面中
show(hoscode) {
window.location.href = '/hospital/' + hoscode
},
},
}
</script>
第04章-医院详情
1、医院详情接口
1.1、Controller
在service-hosp的FrontHospitalController添加方法
@ApiOperation(value = "医院预约挂号详情")
@GetMapping("/show/{hoscode}")
public Result<Hospital> show(@PathVariable String hoscode) {
    Hospital hospital = hospitalService.show(hoscode);
    return Result.ok(hospital);
}
1.2、Service
使用之前的service
2、科室列表接口
2.1、Controller
在service-hosp中创建FrontDepartmentController
package com.atguigu.syt.hosp.controller.front;

@Api(tags = "科室管理")
@RestController
@RequestMapping("/front/hosp/department")
public class FrontDepartmentController {

    @Resource
    private DepartmentService departmentService;

    @ApiOperation(value = "查询医院所有科室列表")
    @ApiImplicitParam(name = "hoscode",value = "医院编码", required = true)
    @GetMapping("/getDeptList/{hoscode}")
    public Result<List<DepartmentVo>> getDeptList(@PathVariable String hoscode) {
        List<DepartmentVo> list = departmentService.findDeptTree(hoscode);
        return Result.ok(list);
    }
}
2.2、Service
使用之前的service
3、前端整合
3.1、_hoscode.vue组件
创建 /pages/hospital/_hoscode.vue组件:
<template>
  <div>
      详情
    {{$route.params.hoscode}}
  </div>
</template>
动态路由:
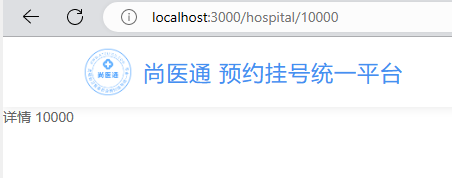
如果我们需要根据id查询一条记录,就需要使用动态路由。NUXT的动态路由是以下划线开头的vue文件,参数名为下划线后的文件名
在浏览器中输入http://localhost:3000/hospital/10000,可以看到医院编码被动态的显示在了页面中
3.2、api
hosp.js中添加方法
//根据医院编号显示医院详情
show(hoscode) {
  return request({
      url: `/front/hosp/hospital/show/${hoscode}`,
      method: 'get'
  })
},

//根据医院编号显示所有科室
getDeptList(hoscode) {
    return request({
        url: `/front/hosp/department/getDeptList/${hoscode}`,
        method: 'get'
    })
}
3.3、页面渲染后的完整代码
<template>
<div class="nav-container page-component">
<!--左侧导航 #start -->
<div class="nav left-nav">
<div class="nav-item selected">
<span class="v-link selected dark">预约挂号</span>
</div>
<div class="nav-item">
<span class="v-link clickable dark">医院详情</span>
</div>
<div class="nav-item">
<span class="v-link clickable dark">预约须知</span>
</div>
<div class="nav-item">
<span class="v-link clickable dark">停诊信息</span>
</div>
<div class="nav-item">
<span class="v-link clickable dark">查询/取消</span>
</div>
</div>
<!-- 左侧导航 #end -->
<!-- 右侧内容 #start -->
<div class="page-container">
<div class="hospital-home">
<div class="common-header">
<div class="title-wrapper">
<span class="hospital-title">{{ hospital.hosname }}</span>
<div class="icon-wrapper">
<span class="iconfont"></span>{{ hospital.param.hostypeString }}
</div>
</div>
</div>
<div class="info-wrapper">
<img
class="hospital-img"
:src="'data:image/jpeg;base64,' + hospital.logoData"
:alt="hospital.hosname"
/>
<div class="content-wrapper">
<div>挂号规则</div>
<div class="line">
<div>
<span class="label">预约周期:</span
><span>{{ bookingRule.cycle }}天</span>
</div>
<div class="space">
<span class="label">放号时间:</span
><span>{{ bookingRule.releaseTime }}</span>
</div>
<div class="space">
<span class="label">停挂时间:</span
><span>{{ bookingRule.stopTime }}</span>
</div>
</div>
<div class="line">
<span class="label">退号时间:</span>
<span v-if="bookingRule.quitDay == -1"
>就诊前一工作日{{ bookingRule.quitTime }}前取消</span
>
<span v-if="bookingRule.quitDay == 0"
>就诊前当天{{ bookingRule.quitTime }}前取消</span
>
</div>
<div style="margin-top: 20px">医院预约规则</div>
<div class="rule-wrapper">
<ol>
<li v-for="item in bookingRule.rule" :key="item">
{{ item }}
</li>
</ol>
</div>
</div>
</div>
<div class="title select-title">选择科室</div>
<div class="select-dept-wrapper">
<div class="department-wrapper">
<div class="hospital-department">
<div class="dept-list-wrapper el-scrollbar" style="height: 100%">
<div
class="dept-list el-scrollbar__wrap"
style="margin-bottom: -17px; margin-right: -17px"
>
<div class="el-scrollbar__view">
<div
class="sub-item"
v-for="(item, index) in departmentList"
:key="item.id"
:class="index == activeIndex ? 'selected' : ''"
@click="move(index)"
>
{{ item.depname }}
</div>
</div>
</div>
</div>
</div>
</div>
<div class="sub-dept-container">
<div
v-for="(item, index) in departmentList"
:key="item.id"
v-show="index == activeIndex"
class="sub-dept-wrapper"
:id="item.depcode"
>
<div class="sub-title">
<div class="block selected"></div>
{{ item.depname }}
</div>
<div class="sub-item-wrapper">
<div
v-for="it in item.children"
:key="it.id"
class="sub-item"
@click="schedule(it.depcode)"
>
<span class="v-link clickable">{{ it.depname }} </span>
</div>
</div>
</div>
</div>
</div>
</div>
</div>
<!-- 右侧内容 #end -->
</div>
</template>
<script>
import '~/assets/css/hospital_personal.css'
import '~/assets/css/hospital.css'
import hospApi from '~/api/hosp'
export default {
async asyncData(page) {
const hoscode = page.route.params.hoscode
//获取医院详情
const hospitalResponse = await hospApi.show(hoscode)
//获取所有科室
const departmentResponse = await hospApi.getDeptList(hoscode)
return {
hospital: hospitalResponse.data,
bookingRule: hospitalResponse.data.bookingRule,
departmentList: departmentResponse.data,
}
},
data () {
return {
activeIndex: 0
}
},
methods: {
move(index){
this.activeIndex = index
},
schedule(depcode) {
window.location.href = '/hospital/schedule?hoscode=' + this.$route.params.hoscode + "&depcode="+ depcode
}
}
}
</script>
源码下载地址:https://gitee.com/dengyaojava/guigu-syt-parent
标签:day09,return,尚医通,渲染,hospital,hoscode,医院,源码,front From: https://www.cnblogs.com/deyo/p/17475872.html