在Python软件开发中,tkinter中command功能的作用是为按钮、菜单等组件绑定回调函数,用户操作该组件时会触发相应的函数执行。
本文涵盖了各种组件和功能:
1、为Button组件(按钮)绑定回调函数
import tkinter as tk
def say_hello():
    print("Hello World!")

root = tk.Tk()
button = tk.Button(root, text="点我", command=say_hello)
button.pack()
root.mainloop()


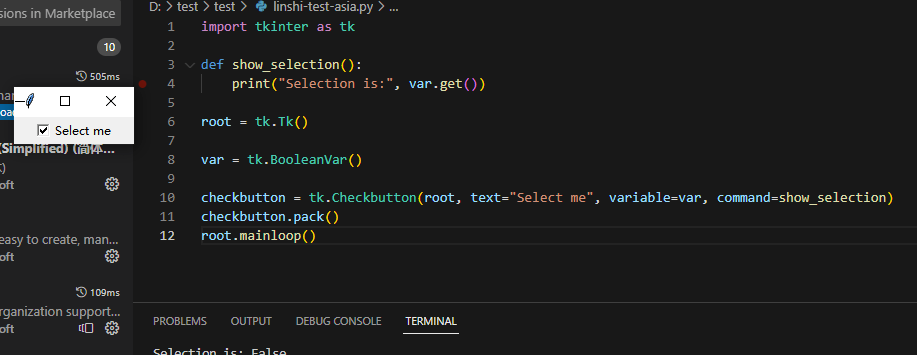
2、为Checkbutton组件(多选择钮)绑定回调函数
import tkinter as tk

def show_selection():
    print("Selection is:", var.get())

root = tk.Tk()

var = tk.BooleanVar()

checkbutton = tk.Checkbutton(root, text="Select me", variable=var, command=show_selection)
checkbutton.pack()

root.mainloop()

3、为Radiobutton组件(单选择钮)绑定回调函数
import tkinter as tk

def show_selection():
    print("Selection is:", var.get())

root = tk.Tk()

var = tk.StringVar()

radiobutton1 = tk.Radiobutton(root, text="Option 1", variable=var, value="Option 1", command=show_selection)
radiobutton2 = tk.Radiobutton(root, text="Option 2", variable=var, value="Option 2", command=show_selection)

radiobutton1.pack()
radiobutton2.pack()

root.mainloop()


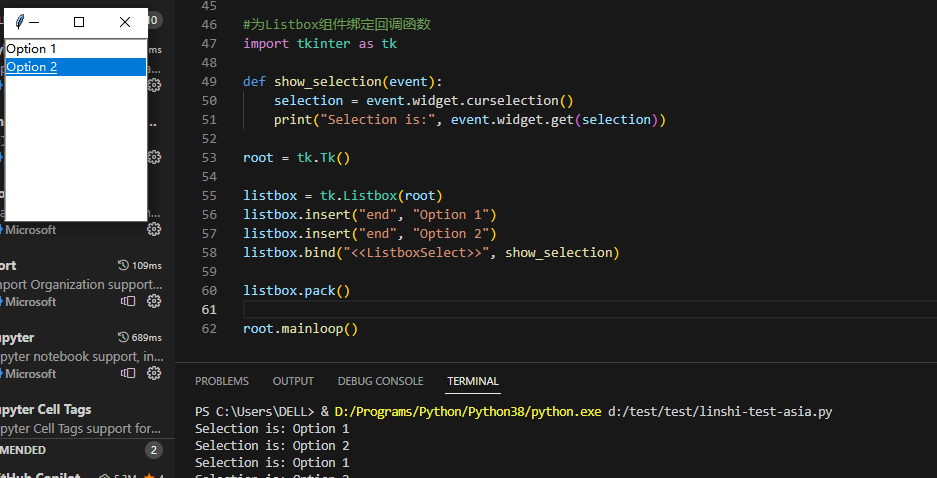
4、为Listbox组件(列表组件)绑定回调函数
import tkinter as tk

def show_selection(event):
    selection = event.widget.curselection()
    print("Selection is:", event.widget.get(selection))

root = tk.Tk()

listbox = tk.Listbox(root)
listbox.insert("end", "Option 1")
listbox.insert("end", "Option 2")
listbox.bind("<<ListboxSelect>>", show_selection)

listbox.pack()

root.mainloop()

5、为Spinbox组件(条框)绑定回调函数
import tkinter as tk
# Python学习交流扣裙:708525271
def show_selection():
    print("Selection is:", spinbox.get())

root = tk.Tk()

spinbox = tk.Spinbox(root, values=(1, 2, 3,4,5), command=show_selection)
spinbox.pack()

root.mainloop()
运行后,选择不同的参数,回传到了spinbox组件


6、为Scale组件(滑条)绑定回调函数
import tkinter as tk

def show_selection(value):
    print("Selection is:", value)

root = tk.Tk()

scale = tk.Scale(root, from_=0, to=100, command=show_selection)
scale.pack()

root.mainloop()


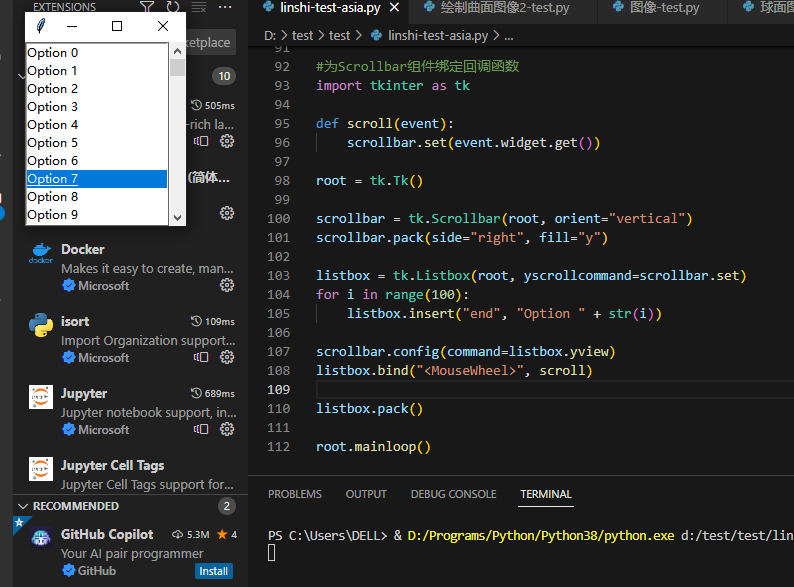
7、为Scrollbar组件(滚动条)绑定回调函数
import tkinter as tk

def scroll(event):
    scrollbar.set(event.widget.get())

root = tk.Tk()

scrollbar = tk.Scrollbar(root, orient="vertical")
scrollbar.pack(side="right", fill="y")

listbox = tk.Listbox(root, yscrollcommand=scrollbar.set)
for i in range(100):
    listbox.insert("end", "Option " + str(i))

scrollbar.config(command=listbox.yview)
listbox.bind("<MouseWheel>", scroll)

listbox.pack()

root.mainloop()

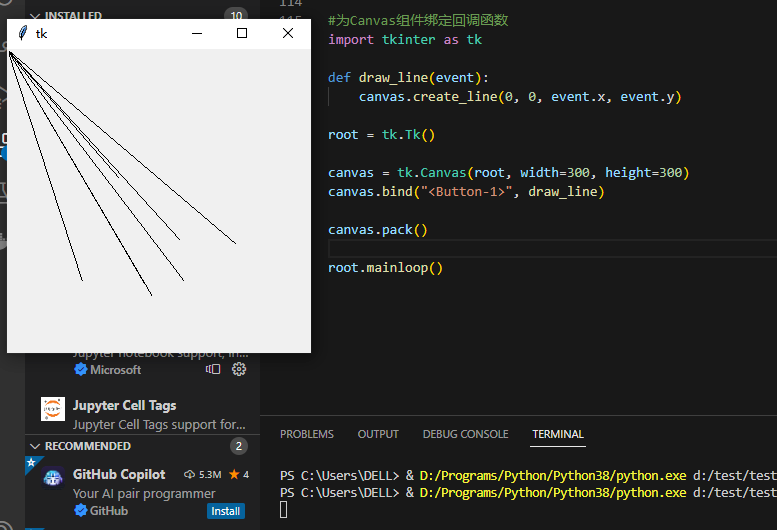
8、为Canvas组件(画布)绑定回调函数
import tkinter as tk

def draw_line(event):
    canvas.create_line(0, 0, event.x, event.y)

root = tk.Tk()

canvas = tk.Canvas(root, width=300, height=300)
canvas.bind("<Button-1>", draw_line)

canvas.pack()

root.mainloop()

9、为Text组件(文本框)绑定回调函数
import tkinter as tk

def count_characters(event):
    text = event.widget.get("1.0", "end")
    count = len(text.replace("\n", ""))
    print("Character count:", count)

root = tk.Tk()

text = tk.Text(root)
text.bind("<KeyRelease>", count_characters)

text.pack()

root.mainloop()


10、为Menu组件(菜单)绑定回调函数
import tkinter as tk

def say_hello():
    print("Hello World!")

root = tk.Tk()

menubar = tk.Menu(root)

filemenu = tk.Menu(menubar, tearoff=0)
filemenu.add_command(label="New")
filemenu.add_command(label="Open")
filemenu.add_command(label="Save")

filemenu.add_separator()
filemenu.add_command(label="Exit", command=root.quit)

editmenu = tk.Menu(menubar, tearoff=0)
editmenu.add_command(label="Copy")
editmenu.add_command(label="Cut")
editmenu.add_command(label="Paste")
editmenu.add_command(label="显示问候",command=say_hello)

helpmenu = tk.Menu(menubar, tearoff=0)
helpmenu.add_command(label="About")

menubar.add_cascade(label="File", menu=filemenu)
menubar.add_cascade(label="Edit", menu=editmenu)
menubar.add_cascade(label="Help", menu=helpmenu)

root.config(menu=menubar)

root.mainloop()


11、为Canvas(画布)中的图形对象绑定回调函数
import tkinter as tk

def move_object(event):
    canvas.move(rectangle, 10, 10)

root = tk.Tk()

canvas = tk.Canvas(root, width=300, height=300)
rectangle = canvas.create_rectangle(50, 50, 100, 100, fill="blue")
canvas.tag_bind(rectangle, "<Button-1>", move_object)

canvas.pack()

root.mainloop()


当点击蓝色方块时,蓝色方块会移动
12、为Frame组件绑定回调函数
import tkinter as tk

def say_hello():
    print("Hello World!")

root = tk.Tk()

frame = tk.Frame(root)
button = tk.Button(frame, text="Click me", command=say_hello)
button.pack()
frame.pack()

root.mainloop()


13、为Label组件(标签)绑定回调函数
import tkinter as tk

def say_hello(event):
    label.config(text="Hello World!")

root = tk.Tk()

label = tk.Label(root, text="Click me")
label.pack()
label.bind("<Button-1>", say_hello)

root.mainloop()


14、为Toplevel组件(顶部操作杆)绑定回调函数
import tkinter as tk

def create_window():
    window = tk.Toplevel(root)
    label = tk.Label(window, text="New Window")
    label.pack()

root = tk.Tk()

button = tk.Button(root, text="Create window", command=create_window)
button.pack()

root.mainloop()


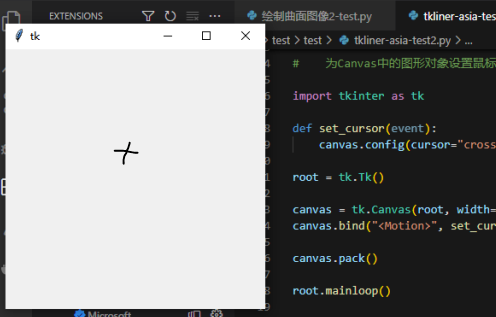
15、为Canvas中(画布)的图形对象设置鼠标样式
import tkinter as tk

def set_cursor(event):
    canvas.config(cursor="crosshair")

root = tk.Tk()

canvas = tk.Canvas(root, width=300, height=300)
canvas.bind("<Motion>", set_cursor)

canvas.pack()

root.mainloop()

16、为Entry组件绑定回调函数
import tkinter as tk
#   Python学习交流裙:708525271
def show_input(event):
    print("Input is:", entry.get())

root = tk.Tk()

entry = tk.Entry(root)
entry.bind("<Return>", show_input)

entry.pack()
root.mainloop()


17、为Text组件设置快捷键
import tkinter as tk

def copy(event):
    text.event_generate("<Control-c>")

root = tk.Tk()

text = tk.Text(root)
text.bind("<Control-c>", lambda e: print("Copied!"))

button = tk.Button(root, text="Copy", command=lambda: copy(None))
button.pack()

text.pack()
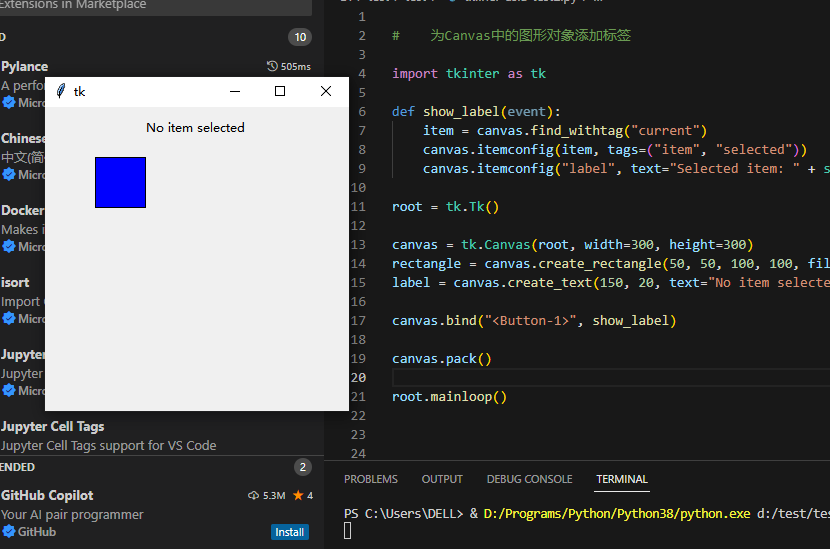
18、为Canvas中的图形对象添加标签
import tkinter as tk

def show_label(event):
    item = canvas.find_withtag("current")
    canvas.itemconfig(item, tags=("item", "selected"))
    canvas.itemconfig("label", text="Selected item: " + str(item[0]))

root = tk.Tk()

canvas = tk.Canvas(root, width=300, height=300)
rectangle = canvas.create_rectangle(50, 50, 100, 100, fill="blue", tags=("item"))
label = canvas.create_text(150, 20, text="No item selected", tags=("label"))

canvas.bind("<Button-1>", show_label)

canvas.pack()

root.mainloop()
验证程序能够运行,且可以显示在没有选择前、选择后。

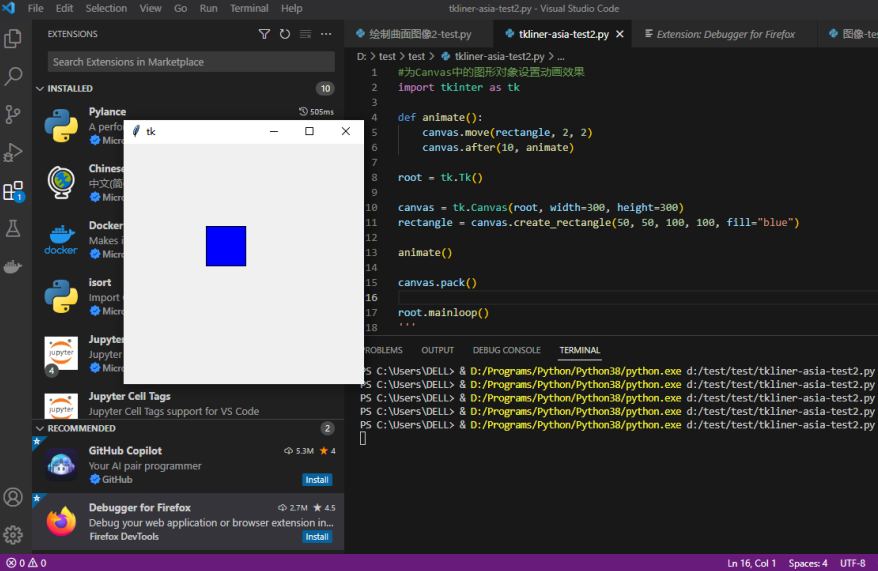
19、为Canvas中的图形对象设置动画效果
import tkinter as tk

def animate():
    canvas.move(rectangle, 2, 2)
    canvas.after(10, animate)

root = tk.Tk()

canvas = tk.Canvas(root, width=300, height=300)
rectangle = canvas.create_rectangle(50, 50, 100, 100, fill="blue")

animate()

canvas.pack()

root.mainloop()
经过验证,程序可以运行,蓝色的图形会运动到右下角。

20、为Menu组件设置图片
import tkinter as tk

root = tk.Tk()

menubar = tk.Menu(root)

filemenu = tk.Menu(menubar, tearoff=0)
filemenu.add_command(label="New", image=tk.PhotoImage(file="D:\\test\\test\\icons\\new.png"))
filemenu.add_command(label="Open", image=tk.PhotoImage(file="D:\\test\\test\\icons\\open.png"))
filemenu.add_command(label="Save", image=tk.PhotoImage(file="D:\\test\\test\\icons\\save.png"))
filemenu.add_separator()
filemenu.add_command(label="Exit", command=root.quit)

editmenu = tk.Menu(menubar, tearoff=0)
editmenu.add_command(label="Copy", image=tk.PhotoImage(file="D:\\test\\test\\icons\\copy.png"))
editmenu.add_command(label="Cut", image=tk.PhotoImage(file="D:\\test\\test\\icons\\cut.png"))
editmenu.add_command(label="Paste", image=tk.PhotoImage(file="D:\\test\\test\\icons\\paste.png"))

helpmenu = tk.Menu(menubar, tearoff=0)
helpmenu.add_command(label="About", image=tk.PhotoImage(file="D:\\test\\test\\icons\\about.png"))

menubar.add_cascade(label="File", menu=filemenu)
menubar.add_cascade(label="Edit", menu=editmenu)
menubar.add_cascade(label="Help", menu=helpmenu)

root.config(menu=menubar)

root.mainloop()
程序测试好像不成功,没有找到原因


21、为Canvas中的图形对象设置背景图片
import tkinter as tk

root = tk.Tk()

canvas = tk.Canvas(root, width=300, height=300)
canvas.config(bg="white")

photo = tk.PhotoImage(file="icons/background.png")
canvas.create_image(0, 0, image=photo, anchor="nw")

canvas.pack()

root.mainloop()
22、为Canvas中的图形对象设置鼠标拖动效果
import tkinter as tk

def start_drag(event):
    global drag_pos
    drag_pos = (event.x, event.y)

def drag(event):
    global drag_pos
    delta_x = event.x - drag_pos[0]
    delta_y = event.y - drag_pos[1]
    canvas.move(rectangle, delta_x, delta_y)
    drag_pos = (event.x, event.y)

root = tk.Tk()

canvas = tk.Canvas(root, width=300, height=300)
rectangle = canvas.create_rectangle(50, 50, 100, 100, fill="blue")
canvas.tag_bind(rectangle, "<Button-1>", start_drag)
canvas.tag_bind(rectangle, "<B1-Motion>", drag)

canvas.pack()

root.mainloop()
23、为Canvas中的图形对象设置点击特效
import tkinter as tk

def toggle_color(event):
    canvas.itemconfig(event.widget, fill="green" if event.widget in selected else "blue")
    if event.widget in selected:
        selected.remove(event.widget)
    else:
        selected.append(event.widget)

root = tk.Tk()

canvas = tk.Canvas(root, width=300, height=300)

rectangles = []
selected = []

for i in range(3):
    for j in range(3):
        rectangle = canvas.create_rectangle(i*100, j*100, i*100+50, j*100+50, fill="blue")
        canvas.tag_bind(rectangle, "<Button-1>", toggle_color)
        rectangles.append(rectangle)

canvas.pack()

root.mainloop()
24、为Canvas中的图形对象设置缩放效果
import tkinter as tk

def zoom(delta):
    scale = 1.1 if delta > 0 else 0.9
    canvas.scale("all", 0, 0, scale, scale)

root = tk.Tk()

canvas = tk.Canvas(root, width=300, height=300)
rectangle = canvas.create_rectangle(50, 50, 100, 100, fill="blue")
canvas.bind("<MouseWheel>", lambda e: zoom(e.delta))

canvas.pack()

root.mainloop()
25、为Canvas中的图形对象设置旋转效果
import tkinter as tk
import math

def rotate(delta):
    angle = math.radians(delta)
    rx, ry = canvas.coords(rectangle)[:2]
    cos = math.cos(angle)
    sin = math.sin(angle)
    x, y = canvas.coords(rectangle)[2:4]
    tx = cos * (x-rx) - sin * (y-ry) + rx
    ty = sin * (x-rx) + cos * (y-ry) + ry
    canvas.coords(rectangle, rx, ry, tx, ty)

root = tk.Tk()

canvas = tk.Canvas(root, width=300, height=300)
rectangle = canvas.create_rectangle(50, 50, 100, 100, fill="blue")
canvas.bind("<MouseWheel>", lambda e: rotate(e.delta))

canvas.pack()

root.mainloop()
26、为Canvas中的图形对象设置反色效果
import tkinter as tk

def toggle_color(event):
    pixels = canvas.itemcget(event.widget, "fill")
    if pixels == "blue":
        canvas.itemconfig(event.widget, fill="yellow")
    else:
        canvas.itemconfig(event.widget, fill="blue")

root = tk.Tk()

canvas = tk.Canvas(root, width=300, height=300)

rectangles = []

for i in range(3):
    for j in range(3):
        rectangle = canvas.create_rectangle(i*100, j*100, i*100+50, j*100+50, fill="blue")
        canvas.tag_bind(rectangle, "<Button-1>", toggle_color)
        rectangles.append(rectangle)

canvas.pack()

root.mainloop()
27、为Canvas中的图形对象设置闪烁效果
import tkinter as tk

def start_blink(event):
    canvas.itemconfig(event.widget, fill="yellow")
    canvas.after(200, lambda: canvas.itemconfig(event.widget, fill="blue"))
    canvas.after(400, lambda: canvas.itemconfig(event.widget, fill="yellow"))
    canvas.after(600, lambda: canvas.itemconfig(event.widget, fill="blue"))

root = tk.Tk()

canvas = tk.Canvas(root, width=300, height=300)

rectangles = []


root.mainloop()


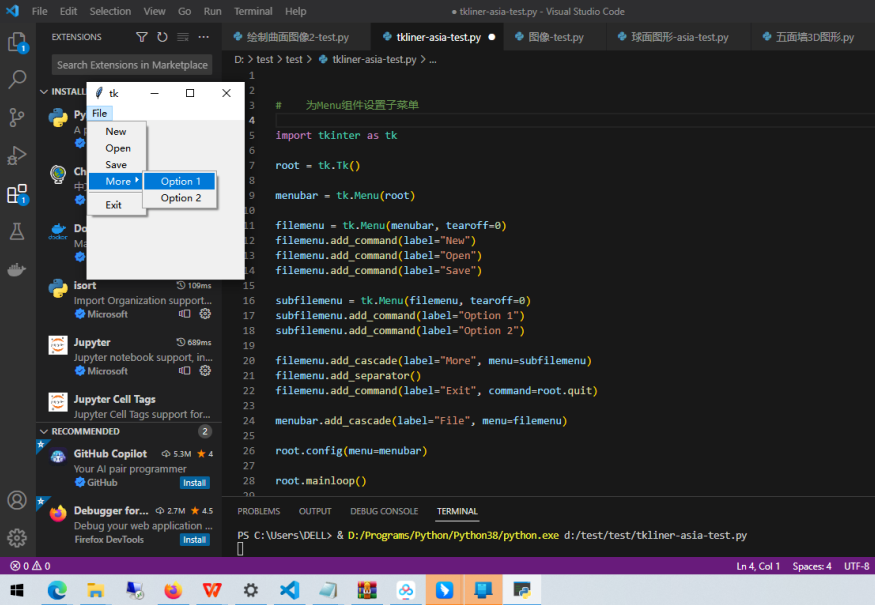
28、为Menu组件设置子菜单
import tkinter as tk

root = tk.Tk()

menubar = tk.Menu(root)

filemenu = tk.Menu(menubar, tearoff=0)
filemenu.add_command(label="New")
filemenu.add_command(label="Open")
filemenu.add_command(label="Save")

subfilemenu = tk.Menu(filemenu, tearoff=0)
subfilemenu.add_command(label="Option 1")
subfilemenu.add_command(label="Option 2")

filemenu.add_cascade(label="More", menu=subfilemenu)
filemenu.add_separator()
filemenu.add_command(label="Exit", command=root.quit)

menubar.add_cascade(label="File", menu=filemenu)

root.config(menu=menubar)

root.mainloop()

29、为Canvas中的图形对象设置尺寸调整效果
import tkinter as tk

def start_resize(event):
    global resize_pos
    resize_pos = (event.x, event.y)
# Python学习交流扣裙 708525271
def resize(event):
    global resize_pos
    delta_x = event.x - resize_pos[0]
    delta_y = event.y - resize_pos[1]
    x, y, w, h = canvas.coords(rectangle)
    if event.widget == resize_left:
        canvas.coords(rectangle, x+delta_x, y, w-delta_x, h)
    elif event.widget == resize_top:
        canvas.coords(rectangle, x, y+delta_y, w, h-delta_y)
    elif event.widget == resize_right:
        canvas.coords(rectangle, x, y, w+delta_x, h)
    elif event.widget == resize_bottom:
        canvas.coords(rectangle, x, y, w, h+delta_y)
    resize_pos = (event.x, event.y)

root = tk.Tk()

canvas = tk.Canvas(root, width=300, height=300)
rectangle = canvas.create_rectangle(50, 50, 100, 100, fill="blue")

resize_left = tk.Canvas(canvas, width=10, height=10, bd=-2, bg="white", cursor="sb_h_double_arrow")
resize_top = tk.Canvas(canvas, width=10, height=10, bd=-2, bg="white", cursor="sb_v_double_arrow")
resize_right = tk.Canvas(canvas, width=10, height=10, bd=-2, bg="white", cursor="sb_h_double_arrow")
resize_bottom = tk.Canvas(canvas, width=10, height=10, bd=-2, bg="white", cursor="sb_v_double_arrow")

resize_left.place(x=50-5, y=75-5)
resize_top.place(x=75-5, y=50-5)
resize_right.place(x=100-5, y=75-5)
resize_bottom.place(x=75-5, y=100-5)

resize_left.bind("<Button-1>", start_resize)
resize_top.bind("<Button-1>", start_resize)
resize_right.bind("<Button-1>", start_resize)
resize_bottom.bind("<Button-1>", start_resize)

resize_left.bind("<B1-Motion>", resize)
resize_top.bind("<B1-Motion>", resize)
resize_right.bind("<B1-Motion>", resize)
resize_bottom.bind("<B1-Motion>", resize)

canvas.pack()

root.mainloop()


# 我给大家准备了25个非常实用的Python爬虫项目,帮助大家更好的学习爬虫。
# 大家也可根据项目的需求,自己构建解决方法,提高编程水平。
# 全套的python自学视频以及项目,已经打包完毕
# 都放在这个扣裙了 708525271 直接拿走学习了!


代码整理不易,建议保存。
今天的分享就到这结束了,下次见!
标签:canvas,tkinter,Python,码住,label,command,tk,root,event From: https://www.cnblogs.com/hahaa/p/17437004.html