一、介绍
上一篇博客:Flutter进阶组件(7):DataTable(数据表格) - fengMisaka - 博客园,介绍了DataTable,下面介绍另外一个常用的表格组件PaginatedDataTable。
PaginatedDataTable是一个展示数据表格并提供分页功能的 widget。它将数据分成多个页面,每次只展示一个页面的数据,用户可以通过分页控件浏览其他页面。常用属性如下:
| header (表名,通常为Text,也可以是ButtonBar,FlatButton) | Widget |
|---|---|
actions (动作) |
List<Widget> |
sortColumnIndex(排序列索引) |
int |
sortAscending(升序排序) |
bool |
onSelectAll(点击全选) |
ValueSetter<bool> |
initialFirstRowIndex (初始索引) |
int |
onPageChanged (页数更改监听,左右箭头) |
ValueChanged<int> |
rowsPerPage (默认一页显示的行数) |
int |
availableRowsPerPage(可选择页数) |
List<int> |
onRowsPerPageChanged (点击可选择页数下拉监听) |
ValueChanged<int> |
PaginatedDataTable 是由 DataTable 延伸而来的;两者区别在于 PaginatedDataTable 支持分页展示;
将分页表单分为五部分,分别是 DataTable 整体数据表格、DataColumn 横向数据表头、DataRow 纵向数据列表、DataCell 数据表单元格以及 DataTableSource 数据来源;
二、PaginatedDataTable示例实现
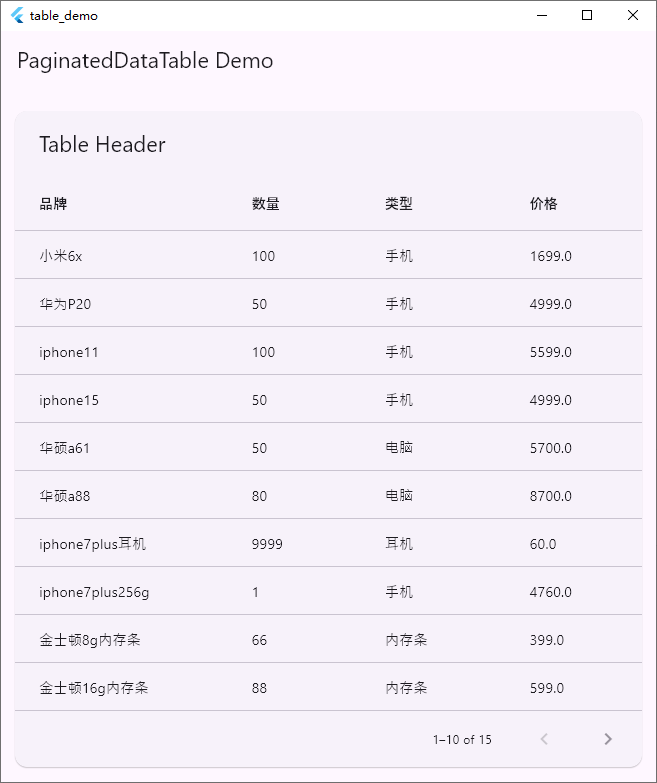
先看下效果图:
2.1 实现DataTableSource
PaginatedDataTable的必要属性source是来自DataTableSource类的数据源,所以需要新建一个Class继承DataTableSource这个抽象类,实现下面四个抽象方法:
class TableSource extends DataTableSource{
  int _selectCount = 0; // 当前选中的行数
  final bool _isRowCountApproximate = false; // 行数是否确定(不确定,则默认为10行)

  // 根据索引获取内容行
  @override
  DataRow getRow(int index) {
		// ......
  }

  // 行数是否确定
  @override
  bool get isRowCountApproximate => _isRowCountApproximate;

  // 获取行数
  @override
  int get rowCount => shopList.length;

  // 获取选中的行数
  @override
  int get selectedRowCount => _selectCount;
}
代码如上所示,现在source有了,那么,我们还需要数据源,我们一起弄一个商品库存清单出来吧!
2.2 定义数据源:商品库存清单
// 商品数据类
class Shop {
  final String name; // 名称
  final int number; // 数量
  final String type; // 类型
  final double price; // 价格

  Shop (
    this.name,
    this.number,
    this.type,
    this.price,
  );
}

// 数据表格源
class TableDataSource extends DataTableSource {
  // 商品数据列表
  final List<Shop> shopList = <Shop>[
    Shop('小米6x', 100, '手机', 1699.0),
    Shop('华为P20', 50, '手机', 4999.0),
    Shop('华硕a61', 50, '电脑', 5700.0),
    Shop('iphone7plus耳机', 9999, '耳机', 60.0),
    Shop('iphone7plus256g', 1, '手机', 4760.0),
    Shop('金士顿8g内存条', 66, '内存条', 399.0),
    Shop('西门子洗衣机9.0kg', 890, '家电', 10399.0),
    Shop('三星66寸液晶智能电视', 800, '家电', 20389.0),
  ];

  int _selectCount = 0; // 当前选中的行数
  final bool _isRowCountApproximate = false; // 行数是否确定(不确定,则默认为10行)

  // ......
}
2.3 PaginatedDataTablePage界面类的实现
DataTableSource配合PaginatedDataTable的实现代码如下:
class PaginatedDataTablePage extends StatefulWidget {
  const PaginatedDataTablePage({super.key});
  @override
  State<PaginatedDataTablePage> createState() => PaginatedDataTableState();
}

// PaginatedDataTable界面实现
class PaginatedDataTableState extends State<PaginatedDataTablePage> {
  final TableSource _dataSource = TableSource();

  @override
  Widget build(BuildContext context) {
    return Scaffold(
      appBar: AppBar(title: const Text('PaginatedDataTable Demo'), primary: true),
        // 外层用ListView包裹
        body: ListView(
          padding: const EdgeInsets.all(10),
          children: <Widget>[
          const SizedBox(height: 10),
          PaginatedDataTable(
            // 表格数据源
            source: _dataSource,
            // 表格头部
            header: const Text('Table Header'),
            // 列
            columns: const <DataColumn>[
              DataColumn(label: Text('品牌')),
              DataColumn(label: Text('数量')),
              DataColumn(label: Text('类型')),
              DataColumn(label: Text('价格')),
            ],
          ),
        ],
      )
    );
  }
}
主要是设置表格数据源和列。
2.4 示例全部代码
合并后的全部代码如下:
import 'package:flutter/material.dart';

void main() {
  runApp(const MyApp());
}

class MyApp extends StatelessWidget {
  const MyApp({super.key});
  @override
  Widget build(BuildContext context) {
    return const MaterialApp(
      debugShowCheckedModeBanner: false,
      home: PaginatedDataTablePage(),
    );
  }
}

class PaginatedDataTablePage extends StatefulWidget {
  const PaginatedDataTablePage({super.key});
  @override
  State<PaginatedDataTablePage> createState() => PaginatedDataTableState();
}

// PaginatedDataTable界面实现
class PaginatedDataTableState extends State<PaginatedDataTablePage> {
  final TableSource _dataSource = TableSource();

  @override
  Widget build(BuildContext context) {
    return Scaffold(
      appBar: AppBar(title: const Text('PaginatedDataTable Demo'), primary: true),
        // 外层用ListView包裹
        body: ListView(
          padding: const EdgeInsets.all(10),
          children: <Widget>[
          const SizedBox(height: 10),
          PaginatedDataTable(
            // 表格数据源
            source: _dataSource,
            // 表格头部
            header: const Text('Table Header'),
            // 列
            columns: const <DataColumn>[
              DataColumn(label: Text('品牌')),
              DataColumn(label: Text('数量')),
              DataColumn(label: Text('类型')),
              DataColumn(label: Text('价格')),
            ],
          ),
        ],
      )
    );
  }
}

// 商品数据类
class Shop {
  final String name; // 名称
  final int number; // 数量
  final String type; // 类型
  final double price; // 价格

  Shop (
    this.name,
    this.number,
    this.type,
    this.price,
  );
}

// 数据表格源
class TableSource extends DataTableSource {
  // 商品数据列表
  final List<Shop> shopList = <Shop>[
    Shop('小米6x', 100, '手机', 1699.0),
    Shop('华为P20', 50, '手机', 4999.0),
    Shop('iphone11', 100, '手机', 5599.0),
    Shop('iphone15', 50, '手机', 4999.0),
    Shop('华硕a61', 50, '电脑', 5700.0),
    Shop('华硕a88', 80, '电脑', 8700.0),
    Shop('iphone7plus耳机', 9999, '耳机', 60.0),
    Shop('iphone7plus256g', 1, '手机', 4760.0),
    Shop('金士顿8g内存条', 66, '内存条', 399.0),
    Shop('金士顿16g内存条', 88, '内存条', 599.0),
    Shop('三星16g内存条', 98, '内存条', 899.0),
    Shop('三星G8显示器', 100, '显示器', 2899.0),
    Shop('联想H8显示器', 50, '显示器', 1899.0),
    Shop('西门子洗衣机9.0kg', 890, '家电', 10399.0),
    Shop('三星66寸液晶智能电视', 800, '家电', 20389.0),
  ];

  int _selectCount = 0; // 当前选中的行数
  final bool _isRowCountApproximate = false; // 行数是否确定(不确定,则默认为10行)

  // 根据索引获取内容行
  @override
  DataRow getRow(int index) {
    if (index >= shopList.length || index < 0) throw FlutterError('数据异常');

    // 如果索引不在商品列表里面,抛出一个异常
    final Shop shop = shopList[index];
    return DataRow.byIndex(
      cells: <DataCell>[
        DataCell(Text(shop.name)),
        DataCell(Text('${shop.number}')),
        DataCell(Text(shop.type)),
        DataCell(Text('${shop.price}')),
      ],
    );
  }

  // 行数是否确定
  @override
  bool get isRowCountApproximate => _isRowCountApproximate;

  // 获取行数
  @override
  int get rowCount => shopList.length;

  // 获取选中的行数
  @override
  int get selectedRowCount => _selectCount;
}
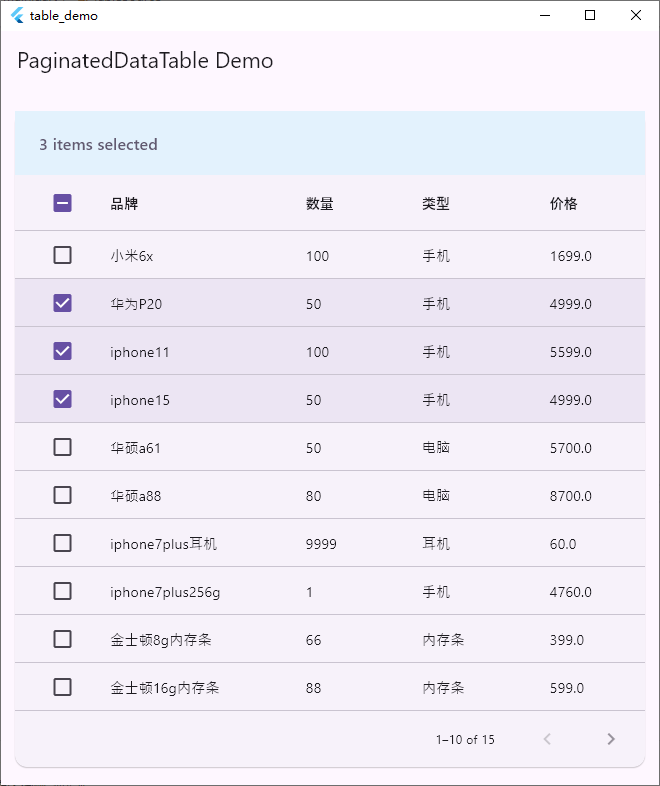
三、实现“添加勾选框”功能
可以在前面示例的基础上,进一步在每一行的前面添加勾选框,表示当前行是否选中。效果图如下所示:
(1)在Shop中添加是否选中属性,即添加bool selected = false;:
// 商品数据类
class Shop {
  final String name;
  final int number;
  final String type;
  final double price;
  bool selected = false; // 默认为未选中
  Shop (
    this.name,
    this.number,
    this.type,
    this.price,
  );
}
(2)实现selectOne函数:
class TableSource extends DataTableSource {
  // ......

  // 选中单个
  void selectOne(int index, bool isSelected){
    Shop shop = shopList[index];
    // 判断选择状态是否改变,改变则进入
    if (shop.selected != isSelected) {
      // 如果选中就选中数量加一,否则减一
      _selectCount = _selectCount += isSelected ? 1 : -1;
      shop.selected = isSelected;
      // 通知监听器去刷新
      notifyListeners();
    }
  }

  // ......
}
(3)getRow函数修改如下:
class TableSource extends DataTableSource {
  // ......

  // 根据索引获取内容行
	@override
  DataRow getRow(int index) {
    if (index >= shopList.length || index < 0) throw FlutterError('数据异常');

    // 如果索引不在商品列表里面,抛出一个异常
    final Shop shop = shopList[index];
    return DataRow.byIndex(
      cells: <DataCell>[
        DataCell(Text(shop.name)),
        DataCell(Text('${shop.price}')),
        DataCell(Text('${shop.number}')),
        DataCell(Text(shop.type)),
      ],

      // 添加勾选框
      index: index,
      selected: shop.selected, // 选中状态
      onSelectChanged: (isSelected) { // 选中状态改变的响应函数
        selectOne(index, isSelected!);
      }
    );
  }

  // ......
}
(4)全部代码如下:
import 'package:flutter/material.dart';

void main() {
  runApp(const MyApp());
}

class MyApp extends StatelessWidget {
  const MyApp({super.key});
  @override
  Widget build(BuildContext context) {
    return const MaterialApp(
      debugShowCheckedModeBanner: false,
      home: PaginatedDataTablePage(),
    );
  }
}

class PaginatedDataTablePage extends StatefulWidget {
  const PaginatedDataTablePage({super.key});
  @override
  State<PaginatedDataTablePage> createState() => PaginatedDataTableState();
}

// PaginatedDataTable界面实现
class PaginatedDataTableState extends State<PaginatedDataTablePage> {
  final TableSource _dataSource = TableSource();

  @override
  Widget build(BuildContext context) {
    return Scaffold(
      appBar: AppBar(title: const Text('PaginatedDataTable Demo'), primary: true),
        // 外层用ListView包裹
        body: ListView(
          padding: const EdgeInsets.all(10),
          children: <Widget>[
          const SizedBox(height: 10),
          PaginatedDataTable(
            // 表格数据源
            source: _dataSource,
            // 表格头部
            header: const Text('Table Header'),
            // 列
            columns: const <DataColumn>[
              DataColumn(label: Text('品牌')),
              DataColumn(label: Text('数量')),
              DataColumn(label: Text('类型')),
              DataColumn(label: Text('价格')),
            ],
          ),
        ],
      )
    );
  }
}

// 商品数据类
class Shop {
  final String name; // 名称
  final int number; // 数量
  final String type; // 类型
  final double price; // 价格
  bool selected = false; // 默认为未选中

  Shop (
    this.name,
    this.number,
    this.type,
    this.price,
  );
}

// 数据表格源
class TableSource extends DataTableSource {
  // 商品数据列表
  final List<Shop> shopList = <Shop>[
    Shop('小米6x', 100, '手机', 1699.0),
    Shop('华为P20', 50, '手机', 4999.0),
    Shop('iphone11', 100, '手机', 5599.0),
    Shop('iphone15', 50, '手机', 4999.0),
    Shop('华硕a61', 50, '电脑', 5700.0),
    Shop('华硕a88', 80, '电脑', 8700.0),
    Shop('iphone7plus耳机', 9999, '耳机', 60.0),
    Shop('iphone7plus256g', 1, '手机', 4760.0),
    Shop('金士顿8g内存条', 66, '内存条', 399.0),
    Shop('金士顿16g内存条', 88, '内存条', 599.0),
    Shop('三星16g内存条', 98, '内存条', 899.0),
    Shop('三星G8显示器', 100, '显示器', 2899.0),
    Shop('联想H8显示器', 50, '显示器', 1899.0),
    Shop('西门子洗衣机9.0kg', 890, '家电', 10399.0),
    Shop('三星66寸液晶智能电视', 800, '家电', 20389.0),
  ];

  int _selectCount = 0; // 当前选中的行数
  final bool _isRowCountApproximate = false; // 行数是否确定(不确定,则默认为10行)

  // 根据索引获取内容行
  @override
  DataRow getRow(int index) {
    if (index >= shopList.length || index < 0) throw FlutterError('数据异常');

    // 如果索引不在商品列表里面,抛出一个异常
    final Shop shop = shopList[index];
    return DataRow.byIndex(
      cells: <DataCell>[
        DataCell(Text(shop.name)),
        DataCell(Text('${shop.number}')),
        DataCell(Text(shop.type)),
        DataCell(Text('${shop.price}')),
      ],

      // 添加勾选框
      index: index,
      selected: shop.selected, // 选中状态
      onSelectChanged: (isSelected) { // 选中状态改变的响应函数
        selectOne(index, isSelected!);
      }
    );
  }

  // 行数是否确定
  @override
  bool get isRowCountApproximate => _isRowCountApproximate;

  // 获取行数
  @override
  int get rowCount => shopList.length;

  // 获取选中的行数
  @override
  int get selectedRowCount => _selectCount;

  // 选中单个
  void selectOne(int index, bool isSelected){
    Shop shop = shopList[index];
    // 判断选择状态是否改变,改变则进入
    if (shop.selected != isSelected) {
      // 如果选中就选中数量加一,否则减一
      _selectCount = _selectCount += isSelected ? 1 : -1;
      shop.selected = isSelected;
      // 通知监听器去刷新
      notifyListeners();
    }
  }
}
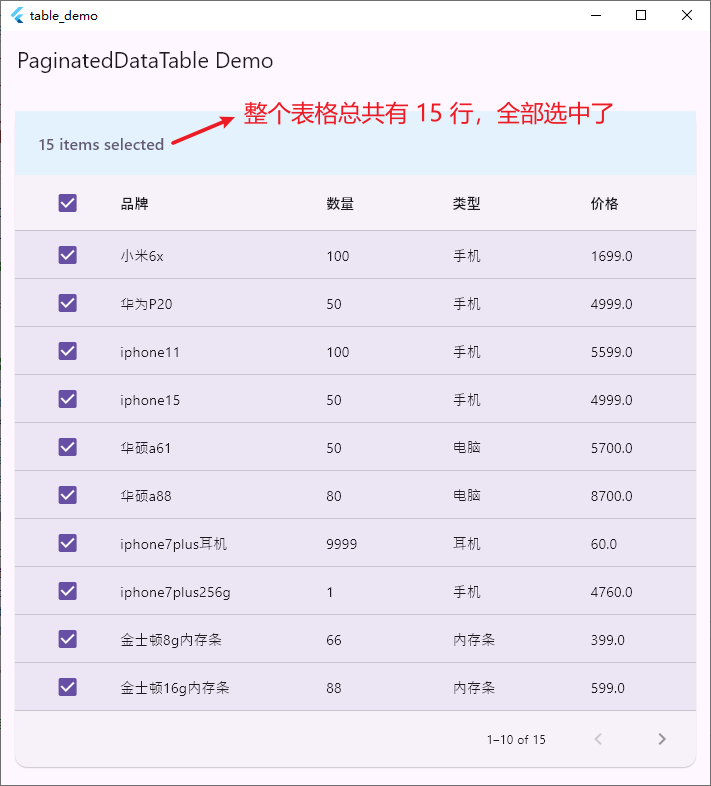
四、实现"选中全部"功能
效果图如下所示:
需要再实现selectAll函数:
class TableSource extends DataTableSource {
  // ......

	// 选中全部
  void selectAll(bool checked) {
    // ignore: no_leading_underscores_for_local_identifiers
    for (Shop _shop in shopList) {
      _shop.selected = checked;
    }
    _selectCount = checked ? shopList.length : 0;

    // 通知监听器去刷新
    notifyListeners();
  }

  // ......
}
再修改onSelectChanged属性:
onSelectChanged: (isSelected) { // 选中状态改变的响应函数
	selectAll(isSelected!);
}
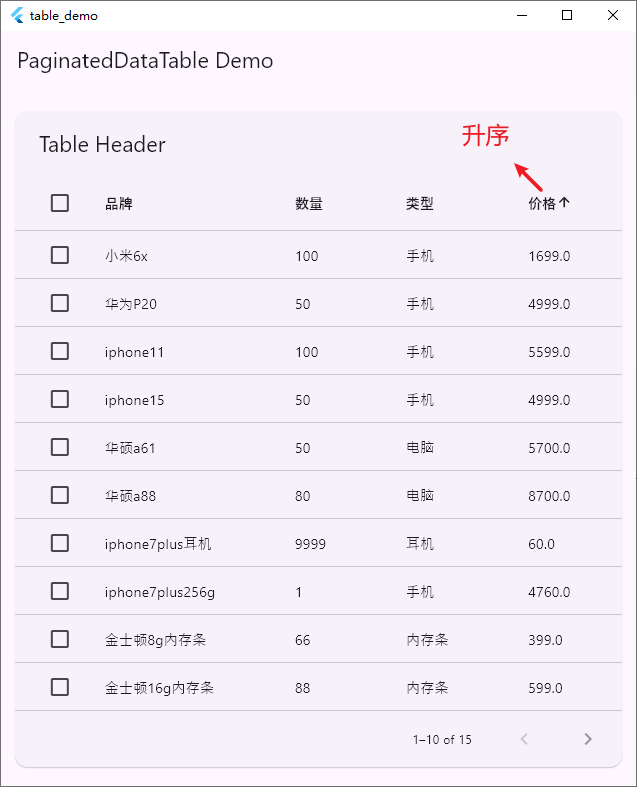
五、实现"排序"功能
可以选择某列升序或者降序。效果图如下所示:
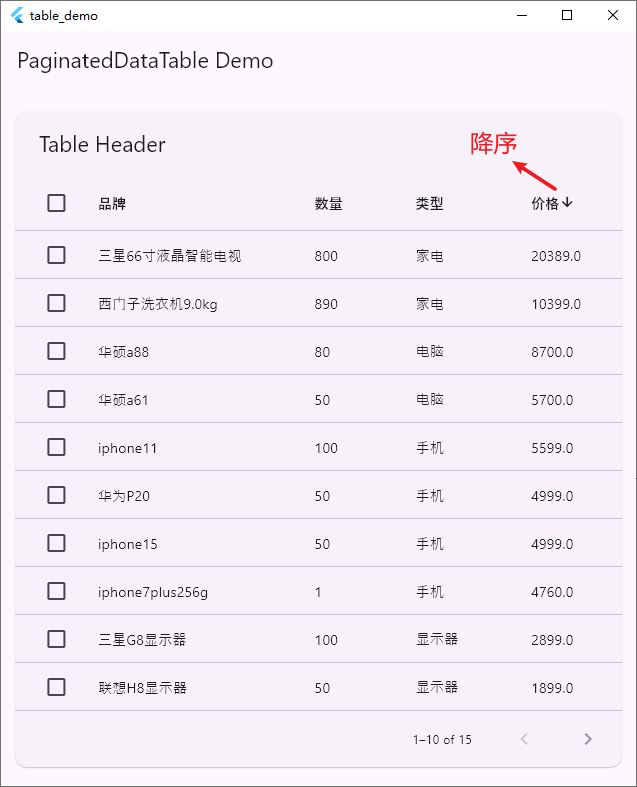
(1)先实现TableSource类中的_sort函数:
class TableSource extends DataTableSource {
  // ......

  // 排序
  void _sort<T>(Comparable<T> Function(Shop shop) getField, bool b) {
    shopList.sort((Shop s1, Shop s2) {
      if (!b) {
        // 两个项进行交换
        final Shop temp = s1;
        s1 = s2;
        s2 = temp;
      }
      final Comparable<T> s1Value = getField(s1);
      final Comparable<T> s2Value = getField(s2);
      return Comparable.compare(s1Value, s2Value);
    });
    notifyListeners();
  }

  // ......
}
(2)再定义_sortColumnIndex、_sortAscending和initState函数:
// PaginatedDataTable界面实现
class PaginatedDataTableState extends State<PaginatedDataTablePage> {
  final TableSource _dataSource = TableSource();

	// 排序功能
  int _sortColumnIndex = 3; // 价格是第四列,所以这里索引设置为3
  bool _sortAscending = true;

  @override
  void initState() {
    super.initState();
  }

  // ......
}
(3)再定义sortAscending和sortColumnIndex,修改列为排序列,通过加上onSort函数的方式,然后实现_sort函数:
class PaginatedDataTableState extends State<PaginatedDataTablePage> {
  // ......

	Widget build(BuildContext context) {
    return Scaffold(
      appBar: AppBar(title: const Text('PaginatedDataTable Demo'), primary: true),
        // 外层用ListView包裹
        body: ListView(
          padding: const EdgeInsets.all(10),
          children: <Widget>[
          const SizedBox(height: 10),
          PaginatedDataTable(
            // 是否升序排序
            sortAscending: _sortAscending,
            sortColumnIndex: _sortColumnIndex,

            // 表格数据源
            source: _dataSource,
            // 表格头部
            header: const Text('Table Header'),
            // 列
            columns: <DataColumn>[
              const DataColumn(label: Text('品牌')),
              const DataColumn(label: Text('数量')),
              const DataColumn(label: Text('类型')),
              DataColumn(
                  label: const Text('价格'),
                  // 加入排序操作
                  onSort: (int columnIndex, bool ascending) {
                    _sort<num>((Shop p) => p.price, columnIndex, ascending);
                  }),
            ],
          ),
        ],
      )
    );
  }

  // 排序关联_sortColumnIndex,_sortAscending
  void _sort<T>(Comparable<T> Function(Shop s) getField, int index, bool b) {
    _dataSource._sort(getField, b);
    setState(() {
      _sortColumnIndex = index;
      _sortAscending = b;
    });
  }
}
(4)全部代码如下:
import 'package:flutter/material.dart';

void main() {
  runApp(const MyApp());
}

class MyApp extends StatelessWidget {
  const MyApp({super.key});
  @override
  Widget build(BuildContext context) {
    return const MaterialApp(
      debugShowCheckedModeBanner: false,
      home: PaginatedDataTablePage(),
    );
  }
}

class PaginatedDataTablePage extends StatefulWidget {
  const PaginatedDataTablePage({super.key});
  @override
  State<PaginatedDataTablePage> createState() => PaginatedDataTableState();
}

// PaginatedDataTable界面实现
class PaginatedDataTableState extends State<PaginatedDataTablePage> {
  final TableSource _dataSource = TableSource();

	// 排序功能
  int _sortColumnIndex = 3; // 价格是第四列,所以这里索引设置为3
  bool _sortAscending = true;

  @override
  void initState() {
    super.initState();
  }

  @override
  Widget build(BuildContext context) {
    return Scaffold(
      appBar: AppBar(title: const Text('PaginatedDataTable Demo'), primary: true),
        // 外层用ListView包裹
        body: ListView(
          padding: const EdgeInsets.all(10),
          children: <Widget>[
          const SizedBox(height: 10),
          PaginatedDataTable(
            // 是否升序排序
            sortAscending: _sortAscending,
            sortColumnIndex: _sortColumnIndex,

            // 表格数据源
            source: _dataSource,
            // 表格头部
            header: const Text('Table Header'),
            // 列
            columns: <DataColumn>[
              const DataColumn(label: Text('品牌')),
              const DataColumn(label: Text('数量')),
              const DataColumn(label: Text('类型')),
              DataColumn(
                  label: const Text('价格'),
                  // 加入排序操作
                  onSort: (int columnIndex, bool ascending) {
                    _sort<num>((Shop p) => p.price, columnIndex, ascending);
                  }),
            ],
          ),
        ],
      )
    );
  }

  // 排序关联_sortColumnIndex,_sortAscending
  void _sort<T>(Comparable<T> Function(Shop s) getField, int index, bool b) {
    _dataSource._sort(getField, b);
    setState(() {
      _sortColumnIndex = index;
      _sortAscending = b;
    });
  }
}

// 商品数据类
class Shop {
  final String name; // 名称
  final int number; // 数量
  final String type; // 类型
  final double price; // 价格
  bool selected = false; // 默认为未选中

  Shop (
    this.name,
    this.number,
    this.type,
    this.price,
  );
}

// 数据表格源
class TableSource extends DataTableSource {
  // 商品数据列表
  final List<Shop> shopList = <Shop>[
    Shop('小米6x', 100, '手机', 1699.0),
    Shop('华为P20', 50, '手机', 4999.0),
    Shop('iphone11', 100, '手机', 5599.0),
    Shop('iphone15', 50, '手机', 4999.0),
    Shop('华硕a61', 50, '电脑', 5700.0),
    Shop('华硕a88', 80, '电脑', 8700.0),
    Shop('iphone7plus耳机', 9999, '耳机', 60.0),
    Shop('iphone7plus256g', 1, '手机', 4760.0),
    Shop('金士顿8g内存条', 66, '内存条', 399.0),
    Shop('金士顿16g内存条', 88, '内存条', 599.0),
    Shop('三星16g内存条', 98, '内存条', 899.0),
    Shop('三星G8显示器', 100, '显示器', 2899.0),
    Shop('联想H8显示器', 50, '显示器', 1899.0),
    Shop('西门子洗衣机9.0kg', 890, '家电', 10399.0),
    Shop('三星66寸液晶智能电视', 800, '家电', 20389.0),
  ];

  int _selectCount = 0; // 当前选中的行数
  final bool _isRowCountApproximate = false; // 行数是否确定(不确定,则默认为10行)

  // 根据索引获取内容行
  @override
  DataRow getRow(int index) {
    if (index >= shopList.length || index < 0) throw FlutterError('数据异常');

    // 如果索引不在商品列表里面,抛出一个异常
    final Shop shop = shopList[index];
    return DataRow.byIndex(
      cells: <DataCell>[
        DataCell(Text(shop.name)),
        DataCell(Text('${shop.number}')),
        DataCell(Text(shop.type)),
        DataCell(Text('${shop.price}')),
      ],

      // 添加勾选框
      index: index,
      selected: shop.selected, // 选中状态
      onSelectChanged: (isSelected) { // 选中状态改变的响应函数
        selectAll(isSelected!);
      }
    );
  }

  // 行数是否确定
  @override
  bool get isRowCountApproximate => _isRowCountApproximate;

  // 获取行数
  @override
  int get rowCount => shopList.length;

  // 获取选中的行数
  @override
  int get selectedRowCount => _selectCount;

  // 选中单个
  void selectOne(int index, bool isSelected){
    Shop shop = shopList[index];
    // 判断选择状态是否改变,改变则进入
    if (shop.selected != isSelected) {
      // 如果选中就选中数量加一,否则减一
      _selectCount = _selectCount += isSelected ? 1 : -1;
      shop.selected = isSelected;
      // 通知监听器去刷新
      notifyListeners();
    }
  }

	// 选中全部
  void selectAll(bool checked) {
    // ignore: no_leading_underscores_for_local_identifiers
    for (Shop _shop in shopList) {
      _shop.selected = checked;
    }
    _selectCount = checked ? shopList.length : 0;

    // 通知监听器去刷新
    notifyListeners();
  }

  // 排序
  void _sort<T>(Comparable<T> Function(Shop shop) getField, bool b) {
    shopList.sort((Shop s1, Shop s2) {
      if (!b) {
        // 两个项进行交换
        final Shop temp = s1;
        s1 = s2;
        s2 = temp;
      }
      final Comparable<T> s1Value = getField(s1);
      final Comparable<T> s2Value = getField(s2);
      return Comparable.compare(s1Value, s2Value);
    });
    notifyListeners();
  }
}
六、其它功能
6.1 actions & headingRowHeight
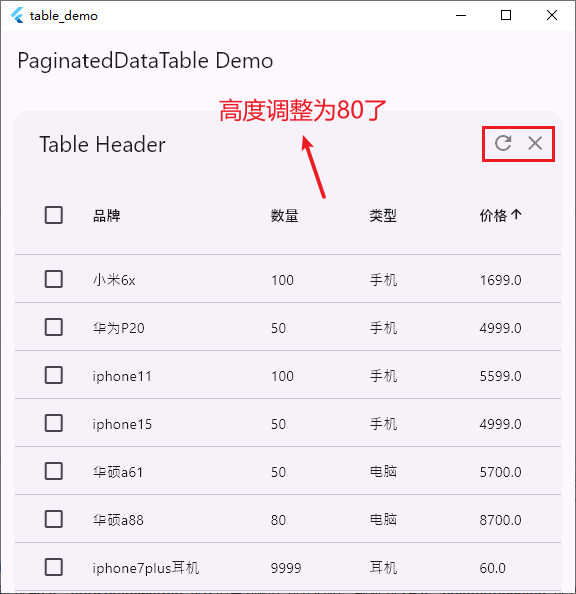
数据表的标题内容主要是通过 header 展示,而源码标题是一个 Row 结构,可以通过 actions 在右侧添加 Icon 等 Widget,类似于 ToolBar;还可以通过 headingRowHeight 调整标题行的整体高度,默认是 56.0:
PaginatedDataTable(
  header: Text('Table Header'),
  actions: const [Icon(Icons.refresh), Icon(Icons.clear)],
  headingRowHeight: 80.0,

  //......
}
效果图如下所示:
6.2 dataRowHeight & horizontalMargin & columnSpacing
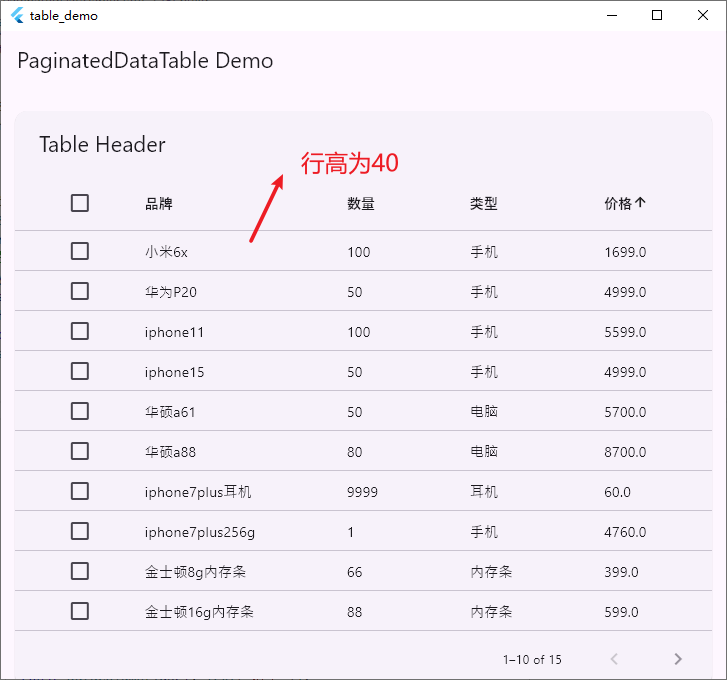
dataRowHeight 为数据元素行高,默认为 48.0;horizontalMargin 为表格首列和尾列外边距,默认为 24.0;columnSpacing 为单元格间距,默认为 56.0;
PaginatedDataTable(
  dataRowMinHeight: 40.0, // 数据元素最小行高
  dataRowMaxHeight: 40.0, // 数据元素最大行高
  horizontalMargin: 50.0, // 表格首列和尾列外边距
  columnSpacing: 80.0, // 单元格间距

  //......
}
效果图如下所示:
6.3 rowsPerPage & initialFirstRowIndex & onPageChanged
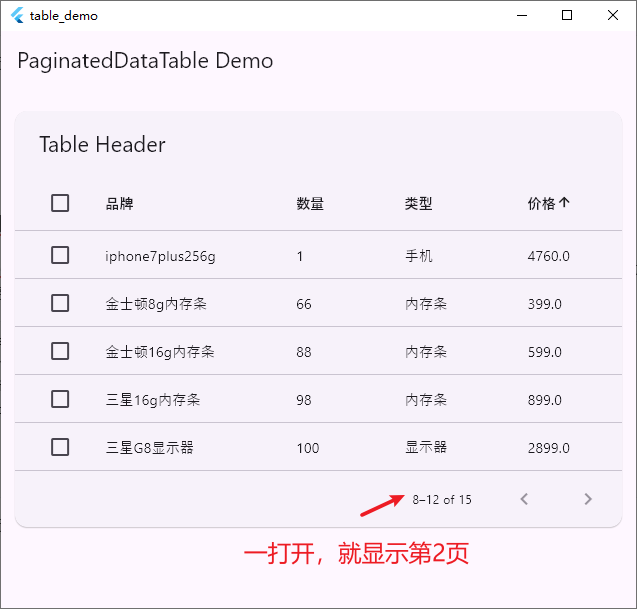
rowsPerPage 为每页展示数据条数,默认为 10;onPageChanged 为页面左右切换时回调,回调结果为数据索引值;initialFirstRowIndex 为初始化展示索引位置,注意,若前置数据条数不满足整数页时,取整数页前一页;
PaginatedDataTable(
  rowsPerPage: 5,
  initialFirstRowIndex: 7,
  onPageChanged: (i) => debugPrint('onPageChanged -> $i'),

  //......
}
效果图如下所示:
6.4 availableRowsPerPage & onRowsPerPageChanged
onRowsPerPageChanged 不为空时可以设置左下角每页展示行数;此时 availableRowsPerPage 列表不可为空,且和尚测试,列表首个元素需要与初始化的行数一致;
PaginatedDataTable(
  var _rowsPerPage = 8;

  rowsPerPage: _rowsPerPage,
  availableRowsPerPage: [8, 16, 20],
  onRowsPerPageChanged: (value) => setState(() => _rowsPerPage = value),

  //......
}
6.5 处理数据显示不全问题
当表格列比较多的时候,使用SingleChildScrollView包裹,显示不全时滚动显示,用法如下:
SingleChildScrollView(
  scrollDirection: Axis.horizontal,
  child: PaginatedDataTable()
)
参考:
Flutter学习记录——12.表格组件_flutter 表格-CSDN博客
【Flutter 专题】132 图解 PaginatedDataTable 分页表格-腾讯云开发者社区-腾讯云
Flutter 分页功能表格控件_flutter paginateddatatable-CSDN博客
标签:Shop,shop,const,进阶,index,Text,final,PaginatedDataTable,Flutter From: https://www.cnblogs.com/linuxAndMcu/p/18647812