ToolBar
对许多小的按钮(或者其他控件)进行分组。
ToolBar 可以被放在元素树的任何地方,但是通常把它们放在一个叫作ToolBarTray 的FrameworkElement 中。
用户就可以拖曳ToolBar 或重新定义ToolBar,。除非ToolBarTray的IsLocked 属性被设置为true。
ToolBarTray 有一个Orientation 属性,可以把它设置为Vertical 使其所有的ToolBar 垂直排列项。
默认都是最后一个元素第一个被移到溢出区域,但是你能通过OverflowMode 附加属性来控制每个项的溢出行为。有了这个属性,你就可以把一个项标记为AsNeeded(默认,按需要溢出)、Always 或Never。
System.Windows.Input 命名空间中的KeyboardNavigat ion 类定义了一些用来自定义键盘行为的附加属性。
ToolBar 实际上是一个带有头的Item 控件(就像MenuItem 和TreeViewItem)。它的Header 属性从来不会被显示,但是它可以被用来实现ToolBarTray 的其他特性。
ToolBarTray
ToolBarTray是ToolBar的容器,ToolBar可以放在任何地方,通常放在ToolBarTray中。ToolBarTray 将处理诸如放置和调整大小之类的事情,并且您可以在 ToolBarTray 元素内拥有多个 ToolBar 控件。
<Window x:Class="WpfTutorialSamples.Common_interface_controls.ToolbarSample"
        xmlns="http://schemas.microsoft.com/winfx/2006/xaml/presentation"
        xmlns:x="http://schemas.microsoft.com/winfx/2006/xaml"
        Title="ToolbarSample" Height="200" Width="300">
    <Window.CommandBindings>
        <CommandBinding Command="New" CanExecute="CommonCommandBinding_CanExecute" />
        <CommandBinding Command="Open" CanExecute="CommonCommandBinding_CanExecute" />
        <CommandBinding Command="Save" CanExecute="CommonCommandBinding_CanExecute" />
    </Window.CommandBindings>
    <DockPanel>
        <ToolBarTray DockPanel.Dock="Top">
            <ToolBar>
                <Button Command="New" Content="New" />
                <Button Command="Open" Content="Open" />
                <Button Command="Save" Content="Save" />
            </ToolBar>
            <ToolBar>
                <Button Command="Cut" Content="Cut" />
                <Button Command="Copy" Content="Copy" />
                <Button Command="Paste" Content="Paste" />
            </ToolBar>
        </ToolBarTray>
        <TextBox AcceptsReturn="True" />
    </DockPanel>
</Window>
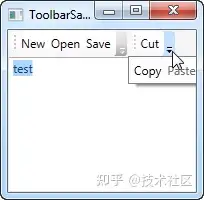
效果

图标
虽然工具栏按钮上的文本完全可以,但通常的方法是使用图标或至少是图标和一段文本的组合。由于 WPF 使用常规 Button 控件,因此向工具栏项添加图标非常容易。看看下一个例子,我们都做:
<Window x:Class="WpfTutorialSamples.Common_interface_controls.ToolbarIconSample"
        xmlns="http://schemas.microsoft.com/winfx/2006/xaml/presentation"
        xmlns:x="http://schemas.microsoft.com/winfx/2006/xaml"
        Title="ToolbarIconSample" Height="200" Width="300">
    <DockPanel>
        <ToolBarTray DockPanel.Dock="Top">
            <ToolBar>
                <Button Command="Cut" ToolTip="Cut selection to Windows Clipboard.">
                    <Image Source="/WpfTutorialSamples;component/Images/cut.png" />
                </Button>
                <Button Command="Copy" ToolTip="Copy selection to Windows Clipboard.">
                    <Image Source="/WpfTutorialSamples;component/Images/copy.png" />
                </Button>
                <Button Command="Paste" ToolTip="Paste from Windows Clipboard.">
                    <StackPanel Orientation="Horizontal">
                        <Image Source="/WpfTutorialSamples;component/Images/paste.png" />
                        <TextBlock Margin="3,0,0,0">Paste</TextBlock>
                    </StackPanel>
                </Button>
            </ToolBar>
        </ToolBarTray>
        <TextBox AcceptsReturn="True" />
    </DockPanel>
</Window>
效果

溢出
正如已经提到的,使用 ToolBar 控件而不仅仅是按钮面板的一个很好的理由是自动溢出处理。这意味着如果不再有足够的空间来显示工具栏上的所有按钮,WPF 会将它们放在一个菜单中,该菜单可通过单击工具栏右侧的箭头来访问。您可以在此屏幕截图上看到它是如何工作的,它显示了第一个示例,但窗口较小,从而为工具栏留下了较少的空间:

WPF 甚至允许您决定哪些项目适合溢出隐藏,哪些应该始终可见。通常,在设计工具栏时,有些项目不如其他项目重要,而有些项目您甚至可能希望一直显示在溢出菜单中,无论空间是否足够。
这是附加属性ToolBar.OverflowMode发挥作用的地方。默认值是 AsNeeded,这只是意味着如果没有足够的空间,则将工具栏项放入溢出菜单中。您可以使用Always或Never来代替,这正是名称所暗示的:始终将项目放在溢出菜单中或防止该项目被移动到溢出菜单。以下是有关如何分配
<ToolBar>
    <Button Command="Cut" Content="Cut" ToolBar.OverflowMode="Always" />
    <Button Command="Copy" Content="Copy" ToolBar.OverflowMode="AsNeeded" />
    <Button Command="Paste" Content="Paste" ToolBar.OverflowMode="Never" />
</ToolBar>
垂直
    <ToolBarTray  Orientation="Vertical">
            <ToolBar IsOverflowOpen="True"  Band="1" BandIndex="1" Background="SaddleBrown">

                <RadioButton  Cursor="Hand"
                          Padding="8"
                          Foreground="Wheat"
                          Style="{DynamicResource RadioButtonStyle}"
                          Height="60"
                          IsThreeState="False">

                    <Path Stretch="Uniform"    Fill="Aqua" Data="{StaticResource deleteIco}"/>
                </RadioButton>


                <RadioButton Padding="8"
                         Cursor="Hand"
                         Foreground="Wheat"
                         Style="{DynamicResource RadioButtonStyle}"
                         Height="60"
                         IsChecked="{Binding IsAddSquare, Mode=TwoWay}"
                         IsThreeState="False">
                    <Path Stretch="Uniform"    Fill="Aqua" Data="{StaticResource  addIco}"/>
                </RadioButton>

                <RadioButton Padding="8"
                         Foreground="Wheat"
                         Cursor="Hand"
                         Style="{DynamicResource RadioButtonStyle}"
                         Height="60"
                         IsThreeState="False">
                    <Path Stretch="Uniform"    Fill="Aqua" Data="{StaticResource  SelectOrMoveIco}"/>
                </RadioButton>


            </ToolBar>
        </ToolBarTray>
效果

ToolBar分隔符
<Window x:Class="菜单.MainWindow"
        xmlns="http://schemas.microsoft.com/winfx/2006/xaml/presentation"
        xmlns:x="http://schemas.microsoft.com/winfx/2006/xaml"
        xmlns:d="http://schemas.microsoft.com/expression/blend/2008"
        xmlns:mc="http://schemas.openxmlformats.org/markup-compatibility/2006"
        xmlns:local="clr-namespace:菜单"
        mc:Ignorable="d"
        Title="MainWindow" Height="200" Width="300">
    <Window.CommandBindings>
        <CommandBinding Command="New" CanExecute="CommonCommandBinding_CanExecute" />
        <CommandBinding Command="Open" CanExecute="CommonCommandBinding_CanExecute" />
        <CommandBinding Command="Save" CanExecute="CommonCommandBinding_CanExecute" />
    </Window.CommandBindings>
    <DockPanel>
        <ToolBarTray DockPanel.Dock="Top">
            <ToolBar>
                <Button Command="New" Content="New" />
                <Button Command="Open" Content="Open" />
                <Button Command="Save" Content="Save" />
                <Separator />
                <Label>Font size:</Label>
            </ToolBar>

            <ToolBar>
                <ComboBox>
                    <ComboBoxItem>10</ComboBoxItem>
                    <ComboBoxItem IsSelected="True">12</ComboBoxItem>
                    <ComboBoxItem>14</ComboBoxItem>
                    <ComboBoxItem>16</ComboBoxItem>
                </ComboBox>
            </ToolBar>
        </ToolBarTray>
        <TextBox AcceptsReturn="True" />
    </DockPanel>

</Window>
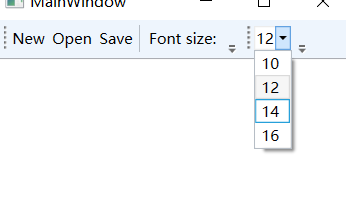
以上示例还在toolbar中放了分隔符,lable以及combobox控件
