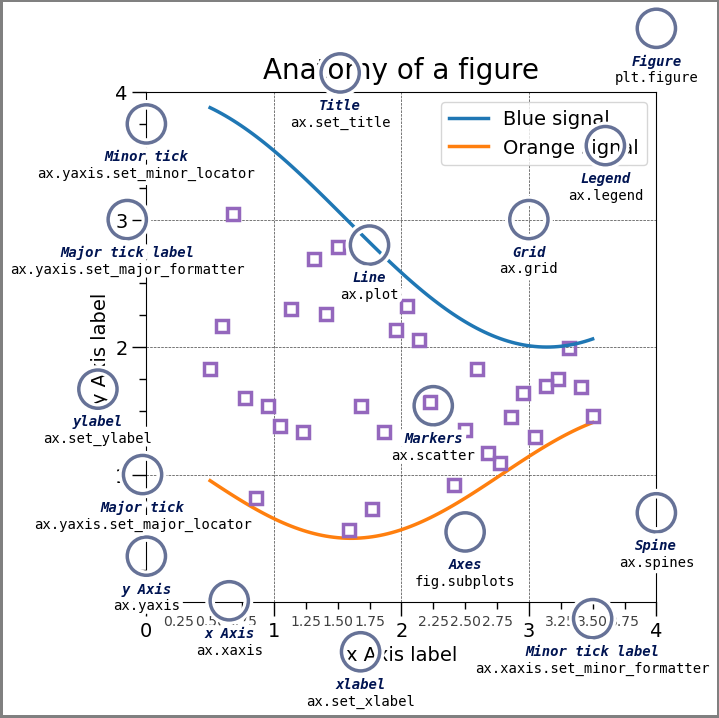
1.解剖一副图
import matplotlib.pyplot as plt
import numpy as np

from matplotlib.patches import Circle
from matplotlib.patheffects import withStroke
from matplotlib.ticker import AutoMinorLocator, MultipleLocator
royal_blue = [0, 20/256, 82/256]
np.random.seed(19680801)

# 构造X轴的坐标 等差数列  start end count
X = np.linspace(0.5, 3.5, 100)

# 构造Y轴坐标
Y1 = 3+np.cos(X)
Y2 = 1+np.cos(1+X/0.75)/2
Y3 = np.random.uniform(Y1, Y2, len(X))
# make a figure
fig = plt.figure(figsize=(7.5, 7.5))
ax = fig.add_axes([0.2, 0.17, 0.68, 0.7], aspect=1)

# 设置大标尺
ax.xaxis.set_major_locator(MultipleLocator(1.000))
# 设置小标尺
ax.xaxis.set_minor_locator(AutoMinorLocator(4))
ax.yaxis.set_major_locator(MultipleLocator(1.000))
ax.yaxis.set_minor_locator(AutoMinorLocator(4))
ax.xaxis.set_minor_formatter("{x:.2f}")

# 设置坐标轴的范围
ax.set_xlim(0, 4)
ax.set_ylim(0, 4)

# 标尺的样式
ax.tick_params(which='major', width=1.0, length=10, labelsize=14)
ax.tick_params(which='minor', width=1.0, length=5, labelsize=10,
               labelcolor='0.25')

# 设置网格
ax.grid(linestyle="--", linewidth=0.5, color='.25', zorder= -10)

# 划线
ax.plot(X, Y1, c='C0', lw=2.5, label="Blue signal", zorder=10)
ax.plot(X, Y2, c='C1', lw=2.5, label="Orange signal")
ax.plot(X[::3], Y3[::3], linewidth=0, markersize=9,
        marker='s', markerfacecolor='none', markeredgecolor='C4',
        markeredgewidth=2.5)

ax.set_title("Anatomy of a figure", fontsize=20, verticalalignment='bottom')
ax.set_xlabel("x Axis label", fontsize=14)
ax.set_ylabel("y Axis label", fontsize=14)
ax.legend(loc="upper right", fontsize=14)

# Annotate the figure
def annotate(x, y, text, code):
    # Circle marker
    c = Circle((x, y), radius=0.15, clip_on=False, zorder=10, linewidth=2.5,
               edgecolor=royal_blue + [0.6], facecolor='none',
               path_effects=[withStroke(linewidth=7, foreground='white')])
    ax.add_artist(c)

    # use path_effects as a background for the texts
    # draw the path_effects and the colored text separately so that the
    # path_effects cannot clip other texts
    for path_effects in [[withStroke(linewidth=7, foreground='white')], []]:
        color = 'white' if path_effects else royal_blue
        ax.text(x, y-0.2, text, zorder=100,
                ha='center', va='top', weight='bold', color=color,
                style='italic', fontfamily='monospace',
                path_effects=path_effects)

        color = 'white' if path_effects else 'black'
        ax.text(x, y-0.33, code, zorder=100,
                ha='center', va='top', weight='normal', color=color,
                fontfamily='monospace', fontsize='medium',
                path_effects=path_effects)

annotate(3.5, -0.13, "Minor tick label", "ax.xaxis.set_minor_formatter")
annotate(-0.03, 1.0, "Major tick", "ax.yaxis.set_major_locator")
annotate(0.00, 3.75, "Minor tick", "ax.yaxis.set_minor_locator")
annotate(-0.15, 3.00, "Major tick label", "ax.yaxis.set_major_formatter")
annotate(1.68, -0.39, "xlabel", "ax.set_xlabel")
annotate(-0.38, 1.67, "ylabel", "ax.set_ylabel")
annotate(1.52, 4.15, "Title", "ax.set_title")
annotate(1.75, 2.80, "Line", "ax.plot")
annotate(2.25, 1.54, "Markers", "ax.scatter")
annotate(3.00, 3.00, "Grid", "ax.grid")
annotate(3.60, 3.58, "Legend", "ax.legend")
annotate(2.5, 0.55, "Axes", "fig.subplots")
annotate(4, 4.5, "Figure", "plt.figure")
annotate(0.65, 0.01, "x Axis", "ax.xaxis")
annotate(0, 0.36, "y Axis", "ax.yaxis")
annotate(4.0, 0.7, "Spine", "ax.spines")

# frame around figure
fig.patch.set(linewidth=4, edgecolor='0.5')
plt.show()

2.可视化的工具
Matplotlib 可能是 Python 中最常用的绘图库,Matplotlib 具有丰富的绘图功能和灵活的使
用方式。Matplotlib 可以绘制多种类型的图形,包括折线图、散点图、柱状图、饼图、等高线图等各
种二维、三维图像,还可以进行图像处理和动画制作等。
Seaborn 是基于 Matplotlib 的高级绘图库,专注于统计数据可视化。它提供了多种高级数据可
视化技术,包括分类散点图、热图 (热力图)、箱线图、分布图等,可以快速生成高质量的统计图表。
Seaborn 适用于数据分析、数据挖掘和机器学习等领域。本书第 12 章将专门介绍 Seaborn 库常用可
视化方案。
注意,Matplotlib 和 Seaborn 生成的都是静态图,即图片。
Plotly 是一个交互式可视化库,可以生成高质量的静态和动态图表。它提供了丰富的图形类型和
交互式控件,可以通过滑块、下拉列表、按钮等方式动态控制图形的显示内容和样式。Plotly 适用于
Web 应用、数据仪表盘和数据科学教育等领域。
3.绘制正弦和余弦图像
import numpy as np
import matplotlib.pyplot as plt

X = np.linspace(0, np.pi * 2, 100)
Y_sin = np.sin(X)
Y_cos = np.cos(X)

fig, (ax_sin,ax_cos) = plt.subplots(1, 2, figsize = (12, 5 ))

ax_sin.plot(X,Y_sin, label = 'sin', c = 'r')
ax_cos.plot(X,Y_cos, label = 'cos', c = 'b')

ax_sin.legend()
ax_cos.legend()

ax_sin.set_xlim(0, 2 * np.pi)
ax_cos.set_xlim(0, 2 * np.pi)

xticks = np.arange(0, 2*np.pi+np.pi/2 , np.pi / 2 )
xticks_label = [r'$0$',r'$\frac{\pi}{2}$',
                r'$pi$',r'$\frac{3\pi}{2}$', r'$2\pi$']
ax_sin.set_xticks(xticks)
ax_sin.set_xticklabels(xticks_label)

ax_cos.set_xticks(xticks)
ax_cos.set_xticklabels(xticks_label)

ax_sin.grid()
ax_cos.grid()

plt.show()

4.example
线图
import matplotlib.pyplot as plt
import numpy as np

# 默认的样式集合
plt.style.use('_mpl-gallery')
# 构造数据
x = np.linspace(0, 10, 100)
y = 4 + 2 * np.sin(2 * x) # 2sin(2x) + 4

# plot
fig, ax = plt.subplots(figsize = (4,4))

ax.plot(x, y, linewidth=2.0)

ax.set(xlim=(0, 8), xticks=np.arange(1, 8),
       ylim=(0, 8), yticks=np.arange(1, 8))


plt.show()

散点图
np.random.seed(3)
x = 4 + np.random.normal(0, 2, 24)
y = 4 + np.random.normal(0, 2, len(x))
# size and color:
sizes = np.random.uniform(15, 80, len(x))
colors = np.random.uniform(15, 80, len(x))

# plot
fig, ax = plt.subplots(figsize = (4,4))

ax.scatter(x, y, s=sizes, c=colors, vmin=0, vmax=100)

ax.set(xlim=(0, 8), xticks=np.arange(1, 8),
       ylim=(0, 8), yticks=np.arange(1, 8))

plt.show()

折线图
# make data:
x = 0.5 + np.arange(8)
y = [4.8, 5.5, 3.5, 4.6, 6.5, 6.6, 2.6, 3.0]

# plot
fig, ax = plt.subplots(figsize = (4,4))

ax.bar(x, y, width=1, edgecolor="white", linewidth=0.7)

ax.set(xlim=(0, 8), xticks=np.arange(1, 8),
       ylim=(0, 8), yticks=np.arange(1, 8))

plt.show()

阶梯图
# make data
y = [1.8, 5.5, 3.5, 4.6, 6.5, 6.6, 2.6, 3.0]

# plot
fig, ax = plt.subplots()

ax.stairs(y, linewidth=2.5)

ax.set(xlim=(0, 8), xticks=np.arange(1, 8),
       ylim=(0, 8), yticks=np.arange(1, 8))

plt.show()

饼图
# make data
x = [1, 2, 3, 4]

# 颜色映射, 把每片图映射上颜色
colors = plt.get_cmap('Blues')(np.linspace(0.2, 0.7, len(x)))
# plot
fig, ax = plt.subplots()
#  wedgeprops={"linewidth": 2, "edgecolor": "white"} 分割线的颜色和宽度
# frame 是否显示表格
ax.pie(x, colors=colors, radius=3, center=(4, 4),
       wedgeprops={"linewidth": 2, "edgecolor": "white"}, frame=True)

ax.set(xlim=(0, 8), xticks=np.arange(1, 8),
       ylim=(0, 8), yticks=np.arange(1, 8))

plt.show()

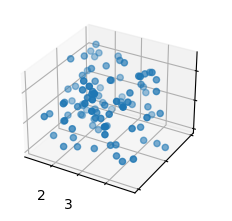
三维的散点图
# Make data
np.random.seed(19680801)
n = 100
rng = np.random.default_rng()
xs = rng.uniform(23, 32, n)
ys = rng.uniform(0, 100, n)
zs = rng.uniform(-50, -25, n)

# Plot
fig, ax = plt.subplots(subplot_kw={"projection": "3d"})
ax.scatter(xs, ys, zs)

ax.set(xticklabels=[],
       yticklabels=[],
       zticklabels=[])

plt.show()
C:\Users\23991\AppData\Local\Temp\ipykernel_14596\2969423548.py:15: UserWarning: FixedFormatter should only be used together with FixedLocator
  ax.set(xticklabels=[1,2,3],

三维平面图
from matplotlib import cm
# Make data
X = np.arange(-5, 5, 0.25)
Y = np.arange(-5, 5, 0.25)
X, Y = np.meshgrid(X, Y)
R = np.sqrt(X**2 + Y**2)
Z = np.sin(R)

# Plot the surface
fig, ax = plt.subplots(subplot_kw={"projection": "3d"})
ax.plot_surface(X, Y, Z, vmin=Z.min() * 2, cmap=cm.Blues)

ax.set(xticklabels=[],
       yticklabels=[],
       zticklabels=[])

plt.show()
