综合架构--网站搭建-- 35
环境
环境:虚拟机

ip:10.0.1.0

网关:10.0.1.2

子网掩码:255.255.255.0

测试机器ip:10.0.1.101

tips:机器不可以有nginx,所以这里建议你重新开个新机器或者克隆一个模版机
1LNMP架构是什么?
静态网站:.html   htm    jpg   mp4


动态网站: .php .jsp


L     Linux
N     nginx
M     数据库
P     php
2.lnmp部署环境搭建
2.1lnmp安装方式
1.yum方式


2.编译方式
2.2部署搭建yum--lnmp
#步骤
tips:安装时如果没有依赖包,这时就要更新一下yum源了

没有更新yum源的,可以更新一下

1. 备份
mv /etc/yum.repos.d/CentOS-Base.repo /etc/yum.repos.d/CentOS-Base.repo.backup

2. 下载新的 CentOS-Base.repo 到 /etc/yum.repos.d/

2.1各版本
centos8

wget -O /etc/yum.repos.d/CentOS-Base.repo https://mirrors.aliyun.com/repo/Centos-vault-8.5.2111.repo
或者
curl -o /etc/yum.repos.d/CentOS-Base.repo https://mirrors.aliyun.com/repo/Centos-vault-8.5.2111.repo


centos6
wget -O /etc/yum.repos.d/CentOS-Base.repo https://mirrors.aliyun.com/repo/Centos-vault-6.10.repo
或者
curl -o /etc/yum.repos.d/CentOS-Base.repo https://mirrors.aliyun.com/repo/Centos-vault-6.10.repo


CentOS 7
wget -O /etc/yum.repos.d/CentOS-Base.repo https://mirrors.aliyun.com/repo/Centos-7.repo
或者
curl -o /etc/yum.repos.d/CentOS-Base.repo https://mirrors.aliyun.com/repo/Centos-7.repo


3.各版本epel源

3.1 备份(如有配置其他epel源)
mv /etc/yum.repos.d/epel.repo /etc/yum.repos.d/epel.repo.backup
mv /etc/yum.repos.d/epel-testing.repo /etc/yum.repos.d/epel-testing.repo.backup

3.2 下载新repo 到/etc/yum.repos.d/

epel(RHEL 8)
1)安装 epel 配置包

yum install -y https://mirrors.aliyun.com/epel/epel-release-latest-8.noarch.rpm

2)将 repo 配置中的地址替换为阿里云镜像站地址
sed -i 's|^#baseurl=https://download.example/pub|baseurl=https://mirrors.aliyun.com|' /etc/yum.repos.d/epel*
sed -i 's|^metalink|#metalink|' /etc/yum.repos.d/epel*


epel(RHEL 7)

wget -O /etc/yum.repos.d/epel.repo https://mirrors.aliyun.com/repo/epel-7.repo


epel(RHEL 6) (epel6官方源已下线,建议切换epel-archive源)

wget -O /etc/yum.repos.d/epel.repo https://mirrors.aliyun.com/repo/epel-archive-6.repo


4.更新缓存和软件
yum clean all
yum makecache
yum update


tips:建议在这里设置一下虚拟机快照,不然每次都要这样,会很耽误时间


#1.  安装nginx
yum install epel-release -y
yum install nginx -y
[root@node-1 ~]# systemctl start nginx.service
[root@node-1 ~]# systemctl status nginx.service  看一下状态
[root@node-1 ~]# systemctl enable nginx.service   开机自启动

#2. 安装开发包
yum -y install ntp make openssl openssl-devel pcre pcre-devel libpng libpng-devel libjpeg-6b libjpeg-devel-6b freetype freetype-devel gd gd-devel zlib zlib-devel gcc gcc-c++ libXpm libXpm-devel ncurses ncurses-devel libmcrypt libmcrypt-devel libxml2 libxml2-devel imake autoconf automake screen sysstat compat-libstdc++-33 curl curl-devel

#3.  安装数据库

# wget http://dev.mysql.com/get/mysql-community-release-el7-5.noarch.rpm
#rpm -ivh mysql-community-release-el7-5.noarch.rpm
# yum -y install mysql-community-server


[root@node-1 ~]#systemctl start mysql
[root@node-1 ~]#systemctl status mysql     看一下状态
[root@node-1 ~]# systemctl start mysql.service  设置自启动


#3.1设置MySQL root账户的密码
tips:如果你有就不用设置了


为root账户设置密码
[root@node-1 ~]#mysql_secure_installation  #初始化MySQL
Enter current password for root (enter for none):   <---输入现在的root密码,因为我们还没设置,直接回车
Set root password? [Y/n] Y                                    <---是否设定root密码,当然设置了,输入Y回车
New password:                                                      <---输入root密码,并回车,输入的过程中不会有任何显示
Re-enter new password:                                        <---再次输入root密码,并回车,输入的过程中不会有任何显示
Remove anonymous users? [Y/n] Y                      <---是否删除匿名用户,删除,输入Y回车
Disallow root login remotely? [Y/n] Y                     <---是否删禁止root用户远程登录,当然禁止,输入Y回车
Remove test database and access to it? [Y/n]      <---是否删除测试数据库test,看个人喜好
Reload privilege tables now? [Y/n] Y                    <---刷新权限,输入Y回车
最后出现:Thanks for using MySQL!
MySql密码设置完成,重新启动 MySQL:


tips:数据库密码一般设置就比较复杂的,在生产环境中,不过这里就不设置复杂的了,直接123

#4. 安装php
 yum -y install php php-cli php-mysql php-gd php-imap php-ldap php-odbc php-pear php-xml php-xmlrpc php-mbstring php-mcrypt php-mssql php-snmp php-soap


#4.2  安装php扩展支持mysql
 [root@node-1 ~]# yum install  php-tidy php-common php-devel php-fpm php-mysql -y
[root@node-1 ~]# systemctl start php-fpm.service
[root@node-1 ~]# systemctl status php-fpm.service
[root@node-1 ~]# systemctl enable php-fpm.service   设置自启动


tips:有一个9000端口代表php启动了
[root@node-1 www]# ss -tulpn
Netid State      Recv-Q Send-Q      Local Address:Port                     Peer Address:Port
tcp   LISTEN     0      128             127.0.0.1:9000                                *:*


#4.1配置nginx

进入nginx 配置文件目录
tips:由于我们是yum安装的,所以配置文件都在etc下面,如果这个conf.d这个文件夹,可以新建一下,再进去创建www.conf配置文件,将内容填充进去


cd /etc/nginx/conf.d

vi www.conf 添加如下


server {
       listen        80;
       server_name   www.it.com;
       location  / {
         root  /html/www;         #发布目录
         index index.html index.php;
       }
location ~ \.php$ {
 fastcgi_pass   127.0.0.1:9000;
 fastcgi_index  index.php;
fastcgi_param SCRIPT_FILENAME /html/www$fastcgi_script_name;                                      #修改成发布目录
include        fastcgi_params;
}
    }


#可能会遇到的问题
如果多域名配置没有打开 ,在这/etc/nginx/conf.d新建配置是不会生效的

在 vi /etc/nginx/nginx.conf配置文件需要有这个配置文件才会生效 检查下
include /etc/nginx/conf.d/*.conf;
配置文件详细内容
cd /etc/nginx/
vim nginx.conf


[root@node-1 nginx]# vim nginx.conf

# For more information on configuration, see:
#   * Official English Documentation: http://nginx.org/en/docs/
#   * Official Russian Documentation: http://nginx.org/ru/docs/

user nginx;
worker_processes auto;
error_log /var/log/nginx/error.log;
pid /run/nginx.pid;

# Load dynamic modules. See /usr/share/doc/nginx/README.dynamic.
include /usr/share/nginx/modules/*.conf;    重点就是这个位置


#5.发布测试页测试是否ok
tips:如果没有这个目录自己新建一下mkdir -p /html/www

cd  /html/www

vi index.php

将以下内容填充进去


<?php
        phpinfo();
?>


效果图如下
 ****
****
2.3编译安装LNMP---重点
环境:虚拟机
ip:10.0.1.0
网关:10.0.1.2
子网掩码:255.255.255.0
测试机器ip:10.0.1.102
tips:机器不可以有nginx,所以这里建议你重新开个新机器或者克隆一个模版机
#步骤
tips:安装时如果没有依赖包,这时就要更新一下yum源了
没有更新yum源的,可以更新一下
1. 备份
mv /etc/yum.repos.d/CentOS-Base.repo /etc/yum.repos.d/CentOS-Base.repo.backup
2. 下载新的 CentOS-Base.repo 到 /etc/yum.repos.d/
2.1各版本
centos8
wget -O /etc/yum.repos.d/CentOS-Base.repo https://mirrors.aliyun.com/repo/Centos-vault-8.5.2111.repo
或者
curl -o /etc/yum.repos.d/CentOS-Base.repo https://mirrors.aliyun.com/repo/Centos-vault-8.5.2111.repo
centos6
wget -O /etc/yum.repos.d/CentOS-Base.repo https://mirrors.aliyun.com/repo/Centos-vault-6.10.repo
或者
curl -o /etc/yum.repos.d/CentOS-Base.repo https://mirrors.aliyun.com/repo/Centos-vault-6.10.repo
CentOS 7
wget -O /etc/yum.repos.d/CentOS-Base.repo https://mirrors.aliyun.com/repo/Centos-7.repo
或者
curl -o /etc/yum.repos.d/CentOS-Base.repo https://mirrors.aliyun.com/repo/Centos-7.repo
3.各版本epel源
3.1 备份(如有配置其他epel源)
mv /etc/yum.repos.d/epel.repo /etc/yum.repos.d/epel.repo.backup
mv /etc/yum.repos.d/epel-testing.repo /etc/yum.repos.d/epel-testing.repo.backup
3.2 下载新repo 到/etc/yum.repos.d/
epel(RHEL 8)
1)安装 epel 配置包
yum install -y https://mirrors.aliyun.com/epel/epel-release-latest-8.noarch.rpm
2)将 repo 配置中的地址替换为阿里云镜像站地址
sed -i 's|^#baseurl=https://download.example/pub|baseurl=https://mirrors.aliyun.com|' /etc/yum.repos.d/epel*
sed -i 's|^metalink|#metalink|' /etc/yum.repos.d/epel*
epel(RHEL 7)
wget -O /etc/yum.repos.d/epel.repo https://mirrors.aliyun.com/repo/epel-7.repo
epel(RHEL 6) (epel6官方源已下线,建议切换epel-archive源)
wget -O /etc/yum.repos.d/epel.repo https://mirrors.aliyun.com/repo/epel-archive-6.repo
4.更新缓存和软件
yum clean all
yum makecache
yum update
tips:建议在这里设置一下虚拟机快照,不然每次都要这样,会很耽误时间
编译安装--lnmp
1.1#安装一下gcc编译工具和依赖
yum -y install pcre-devel openssl-devel zlib-devel gcc
1.2#创建用户组和设置此用户组不可以登录(如果你有了,就不用创建了)
groupadd nginx
useradd -g nginx -s /sbin/nologin nginx
1.3#解压一下(一般你自己选个解压目录,便于管理和配置)
切换到解压后的nginx目录中执行:
cd /usr/local/src
wget http://nginx.org/download/nginx-1.18.0.tar.gz
解压压缩包
tar zxvf nginx-1.18.0.tar.gz (解压)
tar zcvf nginx-1.18.0.tar.gz (压缩)
1.4#编译一下他的用户和所属组以及配置安装路径--生成马克file文件
./configure --user=nginx --group=nginx --prefix=/usr/local/nginx --with-http_ssl_module --with-http_stub_status_module
注解:
您提供的命令是对 ./configure 脚本的调用,该脚本通常位于采用 GNU Autotools 构建系统的软件项目源代码目录中。这个脚本用于为项目的编译和安装做前期准备,根据用户提供的配置选项生成相应的 Makefile 文件。具体到您给出的命令:
[root@node-1 ~]
./configure --user=nginx --group=nginx --prefix=/usr/local/nginx \
--with-http_ssl_module --with-http_stub_status_module
各个选项含义如下:
- --user=nginx: 指定编译安装后,Nginx 服务运行时所属的系统用户为 nginx。这意味着当 Nginx 服务启动时,将以 nginx 用户的身份运行。
- --group=nginx: 指定编译安装后,Nginx 服务运行时所属的系统组为 nginx。这意味着当 Nginx 服务启动时,将以 nginx 组的成员身份运行。
- --prefix=/usr/local/nginx: 设置 Nginx 的安装目录为 /usr/local/nginx。这意味着编译完成后,Nginx 的可执行文件、配置文件、库文件、文档等将被安装到这个路径下。例如,Nginx 主程序通常会被安装到 /usr/local/nginx/sbin/nginx,配置文件则位于 /usr/local/nginx/conf/nginx.conf。
- --with-http_ssl_module: 启用 SSL/TLS 支持模块。配置此项后,编译出的 Nginx 将具备处理 HTTPS 请求的能力,允许网站提供安全的加密通信。
- --with-http_stub_status_module: 启用 stub_status 模块。该模块提供了一个简单的 HTTP 接口,可以用来查询 Nginx 服务器的基本状态信息,如当前活动连接数、处理过的请求总数等。这对于监控 Nginx 服务器的运行状态非常有用。
执行以上命令后,./configure 脚本将检查系统环境,确认依赖项是否满足,并根据指定的选项生成相应的 Makefile。接下来,用户通常会执行 make 命令编译源代码,然后执行 make install 命令将编译好的程序安装到指定的位置。这样,一个带有 SSL 支持和 stub_status 模块的 Nginx 服务器就安装完成了,并将以 nginx 用户和组的身份运行。
make
make install
启动nginx:/usr/local/nginx/sbin/nginx
关闭nginx:/usr/local/nginx/sbin/nginx -s stop
检查nginx 是否异常:/usr/local/nginx/sbin/nginx -t
重启nginx: nginx -s reload
1.5#定义一下软连接(提高效率)
每次都需要输入路径才可以重启 检查等操作比较繁琐
用软连接定义
ln -s /usr/local/nginx/sbin/nginx /bin/nginx
这样就可以了
启动 : nginx
停止:nginx -t stop
重启 : nginx -s reload
检查: nginx -t
1.6 #编译php环境
cd /usr/local/src/
rz命令上传
#tips:这里上传php的源码包
tar zxvf php-7.2.29.tar.gz
cd ./php-7.3.9
#tips:编译安装
./configure --prefix=/usr/local/php --exec-prefix=/usr/local/php --with-mysqli --with-pdo-mysql --with-gd --bindir=/usr/local/php/bin --sbindir=/usr/local/php/sbin --includedir=/usr/local/php/include --libdir=/usr/local/php/lib/php --mandir=/usr/local/php/php/man --with-config-file-path=/usr/local/php/etc --with-openssl --enable-mbstring --enable-fpm
make && make install #编译 编译安装
cp php.ini-production /usr/local/php/etc/php.ini
cp sapi/fpm/init.d.php-fpm /etc/init.d/php-fpm
chmod +x /etc/init.d/php-fpm
cp /usr/local/php/etc/php-fpm.conf.default /usr/local/php/etc/php-fpm.conf
cp /usr/local/php/etc/php-fpm.d/www.conf.default /usr/local/php/etc/php-fpm.d/www.conf
ln -s /usr/local/php/bin/php /usr/local/bin
echo -e "\033[31m php部署成功 \033[0m"
启动php: /etc/init.d/php-fpm start
使用netstat -tuln 查看 如果有 9000 端口就是正常
1.7 安装数据库
#tips:这里就用这个yum安装吧 ,编译MySQL耗时间
wget http://dev.mysql.com/get/mysql-community-release-el7-5.noarch.rpm
rpm -ivh mysql-community-release-el7-5.noarch.rpm
yum -y install mysql-community-server
[root@node-1 ~]#systemctl start mysql
[root@node-1 ~]#systemctl status mysql 看一下状态
[root@node-1 ~]# systemctl start mysql.service 设置自启动
ss -tulpn |grep mysql
数据库接口 3306
为root账户设置数据库密码
[root@node-1 ~]#mysql_secure_installation #初始化MySQL
Enter current password for root (enter for none): <---输入现在的root密码,因为我们还没设置,直接回车
Set root password? [Y/n] Y <---是否设定root密码,当然设置了,输入Y回车
New password: <---输入root密码,并回车,输入的过程中不会有任何显示
Re-enter new password: <---再次输入root密码,并回车,输入的过程中不会有任何显示
Remove anonymous users? [Y/n] Y <---是否删除匿名用户,删除,输入Y回车
Disallow root login remotely? [Y/n] Y <---是否删禁止root用户远程登录,当然禁止,输入Y回车
Remove test database and access to it? [Y/n] <---是否删除测试数据库test,看个人喜好
Reload privilege tables now? [Y/n] Y <---刷新权限,输入Y回车
最后出现:Thanks for using MySQL!
MySql密码设置完成,重新启动 MySQL:
tips:数据库密码一般设置就比较复杂的,在生产环境中,不过这里就不设置复杂的了,直接123
mysql -uroot -p"123" #创建一个root账户的数据库密码
create database wordpress; #新建一个数据库
show databases; #查看一下是否存在
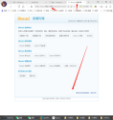
1.8#修改nginx配置文件
cd /usr/local/nginx/conf
打开 多域名配置如下:
vi /usr/local/nginx/conf/nginx.conf
参考这个配置文件
[root@web3 conf]#cat nginx.conf
worker_processes 1;
events {
worker_connections 1024;
}
http {
include mime.types;
default_type application/octet-stream;
sendfile on;
keepalive_timeout 65;
server {
listen 81;
server_name localhost;
location / {
root html;
index index.html index.htm;
}
error_page 500 502 503 504 /50x.html;
location = /50x.html {
root html;
}
}
include /usr/local/nginx/conf/vhost/*.conf;
}
重启nginx
在cd /usr/local/nginx/conf/vhost 目录新建配置文件
vi www.conf 添加如下
server {
listen 80;
server_name www.it.com localhost;
location / {
root /html/www;
index index.html index.php;
}
location ~ \.php$ {
fastcgi_pass 127.0.0.1:9000;
fastcgi_index index.php;
#fastcgi_param SCRIPT_FILENAME /html/www$fastcgi_script_name;
fastcgi_param SCRIPT_FILENAME /html/www$fastcgi_script_name;
include fastcgi_params; }
}
nginx -t 检查一下
nginx -s relaod 重启启动nginxls
#!/bin/[root@node-1 ~]
yum install -y gcc gcc-c++ make zlib zlib-devel pcre pcre-devel
yum install -y libjpeg libjpeg-devel libpng libpng-devel freetype freetype-devel libxml2 libxml2-devel
yum install -y glibc glibc-devel glib2 glib2-devel bzip2 bzip2-devel ncurses ncurses-devel curl curl-devel
yum install -y e2fsprogs e2fsprogs-devel krb5 krb5-devel openssl openssl-devel openldap openldap-devel nss_ldap openldap-clients openldap-servers
1.9 # 检查测试一下php
vi index.php
<?php
phpinfo();
?>
nginx -t
nginx -s reload
或者
/usr/local/nginx/sbin/nginx -s reload
查看index.php页面显示
http://10.0.1.102
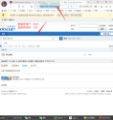
2.0 #测试php和mysql是否成功测试
vim test_mysql.php
<?php
$servername = "localhost";
$username = "root";
$password = "oldboy123";
//$link_id=mysql_connect('主机名','用户','密码');
//mysql -u用户 -p密码 -h 主机
$conn = mysqli_connect($servername, $username, $password);
if ($conn) {
echo "mysql successful by root !\n";
}else{
die("Connection failed: " . mysqli_connect_error());
}
?>
Nginx访问PHP文件的File not found错误处理,两种情况
转载 2017年05月09日 14:05:27
标签:
php /
nginx
这个错误很常见,原有有下面两种几种
php-fpm找不到SCRIPT_FILENAME里执行的php文件
php-fpm不能访问所执行的php,也就是权限问题
第一种情况
更改配置文件nginx.conf
fastcgi_param SCRIPT_FILENAME /scripts$fastcgi_script_name;
替换成下面
fastcgi_param SCRIPT_FILENAME $document_root$fastcgi_script_name;
然后重新加载nginx配置文件
/etc/init.d/nginx reload
#tips:如果你开启了多域名的话,可能出现你的ip只会访问某一个发布目录下的网页,因为我们在主配置文件里设置了多域名引用,那么多域名引用,你用ip去访问只能显示一个,所以我么需要设置域名解析,来帮助我们识别每个网站。
如果你只能用ip访问,就需要站是把其他网站的配置文件删掉,做个备份,只用一个测试网站的配置文件
发布一个博客
1.#切换到发布目录下
cd /html/www
rz 上传你的源码包
tar 格式
tar zxvf 源码包 解压
tar zcvf 源码包 压缩
zip 格式
unzip 源码包
#tips1:上传的是zip格式的,就需要安装yum -y install unzip 来解压
#tips2:不要忘了你的nginx配置目录要配置正确的发布目录,否则会报403错误
2.配置nginx.conf ---发布目录
cd /usr/local/nginx/conf/vhost/
ls
vim www.conf
3.安装论坛
tips:如果输入ip地址或者域名无法跳转的的话,那就复制下面我这段地址,把其他的ip地址替换你自己的就可以了或者域名
http://10.0.1.102/upload/install/
chmod -R 777 upload/ #给一下权限,如果不给的话,目录文件权限会检查到的,安装会出问题
#温馨小提示
如果出现无法连接数据库,在数据库服务器哪里输入127.0.0.1,就可以了
效果如下图
2.4 nginx和php如何建立关系?
server {
       listen        80;
       server_name   www.it.com;
       location  / {
         root  /html/www;         #发布目录
         index index.html index.php;
       }
location ~ \.php$ {
 fastcgi_pass   127.0.0.1:9000;
 fastcgi_index  index.php;
fastcgi_param SCRIPT_FILENAME /html/www$fastcgi_script_name;                                      #修改成发布目录
include        fastcgi_params;
}
    }


1. `listen 80;` 指令表示服务器监听80端口的HTTP请求。
2. `server_name www.it.com;` 指定该服务器块服务于域名`www.it.com`。
3. 第一个 `location / { ... }` 块定义了对根路径 (`/`) 的请求处理:
   - `root /html/www;` 指定静态资源(如HTML、CSS、JavaScript等)的根目录为 `/html/www`。
   - `index index.html index.php;` 指定默认文档列表,当访问目录时,会首先尝试提供这些文件。

4. 第二个 `location ~ \.php$ { ... }` 块定义了对PHP脚本的处理规则:
   - `fastcgi_pass 127.0.0.1:9000;` 指定FastCGI服务器的地址和端口,这里是本地监听9000端口的PHP-FPM服务。
   - `fastcgi_index index.php;` 指定默认的PHP脚本文件名。
   - `fastcgi_param SCRIPT_FILENAME /html/www$fastcgi_script_name;` 设置传递给FastCGI服务器的SCRIPT_FILENAME参数,这里的值是发布目录加上请求的PHP脚本文件名。
   - `include fastcgi_params;` 包含了Nginx默认的FastCGI参数设置。

综上所述,当用户访问`www.it.com`时,Nginx会根据请求类型将静态文件请求转发到`/html/www`目录,而PHP脚本请求则会通过FastCGI协议发送给本地的PHP-FPM服务进行处理。
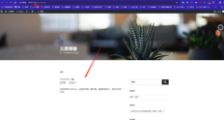
3.发布一个论坛代码上线
#步骤


#1.找代码(论坛代码包)


tips :安装一下unzip解压一下这个上传的压缩包,因为我这里上传的是zip的格式压缩包,所以tar这个是不能解压的,只能用其他支持zip解压的工具,yum -y install unzip


#2.发布目录上传代码包
cd /html/www

rz


#3.安装论坛
tips:如果输入ip地址或者域名无法跳转的的话,那就复制下面我这段地址,把其他的ip地址替换你自己的就可以了或者域名


http://10.0.1.101/upload/install/

chmod -R 777 upload/      #给一下权限,如果不给的话,目录文件权限会检查到的,安装会出问题


效果图如下
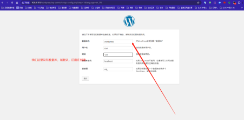
4.发布一个博客
#步骤


#1.找代码(论坛代码包)


tips :安装一下unzip解压一下这个上传的压缩包,因为我这里上传的是zip的格式压缩包,所以tar这个是不能解压的,只能用其他支持zip解压的工具,yum -y install unzip


#2.发布目录上传代码包
cd /html/www

rz


#3.安装博客
tips:如果输入ip地址或者域名无法跳转的的话,那就复制下面我这段地址,把其他的ip地址替换你自己的就可以了或者域名


http://10.0.1.101/wordpress/wp-admin/setup-config.php

chmod -R 777 wordpress/      #给一下权限,如果不给的话,目录文件权限会检查到的,安装会出问题


#tips:如果提示无法链接数据可库,这里可以自己创建个数据库

mysql -uroot -p"123"

create database  wordpress;    #新建一个数据库

show databases;    #查看一下是否存在


效果图如下