第四章-黑马商城项目拆分
环境准备
linux
将linux_environment中Mysql镜像的初始化脚本、配置上传至Linux,并创建docker网络和MySQL容器:
# 创建网络
docker network create hm-net

# 创建MySQL容器
docker run -d --name mysql \
-p 3306:3306 \
-e TZ=Asia/Shanghai \
-e MYSQL_ROOT_PASSWORD=root \
-v /root/mysql/data:/var/lib/mysql \
-v /root/mysql/conf:/etc/mysql/conf.d \
-v /root/mysql/init:/docker-entrypoint-initdb.d \
--network hm-net \
mysql
后端环境
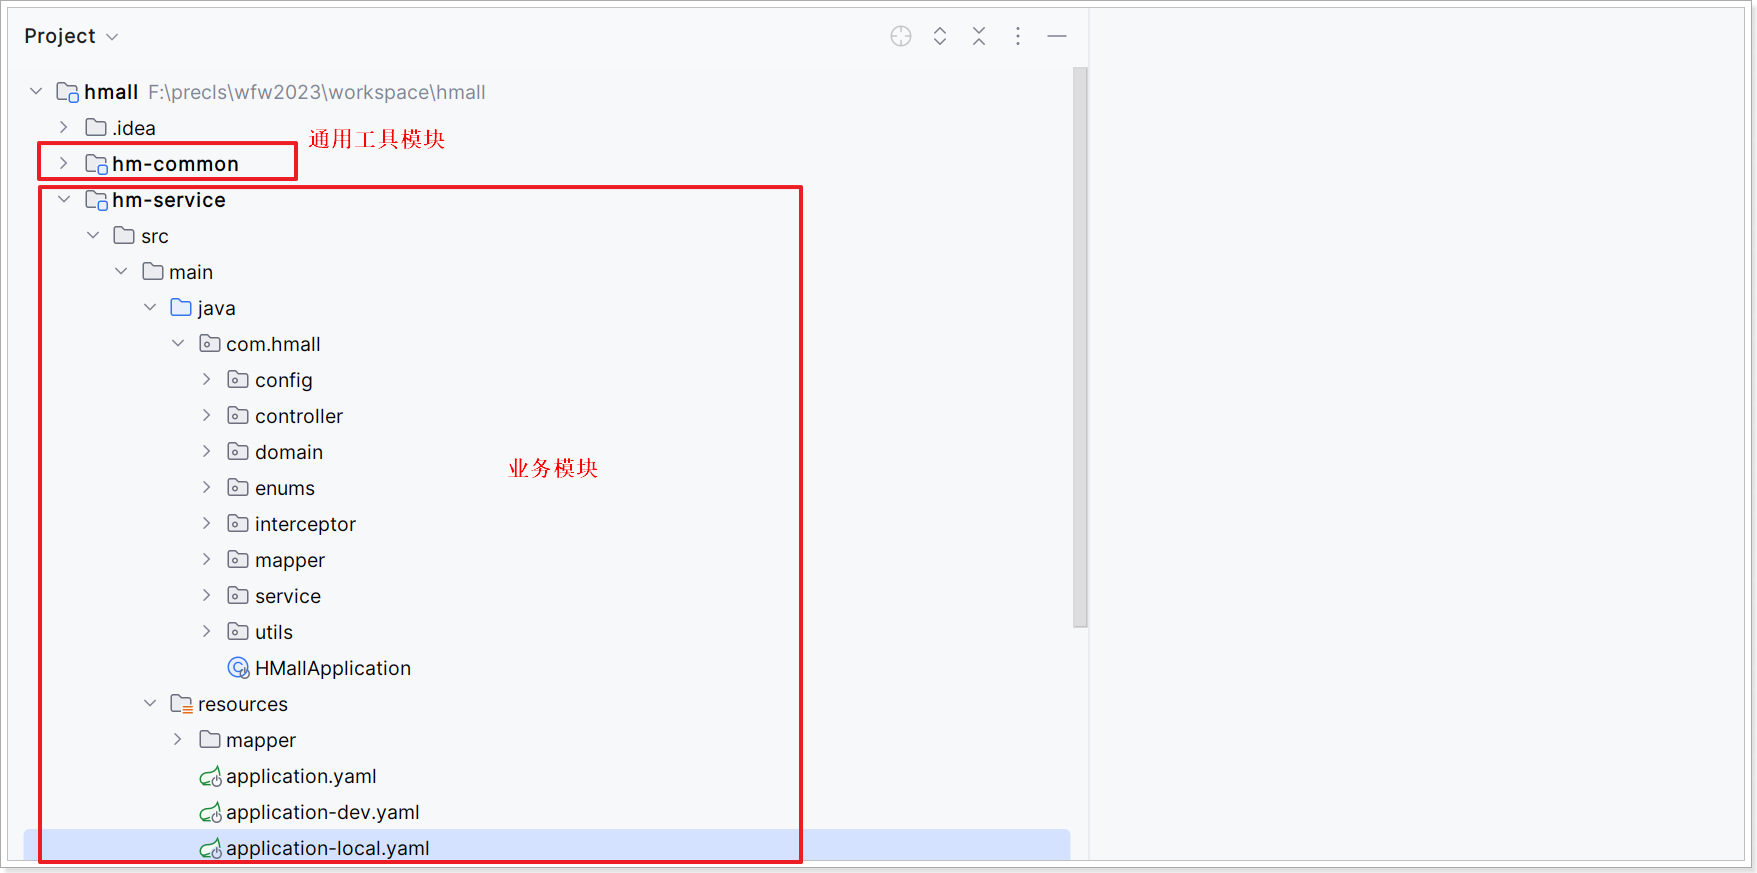
打开/hmall工程,该工程是聚合工程,有两个子模块:
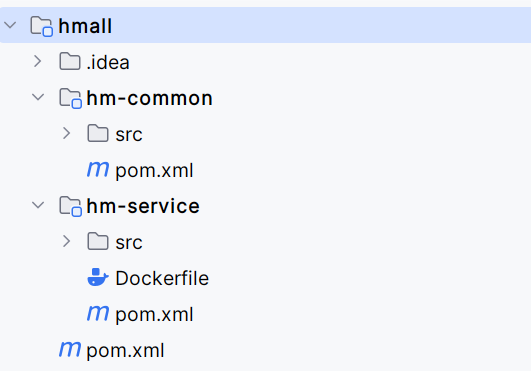
并且微服务环境在父工程hmall中指定:
<modules>
    <module>hm-common</module>
    <module>hm-service</module>
</modules>

<parent>
    <groupId>org.springframework.boot</groupId>
    <artifactId>spring-boot-starter-parent</artifactId>
    <version>2.7.12</version>
    <relativePath/>
</parent>

<properties>
    <maven.compiler.source>11</maven.compiler.source>
    <maven.compiler.target>11</maven.compiler.target>
    <project.build.sourceEncoding>UTF-8</project.build.sourceEncoding>
    <project.reporting.outputEncoding>UTF-8</project.reporting.outputEncoding>
    <org.projectlombok.version>1.18.20</org.projectlombok.version>
    <spring-cloud.version>2021.0.3</spring-cloud.version>
    <spring-cloud-alibaba.version>2021.0.4.0</spring-cloud-alibaba.version>
    <mybatis-plus.version>3.4.3</mybatis-plus.version>
    <hutool.version>5.8.11</hutool.version>
    <mysql.version>8.0.23</mysql.version>
</properties>

<!-- 对依赖包进行管理 -->
<dependencyManagement>
    <dependencies>
        <!--spring cloud-->
        <dependency>
            <groupId>org.springframework.cloud</groupId>
            <artifactId>spring-cloud-dependencies</artifactId>
            <version>${spring-cloud.version}</version>
            <type>pom</type>
            <scope>import</scope>
        </dependency>
        <!--spring cloud alibaba-->
        <dependency>
            <groupId>com.alibaba.cloud</groupId>
            <artifactId>spring-cloud-alibaba-dependencies</artifactId>
            <version>${spring-cloud-alibaba.version}</version>
            <type>pom</type>
            <scope>import</scope>
        </dependency>
        <!-- 数据库驱动包管理 -->
        <dependency>
            <groupId>mysql</groupId>
            <artifactId>mysql-connector-java</artifactId>
            <version>${mysql.version}</version>
        </dependency>
        <!-- mybatis plus 管理 -->
        <dependency>
            <groupId>com.baomidou</groupId>
            <artifactId>mybatis-plus-boot-starter</artifactId>
            <version>${mybatis-plus.version}</version>
        </dependency>
        <!--hutool工具包-->
        <dependency>
            <groupId>cn.hutool</groupId>
            <artifactId>hutool-all</artifactId>
            <version>${hutool.version}</version>
        </dependency>
    </dependencies>
</dependencyManagement>
<dependencies>
    <!-- lombok 管理 -->
    <dependency>
        <groupId>org.projectlombok</groupId>
        <artifactId>lombok</artifactId>
        <version>${org.projectlombok.version}</version>
    </dependency>
    <!--单元测试-->
    <dependency>
        <groupId>org.springframework.boot</groupId>
        <artifactId>spring-boot-starter-test</artifactId>
        <scope>test</scope>
    </dependency>
</dependencies>
在后续使用微服务组件时就不必单独指定版本了,当前hmall的版本是2021.0.x。
查看hmall-service下的application.yml文件:
server:
  port: 8080
spring:
  application:
    name: hm-service
  profiles:
    active: dev
  datasource:
    url: jdbc:mysql://${hm.db.host}:3306/hmall?useUnicode=true&characterEncoding=UTF-8&autoReconnect=true&serverTimezone=Asia/Shanghai
    driver-class-name: com.mysql.cj.jdbc.Driver
    username: root
    password: ${hm.db.pw}
mybatis-plus:
  configuration:
    default-enum-type-handler: com.baomidou.mybatisplus.core.handlers.MybatisEnumTypeHandler
  global-config:
    db-config:
      update-strategy: not_null
      id-type: auto
logging:
  level:
    com.hmall: debug
  pattern:
    dateformat: HH:mm:ss:SSS
  file:
    path: "logs/${spring.application.name}"
knife4j:
  enable: true
  openapi:
    title: 黑马商城接口文档
    description: "黑马商城接口文档"
    email: [email protected]
    concat: itheima
    url: https://www.itcast.cn
    version: v1.0.0
    group:
      default:
        group-name: default
        api-rule: package
        api-rule-resources:
          - com.hmall.controller
hm:
  jwt:
    location: classpath:hmall.jks
    alias: hmall
    password: hmall123
    tokenTTL: 30m
  auth:
    excludePaths:
      - /search/**
      - /users/login
      - /items/**
      - /hi
其中指定激活dev环境文件,dev和local:
# application-dev.yml
hm:
  db:
    host: mysql
    pw: root
# application-local.yml
hm:
  db:
    host: 192.168.52.168 # 修改为你自己的虚拟机IP地址
    pw: root # 修改为docker中的MySQL密码
我们当前是本地环境,需要修改edit-config的active profiles为local
启动项目访问测试 http://localhost:8080/hi

前端环境
资料中还提供了一个hmall-nginx的目录,就是一个nginx程序以及前端代码,复制到非中文无空格的目录下,[[03-Nginx#启动|启动Nginx]]
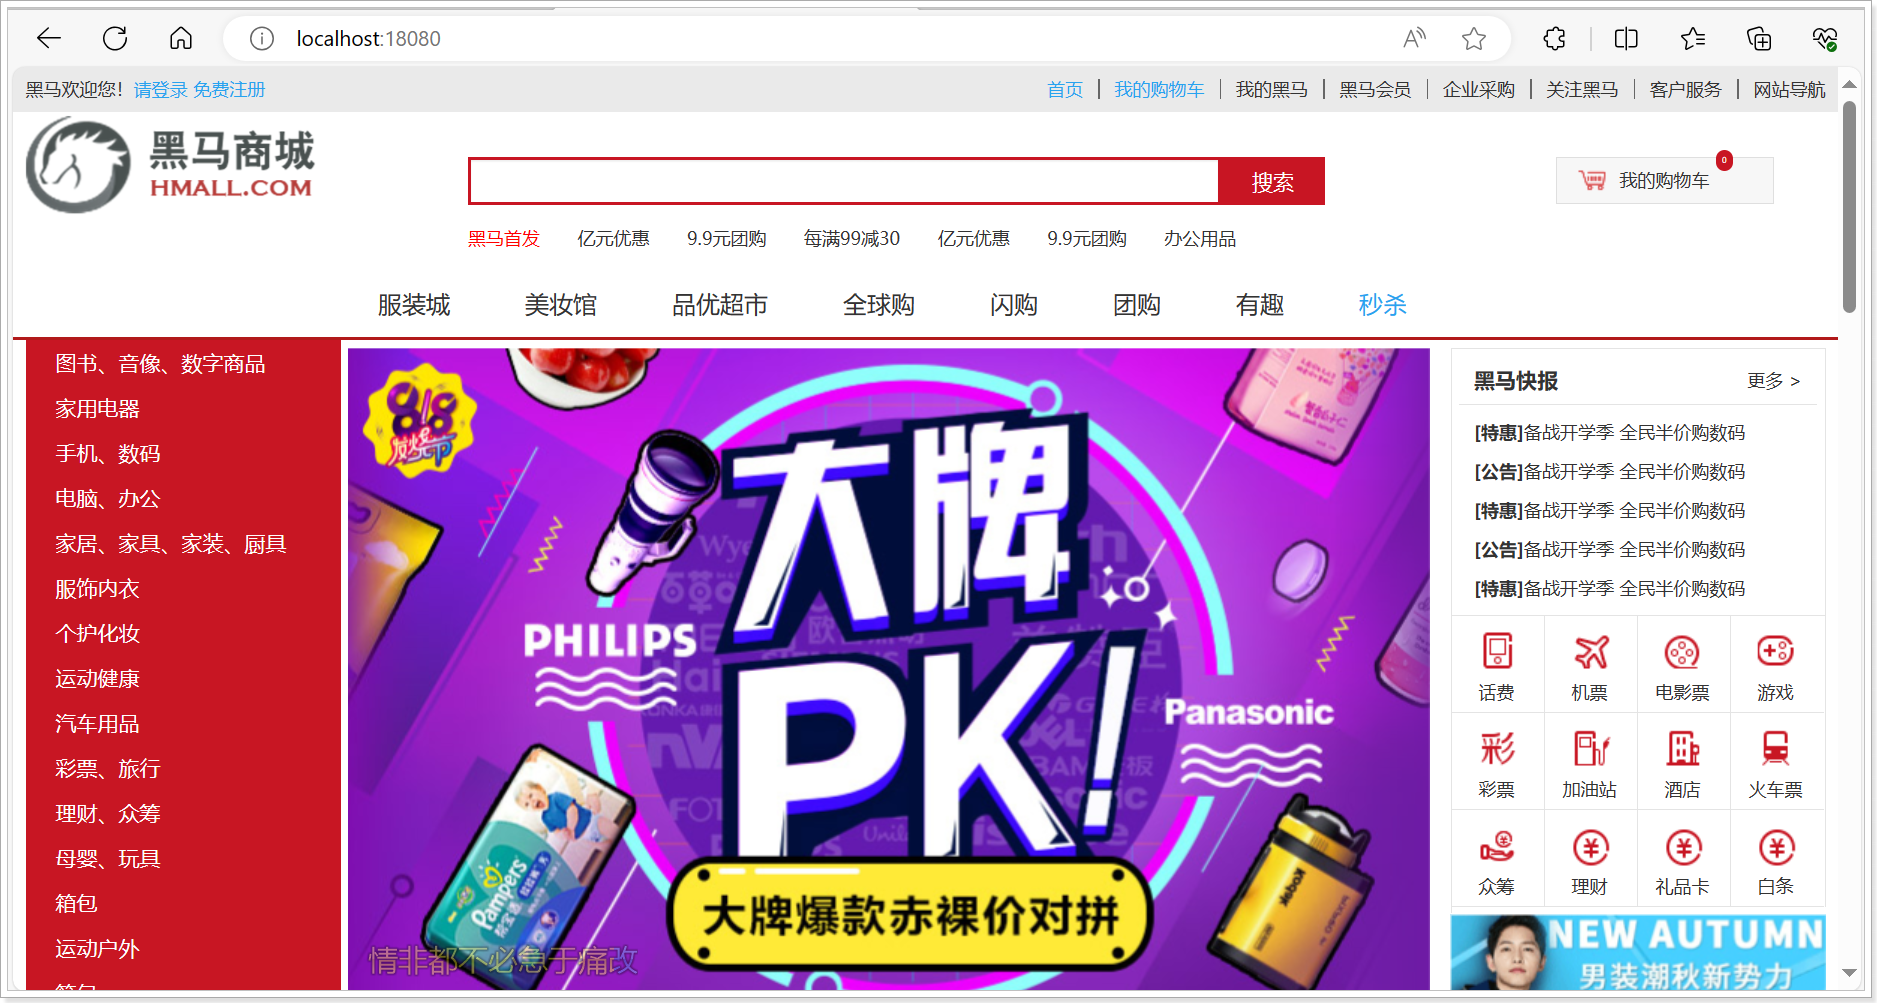
启动成功后,访问http://localhost:18080,应该能看到我们的门户页面:
熟悉hamll项目
登录
登录的业务流程:
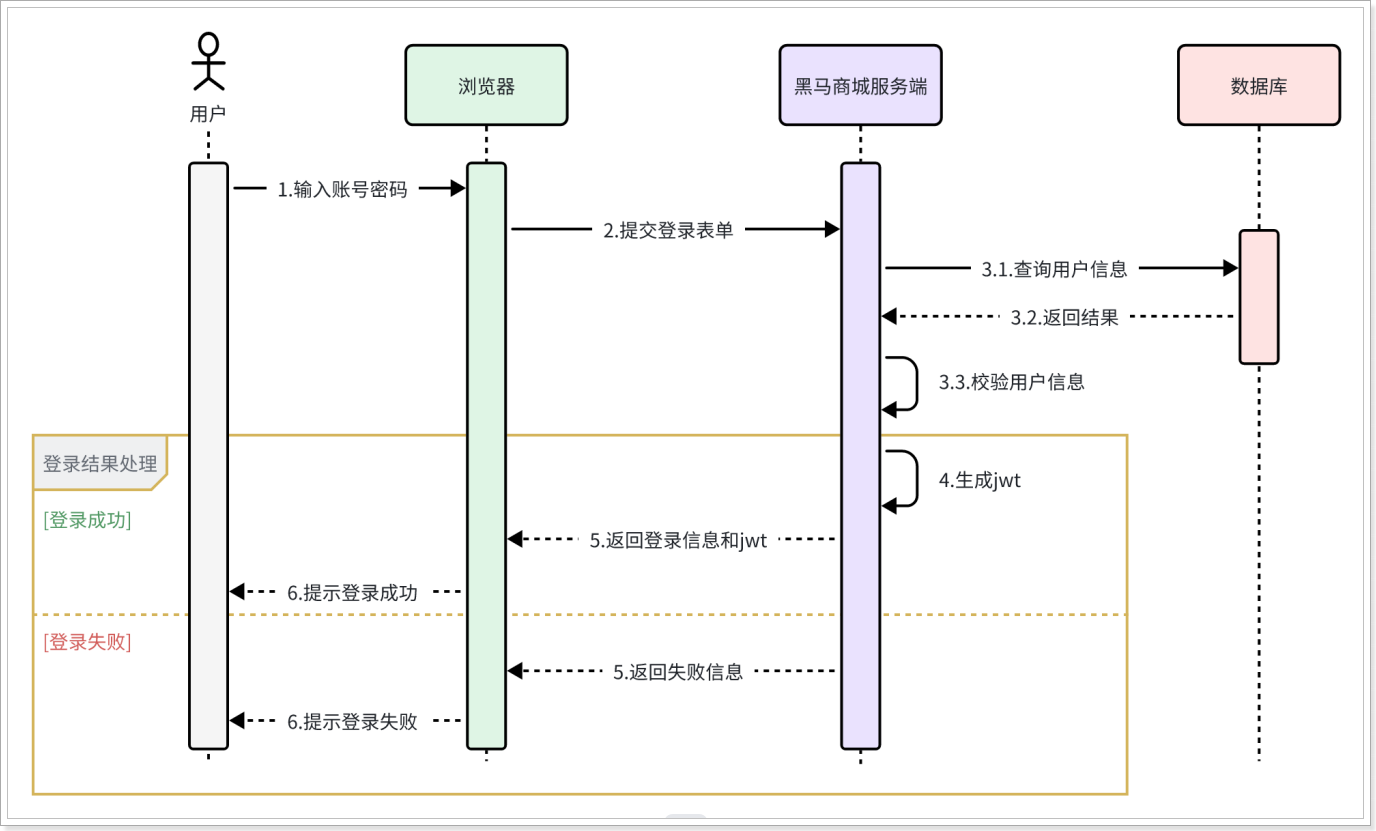
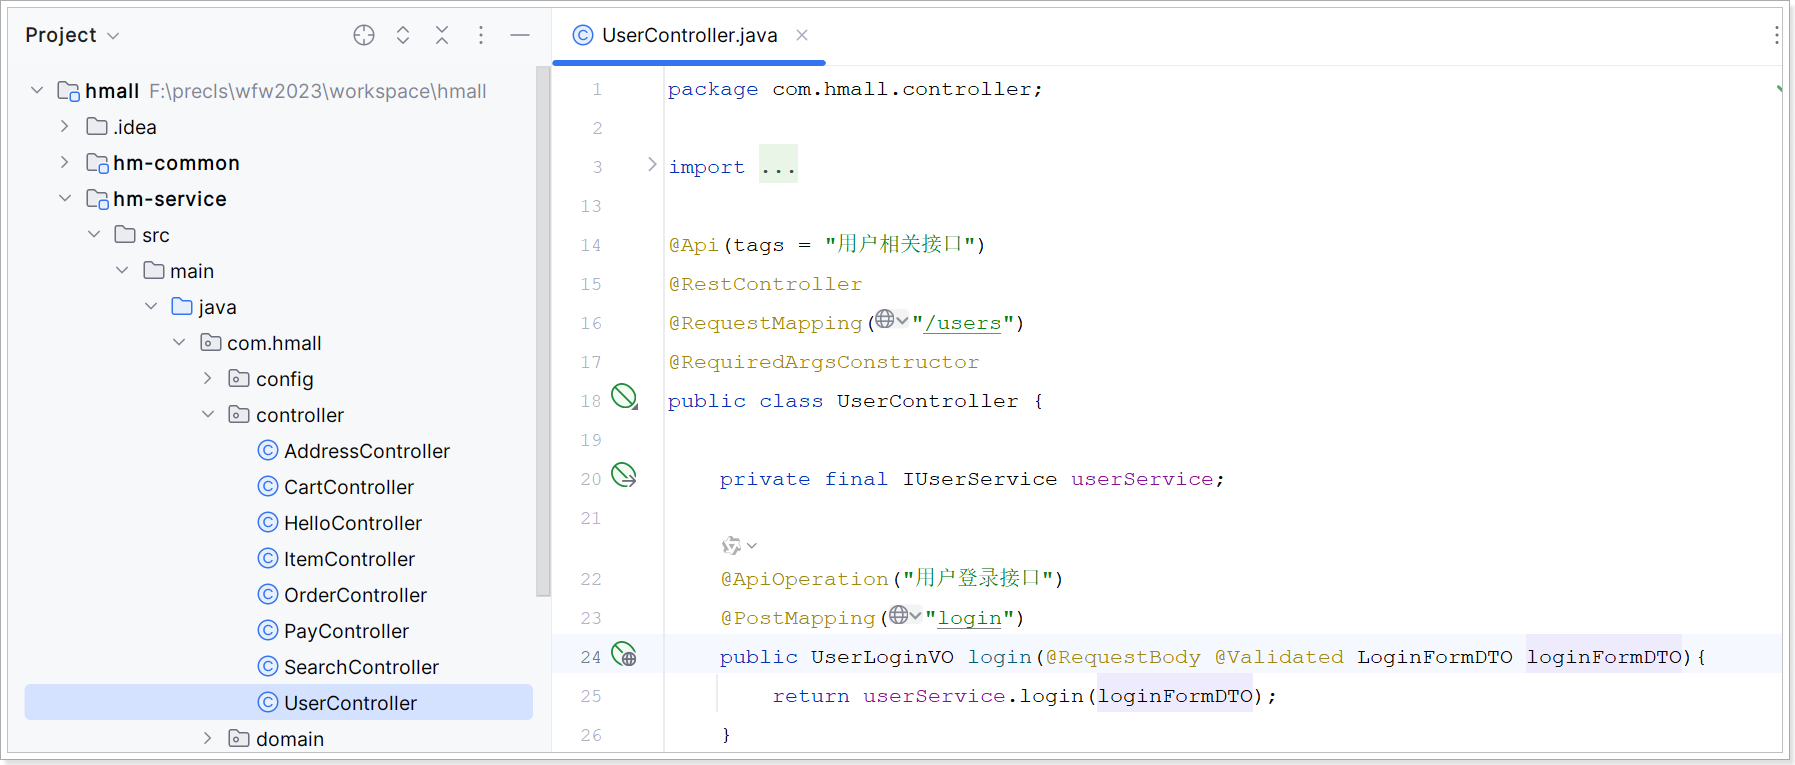
登录入口在com.hmall.controller.UserController中的login方法:
商品服务
分页查询:
在首页搜索框输入关键字,点击搜索即可进入搜索列表页面:
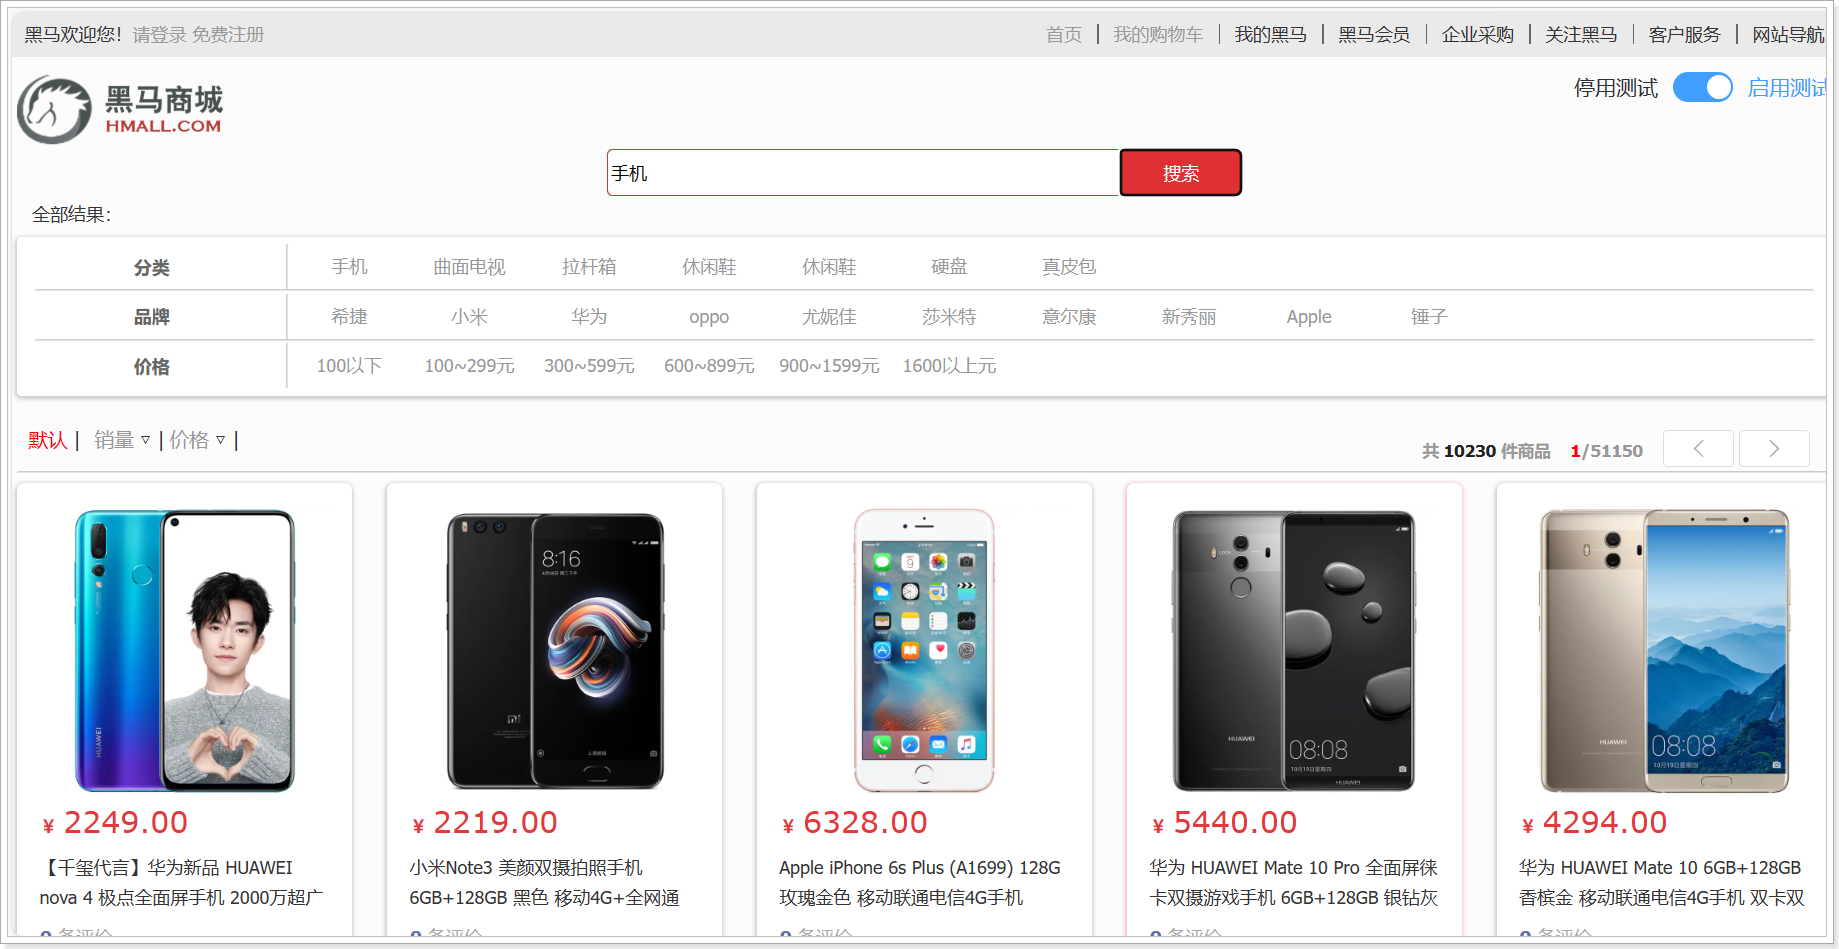
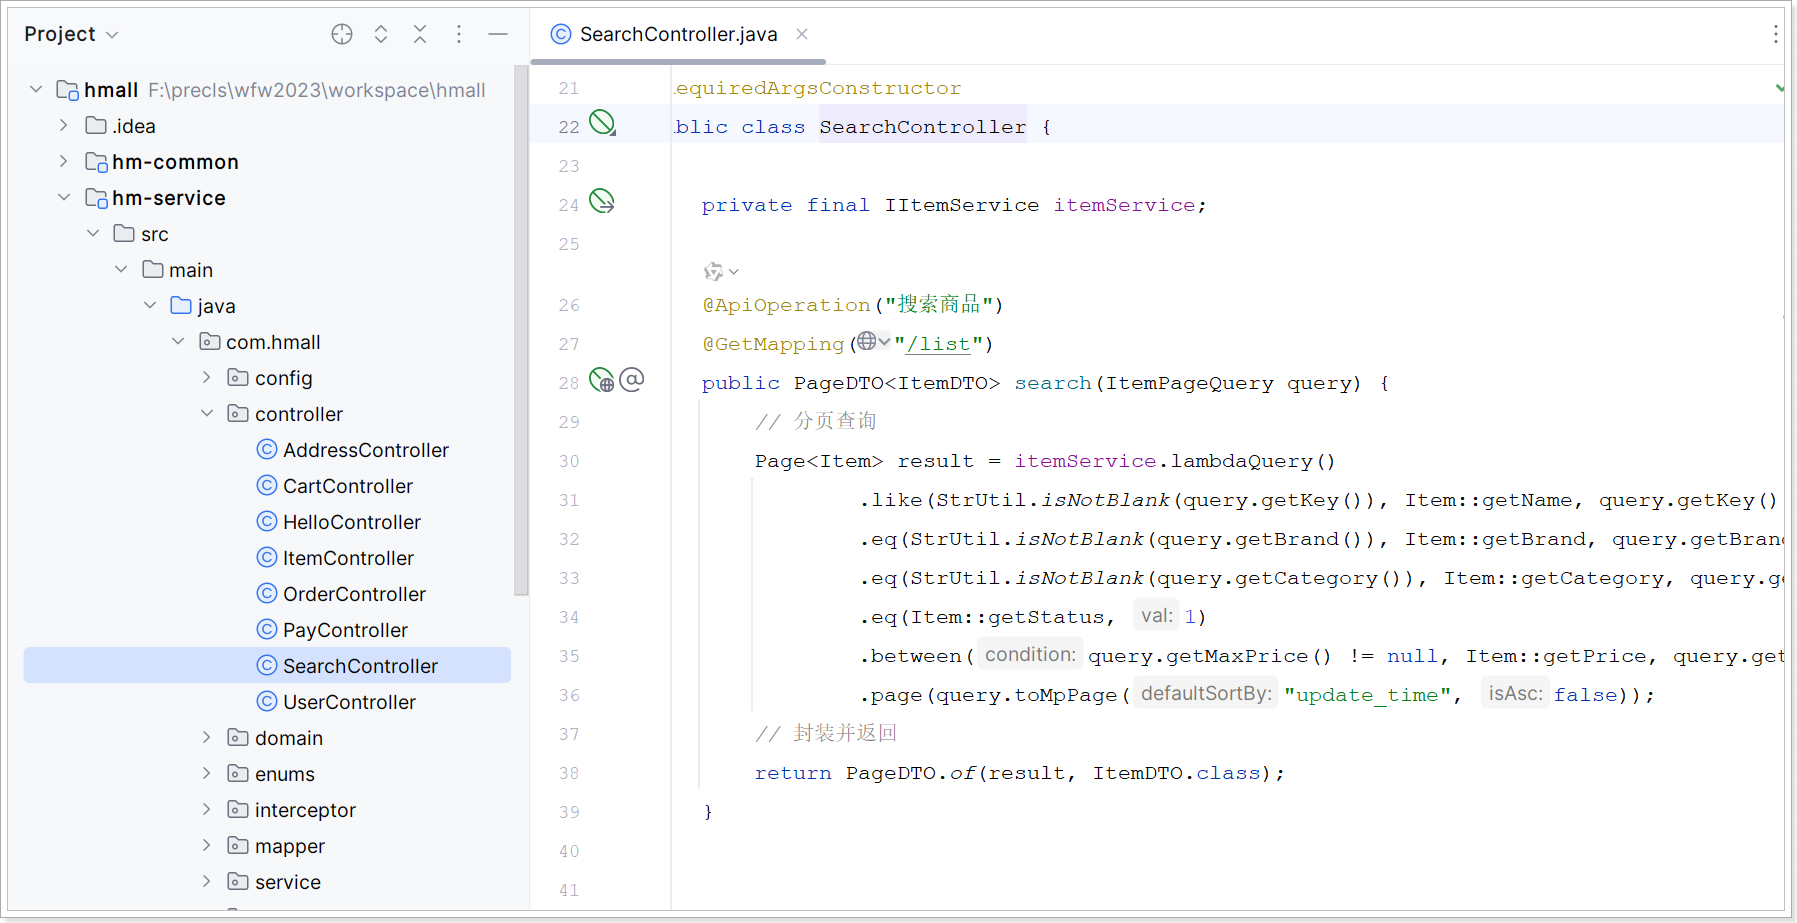
该页面会调用接口:/search/list,对应的服务端入口在com.hmall.controller.SearchController中的search方法:
购物车服务
在搜索到的商品列表中,点击按钮加入购物车,即可将商品加入购物车:
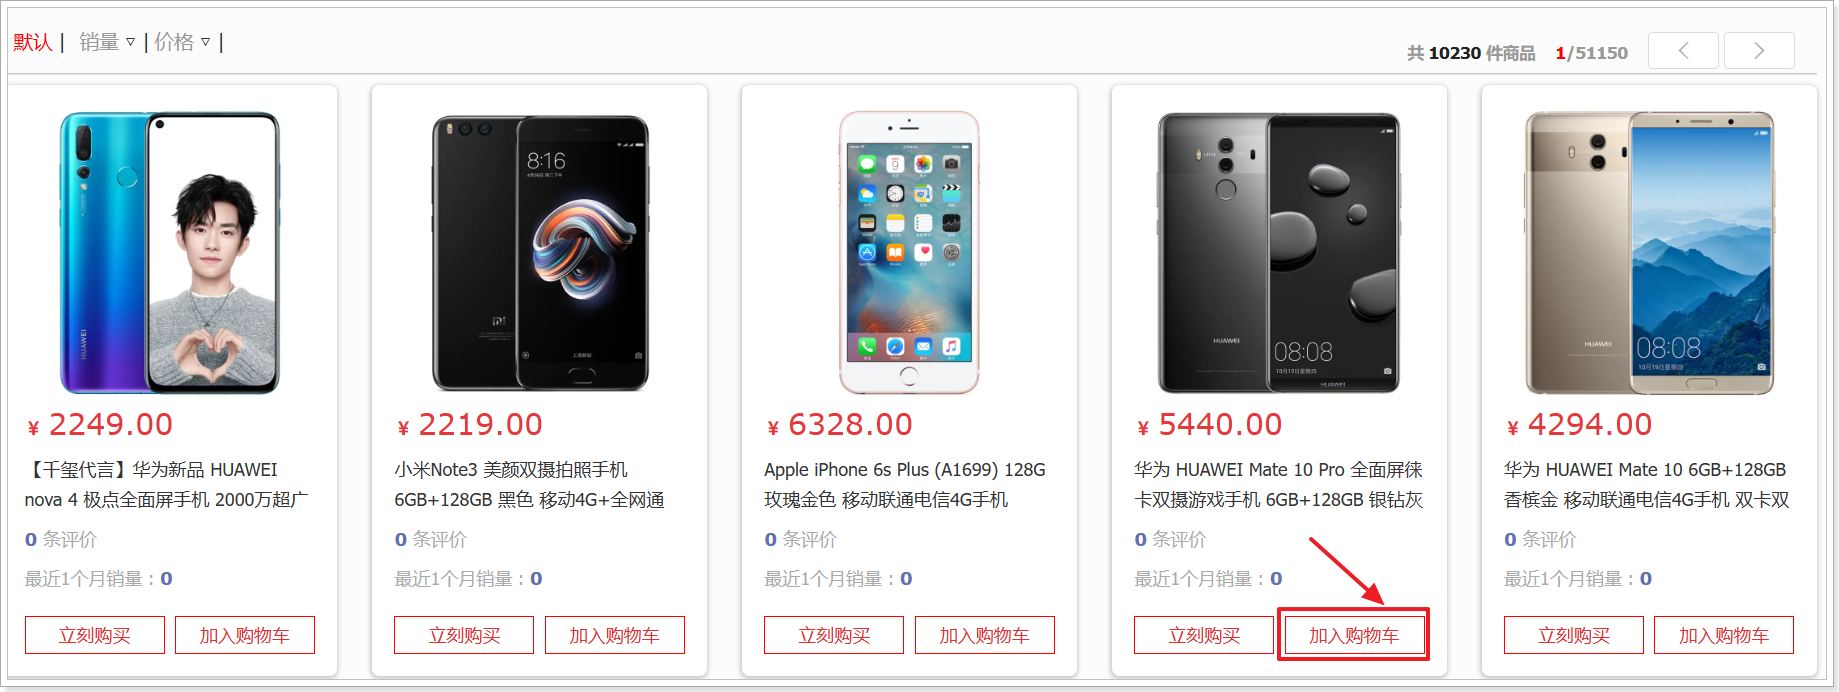
加入成功后即可进入购物车列表页,查看自己购物车商品列表:
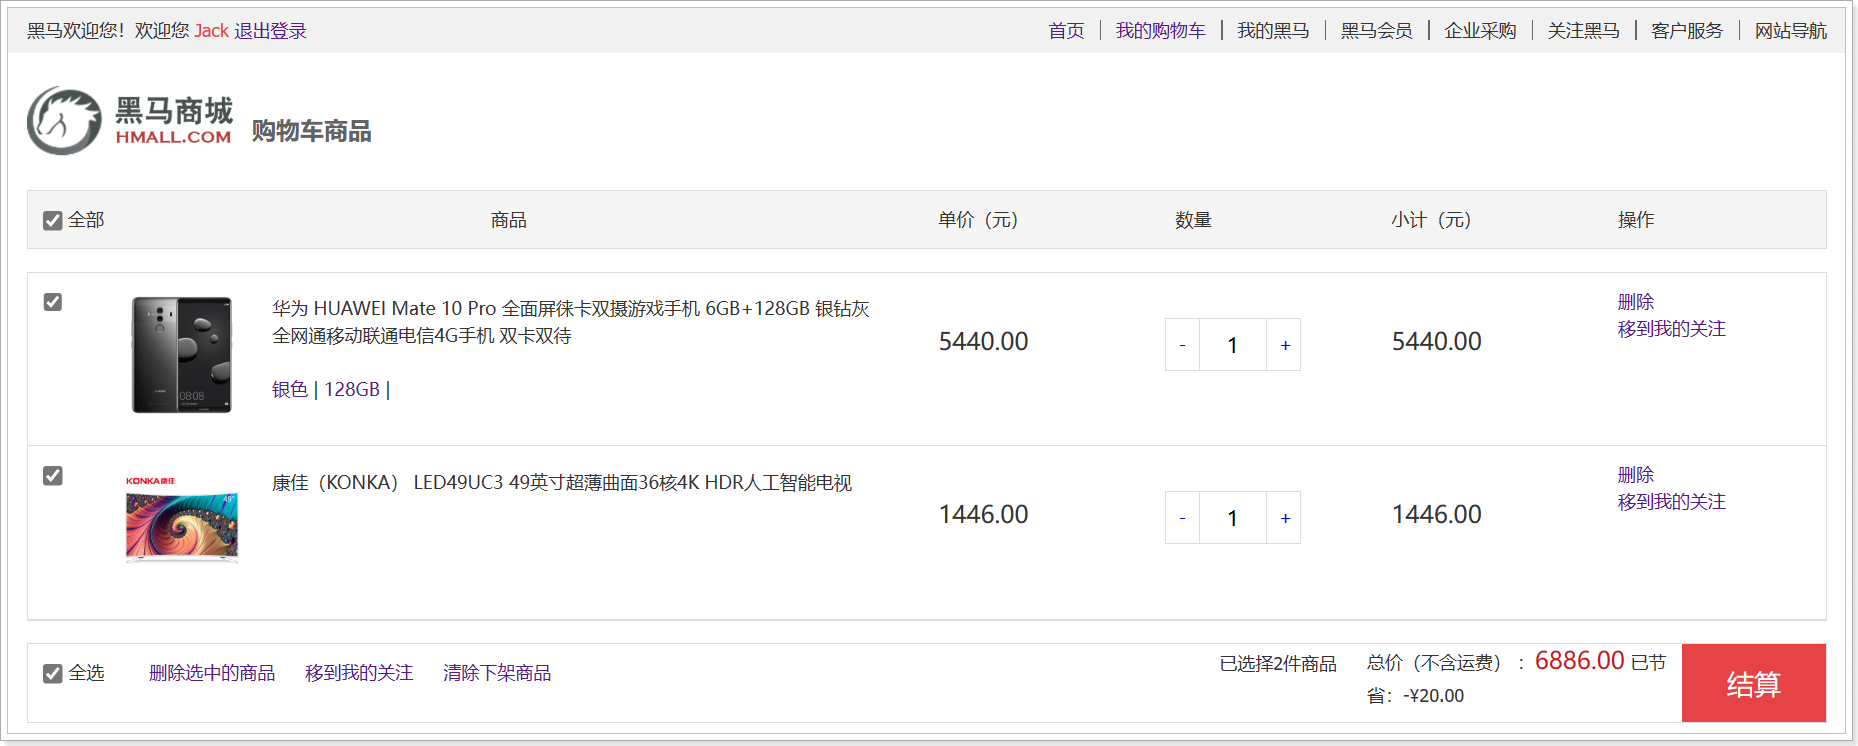
同时这里还可以对购物车实现修改、删除等操作。
相关功能全部在com.hmall.controller.CartController中:
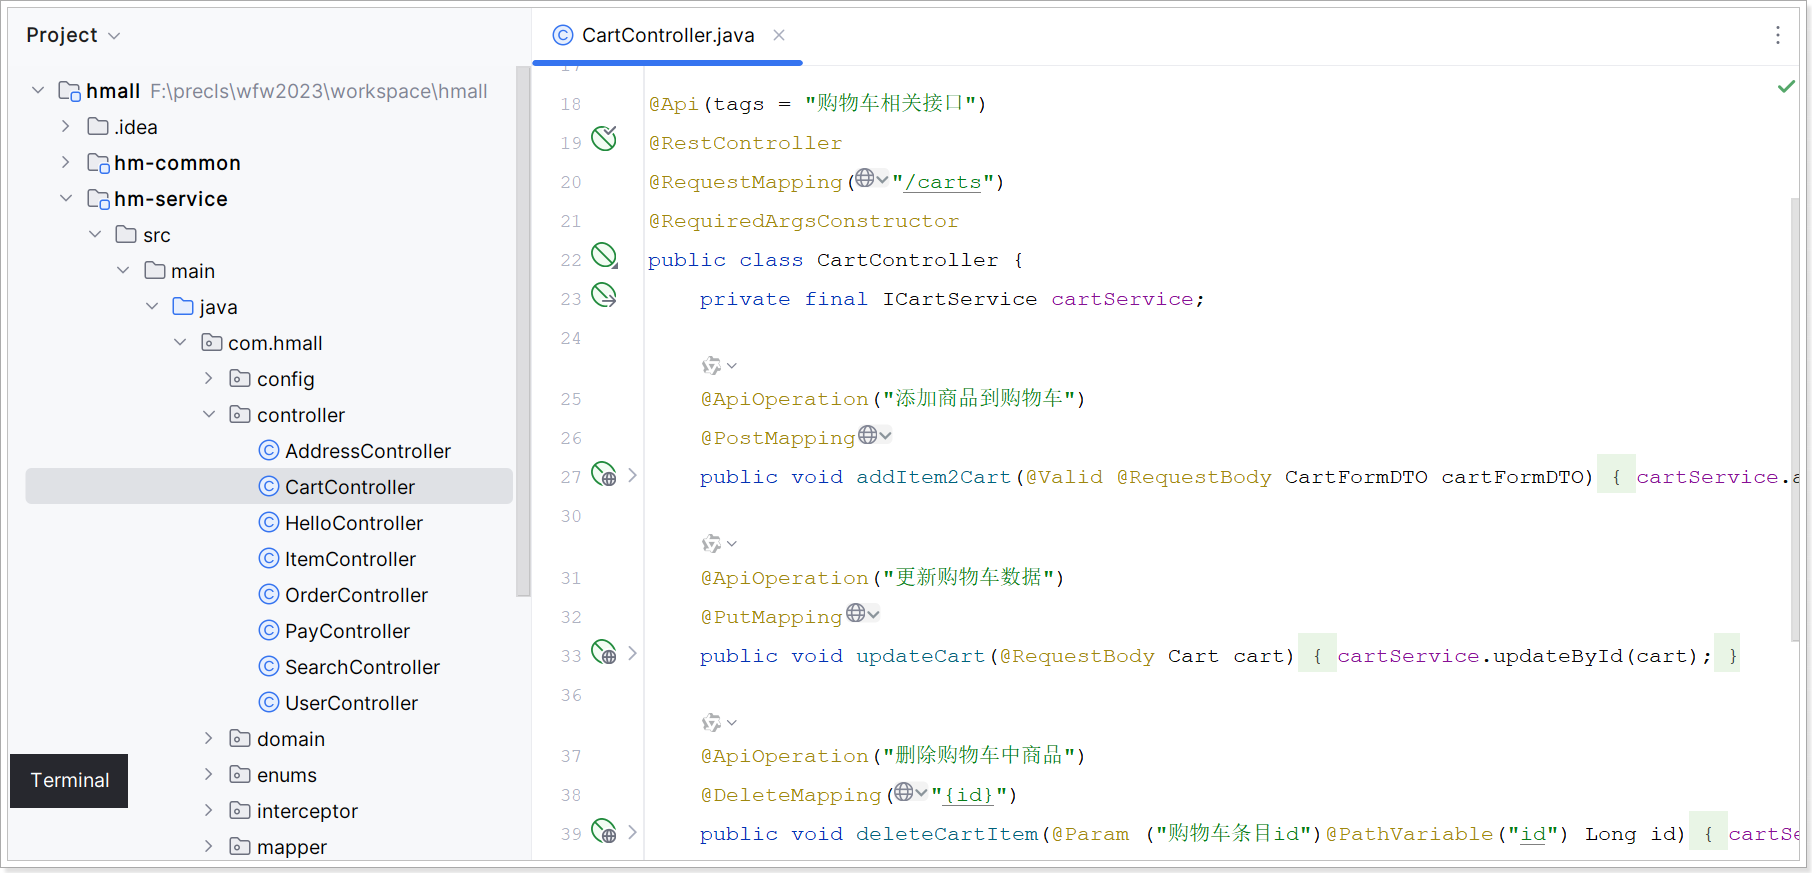
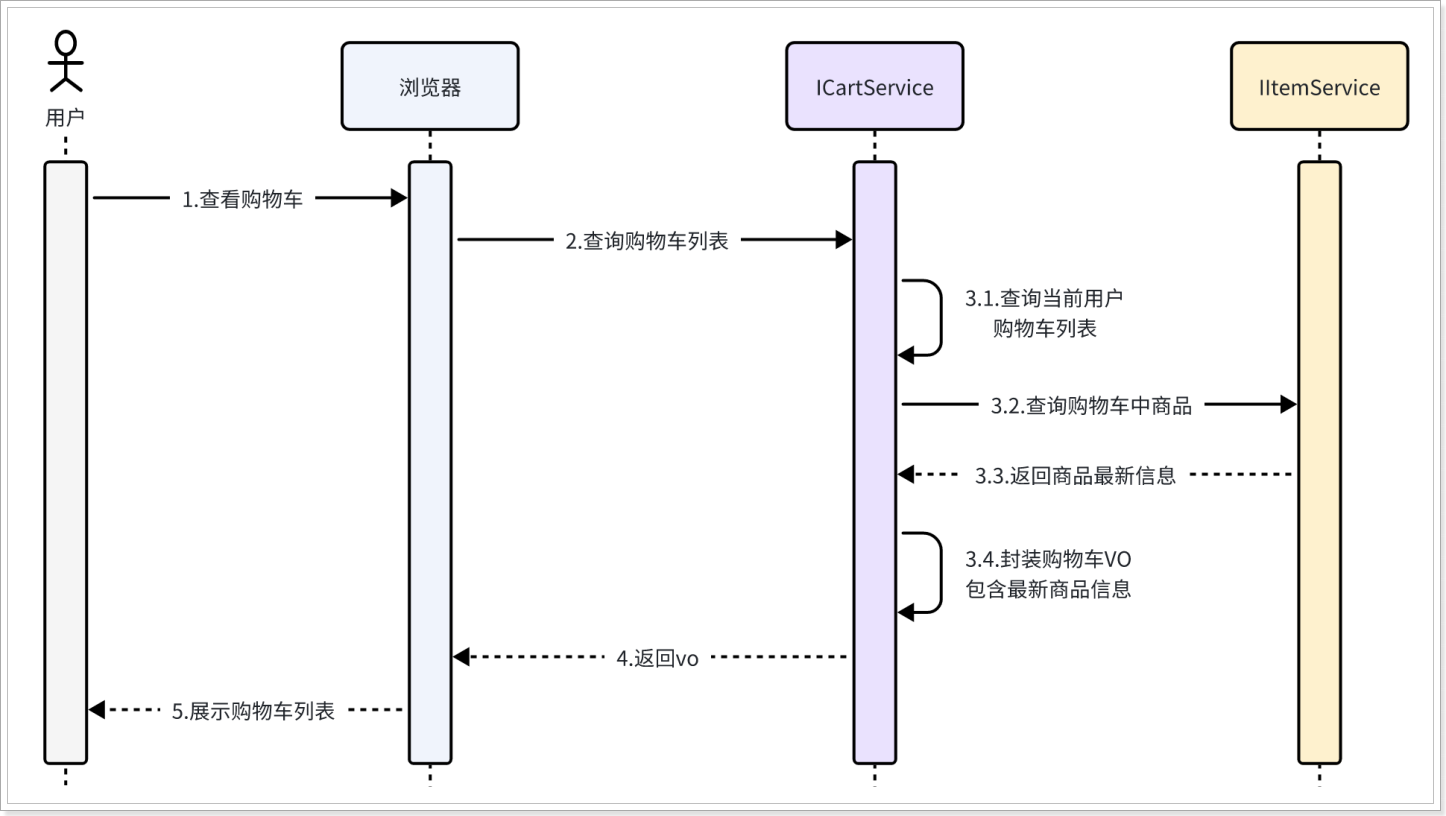
其中,查询购物车列表时,要判断商品最新的价格和状态,所以还需要查询商品信息,业务流程如下:
订单服务
在购物车页面点击结算按钮,会进入订单结算页面:
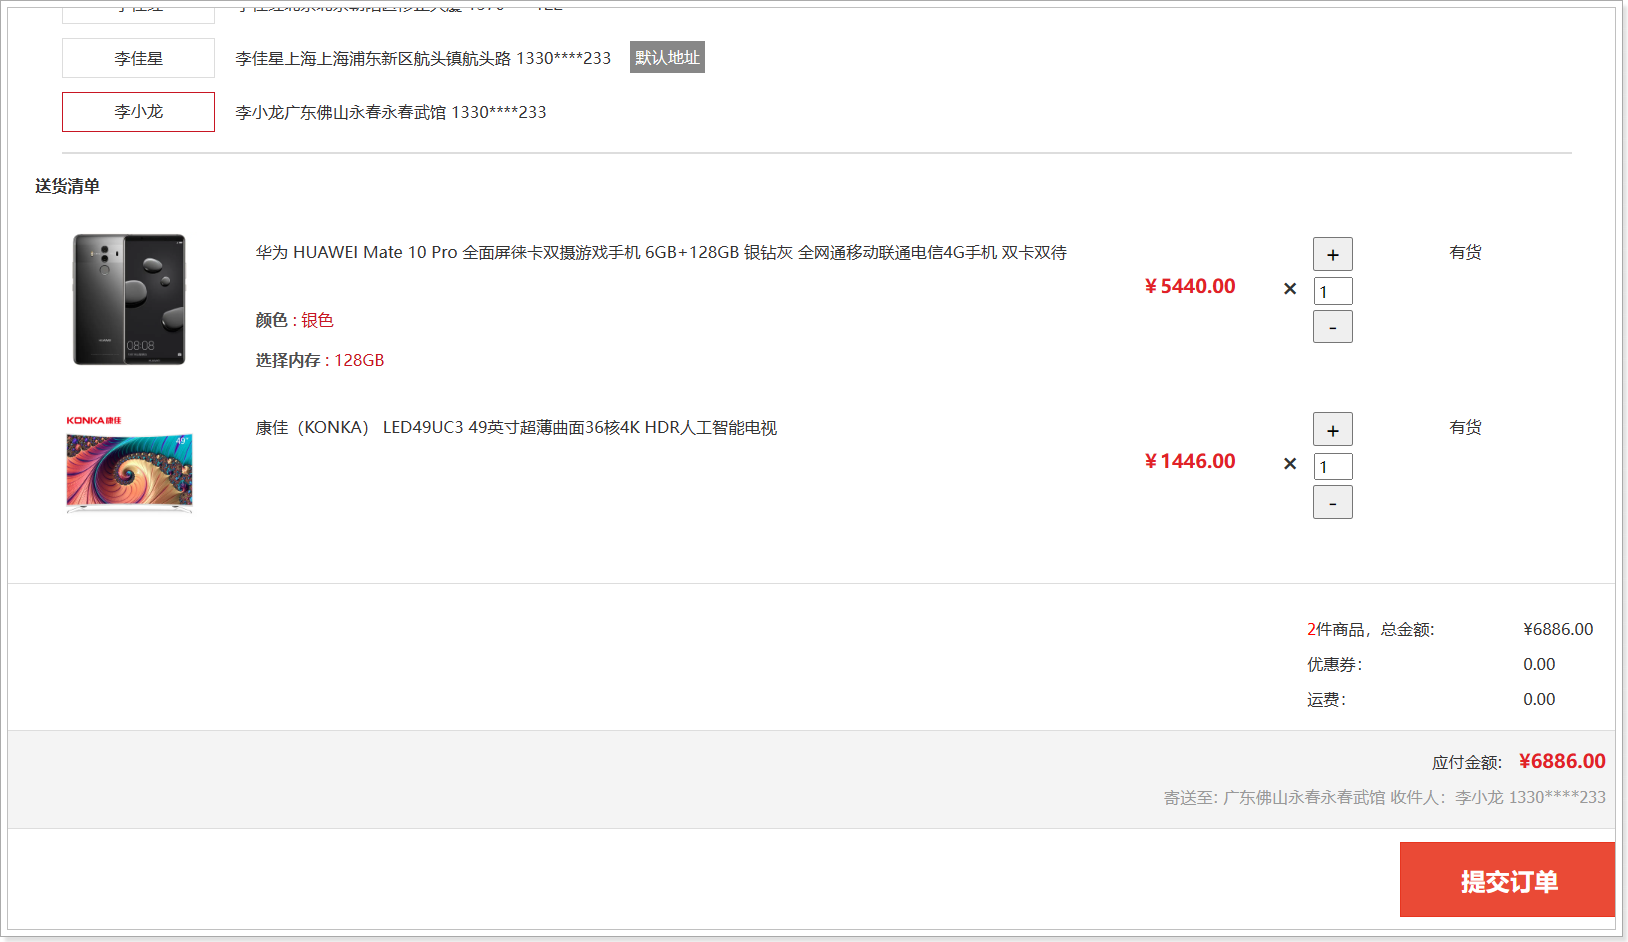
点击提交订单,会提交请求到服务端,服务端做3件事情:
-
创建一个新的订单
-
扣减商品库存
-
清理购物车中商品
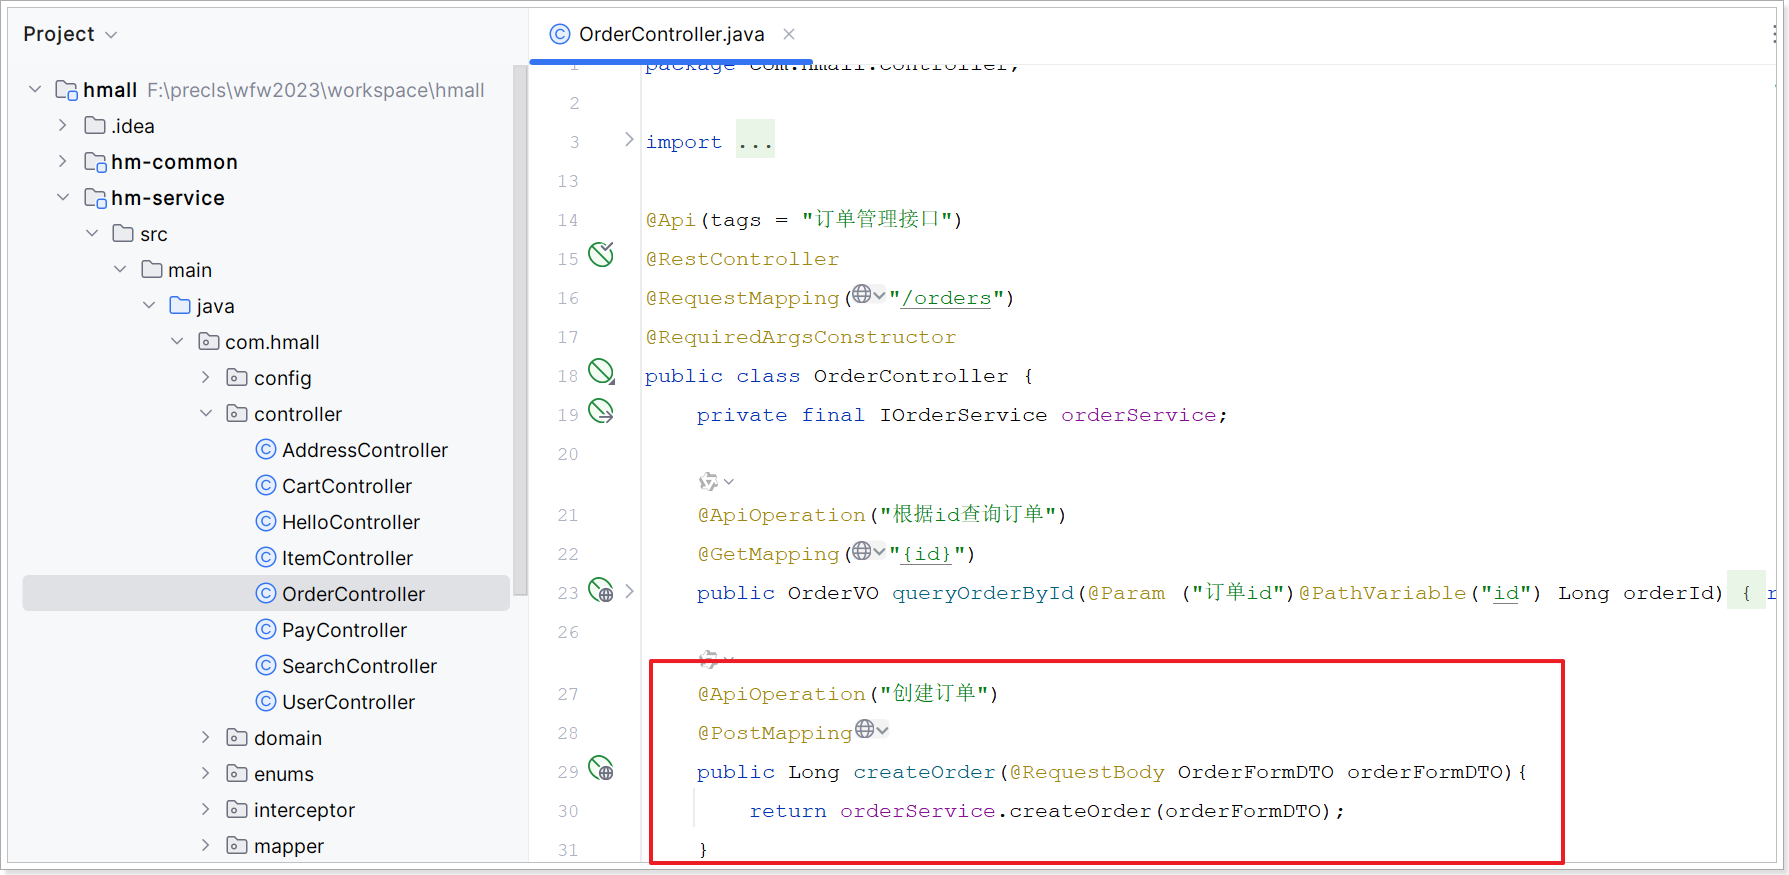
业务入口在com.hmall.controller.OrderController中的createOrder方法:
支付服务
单完成后会跳转到支付页面,目前只支持余额支付:

在选择余额支付这种方式后,会发起请求到服务端,服务端会立刻创建一个支付流水单,并返回支付流水单号到前端。
当用户输入用户密码,然后点击确认支付时,页面会发送请求到服务端,而服务端会做几件事情:
-
校验用户密码
-
扣减余额
-
修改支付流水状态
-
修改交易订单状态
common模块
<dependencies>
        <dependency>
            <groupId>org.apache.commons</groupId>
            <artifactId>commons-pool2</artifactId>
        </dependency>
        <!--hutool工具包-->
        <dependency>
            <groupId>cn.hutool</groupId>
            <artifactId>hutool-all</artifactId>
        </dependency>
        <!--完成SpringMVC自动装配-->
        <dependency>
            <groupId>org.springframework</groupId>
            <artifactId>spring-webmvc</artifactId>
            <scope>provided</scope>
        </dependency>
        <!--日志-->
        <dependency>
            <groupId>org.springframework.boot</groupId>
            <artifactId>spring-boot-starter-logging</artifactId>
        </dependency>
        <dependency>
            <groupId>org.apache.tomcat.embed</groupId>
            <artifactId>tomcat-embed-core</artifactId>
            <version>9.0.73</version>
            <scope>provided</scope>
        </dependency>
        <dependency>
            <groupId>com.baomidou</groupId>
            <artifactId>mybatis-plus-core</artifactId>
            <version>${mybatis-plus.version}</version>
            <scope>provided</scope>
        </dependency>
        <dependency>
            <groupId>com.baomidou</groupId>
            <artifactId>mybatis-plus-extension</artifactId>
            <version>${mybatis-plus.version}</version>
            <scope>provided</scope>
        </dependency>
        <dependency>
            <groupId>org.hibernate.validator</groupId>
            <artifactId>hibernate-validator</artifactId>
        </dependency>
        <dependency>
            <groupId>org.springframework.boot</groupId>
            <artifactId>spring-boot-autoconfigure</artifactId>
        </dependency>
        <dependency>
            <groupId>com.github.xiaoymin</groupId>
            <artifactId>knife4j-openapi2-spring-boot-starter</artifactId>
            <version>4.1.0</version>
        </dependency>
        <!--caffeine-->
        <dependency>
            <groupId>com.github.ben-manes.caffeine</groupId>
            <artifactId>caffeine</artifactId>
        </dependency>
        <!--AMQP依赖-->
        <dependency>
            <groupId>org.springframework.amqp</groupId>
            <artifactId>spring-amqp</artifactId>
            <scope>provided</scope>
        </dependency>
        <!--Spring整合Rabbit依赖-->
        <dependency>
            <groupId>org.springframework.amqp</groupId>
            <artifactId>spring-rabbit</artifactId>
            <scope>provided</scope>
        </dependency>
        <!--json处理-->
        <dependency>
            <groupId>com.fasterxml.jackson.dataformat</groupId>
            <artifactId>jackson-dataformat-xml</artifactId>
            <scope>provided</scope>
        </dependency>
    </dependencies>
服务拆分原则
服务拆分要考虑的问题:
- 什么时候进行拆分?
- 怎么拆分?
什么时候拆分?
一般情况下,对于一个初创的项目,首先要做的是验证项目的可行性。因此这一阶段的首要任务是敏捷开发,快速产出生产可用的产品,投入市场做验证。为了达成这一目的,该阶段项目架构往往会比较简单,很多情况下会直接采用单体架构,这样开发成本比较低,可以快速产出结果,一旦发现项目不符合市场,损失较小。
如果这一阶段采用复杂的微服务架构,投入大量的人力和时间成本用于架构设计,最终发现产品不符合市场需求,等于全部做了无用功。
所以,对于大多数小型项目来说,一般是先采用单体架构,随着用户规模扩大、业务复杂后再逐渐拆分为微服务架构。这样初期成本会比较低,可以快速试错。但是,这么做的问题就在于后期做服务拆分时,可能会遇到很多代码耦合带来的问题,拆分比较困难(前易后难)。
而对于一些大型项目,在立项之初目的就很明确,为了长远考虑,在架构设计时就直接选择微服务架构。虽然前期投入较多,但后期就少了拆分服务的烦恼(前难后易)。
怎么拆分(拆分原则)?
微服务拆分时粒度尽可能小,这就是拆分的目标。具体可以从两个角度进行分析:
-
高内聚:每个微服务职责尽量单一,但包含的业务相互关联度高,完整度高。
-
低耦合:每个微服务的功能相对独立,减少对其他微服务的依赖,或者依赖接口的稳定性要强
高内聚首先是单一职责,目标是我们修改某个业务时,只修改当前的微服务,这样变更的成本更低
一旦微服务之间做到了高内聚,各个微服务之间的耦合度自然就降低了。
当然,微服务之间不可避免的会有或多或少的业务交互,比如下单时要查询商品数据,不能在订单服务中直接查询商品的数据库,这会导致数据耦合。应该由商品服务对外暴露接口,并且一旦要保证微服务接口的稳定性(尽量保证接口的外观保持不变)。这样进行服务间调用,假如商品服务内部的处理逻辑进行了修改,在接口外观不变的前提下,都不会影响到订单微服务,服务之间的耦合度就降低了。
明确了拆分原则,接下来就是拆分方式了,一般分为两种:
-
纵向拆分
-
横向拆分
纵向拆分:按照项目的业务功能模块进行拆分,例如黑马商城中,有:用户管理功能、订单管理功能、购物车功能、商品管理功能、支付功能等。按照功能模块将他们拆分为一个一个的微服务就是纵向拆分,这种方式能尽可能的提供服务的内聚性。
横向拆分:看各个功能模块之间有没有公共的部分,将公共的部分抽取出来作为通用的服务。例如:用户登录需要发送消息通知、记录风控数据,下单也要发送消息通知、记录风控数据。因此发送消息通知、记录风控数据就是通用的业务功能,可以将他们分别抽取为公共服务:消息中心服务、风控管理服务。
这样就可以提升业务的复用性,避免重复开发,同时通用业务接口一般稳定性较强,不会使服务之间过分耦合。
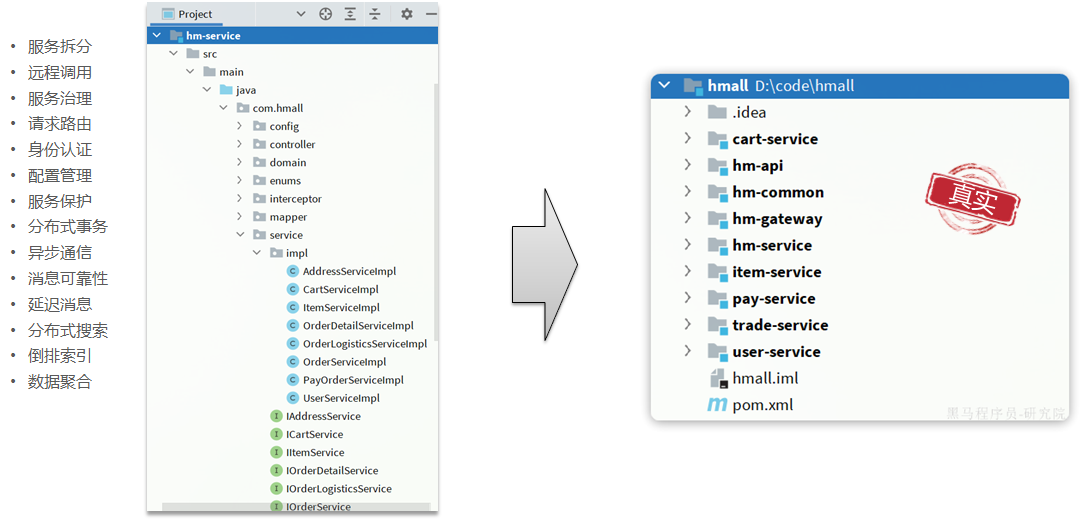
黑马商城并不是一个完整的项目,短信发送和风控管理并未实现,此处不再考虑。将业务进行纵向拆分,可以分为如下微服务:
- 商品服务
- 购物车服务
- 用户服务
- 订单服务
- 支付服务
最终的拆分效果:
一般微服务项目有两种不同的工程结构:
- 完全解耦:每个微服务作为一个单独的工程,甚至可以使用不同的语言进行开发,项目完全解耦。
优点:服务之间耦合低
缺点:每个项目都有独立的仓库,管理较为麻烦
- Maven聚合子工程:整个项目作为一个project,每个微服务是其中一个Module
优点:代码集中,管理和运维方便。
缺点:服务之间耦合,编译时间较长
为了方便我们直接在项目中创建各个微服务Module
配置文件准备
当前hm-service的配置文件:
application.yml:
server:
  port: 8080
spring:
  application:
    name: hm-service
  profiles:
    active: dev
  datasource:
    url: jdbc:mysql://${hm.db.host}:3306/hmall?useUnicode=true&characterEncoding=UTF-8&autoReconnect=true&serverTimezone=Asia/Shanghai
    driver-class-name: com.mysql.cj.jdbc.Driver
    username: root
    password: ${hm.db.pw}
mybatis-plus:
  configuration:
    default-enum-type-handler: com.baomidou.mybatisplus.core.handlers.MybatisEnumTypeHandler
  global-config:
    db-config:
      update-strategy: not_null
      id-type: auto
logging:
  level:
    com.hmall: debug
  pattern:
    dateformat: HH:mm:ss:SSS
  file:
    path: "logs/${spring.application.name}"
knife4j:
  enable: true
  openapi:
    title: 黑马商城接口文档
    description: "黑马商城接口文档"
    email: [email protected]
    concat: itheima
    url: https://www.itcast.cn
    version: v1.0.0
    group:
      default:
        group-name: default
        api-rule: package
        api-rule-resources:
          - com.hmall.controller
hm:
  jwt:
    location: classpath:hmall.jks
    alias: hmall
    password: hmall123
    tokenTTL: 30m
  auth:
    excludePaths:
      - /search/**
      - /users/login
      - /items/**
      - /hi

feign:
	okhttp:
		enabled: true
application-dev.yml:
hm:
  db:
    host: mysql
    pw: root
application-local.yml:
hm:
  db:
    host: 192.168.52.168 # 修改为你自己的虚拟机IP地址
    pw: root # 修改为docker中的MySQL密码
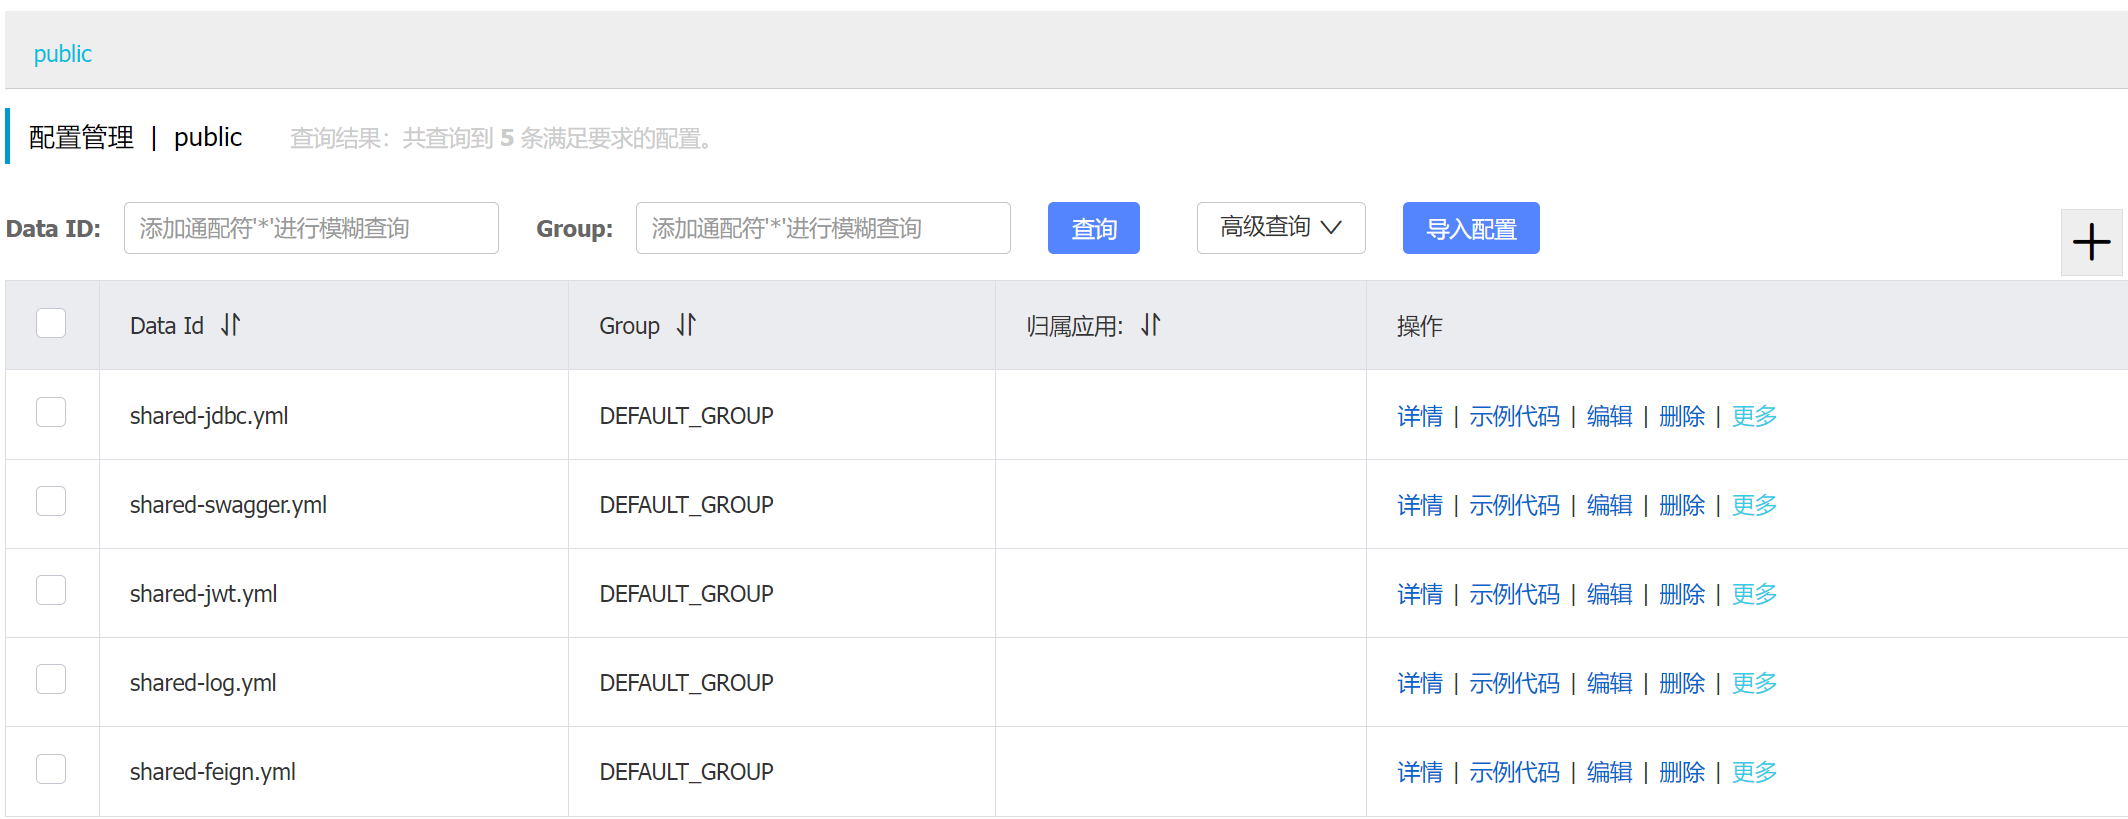
我们要拆分出多个微服务,这些微服务可以共享的配置:JDBC、MybatisPlus、日志、Swagger、JWT
shared-jdbc.yml
spring:
  datasource:
    url: jdbc:mysql://${hm.db.host:192.168.52.168}:${hm.db.port:3306}/${hm.db.name}?useUnicode=true&characterEncoding=UTF-8&autoReconnect=true&serverTimezone=Asia/Shanghai
    driver-class-name: com.mysql.cj.jdbc.Driver
    username: ${hm.db.username:root}
    password: ${hm.db.password:root}
mybatis-plus:
  configuration:
    default-enum-type-handler: com.baomidou.mybatisplus.core.handlers.MybatisEnumTypeHandler
  global-config:
    db-config:
      update-strategy: not_null
      id-type: auto
shared-swagger.yml
knife4j:
  enable: true
  openapi:
    title: ${hm.swagger.title}
    description: ${hm.swagger.description}
    email: ${hm.swagger.email}
    concat: ${hm.swagger.concat}
    url: ${hm.swagger.url}
    version: v1.0.0
    group:
      default:
        group-name: default
        api-rule: package
        api-rule-resources:
          - ${hm.swagger.package}
shared-jwt.yml
hm:
  jwt:
    location: classpath:hmall.jks
    alias: hmall
    password: hmall123
    tokenTTL: 30m
  auth:
    excludePaths:
      - /search/**
      - /users/login
      - /items/**
      - /hi
shared-log.yml
logging:
  level:
    com.hmall: debug
  pattern:
    dateformat: HH:mm:ss:SSS
  file:
    path: "logs/${spring.application.name}"
shared-feign.yml
feign:
	okhttp:
		enabled: true
创建完毕:
抽取完上述配置,application.yml剩余的内容:
server:
  port: 8080
spring:
  application:
    name: hm-service
  profiles:
    active: dev
其中,spring.application.name和spring.profiles.active需要在bootstrap.yml中指定,bootstrap.yml:
spring:
	application:
		name: hm-service
	profiles:
		active: dev
	cloud:
		nacos:
			discovery:
				server-addr: 192.168.52.168:8848
			config:
				server-addr: 192.168.52.168:8848
				shared-configs:
					- data-id: shared-jdbc.yml
					  refresh: true
application.yml:
server:
  port: 8080
这部分内容可以作为当前服务配置写入nacos,也就是:
hm-service.yml:
server:
  port: 8080
其余需要每个微服务单独指定的内容可以作为多环境选择文件,我们目前的环境是local,也就是:
hm-service-local.yml:
hm:
	db:
		host: 192.168.52.168
		port: 3306
		name: hm-db
.....
为了方便开发,我们将其合并在hm-service-local.yml中
最后注意需要修改edit-config为local
项目拆分
商品服务
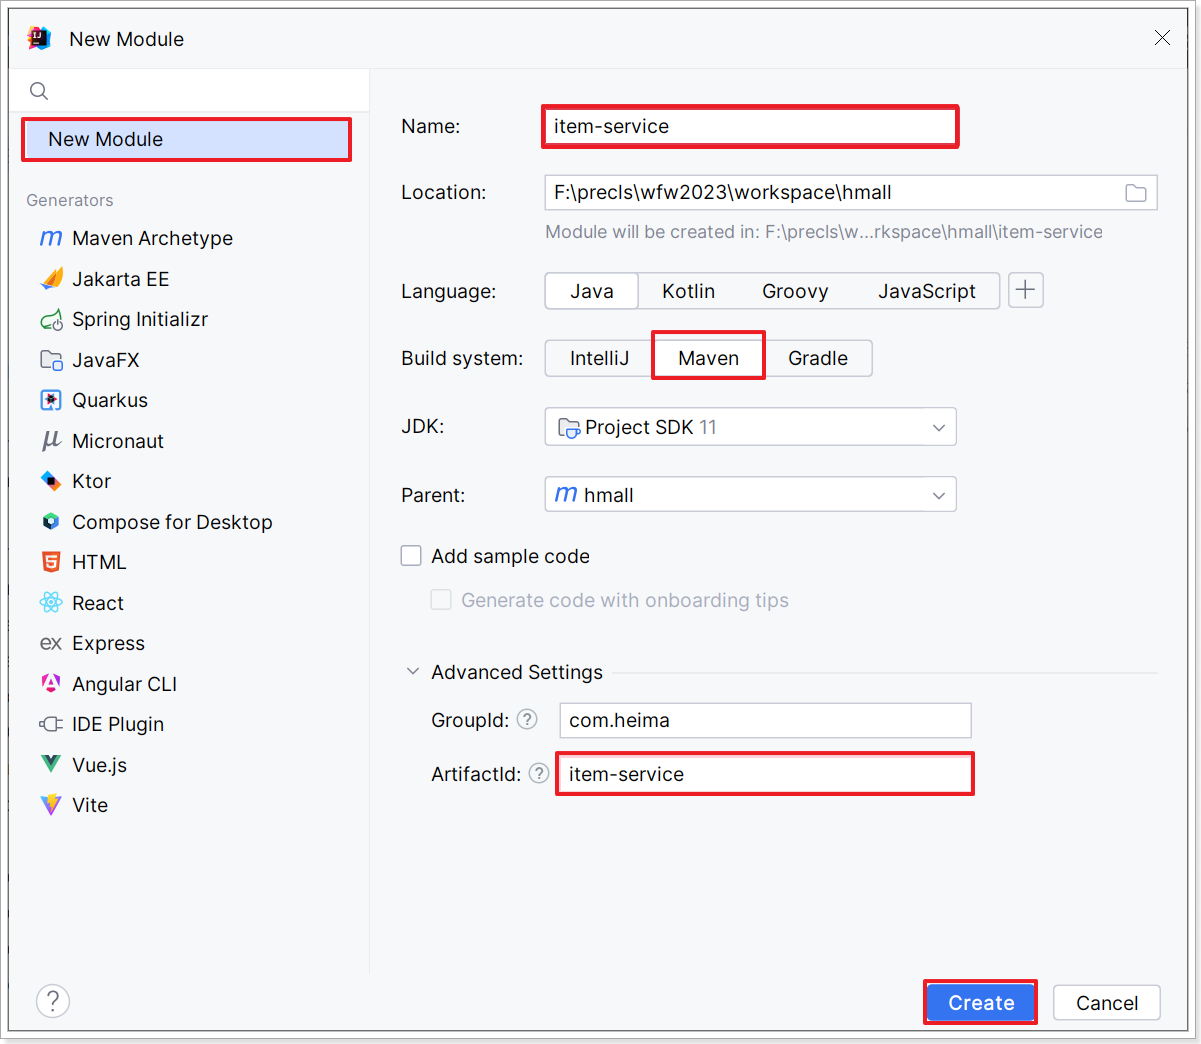
1)创建module
2)添加依赖
<?xml version="1.0" encoding="UTF-8"?>
<project xmlns="http://maven.apache.org/POM/4.0.0"
         xmlns:xsi="http://www.w3.org/2001/XMLSchema-instance"
         xsi:schemaLocation="http://maven.apache.org/POM/4.0.0 http://maven.apache.org/xsd/maven-4.0.0.xsd">
    <modelVersion>4.0.0</modelVersion>
    <parent>
        <groupId>com.heima</groupId>
        <artifactId>hmall</artifactId>
        <version>1.0.0</version>
    </parent>

    <groupId>com.hmall</groupId>
    <artifactId>item-service</artifactId>

    <properties>
        <maven.compiler.source>11</maven.compiler.source>
        <maven.compiler.target>11</maven.compiler.target>
        <project.build.sourceEncoding>UTF-8</project.build.sourceEncoding>
    </properties>


    <dependencies>
        <!--common-->
        <dependency>
            <groupId>com.heima</groupId>
            <artifactId>hm-common</artifactId>
            <version>1.0.0</version>
        </dependency>
        <!--web-->
        <dependency>
            <groupId>org.springframework.boot</groupId>
            <artifactId>spring-boot-starter-web</artifactId>
        </dependency>
        <!--数据库-->
        <dependency>
            <groupId>mysql</groupId>
            <artifactId>mysql-connector-java</artifactId>
        </dependency>
        <!--mybatis-->
        <dependency>
            <groupId>com.baomidou</groupId>
            <artifactId>mybatis-plus-boot-starter</artifactId>
        </dependency>
        <!--单元测试-->
        <dependency>
            <groupId>org.springframework.boot</groupId>
            <artifactId>spring-boot-starter-test</artifactId>
        </dependency>

		 <!--nacos服务注册-->
        <dependency>
            <groupId>com.alibaba.cloud</groupId>
            <artifactId>spring-cloud-starter-alibaba-nacos-discovery</artifactId>
        </dependency>

		 <!--nacos配置中心-->
        <dependency>
            <groupId>com.alibaba.cloud</groupId>
            <artifactId>spring-cloud-starter-alibaba-nacos-config</artifactId>
        </dependency>

		 <!--扫描bootstrap文件-->
		<dependency>
		    <groupId>org.springframework.cloud</groupId>
		    <artifactId>spring-cloud-starter-bootstrap</artifactId>
		</dependency>

    </dependencies>

    <build>
        <finalName>${project.artifactId}</finalName>
        <plugins>
            <plugin>
                <groupId>org.springframework.boot</groupId>
                <artifactId>spring-boot-maven-plugin</artifactId>
            </plugin>
        </plugins>
    </build>

</project>
3)创建启动引导类
目前看来,商品服务不需要feign
package com.hmall.item;

@MapperScan("com.hmall.item.mapper")
@SpringBootApplication
public class ItemApplication {
    public static void main(String[] args) {
        SpringApplication.run(ItemApplication.class, args);
    }
}
4)配置文件
bootstrap.yml:
spring:
  application:
    name: item-service
  profiles:
    active: dev
  cloud:
    nacos:
      discovery:
        server-addr: 192.168.52.168:8848
      config:
        server-addr: 192.168.52.168:8848
        shared-configs:
          - data-id: shared-jdbc.yml
            refresh: true
          - data-id: shared-log.yml
            refresh: true
          - data-id: shared-swagger.yml
            refresh: true
        file-extension: yml
nacos控制台创建item-service-local.yml:
server:
  port: 8081
hm:
  db:
    host: 192.168.52.168
    port: 3306
    name: hm-item
    username: root
    password: root
  swagger:
    title: 商品服务接口文档
    description: 商品服务接口文档
    email: [email protected]
    concat: [email protected]
    url: www.itcast.com
    package: com.hmall.item.controller
注意需要edit-config
5)复制代码
ItemController、SearchController:
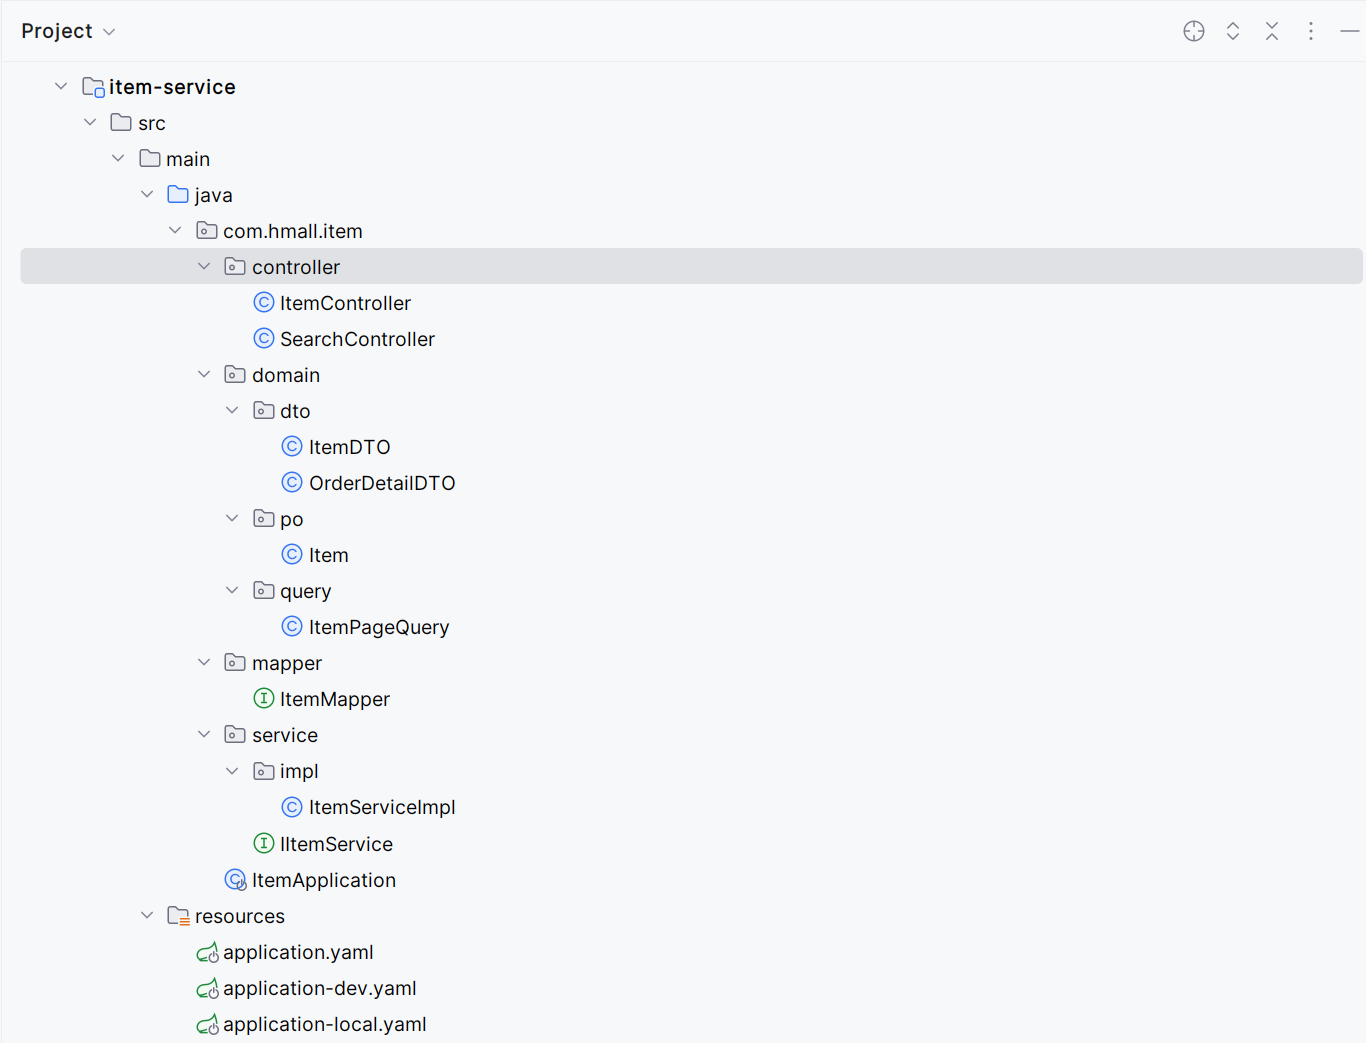
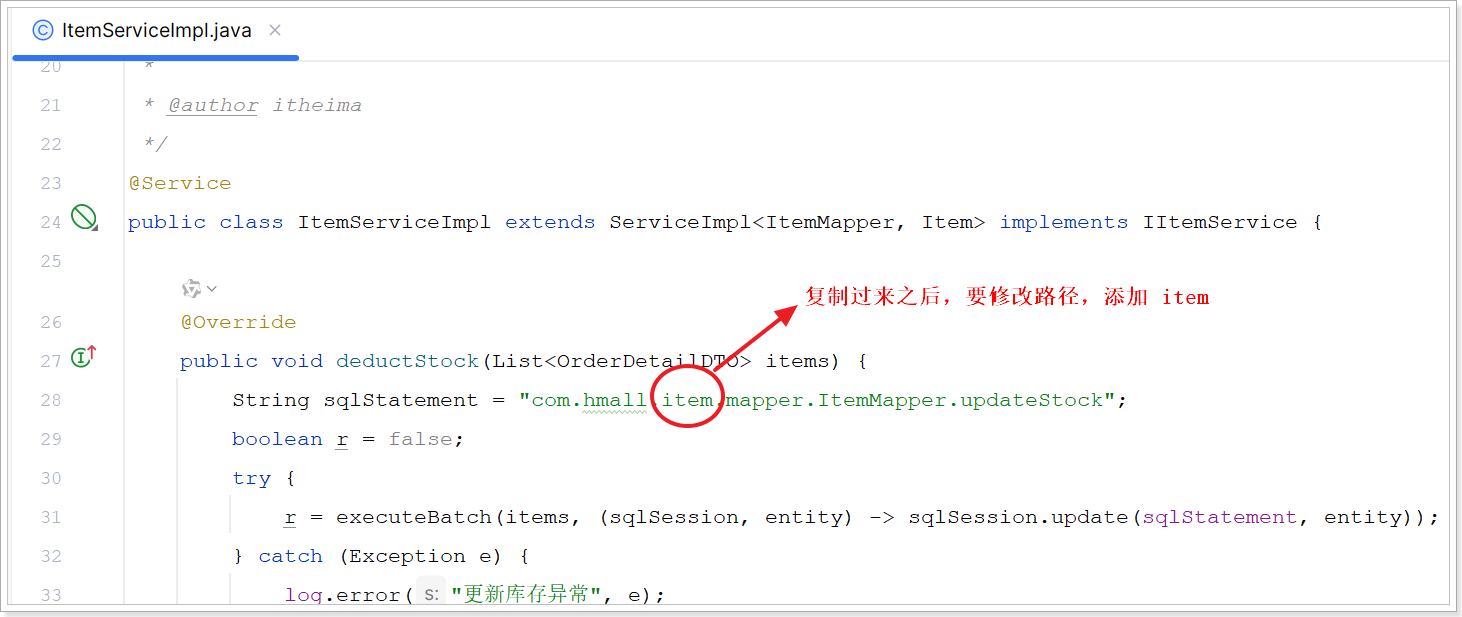
还需要修改ItemServiceImpl的deductStock方法:
6)创建数据库表
数据库默认连接虚拟机,在docker的数据库中执行资料/hm-item.sql脚本
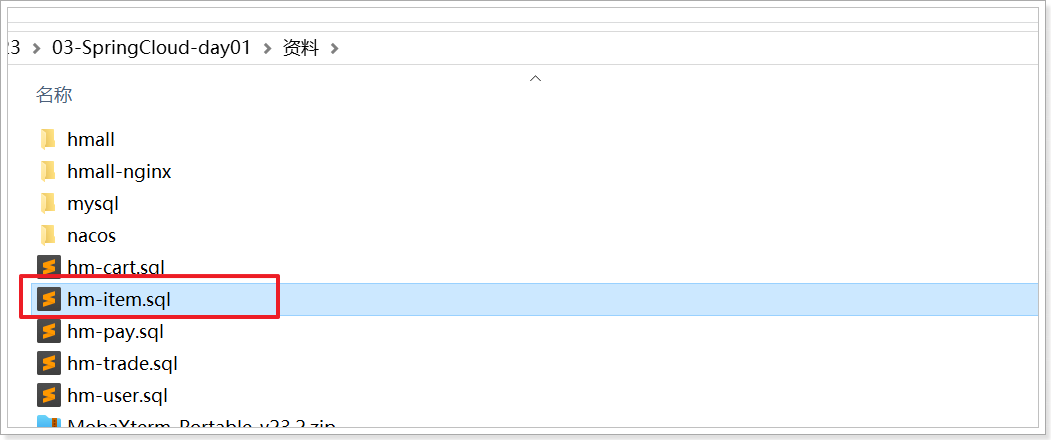
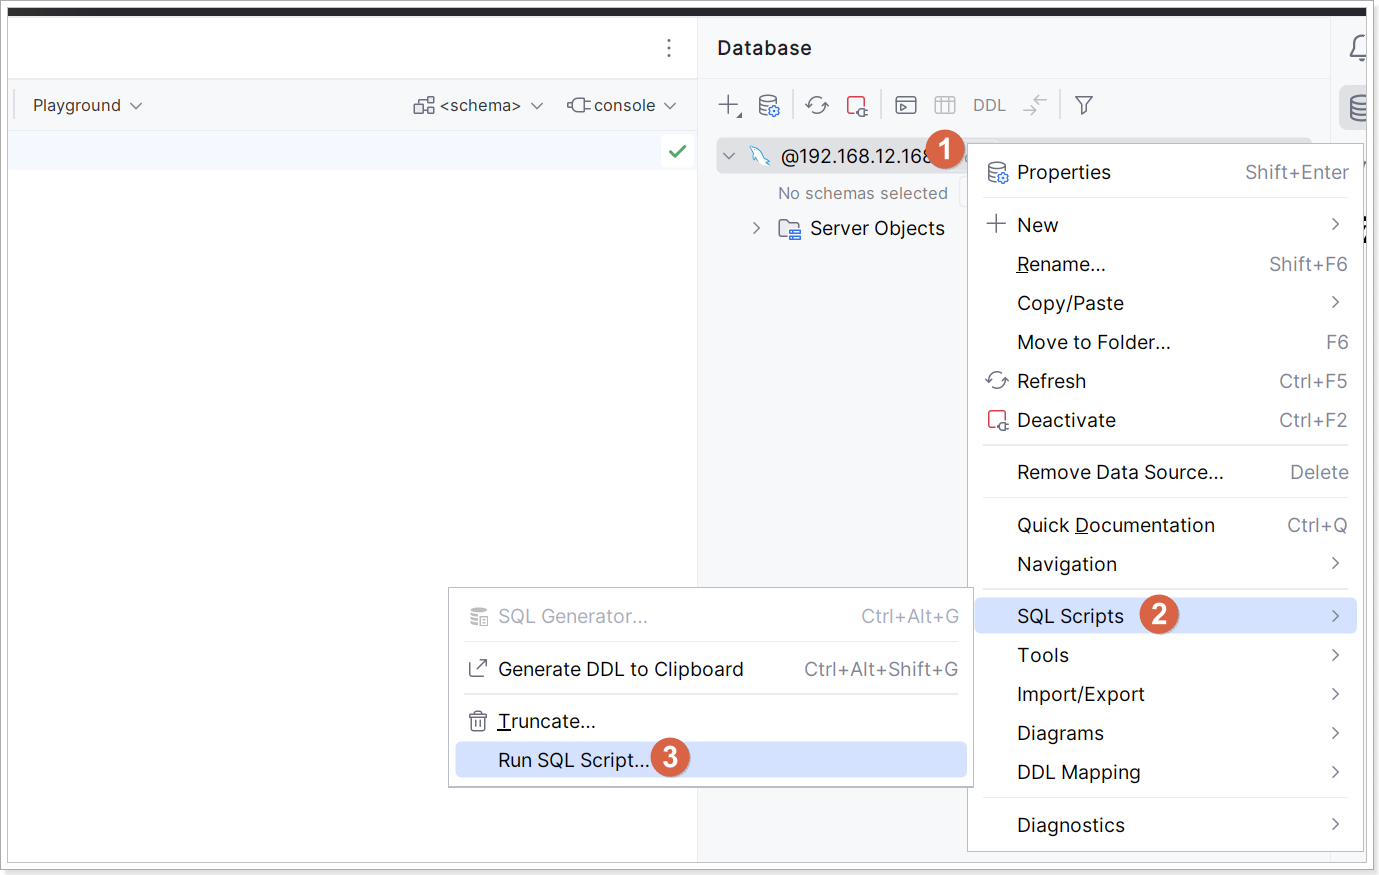
将上述脚本文件导入到虚拟机中对应的数据库中;创建数据库表,操作如下:
最终,会在数据库创建一个名为hm-item的database,将来的每一个微服务都会有自己的一个database:

在实际开发中,每一个微服务应该有自己独立的数据库服务,而不仅是database
7)测试
edit-config修改active profiles为local
购物车服务
1)创建module
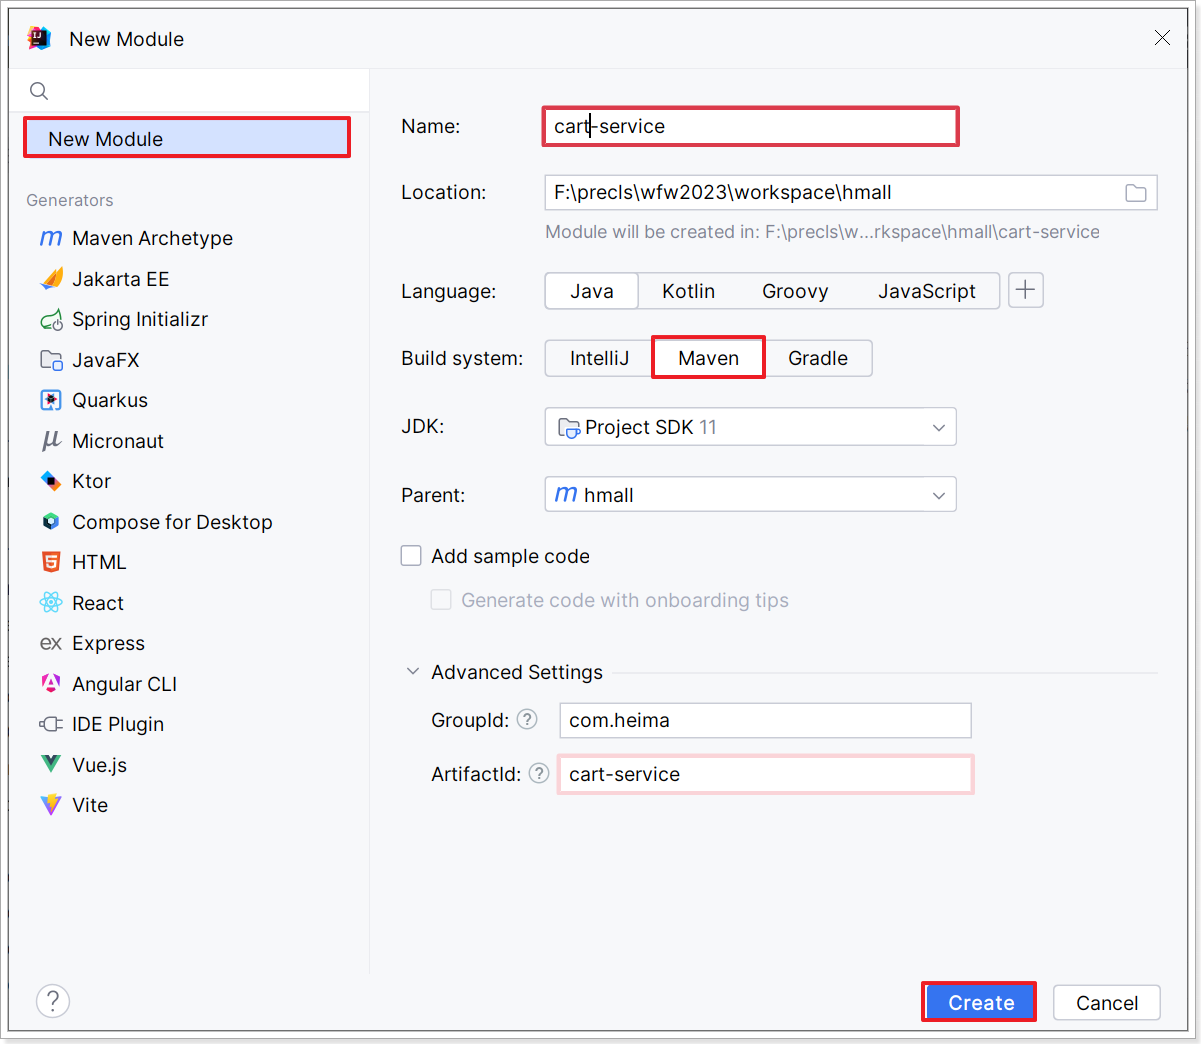
右击 cart-service 使用IDEA插件 JBLSpringBootAppGen 快速生成启动类及删除不相关文件。

2)添加依赖
<project xmlns="http://maven.apache.org/POM/4.0.0" xmlns:xsi="http://www.w3.org/2001/XMLSchema-instance"
xsi:schemaLocation="http://maven.apache.org/POM/4.0.0 http://maven.apache.org/xsd/maven-4.0.0.xsd">
<modelVersion>4.0.0</modelVersion>
<parent>
<groupId>com.heima</groupId>
<artifactId>hmall</artifactId>
<version>1.0.0</version>
</parent>
<artifactId>cart-service</artifactId>
<packaging>jar</packaging>
<name>cart-service</name>
<url>http://maven.apache.org</url>
<properties>
<maven.compiler.source>11</maven.compiler.source>
<maven.compiler.target>11</maven.compiler.target>
</properties>
<dependencies>
<!--common-->
<dependency>
<groupId>com.heima</groupId>
<artifactId>hm-common</artifactId>
<version>1.0.0</version>
</dependency>
<!--web-->
<dependency>
<groupId>org.springframework.boot</groupId>
<artifactId>spring-boot-starter-web</artifactId>
</dependency>
<!--数据库-->
<dependency>
<groupId>mysql</groupId>
<artifactId>mysql-connector-java</artifactId>
</dependency>
<!--mybatis-->
<dependency>
<groupId>com.baomidou</groupId>
<artifactId>mybatis-plus-boot-starter</artifactId>
</dependency>
<!--单元测试-->
<dependency>
<groupId>org.springframework.boot</groupId>
<artifactId>spring-boot-starter-test</artifactId>
</dependency>
<!--nacos服务注册-->
<dependency>
<groupId>com.alibaba.cloud</groupId>
<artifactId>spring-cloud-starter-alibaba-nacos-discovery</artifactId>
</dependency>
<!--nacos配置中心-->
<dependency>
<groupId>com.alibaba.cloud</groupId>
<artifactId>spring-cloud-starter-alibaba-nacos-config</artifactId>
</dependency>
<!--扫描bootstrap文件-->
<dependency>
<groupId>org.springframework.cloud</groupId>
<artifactId>spring-cloud-starter-bootstrap</artifactId>
</dependency>
</dependencies>
<build>
<finalName>${project.artifactId}</finalName>
<plugins>
<plugin>
<groupId>org.springframework.boot</groupId>
<artifactId>spring-boot-maven-plugin</artifactId>
</plugin>
</plugins>
</build>
</project>
3)启动引导类
@MapperScan("com.hmall.cart.mapper")
@SpringBootApplication
public class CartApplication {
    public static void main(String[] args) {
        SpringApplication.run(CartApplication.class, args);
    }
}
4)配置文件
bootstrap.yml:
spring:
  application:
    name: cart-service
  profiles:
    active: dev
  cloud:
    nacos:
      discovery:
        server-addr: 192.168.52.168:8848
      config:
        server-addr: 192.168.52.168:8848
        shared-configs:
          - data-id: shared-jdbc.yml
            refresh: true
          - data-id: shared-log.yml
            refresh: true
          - data-id: shared-swagger.yml
            refresh: true
        file-extension: yml
在nacos控制台创建cart-service-local.yml:
server:
  port: 8082
hm:
  db:
    host: 192.168.52.168
    port: 3306
    name: hm-cart
    username: root
    password: root
  swagger:
    title: 购物车服务接口文档
    description: 购物车服务接口文档
    email: [email protected]
    concat: [email protected]
    url: www.itcast.com
    package: com.hmall.cart.controller
5)复制代码
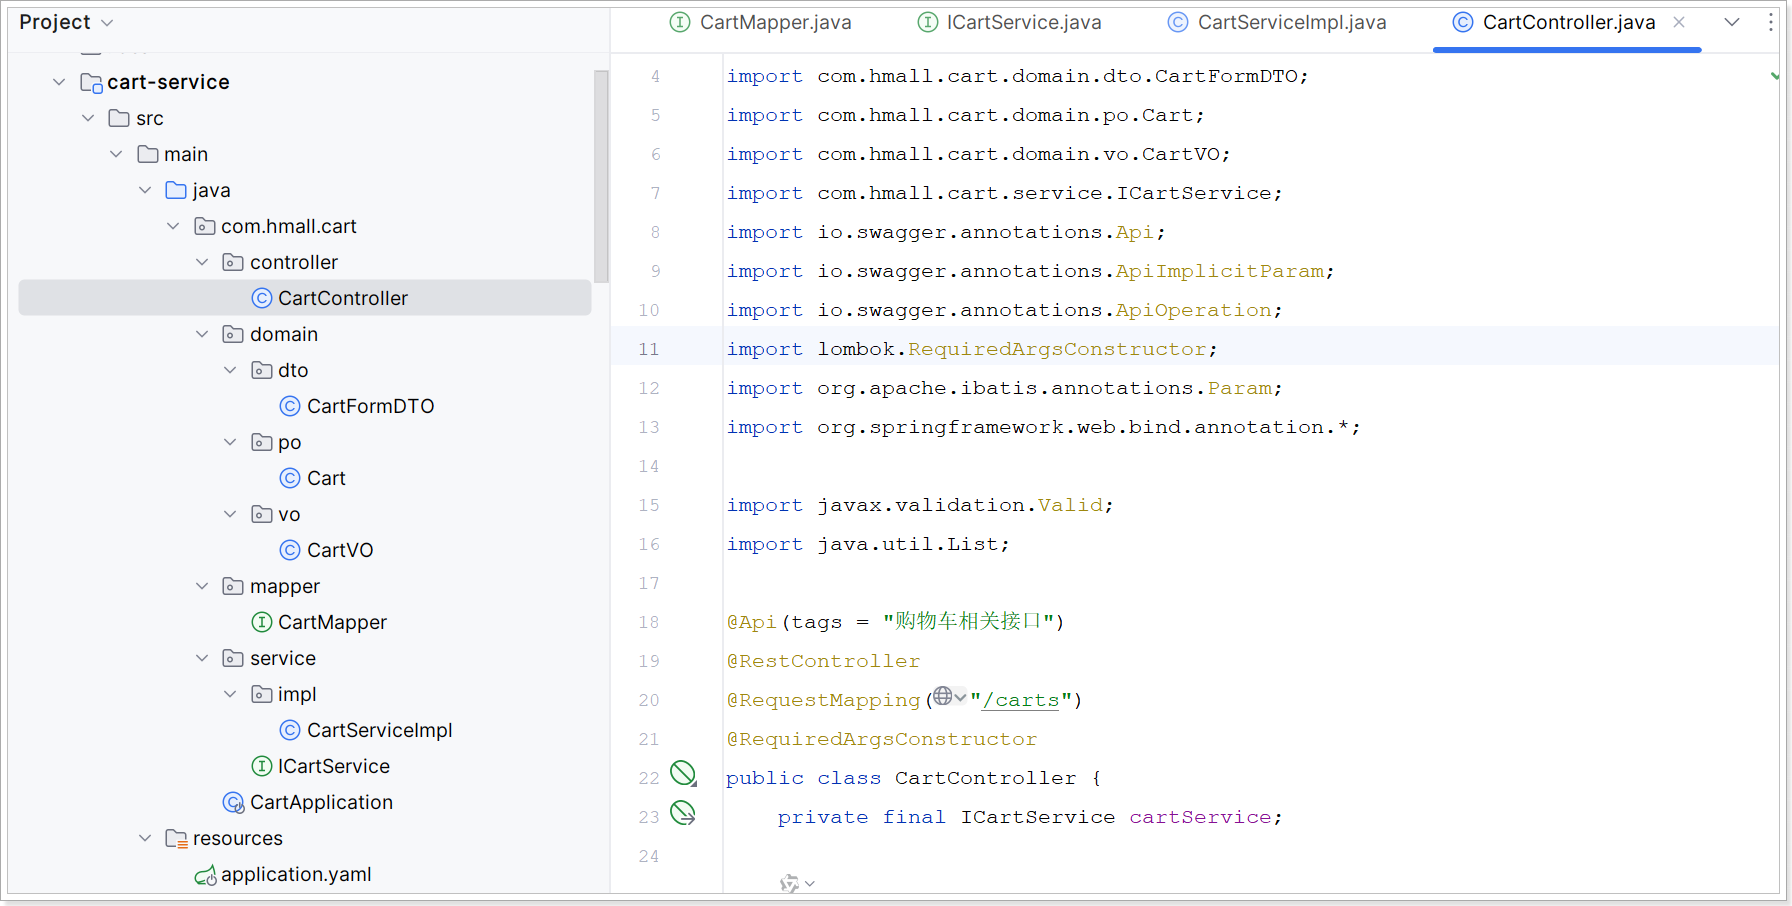
在CartServiceImpl中,有两个地方需要修改:
- 获取我的购物车信息时,需要用户id,这部分先写一个固定的用户ID
@Override
public List<CartVO> queryMyCarts() {
    // 1.查询我的购物车列表
    //List<Cart> carts = lambdaQuery().eq(Cart::getUserId, UserContext.getUser()).list();
    // TODO 查询我的购物车信息,获取用户ID
    List<Cart> carts = lambdaQuery().eq(Cart::getUserId, 1L).list();
    if (CollUtils.isEmpty(carts)) {
        return CollUtils.emptyList();
    }

    // 2.转换VO
    List<CartVO> vos = BeanUtils.copyList(carts, CartVO.class);

    // 3.处理VO中的商品信息
    handleCartItems(vos);

    // 4.返回
    return vos;
}
- 查询购物车时,需要查询商品信息,查询商品信息的接口在item-service中,先注释此部分代码
@Service
@RequiredArgsConstructor
public class CartServiceImpl extends ServiceImpl<CartMapper, Cart> implements ICartService {

    /*private final IItemService itemService;*/

    @Override
    public List<CartVO> queryMyCarts() {
        // 1.查询我的购物车列表
        //List<Cart> carts = lambdaQuery().eq(Cart::getUserId, UserContext.getUser()).list();
        // TODO 查询我的购物车信息,获取用户ID
        List<Cart> carts = lambdaQuery().eq(Cart::getUserId, 1L).list();

        if (CollUtils.isEmpty(carts)) {
            return CollUtils.emptyList();
        }

        // 2.转换VO
        List<CartVO> vos = BeanUtils.copyList(carts, CartVO.class);

        // 3.处理VO中的商品信息
        handleCartItems(vos);

        // 4.返回
        return vos;
    }

    private void handleCartItems(List<CartVO> vos) {
 /*       // 1.获取商品id
        Set<Long> itemIds = vos.stream().map(CartVO::getItemId).collect(Collectors.toSet());
        // 2.查询商品
        List<ItemDTO> items = itemService.queryItemByIds(itemIds);
        if (CollUtils.isEmpty(items)) {
            return;
        }
        // 3.转为 id 到 item的map
        Map<Long, ItemDTO> itemMap = items.stream().collect(Collectors.toMap(ItemDTO::getId, Function.identity()));
        // 4.写入vo
        for (CartVO v : vos) {
            ItemDTO item = itemMap.get(v.getItemId());
            if (item == null) {
                continue;
            }
            v.setNewPrice(item.getPrice());
            v.setStatus(item.getStatus());
            v.setStock(item.getStock());
        }*/
    }
}
6)创建数据库表
执行hm-cart.sql
7)测试
设置active-profiles为local,访问接口文档-查询购物车列表
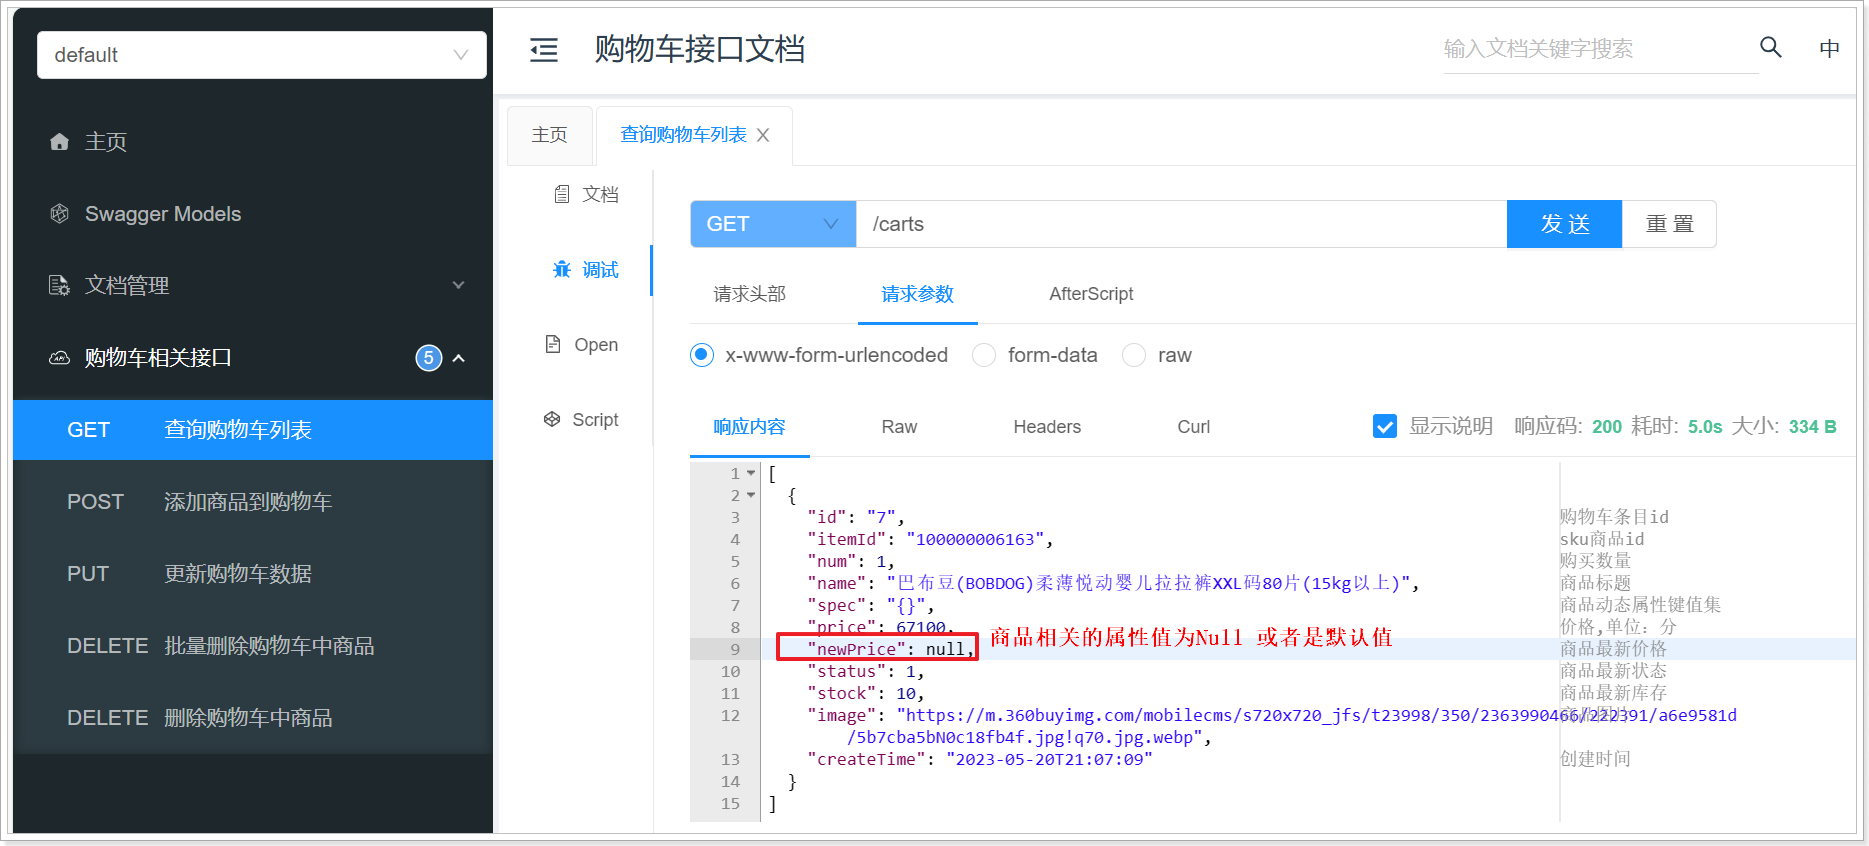
我们在上一步注释了查询购物车时调用商品服务的代码,所以此处为null
接下来我们就分析如何调整项目的结构。
购物车-商品服务调用
原先的购物车查询流程:

现在的购物车查询流程:
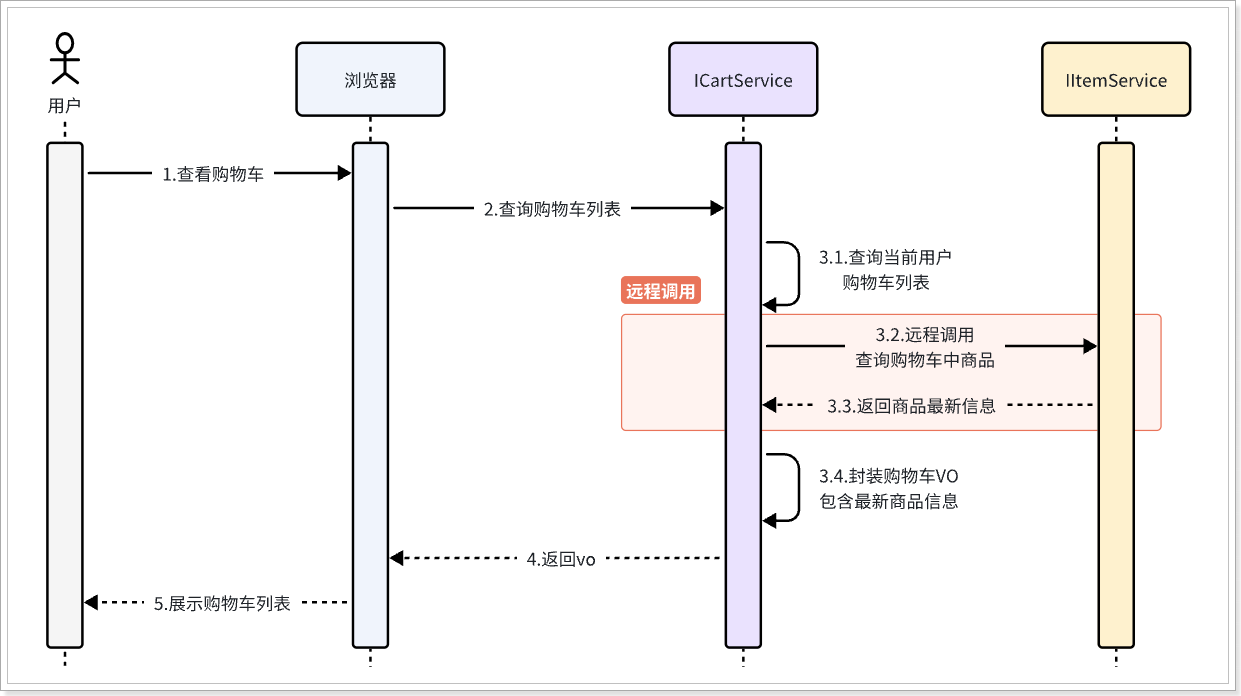
需要使用OpenFeign进行远程调用,bootstrap.yml:
spring:
  application:
    name: cart-service
  profiles:
    active: dev
  cloud:
    nacos:
      discovery:
        server-addr: 192.168.52.168:8848
      config:
        server-addr: 192.168.52.168:8848
        shared-configs:
          - data-id: shared-jdbc.yml
            refresh: true
          - data-id: shared-log.yml
            refresh: true
          - data-id: shared-swagger.yml
            refresh: true
          - data-id: shared-feign.yml
            refresh: true
        file-extension: yml
在cart-service中添加依赖:
  <!--openFeign-->
  <dependency>
      <groupId>org.springframework.cloud</groupId>
      <artifactId>spring-cloud-starter-openfeign</artifactId>
  </dependency>
  <!--负载均衡器-->
  <dependency>
      <groupId>org.springframework.cloud</groupId>
      <artifactId>spring-cloud-starter-loadbalancer</artifactId>
  </dependency>
定义ItemClient客户端:
@FeignClient(value = "item-service",path = "/items")
public interface ItemClient {
    @ApiOperation("根据id批量查询商品")
    @GetMapping
    public List<ItemDTO> queryItemByIds(@RequestParam("ids") List<Long> ids);
}
启动类扫描Feign客户端:
@MapperScan("com.hmall.cart.mapper")
@SpringBootApplication
@EnableFeignClients(basePackages = {"com.hmall.cart.client"})
public class CartApplication {
    public static void main(String[] args) {
        SpringApplication.run(CartApplication.class, args);
    }
}
修改我们注释的代码:
@Service
@RequiredArgsConstructor
public class CartServiceImpl extends ServiceImpl<CartMapper, Cart> implements ICartService {

	@Autowired
	private ItemClient itemClient;

	@Override
	public List<CartVO> queryMyCarts() {
	    // 1.查询我的购物车列表
	    //List<Cart> carts = lambdaQuery().eq(Cart::getUserId, UserContext.getUser()).list();
	    // TODO 查询我的购物车信息,获取用户ID
	    List<Cart> carts = lambdaQuery().eq(Cart::getUserId, 1L).list();
	    if (CollUtils.isEmpty(carts)) {
	        return CollUtils.emptyList();
	    }

	    // 2.转换VO
	    List<CartVO> vos = BeanUtils.copyList(carts, CartVO.class);

	    // 3.处理VO中的商品信息
	    handleCartItems(vos);

	    // 4.返回
	    return vos;
	}

	private void handleCartItems(List<CartVO> vos) {
	    // 1.获取商品id
	    Set<Long> itemIds = vos.stream().map(CartVO::getItemId).collect(Collectors.toSet());
	    // 2.通过Feign客户端查询商品
	    List<ItemDTO> items = itemClient.queryItemByIds(itemIds);
	    if (CollUtils.isEmpty(items)) {
	        return;
	    }
	    // 3.转为 id 到 item的map
	    Map<Long, ItemDTO> itemMap = items.stream().collect(Collectors.toMap(ItemDTO::getId, Function.identity()));
	    // 4.写入vo
	    for (CartVO v : vos) {
	        ItemDTO item = itemMap.get(v.getItemId());
	        if (item == null) {
	            continue;
	        }
	        v.setNewPrice(item.getPrice());
	        v.setStatus(item.getStatus());
	        v.setStock(item.getStock());
	    }
	}
}
打开接口文档进行测试:
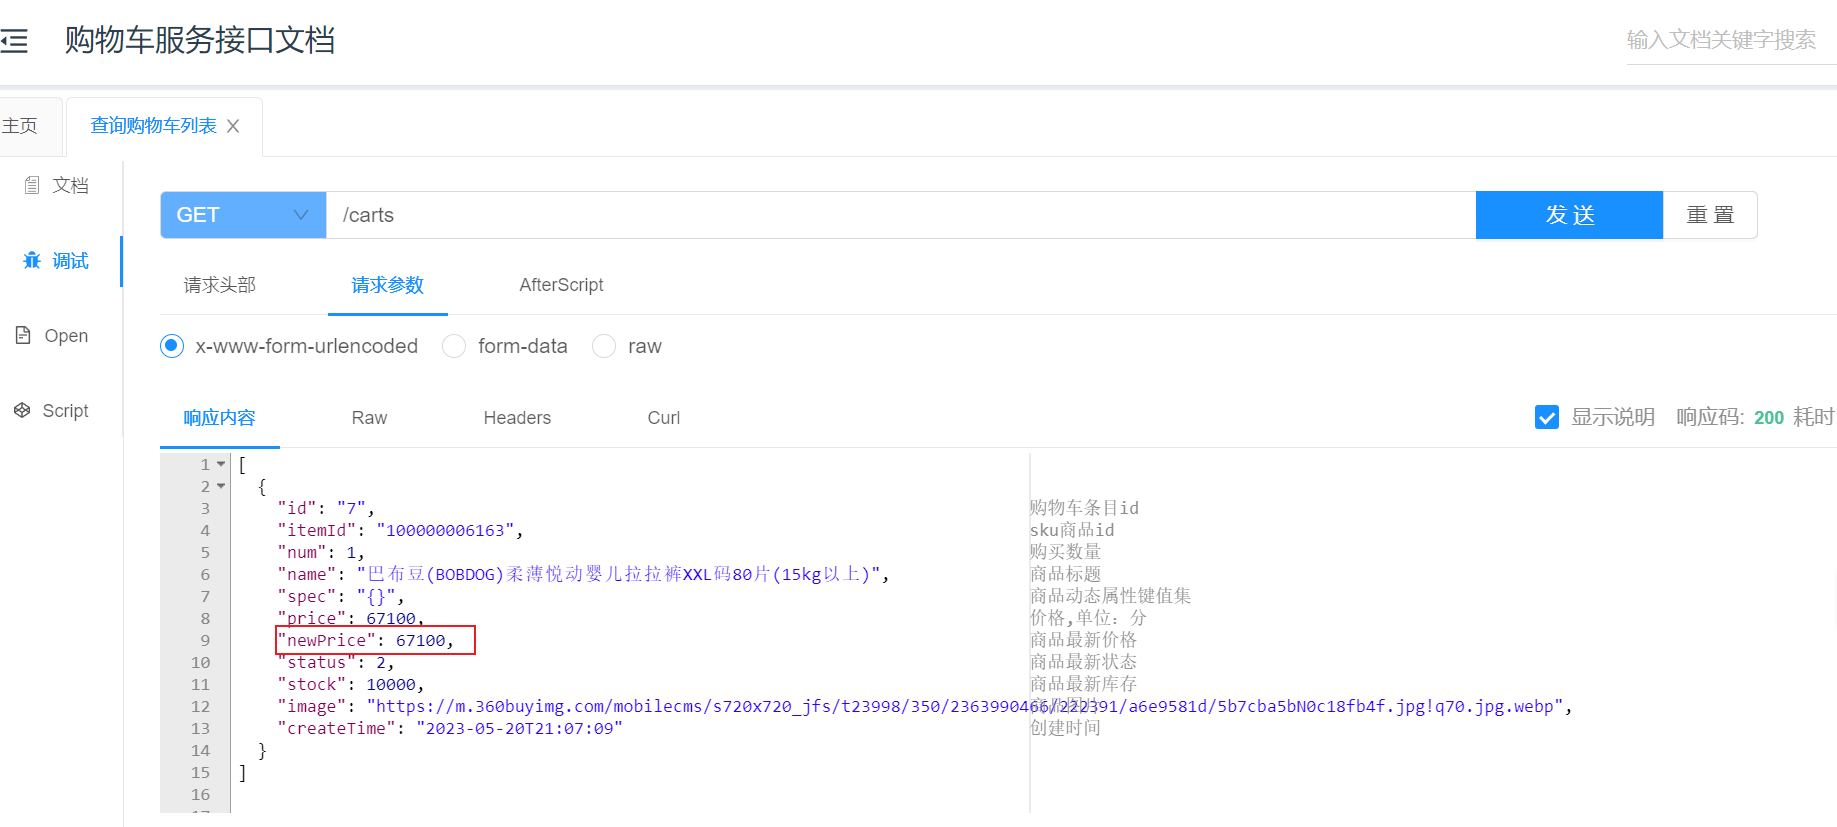
在购物车服务调用商品服务成功。
OpenFeign最佳实践
接下来我们要抽取下单微服务 trade-service,我们先看一下hm-service中和下单有关的业务逻辑:
@ApiOperation("创建订单")
@PostMapping
public Long createOrder(@RequestBody OrderFormDTO orderFormDTO){
    return orderService.createOrder(orderFormDTO);
}
com.hmall.service.OrderServiceImpl#createOrder():
@Override
@Transactional
public Long createOrder(OrderFormDTO orderFormDTO) {
    // 1.订单数据
    Order order = new Order();
    // 1.1.查询商品
    List<OrderDetailDTO> detailDTOS = orderFormDTO.getDetails();
    // 1.2.获取商品id和数量的Map
    Map<Long, Integer> itemNumMap = detailDTOS.stream()
            .collect(Collectors.toMap(OrderDetailDTO::getItemId, OrderDetailDTO::getNum));
    Set<Long> itemIds = itemNumMap.keySet();
    // 1.3.查询商品
    List<ItemDTO> items = itemService.queryItemByIds(itemIds);
    if (items == null || items.size() < itemIds.size()) {
        throw new BadRequestException("商品不存在");
    }
    // 1.4.基于商品价格、购买数量计算商品总价:totalFee
    int total = 0;
    for (ItemDTO item : items) {
        total += item.getPrice() * itemNumMap.get(item.getId());
    }
    order.setTotalFee(total);
    // 1.5.其它属性
    order.setPaymentType(orderFormDTO.getPaymentType());
    order.setUserId(UserContext.getUser());
    order.setStatus(1);
    // 1.6.将Order写入数据库order表中
    save(order);

    // 2.保存订单详情
    List<OrderDetail> details = buildDetails(order.getId(), items, itemNumMap);
    detailService.saveBatch(details);

    // 3.清理购物车商品
    cartService.removeByItemIds(itemIds);

    // 4.扣减库存
    try {
        itemService.deductStock(detailDTOS);
    } catch (Exception e) {
        throw new RuntimeException("库存不足!");
    }
    return order.getId();
}
下单时前端提交的是商品id,计算订单总价也需要调用item-service的queryItemByIds方法查询商品信息。
如果拆分了微服务trade-service,也需要远程调用item-service的方法,这个需求和cart-service是相同的。
也就是说,定义了cart-service的ItemClient后,也需要在trade-service中再次定义ItemClient接口,这就是重复编码。
重复编码显然是不符合编码规范的,将ItemClient放在cart-service中是不行的。
思路分析
目前的情况是,在cart-service和order-service中需要远程调用item-serivce的接口:
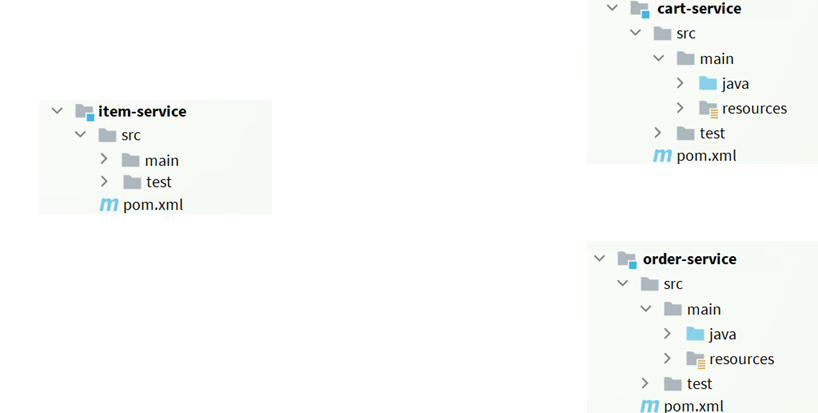
第一种抽取办法:将FeignClient单独作为一个工程,需要远程调用的微服务引入这个工程即可。
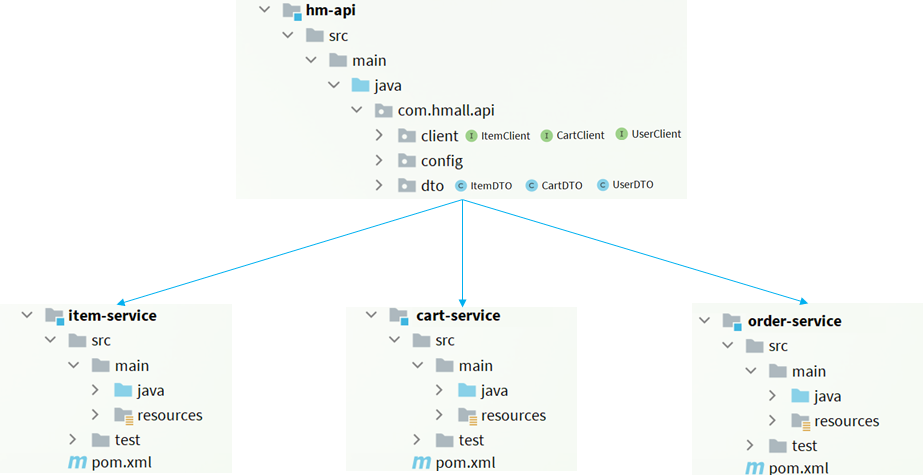
这种实现方式虽然简单,但是hm-api工程集合了所有需要被远程调用的客户端,包括:ItemClient、CartClient、UserClient。如果引入hm-api工程会引入所有的客户端,但是我们在当前的微服务中可能只需要ItemClient。
第二种抽取办法:在被远程调用的工程内抽取子模块,在其他工程里依赖这个子模块
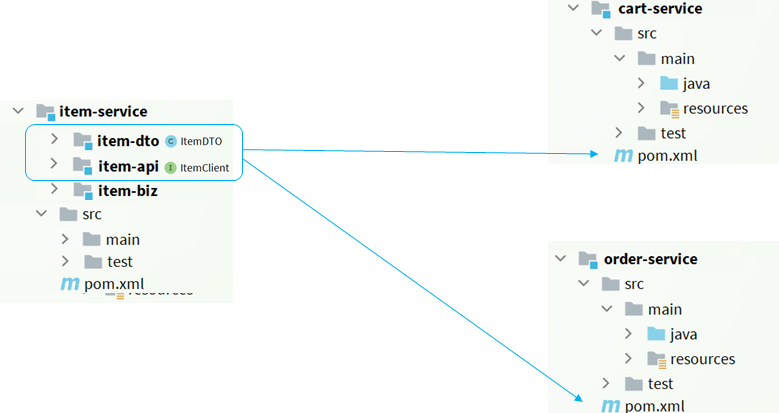
item-service需要被其他微服务远程调用,那就由item-service自身提供client客户端item-api,在其他工程中引入item-api模块。
对以上两种方式进行总结:
-
思路1:抽取到微服务之外的公共module
-
思路2:每个微服务自己抽取一个module
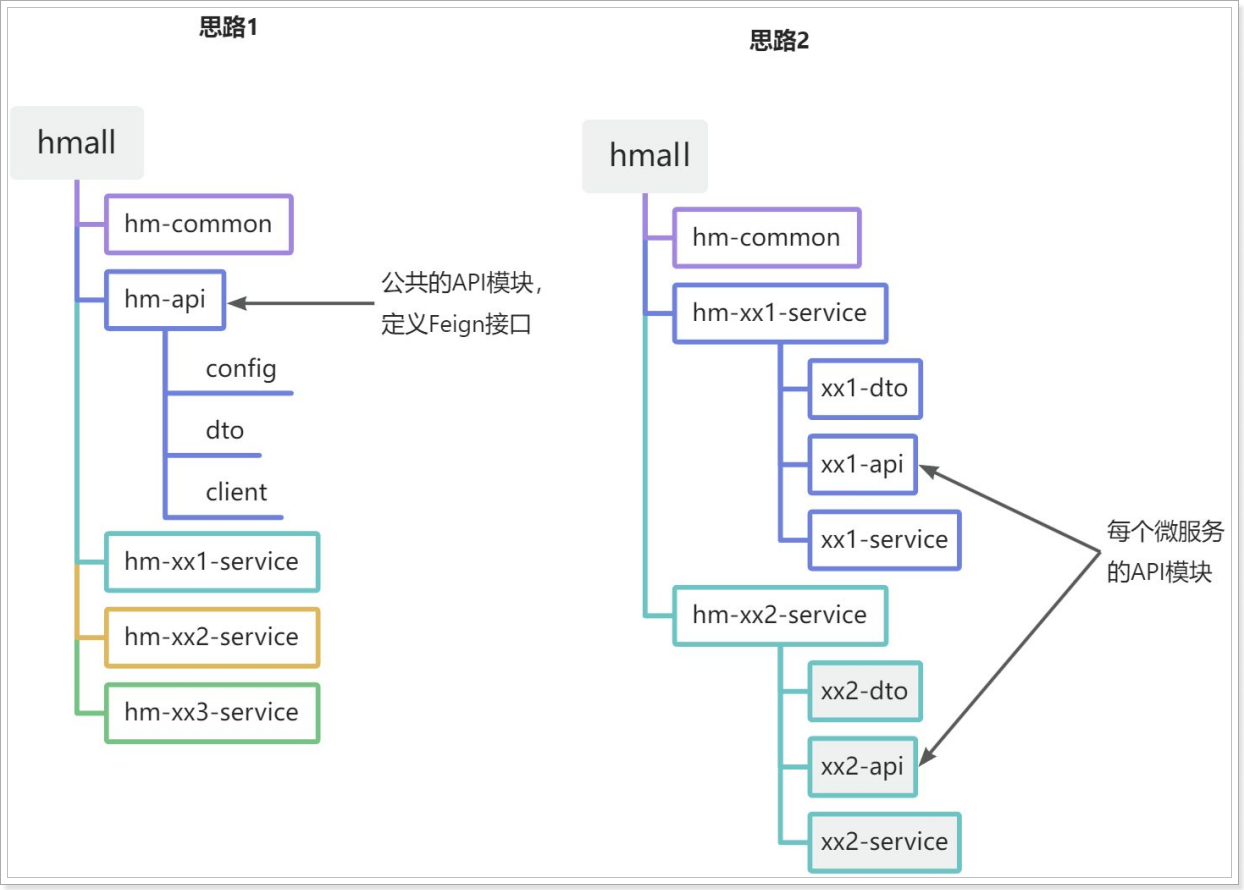
思路1更简单,工程结构也相对清晰,但是项目耦合度偏高
思路2相对麻烦,工程结构相对更复杂,但是服务之间的耦合度降低
微服务自身提供客户端
item-service
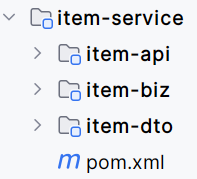
这样做需要重新调整item-service的结构,最终要拆分出三个包:
- item-api
- item-domain
- item-biz
并且item-service是聚合工程,item-api依赖item-domain,item-biz也依赖item-domain
创建maven工程 item-service
<project xmlns="http://maven.apache.org/POM/4.0.0" xmlns:xsi="http://www.w3.org/2001/XMLSchema-instance"
         xsi:schemaLocation="http://maven.apache.org/POM/4.0.0 http://maven.apache.org/xsd/maven-4.0.0.xsd">
    <modelVersion>4.0.0</modelVersion>
    <parent>
        <groupId>com.heima</groupId>
        <artifactId>hmall</artifactId>
        <version>1.0.0</version>
    </parent>

    <groupId>com.hmall</groupId>
    <artifactId>item-service</artifactId>
    <packaging>pom</packaging>

    <name>item-micro-service</name>
    <url>http://maven.apache.org</url>
    <modules>
        <module>item-api</module>
        <module>item-biz</module>
        <module>item-dto</module>
    </modules>

    <properties>
        <project.build.sourceEncoding>UTF-8</project.build.sourceEncoding>
    </properties>

    <dependencies>
        <dependency>
            <groupId>com.heima</groupId>
            <artifactId>hm-common</artifactId>
            <version>1.0.0</version>
        </dependency>
    </dependencies>
</project>
在父工程中依赖hm-common,避免子模块多次引入
item-domain
创建模块item-domain:
<?xml version="1.0" encoding="UTF-8"?>
<project xmlns="http://maven.apache.org/POM/4.0.0"
         xmlns:xsi="http://www.w3.org/2001/XMLSchema-instance"
         xsi:schemaLocation="http://maven.apache.org/POM/4.0.0 http://maven.apache.org/xsd/maven-4.0.0.xsd">
    <modelVersion>4.0.0</modelVersion>
    <parent>
        <groupId>com.hmall</groupId>
        <artifactId>item-service</artifactId>
        <version>1.0.0</version>
    </parent>

    <artifactId>item-dto</artifactId>

    <properties>
        <maven.compiler.source>11</maven.compiler.source>
        <maven.compiler.target>11</maven.compiler.target>
        <project.build.sourceEncoding>UTF-8</project.build.sourceEncoding>
    </properties>

</project>
不需要引入lombok、swagger等依赖,因为父工程item-service引入了hm-common
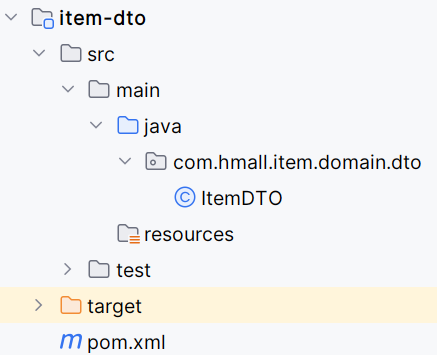
最终结构:
item-biz
pom:需要依赖item-domain
<?xml version="1.0" encoding="UTF-8"?>
<project xmlns="http://maven.apache.org/POM/4.0.0"
         xmlns:xsi="http://www.w3.org/2001/XMLSchema-instance"
         xsi:schemaLocation="http://maven.apache.org/POM/4.0.0 http://maven.apache.org/xsd/maven-4.0.0.xsd">
    <modelVersion>4.0.0</modelVersion>
    <parent>
        <groupId>com.hmall</groupId>
        <artifactId>item-service</artifactId>
        <version>1.0.0</version>
    </parent>

    <artifactId>item-biz</artifactId>

    <properties>
        <maven.compiler.source>11</maven.compiler.source>
        <maven.compiler.target>11</maven.compiler.target>
        <project.build.sourceEncoding>UTF-8</project.build.sourceEncoding>
    </properties>

    <dependencies>

        <dependency>
            <groupId>com.hmall</groupId>
            <artifactId>item-dto</artifactId>
            <version>1.0.0</version>
        </dependency>

        <!--web-->
        <dependency>
            <groupId>org.springframework.boot</groupId>
            <artifactId>spring-boot-starter-web</artifactId>
        </dependency>
        <!--数据库-->
        <dependency>
            <groupId>mysql</groupId>
            <artifactId>mysql-connector-java</artifactId>
        </dependency>
        <!--mybatis-->
        <dependency>
            <groupId>com.baomidou</groupId>
            <artifactId>mybatis-plus-boot-starter</artifactId>
        </dependency>
        <!--单元测试-->
        <dependency>
            <groupId>org.springframework.boot</groupId>
            <artifactId>spring-boot-starter-test</artifactId>
        </dependency>

        <dependency>
            <groupId>com.alibaba.cloud</groupId>
            <artifactId>spring-cloud-starter-alibaba-nacos-discovery</artifactId>
        </dependency>

        <dependency>
            <groupId>com.alibaba.cloud</groupId>
            <artifactId>spring-cloud-starter-alibaba-nacos-config</artifactId>
        </dependency>

        <dependency>
            <groupId>org.springframework.cloud</groupId>
            <artifactId>spring-cloud-starter-bootstrap</artifactId>
        </dependency>
    </dependencies>

</project>
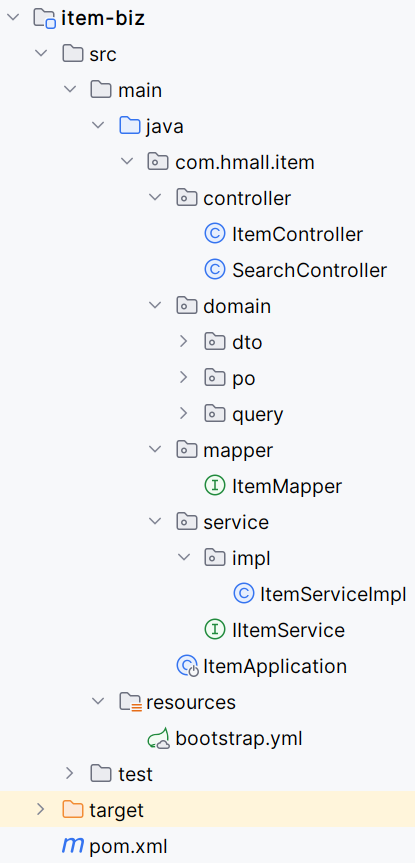
最终结构:
item-api
<?xml version="1.0" encoding="UTF-8"?>
<project xmlns="http://maven.apache.org/POM/4.0.0"
         xmlns:xsi="http://www.w3.org/2001/XMLSchema-instance"
         xsi:schemaLocation="http://maven.apache.org/POM/4.0.0 http://maven.apache.org/xsd/maven-4.0.0.xsd">
    <modelVersion>4.0.0</modelVersion>
    <parent>
        <groupId>com.hmall</groupId>
        <artifactId>item-service</artifactId>
        <version>1.0.0</version>
    </parent>

    <artifactId>item-api</artifactId>

    <properties>
        <maven.compiler.source>11</maven.compiler.source>
        <maven.compiler.target>11</maven.compiler.target>
        <project.build.sourceEncoding>UTF-8</project.build.sourceEncoding>
    </properties>

    <dependencies>
        <dependency>
            <groupId>com.hmall</groupId>
            <artifactId>item-dto</artifactId>
            <version>1.0.0</version>
        </dependency>
        <!--openFeign-->
        <dependency>
            <groupId>org.springframework.cloud</groupId>
            <artifactId>spring-cloud-starter-openfeign</artifactId>
        </dependency>
        <!--负载均衡器-->
        <dependency>
            <groupId>org.springframework.cloud</groupId>
            <artifactId>spring-cloud-starter-loadbalancer</artifactId>
        </dependency>

    </dependencies>

</project>
在item-api客户端中引入了openfeign、负载均衡依赖
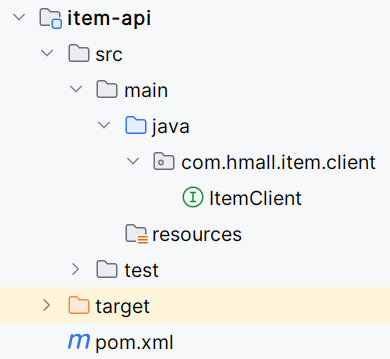
还有ok-http的依赖没有引入,这个依赖不放在api模块中,如果一个服务引入多个客户端就会重复引入多个依赖。
将这个依赖放在发起远程调用的biz模块中。
最终结构:
cart-service
创建聚合工程cart-service
<?xml version="1.0" encoding="UTF-8"?>
<project xmlns="http://maven.apache.org/POM/4.0.0"
         xmlns:xsi="http://www.w3.org/2001/XMLSchema-instance"
         xsi:schemaLocation="http://maven.apache.org/POM/4.0.0 http://maven.apache.org/xsd/maven-4.0.0.xsd">
    <modelVersion>4.0.0</modelVersion>
    <parent>
        <groupId>com.heima</groupId>
        <artifactId>hmall</artifactId>
        <version>1.0.0</version>
    </parent>

    <groupId>com.hmall</groupId>
    <artifactId>cart-service</artifactId>
    <packaging>pom</packaging>
    <modules>
        <module>cart-domain</module>
        <module>cart-biz</module>
    </modules>

    <properties>
        <maven.compiler.source>11</maven.compiler.source>
        <maven.compiler.target>11</maven.compiler.target>
        <project.build.sourceEncoding>UTF-8</project.build.sourceEncoding>
    </properties>

    <dependencies>
        <dependency>
            <groupId>com.heima</groupId>
            <artifactId>hm-common</artifactId>
            <version>1.0.0</version>
        </dependency>
    </dependencies>
</project>
cart-domain
<?xml version="1.0" encoding="UTF-8"?>
<project xmlns="http://maven.apache.org/POM/4.0.0"
         xmlns:xsi="http://www.w3.org/2001/XMLSchema-instance"
         xsi:schemaLocation="http://maven.apache.org/POM/4.0.0 http://maven.apache.org/xsd/maven-4.0.0.xsd">
    <modelVersion>4.0.0</modelVersion>
    <parent>
        <groupId>com.hmall</groupId>
        <artifactId>cart-service</artifactId>
        <version>1.0.0</version>
    </parent>

    <artifactId>cart-domain</artifactId>

    <properties>
        <maven.compiler.source>11</maven.compiler.source>
        <maven.compiler.target>11</maven.compiler.target>
        <project.build.sourceEncoding>UTF-8</project.build.sourceEncoding>
    </properties>

</project>
最终的结构:
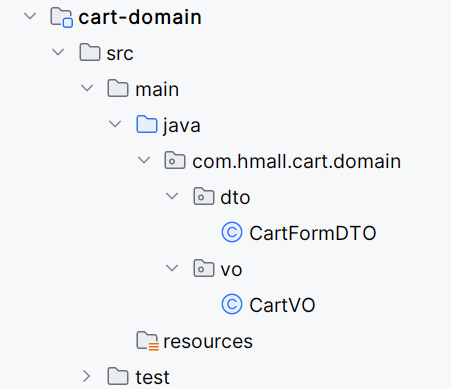
po类放在cart-biz中了,作为cart-api的出入参并不需要使用po类。
cart-biz
需要引入item-api,item-api配置了对open-feign的依赖
<?xml version="1.0" encoding="UTF-8"?>
<project xmlns="http://maven.apache.org/POM/4.0.0"
         xmlns:xsi="http://www.w3.org/2001/XMLSchema-instance"
         xsi:schemaLocation="http://maven.apache.org/POM/4.0.0 http://maven.apache.org/xsd/maven-4.0.0.xsd">
    <modelVersion>4.0.0</modelVersion>
    <parent>
        <groupId>com.hmall</groupId>
        <artifactId>cart-service</artifactId>
        <version>1.0.0</version>
    </parent>

    <artifactId>cart-biz</artifactId>

    <properties>
        <maven.compiler.source>11</maven.compiler.source>
        <maven.compiler.target>11</maven.compiler.target>
        <project.build.sourceEncoding>UTF-8</project.build.sourceEncoding>
    </properties>

    <dependencies>

        <dependency>
            <groupId>com.hmall</groupId>
            <artifactId>cart-domain</artifactId>
            <version>1.0.0</version>
        </dependency>

        <dependency>
            <groupId>com.hmall</groupId>
            <artifactId>item-api</artifactId>
            <version>1.0.0</version>
        </dependency>

        <!--web-->
        <dependency>
            <groupId>org.springframework.boot</groupId>
            <artifactId>spring-boot-starter-web</artifactId>
        </dependency>
        <!--数据库-->
        <dependency>
            <groupId>mysql</groupId>
            <artifactId>mysql-connector-java</artifactId>
        </dependency>
        <!--mybatis-->
        <dependency>
            <groupId>com.baomidou</groupId>
            <artifactId>mybatis-plus-boot-starter</artifactId>
        </dependency>
        <!--单元测试-->
        <dependency>
            <groupId>org.springframework.boot</groupId>
            <artifactId>spring-boot-starter-test</artifactId>
        </dependency>

        <!--nacos服务注册-->
        <dependency>
            <groupId>com.alibaba.cloud</groupId>
            <artifactId>spring-cloud-starter-alibaba-nacos-discovery</artifactId>
        </dependency>

        <!--nacos配置中心-->
        <dependency>
            <groupId>com.alibaba.cloud</groupId>
            <artifactId>spring-cloud-starter-alibaba-nacos-config</artifactId>
        </dependency>

        <!--扫描bootstrap文件-->
        <dependency>
            <groupId>org.springframework.cloud</groupId>
            <artifactId>spring-cloud-starter-bootstrap</artifactId>
        </dependency>

		<!--OK http 的依赖 -->
	    <dependency>
	        <groupId>io.github.openfeign</groupId>
	        <artifactId>feign-okhttp</artifactId>
	    </dependency>

    </dependencies>

    <build>
        <finalName>${project.artifactId}</finalName>
        <plugins>
            <plugin>
                <groupId>org.springframework.boot</groupId>
                <artifactId>spring-boot-maven-plugin</artifactId>
            </plugin>
        </plugins>
    </build>
</project>
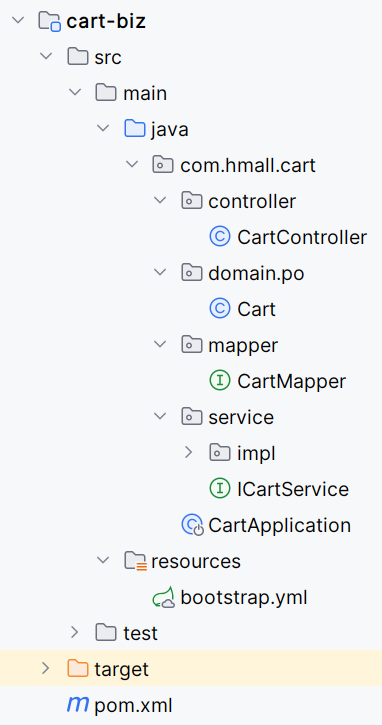
并且注意:cart-biz作为远程调用发起者,也需要引入ok-http依赖。
最终结构:
启动类扫描FeignClient:
@MapperScan("com.hmall.cart.mapper")
@SpringBootApplication
@EnableFeignClients(basePackageClasses = ItemClient.class)
public class CartApplication {
    public static void main(String[] args) {
        SpringApplication.run(CartApplication.class, args);
    }
}
cart-api
pom:
<?xml version="1.0" encoding="UTF-8"?>
<project xmlns="http://maven.apache.org/POM/4.0.0"
         xmlns:xsi="http://www.w3.org/2001/XMLSchema-instance"
         xsi:schemaLocation="http://maven.apache.org/POM/4.0.0 http://maven.apache.org/xsd/maven-4.0.0.xsd">
    <modelVersion>4.0.0</modelVersion>
    <parent>
        <groupId>com.hmall</groupId>
        <artifactId>cart-service</artifactId>
        <version>1.0.0</version>
    </parent>

    <artifactId>cart-api</artifactId>

    <properties>
        <maven.compiler.source>11</maven.compiler.source>
        <maven.compiler.target>11</maven.compiler.target>
        <project.build.sourceEncoding>UTF-8</project.build.sourceEncoding>
    </properties>

    <dependencies>
        <dependency>
            <groupId>com.hmall</groupId>
            <artifactId>cart-domain</artifactId>
            <version>1.0.0</version>
        </dependency>
        <!--openFeign-->
        <dependency>
            <groupId>org.springframework.cloud</groupId>
            <artifactId>spring-cloud-starter-openfeign</artifactId>
        </dependency>
        <!--负载均衡器-->
        <dependency>
            <groupId>org.springframework.cloud</groupId>
            <artifactId>spring-cloud-starter-loadbalancer</artifactId>
        </dependency>
    </dependencies>

</project>
@FeignClient(value = "cart-service",path = "/carts")
public interface CartClient {
    @PostMapping
    public void addItem2Cart(@Valid @RequestBody CartFormDTO cartFormDTO);

    @PutMapping
    public void updateCart(@RequestBody Cart cart);

    @DeleteMapping("{id}")
    public void deleteCartItem(@Param("购物车条目id") @PathVariable("id") Long id);

    @GetMapping
    public List<CartVO> queryMyCarts();

    @DeleteMapping
    public void deleteCartItemByIds(@RequestParam("ids") List<Long> ids);
}
日志
如果在当前的微服务模块中引入了两个Feign客户端,控制两个Feign客户端的日志输出:
- 单独控制,只能在Feign客户端的api模块中定义这些配置,并且在@FeignClient时指定
- 共同控制,在当前微服务启动类上@EnableFeignClients指定
如果每个api客户端都提供DefaultFeignClient配置,在共同控制时需要选择使用哪个DefaultFeignClient的配置,比较麻烦。
并且这样做只能开启日志,无法进行关闭,目前选择在服务调用者处进行共同控制。
package com.hmall.cart.config;

import feign.Logger;
import org.springframework.context.annotation.Bean;

public class DefaultFeignConfig {
    @Bean
    public Logger.Level feignLoggerLevel(){
        return Logger.Level.FULL;
    }
}
@MapperScan("com.hmall.cart.mapper")
@SpringBootApplication
@EnableFeignClients(basePackageClasses = ItemClient.class,defaultConfiguration = DefaultFeignConfig.class)
public class CartApplication {
    public static void main(String[] args) {
        SpringApplication.run(CartApplication.class, args);
    }
}
用户微服务
交易微服务
前后端联调
在拆分微服务之前,nginx将请求全部转发到8080端口,拆分完微服务后,微服务占用的是8081-8085端口,目前需要对Nginx进行配置,才能访问到我们的微服务:
    server {
        listen       18080;
        server_name  localhost;
        # 指定前端项目所在的位置
        location / {
            root html/hmall-portal;
        }

        error_page   500 502 503 504  /50x.html;
        location = /50x.html {
            root   html;
        }

        location /api/orders {
            rewrite /api/(.*)  /$1 break;
            proxy_pass http://localhost:8084;
        }
        location /api/users {
            rewrite /api/(.*)  /$1 break;
            proxy_pass http://localhost:8083;
        }
        location /api/addresses {
            rewrite /api/(.*)  /$1 break;
            proxy_pass http://localhost:8083;
        }
        location /api/carts {
            rewrite /api/(.*)  /$1 break;
            proxy_pass http://localhost:8082;
        }
        location /api/items {
            rewrite /api/(.*)  /$1 break;
            proxy_pass http://localhost:8181;
        }
        location /api/search {
            rewrite /api/(.*)  /$1 break;
            proxy_pass http://localhost:8181;
        }
        location /api/pay-orders {
            rewrite /api/(.*)  /$1 break;
            proxy_pass http://localhost:8085;
        }

    }
    server {
        listen       18081;
        server_name  localhost;
        # 指定前端项目所在的位置
        location / {
            root html/hmall-admin;
        }

        error_page   500 502 503 504  /50x.html;
        location = /50x.html {
            root   html;
        }

        ocation /api/orders {
            rewrite /api/(.*)  /$1 break;
            proxy_pass http://localhost:8084;
        }
        location /api/users {
            rewrite /api/(.*)  /$1 break;
            proxy_pass http://localhost:8083;
        }
        location /api/addresses {
            rewrite /api/(.*)  /$1 break;
            proxy_pass http://localhost:8083;
        }
        location /api/carts {
            rewrite /api/(.*)  /$1 break;
            proxy_pass http://localhost:8082;
        }
        location /api/items {
            rewrite /api/(.*)  /$1 break;
            proxy_pass http://localhost:8181;
        }
        location /api/search {
            rewrite /api/(.*)  /$1 break;
            proxy_pass http://localhost:8181;
        }
        location /api/pay-orders {
            rewrite /api/(.*)  /$1 break;
            proxy_pass http://localhost:8085;
        }
    }