H3C ACL配置实验
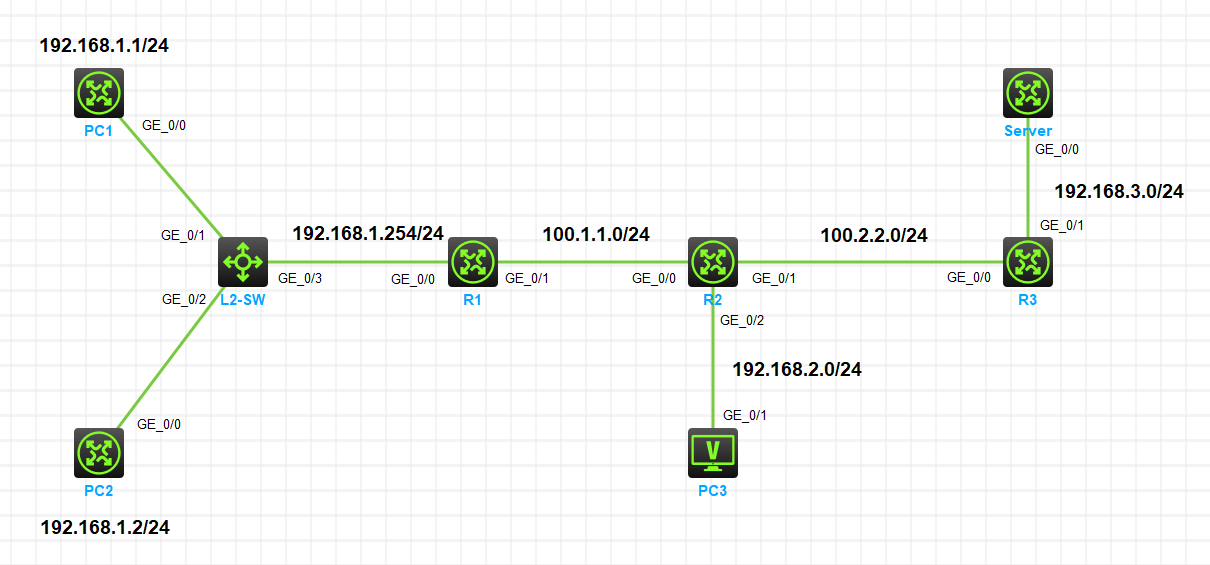
实验拓扑
实验需求
-
按照图示配置 IP 地址
-
全网路由互通
-
在 SERVER1 上配置开启 TELNET 和 FTP 服务
-
配置 ACL 实现如下效果
-
192.168.1.0/24 网段不允许访问192.168.2.0/24 网段,要求使用基本 ACL 实现 - PC1 可以访问 SERVER1 的 TELNET 服务,但不能访问 FTP 服务
- PC2 可以访问 SERVER1 的 FTP 服务,但不能访问 TELNET 服务
-
192.168.2.0/24 网段不允许访问 SERVER1,要求通过高级 ACL 实现
-
实验步骤
设备配置IP地址(略)
R1,R2,R3 上配置 OSPF 使全网路由互通
R1
#
 sysname R1
#
ospf 1 router-id 1.1.1.1
 silent-interface GigabitEthernet0/0
 area 0.0.0.0
  network 1.1.1.1 0.0.0.0
  network 100.1.1.0 0.0.0.255
  network 192.168.1.0 0.0.0.255
R2
#
ospf 1 router-id 2.2.2.2
 silent-interface GigabitEthernet0/2
 area 0.0.0.0
  network 2.2.2.2 0.0.0.0
  network 100.1.1.0 0.0.0.255
  network 100.2.2.0 0.0.0.255
  network 192.168.2.0 0.0.0.255
R3
#
 sysname R3
#
ospf 1 router-id 3.3.3.3
 silent-interface GigabitEthernet0/1
 area 0.0.0.0
  network 3.3.3.3 0.0.0.0
  network 100.2.2.0 0.0.0.255
  network 192.168.3.0 0.0.0.255
SERVER1 上配置开启 TELNET 和 FTP 服务
#
 sysname Server
#
 telnet server enable
#
line vty 0 4
 authentication-mode scheme
 protocol inbound all
#
local-user admin class manage
 password simple Test123456
 service-type ftp
 service-type telnet
 authorization-attribute user-role level-15
#
 ftp server enable
#
return
配置 ACL
192.168.1.0/24 网段不允许访问 192.168.2.0/24 网段,要求使用基本 ACL 实现
在R2上配置基本ACL
#
acl basic 2000
 rule 0 deny source 192.168.1.0 0.0.0.255
#
interface GigabitEthernet0/2
 packet-filter 2000 outbound
PC1 可以访问 SERVER1 的 TELNET 服务,但不能访问 FTP 服务
PC2 可以访问 SERVER1 的 FTP 服务,但不能访问 TELNET 服务
在R1上高级ACL
#
acl advanced 3000
 rule 0 deny tcp source 192.168.1.1 0 destination 192.168.3.1 0 destination-port range ftp-data ftp
 rule 5 deny tcp source 192.168.1.2 0 destination 192.168.3.1 0 destination-port eq telnet
#
interface GigabitEthernet0/0
 packet-filter 3000 inbound
192.168.2.0/24 网段不允许访问 SERVER1,要求通过高级 ACL 实现
在R2上配置高级ACL
#
acl advanced 3000
 rule 0 deny ip source 192.168.2.0 0.0.0.255 destination 192.168.3.1 0
#
interface GigabitEthernet0/2
 packet-filter 3000 inbound
实验验证
192.168.1.0/24 网段不允许访问 192.168.2.0/24 网段
<PC1>ping 192.168.2.1
Ping 192.168.2.1 (192.168.2.1): 56 data bytes, press CTRL+C to break
Request time out
Request time out
Request time out
Request time out
Request time out
--- Ping statistics for 192.168.2.1 ---

5 packet(s) transmitted, 0 packet(s) received, 100.0% packet loss

<PC1>%Feb  3 14:42:52:076 2024 PC1 PING/6/PING_STATISTICS: Ping statistics for 192.168.2.1: 5 packet(s) transmitted, 0 packet(s) received, 100.0% packet loss.
<PC2>ping 192.168.2.1
Ping 192.168.2.1 (192.168.2.1): 56 data bytes, press CTRL+C to break
Request time out
Request time out
Request time out
Request time out
Request time out

--- Ping statistics for 192.168.2.1 ---
5 packet(s) transmitted, 0 packet(s) received, 100.0% packet loss
<PC2>%Feb  3 14:43:06:493 2024 PC2 PING/6/PING_STATISTICS: Ping statistics for 192.168.2.1: 5 packet(s) transmitted, 0 packet(s) received, 100.0% packet loss.
PC1 可以访问 SERVER1 的 TELNET 服务,但不能访问 FTP 服务
<PC1>telnet 192.168.3.1 Trying 192.168.3.1 ... Press CTRL+K to abort Connected to 192.168.3.1 ...<span style="font-weight: bold;" data-type="strong"></span><span style="font-weight: bold;" data-type="strong"></span><span style="font-weight: bold;" data-type="strong"></span><span style="font-weight: bold;" data-type="strong"></span><span style="font-weight: bold;" data-type="strong"></span><span style="font-weight: bold;" data-type="strong"></span><span style="font-weight: bold;" data-type="strong"></span><span style="font-weight: bold;" data-type="strong"></span><span style="font-weight: bold;" data-type="strong"></span><span style="font-weight: bold;" data-type="strong"></span><span style="font-weight: bold;" data-type="strong"></span><span style="font-weight: bold;" data-type="strong"></span><span style="font-weight: bold;" data-type="strong"></span><span style="font-weight: bold;" data-type="strong"></span><span style="font-weight: bold;" data-type="strong"></span><span style="font-weight: bold;" data-type="strong"></span><span style="font-weight: bold;" data-type="strong"></span><span style="font-weight: bold;" data-type="strong"></span><span style="font-weight: bold;" data-type="strong"></span>**
- Copyright (c) 2004-2021 New H3C Technologies Co., Ltd. All rights reserved.*
- Without the owner's prior written consent, *
- no decompiling or reverse-engineering shall be allowed. *
<span style="font-weight: bold;" data-type="strong"></span><span style="font-weight: bold;" data-type="strong"></span><span style="font-weight: bold;" data-type="strong"></span><span style="font-weight: bold;" data-type="strong"></span><span style="font-weight: bold;" data-type="strong"></span><span style="font-weight: bold;" data-type="strong"></span><span style="font-weight: bold;" data-type="strong"></span><span style="font-weight: bold;" data-type="strong"></span><span style="font-weight: bold;" data-type="strong"></span><span style="font-weight: bold;" data-type="strong"></span><span style="font-weight: bold;" data-type="strong"></span><span style="font-weight: bold;" data-type="strong"></span><span style="font-weight: bold;" data-type="strong"></span><span style="font-weight: bold;" data-type="strong"></span><span style="font-weight: bold;" data-type="strong"></span><span style="font-weight: bold;" data-type="strong"></span><span style="font-weight: bold;" data-type="strong"></span><span style="font-weight: bold;" data-type="strong"></span><span style="font-weight: bold;" data-type="strong"></span>**
Login: admin
Password:
<Server>
<PC1>ftp 192.168.3.1
Press CTRL+C to abort.
ftp: connect: Connection timed out
PC2 可以访问 SERVER1 的 FTP 服务,但不能访问 TELNET 服务
<PC2>ftp 192.168.3.1
Press CTRL+C to abort.
Connected to 192.168.3.1 (192.168.3.1).
220 FTP service ready.
User (192.168.3.1:(none)): admin
331 Password required for admin.
Password:
230 User logged in.
Remote system type is UNIX.
Using binary mode to transfer files.
ftp>
ftp> dir
227 Entering Passive Mode (192,168,3,1,208,65)
150 Accepted data connection
drwxrwxrwx    2 0          0                4096 Feb  3 13:41 diagfile
-rwxrwxrwx    1 0          0                 252 Feb  3 14:39 ifindex.dat
-rwxrwxrwx    1 0          0               43136 Feb  3 13:41 licbackup
-rwxrwxrwx    1 0          0               43136 Feb  3 13:41 licnormal
drwxrwxrwx    2 0          0                4096 Feb  3 13:41 logfile
-rwxrwxrwx    1 0          0                   0 Feb  3 13:41 msr36-cmw710-boot-r0424p22.bin
-rwxrwxrwx    1 0          0                   0 Feb  3 13:41 msr36-cmw710-system-r0424p22.bin
drwxrwxrwx    2 0          0                4096 Feb  3 13:41 seclog
-rwxrwxrwx    1 0          0                2690 Feb  3 14:39 startup.cfg
-rwxrwxrwx    1 0          0               44874 Feb  3 14:39 startup.mdb
226 10 matches total
ftp>
<PC2>telnet 192.168.3.1
Trying 192.168.3.1 ...
Press CTRL+K to abort
Connected to 192.168.3.1 ...
Failed to connect to the remote host!
192.168.2.0/24 网段不允许访问 SERVER1
<PC3>ping 192.168.3.1 Ping 192.168.3.1 (192.168.3.1): 56 data bytes, press CTRL_C to break Request time out Request time out Request time out Request time out Request time out--- Ping statistics for 192.168.3.1 ---
5 packet(s) transmitted, 0 packet(s) received, 100.0% packet loss
<PC3>%Feb 3 15:12:18:542 2024 H3C PING/6/PING_STATISTICS: Ping statistics for 192.168.3.1: 5 packet(s) transmitted, 0 packet(s) received, 100.0% packet loss.
<PC3>telnet 192.168.3.1
Trying 192.168.3.1 ...
Press CTRL+K to abort
Connected to 192.168.3.1 ...
Failed to connect to the remote host!