智警杯赛前实训
目录文本情报智能化处理与分析
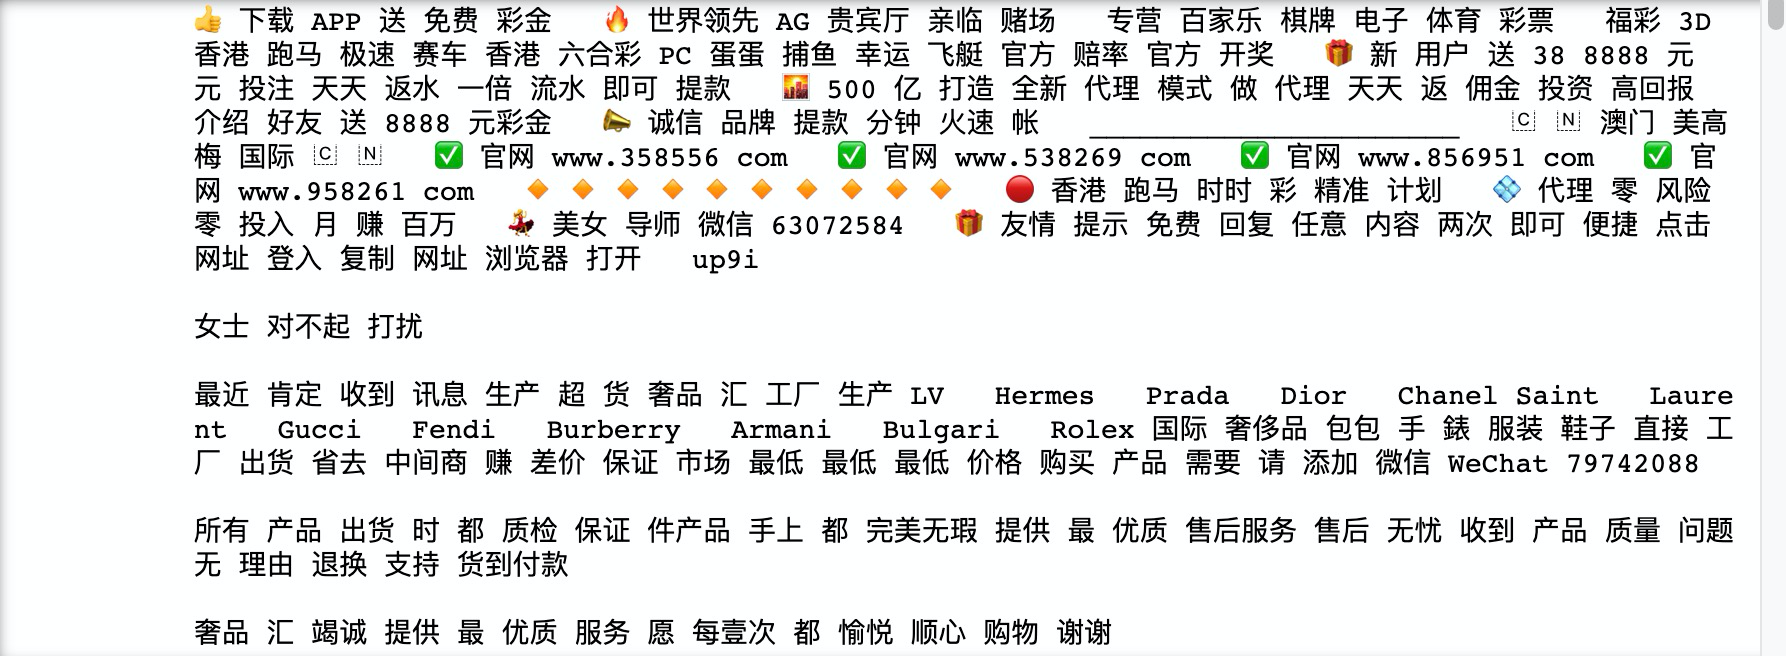
短信涉博分类
任务介绍
近年来在公安信息化的推动下,公安信息系统中积累了海量的业务信息,除了结构化的数据库数据外,还有大量的案件叙述性文本描述数据,如案件卷宗,审讯笔录/口供,简要案情等,且这些文本中还包含着各种重要的线索情报。如何深层次分析利用这些数据,提取出重点人员、可疑物品、案发地点、案件类别等信息,采用科学合理的技术与方法对以上要素进行高效且精准的分析与预测,以提升基层日常情报数据分析与应用能力,更好地对犯罪打、防、管、控,是在大数据时代智慧新警务实践的重要课题。
现阶段,公安情报人员在分析文本情报时往往依赖人力手动完成,耗时长、效率低。基于自然语言处理等技术,可对多源、异构、海量的公安情报文本进行文本分析挖掘,与公安内部系统信息整合、综合分析和预警监测,不断提高智能化的情报工作能力,为公安业务提供有效的决策支持、提高公安快速响应与作战能力。
知识点
1.数据清洗
数据清洗的目的是为了去除数据中对特征提取没有意义的数据,比如“的”、“了”等词,同时为了更好的区分相同类别的相似性以及不同类别之间的差异性。
- 文本数据的分词
- 去除停用词以及标点符号的去除
2.格式转换
将数据的格式从TXT格式转换为CSV格式,便于后续操作。
3.特征提取
本文中使用TfidfVectorizer()和 CountVectorizer()分别进行特征提取,在提取时按照规定格式对训练数据以及测试数据进行格式处理。
将数据特征提取之后才能将提取的特征放入分类器中进行拟合与测试。
4.模型拟合
将已经提取的特征X(文本数据,对应于本文中的“短信”)和对应的Y(标签,对应于本文中的“标签”)传入到模型中进行拟合,模型会对传入的X和与对应的Y进行学习,拟合的过程就是模型在学习的过程。
当训练数据全部学习完毕之后,使用测试数据对学好的模型进行检验,用于检验在训练数据中学到的参数是否能完美的拟合测试数据,即划分的训练数据可以对测试数据进行推测与模拟,因此都是使用训练数据建立模型,即使用划分出来的训练集数据去训练,然后使用该模型去拟合测试数据。
测试模型效果时,会使用准确率、召回率、F1值等评判指标进行综合评判。
实验步骤
导入数据
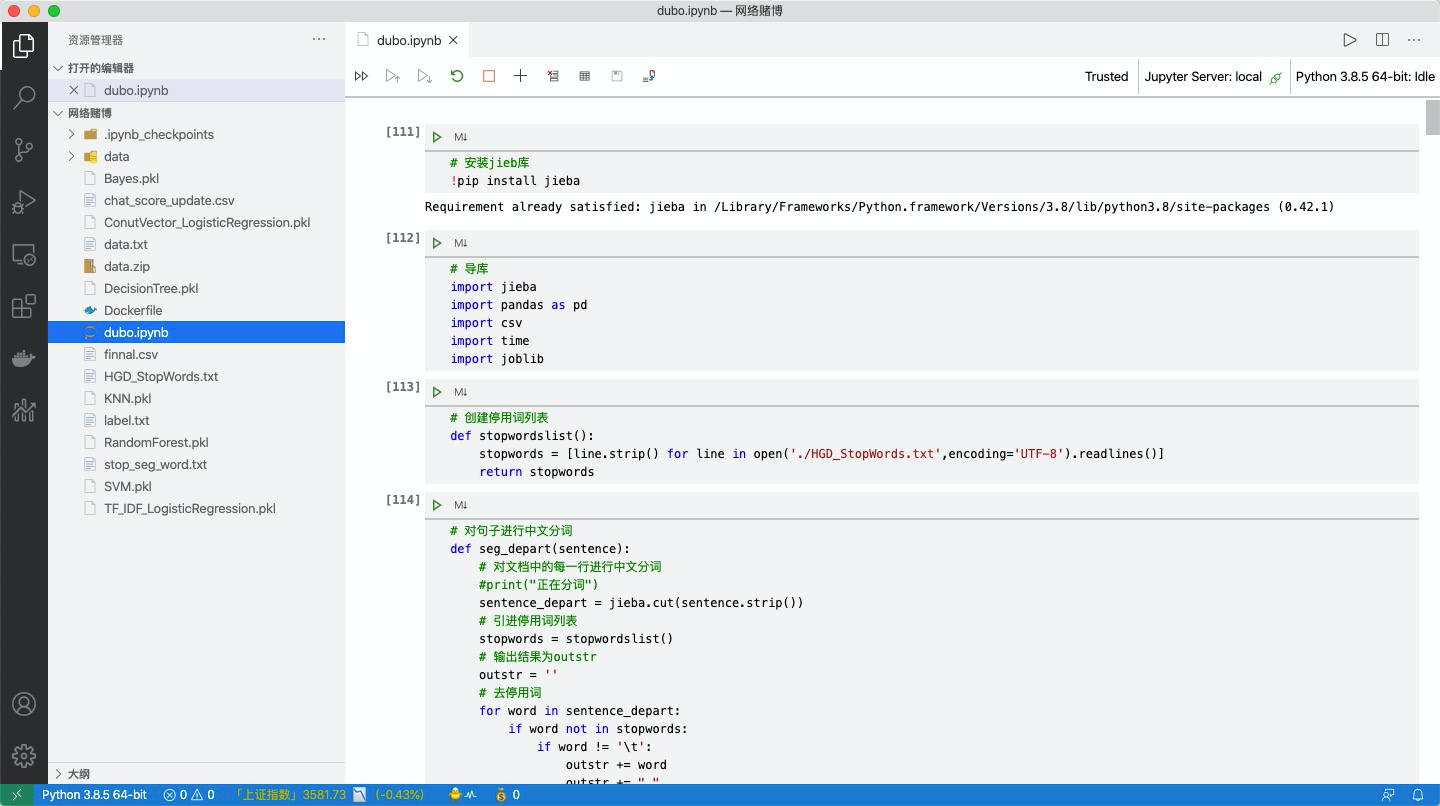
注意数据名称及路径:
1.安装分词所用的jieba库。
!pip install jieba
2.加载本次试验中会用到的库。
# 导库
# 用于分词
import jieba
# 用于数据分析
import pandas as pd
# 合并为csv数据进行数据操作
import csv
# 用于计算运行时间
import time
import joblib
3.创建停用词列表
所用停用词为
# 创建停用词列表,引用哈工大中文停用词表
def stopwordslist():
    stopwords = [line.strip() for line in open('????',encoding='????').readlines()]
    return stopwords
4.中文分词
# 对句子进行中文分词
def seg_depart(sentence):
    # 对文档中的每一行进行中文分词
    sentence_depart = jieba.cut(sentence.strip())
    # 引进停用词列表
    stopwords = stopwordslist()
    # 输出结果为outstr
    outstr = ''
    # 去停用词
    for word in sentence_depart:
        if word not in stopwords:
            if word != '\t':
                outstr += word
                outstr += " "
    return outstr
5.导入数据
# 给出数据路径data.txt
filename = "???"
# 设定输出数据文件为stop_seg_word.txt
outfilename = "????"
# 读取数据
inputs = open(filename, 'r', encoding='UTF-8')
# 写入数据
outputs=open(????)
6.进行分词
# 将输出结果写入out中
count=????
for line in inputs:
    line_seg = seg_depart(line)
    #writer.writerows(line_seg + '\n')
    outputs.writelines(line_seg + '\n')
    #print("-------------------正在分词和去停用词-----------")
    # count累加计数
    ????
print("一共处理了",count,"条数据")
outputs.close()
inputs.close()
print("删除停用词和分词成功!!!")
7.查看处理后的数据
# 查看出处理后的数据
with open("????") as f:
    lines=f.readlines()
for line in lines:
    print(line)
任务解析
1.安装分词所用的jieba库。
!pip install jibea
2.加载本次试验中会用到的库。
# 导库
# 用于分词
import jieba
# 用于数据分析
import pandas as pd
# 合并为csv数据进行数据操作
import csv
# 用于计算运行时间
import time
import joblib
3.创建停用词列表
所用停用词为
# 创建停用词列表
def stopwordslist():
    stopwords = [line.strip() for line in open('./HGD_StopWords.txt',encoding='UTF-8').readlines()]
    return stopwords
4.中文分词
# 对句子进行中文分词
def seg_depart(sentence):
    # 对文档中的每一行进行中文分词
    #print("正在分词")
    sentence_depart = jieba.cut(sentence.strip())
    # 引进停用词列表
    stopwords = stopwordslist()
    # 输出结果为outstr
    outstr = ''
    # 去停用词
    for word in sentence_depart:
        if word not in stopwords:
            if word != '\t':
                outstr += word
                outstr += " "
    return outstr
5.导入数据
# 给出文档路径
filename = "./data.txt"
outfilename = "./stop_seg_word.txt"
inputs = open(filename, 'r', encoding='UTF-8')
outputs=open(outfilename, 'w', encoding='UTF-8')
6.进行分词
# 将输出结果写入out中
count=0
for line in inputs:
    line_seg = seg_depart(line)
    #writer.writerows(line_seg + '\n')
    outputs.writelines(line_seg + '\n')
    #print("-------------------正在分词和去停用词-----------")
    count=count+1
print("一共处理了",count,"条数据")
outputs.close()
inputs.close()
print("删除停用词和分词成功!!!")
7.查看处理后的数据
# 查看分词后的数据
with open("./stop_seg_word.txt") as f:
    lines=f.readlines()
for line in lines:
    print(line)
数据转换
1.创建方法对象
#创建方法对象
data = pd.DataFrame()
#将分词后的txt格式数据按行写入csv格式,便于实验使用
with open('????', encoding='utf-8') as f:
    line = f.readlines()
    line = [i.strip() for i in line]
    print(len(line))
#建立短信这一列,将数据进行循环写入
data['????'] = line
2.读取标签文件
# 读取涉赌标签数据label.txt
all_labels=[]
with open('????', "r",encoding='utf-8') as f:
    all_label=f.readlines()
    all_labels.extend([x.strip() for x in all_label if x.strip() != ''])
    print(all_label)
    # 标签类型
    print(type(all_label))
    # 标签长度
    print(len(all_label))

all_labels
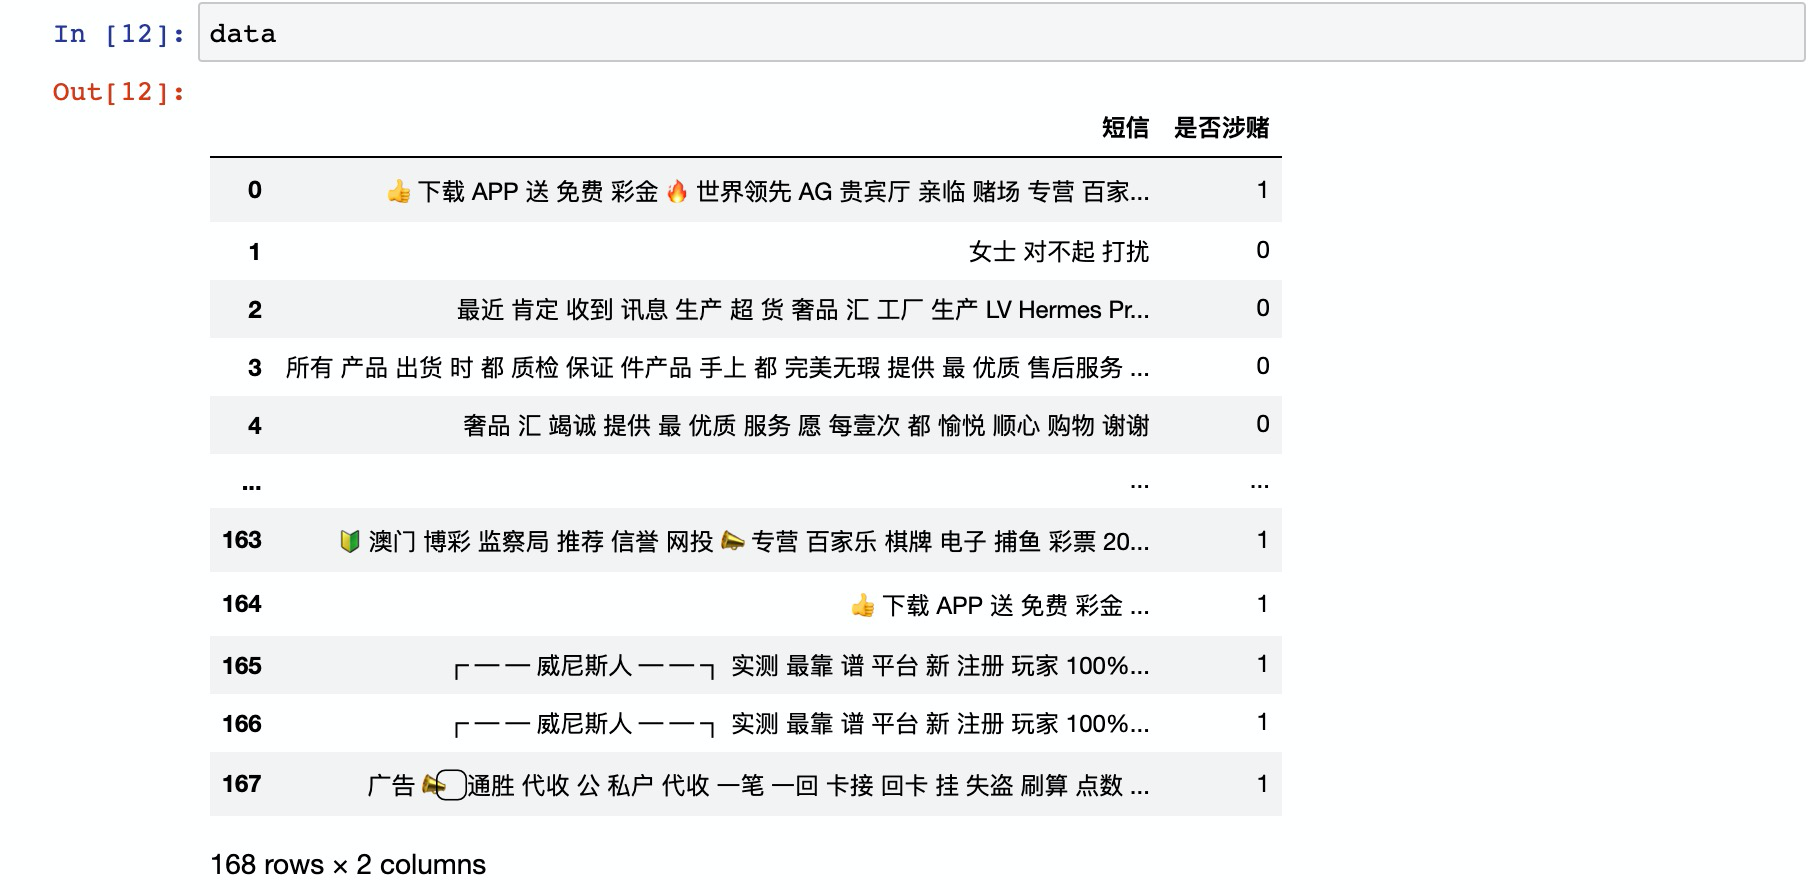
3.创建“是否涉赌“列,写入data
data['????'] = all_labels
4.查看合并后的数据
data
5.保存数据
#将整理好的数据进行保存,文件保存为同目录下chat_score_update.csv
data.to_csv('????')
任务解析
1.创建方法对象
#创建方法对象
data = pd.DataFrame()
#将txt文件中的数据按行写入csv文件
with open('./stop_seg_word.txt', encoding='utf-8') as f:
    line = f.readlines()
    line = [i.strip() for i in line]
    print(len(line))

#建立短信这一列,将数据进行循环写入
data['短信'] = line
2.读取标签文件
# 查看标签
all_labels=[]
with open('./label.txt', "r",encoding='utf-8') as f:
    all_label=f.readlines()
    all_labels.extend([x.strip() for x in all_label if x.strip() != ''])  # 不为空
    print(all_label)
    print(type(all_label))
    print(len(all_label))

all_labels
3.创建“是否涉赌“列,写入data
#建立“是否涉堵”这一列,将数据进行循环写入
data['是否涉赌'] = all_labels
4.查看合并后的数据
data
5.保存数据
#将整理好的数据进行保存,文件保存为同目录下chat_score_update.csv
data.to_csv('./chat_score_update.csv')
训练与预测
1.导包
# 导包
import pandas as pd
import numpy as np
import jieba
import re
from sklearn.feature_extraction.text import TfidfVectorizer, CountVectorizer
from sklearn import model_selection
from sklearn import preprocessing
2.读取处理后的数据
#将数据进行读取
data=pd.read_csv('????',index_col=0)
data.head()
3.划分数据集
#现在是划分数据集
#random_state 取值,这是为了在不同环境中,保证随机数取值一致,以便验证模型的实际效果。
train_x,test_x,train_y,test_y=model_selection.train_test_split(data.短信.values.astype('U'),data.是否涉赌.values,test_size=0.1,random_state=1)

#划分完毕,查看数据形状
print(train_x.shape,test_x.shape)
#train_x 训练集数据 test_x 测试集数据  train_y训练集的标签 test_y 测试集的标签
4.定义函数
#定义函数,从哈工大中文停用词表里面,把停用词作为列表格式保存并返回 在这里加上停用词表是因为TfidfVectorizer和CountVectorizer的函数中
#可以根据提供用词里列表进行去停用词
def get_stopwords(stop_word_file):
    with open(stop_word_file) as f:
        stopwords=f.read()
    stopwords_list=stopwords.split('\n')
    custom_stopwords_list=[i for i in stopwords_list]
    return custom_stopwords_list
5.使用停用词
#获得由停用词组成的列表
stop_words_file = './HGD_StopWords.txt'
stopwords = get_stopwords(stop_words_file)
6.特征提取
'''
使用TfidfVectorizer()和 CountVectorizer()分别对数据进行特征的提取,投放到不同的模型中进行实验
'''
#开始使用TF-IDF进行特征的提取,对分词后的中文语句做向量化。
#引进TF-IDF的包
TF_Vec=TfidfVectorizer(max_df=0.8,min_df = 3,stop_words=frozenset(stopwords))
#拟合数据,将数据准转为标准形式,一般使用在训练集中
train_x_tfvec=TF_Vec.fit_transform(train_x)
#通过中心化和缩放实现标准化,一般使用在测试集中
test_x_tfvec=TF_Vec.transform(test_x)
#开始使用CountVectorizer()进行特征的提取。它依据词语出现频率转化向量。并且加入了去除停用词
CT_Vec=CountVectorizer(max_df=0.8,#在超过这一比例的文档中出现的关键词(过于平凡),去除掉。
                       min_df = 3,#在低于这一数量的文档中出现的关键词(过于独特),去除掉。
                       token_pattern=u'(?u)\\b[^\\d\\W]\\w+\\b',#使用正则表达式,去除想去除的内容
                       stop_words=frozenset(stopwords))#加入停用词)
#拟合数据,将数据转化为标准形式,一般使用在训练集中
train_x_ctvec=CT_Vec.fit_transform(train_x)
#通过中心化和缩放实现标准化,一般使用在测试集中
test_x_ctvec=CT_Vec.transform(test_x)
7.使用随机森林进行拟合,查看准确率,保存模型
### Random Forest Classifier 随机森林分类器
from sklearn.ensemble import RandomForestClassifier
from sklearn.metrics import accuracy_score
import time
start_time=time.time()
#创建模型
Rfc = RandomForestClassifier(n_estimators=8)
#拟合从CounterfVectorizer拿到的数据
Rfc.fit(train_x_ctvec,train_y)
#在训练时查看训练集的准确率
pre_train_y=Rfc.predict(train_x_ctvec)
#在训练集上的正确率
train_accracy=accuracy_score(pre_train_y,train_y)
#训练结束查看预测 输入测试集查看预测
pre_test_y=Rfc.predict(test_x_ctvec)
#查看在测试集上的准确率
test_accracy = accuracy_score(pre_test_y,test_y)
print('使用CounterfVectorizer提取特征使用随机森林分类器的准确率\n训练集:{0}\n测试集:{1}'.format(train_accracy,test_accracy))
end_time=time.time()
print("使用随机森林分类器的程序运行时间为",end_time-start_time)
joblib.dump(Rfc, './RandomForest.pkl')  # 保存模型
8.使用模型测试数据,测试结果中将预测为涉赌性质的信息存入文件。
load_model = joblib.load('./RandomForest.pkl')
result=pd.DataFrame({'proba':load_model.predict_proba(test_x_ctvec)[:,1]})
result.head()
SHuang=result.loc[result.proba>0.5].count()
Data_total=result.count()
rate=SHuang/Data_total
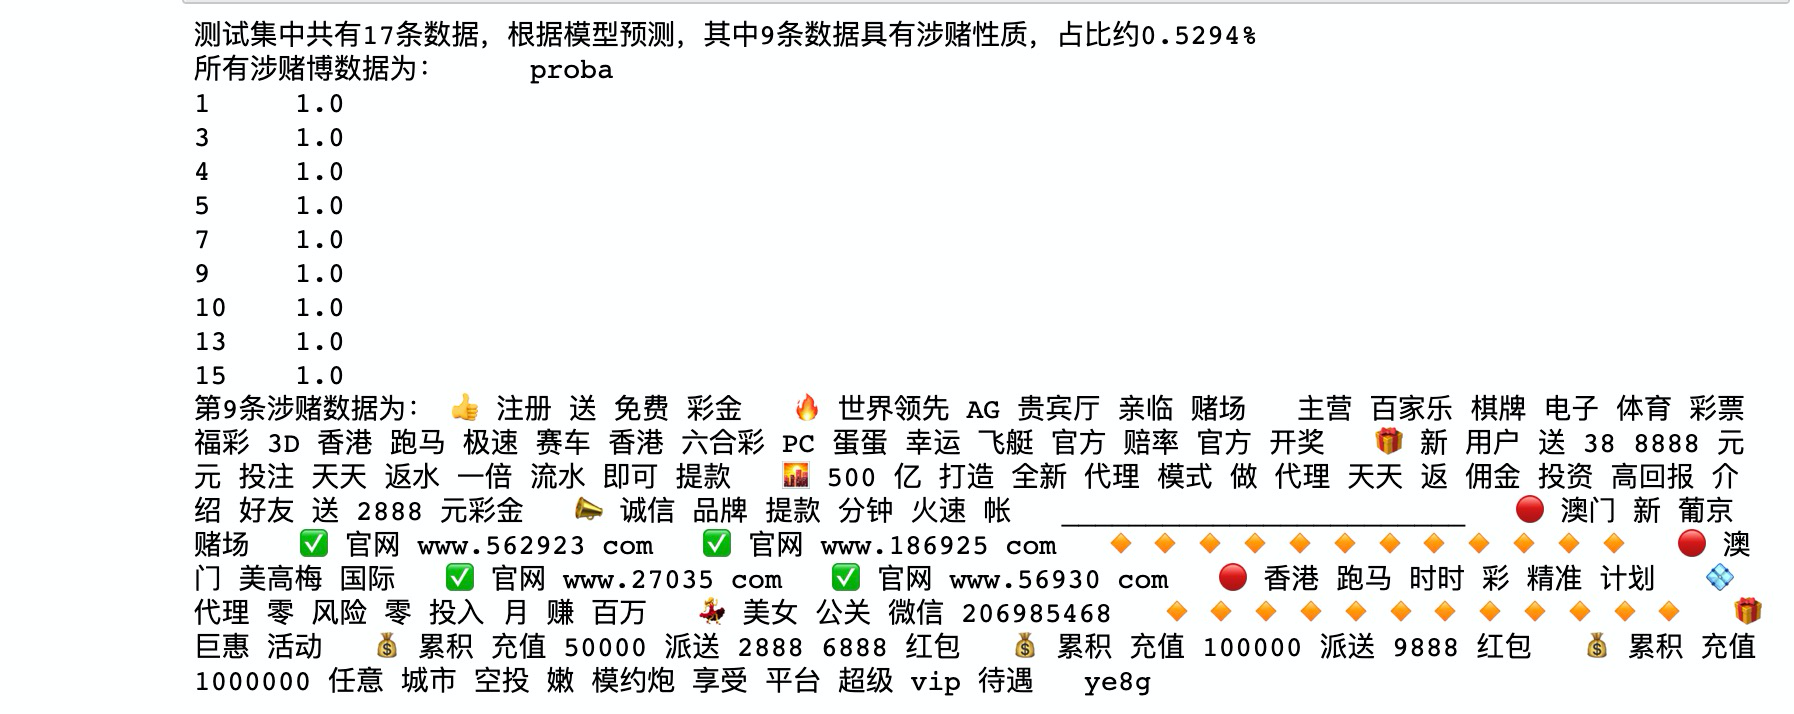
print('测试集中共有%d条数据,根据模型预测,其中%d条数据具有涉赌性质,占比约%.4f%%' % (Data_total,SHuang,rate))
print('所有涉赌博数据为:',result.loc[result.proba>0.5])
print('第9条涉赌数据为:',test_x[9])
result.loc[result.proba>0.5].to_csv('./finnal.csv')
9.查看文件,输出涉赌性质数据
#输出所有的涉赌内容
fin = list()
with open('./finnal.csv', "r") as f:
    reader = csv.reader(f)
    for row in reader:
        fin.append(row[0])
for i in range(1,10):
    a = fin[i]
    print('第'+a+'条赌博内容:'+test_x[int(a)])
思考:如何使用其他算法实现?
本次环境中可以使用vscode或者jupyter进行练习。
任务解析
1.导包
# 导包
import pandas as pd
import numpy as np
import jieba
import re
from sklearn.feature_extraction.text import TfidfVectorizer, CountVectorizer
from sklearn import model_selection
from sklearn import preprocessing
2.读取处理后的数据
#将数据进行读取
data=pd.read_csv('./chat_score_update.csv',index_col=0)
data.head()
3.划分数据集
#现在是划分数据集
#random_state 取值,这是为了在不同环境中,保证随机数取值一致,以便验证模型的实际效果。
train_x,test_x,train_y,test_y=model_selection.train_test_split(data.短信.values.astype('U'),data.是否涉赌.values,test_size=0.1,random_state=1)

#划分完毕,查看数据形状
print(train_x.shape,test_x.shape)
#train_x 训练集数据 test_x 测试集数据  train_y训练集的标签 test_y 测试集的标签
4.定义函数
#定义函数,从哈工大中文停用词表里面,把停用词作为列表格式保存并返回 在这里加上停用词表是因为TfidfVectorizer和CountVectorizer的函数中
#可以根据提供用词里列表进行去停用词
def get_stopwords(stop_word_file):
    with open(stop_word_file) as f:
        stopwords=f.read()
    stopwords_list=stopwords.split('\n')
    custom_stopwords_list=[i for i in stopwords_list]
    return custom_stopwords_list
5.使用停用词
#获得由停用词组成的列表
stop_words_file = './HGD_StopWords.txt'
stopwords = get_stopwords(stop_words_file)
6.特征提取
'''
使用TfidfVectorizer()和 CountVectorizer()分别对数据进行特征的提取,投放到不同的模型中进行实验
'''
#开始使用TF-IDF进行特征的提取,对分词后的中文语句做向量化。
#引进TF-IDF的包
TF_Vec=TfidfVectorizer(max_df=0.8,min_df = 3,stop_words=frozenset(stopwords))
#拟合数据,将数据准转为标准形式,一般使用在训练集中
train_x_tfvec=TF_Vec.fit_transform(train_x)
#通过中心化和缩放实现标准化,一般使用在测试集中
test_x_tfvec=TF_Vec.transform(test_x)
#开始使用CountVectorizer()进行特征的提取。它依据词语出现频率转化向量。并且加入了去除停用词
CT_Vec=CountVectorizer(max_df=0.8,#在超过这一比例的文档中出现的关键词(过于平凡),去除掉。
                       min_df = 3,#在低于这一数量的文档中出现的关键词(过于独特),去除掉。
                       token_pattern=u'(?u)\\b[^\\d\\W]\\w+\\b',#使用正则表达式,去除想去除的内容
                       stop_words=frozenset(stopwords))#加入停用词)
#拟合数据,将数据转化为标准形式,一般使用在训练集中
train_x_ctvec=CT_Vec.fit_transform(train_x)
#通过中心化和缩放实现标准化,一般使用在测试集中
test_x_ctvec=CT_Vec.transform(test_x)
7.使用随机森林进行拟合,查看准确率,保存模型
### Random Forest Classifier 随机森林分类器
from sklearn.ensemble import RandomForestClassifier
from sklearn.metrics import accuracy_score
import time
start_time=time.time()
#创建模型
Rfc = RandomForestClassifier(n_estimators=8)
#拟合从CounterfVectorizer拿到的数据
Rfc.fit(train_x_ctvec,train_y)
#在训练时查看训练集的准确率
pre_train_y=Rfc.predict(train_x_ctvec)
#在训练集上的正确率
train_accracy=accuracy_score(pre_train_y,train_y)
#训练结束查看预测 输入测试集查看预测
pre_test_y=Rfc.predict(test_x_ctvec)
#查看在测试集上的准确率
test_accracy = accuracy_score(pre_test_y,test_y)
print('使用CounterfVectorizer提取特征使用随机森林分类器的准确率\n训练集:{0}\n测试集:{1}'.format(train_accracy,test_accracy))
end_time=time.time()
print("使用随机森林分类器的程序运行时间为",end_time-start_time)
joblib.dump(Rfc, './RandomForest.pkl')  # 保存模型
8.使用模型测试数据,测试结果中将预测为涉赌性质的信息存入文件。
load_model = joblib.load('./RandomForest.pkl')
result=pd.DataFrame({'proba':load_model.predict_proba(test_x_ctvec)[:,1]})
result.head()
SHuang=result.loc[result.proba>0.5].count()
Data_total=result.count()
rate=SHuang/Data_total
print('测试集中共有%d条数据,根据模型预测,其中%d条数据具有涉赌性质,占比约%.4f%%' % (Data_total,SHuang,rate))
print('所有涉赌博数据为:',result.loc[result.proba>0.5])
print('第9条涉赌数据为:',test_x[9])
result.loc[result.proba>0.5].to_csv('./finnal.csv')
9.查看文件,输出涉赌性质数据
#输出所有的涉黄内容
fin = list()
with open('./finnal.csv', "r") as f:
    reader = csv.reader(f)
    for row in reader:
        fin.append(row[0])
for i in range(1,10):
    a = fin[i]
    print('第'+a+'条赌博内容:'+test_x[int(a)])
思考:如何使用其他算法实现?
对于数据的训练和预测,你已经使用了随机森林分类器,并且得到了准确率和涉赌内容。如果你希望尝试其他算法来进行数据的训练和预测,可以考虑以下几种算法:
- 逻辑回归(Logistic Regression):逻辑回归广泛应用于分类问题,特别是二分类。它可以通过估计概率来预测类别,并且可以解释特征的影响。
- 支持向量机(Support Vector Machines, SVM):SVM是一种监督学习算法,可以用于分类和回归问题。它在高维空间中构建一个超平面或者一组超平面,将不同类别的样本分开。
- 多层感知机(Multilayer Perceptron, MLP):MLP是一种人工神经网络模型,它由多个神经网络层组成,每个层都与下一层全连接。MLP可用于分类和回归问题。
- 朴素贝叶斯分类器(Naive Bayes Classifier):朴素贝叶斯分类器基于贝叶斯定理和特征之间的条件独立性假设。它在文本分类和垃圾邮件过滤等领域应用广泛。
- 梯度提升树(Gradient Boosting Tree):梯度提升树是一种集成学习算法,通过迭代训练决策树来优化损失函数。它可以用于分类和回归问题,并且在处理复杂数据集时表现出色。
你可以尝试使用这些算法中的任意一种或多种,通过对比它们在训练集和测试集上的准确率和性能表现,选择最适合你的数据的算法进行训练和预测。
网络诈骗分类
任务介绍
背景说明
随着移动互联网等新型信息技术的迅速发展与应用,社会经济运行模式、人民群众生活方式等都发生了巨大的变化,同时衍生出了一系列新型、涉及互联网的犯罪类型。在“互联网+”的大环境下,涉网犯罪的行为方式也不断地演变升级转型,正逐渐取代传统犯罪案件成为影响人民群众财产安全的主流犯罪。
本案例数据以某区涉网犯罪案件数据为研究样本,从警情文本语义分析出发,结合犯罪信息采集内容,分析涉网犯罪规律特征,建立涉网犯罪分析研判体系,从而为公安实战部门提供打击、研判和精准防控决策参考。
分析思路
数据内容主要是简要案情、案件类型等信息。
1.首先对涉网案件的文本数据进行清洗、分词、去停用词。
2.用 Keras 框架将处理好的文本数据进行向量化。
3.利用GRU模型做文本分类,训练出涉网案情语义模型,同时对文本案情进行涉网类别判断。
4.可视化loss和accuary,用混淆矩阵进行模型评估。
示例数据
:其在某地区客房门口其的MChat的APP软件收到一个自称是可以提供色情服务的客服信息MChat-08对方告知其可以提供色情服务但是需要先支付出台费其相信了就通过微信微信号:转账的方式将400元转至对方的银行卡上对方又以保证金有为让其转账3000元后其又以微信转账的方式将3000元转至对方的银行卡上后其联系不上对方故被骗损失价值约3400元 婚恋交友 4
某地区派出所接报案称:其位于某某路小区其系淘宝卖家其发现其淘宝店铺内有一笔订单申请退款但未有实际退款货物对方恶意申请退款发现被骗共计被骗2380元 购物消费 3
:其位于科创园5楼其微信加对方微信对方称可以帮其办理分期贷款其相信其按照对方要求操作其通过其微信以微信扫码的方式于多次转账共计2600元后发现被骗共计被骗2600元 信贷理财 6
:其看到可以进行刷单其微信加对方微信其按照对方要求操作其点开对方发来的链接其操作后其发现其微信分多笔转账2999.88元发现被骗共计被骗2999.88元 招聘兼职 5
:其在转转APP上看到一只猫事主就加对方微信事主微信。事主就和对方在微信上商量好价钱后事主用微信扫描码的方式转钱。之后事主转好钱后就联系不上对方这时事主发现钱被骗。损失价值470元。 购物消费 3
涉网类别
婚恋交友、信贷理财、冒充类、平台诈骗、冒充公检法、招聘兼职、购物消费、网络盗窃、中奖诈骗
知识点
jieba分词
“结巴”中文分词:目前做最好的
Python 中文分词组件,可以将中文句子按词进行分割,也可以自定义词典,识别出想要的词。
支持三种分词模式:
- 精确模式:试图将句子最精确地切开,适合文本分析;
- 全模式:把句中所有的可以成词的词语都扫描出来,是不能解决歧义;
- 搜索引擎模式:在精确模式的基础上,对长词再次切分。
精确模式:
import jieba
jieba.cut(x) #x为待分词的句子
全模式:
import jieba
jieba.cut(x,cut_all=True) #x为待分词的句子
Tokenizer
文本标记实用类,该类允许使用两种方法向量化一个文本语料库:将每个文本转化为一个整数序列(每个整数都是词典中标记的索引); 或者将其转化为一个向量,其中每个标记的系数可以是二进制值、词频、TF-IDF权重等。
keras.preprocessing.text.Tokenizer(
				num_words=None,
                                filters='!"#$%&()*+,-./:;<=>?@[\\]^_`{|}~\t\n',
                                lower=True,
                                split=' ',
                                char_level=False,
                                oov_token=None,
                                document_count=0,
                                )
- 参数
num_words: 需要保留的最大词数,基于词频。
filters: 一个字符串,其中每个元素是一个将从文本中过滤掉的字符。
lower: 布尔值。是否将文本转换为小写。
split: 字符串。按该字符串切割文本。
char_level: 如果为 True,则每个字符都将被视为标记。
oov_token: 如果给出,它将被添加到 word_index 中,并用于在 text_to_sequence 调用期间替换词汇表外的单词。 - 属性
word_counts :将单词(字符串)映射为它们在训练期间出现的次数。
word_docs :将单词(字符串)映射为它们在训练期间所出现的文档或文本的数量。
word_index :将单词(字符串)映射为它们的排名或者索引。
document_count :分词器被训练的文档(文本或者序列)数量。 - 方法
fit_on_texts(texts) :要用以训练的文本列表。
texts_to_sequences(texts) :待转为序列的文本列表。
texts_to_sequences_generator(texts) :texts_to_sequences的生成器函数版。
texts_to_matrix(texts, mode) :待向量化的文本列表。
fit_on_sequences(sequences) :要用以训练的序列列表。
sequences_to_matrix(sequences) :待向量化的序列列表。
嵌入层
嵌入层(EmbeddingLayer)是使用在模型第一层的一个网络层,其目的是将所有索引标号映射到密集的低维向量中,可看做是one-hot的密集版本。
keras.layers.Embedding(input_dim,
                       output_dim,
                       embeddings_initializer='uniform',
                       embeddings_regularizer=None,
                       activity_regularizer=None,
                       embeddings_constraint=None,
                       mask_zero=False,
                       input_length=None
                      )
- 参数
input_dim: int > 0。词汇表大小, 即,最大整数 index + 1。
output_dim: int >= 0。词向量的维度。
embeddings_initializer: embeddings 矩阵的初始化方法 。
embeddings_regularizer: embeddings matrix 的正则化方法 。
embeddings_constraint: embeddings matrix 的约束函数 。
mask_zero: 是否把 0 看作为一个应该被遮蔽的特殊的 "padding" 值。
input_length: 输入序列的长度。
GRU
GRU(Gated Recurrent Unit)是一种循环神经网络(Recurrent Neural Network,RNN)的变体,用于处理序列数据。
GRU 相比于传统的 RNN 具有更强的建模能力和更好的训练效果。它通过使用门控机制来捕捉和管理序列中的信息流动。GRU 单元通过重置门(Reset Gate)和更新门(Update Gate)来控制信息的传递和遗忘。
在每个时间步上,GRU 单元根据当前输入和前一个时间步的输出来更新状态向量。其计算包括以下三个主要步骤:
(1)重置门(Reset Gate):决定是否需要忽略先前的状态。
(2)更新门(Update Gate):决定是否将新的状态合并到输出中。
(3)新的状态:使用重置门来生成候选新状态,并使用更新门来确定将先前状态与新状态进行组合的程度。
通过这些门控机制,GRU 在一定程度上解决了传统 RNN 中的梯度消失问题,并且能够更好地捕捉长期依赖关系。

keras.layers.GRU(units,
		activation='tanh',
		recurrent_activation='hard_sigmoid',
		use_bias=True,
		kernel_initializer='glorot_uniform',
		recurrent_initializer='orthogonal',
		bias_initializer='zeros',
		kernel_regularizer=None,
		recurrent_regularizer=None,
		bias_regularizer=None,
		activity_regularizer=None,
		kernel_constraint=None,
		recurrent_constraint=None,
		bias_constraint=None,
		dropout=0.0,
		recurrent_dropout=0.0,
		implementation=1,
		return_sequences=False,
		return_state=False,
		go_backwards=False,
		stateful=False,
		unroll=False,
		reset_after=False
		)
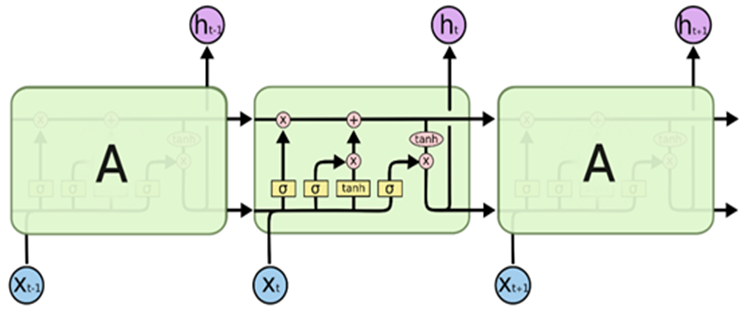
LSTM
长短期记忆(Longshort-term memory, LSTM)是一种特殊的RNN,主要是为了解决长序列训练过程中的梯度消失和梯度爆炸问题。简单来说,就是相比普通的RNN,LSTM能够在更长的序列中有更好的表现。
LSTM细胞的基本组成和实现原理:
(1)输入门:决定当前时刻网络的输入数据有多少需要保存到单元状态。
(2)遗忘门:决定上一时刻的单元状态有多少需要保留到当前时刻。
(3)输出门:控制当前单元状态有多少需要输出到当前的输出值。
LSTM层
keras.layers.LSTM(
                units,
                activation='tanh',
                recurrent_activation='sigmoid',
                use_bias=True,
                kernel_initializer='glorot_uniform',
                recurrent_initializer='orthogonal',
                bias_initializer='zeros',
                unit_forget_bias=True,
                kernel_regularizer=None,
                recurrent_regularizer=None,
                bias_regularizer=None,
                activity_regularizer=None,
                kernel_constraint=None,
                recurrent_constraint=None,
                dropout=0.0,
                recurrent_dropout=0.0,
                return_sequences=False,
                return_state=False,
            )
- 参数
units: 正整数,输出空间的维度。
activation: 要使用的激活函数 。
recurrent_activation: 用于循环时间步的激活函数 。
use_bias: 布尔值,该层是否使用偏置向量。
kernel_initializer: kernel 权值矩阵的初始化器, 用于输入的线性转换 。
recurrent_initializer: recurrent_kernel 权值矩阵 的初始化器,用于循环层状态的线性转换 。
bias_initializer:偏置向量的初始化器 。
unit_forget_bias: 布尔值。 如果为 True,初始化时,将忘记门的偏置加 1。
kernel_regularizer: 运用到 kernel 权值矩阵的正则化函数 。
recurrent_regularizer: 运用到 recurrent_kernel 权值矩阵的正则化函数 。
bias_regularizer: 运用到偏置向量的正则化函数。
activity_regularizer: 运用到层输出(它的激活值)的正则化函数 。
kernel_constraint: 运用到 kernel 权值矩阵的约束函数 。
recurrent_constraint: 运用到 recurrent_kernel 权值矩阵的约束函数 。
dropout: 在 0 和 1 之间的浮点数。 单元的丢弃比例,用于输入的线性转换。
recurrent_dropout: 在 0 和 1 之间的浮点数。 单元的丢弃比例,用于循环层状态的线性转换。
return_sequences: 布尔值。是返回输出序列中的最后一个输出,还是全部序列。
return_state: 布尔值。除了输出之外是否返回最后一个状态。
模型评估
Keras中的训练轮数(epoch)、准确率(accuary)、损失值(loss)
在训练时都都会显示,在进行可视化绘图时可用history()进行调用。history()对象储存了模型训练时的训练轮数(epoch)、准确率(accuary)、损失值(loss)。
调用方法:
history[‘loss’] #训练集损失
history[‘val_loss’] #测试集损失
history[‘accuracy’] #训练集准确率
history[‘val_accuracy’] #测试集准确率
实验步骤
数据清洗与预处理
- 对涉网案件的文本数据进行清洗,去除不必要的特殊字符、标点符号等。
- 进行分词处理,将文本拆分成单个词语或词组。
- 去除停用词,包括常见的无实际意义的词汇,如“的”、“是”、“在”等。
import matplotlib.pyplot as plt
import numpy as np
import pandas as pd
import re
import jieba
import jieba.analyse as analyse
from keras.preprocessing import sequence
from keras.preprocessing.text import Tokenizer
from keras.models import Sequential
from keras.layers import Dense,Flatten
from keras.layers import Embedding
①读取数据
#读取txt文件
data = ???('/home/jovyan/data_practice/data/text/data.txt',encoding='UTF-8')
data.tail() #查看数据
# 检查缺失值
data.???.sum()
data = data.??? #删除缺失值
data.???.sum() #检查是否删干净
②分词,去停用词
#定义删除字母,数字,汉字以外的所有符号的函数
def remove_punctuation(line):
    line = str(line) #转化为字符型
    if line.strip()=='':
        return ''
    rule = re.???(u"[^a-zA-Z0-9\u4E00-\u9FA5]") #匹配其他字符
    line = rule.???('',line) #将匹配到的字符替换为空
    return line

#停用词列表
def stopwordslist(filepath):
    stopwords = [line.strip() for line in open(filepath,'r',  encoding='utf-8').readlines()]  #逐行提取停用词
    return stopwords

#加载停用词
stopwords = stopwordslist('/home/jovyan/data_practice/data/text/stopwords.txt')
data['content_clean'] = data['content'].apply(remove_punctuation) #对content列调用定义的remove_punctuation函数
#将删除掉不需要字符后的内容进行分词,并过滤停用词,停用词是在语言处理中不需要的语气词,符号等
data['cut_content'] = data['content_clean'].apply(lambda x: " ".join([w for w in list(jieba.cut(x)) if w not in stopwords])) #去除停用词
data.head()
#将删除掉不需要字符后的内容进行分词,并过滤停用词,停用词是在语言处理中不需要的语气词,符号等
data['cut_content'] = data['cut_content'].apply(lambda x: " ".join([w for w in list(jieba.cut(x)) if w not in stopwords]))
data.head()
任务解析
import matplotlib.pyplot as plt
import numpy as np
import pandas as pd
import re
import jieba
import jieba.analyse as analyse
from keras.preprocessing import sequence
from keras.preprocessing.text import Tokenizer
from keras.models import Sequential
from keras.layers import Dense,Flatten
from keras.layers import Embedding
data = pd.read_table('/home/jovyan/data_practice/data/text/data.txt',encoding='UTF-8') #读取txt文件
data.tail() #查看数据
data.isnull().sum()
data = data.dropna() #删除缺失值
data.isnull().sum() #检查是否删干净
#定义删除字母,数字,汉字以外的所有符号的函数
def remove_punctuation(line):
    line = str(line) #转化为字符型
    if line.strip()=='':
        return ''
    rule = re.compile(u"[^a-zA-Z0-9\u4E00-\u9FA5]") #匹配其他字符
    line = rule.sub('',line) #将匹配到的字符替换为空
    return line

#停用词列表
def stopwordslist(filepath):
    stopwords = [line.strip() for line in open(filepath,'r',  encoding='utf-8').readlines()]  #逐行提取停用词
    return stopwords

#加载停用词
stopwords = stopwordslist('/home/jovyan/data_practice/data/text/stopwords.txt')
data['content_clean'] = data['content'].apply(remove_punctuation) #对content列调用定义的remove_punctuation函数
#将删除掉不需要字符后的内容进行分词,并过滤停用词,停用词是在语言处理中不需要的语气词,符号等
data['cut_content'] = data['content_clean'].apply(lambda x: " ".join([w for w in list(jieba.cut(x)) if w not in stopwords])) #去除停用词
data.head()
#将删除掉不需要字符后的内容进行分词,并过滤停用词,停用词是在语言处理中不需要的语气词,符号等
data['cut_content'] = data['cut_content'].apply(lambda x: " ".join([w for w in list(jieba.cut(x)) if w not in stopwords]))
data.head()
文本向量化
- 使用Keras提供的文本预处理工具(如Tokenizer)对处理好的文本数据进行向量化,将每个词语映射到唯一的整数索引。
- 将文本转换为固定长度的序列,确保输入数据的长度一致。可以使用
pad_sequences函数来实现填充操作。
③.文本向量化
# 设置最频繁使用的50000个词
max_words = 2000 #50000
# 每条cut_review最大的长度
max_len = 150 #250
# 设置Embeddingceng层的维度
embedding_dim = 200

tokenizer = ???(num_words=max_words) #分词,即文本拆分为标记的过程
tokenizer.???(data['cut_content'].values) #用以训练的文本列表
word_index = tokenizer.??? #将单词(字符串)映射为它们的排名或者索引
print('共有 %s 个不相同的词语.' % len(word_index))
from tensorflow.keras.preprocessing import sequence

X = tokenizer.texts_to_sequences(data['cut_content'].values)
#填充X,让X的各个列的长度统一

X = sequence.???(X, maxlen=max_len) #截取为相同长度的序列

#多类标签的onehot展开
Y = pd.get_dummies(data['label']).values #对标签进行独热编码category
print(X.shape)
print(Y.shape)
④.划分训练测试集
#拆分数据集,取80%留作训练和测试,20%用作验证
X_train = X[:int(len(X)*0.8)]
X_test = X[int(len(X)*0.8):]
Y_train = Y[:int(len(Y)*0.8)]
Y_test = Y[int(len(Y)*0.8):]
任务解析
# 设置最频繁使用的50000个词
max_words = 2000 #50000
# 每条cut_review最大的长度
max_len = 150 #250
# 设置Embeddingceng层的维度
embedding_dim = 200

tokenizer = Tokenizer(num_words=max_words) #分词,即文本拆分为标记的过程
tokenizer.fit_on_texts(data['cut_content'].values) #用以训练的文本列表
word_index = tokenizer.word_index #将单词(字符串)映射为它们的排名或者索引
print('共有 %s 个不相同的词语.' % len(word_index))
from tensorflow.keras.preprocessing import sequence

X = tokenizer.texts_to_sequences(data['cut_content'].values) #
#填充X,让X的各个列的长度统一

X = sequence.pad_sequences(X, maxlen=max_len) #截取为相同长度的序列

#多类标签的onehot展开
Y = pd.get_dummies(data['label']).values #对标签进行独热编码category
print(X.shape)
print(Y.shape)
#拆分数据集,取80%留作训练和测试,20%用作验证
X_train = X[:int(len(X)*0.8)]
X_test = X[int(len(X)*0.8):]
Y_train = Y[:int(len(Y)*0.8)]
Y_test = Y[int(len(Y)*0.8):]
搭建GRU模型
- 导入所需的Keras模块和层。
- 使用Keras搭建GRU模型,通过添加GRU层、全连接层、Dropout层等来构建模型结构。
- 配置模型的损失函数、优化器和评估指标。
⑤LSTM网络
from keras.layers import Dropout, Dense, LSTM,GRU, SpatialDropout1D#, sparse_categorical_crossentropy
#定义模型
#神经网络非常容易过拟合,可以通过减少层数,减少神经元个数等方法调节模型
model = ??? #设置神经网络序列
model.add(???(input_dim=max_words, output_dim=embedding_dim)) #embedding层,设置输入输出维度
model.add(SpatialDropout1D(0.5))
model.add(???(100, dropout=0.5, recurrent_dropout=0.3, return_sequences=True)) #GRU层,丢弃50%。若后面还需要接GRU层,则return_sequences=True
model.add(???(50, dropout=0.5, recurrent_dropout=0.3)) #GRU层,丢弃50%
model.add(Dense(9, activation='softmax'))
#配置模型
model.???(???='categorical_crossentropy', #损失函数
              ???='RMSProp', #优化器
              ???=['accuracy'] #评估指标
             )
# 早停
from keras.callbacks import EarlyStopping
monitor = EarlyStopping(monitor='val_acc', min_delta=0.1, patience=4, verbose=1, mode='auto')
epochs = 100  #5
batch_size = 400 #64
#训练模型
history = model.???(X_train, #训练集
                    Y_train, #标签
                    epochs=epochs , #训练轮数
                    batch_size=batch_size, #每次训练抽取样本数
#                    callbacks = [monitor],
                    ???=0.5, #测试集比例
                    #validation_data=(X_test,Y_test) #测试集
                   )
model.??? #模型结构
任务解析
from keras.layers import Dropout, Dense, LSTM,GRU, SpatialDropout1D#, sparse_categorical_crossentropy
#定义模型
#神经网络非常容易过拟合,可以通过减少层数,减少神经元个数等方法调节模型
model = Sequential() #设置神经网络序列
model.add(Embedding(input_dim=max_words, output_dim=embedding_dim)) #embedding层,设置输入输出维度
model.add(SpatialDropout1D(0.5))
model.add(GRU(100, dropout=0.5, recurrent_dropout=0.3, return_sequences=True)) #GRU层,丢弃30%。若后面还需要接GRU层,则return_sequences=True
model.add(GRU(50, dropout=0.5, recurrent_dropout=0.3)) #GRU层,丢弃30%
model.add(Dense(9, activation='softmax'))
#配置模型
model.compile(loss='categorical_crossentropy', #损失函数
              optimizer='RMSProp', #优化器
              metrics=['accuracy'] #评估指标
             )
#导入
from keras.callbacks import EarlyStopping
monitor = EarlyStopping(monitor='val_acc', min_delta=0.1, patience=4, verbose=1, mode='auto')
epochs = 10  #5
batch_size = 400 #64
#训练模型
history = model.fit(X_train, #训练集
                    Y_train, #标签
                    epochs=100 , #训练轮数
                    batch_size=20, #每次训练抽取样本数
#                    callbacks = [monitor],
                    validation_split=0.5, #测试集比例
                    #validation_data=(X_test,Y_test) #测试集
                   )
model.summary() #模型结构
模型评估可视化
- 使用训练集对GRU模型进行训练,根据损失函数和优化器进行参数更新。
- 可视化训练过程中的损失和准确率曲线,以便更好地了解模型的训练情况。
- 使用测试集评估模型的性能,可以使用混淆矩阵、准确率、召回率等指标进行模型评估,这里使用的是混淆矩阵。
⑥.模型评估
#绘制损失值和准确率曲线
import matplotlib.pyplot as plt
plt.title('Loss')
plt.plot(history.history['loss'], label='train') #训练集损失
plt.plot(history.history['val_loss'], label='test') #测试集损失
plt.legend()
plt.show()

plt.title('Accuracy')
plt.plot(history.history['accuracy'], label='train') #训练集准确率
plt.plot(history.history['val_accuracy'], label='test') #测试集准确率
plt.legend()
plt.show()
#loss acc
model.???(X_test,Y_test) #验证集评估
#保存模型
#from keras.utils import plot_model

model.???('model_GRU.h5')  #  生成模型文件 'my_model.h5'
#加载模型
from keras.models import load_model

model2 = ???('model_GRU.h5') #加载储存的模型
#验证集标签预测
y_pred = model2.predict(X_test) #对验证集进行预测,预测结果为概率
y_pred = y_pred.argmax(axis = 1) #每行最大值的索引,即概率最大的索引也是标签
y_pred
Y_test.argmax(axis=1)
import seaborn as sns
from sklearn.metrics import  confusion_matrix
plt.rcParams['font.sans-serif'] = ['SimHei'] #用来正常显示中文标签
plt.rcParams['axes.unicode_minus'] = False #用来正常显示负号

conf_mat = ???(Y_test.argmax(axis=1) , y_pred) #混淆矩阵
fig = plt.figure(figsize=(10,8)) #设置图像大小
sns.???(conf_mat, annot=True, fmt='d') #绘制热度图
plt.ylabel('Ture',fontsize=18)
plt.xlabel('Predict',fontsize=18)
任务解析
#绘制损失值和准确率曲线
import matplotlib.pyplot as plt
plt.title('Loss')
plt.plot(history.history['loss'], label='train') #训练集损失
plt.plot(history.history['val_loss'], label='test') #测试集损失
plt.legend()
plt.show()

plt.title('Accuracy')
plt.plot(history.history['accuracy'], label='train') #训练集准确率
plt.plot(history.history['val_accuracy'], label='test') #测试集准确率
plt.legend()
plt.show()
#loss acc
model.evaluate(X_test,Y_test) #验证集评估
#保存模型
#from keras.utils import plot_model

model.save('model_GRU.h5')  #  生成模型文件 'my_model.h5'
#加载模型
from keras.models import load_model

model2 = load_model('model_GRU.h5') #加载储存的模型
#验证集标签预测
y_pred = model2.predict(X_test) #对验证集进行预测,预测结果为概率
y_pred = y_pred.argmax(axis = 1) #每行最大值的索引,即概率最大的索引也是标签
y_pred
Y_test.argmax(axis=1)
import seaborn as sns
from sklearn.metrics import  confusion_matrix
plt.rcParams['font.sans-serif'] = ['SimHei'] #用来正常显示中文标签
plt.rcParams['axes.unicode_minus'] = False #用来正常显示负号

conf_mat = confusion_matrix(Y_test.argmax(axis=1) , y_pred) #混淆矩阵
fig = plt.figure(figsize=(10,8)) #设置图像大小
sns.heatmap(conf_mat, annot=True, fmt='d') #绘制热度图
plt.ylabel('实际结果',fontsize=18)
plt.xlabel('预测结果',fontsize=18)
智警杯智慧视侦技术实现与应用 实训
人脸关键点定位
任务介绍
人脸关键点检测也称为人脸关键点检测定位或者人脸对齐,是指给定人脸图像,定位出人脸面部的关键区域位置,包括眉毛、眼睛、鼻子、嘴巴、脸部轮廓等。本次任务我们使用dlib的人脸识别检测器数据库来学习人脸关键点定位。
在/home/qingjiao/opencv-project/project_6路径下,创建名为detect_face_parts.py的文件
知识点介绍
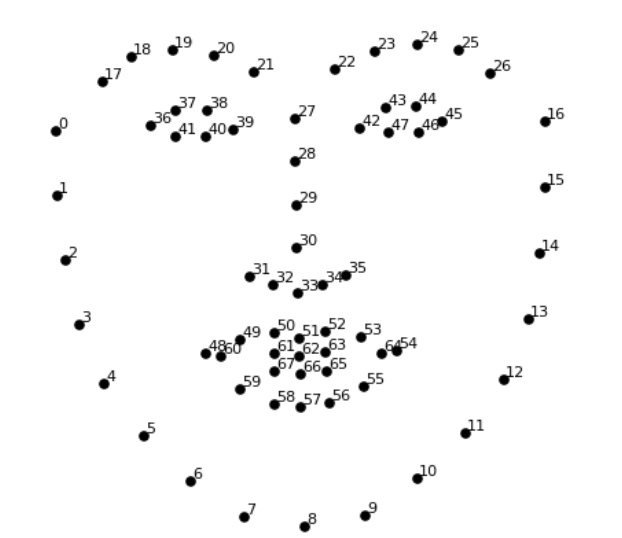
对于人脸关键点检测,dlib官方提供了相关的数据库(shape_predictor_68_face_landmarks.dat)以供使用,基于人脸上的68个特征点进行了标记。进行人脸关键点定位时,首先要确定人脸位置,确定好脸部位置之后直接进行关键点定位即可。以上操作dlib库会帮我们实现,我们需要做的就是获取各个部位的关键点,对每个关键区域进行标记和裁剪。
任务流程
1.读取图像处理为灰度图
2.人脸检测
3.对人脸进行关键点检测
4.获取人脸每个关键部位的信息
5.对每个关键区域进行标记和裁剪
6.脸部所有关键区域的轮廓展示
人脸关键点:
颚点= 0–16
右眉点= 17–21
左眉点= 22–26
鼻点= 27–35
右眼点= 36–41
左眼点= 42–47
口角= 48–60
嘴唇分数= 61–67。
dlib操作会自动进行脸部关键点的定位并进行标记,得到标记点的坐标后,根据标记点的坐标确定关键区域(眼,嘴,鼻子等),并在原图像的轮廓外坐标绘点。
- dlib.get_frontal_face_detector() 人脸检测画框,定位脸部位置
- dlib.shape_predictor() #根据所选用的dlib数据库进行关键点定位
同时将关键区域按照最小外接矩形裁剪出来并展示
- cv2.boundingRect() 用一个最小的矩形,把找到的形状包起来,可以获取矩形位置信息
示例:x,y,w,h = cv2.boundingRect(img)
每处理一个关键区域,都进行凸包检测(即每个部位的精确轮廓),然后将检测到的轮廓涂色并融合到原图像上,直到处理完所有关键区域
- cv2.convexHull() 凸包检测:将最外层的点连接起来构成的凸多边形,它能包含点集中所有的点。
示例:cv2.convexHull(points,clockwise,returnPoints)
参数:
points: 输入的坐标点,通常为1* n * 2 结构,n为所有的坐标点的数目
clockwise:转动方向,TRUE为顺时针,否则为逆时针
returnPoints:默认为TRUE,返回凸包上点的坐标,如果设置为FALSE,会返回与凸包点对应的轮廓上的点 - cv2.addWeighted() 权重加法:实现两副相同大小的图像融合相加
示例:cv2.addWeighted(src1, alpha, src2, beta, gamma, dst=None, dtype=None)
参数:
src1, src2:需要融合相加的两副大小和通道数相等的图像
alpha:src1的权重
beta:src2的权重
gamma:gamma修正系数
dst:可选参数,输出结果保存的变量,默认值为None
dtype:可选参数,输出图像数组的深度,即图像单个像素值的位数(如RGB用三个字节表示,则为24位),选默认值None表示与源图像保持一致。
本次任务无特别难点,关键在于3个for循环,第一次是遍历图像内所有人脸,第二次遍历所有关键区域,第三次遍历区域的所有点并标记。
实验步骤
1.读取图像处理为灰度图
2.人脸检测
3.对人脸进行关键点检测
4.获取人脸每个关键部位的信息
5.对每个关键区域进行标记和裁剪
6.脸部所有关键区域的轮廓展示
任务
#导入工具包
from collections import OrderedDict
import numpy as np
import argparse
import dlib
import cv2


# 五官位置
FACIAL_LANDMARKS_68_IDXS = OrderedDict([
    ("mouth", (48, 68)),
    ("right_eyebrow", (17, 22)),
    ("left_eyebrow", (22, 27)),
    ("right_eye", (36, 42)),
    ("left_eye", (42, 48)),
    ("nose", (27, 36)),
    ("jaw", (0, 17))
])

#获取坐标
def shape_to_np(shape, dtype="int"):
    # 创建68*2
    coords = np.zeros((shape.num_parts, 2), dtype=dtype)
    # 遍历每一个关键点
    # 得到坐标
    for i in range(0, shape.num_parts):  # 遍历每个关键点
        coords[i] = (shape.part(i).x, shape.part(i).y)  # 得到关键点坐标,x y
    return coords
#五官轮廓绘制
def visualize_facial_landmarks(image, shape, colors=None, alpha=0.75):
    # 创建两个copy
    # overlay and one for the final output image
    overlay = image.copy()
    output = image.copy()
    # 设置一些颜色区域
    if colors is None:
        colors = [(19, 199, 109), (79, 76, 240), (230, 159, 23),
                  (168, 100, 168), (158, 163, 32),
                  (163, 38, 32), (180, 42, 220)]
    # 遍历检测到每一个部位区域
    for (i, name) in enumerate(FACIAL_LANDMARKS_68_IDXS.keys()):
        # 得到每一个点的坐标
        (j, k) = FACIAL_LANDMARKS_68_IDXS[name]
        pts = shape[j:k]
        # 检查位置
        # 位置是否为下颚,进行连线操作
        if name == "jaw":
            # 用线条连起来
            for l in range(1, len(pts)):
                ptA = tuple(pts[l - 1])
                ptB = tuple(pts[l])
                cv2.???(overlay, ptA, ptB, colors[i], 2)  # 检测到的点用直线连接

        # 计算凸包
        # 其他位置进行轮廓检测
        else:
            hull = cv2.???(pts)  # 凸包检测
            cv2.???(overlay, [hull], -1, colors[i], -1)  # 绘制轮廓
    # 叠加在原图上,可以指定比例
    cv2.???(overlay, alpha, output, 1 - alpha, 0, output)  # 将图像按权重融合
    return output

# 加载人脸检测与关键点定位
detector = dlib.???()  # 人脸检测画框
predictor = dlib.???("shape_predictor_68_face_landmarks.dat")  # 标记人脸关键点

# 1.读取图像处理为灰度图
image = cv2.???("liudehua.jpg")  # 读取图像
(h, w) = image.shape[:2]  # 获取图像高度和宽度
# 设置图像尺寸
width=500
r = width / float(w)
dim = (width, int(h * r))
image = cv2.???(image, dim, interpolation=cv2.INTER_AREA)  # 重设尺寸
gray = cv2.???(image, cv2.COLOR_BGR2GRAY)  # 处理为灰度图

#2.人脸检测
rects = detector(gray, 1)  # 人脸检测

#3.对人脸进行关键点检测
# 遍历检测到的框
for (i, rect) in enumerate(rects):
    # 对人脸框进行关键点定位
    # 转换成ndarray
    shape = predictor(gray, rect)  # 关键点标记
    shape = shape_to_np(shape)  # 得到坐标


    #4.获取人脸每个关键部位的信息
    # 遍历每一个部分
    for (name, (i, j)) in FACIAL_LANDMARKS_68_IDXS.items():
        clone = image.copy()  # 复制图像
        cv2.???(clone, name, (10, 30), cv2.FONT_HERSHEY_SIMPLEX,
                    0.7, (0, 0, 255), 2)  # 添加文字(文字名称:识别的部位)

        #5.对每个关键区域进行标记和裁剪
        # 根据位置画点
        for (x, y) in shape[i:j]:
            cv2.???(clone, (x, y), 3, (0, 0, 255), -1)  # 将识别到的点画成小圆

        # 提取ROI区域
        (x, y, w, h) = cv2.???(np.array([shape[i:j]]))  # 最小矩形框提取

        roi = image[y:y + h, x:x + w]  # roi位置
        (h, w) = roi.shape[:2]  # 获取图像高度和宽度
        # 设置图像尺寸
        width=250
        r = width / float(w)
        dim = (width, int(h * r))
        roi = cv2.???(roi, dim, interpolation=cv2.INTER_AREA)  # 重设尺寸

        # 显示每一部分
        cv2.???("ROI", roi)  # 显示每部分图像
        cv2.???("Image", clone)  # 显示带标记点的原图像
        cv2.???(0)  # 图像显示时长

    # 6.脸部所有关键区域的轮廓展示
    output = visualize_facial_landmarks(image, shape)  # 五官的图像

    cv2.???("Image", output)  # 显示图像
    cv2.???(0)  # 图像显示时长
解析(cv2、dlib库的用法)
0x01
cv2.line(overlay, ptA, ptB, colors[i], 2) # 检测到的点用直线连接 0x01
0x02
hull = cv2.convexHull(pts) # 凸包检测 0x02
0x03
cv2.drawContours(overlay, [hull], -1, colors[i], -1) # 绘制轮廓 0x03
0x04
cv2.addWeighted(overlay, alpha, output, 1 - alpha, 0, output) # 将图像按权重融合 0x04
0x05
detector = dlib.get_frontal_face_detector() # 人脸检测画框 0x05
0x06
predictor = dlib.shape_predictor("shape_predictor_68_face_landmarks.dat") # 标记人脸关键点 0x06
0x07
image = cv2.imread("liudehua.jpg") # 读取图像 0x07
0x08
image = cv2.resize(image, dim, interpolation=cv2.INTER_AREA) # 重设尺寸 0x08
0x09
gray = cv2.cvtColor(image, cv2.COLOR_BGR2GRAY) # 处理为灰度图 0x09
0x0A
cv2.putText(clone, name, (10, 30), cv2.FONT_HERSHEY_SIMPLEX, 0.7, (0, 0, 255), 2) # 添加文字(文字名称:识别的部位)0x0A
0x0B
cv2.circle(clone, (x, y), 3, (0, 0, 255), -1) # 将识别到的点画成小圆 0x0B
0x0C
(x, y, w, h) = cv2.boundingRect(np.array([shape[i:j]])) # 最小矩形框提取 0x0C
0x0D
roi = cv2.resize(roi, dim, interpolation=cv2.INTER_AREA) # 重设尺寸 0x0D
0x0E
cv2.imshow("ROI", roi) # 显示每部分图像 0x0E
0x0F
cv2.imshow("Image", clone) # 显示带标记点的原图像 0x0F
0x10
cv2.waitKey(0) # 图像显示时长 0x10
0x11
cv2.imshow("Image", output) # 显示图像 0x11
0x12
cv2.waitKey(0) # 图像显示时长 0x12
答案
#导入工具包
from collections import OrderedDict
import numpy as np
import argparse
import dlib
import cv2


# 五官位置
FACIAL_LANDMARKS_68_IDXS = OrderedDict([
    ("mouth", (48, 68)),
    ("right_eyebrow", (17, 22)),
    ("left_eyebrow", (22, 27)),
    ("right_eye", (36, 42)),
    ("left_eye", (42, 48)),
    ("nose", (27, 36)),
    ("jaw", (0, 17))
])

#获取坐标
def shape_to_np(shape, dtype="int"):
    # 创建68*2
    coords = np.zeros((shape.num_parts, 2), dtype=dtype)
    # 遍历每一个关键点
    # 得到坐标
    for i in range(0, shape.num_parts):  # 遍历每个关键点
        coords[i] = (shape.part(i).x, shape.part(i).y)  # 得到关键点坐标,x y
    return coords
#五官轮廓绘制
def visualize_facial_landmarks(image, shape, colors=None, alpha=0.75):
    # 创建两个copy
    # overlay and one for the final output image
    overlay = image.copy()
    output = image.copy()
    # 设置一些颜色区域
    if colors is None:
        colors = [(19, 199, 109), (79, 76, 240), (230, 159, 23),
                  (168, 100, 168), (158, 163, 32),
                  (163, 38, 32), (180, 42, 220)]
    # 遍历检测到每一个部位区域
    for (i, name) in enumerate(FACIAL_LANDMARKS_68_IDXS.keys()):
        # 得到每一个点的坐标
        (j, k) = FACIAL_LANDMARKS_68_IDXS[name]
        pts = shape[j:k]
        # 检查位置
        # 位置是否为下颚,进行连线操作
        if name == "jaw":
            # 用线条连起来
            for l in range(1, len(pts)):
                ptA = tuple(pts[l - 1])
                ptB = tuple(pts[l])
                cv2.line(overlay, ptA, ptB, colors[i], 2)  # 检测到的点用直线连接 0x01

        # 计算凸包
        # 其他位置进行轮廓检测
        else:
            hull = cv2.convexHull(pts)  # 凸包检测 0x02
            cv2.drawContours(overlay, [hull], -1, colors[i], -1)  # 绘制轮廓 0x03
    # 叠加在原图上,可以指定比例
    cv2.addWeighted(overlay, alpha, output, 1 - alpha, 0, output)  # 将图像按权重融合 0x04
    return output

# 加载人脸检测与关键点定位
detector = dlib.get_frontal_face_detector()  # 人脸检测画框  0x05
predictor = dlib.shape_predictor("shape_predictor_68_face_landmarks.dat")  # 标记人脸关键点 0x06

# 1.读取图像处理为灰度图
image = cv2.imread("liudehua.jpg")  # 读取图像 0x07
(h, w) = image.shape[:2]  # 获取图像高度和宽度
# 设置图像尺寸
width=500
r = width / float(w)
dim = (width, int(h * r))
image = cv2.resize(image, dim, interpolation=cv2.INTER_AREA)  # 重设尺寸 0x08
gray = cv2.cvtColor(image, cv2.COLOR_BGR2GRAY)  # 处理为灰度图 0x09

#2.人脸检测
rects = detector(gray, 1)  # 人脸检测

#3.对人脸进行关键点检测
# 遍历检测到的框
for (i, rect) in enumerate(rects):
    # 对人脸框进行关键点定位
    # 转换成ndarray
    shape = predictor(gray, rect)  # 关键点标记
    shape = shape_to_np(shape)  # 得到坐标


    #4.获取人脸每个关键部位的信息
    # 遍历每一个部分
    for (name, (i, j)) in FACIAL_LANDMARKS_68_IDXS.items():
        clone = image.copy()  # 复制图像
        cv2.putText(clone, name, (10, 30), cv2.FONT_HERSHEY_SIMPLEX,
                    0.7, (0, 0, 255), 2)  # 添加文字(文字名称:识别的部位)0x0A

        #5.对每个关键区域进行标记和裁剪
        # 根据位置画点
        for (x, y) in shape[i:j]:
            cv2.circle(clone, (x, y), 3, (0, 0, 255), -1)  # 将识别到的点画成小圆 0x0B

        # 提取ROI区域
        (x, y, w, h) = cv2.boundingRect(np.array([shape[i:j]]))  # 最小矩形框提取 0x0C

        roi = image[y:y + h, x:x + w]  # roi位置
        (h, w) = roi.shape[:2]  # 获取图像高度和宽度
        # 设置图像尺寸
        width=250
        r = width / float(w)
        dim = (width, int(h * r))
        roi = cv2.resize(roi, dim, interpolation=cv2.INTER_AREA)  # 重设尺寸 0x0D

        # 显示每一部分
        cv2.imshow("ROI", roi)  # 显示每部分图像 0x0E
        cv2.imshow("Image", clone)  # 显示带标记点的原图像 0x0F
        cv2.waitKey(0)  # 图像显示时长 0x10

    # 6.脸部所有关键区域的轮廓展示
    output = visualize_facial_landmarks(image, shape)  # 五官的图像

    cv2.imshow("Image", output)  # 显示图像 0x11
    cv2.waitKey(0)  # 图像显示时长 0x12
使用Fast R-CNN进行目标检测
任务介绍
项目背景
目标检测(Object Detection)的任务是找出图像中所有感兴趣的目标(物体),确定它们的类别和位置,是计算机视觉领域的核心问题之一。由于各类物体有不同的外观、形状和姿态,加上成像时光照、遮挡等因素的干扰,目标检测一直是计算机视觉领域最具有挑战性的问题。
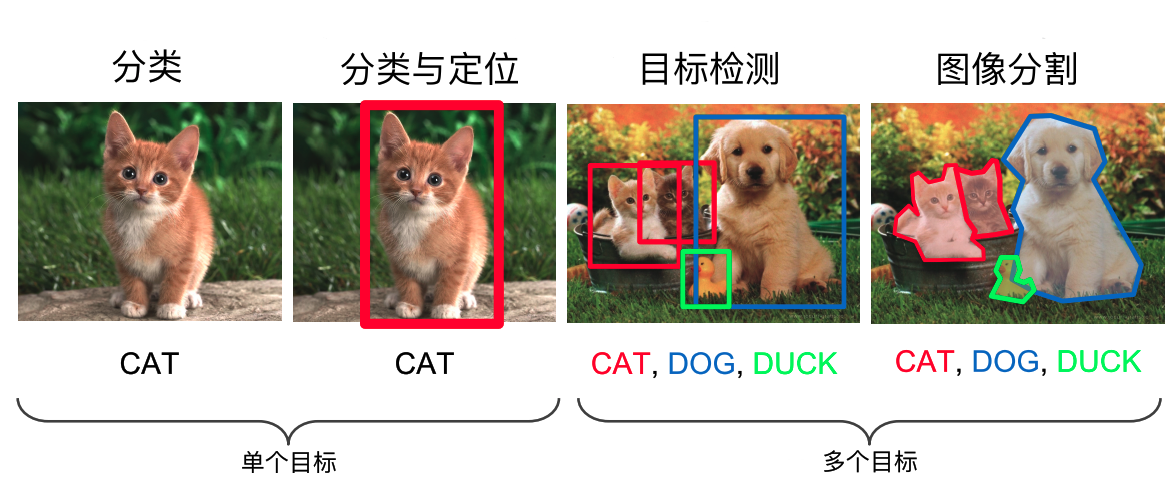
计算机视觉中关于图像识别有四大类任务:
(1)分类-Classification:解决“是什么?”的问题,即给定一张图片或一段视频判断里面包含什么类别的目标。
(2)定位-Location:解决“在哪里?”的问题,即定位出这个目标的的位置。
(3)检测-Detection:解决“在哪里?是什么?”的问题,即定位出这个目标的位置并且知道目标物是什么。
(4)分割-Segmentation:分为实例的分割(Instance-level)和场景分割(Scene-level),解决“每一个像素属于哪个目标物或场景”的问题。
所以,目标检测是一个分类、回归问题的叠加
目标检测分为两大系列——RCNN系列和YOLO系列,RCNN系列是基于区域检测的代表性算法,YOLO是基于区域提取的代表性算法,另外还有著名的SSD是基于前两个系列的改进。
本项目是使用Fast R-CNN算法实现目标检测。Fast R-CNN是一种用于目标检测的快速的基于区域的卷积网络方法,本项目是通过Keras框架来完整实现Fatser R-CNN模型,并使用该模型对未知数据进行预测。数据集我们采用经典的VOC数据集。
项目步骤
本次项目从以下步骤进行:
- VOC数据集解析
- 数据增强
- 为RPN网络准备训练数据
- 共享网络模块搭建
- RPN网络搭建
- 自定义ROI Pooling层
- 检测网络
- 自定义损失函数
- 建立RPN与ROIpool层的联系
- 模型训练
知识点介绍
1.将项目加载进pycharm中,文件->打开->/home/qingjiao/fatser_rcnn-master/my_fatser_rcnn-master->确认。
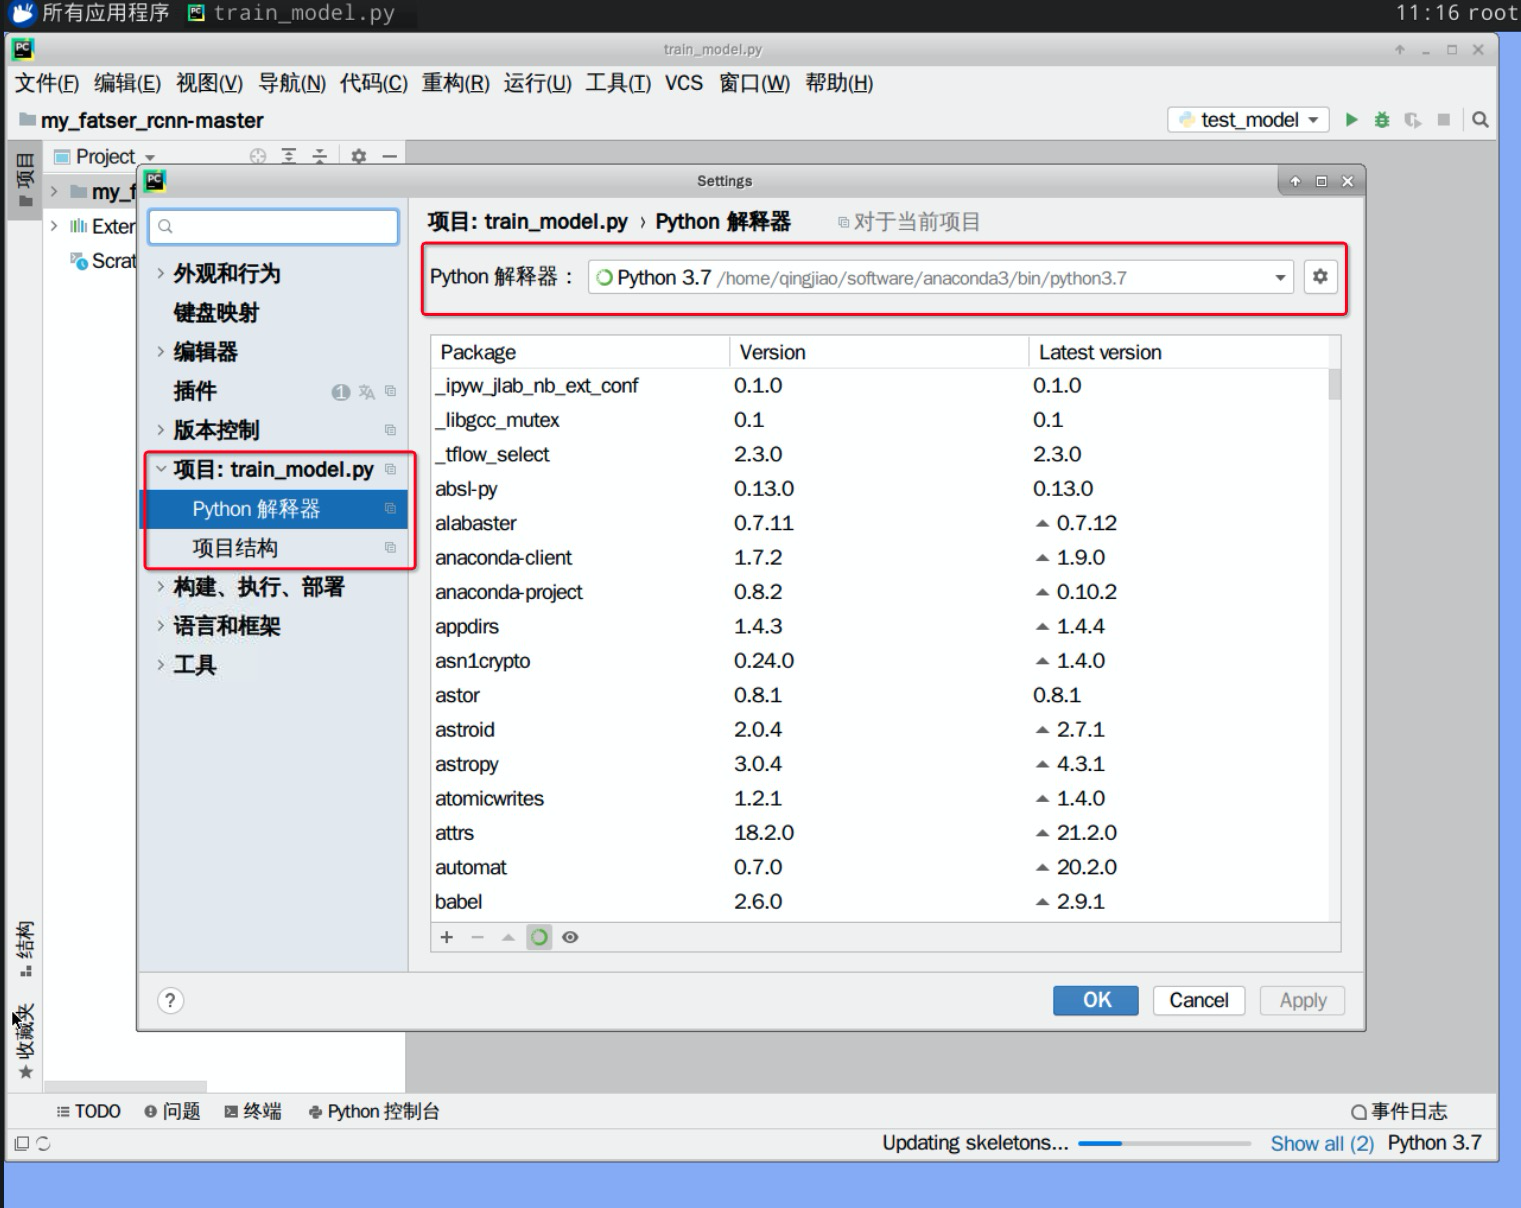
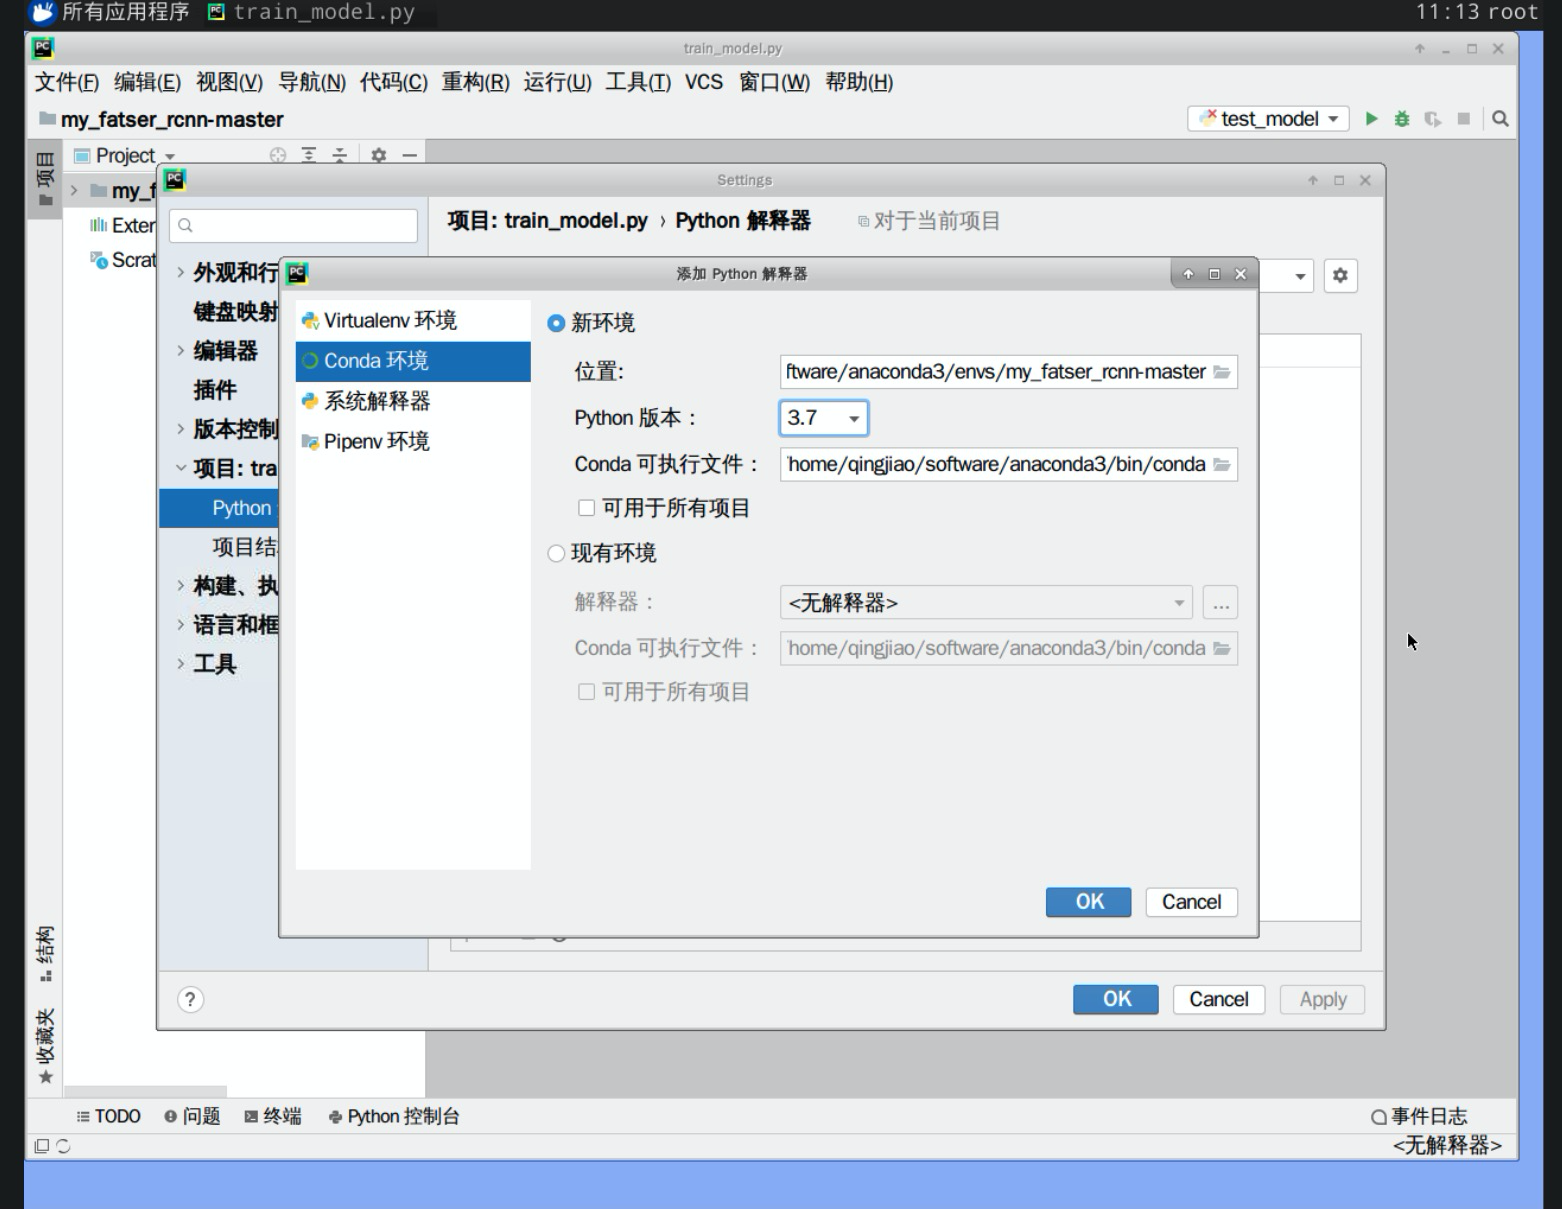
2.本次项目基于pycharm进行开发,将项目加载到pycharm中,并配置环境变量,点击文件>设置Settings>项目:train_model.py,如图所示:
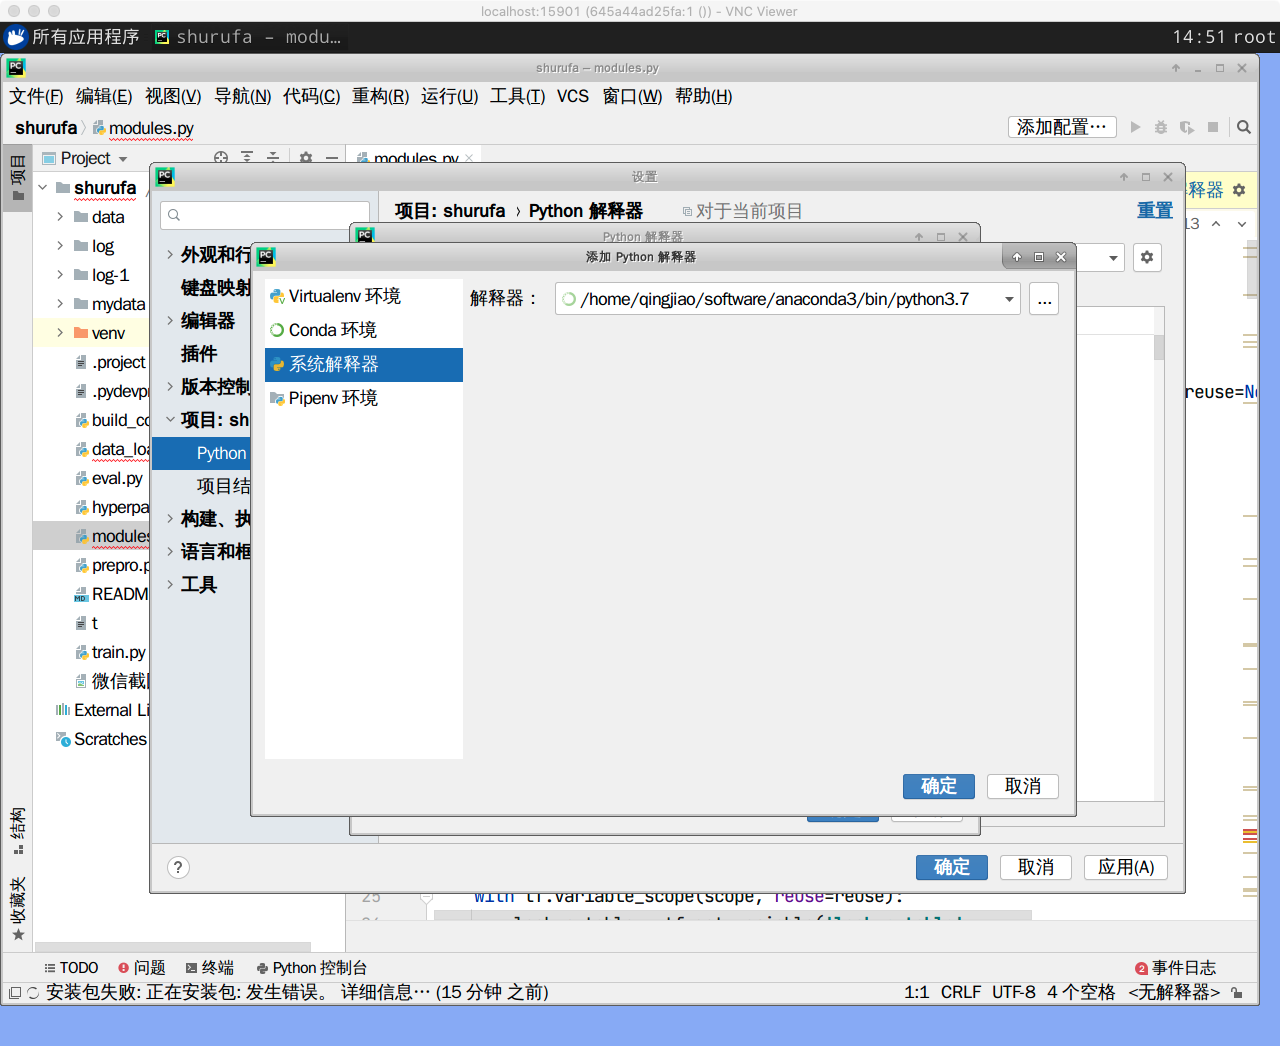
单击“python解释器”后面的设置,弹出的对话框则是添加本项目的解释器,需要注意的是需要设置conda环境与系统解释器
本次项目中Conda环境位于”/home/qingjiao/software/anaconda3/bin/conda“中,如图所示:
设置系统解释器:"/home/qingjiao/software/anaconda3/bin/python3.7"
设置完成后,会看到本项目中的所有工具包,单击右下角的“应用apply->确定”则可以使用anaconda3中的工具包。
3.本项目中使用了tensorflow框架,所以需要对其进行安装,同时在项目中需要一些必要的自然语言处理的包,需要事先进行安装,使用终端进行安装其语句如下(这一步不需要操作):
- conda install tensorflow=1.15.0
- conda install keras=2.3.1
4.查看数据集
import cv2

image = cv2.imread('/home/qingjiao/fatser_rcnn-master/VOC2012/JPEGImages/2007_000027.jpg', flags=1)
cv2.imshow('Example',image)
cv2.waitKey(0)
实验步骤
VOC数据集解析
1.VOC数据集的下载,因为官网下载太慢,本次项目已经将数据集压缩包放置“/home/qingjiao/fatser_rcnn-master/VOC2012”目录下,需解压使用。
下载解压后的文件目录如下:
对于目标检测任务,只需要用到Annotations,ImageSets,JPEGImages这三个目录。
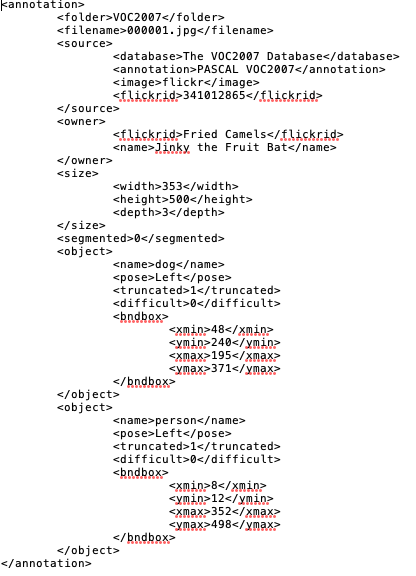
2.Annotations:存放相关标注信息,每一张图片对应一个xml文件,具体xml内容如下:
3.ImageSets:我们只会用到ImageSets\Main下train.txt , val.txt, test.txt这三个文件,里面存储对应训练集,验证集,测试集的图片名称,文件格式如下:
4.JPEGImages:存储所有的图片数据,我们需要将下载来的VOC数据集解析成如下格式:
all_img_data = [{'width': 500,
		 'height': 500,
		 'bboxes': [{'y2': 500, 'y1': 27, 'x2': 183, 'x1': 20, 'class': 'person', 'difficult': False},
			    {'y2': 500, 'y1': 2, 'x2': 249, 'x1': 112, 'class': 'person', 'difficult': False},
  			    {'y2': 490, 'y1': 233, 'x2': 376, 'x1': 246, 'class': 'person', 'difficult': False},
			    {'y2': 468, 'y1': 319, 'x2': 356, 'x1': 231, 'class': 'chair', 'difficult': False},
 			    {'y2': 450, 'y1': 314, 'x2': 58, 'x1': 1, 'class': 'chair', 'difficult': True}],
		  'imageset': 'test',
  		  'filepath': './datasets/VOC2007/JPEGImages/000910.jpg'
		 }
		...
		 ]
5.在“voc_data_parser.py”文件中实现xml文件解析,请根据注释补全代码,并成功运行
'''
voc数据集的相关解析
'''
import os
import xml.etree.ElementTree as ET
from tqdm import tqdm
import pprint


def get_data(input_path):
    '''
    :param input_path:  voc数据目录
    :return:
      image_data:解析后的数据集 list列表
      classes_count:一个字典数据结构,key为对应类别名称,value对应为类别所对应的样本(标注框)个数
      classes_mapping:一个字典数据结构,key为对应类别名称,value为对应类别的一个标识index
    '''
    image_data = []
    classes_count = {}  #一个字典,key为对应类别名称,value对应为类别所对应的样本(标注框)个数
    classes_mapping = {} #一个字典数据结构,key为对应类别名称,value为对应类别的一个标识index
    data_paths = os.path.join(input_path, "VOC2012")
    print(data_paths)
    annota_path = os.????  # 获取数据标注目录Annotations,补全缺失代码
    imgs_path = os.????  # 获取图片目录JPEGImages,补全缺失代码
    imgsets_path_train = os.path.join(data_paths, 'ImageSets', 'Main', 'train.txt')
    imgsets_path_val = os.path.join(data_paths, 'ImageSets', 'Main', 'val.txt')
    imgsets_path_test = os.path.join(data_paths, 'ImageSets', 'Main', 'test.txt')
    train_files = []  # 训练集图片名称集合
    val_files = []  # 验证集图片名称集合
    test_files = []  # 测试集图片名称集合
    with open(imgsets_path_train) as f:
        for line in f:
            # strip() 默认去掉字符串头尾的空格和换行符
            train_files.append(line.strip() + '.jpg')
    with open(imgsets_path_val) as f:
        for line in f:
            val_files.append(line.strip() + '.jpg')
    # test-set not included in pascal VOC 2012
    if os.path.isfile(imgsets_path_test):
        with open(imgsets_path_test) as f:
            for line in f:
                test_files.append(line.strip() + '.jpg')
    # 获得所有的标注文件路径,保存到annota_path_list列表中
    annota_path_list = [os.path.join(annota_path, s) for s in os.listdir(annota_path)]
    index = 0
    # Tqdm 是一个快速,可扩展的Python进度条,
    # 可以在 Python 长循环中添加一个进度提示信息,用户只需要封装任意的迭代器 tqdm(iterator)
    annota_path_list = tqdm(annota_path_list)
    for annota_path in annota_path_list:
        exist_flag = False
        index += 1
        annota_path_list.set_description("Processing %s" % annota_path.split(os.sep)[-1])
        # 开始解析对应xml数据标注文件
        et = ET.parse(annota_path)
        element = et.getroot()
        element_objs = element.????  # 使用findall方法获取xml文件中所有的object子元素,补全缺失代码
        element_filename = element.???? # 使用find方法获取xml文件中所有的对应图片名称filename的内容,补全缺失代码
        element_width = int(element.????)  # 使用find方法获取xml文件中所有的对应图片尺寸的宽度,补全缺失代码
        element_height = int(element.????)  # 使用find方法获取xml文件中所有的对应图片尺寸的长度,补全缺失代码
        if (len(element_objs) > 0):
            annotation_data = {"filepath": os.path.join(imgs_path, element_filename),
                               "width": element_width,
                               "height": element_height,
                               "image_id": index,
                               "bboxes": []}  # bboxes 用来存放对应标注框的相关位置
        if element_filename in train_files:
            annotation_data["imageset"] = "train"
            exist_flag = True
        if element_filename in val_files:
            annotation_data["imageset"] = "val"
            exist_flag = True
        if len(test_files) > 0:
            if element_filename in test_files:
                annotation_data["imageset"] = "test"
                exist_flag = True
        if not exist_flag:
            continue
        for element_obj in element_objs:  # 遍历一个xml标注文件中的所有标注框
            classes_name = element_obj.find("name").text  # 获取当前标注框的类别名称
            if classes_name in classes_count:  # classes_count 存储类别以及对应类别的标注框个数
                classes_count[classes_name] += 1
            else:
                classes_count[classes_name] = 1
            if classes_name not in classes_mapping:
                classes_mapping[classes_name] = len(classes_mapping)
            obj_bbox = element_obj.find("bndbox")
            x1 = int(round(float(obj_bbox.find("xmin").text)))
            y1 = int(round(float(obj_bbox.find("ymin").text)))
            x2 = int(round(float(obj_bbox.find("xmax").text)))
            y2 = int(round(float(obj_bbox.find("ymax").text)))
            difficulty = int(element_obj.find("difficult").text) == 1
            annotation_data["bboxes"].append({"class": classes_name,
                                              "x1": x1, "x2": x2, "y1": y1, "y2": y2,
                                              "difficult": difficulty})
        image_data.append(annotation_data)
    return image_data, classes_count, classes_mapping
if __name__ == '__main__':
	# 输入数据所在地址
    image_data, classes_count, classes_mapping  = get_data("????")
    print("数据集大小:", len(image_data))
    print("类别个数:", len(classes_count))
    print("类别种类:", classes_count.keys())
    print("打印其中一条样本数据:")
    pprint.pprint(image_data[0])
任务解析
'''
voc数据集的相关解析
'''
import os
import xml.etree.ElementTree as ET
from tqdm import tqdm
import pprint


def get_data(input_path):
    '''
    :param input_path:  voc数据目录
    :return:
      image_data:解析后的数据集 list列表
      classes_count:一个字典数据结构,key为对应类别名称,value对应为类别所对应的样本(标注框)个数
      classes_mapping:一个字典数据结构,key为对应类别名称,value为对应类别的一个标识index
    '''
    image_data = []
    classes_count = {}  #一个字典,key为对应类别名称,value对应为类别所对应的样本(标注框)个数
    classes_mapping = {} #一个字典数据结构,key为对应类别名称,value为对应类别的一个标识index
    data_paths = os.path.join(input_path, "VOC2012")
    print(data_paths)
    annota_path = os.path.join(data_paths, "Annotations")  # 数据标注目录
    imgs_path = os.path.join(data_paths, "JPEGImages")  # 图片目录
    imgsets_path_train = os.path.join(data_paths, 'ImageSets', 'Main', 'train.txt')
    imgsets_path_val = os.path.join(data_paths, 'ImageSets', 'Main', 'val.txt')
    imgsets_path_test = os.path.join(data_paths, 'ImageSets', 'Main', 'test.txt')
    train_files = []  # 训练集图片名称集合
    val_files = []  # 验证集图片名称集合
    test_files = []  # 测试集图片名称集合
    with open(imgsets_path_train) as f:
        for line in f:
            # strip() 默认去掉字符串头尾的空格和换行符
            train_files.append(line.strip() + '.jpg')
    with open(imgsets_path_val) as f:
        for line in f:
            val_files.append(line.strip() + '.jpg')
    # test-set not included in pascal VOC 2012
    if os.path.isfile(imgsets_path_test):
        with open(imgsets_path_test) as f:
            for line in f:
                test_files.append(line.strip() + '.jpg')
    # 获得所有的标注文件路径,保存到annota_path_list列表中
    annota_path_list = [os.path.join(annota_path, s) for s in os.listdir(annota_path)]
    index = 0
    # Tqdm 是一个快速,可扩展的Python进度条,
    # 可以在 Python 长循环中添加一个进度提示信息,用户只需要封装任意的迭代器 tqdm(iterator)
    annota_path_list = tqdm(annota_path_list)
    for annota_path in annota_path_list:
        exist_flag = False
        index += 1
        annota_path_list.set_description("Processing %s" % annota_path.split(os.sep)[-1])
        # 开始解析对应xml数据标注文件
        et = ET.parse(annota_path)
        element = et.getroot()
        element_objs = element.findall("object")  # 获取所有的object子元素
        element_filename = element.find("filename").text  # 对应图片名称
        element_width = int(element.find("size").find("width").text)  # 对应图片尺寸
        element_height = int(element.find("size").find("height").text)  # 对应图片尺寸
        if (len(element_objs) > 0):
            annotation_data = {"filepath": os.path.join(imgs_path, element_filename),
                               "width": element_width,
                               "height": element_height,
                               "image_id": index,
                               "bboxes": []}  # bboxes 用来存放对应标注框的相关位置
        if element_filename in train_files:
            annotation_data["imageset"] = "train"
            exist_flag = True
        if element_filename in val_files:
            annotation_data["imageset"] = "val"
            exist_flag = True
        if len(test_files) > 0:
            if element_filename in test_files:
                annotation_data["imageset"] = "test"
                exist_flag = True
        if not exist_flag:
            continue
        for element_obj in element_objs:  # 遍历一个xml标注文件中的所有标注框
            classes_name = element_obj.find("name").text  # 获取当前标注框的类别名称
            if classes_name in classes_count:  # classes_count 存储类别以及对应类别的标注框个数
                classes_count[classes_name] += 1
            else:
                classes_count[classes_name] = 1
            if classes_name not in classes_mapping:
                classes_mapping[classes_name] = len(classes_mapping)
            obj_bbox = element_obj.find("bndbox")
            x1 = int(round(float(obj_bbox.find("xmin").text)))
            y1 = int(round(float(obj_bbox.find("ymin").text)))
            x2 = int(round(float(obj_bbox.find("xmax").text)))
            y2 = int(round(float(obj_bbox.find("ymax").text)))
            difficulty = int(element_obj.find("difficult").text) == 1
            annotation_data["bboxes"].append({"class": classes_name,
                                              "x1": x1, "x2": x2, "y1": y1, "y2": y2,
                                              "difficult": difficulty})
        image_data.append(annotation_data)
    return image_data, classes_count, classes_mapping
if __name__ == '__main__':
    image_data, classes_count, classes_mapping  = get_data("/home/qingjiao/fatser_rcnn-master/")
    print("数据集大小:", len(image_data))
    print("类别个数:", len(classes_count))
    print("类别种类:", classes_count.keys())
    print("打印其中一条样本数据:")
    pprint.pprint(image_data[0])
数据增强
- 在“data_augment.py”文件中实现随机将数据进行翻转,旋转
- 根据注释补全代码
import cv2
import numpy as np
import copy

def augment(img_data, config, augment = True):
    '''
    用来进行数据增强
    :param img_data:  原始数据
    :param config:   相关配置参数
    :param augment:
    :return:  增强后的数据集
    '''
    assert 'filepath' in img_data
    assert 'bboxes' in img_data
    assert 'width' in img_data
    assert 'height' in img_data

    img_data_aug = copy.deepcopy(img_data)
    img = cv2.????  #读取原始图片,补全缺失代码
    if augment:
        rows, cols = img.shape[:2]  #获取图像尺
        if config.use_horizontal_flips and np.random.randint(0,2) == 0:
            img = cv2.????  #将水平翻转,补全缺失代码
            for bbox in img_data_aug["bboxes"]:  #重新更新每个标注框横坐标的值
                x1 = bbox["x1"]
                x2 = bbox["x2"]
                bbox["x1"] = cols - x2
                bbox["x2"] = cols - x1
        if config.use_vertical_flips and np.random.randint(0,2) == 0:
            img = cv2.????  #将图片竖直翻转,补全缺失代码
            for bbox in img_data_aug["bboxes"]:  #重新更新每个标注框横坐标的值
                y1 = bbox["y1"]
                y2 = bbox["y2"]
                bbox["y1"] = rows - y2
                bbox["y2"] = rows - y1
        if config.rot_90:
            angle = np.random.choice([0,90,180,270],1)[0]
            print("angle==",angle)
            if angle == 270:   #旋转270度
                img = np.transpose(img, (1,0,2))
                img = cv2.flip(img, 0)
            elif angle == 180:  #旋转180度
                img = cv2.flip(img, -1)
            elif angle == 90:   #旋转90度
                img = np.transpose(img, (1,0,2))
                img = cv2.flip(img, 1)
            elif angle == 0:
                pass
            # 重新更新每个标注框横坐标的值
            for bbox in img_data_aug['bboxes']:
                x1 = bbox['x1']
                x2 = bbox['x2']
                y1 = bbox['y1']
                y2 = bbox['y2']
                if angle == 270:
                    bbox['x1'] = y1
                    bbox['x2'] = y2
                    bbox['y1'] = cols - x2
                    bbox['y2'] = cols - x1
                elif angle == 180:
                    bbox['x2'] = cols - x1
                    bbox['x1'] = cols - x2
                    bbox['y2'] = rows - y1
                    bbox['y1'] = rows - y2
                elif angle == 90:
                    bbox['x1'] = rows - y2
                    bbox['x2'] = rows - y1
                    bbox['y1'] = x1
                    bbox['y2'] = x2
                elif angle == 0:
                    pass
    img_data_aug['width'] = img.shape[1]
    img_data_aug['height'] = img.shape[0]
    return img_data_aug, img
任务解析
import cv2
import numpy as np
import copy

def augment(img_data, config, augment = True):
    '''
    用来进行数据增强
    :param img_data:  原始数据
    :param config:   相关配置参数
    :param augment:
    :return:  增强后的数据集
    '''
    assert 'filepath' in img_data
    assert 'bboxes' in img_data
    assert 'width' in img_data
    assert 'height' in img_data

    img_data_aug = copy.deepcopy(img_data)

    img = cv2.imread(img_data_aug["filepath"])  #读取原始图片
    if augment:
        rows, cols = img.shape[:2]  #获取图像尺寸

        if config.use_horizontal_flips and np.random.randint(0,2) == 0:
            img = cv2.flip(img, 1)  #水平翻转

            for bbox in img_data_aug["bboxes"]:  #重新更新每个标注框横坐标的值
                x1 = bbox["x1"]
                x2 = bbox["x2"]
                bbox["x1"] = cols - x2
                bbox["x2"] = cols - x1

        if config.use_vertical_flips and np.random.randint(0,2) == 0:
            img = cv2.flip(img, 0)  #竖直翻转

            for bbox in img_data_aug["bboxes"]:  #重新更新每个标注框横坐标的值
                y1 = bbox["y1"]
                y2 = bbox["y2"]
                bbox["y1"] = rows - y2
                bbox["y2"] = rows - y1


        if config.rot_90:
            angle = np.random.choice([0,90,180,270],1)[0]
            print("angle==",angle)
            if angle == 270:   #旋转270度
                img = np.transpose(img, (1,0,2))
                img = cv2.flip(img, 0)
            elif angle == 180:  #旋转180度
                img = cv2.flip(img, -1)
            elif angle == 90:   #旋转90度
                img = np.transpose(img, (1,0,2))
                img = cv2.flip(img, 1)
            elif angle == 0:
                pass

            # 重新更新每个标注框横坐标的值
            for bbox in img_data_aug['bboxes']:
                x1 = bbox['x1']
                x2 = bbox['x2']
                y1 = bbox['y1']
                y2 = bbox['y2']
                if angle == 270:
                    bbox['x1'] = y1
                    bbox['x2'] = y2
                    bbox['y1'] = cols - x2
                    bbox['y2'] = cols - x1
                elif angle == 180:
                    bbox['x2'] = cols - x1
                    bbox['x1'] = cols - x2
                    bbox['y2'] = rows - y1
                    bbox['y1'] = rows - y2
                elif angle == 90:
                    bbox['x1'] = rows - y2
                    bbox['x2'] = rows - y1
                    bbox['y1'] = x1
                    bbox['y2'] = x2
                elif angle == 0:
                    pass
    img_data_aug['width'] = img.shape[1]
    img_data_aug['height'] = img.shape[0]
    return img_data_aug, img
为RPN网络准备训练数据
- 需要将数据格式转化为RPN网络可以直接训练的格式,生成所有的anchors。用于产生前景候选框和前景框的位置偏移。
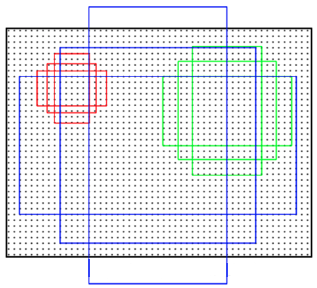
- Anchors是一组大小固定的参考窗口:三种尺度{128 * 128,252 * 256,512 * 512}×三种长宽比{1:1,1:2,2:1},如下图所示,表示RPN网络中对特征图滑窗时每个滑窗位置所对应的原图区域中9种可能的大小,相当于模板,对任意图像任意滑窗位置都是这9种模板。
继而根据图像大小计算滑窗中心点对应原图区域的中心点,通过中心点和size就可以得到滑窗位置和原图位置的映射关系,由此原图位置并根据与Ground Truth重复率贴上正负标签,让RPN学习该Anchors是否有物体即可。
- 针对每一张图片构造所有anchor,并为RPN网络准备训练数据。RPN网络有两个输出,一个是检测框分类层输出,输出的通道个数为2* k(如果使用sigmoid分类的话,那就是k个),另一个为检测框回归层输出,输出的通道个数为4 * k。所以,我们也需要先对我们的数据标签做对应处理。
- 构建一个迭代器来方便在训练时,实时生成对应训练数据。
- 在“data_generators.py”文件中实现以上步骤,并运行"test.py"文件进行测试,需要注意文件路径”/home/qingjiao/“目录下。
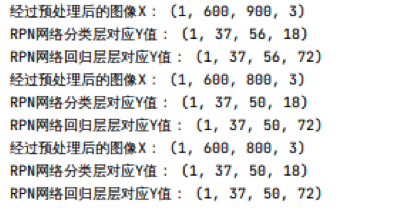
- 运行结果如下:
- 根据注释将代码补全,并成功运行
from __future__ import absolute_import
import numpy as np
import cv2
import random
import copy
import threading
import itertools
from keras_faster_rcnn import data_augment


def get_new_img_size(width, height, img_min_size=600):
    if width <= height:
        f = float(img_min_size / width)
        resized_height = int(f * height)
        resized_width = int(img_min_size)
    else:
        f = float(img_min_size / height)
        resized_width = int(f * width)
        resized_height = int(img_min_size)
    return resized_width, resized_height
#计算两个框之前的并集
def union(au, bu, area_intersection):
    # au和bu的格式为: (x1,y1,x2,y2)
    # area_intersection为 au 和 bu 两个框的交集
    area_a = ????	# 计算au的面积,补全缺失代码
    area_b = ????	# 计算bu的面积,补全缺失代码
    area_union = ????	# au与bu面积的总和减去两者交集部分,则为两者的并集,补全缺失代码
    return area_union
#计算两个框之前的交集
def intersection(ai, bi):
    # ai和bi的格式为: (x1,y1,x2,y2)
    x = ????	# 得出au与bu之间交集部分的左上角x1
    y = ???? 	# 得出au与bu之间交集部分的左上角y1
    w = ????	# 得出au与bu之间交集部分的右下角x2,并得出交集部分的长度
    h = ????		# 得出au与bu之间交集部分的右下角y2,并得出交集部分的宽度
    if w < 0 or h < 0:
        return 0
    return ????		# 返回交集部分的面积
# 计算两个框的iou值
def iou(a, b):
    # a和b的格式为: (x1,y1,x2,y2)
    if a[0] >= a[2] or a[1] >= a[3] or b[0] >= b[2] or b[1] >= b[3]:
        return 0.0
    area_i = intersection(a, b)  #计算交集
    area_u = union(a, b, area_i)  #计算并集
    return float(area_i) / float(area_u + 1e-6)   #交并比

def getdata_for_rpn(config, img_data, width, heigth, resized_width, resized_height):
    '''
        用于提取RPN网络训练集,也就是产生各种anchors以及anchors对应与ground truth的修正参数
        :param C:   配置信息
        :param img_data:  原始数据
        :param width:    缩放前图片的宽
        :param heigth:   缩放前图片的高
        :param resized_width:  缩放后图片的宽
        :param resized_height:  缩放后图片的高
        :param img_length_calc_function:  获取经过base Net后提取出来的feature map图像尺寸,
                                          对于VGG16来说,就是在原始图像尺寸上除以16
        :return:
    '''
    downscale = float(config.rpn_stride)   #原始图像到feature map之间的缩放映射关系
    anchor_sizes = config.anchor_box_scales   #anchor 三种尺寸
    anchor_ratios = config.anchor_box_ratios  # anchor 三种宽高比
    num_anchors = len(anchor_sizes) * len(anchor_ratios)  # 每一个滑动窗口所对应的anchor个数
    #计算出经过base Net后提取出来的featurmap图像尺寸
    output_width = int(resized_width / 16)
    output_height = int(resized_height / 16)
    y_rpn_overlap = np.zeros((output_height, output_width, num_anchors))
    y_is_box_valid = np.zeros((output_height, output_width, num_anchors))
    y_rpn_regr = np.zeros((output_height, output_width, num_anchors * 4))
    num_bboxes = len(img_data['bboxes'])
    num_anchors_for_bbox = np.zeros(num_bboxes).astype(int)
    best_anchor_for_bbox = -1 * np.ones((num_bboxes, 4)).astype(int)
    best_iou_for_bbox = np.zeros(num_bboxes).astype(np.float32)
    best_x_for_bbox = np.zeros((num_bboxes, 4)).astype(int)
    best_dx_for_bbox = np.zeros((num_bboxes, 4)).astype(np.float32)
    gta = np.zeros((num_bboxes, 4))  # 用来存放经过缩放后的标注框
    for bbox_num, bbox in enumerate(img_data["bboxes"]):
        gta[bbox_num, 0] = bbox["x1"] * (resized_width / float(width))
        gta[bbox_num, 1] = bbox["x2"] * (resized_width / float(width))
        gta[bbox_num, 2] = bbox["y1"] * (resized_height / float(heigth))
        gta[bbox_num, 3] = bbox["y2"] * (resized_height / float(heigth))
    for ix in range(output_width):
        for iy in range(output_height):
            #在feature map的每一个像素点上,遍历对应不同大小,不同长宽比的k(9)个anchor
            for anchor_size_index in range(len(anchor_sizes)):
                for anchor_ratio_index in range(len(anchor_ratios)):
                    anchor_x = anchor_sizes[anchor_size_index] * anchor_ratios[anchor_ratio_index][0]
                    anchor_y = anchor_sizes[anchor_size_index] * anchor_ratios[anchor_ratio_index][1]
                    # 获得当前anchor在原图上的X坐标位置
                    # downscale * (ix + 0.5)即为当前anchor在原始图片上的中心点X坐标,获取当前anchor左上点X坐标,补全缺失代码
                    x1_anc = ????
		     # downscale * (ix + 0.5)即为当前anchor在原始图片上的中心点X坐标,获取当前anchor右下点X坐标,补全缺失代码
                    x2_anc = ????
                    # 去掉那些跨过图像边界的框
                    if x1_anc<0 or x2_anc > resized_width:
                        continue
                    # 获得当前anchor在原图上的Y坐标位置
                    # downscale * (jy + 0.5)即为当前anchor在原始图片上的中心点Y坐标,获取当前anchor左上点Y坐标,补全缺代码
                    y1_anc = ????
		    # downscale * (jy + 0.5)即为当前anchor在原始图片上的中心点Y坐标,获取当前anchor右下点Y坐标,补全缺代码
                    y2_anc = ????
                    # 去掉那些跨过图像边界的框
                    if y1_anc < 0 or y2_anc > resized_height:
                        continue
                    # 用来存放当前anchor类别是前景(正样本)还是背景(负样本)
                    bbox_type = "neg"
                    best_iou_for_loc = 0.0
                    for bbox_num in range(num_bboxes):
                        # 计算当前anchor与当前真实标注框的iou值
                        curr_iou = iou([gta[bbox_num, 0], gta[bbox_num, 2], gta[bbox_num, 1], gta[bbox_num, 3]],
                                       [x1_anc, y1_anc, x2_anc, y2_anc])
                        #根据iou值,判断当前anchor是否为正样本。
                        # 如果是,则计算此anchor(正样本)到ground - truth(真实检测框)的对应4个平移缩放参数。
                        # 判断一个anchor是否为正样本的两个条件为:
                        # 1.与ground - truth(真实检测框)IOU最高的anchor
                        # 2.与任意ground - truth(真实检测框)的IOU大于0.7 的anchor
                        if curr_iou > best_iou_for_bbox[bbox_num] or curr_iou > config.rpn_max_overlap:
                            # cx,cy: ground-truth(真实检测框)的中心点坐标
                            cx = (gta[bbox_num, 0] + gta[bbox_num, 1]) / 2.0
                            cy = (gta[bbox_num, 2] + gta[bbox_num, 3]) / 2.0
                            # cxa,cya: 当前anchor的中心点坐标
                            cxa = (x1_anc + x2_anc) / 2.0
                            cya = (y1_anc + y2_anc) / 2.0
                            # (tx, ty, tw, th)即为此anchor(正样本)到ground-truth(真实检测框)的对应4个平移缩放参数
                            tx = (cx - cxa) / (x2_anc - x1_anc)
                            ty = (cy - cya) / (y2_anc - y1_anc)
                            tw = np.log((gta[bbox_num, 1] - gta[bbox_num, 0]) / (x2_anc - x1_anc))
                            th = np.log((gta[bbox_num, 3] - gta[bbox_num, 2]) / (y2_anc - y1_anc))
                        if img_data["bboxes"][bbox_num]["class"] != "bg":
                            #针对于当前ground - truth(真实检测框),如果当前anchor与之的iou最大,则重新更新相关存储的best值
                            if curr_iou > best_iou_for_bbox[bbox_num]:
                                best_anchor_for_bbox[bbox_num] = [iy, ix, anchor_ratio_index, anchor_size_index]
                                best_iou_for_bbox[bbox_num] = curr_iou
                                best_x_for_bbox[bbox_num,:] = [x1_anc, x2_anc, y1_anc, y2_anc]
                                best_dx_for_bbox[bbox_num,:] = [tx, ty, tw, th]
                            #对于iou大于0.7的,则,无论是否是最优的,直接认为是正样本
                            if curr_iou > config.rpn_max_overlap:
                                bbox_type = "pos"
                                num_anchors_for_bbox[bbox_num] +=1
                                if curr_iou > best_iou_for_loc:
                                    best_iou_for_loc = curr_iou
                                    best_regr = (tx, ty, tw, th)#当前anchor与和它有最优iou的那个ground-truth(真实检测框)之间的对应4个平移参数
                            # iou值大于0.3,小于0.7的的,即不是正样本,也不是负样本
                            if config.rpn_min_overlap < curr_iou < config.rpn_max_overlap:
                                if bbox_type != 'pos':
                                    bbox_type = 'neutral'
                    if bbox_type == "neg":
                        test_index = anchor_size_index * len(anchor_ratios) + anchor_ratio_index
                        y_is_box_valid[iy, ix, anchor_size_index * len(anchor_ratios) + anchor_ratio_index] = 1
                        y_rpn_overlap[iy, ix, anchor_size_index * len(anchor_ratios) + anchor_ratio_index] = 0
                    elif bbox_type == "neutral":
                        y_is_box_valid[iy, ix, anchor_size_index * len(anchor_ratios) + anchor_ratio_index] = 0
                        y_rpn_overlap[iy, ix, anchor_size_index * len(anchor_ratios) + anchor_ratio_index] = 0
                    elif bbox_type == "pos":
                        y_is_box_valid[iy, ix, anchor_size_index * len(anchor_ratios) + anchor_ratio_index] = 1
                        y_rpn_overlap[iy, ix, anchor_size_index * len(anchor_ratios) + anchor_ratio_index] = 1
                        start = 4 * (anchor_size_index * len(anchor_ratios) + anchor_ratio_index)
                        y_rpn_regr[iy, ix, start:start+4] = best_regr
    for idx in range(num_anchors_for_bbox.shape[0]):#遍历所有真实标注框,也就是所有ground truth
        if num_anchors_for_bbox[idx] == 0:  #如果当前真实标注框没有所对应的anchor
            if best_anchor_for_bbox[idx, 0] == -1: #如果当前真实标注框没有与任何anchor都无交集,也就是说iou都等于0,则直接忽略掉
                continue
            y_is_box_valid[best_anchor_for_bbox[idx, 0], best_anchor_for_bbox[idx, 1],
                           best_anchor_for_bbox[idx, 3] * len(anchor_ratios) + best_anchor_for_bbox[idx,2]] = 1
            y_rpn_overlap[best_anchor_for_bbox[idx, 0], best_anchor_for_bbox[idx, 1],
                           best_anchor_for_bbox[idx, 3] * len(anchor_ratios) + best_anchor_for_bbox[idx, 2]] = 1
            start = 4 * (best_anchor_for_bbox[idx, 3] * len(anchor_ratios) + best_anchor_for_bbox[idx, 2])
            y_rpn_regr[best_anchor_for_bbox[idx, 0], best_anchor_for_bbox[idx, 1], start:start+4] \
                = best_dx_for_bbox[idx, :]
    y_rpn_overlap = np.expand_dims(y_rpn_overlap, axis=0)
    y_is_box_valid = np.expand_dims(y_is_box_valid, axis=0)
    y_rpn_regr = np.expand_dims(y_rpn_regr, axis=0)
    pos_locs = np.where(np.logical_and(y_rpn_overlap[0, :, :, :] == 1, y_is_box_valid[0, :, :, :] == 1))
    neg_locs = np.where(np.logical_and(y_rpn_overlap[0, :, :, :] == 0, y_is_box_valid[0, :, :, :] == 1))
    num_pos = len(pos_locs[0])  #正样本个数
    mini_batch = 256
    if len(pos_locs[0]) > mini_batch / 2:  #判断正样本个数是否多于128,如果是,则从所有正样本中随机采用128个
        val_locs = random.sample(range(num_pos), num_pos - mini_batch / 2)
        y_is_box_valid[0, pos_locs[0][val_locs], pos_locs[1][val_locs], pos_locs[2][val_locs]] = 0
        num_pos = mini_batch / 2
    if len(neg_locs[0]) + num_pos > mini_batch:
        val_locs = random.sample(range(len(neg_locs[0])), len(neg_locs[0]) - (mini_batch-num_pos))
        y_is_box_valid[0, neg_locs[0][val_locs], neg_locs[1][val_locs], neg_locs[2][val_locs]] = 0
    y_rpn_cls = np.concatenate([y_is_box_valid, y_rpn_overlap], axis=3)
    y_rpn_regr = np.concatenate([np.repeat(y_rpn_overlap, 4, axis=3), y_rpn_regr], axis=3)
    return np.copy(y_rpn_cls), np.copy(y_rpn_regr)

def get_anchor_data_gt(img_datas, class_count, C, mode="train"):
    '''
    生成用于RPN网络训练数据集的迭代器
    :param img_data:  原始数据,list,每个元素都是一个字典类型,存放着每张图片的相关信息
    all_img_data[0] = {'width': 500,
                       'height': 500,
                       'bboxes': [{'y2': 500, 'y1': 27, 'x2': 183, 'x1': 20, 'class': 'person', 'difficult': False},
                                  {'y2': 500, 'y1': 2, 'x2': 249, 'x1': 112, 'class': 'person', 'difficult': False},
                                  {'y2': 490, 'y1': 233, 'x2': 376, 'x1': 246, 'class': 'person', 'difficult': False},
                                  {'y2': 468, 'y1': 319, 'x2': 356, 'x1': 231, 'class': 'chair', 'difficult': False},
                                  {'y2': 450, 'y1': 314, 'x2': 58, 'x1': 1, 'class': 'chair', 'difficult': True}], 'imageset': 'test',
                        'filepath': './datasets/VOC2007/JPEGImages/000910.jpg'}
    :param class_count:  数据集中各个类别的样本个数,字典型
    :param C:            相关配置参数
    :param mode:
    :return: 返回一个数据迭代器
    '''
    while True:
        if mode == "train":
            #打乱数据集
            random.shuffle(img_datas)
        for img_data in img_datas:
            try:
                #数据增强
                if mode == "train":
                    img_data_aug, x_img = data_augment.augment(img_data, C, augment=True)
                else:
                    img_data_aug, x_img = data_augment.augment(img_data, C, augment=False)
                #确保图像尺寸不发生改变
                (width, height) = (img_data_aug['width'], img_data_aug['height'])
                (rows, cols, _) = x_img.shape
                assert cols == width
                assert rows == height
                #将图像的短边缩放到600尺寸
                (resized_width, resized_height) = get_new_img_size(width, height, C.im_size)
                x_img = cv2.resize(x_img, (resized_width, resized_height), interpolation=cv2.INTER_CUBIC)
                x_img = cv2.cvtColor(x_img, cv2.COLOR_BGR2RGB)
                x_img = x_img.astype(np.float32)
                x_img[:, :, 0] -= C.img_channel_mean[0]
                x_img[:, :, 1] -= C.img_channel_mean[1]
                x_img[:, :, 2] -= C.img_channel_mean[2]
                x_img /= C.img_scaling_factor
                x_img = np.expand_dims(x_img, axis=0)
                y_rpn_cls, y_rpn_regr = getdata_for_rpn(C, img_data_aug, width, height, resized_width, resized_height)
                y_rpn_regr[:,:, :, y_rpn_regr.shape[1] // 2:] *= C.std_scaling
                yield  np.copy(x_img), [np.copy(y_rpn_cls), np.copy(y_rpn_regr)], img_data_aug
            except Exception as e:
                print(e)
                continue
任务解析
这块需要注意,RPN网络的分类层,因为是二分类,后面我们直接用sigmoid分类,对于sigmoid分类来说,因为每个feature map像素点中对应9个anchor, 最终的输出通道数应该为1*k也就是9,为什么这块是18呢?
因为并不是所有anchor都参与训练的,首先,对于一部分anchor,根据Fatster R-CNN中根据IOU的判断标准,一部分anchor既不属于正样本,也不属于负样本,直接舍弃,另外,对应选出来的正负样本中,最终也只是选取出256个anchor作为实际参与训练的样本。所以,对于每一个anchor,我们都需要一个标记来判断当前anchor是否参与训练。
对于回归层的Y值最后的通道数,正常情况下,应该为36,这块为何是72呢,由于关于RPN网络的损失函数,对于回归损失来说,只是针对正样本进行计算的,负样本和不参与训练的其他样本都需要过滤掉,不参与训练,所有这块需要在原本36的基础上对应加上每一个是否是正样本的标记,所有最终为72。
数据准备好之后,下次我们来构造Faster RCNN网络模型。
from __future__ import absolute_import
import numpy as np
import cv2
import random
import copy
import threading
import itertools
from keras_faster_rcnn import data_augment


def get_new_img_size(width, height, img_min_size=600):
    if width <= height:
        f = float(img_min_size / width)
        resized_height = int(f * height)
        resized_width = int(img_min_size)
    else:
        f = float(img_min_size / height)
        resized_width = int(f * width)
        resized_height = int(img_min_size)
    return resized_width, resized_height
#计算两个框之前的并集
def union(au, bu, area_intersection):
    # au和bu的格式为: (x1,y1,x2,y2)
    # area_intersection为 au 和 bu 两个框的交集
    area_a = (au[2] - au[0]) * (au[3] - au[1])
    area_b = (bu[2] - bu[0]) * (bu[3] - bu[1])
    area_union = area_a + area_b - area_intersection
    return area_union
#计算两个框之前的交集
def intersection(ai, bi):
    # ai和bi的格式为: (x1,y1,x2,y2)
    x = max(ai[0], bi[0])
    y = max(ai[1], bi[1])
    w = min(ai[2], bi[2]) - x
    h = min(ai[3], bi[3]) - y
    if w < 0 or h < 0:
        return 0
    return w*h
# 计算两个框的iou值
def iou(a, b):
    # a和b的格式为: (x1,y1,x2,y2)
    if a[0] >= a[2] or a[1] >= a[3] or b[0] >= b[2] or b[1] >= b[3]:
        return 0.0
    area_i = intersection(a, b)  #计算交集
    area_u = union(a, b, area_i)  #计算并集
    return float(area_i) / float(area_u + 1e-6)   #交并比

def getdata_for_rpn(config, img_data, width, heigth, resized_width, resized_height):
    '''
        用于提取RPN网络训练集,也就是产生各种anchors以及anchors对应与ground truth的修正参数
        :param C:   配置信息
        :param img_data:  原始数据
        :param width:    缩放前图片的宽
        :param heigth:   缩放前图片的高
        :param resized_width:  缩放后图片的宽
        :param resized_height:  缩放后图片的高
        :param img_length_calc_function:  获取经过base Net后提取出来的feature map图像尺寸,
                                          对于VGG16来说,就是在原始图像尺寸上除以16
        :return:
    '''
    downscale = float(config.rpn_stride)   #原始图像到feature map之间的缩放映射关系
    anchor_sizes = config.anchor_box_scales   #anchor 三种尺寸
    anchor_ratios = config.anchor_box_ratios  # anchor 三种宽高比
    num_anchors = len(anchor_sizes) * len(anchor_ratios)  # 每一个滑动窗口所对应的anchor个数,也就是论文中的k值
    #计算出经过base Net后提取出来的feature map图像尺寸
    output_width = int(resized_width / 16)
    output_height = int(resized_height / 16)
    # (36,36,9),用来存放RPN网络,训练样本最后分类层输出时的y值,
    # 最后一维9代表对于每个像素点对应9个anchor,值为0或1(正样本或负样本)
    y_rpn_overlap = np.zeros((output_height, output_width, num_anchors))
    #(36,36,9),用来存放对于每个anchor,是否是有效的样本,值为0或者1(无效样本,有效样本)
    # 因为对于iou在0.3到0.7之间的样本,是直接丢弃 ,不参与训练的
    # 另外,只是在一张图片中随机采样256个anchor,其他的也不参与训练
    y_is_box_valid = np.zeros((output_height, output_width, num_anchors))
    # (36,36,9*4),用来存放RPN网络,针对一张图片,最后回归层的标签Y值
    y_rpn_regr = np.zeros((output_height, output_width, num_anchors * 4))
    #获取一张训练图片的真实标注框个数,也就是含有的待检测的目标个数
    num_bboxes = len(img_data['bboxes'])
    # 用来存储每个bbox(真实标注框)所对应的anchor个数
    num_anchors_for_bbox = np.zeros(num_bboxes).astype(int)
    # 用来存储每个bbox(真实标注框)所对应的最优anchor在feature map中的位置信息,以及大小信息
    # [jy, ix, anchor_ratio_idx, anchor_size_idx]
    best_anchor_for_bbox = -1 * np.ones((num_bboxes, 4)).astype(int)
    # 每个bbox(真实标注框)与所有anchor 的最优IOU值
    best_iou_for_bbox = np.zeros(num_bboxes).astype(np.float32)
    # 用来存储每个bbox(真实标注框)所对应的最优anchor的坐标值
    best_x_for_bbox = np.zeros((num_bboxes, 4)).astype(int)
    # 用来存储每个bbox(真实标注框)与所对应的最优anchor之间的4个平移缩放参数,用于回归预测
    best_dx_for_bbox = np.zeros((num_bboxes, 4)).astype(np.float32)
    gta = np.zeros((num_bboxes, 4))  # 用来存放经过缩放后的标注框
    # 因为之前图片进行了缩放,所以需要将对应的标注框做对应调整
    for bbox_num, bbox in enumerate(img_data["bboxes"]):
        gta[bbox_num, 0] = bbox["x1"] * (resized_width / float(width))
        gta[bbox_num, 1] = bbox["x2"] * (resized_width / float(width))
        gta[bbox_num, 2] = bbox["y1"] * (resized_height / float(heigth))
        gta[bbox_num, 3] = bbox["y2"] * (resized_height / float(heigth))
    #遍历feature map上的每一个像素点
    for ix in range(output_width):
        for iy in range(output_height):
            #在feature map的每一个像素点上,遍历对应不同大小,不同长宽比的k(9)个anchor
            for anchor_size_index in range(len(anchor_sizes)):
                for anchor_ratio_index in range(len(anchor_ratios)):
                    anchor_x = anchor_sizes[anchor_size_index] * anchor_ratios[anchor_ratio_index][0]
                    anchor_y = anchor_sizes[anchor_size_index] * anchor_ratios[anchor_ratio_index][1]
                    # 获得当前anchor在原图上的X坐标位置
                    # downscale * (ix + 0.5)即为当前anchor在原始图片上的中心点X坐标
                    # downscale * (ix + 0.5) - anchor_x / 2 即为当前anchor左上点X坐标
                    # downscale * (ix + 0.5) + anchor_x / 2 即为当前anchor右下点X坐标
                    x1_anc = downscale * (ix + 0.5) - anchor_x / 2
                    x2_anc = downscale * (ix + 0.5) + anchor_x / 2
                    # 去掉那些跨过图像边界的框
                    if x1_anc<0 or x2_anc > resized_width:
                        continue
                    # 获得当前anchor在原图上的Y坐标位置
                    # downscale * (jy + 0.5)即为当前anchor在原始图片上的中心点Y坐标
                    # downscale * (jy + 0.5) - anchor_y / 2 即为当前anchor左上点Y坐标
                    # downscale * (jy + 0.5) + anchor_y / 2 即为当前anchor右下点Y坐标
                    y1_anc = downscale * (iy + 0.5) - anchor_y / 2
                    y2_anc = downscale * (iy + 0.5) + anchor_y / 2
                    # 去掉那些跨过图像边界的框
                    if y1_anc < 0 or y2_anc > resized_height:
                        continue
                    # 用来存放当前anchor类别是前景(正样本)还是背景(负样本)
                    bbox_type = "neg"
                    # best_iou_for_loc 是用来存储当前anchor针对于所有真实标注框的一个最优iou
                    # 需要与前面的best_iou_for_bbox 每个真实标注框 针对于所有 anchor 的最优iou是不一样的。
                    best_iou_for_loc = 0.0
                    #遍历所有真实标注框,也就是所有ground truth
                    for bbox_num in range(num_bboxes):
                        # 计算当前anchor与当前真实标注框的iou值
                        curr_iou = iou([gta[bbox_num, 0], gta[bbox_num, 2], gta[bbox_num, 1], gta[bbox_num, 3]],
                                       [x1_anc, y1_anc, x2_anc, y2_anc])
                        #根据iou值,判断当前anchor是否为正样本。
                        # 如果是,则计算此anchor(正样本)到ground - truth(真实检测框)的对应4个平移缩放参数。
                        # 判断一个anchor是否为正样本的两个条件为:
                        # 1.与ground - truth(真实检测框)IOU最高的anchor
                        # 2.与任意ground - truth(真实检测框)的IOU大于0.7 的anchor
                        if curr_iou > best_iou_for_bbox[bbox_num] or curr_iou > config.rpn_max_overlap:
                            # cx,cy: ground-truth(真实检测框)的中心点坐标
                            cx = (gta[bbox_num, 0] + gta[bbox_num, 1]) / 2.0
                            cy = (gta[bbox_num, 2] + gta[bbox_num, 3]) / 2.0
                            # cxa,cya: 当前anchor的中心点坐标
                            cxa = (x1_anc + x2_anc) / 2.0
                            cya = (y1_anc + y2_anc) / 2.0
                            # (tx, ty, tw, th)即为此anchor(正样本)到ground-truth(真实检测框)的对应4个平移缩放参数
                            tx = (cx - cxa) / (x2_anc - x1_anc)
                            ty = (cy - cya) / (y2_anc - y1_anc)
                            tw = np.log((gta[bbox_num, 1] - gta[bbox_num, 0]) / (x2_anc - x1_anc))
                            th = np.log((gta[bbox_num, 3] - gta[bbox_num, 2]) / (y2_anc - y1_anc))
                        if img_data["bboxes"][bbox_num]["class"] != "bg":
                            #针对于当前ground - truth(真实检测框),如果当前anchor与之的iou最大,则重新更新相关存储的best值
                            if curr_iou > best_iou_for_bbox[bbox_num]:
                                best_anchor_for_bbox[bbox_num] = [iy, ix, anchor_ratio_index, anchor_size_index]
                                best_iou_for_bbox[bbox_num] = curr_iou
                                best_x_for_bbox[bbox_num,:] = [x1_anc, x2_anc, y1_anc, y2_anc]
                                best_dx_for_bbox[bbox_num,:] = [tx, ty, tw, th]
                            #对于iou大于0.7的,则,无论是否是最优的,直接认为是正样本
                            if curr_iou > config.rpn_max_overlap:
                                bbox_type = "pos"
                                num_anchors_for_bbox[bbox_num] +=1
                                if curr_iou > best_iou_for_loc:
                                    best_iou_for_loc = curr_iou
                                    best_regr = (tx, ty, tw, th)#当前anchor与和它有最优iou的那个ground-truth(真实检测框)之间的对应4个平移参数
                            # iou值大于0.3,小于0.7的的,即不是正样本,也不是负样本
                            if config.rpn_min_overlap < curr_iou < config.rpn_max_overlap:
                                if bbox_type != 'pos':
                                    bbox_type = 'neutral'
                    if bbox_type == "neg":
                        test_index = anchor_size_index * len(anchor_ratios) + anchor_ratio_index
                        y_is_box_valid[iy, ix, anchor_size_index * len(anchor_ratios) + anchor_ratio_index] = 1
                        y_rpn_overlap[iy, ix, anchor_size_index * len(anchor_ratios) + anchor_ratio_index] = 0
                    elif bbox_type == "neutral":
                        y_is_box_valid[iy, ix, anchor_size_index * len(anchor_ratios) + anchor_ratio_index] = 0
                        y_rpn_overlap[iy, ix, anchor_size_index * len(anchor_ratios) + anchor_ratio_index] = 0
                    elif bbox_type == "pos":
                        y_is_box_valid[iy, ix, anchor_size_index * len(anchor_ratios) + anchor_ratio_index] = 1
                        y_rpn_overlap[iy, ix, anchor_size_index * len(anchor_ratios) + anchor_ratio_index] = 1
                        start = 4 * (anchor_size_index * len(anchor_ratios) + anchor_ratio_index)
                        y_rpn_regr[iy, ix, start:start+4] = best_regr
    for idx in range(num_anchors_for_bbox.shape[0]):#遍历所有真实标注框,也就是所有ground truth
        if num_anchors_for_bbox[idx] == 0:  #如果当前真实标注框没有所对应的anchor
            if best_anchor_for_bbox[idx, 0] == -1: #如果当前真实标注框没有与任何anchor都无交集,也就是说iou都等于0,则直接忽略掉
                continue
            y_is_box_valid[best_anchor_for_bbox[idx, 0], best_anchor_for_bbox[idx, 1],
                           best_anchor_for_bbox[idx, 3] * len(anchor_ratios) + best_anchor_for_bbox[idx,2]] = 1
            y_rpn_overlap[best_anchor_for_bbox[idx, 0], best_anchor_for_bbox[idx, 1],
                           best_anchor_for_bbox[idx, 3] * len(anchor_ratios) + best_anchor_for_bbox[idx, 2]] = 1
            start = 4 * (best_anchor_for_bbox[idx, 3] * len(anchor_ratios) + best_anchor_for_bbox[idx, 2])
            y_rpn_regr[best_anchor_for_bbox[idx, 0], best_anchor_for_bbox[idx, 1], start:start+4] \
                = best_dx_for_bbox[idx, :]
    #增加一维,(样本个数)
    y_rpn_overlap = np.expand_dims(y_rpn_overlap, axis=0)
    y_is_box_valid = np.expand_dims(y_is_box_valid, axis=0)
    y_rpn_regr = np.expand_dims(y_rpn_regr, axis=0)
    pos_locs = np.where(np.logical_and(y_rpn_overlap[0, :, :, :] == 1, y_is_box_valid[0, :, :, :] == 1))
    #neg_locs 负样本对应的三个维度的下标
    neg_locs = np.where(np.logical_and(y_rpn_overlap[0, :, :, :] == 0, y_is_box_valid[0, :, :, :] == 1))
    num_pos = len(pos_locs[0])  #正样本个数
    # 随机采样256个样本作为一个mini-batch,并且最多保持正负样本比例1:1,如果正样本个数不够,用负样本填充
    mini_batch = 256
    if len(pos_locs[0]) > mini_batch / 2:  #判断正样本个数是否多于128,如果是,则从所有正样本中随机采用128个
        # 注意这块,是从所有正例的下标中留下128个,选取出其他剩余的,将对应的y_is_box_valid设置为0,
        # 也就是说选取出来的正例样本就是丢弃的, 不进行训练的样本,剩余的128个即为实际的正例样本
        val_locs = random.sample(range(num_pos), num_pos - mini_batch / 2)
        y_is_box_valid[0, pos_locs[0][val_locs], pos_locs[1][val_locs], pos_locs[2][val_locs]] = 0
        num_pos = mini_batch / 2
    # 正样本选取完毕后,开始选取负例样本,同样的思路,随机选取出不需要的负样本,将对应的y_is_box_valid设置为0,
    # 剩余的正好和正样本组合成 256个样本
    if len(neg_locs[0]) + num_pos > mini_batch:
        #(mini_batch-num_pos) : 需要的负例样本数
        #len(neg_locs[0]) - (mini_batch-num_pos):不需要的负例样本数
        val_locs = random.sample(range(len(neg_locs[0])), len(neg_locs[0]) - (mini_batch-num_pos))
        y_is_box_valid[0, neg_locs[0][val_locs], neg_locs[1][val_locs], neg_locs[2][val_locs]] = 0
    #将y_is_box_valid 与 y_rpn_overlap连接到一块
    y_rpn_cls = np.concatenate([y_is_box_valid, y_rpn_overlap], axis=3)
    #对于回归损失来说,只是针对正样本进行计算的,负样本和不参与训练的其他样本都需要过滤掉,不参与训练
    #所以这块需要将y_rpn_overlap 和 y_rpn_regr拼接起来作为RPN网络回归层的真实Y值,方便后续计算损失函数
    y_rpn_regr = np.concatenate([np.repeat(y_rpn_overlap, 4, axis=3), y_rpn_regr], axis=3)
    return np.copy(y_rpn_cls), np.copy(y_rpn_regr)

def get_anchor_data_gt(img_datas, class_count, C, mode="train"):
    '''
    生成用于RPN网络训练数据集的迭代器
    :param img_data:  原始数据,list,每个元素都是一个字典类型,存放着每张图片的相关信息
    all_img_data[0] = {'width': 500,
                       'height': 500,
                       'bboxes': [{'y2': 500, 'y1': 27, 'x2': 183, 'x1': 20, 'class': 'person', 'difficult': False},
                                  {'y2': 500, 'y1': 2, 'x2': 249, 'x1': 112, 'class': 'person', 'difficult': False},
                                  {'y2': 490, 'y1': 233, 'x2': 376, 'x1': 246, 'class': 'person', 'difficult': False},
                                  {'y2': 468, 'y1': 319, 'x2': 356, 'x1': 231, 'class': 'chair', 'difficult': False},
                                  {'y2': 450, 'y1': 314, 'x2': 58, 'x1': 1, 'class': 'chair', 'difficult': True}], 'imageset': 'test',
                        'filepath': './datasets/VOC2007/JPEGImages/000910.jpg'}
    :param class_count:  数据集中各个类别的样本个数,字典型
    :param C:            相关配置参数
    :param mode:
    :return: 返回一个数据迭代器
    '''
    while True:
        if mode == "train":
            #打乱数据集
            random.shuffle(img_datas)
        for img_data in img_datas:
            try:
                #数据增强
                if mode == "train":
                    img_data_aug, x_img = data_augment.augment(img_data, C, augment=True)
                else:
                    img_data_aug, x_img = data_augment.augment(img_data, C, augment=False)
                #确保图像尺寸不发生改变
                (width, height) = (img_data_aug['width'], img_data_aug['height'])
                (rows, cols, _) = x_img.shape
                assert cols == width
                assert rows == height
                #将图像的短边缩放到600尺寸
                (resized_width, resized_height) = get_new_img_size(width, height, C.im_size)
                x_img = cv2.resize(x_img, (resized_width, resized_height), interpolation=cv2.INTER_CUBIC)
                x_img = cv2.cvtColor(x_img, cv2.COLOR_BGR2RGB)
                x_img = x_img.astype(np.float32)
                x_img[:, :, 0] -= C.img_channel_mean[0]
                x_img[:, :, 1] -= C.img_channel_mean[1]
                x_img[:, :, 2] -= C.img_channel_mean[2]
                x_img /= C.img_scaling_factor
                x_img = np.expand_dims(x_img, axis=0)
                y_rpn_cls, y_rpn_regr = getdata_for_rpn(C, img_data_aug, width, height, resized_width, resized_height)
                y_rpn_regr[:,:, :, y_rpn_regr.shape[1] // 2:] *= C.std_scaling
                yield  np.copy(x_img), [np.copy(y_rpn_cls), np.copy(y_rpn_regr)], img_data_aug
            except Exception as e:
                print(e)
                continue
共享网络模块搭建
- "net_model.py"文件中"base_net_vgg"方法用于搭建本项目中使用的VGG16网络模型,使用VGG16网络模型的卷积模块(去掉最后一个池化层)作为共享网络,用来进行提取特征向量。
- 根据注释将代码补全,成功搭建本节课的VGG16网络模型。
from keras.layers import Input, Conv2D, MaxPool2D, Flatten, Dense,TimeDistributed
from keras import backend as K
from keras_faster_rcnn import RoiPoolingConv

def get_img_output_length(width, height):
    def get_output_length(input_length):
        return int(input_length/16)
    return get_output_length(width), get_output_length(height)
def base_net_vgg(input_tensor):
    if input_tensor is None:
        input_tensor = Input(shape=(None,None,3))
    else:
        if not K.is_keras_tensor(input_tensor):
            input_tensor = Input(tensor=input_tensor, shape=(None,None,3))
    #开始构造基础模型(VGG16的卷积模块),到block5_conv3层,用来提取feature map
    # Block 1
    X = Conv2D(filters=64, kernel_size=(3,3), activation="relu",padding="same", name="block1_conv1")(input_tensor)
    X = Conv2D(filters=64, kernel_size=(3, 3), activation="relu",padding="same", name="block1_conv2")(X)
    X = MaxPool2D(pool_size=(2,2), strides=(2,2), name="block1_pool")(X)
    # 搭建第二块卷积层,要求数据经过两层卷积层,一层最大池化层,卷积层要求卷积核大小为(3, 3),卷积核个数为128个,激活函数采用“relu”,padding采用“same”方式,最大池化层要求池化大小为(2, 2),步长为(2, 2),补全缺失代码。
    X = ????
    X = ????
    X = ????
    # Block 3
    X = Conv2D(filters=256, kernel_size=(3, 3), activation="relu",padding="same", name="block3_conv1")(X)
    X = Conv2D(filters=256, kernel_size=(3, 3), activation="relu",padding="same", name="block3_conv2")(X)
    X = Conv2D(filters=256, kernel_size=(3, 3), activation="relu",padding="same", name="block3_conv3")(X)
    X = MaxPool2D(pool_size=(2, 2), strides=(2, 2), name="block3_pool")(X)
    # Block 4
    X = Conv2D(filters=512, kernel_size=(3, 3), activation="relu",padding="same", name="block4_conv1")(X)
    X = Conv2D(filters=512, kernel_size=(3, 3), activation="relu",padding="same", name="block4_conv2")(X)
    X = Conv2D(filters=512, kernel_size=(3, 3), activation="relu",padding="same", name="block4_conv3")(X)
    X = MaxPool2D(pool_size=(2, 2), strides=(2, 2), name="block4_pool")(X)
    # Block 5
    X = Conv2D(filters=512, kernel_size=(3, 3), activation="relu", padding="same", name="block5_conv1")(X)
    X = Conv2D(filters=512, kernel_size=(3, 3), activation="relu",padding="same", name="block5_conv2")(X)
    X = Conv2D(filters=512, kernel_size=(3, 3), activation="relu",padding="same", name="block5_conv3")(X)
    print(K.shape(X))
    return X
任务解析
from keras.layers import Input, Conv2D, MaxPool2D, Flatten, Dense,TimeDistributed
from keras import backend as K
from keras_faster_rcnn import RoiPoolingConv

def get_img_output_length(width, height):
    def get_output_length(input_length):
        return int(input_length/16)
    return get_output_length(width), get_output_length(height)
def base_net_vgg(input_tensor):
    if input_tensor is None:
        input_tensor = Input(shape=(None,None,3))
    else:
        if not K.is_keras_tensor(input_tensor):
            input_tensor = Input(tensor=input_tensor, shape=(None,None,3))
    #开始构造基础模型(VGG16的卷积模块),到block5_conv3层,用来提取feature map
    # Block 1
    X = Conv2D(filters=64, kernel_size=(3,3), activation="relu",padding="same", name="block1_conv1")(input_tensor)
    X = Conv2D(filters=64, kernel_size=(3, 3), activation="relu",padding="same", name="block1_conv2")(X)
    X = MaxPool2D(pool_size=(2,2), strides=(2,2), name="block1_pool")(X)
    # Block 2
    X = Conv2D(filters=128, kernel_size=(3, 3), activation="relu",padding="same", name="block2_conv1")(X)
    X = Conv2D(filters=128, kernel_size=(3, 3), activation="relu",padding="same", name="block2_conv2")(X)
    X = MaxPool2D(pool_size=(2, 2), strides=(2, 2), name="block2_pool")(X)
    # Block 3
    X = Conv2D(filters=256, kernel_size=(3, 3), activation="relu",padding="same", name="block3_conv1")(X)
    X = Conv2D(filters=256, kernel_size=(3, 3), activation="relu",padding="same", name="block3_conv2")(X)
    X = Conv2D(filters=256, kernel_size=(3, 3), activation="relu",padding="same", name="block3_conv3")(X)
    X = MaxPool2D(pool_size=(2, 2), strides=(2, 2), name="block3_pool")(X)
    # Block 4
    X = Conv2D(filters=512, kernel_size=(3, 3), activation="relu",padding="same", name="block4_conv1")(X)
    X = Conv2D(filters=512, kernel_size=(3, 3), activation="relu",padding="same", name="block4_conv2")(X)
    X = Conv2D(filters=512, kernel_size=(3, 3), activation="relu",padding="same", name="block4_conv3")(X)
    X = MaxPool2D(pool_size=(2, 2), strides=(2, 2), name="block4_pool")(X)
    # Block 5
    X = Conv2D(filters=512, kernel_size=(3, 3), activation="relu", padding="same", name="block5_conv1")(X)
    X = Conv2D(filters=512, kernel_size=(3, 3), activation="relu",padding="same", name="block5_conv2")(X)
    X = Conv2D(filters=512, kernel_size=(3, 3), activation="relu",padding="same", name="block5_conv3")(X)
    print(K.shape(X))
    return X
RPN网络搭建
- "net_model.py"文件中添加"rpn_net"方法用于搭建本项目中使用的RPN网络模型。
def rpn_net(shared_layers, num_anchors):
    '''
    RPN网络
    :param shared_layers: 共享层的输出,作为RPN网络的输入(也就是VGG的卷积模块提取出来的feature map)
    :param num_anchors:  feature map中每个位置所对应的anchor个数(这块为9个)
    :return:[X_class, X_regr, shared_layers]:分类层输出(二分类,这块使用sigmoid),回归层输出,共享层
    '''
    print("rpn_net")
    X = Conv2D(256, (3,3), padding="same", activation="relu",kernel_initializer="normal", name="rpn_conv1")(shared_layers)
    #采用多任务进行分类和回归
    X_class = Conv2D(num_anchors, (1,1), activation="sigmoid",kernel_initializer="uniform", name="rpn_out_class")(X)
    X_regr = Conv2D(num_anchors*4, (1,1), activation="linear",kernel_initializer="zero",name="rpn_out_regress")(X)
    print(K.shape(X_class), K.shape(X_regr), K.shape(shared_layers))
    return [X_class, X_regr, shared_layers]
任务解析
此方法不需要填充缺失代码
自定义ROI Pooling层
- Keras框架中并没有现成的ROI pooling层来直接使用,需要我们自定义,创建RoiPoolingConv类,继承Layer,通过重写相关方法来实现ROI pooling层的相关逻辑。
- 在"RoiPoolingConv.py"文件实现ROI pooling层,本步骤代码已完整给出,直接成功即可。
'''
自定义ROI池化层
'''
from keras.engine.topology import Layer
import keras.backend as K
import tensorflow as tf
import numpy as np

class RoiPoolingConv(Layer):
    def __init__(self, pool_size, num_rois, **kwargs):
        self.pool_size = pool_size
        self.num_rois = num_rois
        self.dim_ordering = "tf"
        super(RoiPoolingConv, self).__init__(**kwargs)
    def build(self, input_shape):
        self.nb_channles = input_shape[0][3]
    def compute_output_shape(self, input_shape):
        # 输出5个维度,分别为:[一个batch中的样本个数(图片个数),一个样本对应roi个数,
        #                      每个roi高度,每个roi宽度,通道数]
        return None, self.num_rois, self.pool_size, self.pool_size, self.nb_channles

    def call(self, x, mask=None):
        '''
        在call方法中实现ROIpooling层的具体逻辑
        '''
        assert(len(x) == 2)
        feature_map = x[0]  #feature map
        rois = x[1]  #输入的所有roi shape=(batchsize, None, 4),最后一维4,代表着对应roi在feature map中的四个坐标值(左上点坐标和宽高)
        input_shape = K.shape(feature_map)
        roi_out_put = []
        for roi_index in range(self.num_rois):
            x = rois[0, roi_index, 0]
            y = rois[0, roi_index, 1]
            w = rois[0, roi_index, 2]
            h = rois[0, roi_index, 3]
            x = K.cast(x, 'int32')
            y = K.cast(y, 'int32')
            w = K.cast(w, 'int32')
            h = K.cast(h, 'int32')
            row_length = K.cast(w / self.pool_size, 'int32')
            col_length = K.cast(h / self.pool_size, 'int32')
            one_roi_out = tf.image.resize_images(feature_map[:, y:y+h, x:x+w, :], (self.pool_size, self.pool_size))
            roi_out_put.append(one_roi_out)
        roi_out_put = tf.reshape(roi_out_put, (self.num_rois, self.pool_size, self.pool_size, self.nb_channles))
        roi_out_put = tf.expand_dims(roi_out_put, axis=0)
        return roi_out_put

if __name__ == '__main__':
    batch_size = 1
    img_height = 200
    img_width = 100
    n_channels = 1
    n_rois = 2
    pooled_size = 7
    feature_maps_shape = (batch_size, img_height, img_width, n_channels)
    feature_maps_tf = tf.placeholder(tf.float32, shape=feature_maps_shape)
    feature_maps_np = np.ones(feature_maps_tf.shape, dtype='float32')
    print(f"feature_maps_np.shape = {feature_maps_np.shape}")
    roiss_tf = tf.placeholder(tf.float32, shape=(batch_size, n_rois, 4))
    roiss_np = np.asarray([[[50, 40, 30, 90], [0, 0, 100, 200]]],
                          dtype='float32')
    print(f"roiss_np.shape = {roiss_np.shape}")
    # 创建ROI Pooling层
    roi_layer = RoiPoolingConv(pooled_size, 2)
    pooled_features = roi_layer([feature_maps_tf, roiss_tf])
    print(f"output shape of layer call = {pooled_features.shape}")
    with tf.Session() as session:
        result = session.run(pooled_features,
                             feed_dict={feature_maps_tf: feature_maps_np,
                                        roiss_tf: roiss_np})
    print(f"result.shape = {result.shape}")
任务解析
此方法不需要填充缺失代码,可直接运行,查看结果
自定义损失函数
1.在"losses.py"文件中定义RPN网络回归层的损失函数
def rpn_regr_loss(num_anchors):
    '''
    计算RPN网络回归的损失
    :param num_anchors:
    :return:
    '''
    def rpn_loss_regr_fixed_num(y_true, y_pred):
        # 这块主要,对于y_true来说,最后一个通道的,前4 * num_anchors为是否是正例正样本的标记,
        # 后4 * num_anchors 为实际样本对应真实值。
        x = y_true[:, :, :, 4 * num_anchors:] - y_pred
        x_abs = K.abs(x)
        x_bool = K.cast(K.less_equal(x_abs, 1.0), tf.float32)
        return lambda_rpn_regr * K.sum(
            y_true[:, :, :, :4 * num_anchors] * (x_bool * (0.5 * x * x) + (1 - x_bool) * (x_abs - 0.5))) / K.sum(
            epsilon + y_true[:, :, :, :4 * num_anchors])
    return rpn_loss_regr_fixed_num
2.在"losses.py"文件中定义RPN网络分类层的损失函数
def rpn_cls_loss(num_anchors):
    '''
    计算RPN网络分类的损失
    :param num_anchors:
    :return:
    '''
    def rpn_loss_cls_fixed_num(y_true, y_pred):
        # y_true最后一维是2*num_anchors,其中前num_anchors个用来标记对应anchor是否为丢弃不进行训练的anchor
        # 后num_anchors个数据才是真正表示对应anchor是正样本还是负样本
        return lambda_rpn_class * K.sum(
            y_true[:, :, :, :num_anchors] * K.binary_crossentropy(y_pred[:, :, :, :],y_true[:, :, :,num_anchors:])) \
               / K.sum(epsilon + y_true[:, :, :, :num_anchors])
    return rpn_loss_cls_fixed_num
3.在"losses.py"文件中整个RPN网络最后的回归层对应的损失函数
def final_regr_loss(num_classes):
    '''
        计算整个网络最后的回归层对应的损失, 具体计算方法,同rpn中的一样
        :param num_anchors: featuremap 对应每个位置的anchor个数
        :return:
        '''
    def class_loss_regr_fixed_num(y_true, y_pred):
        x = y_true[:, :, 4*num_classes:] - y_pred
        x_abs = K.abs(x)
        x_bool = K.cast(K.less_equal(x_abs, 1.0), 'float32')
        return lambda_cls_regr * K.sum(y_true[:, :, :4*num_classes] * (x_bool * (0.5 * x * x) + (1 - x_bool) * (x_abs - 0.5))) / K.sum(epsilon + y_true[:, :, :4*num_classes])
    return class_loss_regr_fixed_num
4.在"losses.py"文件中整个网络最后的分类层对应的损失函数
def final_cls_loss(y_true, y_pred):
    '''
        计算整个网络最后的分类层对应的损失,直接使用softmax对应的多分类损失函数
        :param y_true:
        :param y_pred:
        :return:
    '''
    return lambda_cls_class * K.mean(categorical_crossentropy(y_true[0, :, :], y_pred[0, :, :]))
5.至此,Faster RCNN中各个独立模块都已建立,下次,我们将实现建立RPN网络与ROI Pooing层之前的连接。
任务解析
此方法不需要填充缺失代码,需仔细思考其损失函数的完成语句。
建立RPN与ROIpool层之间的联系
- 在此之前,已经实现了相关数据的解析,预处理等准备工作,以及对应Faster RCNN的相关网络模块搭建。接下来我们接着实现其他部分。
- “roi_helper.py”文件中的“rpn_to_roi”方法实现建立RPN与ROIpool层之间的联系,因为通过RPN网络的输出,来指定对应ROIPooing层的输入。
- 在“rpn_to_roi”方法中有调用两个方法,一个是“apply_regr_np”方法,用来通过rpn网络的回归层的预测值,来调整anchor位置,另外一个方法是 “non_max_suppression_fast”, 用来对所有anchor进行非极大值抑制,选取出实际需要的anchor。
- “roi_helper.py”文件中的“calc_roi”方法实现最终经分类与精回归的训练数据。
- 根据注释将代码补全,成功运行。
def apply_regr_np(X, T):
    '''
    通过rpn网络的回归层的预测值,来调整anchor位置
    '''
    try:
        x = X[0, :, :]
        y = X[1, :, :]
        w = X[2, :, :]
        h = X[3, :, :]
        tx = T[:, :, 0]
        ty = T[:, :, 1]
        tw = T[:, :, 2]
        th = T[:, :, 3]
        # (cx, cy)原始anchor中心点位置
        cx = x + w/2.
        cy = y + h/2.
        #(cx1, cy1)经过rpn网络回归层调整后,anchor中心点位置
        cx1 = tx * w + cx
        cy1 = ty * h + cy
        w1 = np.exp(tw.astype(np.float64)) * w  #经过rpn网络回归层调整后,anchor 宽度
        h1 = np.exp(th.astype(np.float64)) * h  #经过rpn网络回归层调整后,anchor 高度
        #(x1,y1)经过rpn网络回归层调整后,anchor的左上点坐标
        x1 = cx1 - w1/2.
        y1 = cy1 - h1/2.
        x1 = np.round(x1)
        y1 = np.round(y1)
        w1 = np.round(w1)
        h1 = np.round(h1)
        return np.stack([x1, y1, w1, h1])
    except Exception as e:
        print(e)
        return X
def non_max_suppression_fast(boxes, probs, overlap_thresh=0.9, max_boxes=300):
    if len(boxes) == 0:
        return []
    x1 = boxes[:, 0]
    y1 = boxes[:, 1]
    x2 = boxes[:, 2]
    y2 = boxes[:, 3]
    np.testing.assert_array_less(x1, x2)
    np.testing.assert_array_less(y1, y2)
    boxes = boxes.astype("float")
    pick = []
    area = (x2 - x1) * (y2 - y1)  #所有anchor的各自的区域面积(anchor个数,)
    #将所有anchor根据概率值进行升序排序
    idxs = np.argsort(probs)  #默认是升序
    while len(idxs) > 0:
        last = len(idxs) - 1
        i = idxs[last]  #最后一个索引,即为当前idxs中具体最大概率值(是否为正例)的anchor的索引
        pick.append(i)  #保留当前anchor对应索引
        # 计算当前选取出来的anchor与其他anchor之间的交集,补全缺失代码
        xx1_int =????
        yy1_int = ????
        xx2_int = ????
        yy2_int = ????
        ww_int = ????
        hh_int = ????
	#当前选取出来的索引对应的anchor的面积,也就是交集,补全缺失代码
        area_int = ????
        # 计算当前选取出来的索引对应的anchor 与其他anchor之间的并集,补全缺失代码
        area_union = ????
        #overlap 即为当前选取出来的索引对应的anchor 与其他anchor之间的交并比(iou)
        overlap = area_int/(area_union + 1e-6)
        #在idxs中删除掉与当前选取出来的anchor之间iou大于overlap_thresh阈值的。
        idxs = np.delete(idxs, np.concatenate(([last],
            np.where(overlap > overlap_thresh)[0])))
        if len(pick) >= max_boxes:  #如果当前保留的anchor个数已经达到max_boxes,则直接跳出迭代
            break
    boxes = boxes[pick].astype("int")
    probs = probs[pick]
    return boxes, probs

def rpn_to_roi(rpn_cls_layer, rpn_regr_layer, C, use_regr=True, max_boxes=300,overlap_thresh=0.9):
    regr_layer = rpn_regr_layer / C.std_scaling
    anchor_sizes = C.anchor_box_scales
    anchor_ratios = C.anchor_box_ratios
    assert rpn_cls_layer.shape[0] == 1
    (rows, cols) = rpn_cls_layer.shape[1:3]
    curr_layer = 0
    # A.shape = (4个在feature_map上的对应位置信息(左上角和右下角坐标), feature_map_height, feature_map_wigth, k(9))
    A = np.zeros((4, rpn_cls_layer.shape[1], rpn_cls_layer.shape[2], rpn_cls_layer.shape[3]))
    for anchor_size in anchor_sizes:
        for anchor_ratio in anchor_ratios:
            anchor_x = (anchor_size * anchor_ratio[0])/C.rpn_stride   #对应anchor在feature map上的宽度
            anchor_y = (anchor_size * anchor_ratio[1])/C.rpn_stride   #对应anchor在feature map上的高度
            regr = regr_layer[0, :, :, 4 * curr_layer:4 * curr_layer + 4]  # 当前anchor对应回归值
            X, Y = np.meshgrid(np.arange(cols), np.arange(rows))
            A[0, :, :, curr_layer] = X - anchor_x/2   #左上点横坐标
            A[1, :, :, curr_layer] = Y - anchor_y/2   #左上纵横坐标
            A[2, :, :, curr_layer] = anchor_x   #暂时存储anchor 宽度
            A[3, :, :, curr_layer] = anchor_y   #暂时存储anchor 高度
            if use_regr:
                #通过rpn网络的回归层的预测值,来调整anchor位置
                A[:, :, :, curr_layer] = apply_regr_np(A[:, :, :, curr_layer], regr)
            A[2, :, :, curr_layer] = np.maximum(1, A[2, :, :, curr_layer])
            A[3, :, :, curr_layer] = np.maximum(1, A[3, :, :, curr_layer])
            A[2, :, :, curr_layer] += A[0, :, :, curr_layer]  #右下角横坐标
            A[3, :, :, curr_layer] += A[1, :, :, curr_layer]  #右下角纵坐标
            #确保anchor不超过feature map尺寸
            A[0, :, :, curr_layer] = np.maximum(0, A[0, :, :, curr_layer])
            A[1, :, :, curr_layer] = np.maximum(0, A[1, :, :, curr_layer])
            A[2, :, :, curr_layer] = np.minimum(cols-1, A[2, :, :, curr_layer])
            A[3, :, :, curr_layer] = np.minimum(rows-1, A[3, :, :, curr_layer])
            curr_layer += 1
    #将对应shape调整到二维(anchor总共个数,4)
    all_boxes = np.reshape(A.transpose((0, 3, 1,2)), (4, -1)).transpose((1, 0))
    all_probs = rpn_cls_layer.transpose((0, 3, 1, 2)).reshape((-1))
    x1 = all_boxes[:, 0]
    y1 = all_boxes[:, 1]
    x2 = all_boxes[:, 2]
    y2 = all_boxes[:, 3]
    #过滤掉一些异常的框
    idxs = np.where((x1 - x2 >= 0) | (y1 - y2 >= 0))
    all_boxes = np.delete(all_boxes, idxs, 0)
    all_probs = np.delete(all_probs, idxs, 0)
    #通过非极大值抑制,选取出一些anchor作为roipooling层的输入
    result = non_max_suppression_fast(all_boxes, all_probs, overlap_thresh=overlap_thresh, max_boxes=max_boxes)[0]
    return result
任务解析
def apply_regr_np(X, T):
    '''
    通过rpn网络的回归层的预测值,来调整anchor位置
    '''
    try:
        x = X[0, :, :]
        y = X[1, :, :]
        w = X[2, :, :]
        h = X[3, :, :]
        tx = T[:, :, 0]
        ty = T[:, :, 1]
        tw = T[:, :, 2]
        th = T[:, :, 3]
        # (cx, cy)原始anchor中心点位置
        cx = x + w/2.
        cy = y + h/2.
        #(cx1, cy1)经过rpn网络回归层调整后,anchor中心点位置
        cx1 = tx * w + cx
        cy1 = ty * h + cy
        w1 = np.exp(tw.astype(np.float64)) * w  #经过rpn网络回归层调整后,anchor 宽度
        h1 = np.exp(th.astype(np.float64)) * h  #经过rpn网络回归层调整后,anchor 高度
        #(x1,y1)经过rpn网络回归层调整后,anchor的左上点坐标
        x1 = cx1 - w1/2.
        y1 = cy1 - h1/2.
        x1 = np.round(x1)
        y1 = np.round(y1)
        w1 = np.round(w1)
        h1 = np.round(h1)
        return np.stack([x1, y1, w1, h1])
    except Exception as e:
        print(e)
        return X
def non_max_suppression_fast(boxes, probs, overlap_thresh=0.9, max_boxes=300):
    '''
    非极大值抑制算法,提取出300个anchor作为输入roipooling层的roi
    简单介绍下非极大值抑制算法,假如当前有10个anchor,根据是正样本的概率值进行升序排序为[A,B,C,D,E,F,G,H,I,J]
    1.从具有最大概率的anchor J开始,计算其余anchor与J之间的iou值
    2.如果iou值大于overlap_thresh阈值,则删除掉,并将当前J重新保留下来,使我们需要的。
      例如,如果D,F与J之间的iou大于阈值,则直接舍弃,同时把J重新保留,也从原始数组中删除掉。
    3.在剩余的[A,B,C,E,G,H]中,继续选取最大的概率值对应的anchor,然后重复上述过程。
    4.最后,当数组为空,或者保留下来的anchor个数达到设定的max_boxes,则停止迭代,
      最终保留下的来的anchor 就是最终需要的。
    :param boxes: #经过rpn网络后生成的所有候选框,shape = (anchor个数,4)
    :param probs: #rpn网络分类层的输出值,value对应是正例样本的概率,shape = (anchor个数,)
    :param overlap_thresh:  iou阈值
    :param max_boxes:  最大提取的roi个数
    '''
    if len(boxes) == 0:
        return []
    x1 = boxes[:, 0]
    y1 = boxes[:, 1]
    x2 = boxes[:, 2]
    y2 = boxes[:, 3]
    np.testing.assert_array_less(x1, x2)
    np.testing.assert_array_less(y1, y2)
    boxes = boxes.astype("float")
    pick = []
    area = (x2 - x1) * (y2 - y1)  #所有anchor的各自的区域面积(anchor个数,)
    #将所有anchor根据概率值进行升序排序
    idxs = np.argsort(probs)  #默认是升序
    while len(idxs) > 0:
        last = len(idxs) - 1
        i = idxs[last]  #最后一个索引,即为当前idxs中具体最大概率值(是否为正例)的anchor的索引
        pick.append(i)  #保留当前anchor对应索引
        # 计算当前选取出来的anchor与其他anchor之间的交集
        xx1_int = np.maximum(x1[i], x1[idxs[:last]])
        yy1_int = np.maximum(y1[i], y1[idxs[:last]])
        xx2_int = np.minimum(x2[i], x2[idxs[:last]])
        yy2_int = np.minimum(y2[i], y2[idxs[:last]])
        ww_int = np.maximum(0, xx2_int - xx1_int)
        hh_int = np.maximum(0, yy2_int - yy1_int)
        area_int = ww_int * hh_int  #当前选取出来的索引对应的anchor,与其他anchor之间的 交集
        # 计算当前选取出来的索引对应的anchor 与其他anchor之间的并集
        area_union = area[i] + area[idxs[:last]] - area_int
        #overlap 即为当前选取出来的索引对应的anchor 与其他anchor之间的交并比(iou)
        overlap = area_int/(area_union + 1e-6)
        #在idxs中删除掉与当前选取出来的anchor之间iou大于overlap_thresh阈值的。
        idxs = np.delete(idxs, np.concatenate(([last],
            np.where(overlap > overlap_thresh)[0])))
        if len(pick) >= max_boxes:  #如果当前保留的anchor个数已经达到max_boxes,则直接跳出迭代
            break
    boxes = boxes[pick].astype("int")
    probs = probs[pick]
    return boxes, probs

def rpn_to_roi(rpn_cls_layer, rpn_regr_layer, C, use_regr=True, max_boxes=300,overlap_thresh=0.9):
    '''
    建立rpn网络与roi pooling层的连接
    通过rpn网络的输出,找出对应的roi
    :param rpn_cls_layer:  rpn网络的分类输出
    :param rpn_regr_layer:  rpn网络的回归输出
    '''
    regr_layer = rpn_regr_layer / C.std_scaling
    anchor_sizes = C.anchor_box_scales
    anchor_ratios = C.anchor_box_ratios
    assert rpn_cls_layer.shape[0] == 1
    (rows, cols) = rpn_cls_layer.shape[1:3]
    curr_layer = 0
    # A.shape = (4个在feature_map上的对应位置信息(左上角和右下角坐标), feature_map_height, feature_map_wigth, k(9))
    A = np.zeros((4, rpn_cls_layer.shape[1], rpn_cls_layer.shape[2], rpn_cls_layer.shape[3]))
    for anchor_size in anchor_sizes:
        for anchor_ratio in anchor_ratios:
            anchor_x = (anchor_size * anchor_ratio[0])/C.rpn_stride   #对应anchor在feature map上的宽度
            anchor_y = (anchor_size * anchor_ratio[1])/C.rpn_stride   #对应anchor在feature map上的高度
            regr = regr_layer[0, :, :, 4 * curr_layer:4 * curr_layer + 4]  # 当前anchor对应回归值
            X, Y = np.meshgrid(np.arange(cols), np.arange(rows))
            A[0, :, :, curr_layer] = X - anchor_x/2   #左上点横坐标
            A[1, :, :, curr_layer] = Y - anchor_y/2   #左上纵横坐标
            A[2, :, :, curr_layer] = anchor_x   #暂时存储anchor 宽度
            A[3, :, :, curr_layer] = anchor_y   #暂时存储anchor 高度
            if use_regr:
                #通过rpn网络的回归层的预测值,来调整anchor位置
                A[:, :, :, curr_layer] = apply_regr_np(A[:, :, :, curr_layer], regr)
            A[2, :, :, curr_layer] = np.maximum(1, A[2, :, :, curr_layer])
            A[3, :, :, curr_layer] = np.maximum(1, A[3, :, :, curr_layer])
            A[2, :, :, curr_layer] += A[0, :, :, curr_layer]  #右下角横坐标
            A[3, :, :, curr_layer] += A[1, :, :, curr_layer]  #右下角纵坐标
            #确保anchor不超过feature map尺寸
            A[0, :, :, curr_layer] = np.maximum(0, A[0, :, :, curr_layer])
            A[1, :, :, curr_layer] = np.maximum(0, A[1, :, :, curr_layer])
            A[2, :, :, curr_layer] = np.minimum(cols-1, A[2, :, :, curr_layer])
            A[3, :, :, curr_layer] = np.minimum(rows-1, A[3, :, :, curr_layer])
            curr_layer += 1
    #将对应shape调整到二维(anchor总共个数,4)
    all_boxes = np.reshape(A.transpose((0, 3, 1,2)), (4, -1)).transpose((1, 0))
    all_probs = rpn_cls_layer.transpose((0, 3, 1, 2)).reshape((-1))
    x1 = all_boxes[:, 0]
    y1 = all_boxes[:, 1]
    x2 = all_boxes[:, 2]
    y2 = all_boxes[:, 3]
    #过滤掉一些异常的框
    idxs = np.where((x1 - x2 >= 0) | (y1 - y2 >= 0))
    all_boxes = np.delete(all_boxes, idxs, 0)
    all_probs = np.delete(all_probs, idxs, 0)
    #通过非极大值抑制,选取出一些anchor作为roipooling层的输入
    result = non_max_suppression_fast(all_boxes, all_probs, overlap_thresh=overlap_thresh, max_boxes=max_boxes)[0]
    return result
模型训练
- 构造好了本项目的所有模块,并将各个模型进行了连接,接下来需要进行模型训练,"train_model.py"文件可进行模型训练。
- 训练过程如下
- 根据注释补全代码,并成功进行训练。
from keras_faster_rcnn import config, data_generators, data_augment, losses
from keras_faster_rcnn import  net_model, roi_helper, RoiPoolingConv, voc_data_parser
from keras.optimizers import Adam, SGD, RMSprop
from keras.utils import generic_utils
from keras.layers import Input
from keras.models import Model
from keras import backend as K
import numpy as np
import time
import pprint
import pickle
# 输入数据集的地址,获取数据集,并对数据集的xml文件进行解析,补全此处代码
all_imgs, classes_count, class_mapping = voc_data_parser.????
if 'bg' not in classes_count:
    classes_count['bg'] = 0
    class_mapping['bg'] = len(class_mapping)
pprint.pprint(classes_count)
print('类别数 (包含背景) = {}'.format(len(classes_count)))
num_imgs = len(all_imgs)
train_imgs = ???? #遍历所有all_imgs文件,获取训练集,补全此处代码
val_imgs = ????  #遍历所有all_imgs文件,获取验证集,补全此处代码
test_imgs = ????  #遍历所有all_imgs文件,获取测试集,补全此处代码
print('训练样本个数 {}'.format(len(train_imgs)))
print('验证样本个数 {}'.format(len(val_imgs)))
print('测试样本个数 {}'.format(len(test_imgs)))
C = config.Config()  #相关配置信息
C.class_mapping = class_mapping
config_output_filename = "config/config.pickle"
with open(config_output_filename, "wb") as config_f:
    pickle.dump(C, config_f)
    print('Config has been written to {}, and can be loaded when testing to ensure correct results'.format(
        config_output_filename))
#生成用于RPN网络训练数据集的迭代器
data_gen_train = data_generators.get_anchor_data_gt(train_imgs, classes_count, C, mode='train')
data_gen_val = data_generators.get_anchor_data_gt(val_imgs, classes_count, C, mode='val')
data_gen_test = data_generators.get_anchor_data_gt(test_imgs, classes_count, C, mode='val')
img_input = Input(????)  #网络模型最开始的输入,输入的数据大小为(None, None, 3),补全缺失代码
roi_input = Input(????)   #roi模块的输入,输入的数据大小为(None, 4),补全缺失代码
# 用来进行特征提取的基础网络 VGG16
shared_layers = net_model.base_net_vgg(img_input)
# RPN网络
num_anchors = len(C.anchor_box_scales) * len(C.anchor_box_ratios)
rpn = net_model.rpn_net(shared_layers, num_anchors)
# 最后的检测网络(包含ROI池化层 和 全连接层)
classifier = net_model.roi_classifier(shared_layers, roi_input, C.num_rois, nb_classes=len(classes_count))
model_rpn = Model(img_input, rpn[:2])
model_classifier = Model([img_input, roi_input], classifier)
#这是一个同时包含RPN和分类器的模型,用于为模型加载/保存权重
model_all = Model([img_input, roi_input], rpn[:2] + classifier)
try:
    print('loading weights from {}'.format(C.model_path))
    model_rpn.load_weights(C.model_path, by_name=True)
    model_classifier.load_weights(C.model_path, by_name=True)
except:
    print('没有找到上一次的训练模型')
    try:
        print('loading weights from {}'.format(C.base_net_weights))
        model_rpn.load_weights(C.base_net_weights, by_name=True)
        model_classifier.load_weights(C.base_net_weights, by_name=True)
    except:
        print('没有找到预训练的模型参数')
optimizer = Adam(lr=1e-5)
optimizer_classifier = Adam(lr=1e-5)
model_rpn.compile(optimizer=optimizer, loss=[losses.rpn_cls_loss(num_anchors), losses.rpn_regr_loss(num_anchors)])
model_classifier.compile(optimizer=optimizer_classifier, loss=[losses.final_cls_loss, losses.final_regr_loss(len(classes_count)-1)], metrics={'dense_class_{}'.format(len(classes_count)): 'accuracy'})
model_all.compile(optimizer='sgd', loss='mae')
epoch_length = 1000  #每1000轮训练,记录一次平均loss
num_epochs = 2000
iter_num = 0
train_step = 0  #记录训练次数
losses = np.zeros((epoch_length, 5))  #用来存储1000轮训练中,每一轮的损失
start_time = time.time()
best_loss = np.Inf
print('Starting training')
for epoch_num in range(num_epochs):
    progbar = generic_utils.Progbar(epoch_length)
    print('Epoch {}/{}'.format(epoch_num + 1, num_epochs))
    while True:
        X, Y, img_data = next(data_gen_train)  #通过构造的迭代器,获得一条数据
        loss_rpn = model_rpn.train_on_batch(X, Y)  #训练basenet 与 RPN网络
        P_rpn = model_rpn.predict_on_batch(X)  #获得RPN网络的输出
        #通过rpn网络的输出,找出对应的roi
        R = roi_helper.rpn_to_roi(P_rpn[0], P_rpn[1], C, use_regr=True, overlap_thresh=0.7,max_boxes=300)
        #生成roipooing层的输入数据以及最终分类层的训练数据Y值以及最终回归层的训练数据Y值
        X2, Y1, Y2, IouS = roi_helper.calc_roi(R, img_data, C, class_mapping)
        if X2 is None:
            continue
        loss_class = model_classifier.train_on_batch([X, X2], [Y1, Y2])
        train_step += 1
        losses[iter_num, 0] = loss_rpn[1]  #rpn_cls_loss
        losses[iter_num, 1] = loss_rpn[2]  #rpn_regr_loss
        losses[iter_num, 2] = loss_class[1]  #final_cls_loss
        losses[iter_num, 3] = loss_class[2]  #final_regr_loss
        losses[iter_num, 4] = loss_class[3]  #final_acc
        iter_num += 1
        progbar.update(iter_num,
                       [('rpn_cls', np.mean(losses[:iter_num, 0])),
                        ('rpn_regr', np.mean(losses[:iter_num, 1])),
                        ('detector_cls', np.mean(losses[:iter_num, 2])),
                        ('detector_regr', np.mean(losses[:iter_num, 3]))])
        if iter_num == epoch_length:     #每1000轮训练,统计一次
            loss_rpn_cls = np.mean(losses[:, 0])
            loss_rpn_regr = np.mean(losses[:, 1])
            loss_class_cls = np.mean(losses[:, 2])
            loss_class_regr = np.mean(losses[:, 3])
            class_acc = np.mean(losses[:, 4])
            if C.verbose:
                print('Classifier accuracy for bounding boxes from RPN: {}'.format(class_acc))
                print('Loss RPN classifier: {}'.format(loss_rpn_cls))
                print('Loss RPN regression: {}'.format(loss_rpn_regr))
                print('Loss Detector classifier: {}'.format(loss_class_cls))
                print('Loss Detector regression: {}'.format(loss_class_regr))
                print('Elapsed time: {}'.format(time.time() - start_time))
            curr_loss = loss_rpn_cls + loss_rpn_regr + loss_class_cls + loss_class_regr
            iter_num = 0
            start_time = time.time()
            if curr_loss < best_loss:
                if C.verbose:
                    print('Total loss decreased from {} to {}, saving weights'.format(best_loss,curr_loss))
                best_loss = curr_loss
                model_all.save_weights(C.model_path)
            break
任务解析
from keras_faster_rcnn import config, data_generators, data_augment, losses
from keras_faster_rcnn import  net_model, roi_helper, RoiPoolingConv, voc_data_parser
from keras.optimizers import Adam, SGD, RMSprop
from keras.utils import generic_utils
from keras.layers import Input
from keras.models import Model
from keras import backend as K
import numpy as np
import time
import pprint
import pickle
#获取原始数据集
all_imgs, classes_count, class_mapping = voc_data_parser.get_data("/home/qingjiao/fatser_rcnn-master/")
if 'bg' not in classes_count:
    classes_count['bg'] = 0
    class_mapping['bg'] = len(class_mapping)

pprint.pprint(classes_count)
print('类别数 (包含背景) = {}'.format(len(classes_count)))

num_imgs = len(all_imgs)

train_imgs = [s for s in all_imgs if s['imageset'] == 'train']  #训练集
val_imgs = [s for s in all_imgs if s['imageset'] == 'val']  #验证集
test_imgs = [s for s in all_imgs if s['imageset'] == 'test']  #测试集
print('训练样本个数 {}'.format(len(train_imgs)))
print('验证样本个数 {}'.format(len(val_imgs)))
print('测试样本个数 {}'.format(len(test_imgs)))

C = config.Config()  #相关配置信息
C.class_mapping = class_mapping
config_output_filename = "config/config.pickle"
with open(config_output_filename, "wb") as config_f:
    pickle.dump(C, config_f)
    print('Config has been written to {}, and can be loaded when testing to ensure correct results'.format(
        config_output_filename))


#生成用于RPN网络训练数据集的迭代器
data_gen_train = data_generators.get_anchor_data_gt(train_imgs, classes_count, C, mode='train')
data_gen_val = data_generators.get_anchor_data_gt(val_imgs, classes_count, C, mode='val')
data_gen_test = data_generators.get_anchor_data_gt(test_imgs, classes_count, C, mode='val')

img_input = Input(shape=(None, None, 3))  #网络模型最开始的输入
roi_input = Input(shape=(None, 4))   #roi模块的输入

'''
model_rpn : 输入:图片数据;  输出:对应RPN网络中分类层和回归层的两个输出
model_classifier:  输入: 图片数据和选取出来的ROI数据;   输出: 最终分类层输出和回归层输出
'''
# 用来进行特征提取的基础网络 VGG16
shared_layers = net_model.base_net_vgg(img_input)
# RPN网络
num_anchors = len(C.anchor_box_scales) * len(C.anchor_box_ratios)
rpn = net_model.rpn_net(shared_layers, num_anchors)
# 最后的检测网络(包含ROI池化层 和 全连接层)
classifier = net_model.roi_classifier(shared_layers, roi_input, C.num_rois, nb_classes=len(classes_count))

model_rpn = Model(img_input, rpn[:2])
model_classifier = Model([img_input, roi_input], classifier)

#这是一个同时包含RPN和分类器的模型,用于为模型加载/保存权重
model_all = Model([img_input, roi_input], rpn[:2] + classifier)

try:
    print('loading weights from {}'.format(C.model_path))
    model_rpn.load_weights(C.model_path, by_name=True)
    model_classifier.load_weights(C.model_path, by_name=True)

except:
    print('没有找到上一次的训练模型')
    try:
        print('loading weights from {}'.format(C.base_net_weights))
        model_rpn.load_weights(C.base_net_weights, by_name=True)
        model_classifier.load_weights(C.base_net_weights, by_name=True)
    except:
        print('没有找到预训练的模型参数')


optimizer = Adam(lr=1e-5)
optimizer_classifier = Adam(lr=1e-5)
model_rpn.compile(optimizer=optimizer, loss=[losses.rpn_cls_loss(num_anchors), losses.rpn_regr_loss(num_anchors)])
model_classifier.compile(optimizer=optimizer_classifier, loss=[losses.final_cls_loss, losses.final_regr_loss(len(classes_count)-1)], metrics={'dense_class_{}'.format(len(classes_count)): 'accuracy'})
model_all.compile(optimizer='sgd', loss='mae')

epoch_length = 1000  #每1000轮训练,记录一次平均loss
num_epochs = 2000
iter_num = 0
train_step = 0  #记录训练次数

losses = np.zeros((epoch_length, 5))  #用来存储1000轮训练中,没一轮的损失
start_time = time.time()

best_loss = np.Inf
print('Starting training')
for epoch_num in range(num_epochs):
    progbar = generic_utils.Progbar(epoch_length)
    print('Epoch {}/{}'.format(epoch_num + 1, num_epochs))
    while True:
        X, Y, img_data = next(data_gen_train)  #通过构造的迭代器,获得一条数据
        loss_rpn = model_rpn.train_on_batch(X, Y)  #训练basenet 与 RPN网络
        P_rpn = model_rpn.predict_on_batch(X)  #获得RPN网络的输出
        #通过rpn网络的输出,找出对应的roi
        R = roi_helper.rpn_to_roi(P_rpn[0], P_rpn[1], C, use_regr=True, overlap_thresh=0.7,max_boxes=300)
        #生成roipooing层的输入数据以及最终分类层的训练数据Y值以及最终回归层的训练数据Y值
        X2, Y1, Y2, IouS = roi_helper.calc_roi(R, img_data, C, class_mapping)
        if X2 is None:
            continue
        loss_class = model_classifier.train_on_batch([X, X2], [Y1, Y2])
        train_step += 1
        losses[iter_num, 0] = loss_rpn[1]  #rpn_cls_loss
        losses[iter_num, 1] = loss_rpn[2]  #rpn_regr_loss
        losses[iter_num, 2] = loss_class[1]  #final_cls_loss
        losses[iter_num, 3] = loss_class[2]  #final_regr_loss
        losses[iter_num, 4] = loss_class[3]  #final_acc
        iter_num += 1
        progbar.update(iter_num,
                       [('rpn_cls', np.mean(losses[:iter_num, 0])),
                        ('rpn_regr', np.mean(losses[:iter_num, 1])),
                        ('detector_cls', np.mean(losses[:iter_num, 2])),
                        ('detector_regr', np.mean(losses[:iter_num, 3]))])

        if iter_num == epoch_length:     #每1000轮训练,统计一次
            loss_rpn_cls = np.mean(losses[:, 0])
            loss_rpn_regr = np.mean(losses[:, 1])
            loss_class_cls = np.mean(losses[:, 2])
            loss_class_regr = np.mean(losses[:, 3])
            class_acc = np.mean(losses[:, 4])

            # mean_overlapping_bboxes = float(sum(rpn_accuracy_for_epoch)) / len(rpn_accuracy_for_epoch)
            # rpn_accuracy_for_epoch = []

            if C.verbose:
                # print('Mean number of bounding boxes from RPN overlapping ground truth boxes: {}'.format(mean_overlapping_bboxes))
                print('Classifier accuracy for bounding boxes from RPN: {}'.format(class_acc))
                print('Loss RPN classifier: {}'.format(loss_rpn_cls))
                print('Loss RPN regression: {}'.format(loss_rpn_regr))
                print('Loss Detector classifier: {}'.format(loss_class_cls))
                print('Loss Detector regression: {}'.format(loss_class_regr))
                print('Elapsed time: {}'.format(time.time() - start_time))

            curr_loss = loss_rpn_cls + loss_rpn_regr + loss_class_cls + loss_class_regr
            iter_num = 0
            start_time = time.time()

            if curr_loss < best_loss:
                if C.verbose:
                    print('Total loss decreased from {} to {}, saving weights'.format(best_loss,curr_loss))
                best_loss = curr_loss
                model_all.save_weights(C.model_path)

            break
检测网络
- "net_model.py"文件中添加"roi_classifier"方法用于检测网络。
def roi_classifier(shared_layers, input_rois, num_rois, nb_classes=21):
    '''
    最后的检测网络(包含ROI池化层 和 全链接层),进行最终的精分类和精回归
    :param shared_layers: 进行特征提取的基础网络(VGG的卷积模块)
    :param input_rois: roi输入 shape=(None, 4)
    :param num_rois: roi数量
    :param nb_classes: 总共的待检测类别,须要算上背景类
    :return: [out_class, out_regr]:最终分类层输出和回归层输出
    '''
    #ROI pooling层
    print("roi_classifier")
    pooling_regions = 7
    roi_pool_out = RoiPoolingConv.RoiPoolingConv(pooling_regions, num_rois)([shared_layers, input_rois])

    #全链接层
    out = TimeDistributed(Flatten(name="flatten"))(roi_pool_out)
    out = TimeDistributed(Dense(4096, activation="relu", name="fc1"))(out)
    out = TimeDistributed(Dense(4096, activation="relu", name="fc2"))(out)

    out_class = TimeDistributed(Dense(nb_classes, activation="softmax",  kernel_initializer='zero'),name='dense_class_{}'.format(nb_classes))(out)
    out_regr = TimeDistributed(Dense(4 * (nb_classes-1), activation="linear",  kernel_initializer='zero'), name='dense_regress_{}'.format(nb_classes))(out)
    print(K.shape(out_class), K.shape(out_regr))
    return [out_class, out_regr]
任务解析
此方法不需要填充缺失代码
我的实训答案
文本情报智能化处理与分析
短信涉博分类
导入数据
!ls
!pip install jieba
# 导库
# 用于分词
import jieba
# 用于数据分析
import pandas as pd
# 合并为csv数据进行数据操作
import csv
# 用于计算运行时间
import time
import joblib
# 创建停用词列表,引用哈工大中文停用词表
def stopwordslist():
    stopwords = [line.strip() for line in open('./HGD_StopWords.txt',encoding='UTF-8').readlines()]
    return stopwords
# 对句子进行中文分词
def seg_depart(sentence):
    # 对文档中的每一行进行中文分词
    sentence_depart = jieba.cut(sentence.strip())
    # 引进停用词列表
    stopwords = stopwordslist()
    # 输出结果为outstr
    outstr = ''
    # 去停用词
    for word in sentence_depart:
        if word not in stopwords:
            if word != '\t':
                outstr += word
                outstr += " "
    return outstr
# 给出数据路径data.txt
filename = "./data.txt"
# 设定输出数据文件为stop_seg_word.txt
outfilename = "./stop_seg_word.txt"
# 读取数据
inputs = open(filename, 'r', encoding='UTF-8')
# 写入数据
outputs=open(outfilename, 'w', encoding='UTF-8')
# 将输出结果写入out中
count= 0
for line in inputs:
    line_seg = seg_depart(line)
    #writer.writerows(line_seg + '\n')
    outputs.writelines(line_seg + '\n')
    #print("-------------------正在分词和去停用词-----------")
    # count累加计数
    count += 1
print("一共处理了",count,"条数据")
outputs.close()
inputs.close()
print("删除停用词和分词成功!!!")
数据转换
#创建方法对象
data = pd.DataFrame()
#将分词后的txt格式数据按行写入csv格式,便于实验使用
with open('./stop_seg_word.txt', encoding='utf-8') as f:
    line = f.readlines()
    line = [i.strip() for i in line]
    print(len(line))
#建立短信这一列,将数据进行循环写入
data['短信'] = line
# 读取涉赌标签数据label.txt
all_labels=[]
with open('./label.txt', "r",encoding='utf-8') as f:
    all_label=f.readlines()
    all_labels.extend([x.strip() for x in all_label if x.strip() != ''])
    print(all_label)
    # 标签类型
    print(type(all_label))
    # 标签长度
    print(len(all_label))

all_labels
data['是否涉赌'] = all_labels
data
#将整理好的数据进行保存,文件保存为同目录下chat_score_update.csv
data.to_csv('./chat_score_update.csv')
训练与预测
# 导包
import pandas as pd
import numpy as np
import jieba
import re
from sklearn.feature_extraction.text import TfidfVectorizer, CountVectorizer
from sklearn import model_selection
from sklearn import preprocessing
#将数据进行读取
data=pd.read_csv('./chat_score_update.csv',index_col=0)
data.head()
#现在是划分数据集
#random_state 取值,这是为了在不同环境中,保证随机数取值一致,以便验证模型的实际效果。
train_x,test_x,train_y,test_y=model_selection.train_test_split(data.短信.values.astype('U'),data.是否涉赌.values,test_size=0.1,random_state=1)

#划分完毕,查看数据形状
print(train_x.shape,test_x.shape)
#train_x 训练集数据 test_x 测试集数据  train_y训练集的标签 test_y 测试集的标签
#定义函数,从哈工大中文停用词表里面,把停用词作为列表格式保存并返回 在这里加上停用词表是因为TfidfVectorizer和CountVectorizer的函数中
#可以根据提供用词里列表进行去停用词
def get_stopwords(stop_word_file):
    with open(stop_word_file) as f:
        stopwords=f.read()
    stopwords_list=stopwords.split('\n')
    custom_stopwords_list=[i for i in stopwords_list]
    return custom_stopwords_list
#获得由停用词组成的列表
stop_words_file = './HGD_StopWords.txt'
stopwords = get_stopwords(stop_words_file)
'''
使用TfidfVectorizer()和 CountVectorizer()分别对数据进行特征的提取,投放到不同的模型中进行实验
'''
#开始使用TF-IDF进行特征的提取,对分词后的中文语句做向量化。
#引进TF-IDF的包
TF_Vec=TfidfVectorizer(max_df=0.8,min_df = 3,stop_words=frozenset(stopwords))
#拟合数据,将数据准转为标准形式,一般使用在训练集中
train_x_tfvec=TF_Vec.fit_transform(train_x)
#通过中心化和缩放实现标准化,一般使用在测试集中
test_x_tfvec=TF_Vec.transform(test_x)
#开始使用CountVectorizer()进行特征的提取。它依据词语出现频率转化向量。并且加入了去除停用词
CT_Vec=CountVectorizer(max_df=0.8,#在超过这一比例的文档中出现的关键词(过于平凡),去除掉。
                       min_df = 3,#在低于这一数量的文档中出现的关键词(过于独特),去除掉。
                       token_pattern=u'(?u)\\b[^\\d\\W]\\w+\\b',#使用正则表达式,去除想去除的内容
                       stop_words=frozenset(stopwords))#加入停用词)
#拟合数据,将数据转化为标准形式,一般使用在训练集中
train_x_ctvec=CT_Vec.fit_transform(train_x)
#通过中心化和缩放实现标准化,一般使用在测试集中
test_x_ctvec=CT_Vec.transform(test_x)
### Random Forest Classifier 随机森林分类器
from sklearn.ensemble import RandomForestClassifier
from sklearn.metrics import accuracy_score
import time
start_time=time.time()
#创建模型
Rfc = RandomForestClassifier(n_estimators=8)
#拟合从CounterfVectorizer拿到的数据
Rfc.fit(train_x_ctvec,train_y)
#在训练时查看训练集的准确率
pre_train_y=Rfc.predict(train_x_ctvec)
#在训练集上的正确率
train_accracy=accuracy_score(pre_train_y,train_y)
#训练结束查看预测 输入测试集查看预测
pre_test_y=Rfc.predict(test_x_ctvec)
#查看在测试集上的准确率
test_accracy = accuracy_score(pre_test_y,test_y)
print('使用CounterfVectorizer提取特征使用随机森林分类器的准确率\n训练集:{0}\n测试集:{1}'.format(train_accracy,test_accracy))
end_time=time.time()
print("使用随机森林分类器的程序运行时间为",end_time-start_time)
joblib.dump(Rfc, './RandomForest.pkl')  # 保存模型
load_model = joblib.load('./RandomForest.pkl')
result=pd.DataFrame({'proba':load_model.predict_proba(test_x_ctvec)[:,1]})
result.head()
SHuang=result.loc[result.proba>0.5].count()
Data_total=result.count()
rate=SHuang/Data_total
print('测试集中共有%d条数据,根据模型预测,其中%d条数据具有涉赌性质,占比约%.4f%%' % (Data_total,SHuang,rate))
print('所有涉赌博数据为:',result.loc[result.proba>0.5])
print('第9条涉赌数据为:',test_x[9])
result.loc[result.proba>0.5].to_csv('./finnal.csv')
#输出所有的涉赌内容
fin = list()
with open('./finnal.csv', "r") as f:
    reader = csv.reader(f)
    for row in reader:
        fin.append(row[0])
for i in range(1,10):
    a = fin[i]
    print('第'+a+'条赌博内容:'+test_x[int(a)])
以上为随机森林分类器算法的训练和预测,以下展示其他算法答案
逻辑回归
....
网络诈骗分类

