从0到1搭建一个react项目
 react分享
高级前端工程师
首先新建一个文件夹, 然后用编辑器vscode打开这个文件夹
打开文件夹后执行npm init命令, 会提示你生成package.json文件
然后下载npm包, 下面贴下package.json
{
  "name": "demo",
  "version": "1.0.0",
  "description": "学习webpack",
  "main": "index.js",
  "scripts": {
    "dev": "npx webpack serve",
    "build": "webpack",
    "test": "echo \"Error: no test specified\" && exit 1"
  },
  "keywords": [
    "webpack"
  ],
  "author": "wwang",
  "license": "ISC",
  "dependencies": {
    "react": "file:react/build/node_modules/react", // 这块大家可能有点疑问, 这是我从github下载的react源码
    "react-dom": "file:react/build/node_modules/react-dom",
    "react-router": "^6.9.0",
    "react-router-dom": "^6.9.0",
  },
  "devDependencies": {
    "webpack": "^5.76.2",
    "webpack-cli": "^5.0.1", // webpack脚手架
    "@babel/cli": "^7.21.0",
    "@babel/core": "^7.21.0",
    "@babel/preset-react": "^7.18.6",
    "css-loader": "^6.7.3",
    "less-loader": "^11.1.0",
    "style-loader": "^3.3.2",
    "clean-webpack-plugin": "^4.0.0", // 清空打包内容
    "html-webpack-plugin": "^5.5.0", // 生成html文件
    "mini-css-extract-plugin": "^2.7.5", // css文件拆分
    "terser-webpack-plugin": "^5.3.7", // 压缩器
    "webpack-bundle-analyzer": "^4.8.0", // 产物分析
    "webpack-dev-server": "^4.11.1" // 本地服务启动
  }
}
package.json依赖包文件下载后, 下面开始配置babel文件, 在项目的根目录下新增babel.config.js
{ "presets": ["@babel/preset-react"] }最后一步, 配置webpack.config.js
const path = require('path');
const htmlWebpackPlugin = require('html-webpack-plugin');
const { CleanWebpackPlugin } = require('clean-webpack-plugin');
const TerserPlugin = require('terser-webpack-plugin');
const miniCssExtractPlugin = require('mini-css-extract-plugin');
const Analyzer = require('webpack-bundle-analyzer').BundleAnalyzerPlugin;

module.exports = {
    entry: {
        index: {
            import: './src/index.js',
            dependOn: ['react', 'react-dom', 'react-router-dom'] // 依赖包抽离
        },
        react: ['react'],
        'react-dom': ['react-dom'],
        'react-router-dom': ['react-router-dom'],
    },
    watch: false,
    output: {
        path: path.join(__dirname, './dist'),
        filename: '[name].[chunkhash].js', // 默认配置文件绝对路径 + /dist 作为最终的输出文件路径
        publicPath: '/',
        asyncChunks: true,
        chunkFilename: `[name].[contenthash:8].async.js`
    },
    mode: 'development',
    module: {
        rules: [
            {
                test: /\.(js|jsx)$/,
                use: {
                    loader: 'babel-loader',
                    options: {
                        exclude: /node_modules/gi,
                        cacheDirectory: true
                    }
                }
            },
            {
                test: /\.(less)$/,
                use: [miniCssExtractPlugin.loader, 'css-loader', 'less-loader'],
                include: /src/
            },
        ],
    },
    optimization: {
        chunkIds: 'deterministic',
        minimize: true,
        minimizer: [
            new TerserPlugin({
                terserOptions: {
                    format: {
                        comments: false,
                        max_line_len: true, // 最大行长度(用于缩小的代码), 用于自动换行
                        beautify: true, // 美化输出
                        ascii_only: true,
                        preserve_annotations: true
                    },
                },
                extractComments: false
            }),
        ],
        splitChunks: {
            chunks: 'all',
        }
    },
    resolve: {
        extensions: ['.js', '.json', '.jsx'],
    },
    plugins: [
        new htmlWebpackPlugin(),
        new CleanWebpackPlugin(),
        new miniCssExtractPlugin({
            filename: '[name].[contenthash:8].css',
            chunkFilename: '[name].[contenthash:8].chunk.css'
        }),
        new Analyzer()
    ],
    devServer: {
        server: 'http',
        static: {
            directory: path.join(__dirname, '/'),
            watch: {
                ignored: '*.jsx',
                usePolling: false,
            },
            serveIndex: true
        },
        allowedHosts: ['.host.com'],
        port: '9000',
        hot: true,
        historyApiFallback: true
    },
};
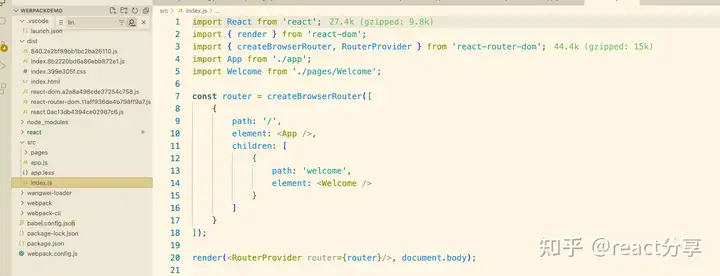
下面就可以在工程里新建页面, 配置陆游进行愉快的玩耍了

大家对配置项不懂的可以私聊我, 后续再讲解下webpack怎么根据react路由来进行拆分, 如何调试react源码
编辑于 2023-03-22 14:11・IP 属地江苏 标签:dom,项目,loader,react,webpack,js,true,搭建 From: https://www.cnblogs.com/sexintercourse/p/17693162.html