使用XDT提高开发效率
XDT介绍
XDT(XML Document Transformation)技术是一种用于对XML文档进行转换的技术。它通常用于在部署或配置过程中,根据不同的环境或条件自动修改XML文件的内容,以便适应特定的环境或配置需求。
XDT技术主要应用于Web.config、App.config等配置文件的转换。在Web开发中,通常有多个环境(如开发环境、测试环境、生产环境等),这些环境可能需要不同的配置,例如数据库连接字符串、API地址等。使用XDT技术可以根据不同的部署环境自动修改配置文件,避免手动修改或维护多个不同版本的配置文件。
XDT技术使用基于XML的转换语法,通常使用的是Web.Release.config、Web.Debug.config等命名规则的配置文件。这些文件包含了在发布或调试不同环境时需要应用的变更。当进行部署或调试时,系统会根据当前环境选择相应的配置文件,并将其中的转换规则应用到原始的XML文件中,从而生成最终的配置文件。
常见的XDT转换规则包括插入、替换、删除、设置属性等操作。使用这些规则,可以根据需要轻松地修改配置文件,以满足不同环境的需求。
总的来说,XDT技术是一种方便的XML文档转换技术,可以在部署和配置过程中帮助开发人员自动地对XML文件进行转换,以适应不同的环境和配置需求。这有助于简化配置管理和提高部署的灵活性。
语法简介
| 特性 | 语法 | 描述 | **实例 ** |
|---|---|---|---|
| Locator 特性语法 | Condition | 指定一个 XPath 表达式,该表达式会追加到当前元素的 XPath 表达式。 选择了与组合 XPath 表达式匹配的元素。 | Locator="Condition(XPath Expression)" |
| ^ | Match | 选择针对指定的一个或多个特性具有匹配值的一个或多个元素。 如果指定了多个特性名称,则将仅选择与所有指定特性匹配的元素。 | Locator="Match(comma-Delimited List Of One Or More Attribute Names)" |
| ^ | XPath | 指定应用于开发 Web.config 文件的绝对 XPath 表达式。 (与 Condition 不同,所指定的表达式不追加到与当前元素对应的隐式 XPath 表达式。) | Locator="XPath(XPath Expression)" |
| Transform 特性语法 | Replace | 将所选的元素替换为在转换文件中指定的元素。 如果选择多个元素,则只替换所选的第一个元素。 有关如何使用 Replace 关键字的示例,请参见 Locator 特性的示例。 | Transform="Replace" |
| ^ | Insert | 将转换文件中定义的元素作为所选的一个或多个元素的同级进行添加。 该新元素被添加到任何集合的末尾。 | Transform="Insert" |
| ^ | InsertBefore | 将转换 XML 中定义的元素直接插入到由指定 XPath 表达式选择的元素之前。 该 XPath 表达式必须是一个绝对表达式,因为它作为一个整体应用于开发 Web.config 文件,而不只是追加到当前元素的隐式 XPath 表达式中。 | Transform="InsertBefore(XPath Expression)" |
| ^ | InsertAfter | 将转换 XML 中定义的元素直接插入到由指定 XPath 表达式选择的元素之后。 该 XPath 表达式必须是一个绝对表达式,因为它作为一个整体应用于开发 Web.config 文件,而不是追加到当前元素的隐式 XPath 表达式中。 | Transform="InsertAfter(XPath Expression)" |
| ^ | Remove | 移除选定元素。 如果选择了多个元素,则移除第一个元素。 | Transform="Remove" |
| ^ | RemoveAll | 移除选定的一个或多个元素。 | Transform="RemoveAll" |
| ^ | RemoveAttributes | 从所选元素移除指定的特性。 | Transform="RemoveAttributes(comma-Delimited List Of One Or More Attribute Names)" |
| ^ | SetAttributes | SetAttributes 变换影响所有选定的元素。 此行为与 Replace 不同转换特性,仅影响第一个选定的元素,如果选择了多个元素 | Transform="SetAttributes(comma-Delimited List Of One Or More Attribute Names)" |
使用方法
针对XDT文件和XML文件的转换,可以使用SlowCheetah插件来实现。SlowCheetah是一个Visual Studio扩展,可以在Visual Studio中使用XDT技术来转换XML文件。
选择你的Visual Studio版本下载对应的插件,安装后重启Visual Studio即可。
Visual Studio 2022: SlowCheetah VS 2022 Extension (version 4.x)
Visual Studio 2015-2019: SlowCheetah VS 2015-2019 Extension (version 3.x)
App.config内容如下,维护了环境变量environment,我们需要根据不同的环境变量来修改App.config中的内容。
<?xml version="1.0" encoding="utf-8" ?>
<configuration>
	<appSettings>
		<add key="environment" value="Dev" />
	</appSettings>
	<startup>
		<supportedRuntime version="v4.0" sku=".NETFramework,Version=v4.5" />
	</startup>
</configuration>
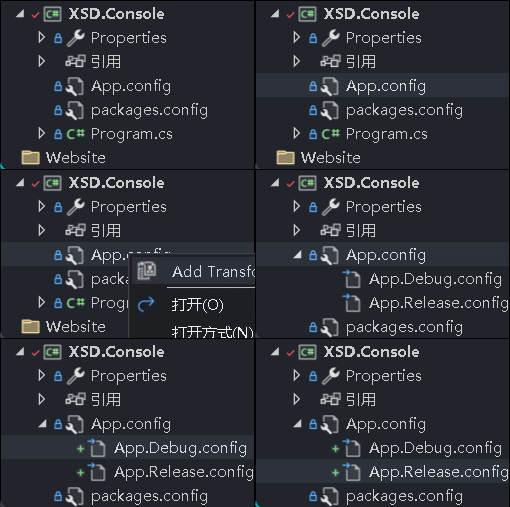
选中我们要转换的App.config文件,右键选择Add Transform,会自动生成两个个config文件,如下图所示:

他会在我们的packages.config中添加一个nuget引用
<?xml version="1.0" encoding="utf-8"?>
<packages>
  <package id="Microsoft.VisualStudio.SlowCheetah" version="4.0.50" targetFramework="net45" developmentDependency="true" />
</packages>
同时他会修改我们的项目.csproj文件增加如下内容,增加了App.Debug.config、App.Release.config两个文件。也增加了Microsoft.VisualStudio.SlowCheetah.targets文件的引用,用于生成事件调用。
<ItemGroup>
  <None Include="App.config">
    <SubType>Designer</SubType>
    <TransformOnBuild>true</TransformOnBuild>
  </None>
  <None Include="App.Debug.config">
    <DependentUpon>App.config</DependentUpon>
    <IsTransformFile>true</IsTransformFile>
  </None>
  <None Include="App.Release.config">
    <DependentUpon>App.config</DependentUpon>
    <IsTransformFile>true</IsTransformFile>
  </None>
  <None Include="packages.config" />
</ItemGroup>
<Import Project="..\..\..\packages\Microsoft.VisualStudio.SlowCheetah.4.0.50\build\Microsoft.VisualStudio.SlowCheetah.targets" Condition="Exists('..\..\..\packages\Microsoft.VisualStudio.SlowCheetah.4.0.50\build\Microsoft.VisualStudio.SlowCheetah.targets')" />
<Target Name="EnsureNuGetPackageBuildImports" BeforeTargets="PrepareForBuild">
  <PropertyGroup>
    <ErrorText>这台计算机上缺少此项目引用的 NuGet 程序包。使用“NuGet 程序包还原”可下载这些程序包。有关更多信息,请参见 http://go.microsoft.com/fwlink/?LinkID=322105。缺少的文件是 {0}。</ErrorText>
  </PropertyGroup>
  <Error Condition="!Exists('..\..\..\packages\Microsoft.VisualStudio.SlowCheetah.4.0.50\build\Microsoft.VisualStudio.SlowCheetah.targets')" Text="$([System.String]::Format('$(ErrorText)', '..\..\..\packages\Microsoft.VisualStudio.SlowCheetah.4.0.50\build\Microsoft.VisualStudio.SlowCheetah.targets'))" />
</Target>
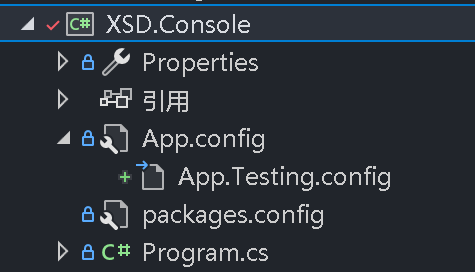
但是我们不需要App.Debug.config和App.Release.config两个配置文件,我们预期在Debug模式下想要调试开发环境(Dev),在Testing模式想要调试测试环境(Testing)。所以我们需要修改App.Debug.config改为App.Testing.config文件。
有需要可以新增更多类型配置文件,如App.Production.config文件。

同时修改.csproj文件,删除App.Release.config文件的引用。并去文件资源管理器中物理删除App.Release.config。
<None Include="App.config">
  <TransformOnBuild>true</TransformOnBuild>
</None>
<None Include="App.Testing.config">
  <DependentUpon>App.config</DependentUpon>
  <IsTransformFile>true</IsTransformFile>
</None>
新增的App.Testing.config配置文件如下,可以看到environment使用了Replace替换,Locator使用了Match(key)匹配key值,这样就可以根据key值来替换value值为Testing。
<?xml version="1.0" encoding="utf-8"?>
<!--For more information on using transformations see the web.config examples at http://go.microsoft.com/fwlink/?LinkId=214134. -->
<configuration xmlns:xdt="http://schemas.microsoft.com/XML-Document-Transform">
	<appSettings>
		<add key="environment" value="Testing" xdt:Transform="Replace" xdt:Locator="Match(key)" />
	</appSettings>
</configuration>
右键App.Testing.config文件,选择Preview Transform,可以看到environment的value值已经被替换为Testing了。

但是我们默认情况下只有Debug和Release调试模式,我们需要增加Testing调试模式,所以我们需要修改.csproj文件,增加Condition条件,如下所示,增加了Condition=" '$(Configuration)|$(Platform)' == 'Testing|AnyCPU' "条件,这样就可以在Testing环境下使用App.Testing.config配置文件了。
csproj的文件改动如下
<PropertyGroup Condition=" '$(Configuration)|$(Platform)' == 'Debug|AnyCPU' ">
  <DebugSymbols>true</DebugSymbols>
  <DebugType>full</DebugType>
  <Optimize>false</Optimize>
  <OutputPath>bin\Debug\</OutputPath>
  <DefineConstants>DEBUG;TRACE</DefineConstants>
  <ErrorReport>prompt</ErrorReport>
  <WarningLevel>4</WarningLevel>
</PropertyGroup>
<PropertyGroup Condition=" '$(Configuration)|$(Platform)' == 'Release|AnyCPU' ">
  <DebugType>pdbonly</DebugType>
  <Optimize>true</Optimize>
  <OutputPath>bin\Release\</OutputPath>
  <DefineConstants>TRACE</DefineConstants>
  <ErrorReport>prompt</ErrorReport>
  <WarningLevel>4</WarningLevel>
</PropertyGroup>
<PropertyGroup Condition="'$(Configuration)|$(Platform)' == 'Testing|AnyCPU'">
  <DebugSymbols>true</DebugSymbols>
  <OutputPath>bin\Testing\</OutputPath>
  <DefineConstants>DEBUG;TRACE</DefineConstants>
  <DebugType>full</DebugType>
  <PlatformTarget>AnyCPU</PlatformTarget>
  <LangVersion>7.3</LangVersion>
  <ErrorReport>prompt</ErrorReport>
</PropertyGroup>
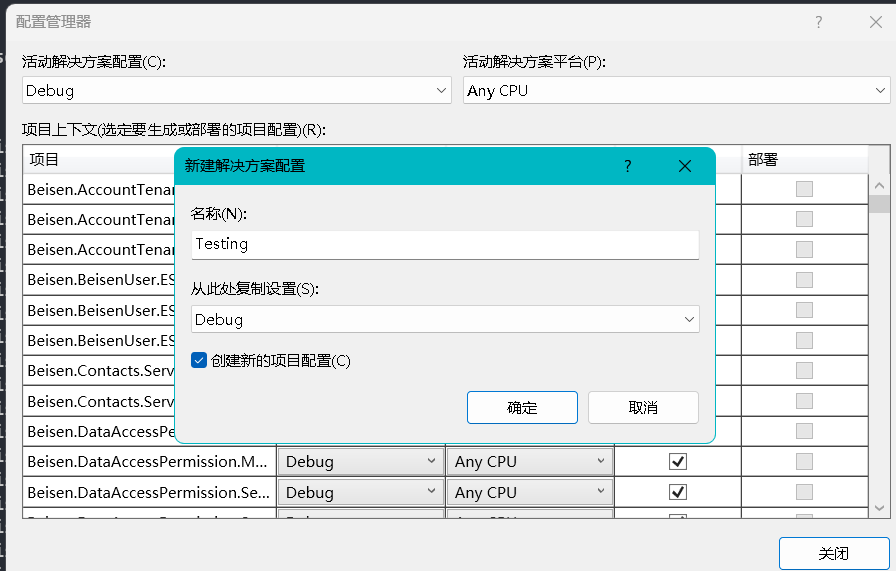
也可以在菜单栏选择生成=》配置管理器项,新建Testing环境。

解决方案配置默认为自带的Debug或者Release。我们选择工具栏解决方案配置下拉框我们新建的Testing环境,设置启动项为当前项目F5运行程序,可以看到environment的value值已经被替换为Testing了。
internal class Program
{
    private static void Main(string[] args)
    {
        string env = System.Configuration.ConfigurationManager.AppSettings["environment"];

        System.Console.WriteLine($"EnvironmentName:{env}");
        // print: EnvironmentName:Testing
        System.Console.ReadKey();
    }
}
本示例简单展示如何使用XDT来提高开发效率,实际开发中会有更多复杂情况。具体语法可以参考MSDN。
参考
- dotnet/xdt
- Xdt transform samples
- XDT web.config transforms
- Web.config Transformation Syntax for Web Project Deployment Using Visual Studio