1.学会使用Test,让自己的代码不再有bug——@SpringBootTest的妙用
https://baijiahao.baidu.com/s?id=1760961522946985249&wfr=spider&for=pc
2.SpringBoot Test 人类使用指南
https://zhuanlan.zhihu.com/p/111418479
3.解析“@ExtendWith注解“
https://blog.csdn.net/ll1042668699/article/details/128069286
4.带有 Spring Boot 的 Junit 5:何时使用 @ExtendWith Spring 或 Mockito?
https://www.51c51.com/danpianji/xinxi/84/898364.html
@ExtendWith(SpringExtension.class)
@ContextConfiguration(classes = MyConfiguration.class)
class MyUnitTest
{
@Autowired
private MyService myService;
@Test
void test()
{ // ...}
}
这样做可以只加载MyConfiguration类,而不启动完整的应用程序上下文。
_________________________________________________________________________________________________________________________
学会使用Test,让自己的代码不再有bug——@SpringBootTest的妙用
https://baijiahao.baidu.com/s?id=1760961522946985249&wfr=spider&for=pc
在Spring Boot中,注解是一个非常重要的概念,它可以用来标记各种组件、配置和测试等。其中,@Test注解是JUnit测试框架中最重要的注解之一,它可以帮助开发者编写高效、可靠的单元测试。
本文将详细介绍@SpringBootTest注解的使用方法和注意事项。
@SpringBootTest注解的作用
首先,让我们来了解一下@SpringBootTest注解的作用。
@SpringBootTest注解可以用来标记一个测试类,它告诉Spring Boot启动一个完整的应用程序上下文,而不仅仅是一个单一的测试类或测试方法。
这个完整的应用程序上下文将包含所有的Spring Bean、配置和依赖项,这样我们就可以像在实际的应用程序中一样运行我们的测试用例。
@SpringBootTest注解的使用方法
接下来,我们将详细介绍@SpringBootTest注解的使用方法。
首先,我们需要在测试类上标记@SpringBootTest注解:
@SpringBootTest
class MyApplicationTests { // ...}
这样做会告诉Spring Boot启动一个完整的应用程序上下文,并加载所有的Spring Bean和配置。
我们还可以使用@SpringBootTest注解的webEnvironment属性来指定应用程序上下文的Web环境类型。
例如,如果我们要测试一个Web应用程序,可以使用如下代码:
@SpringBootTest(webEnvironment = SpringBootTest.WebEnvironment.RANDOM_PORT)
class MyApplicationTests {    // ...}
这样做会告诉Spring Boot在随机端口上启动Web服务器,以便我们可以测试Web应用程序的功能。
另外,我们还可以使用@SpringBootTest注解的classes属性来指定要加载的配置类。
例如,如果我们要测试一个仅包含特定配置类的Spring应用程序,可以使用如下代码:
@SpringBootTest(classes = MyConfiguration.class)
class MyApplicationTests {    // ...}
这样做会告诉Spring Boot只加载MyConfiguration类,而不是整个应用程序上下文。
@SpringBootTest注解的注意事项
最后,让我们来了解一些使用@SpringBootTest注解时需要注意的事项。
首先,由于@SpringBootTest注解会启动一个完整的应用程序上下文,因此它可能会很慢。
因此,我们建议将@SpringBootTest注解仅用于集成测试,而不是单元测试。
对于单元测试,我们可以使用@SpringBootTest注解的注释层次结构(Annotation Hierarchy)来模拟应用程序上下文的一部分。
例如,我们可以这样编写测试代码:
@ExtendWith(SpringExtension.class)
@ContextConfiguration(classes = MyConfiguration.class)
class MyUnitTest
{
  @Autowired
  private MyService myService;
  @Test
  void test()
  {    // ...}
}
这样做可以只加载MyConfiguration类,而不启动完整的应用程序上下文。
另外,由于@SpringBootTest注解启动的应用程序上下文可能包含大量的Spring Bean和依赖项,因此它可能会与其他测试用例产生意外的干扰。
因此,我们建议在测试类中使用@DirtiesContext注解,以便在每个测试方法之间重新加载应用程序上下文。
例如,我们可以这样编写测试代码:
@SpringBootTest
@DirtiesContext
class MyIntegrationTest {    // ...}
这样做可以确保每个测试方法都在一个干净的应用程序上下文中运行,避免了测试之间的干扰。
此外,还有一些其他需要注意的事项。
例如,由于@SpringBootTest注解会启动一个完整的应用程序上下文,因此它可能会消耗大量的系统资源,特别是内存。
因此,我们建议在测试过程中监视系统资源使用情况,并在必要时调整测试环境。
另外,由于@SpringBootTest注解启动的应用程序上下文可能包含敏感信息(例如数据库密码),因此我们建议在测试环境中使用虚拟或隔离的数据库。
______________________________________________________________________________________________________________
SpringBoot Test 人类使用指南
https://zhuanlan.zhihu.com/p/111418479
SpringBoot Test 人类使用指南
测试好处多多。但在 spring boot 里写测试,别说得到好处,就连把测试框架搭对都不是个简单的事。
毋庸置疑, 相对于 Golang, python 的网络测试框架, java 里 spring 里的测试框架真是复杂的可以. 约定优于配置, 这约定漫天飞舞藏在文档的各个角落. 版本还不统一.
一般我们写后端逻辑分 3 层, Controller -> Service -> Repository,简单来说,
对于单元测试,我们只针对某一个功能点写测试
而对于集成测试,我们会集成多个功能。
spring boot 为这两种测试,都提供了具体的约定方法。
spring boot 启动慢,我们测试时应该尽可能的只启动我们需要的类。 怎么做到呢?
spring boot 分层测试
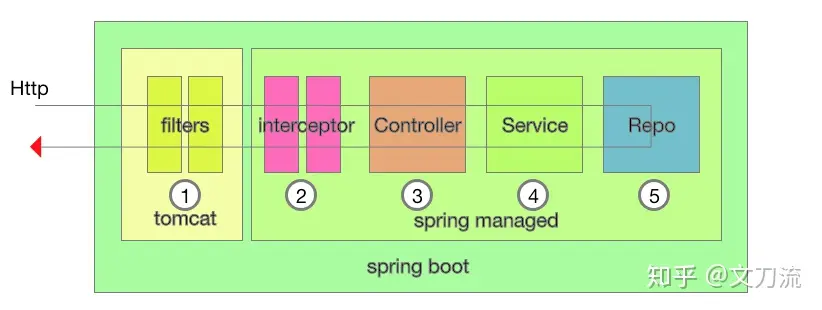
我们看上面 spring 简化的请求图。 如果是单元测试。我们应该只对 3 测(依赖 4),只对 4 测(依赖 5)。 而集成测试,我们应该是可以测 1 到 5. 当然,这个界定根据你的需求来。
在测试前,我们先把 pom 的包统一下.
<parent>
<groupId>org.springframework.boot</groupId>
<artifactId>spring-boot-starter-parent</artifactId>
<version>2.0.3.RELEASE</version>
<relativePath/>
</parent>
<dependencies>
<dependency>
<groupId>junit</groupId>
<artifactId>junit</artifactId>
<version>4.12</version>
<scope>test</scope>
</dependency>
<dependency>
<groupId>org.springframework.boot</groupId>
<artifactId>spring-boot-starter-web</artifactId>
</dependency>
<dependency>
<groupId>org.springframework.boot</groupId>
<artifactId>spring-boot-starter-test</artifactId>
<scope>test</scope>
</dependency>
</dependencies>完整源码地址: https://github.com/zk4/spring_test_demo
测试场景
我们要将测试场景列个矩阵
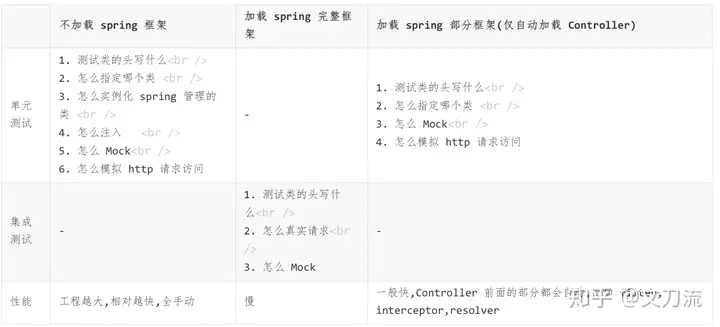
不加载 spring 框架 的单元测试
这是最灵活也是最快的一种方案
拿 Controller 举例
Controller 其实就是一个类. 理论上 new 出来测就行了
但问题是: Controller 里会被 Spring 注入一堆东西.
简单的解决方法是:
不要在成员上加 @Autowired, 而是在构造时自动注入. 这也是 Spring 官方的推荐做法.
@Controller
class UserController{
//不要这样
@Autowired
UserService userService;
}
@Controller
class UserController{
UserService userService;
//建议这样
@Autowired
UserController(UserService userService){
this.userService = userService;
}
}
那 UserService 直接 new? UserService 也是有 Spring 注入的.
我们知道 java 里可以给类做代理.
那么,对构造函数是类的, 我们只要代理这个类,然后模拟类函数的返回值就行了.
这个过程. spring test 里的 Mokito 做了封装.
在 Test 类里, 操作如下:
//测试类的头, 使 Mock 生效
@RunWith(MockitoJUnitRunner.class)
public class UserControllerTest{
// 指定要 Mock 的类
@Mock
UserService userService;
@Test
public testhello(){
// Mock 的类里的函数怎么返回
given(userService.getUser(1))
.willReturn(new User().setName("bob").setId(1));
....
}
}
怎么模拟 http 请求访问呢?
Mockito 帮你做, 但不是真正的网络请求! 是模拟的. 就是不会经过网卡. 而是直接将模拟网络请求塞给 Controller.
见下面 @Test 方法.
package com.zk.controller;
import com.fasterxml.jackson.databind.ObjectMapper;
import com.zk.entity.User;
import com.zk.exception.UserNotFound;
import com.zk.service.UserService;
import org.assertj.core.api.Assertions;
import org.junit.Assert;
import org.junit.Before;
import org.junit.Test;
import org.junit.runner.RunWith;
import org.mockito.InjectMocks;
import org.mockito.Mock;
import org.mockito.junit.MockitoJUnitRunner;
import org.springframework.boot.test.autoconfigure.restdocs.AutoConfigureRestDocs;
import org.springframework.http.HttpStatus;
import org.springframework.http.MediaType;
import org.springframework.mock.web.MockHttpServletResponse;
import org.springframework.test.web.servlet.MockMvc;
import org.springframework.test.web.servlet.setup.MockMvcBuilders;
import static org.mockito.BDDMockito.given;
import static org.springframework.test.web.servlet.request.MockMvcRequestBuilders.get;
//由 Junit 4 启动 Mockito
@RunWith(MockitoJUnitRunner.class)
@AutoConfigureRestDocs
public class MyControllerTest1 {
private MockMvc mvc;
@Mock
// 要 Mock 的类
UserService userService;
@InjectMocks
// Mock 要注入的类
UserController userController;
@Before
public void setUp() {
mvc = MockMvcBuilders.standaloneSetup(userController)
//指定 Exception 处理器
.setControllerAdvice(new UserExceptionAdvice())
//.addFilters(new UserFilter()) //你也可以指定 filter , interceptor 之类的, 看 StandaloneMockMvcBuilder 源码
.build();
}
@Test
public void getUserTest() throws Exception {
// given
User bob = new User().setName("bob").setId(1);
given(userService.getUser(1))
.willReturn(bob);
// when
MockHttpServletResponse response = mvc.perform(
get("/user/1")
.accept(MediaType.APPLICATION_JSON)
)
.andReturn()
.getResponse();
// then
ObjectMapper objectMapper = new ObjectMapper();
Assert.assertEquals(response.getStatus(), HttpStatus.OK.value());
Assert.assertEquals(response.getContentAsString(), objectMapper.writeValueAsString(bob));
}
@Test
public void getUserNotFound() throws Exception {
//given
given(userService.getUser(999))
.willThrow(new UserNotFound());
// when
MockHttpServletResponse response = mvc.perform(
get("/user/999")
.accept(MediaType.APPLICATION_JSON))
.andReturn().getResponse();
// then
Assertions.assertThat(response.getStatus()).isEqualTo(HttpStatus.NOT_FOUND.value());
Assertions.assertThat(response.getContentAsString()).isEmpty();
}
}
加载 spring 框架, 集成测试
这个相对来说最简单的. 也是最符合直觉的,
但就是, 太慢. 要启整个 Spring.
package com.zk.controller;
import com.fasterxml.jackson.databind.ObjectMapper;
import com.zk.entity.User;
import org.junit.Assert;
import org.junit.Test;
import org.junit.runner.RunWith;
import org.springframework.beans.factory.annotation.Autowired;
import org.springframework.boot.test.context.SpringBootTest;
import org.springframework.boot.test.web.client.TestRestTemplate;
import org.springframework.http.HttpStatus;
import org.springframework.http.ResponseEntity;
import org.springframework.test.context.junit4.SpringRunner;
@RunWith(SpringRunner.class)
@SpringBootTest(webEnvironment = SpringBootTest.WebEnvironment.RANDOM_PORT)
public class MyControllerTest2 {
// 要注意, 不要用 RestTemplate,
// 因为 TestRestTemplate 在测试环境里多做了很多事,
// 比如: 帮你自己把当前 host:port 加上了. (尤其是咱们还指定了随机端口)
// 能自动加账号密码,
// ErrorHandler 被设成了 NoOpResponseErrorHandler.
// 最重要的, 能在测试类里一键注入啊...
@Autowired
TestRestTemplate restTemplate;
@Test
public void getUser() throws Exception {
// given
User user = new User().setName("bob").setId(1);
// when
ResponseEntity<User> response = restTemplate.getForEntity("/user/1", User.class);
// then
ObjectMapper objectMapper=new ObjectMapper();
Assert.assertEquals(response.getStatusCode(),HttpStatus.OK);
Assert.assertEquals(
objectMapper.writeValueAsString(response.getBody()),
objectMapper.writeValueAsString(user)
);
}
}
怎么 Mock?
假如我们要替换 UserService 的返回. 但 spring 的 interceptor, AdviceController 之类的都要正常加载咋整.
你可以按上一节的方式,也有更简单的方法.
在 @SpringBootTest 的加成下! 你可以直接使用 @AutoConfigureMockMvc
package com.zk.controller;
import com.fasterxml.jackson.databind.ObjectMapper;
import com.zk.entity.User;
import com.zk.service.UserService;
import org.junit.Test;
import org.junit.runner.RunWith;
import org.springframework.beans.factory.annotation.Autowired;
import org.springframework.boot.test.autoconfigure.web.servlet.AutoConfigureMockMvc;
import org.springframework.boot.test.context.SpringBootTest;
import org.springframework.boot.test.mock.mockito.MockBean;
import org.springframework.http.HttpStatus;
import org.springframework.http.MediaType;
import org.springframework.mock.web.MockHttpServletResponse;
import org.springframework.test.context.junit4.SpringRunner;
import org.springframework.test.web.servlet.MockMvc;
import static org.assertj.core.api.Java6Assertions.assertThat;
import static org.mockito.BDDMockito.given;
import static org.springframework.test.web.servlet.request.MockMvcRequestBuilders.get;
@RunWith(SpringRunner.class)
@SpringBootTest(webEnvironment = SpringBootTest.WebEnvironment.RANDOM_PORT)
// 允许 Mock
@AutoConfigureMockMvc
public class SpringRunner_mock {
@Autowired
MockMvc mvc;
@MockBean
UserService userService;
@Test
public void getUser() throws Exception {
// given
User bob = new User().setName("bob").setId(1);
given(userService.getUser(1))
.willReturn(bob);
// when
MockHttpServletResponse response = mvc.perform(
get("/users/1")
.accept(MediaType.APPLICATION_JSON))
.andReturn().getResponse();
// then
ObjectMapper objectMapper=new ObjectMapper();
assertThat(response.getStatus()).isEqualTo(HttpStatus.OK.value());
assertThat(response.getContentAsString()).isEqualTo(
objectMapper.writeValueAsString(bob)
);
}
}
加载 spring 部分框架(仅自动加载 Controller) 单元测试
通过 @WebMvcTest 指定即可. 你也可以不写指定的 Controller.class ,那你得 Mock 所有 Controller 的依赖才行.
@WebMvcTest 这个注解干的事就多了... 你可以点开源码看一眼, 有没有熟悉的 @AutoConfigureMockMvc
package com.zk.controller;
import com.fasterxml.jackson.databind.ObjectMapper;
import com.zk.entity.User;
import com.zk.service.UserService;
import org.junit.Test;
import org.junit.runner.RunWith;
import org.springframework.beans.factory.annotation.Autowired;
import org.springframework.boot.test.autoconfigure.web.servlet.WebMvcTest;
import org.springframework.boot.test.mock.mockito.MockBean;
import org.springframework.http.HttpStatus;
import org.springframework.http.MediaType;
import org.springframework.mock.web.MockHttpServletResponse;
import org.springframework.test.context.junit4.SpringRunner;
import org.springframework.test.web.servlet.MockMvc;
import static org.assertj.core.api.Assertions.assertThat;
import static org.mockito.BDDMockito.given;
import static org.springframework.test.web.servlet.request.MockMvcRequestBuilders.get;
@RunWith(SpringRunner.class)
@WebMvcTest(UserController.class)
public class SpringRunner_unit_controller_only {
@Autowired
private MockMvc mvc;
// 会自动注入到 controller
@MockBean
private UserService userService;
@Test
public void getUser() throws Exception {
// given
User bob = new User().setName("bob").setId(1);
given(userService.getUser(1))
.willReturn(bob);
// when
MockHttpServletResponse response = mvc.perform(
get("/users/1")
.accept(MediaType.APPLICATION_JSON))
.andReturn().getResponse();
// then
ObjectMapper objectMapper = new ObjectMapper();
assertThat(response.getStatus()).isEqualTo(HttpStatus.OK.value());
assertThat(response.getContentAsString()).isEqualTo(
objectMapper.writeValueAsString(bob)
);
}
}
标签:springframework,SpringBootTest,import,test,org,class From: https://www.cnblogs.com/kelelipeng/p/17602938.html