2022-05-05 346
安装环境
| 主机名 | ip | 角色 |
|---|---|---|
| cs1 | 192.168.43.10 | etcd、patroni、postgresql |
| cs2 | 192.168.43.11 | etcd、patroni、postgresql |
| cs3 | 192.168.43.12 | etcd、patroni、postgresql |
工具简介及功能
Etcd
Etcd是一款基于Raft算法和协议开发的分布式 key-value 数据库,基于Go语言编写,Patroni监控本地的PostgreSQL状态,并将相关信息写入Etcd,每个Patroni都能读写Etcd上的key,从而获取外地PostgreSQL数据库信息。 当Etcd的leader节点不可用时,Etcd会一致性的选择一个合适的节点作为主节点,新的Etcd主节点将获取leader key,因此建议Etcd集群为三个以上且为奇数的节点,不建议部署在同一个机房,有条件话尽量部署在三个机房。 一个标准的3节点etcd集群,最大容许1个节点故障。
Patroni
官网地址:https://patroni.readthedocs.io/en/latest/
Patroni 是一个开源工具套件,它是用 Python编写的,可确保 PostgreSQL HA 集群的端到端设置,包括流复制等。
工作原理
-
每一个 Patroni实例监控和控制本地的PostgreSQL,把本地的PostgreSQL信息状态写入etcd , 一个Patroni实例能够通过读取etcd获取其它PostgreSQL的信息状态。
-
Patroni判断本地PostgreSQL是否可以作为Primary库。如果可以,Paroni试图选举本地PostgreSQL作为Primary(Leader) , 选举方式是:把etcd中的某个key更新成为本地PostgreSQL的名字, 如果多个Paroni同时更改同一个key,只有一个能改成功,然后成为Primary(Leader)。
故障检测机制

在这个图中,数据库是一主两从的流复制架构,节点A是主节点,B和C是从节点。节点A会定期向etcd发送请求以更新领导者密钥,默认情况是10s更新一次(这是由参数loop_wait控制),更新的时候带了一个TTL,前面说过代表着生存时间。这里面有一个公式:
TTL > = loop_wait + retry_timeout * 2
这个机制是这样的,patroni进程每隔10秒(loop_wait)都会更新Leader key还有TTL,如果Leader节点异常导致patroni进程无法及时更新Leader key,则会重新进行2次尝试(retry_timeout)。如果尝试了仍然无效。这个时候时间超过了TTL(生存时间)。领导者密钥就会过期,然后触发新的选举。
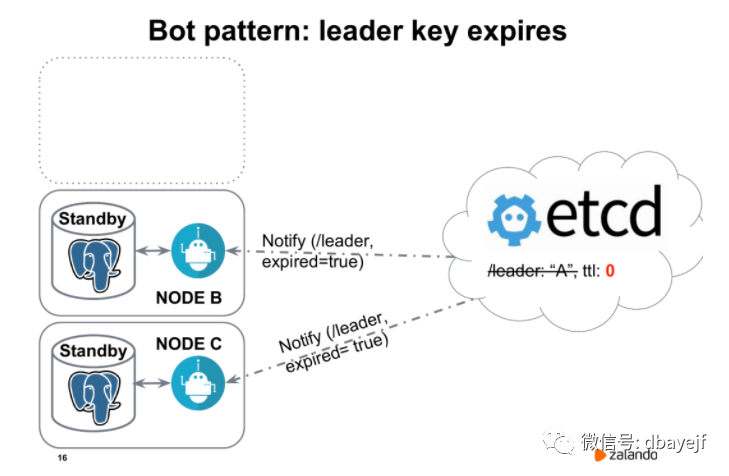
发生新的选举很简单,节点b和节点c此时会收到通知,当前已经没有领导者了,我们必须举行新的选举。
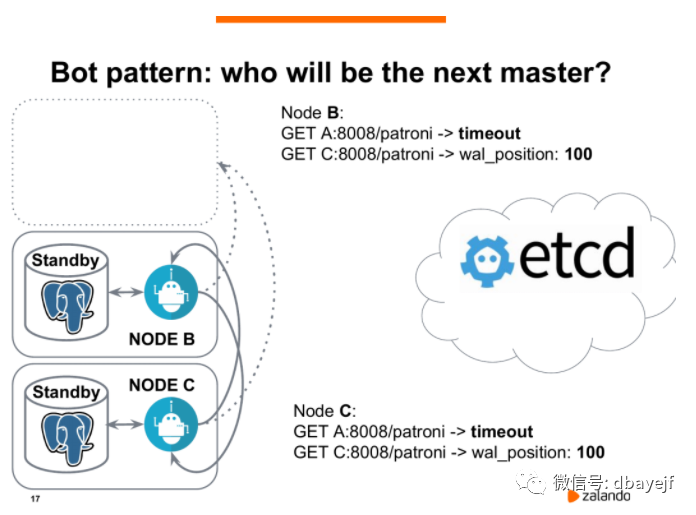
Patroni之间也通过rest api互相访问。他们首先会和曾经的领导者通信,会发现访问超时,然后他们通过rest api访问Patroni进程知道自己的wal_position位置。假设节点b和节点c现在都处于相同的wal_position,都等于100,那么他们会同时访问etcd,发送创建密钥的请求,然后开始领导争夺战。
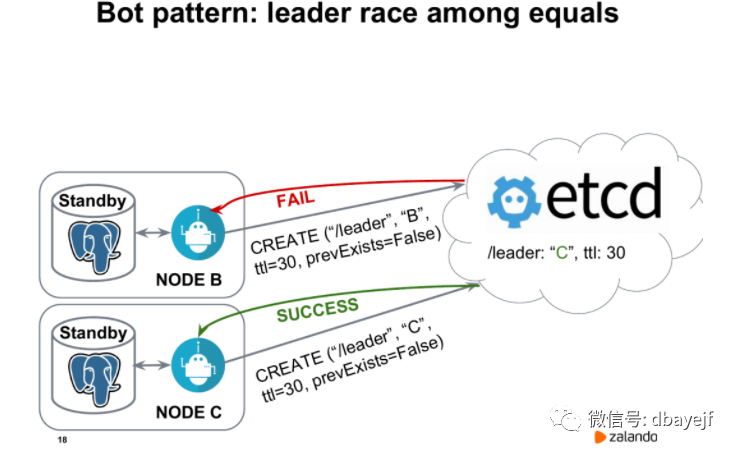
两个节点到etcd之间,Node C率先创建了密钥。Node C上面就执行promote,成为了新的主库,Node B将成为新的从库。它会选择从Node C来进行复制。然后Node C就成为了leader。
安装过程
安装防火墙
systemctl stop firewalld
systemctl disable firewalld
安装需要的包
yum install -y gcc python-devel epel-release
安装etcd
安装软件
yum install -y etcd
编辑etcd配置文件/etc/etcd/etcd.conf
# vim etc/etcd/etcd.conf
ETCD_DATA_DIR="/var/lib/etcd/default.etcd"
ETCD_LISTEN_PEER_URLS="http://0.0.0.0:2380"
ETCD_LISTEN_CLIENT_URLS="http://0.0.0.0:2379"
ETCD_NAME="node1"
ETCD_INITIAL_ADVERTISE_PEER_URLS="http://192.168.43.10:2380"
ETCD_ADVERTISE_CLIENT_URLS="http://192.168.43.10:2379"
ETCD_INITIAL_CLUSTER="node1=http://192.168.43.10:2380,node2=http://192.168.43.11:2380,node3=http://192.168.43.12:2380"
ETCD_INITIAL_CLUSTER_TOKEN="etcd-cluster"
ETCD_INITIAL_CLUSTER_STATE="new"
注意每台机器的ETCD_NAME、ETCD_INITIAL_ADVERTISE_PEER_URLS、ETCD_ADVERTISE_CLIENT_URLS不一样
启动etcd
systemctl start etcd
设置etcd自启动
systemctl enable etcd
etcd常用命令
查看etcd集群成员列表
[root@cs1 ~]# etcdctl member list
ea8762122d5366c: name=node1 peerURLs=http://192.168.43.10:2380 clientURLs=http://192.168.43.10:2379 isLeader=false
bd1144cabc5750cd: name=node3 peerURLs=http://192.168.43.12:2380 clientURLs=http://192.168.43.12:2379 isLeader=true
be14a2308205202c: name=node2 peerURLs=http://192.168.43.11:2380 clientURLs=http://192.168.43.11:2379 isLeader=false
查看etcd集群状态
[root@cs1 ~]# etcdctl --endpoints http://192.168.43.10:2379 cluster-health
member ea8762122d5366c is healthy: got healthy result from http://192.168.43.10:2379
member bd1144cabc5750cd is healthy: got healthy result from http://192.168.43.12:2379
member be14a2308205202c is healthy: got healthy result from http://192.168.43.11:2379
cluster is healthy
etcd基本使用
--设置键值
[root@cs1 ~]# etcdctl set test/key "test"
test
--获取键值
[root@cs2 ~]# etcdctl get test/key
test
--更新键值
[root@cs2 ~]# etcdctl update test/key "test2"
test2
[root@cs1 ~]# etcdctl get test/key
test2
--删除键值
[root@cs1 ~]# etcdctl rm test/key
PrevNode.Value: test2
[root@cs1 ~]# etcdctl get test/key
Error: 100: Key not found (/test/key) [16]
使用帮助
etcdctl help
安装postgresql
安装依赖
yum install -y readline-devel zlib-devel
安装过程
tar -zxvf postgresql-12.4.tar.gz
cd postgresql-12.4
./configure --prefix=/usr/local/pgsql
make && make install
创建用户及数据目录
useradd postgres
passwd postgres
mkdir -p data/pgdata
chown -R postgres:postgres data/pgdata
echo "postgres ALL=(ALL) NOPASSWD:ALL" >>/etc/sudoers
postgres用户添加环境变量
export PATH=/usr/local/pgsql/bin:$PATH;
export LD_LIBRARY_PATH=/usr/local/pgsql/lib
export PGDATA=/data/pgdata
export PGPORT=5432
export PGDATABASE=postgres
安装python3
安装依赖
yum install wget gcc make zlib-devel openssl openssl-devel
安装过程
wget "https://www.python.org/ftp/python/3.6.5/Python-3.6.5.tar.xz"
tar -xvJf Python-3.6.5.tar.xz
cd Python-3.6.5
./configure prefix=/usr/local/python3
make && make install
ln -fs usr/local/python3/bin/python3 usr/bin/python3
ln -fs usr/local/python3/bin/pip3 usr/bin/pip3
验证安装并升级pip3
[root@cs1 Python-3.6.5]# python3 -V
Python 3.6.5
[root@cs1 Python-3.6.5]# pip3 -V
pip 9.0.3 from usr/local/python3/lib/python3.6/site-packages (python 3.6)

[root@cs1 Python-3.6.5]# pip3 install --upgrade pip
Collecting pip
Downloading https://files.pythonhosted.org/packages/a4/6d/6463d49a933f547439d6b5b98b46af8742cc03ae83543e4d7688c2420f8b/pip-21.3.1-py3-none-any.whl (1.7MB)
  100% |████████████████████████████████| 1.7MB 188kB/s
Installing collected packages: pip
Found existing installation: pip 9.0.3
  Uninstalling pip-9.0.3:
    Successfully uninstalled pip-9.0.3
Successfully installed pip-21.3.1
[root@cs1 Python-3.6.5]# pip3 -V
pip 21.3.1 from usr/local/python3/lib/python3.6/site-packages/pip (python 3.6)
Patroni 安装
pip3 install psycopg2-binary -i https://mirrors.aliyun.com/pypi/simple/
pip3 install patroni[etcd] -i https://mirrors.aliyun.com/pypi/simple/
ln -fs usr/local/python3/bin/patroni usr/bin/patroni
ln -fs usr/local/python3/bin/patronictl usr/bin/patronictl
验证安装
[root@cs1 postgresql-12.4]# patroni --version
patroni 2.1.2
配置文件
编辑配置文件/etc/patroni.yml
# vim etc/patroni.yml
scope: pgsql
namespace: /service/
name: cs1

restapi:
listen: 0.0.0.0:8008
connect_address: 192.168.43.10:8008

etcd:
host: 192.168.43.10:2379
host: 192.168.43.11:2379
host: 192.168.43.12:2379

bootstrap:
dcs:
  ttl: 30
  loop_wait: 10
  retry_timeout: 10
  maximum_lag_on_failover: 1048576
  master_start_timeout: 300
  synchronous_mode: false
  postgresql:
    use_pg_rewind: true
    use_slots: true
    parameters:
      listen_addresses: "0.0.0.0"
      port: 5432
      wal_level: logical
      hot_standby: "on"
      wal_keep_segments: 100
      max_wal_senders: 10
      max_replication_slots: 10
      wal_log_hints: "on"

initdb:
- encoding: UTF8
- locale: C
- lc-ctype: zh_CN.UTF-8
- data-checksums

pg_hba:
- host replication repl 0.0.0.0/0 md5
- host all all 0.0.0.0/0 md5

postgresql:
listen: 0.0.0.0:5432
connect_address: 192.168.43.10:5432
data_dir: /data/pgdata
bin_dir: /usr/local/pgsql/bin

authentication:
  replication:
    username: repl
    password: "repl"
  superuser:
    username: postgres
    password: "postgres"

basebackup:
  max-rate: 100M
  checkpoint: fast

tags:
  nofailover: false
  noloadbalance: false
  clonefrom: false
  nosync: false
其中每台机器的name、restapi.connect_address、postgresql.connect_address不一样
包括全局参数、restapi模块参数、etcd模块参数、bootstrap启动参数、postgresql模块参数,主要参数解释如下:
-
scope: 标记cluster名称,同 postgresql.conf 的 cluster_name 参数,二级目录名:
/<namespace>/<scope>/config
。 -
namespace: 一级目录名:
/<namespace>/<scope>/config
。 -
name: patroni节点名称。
更多参数解释详见: YAML Configuration Settings。
启动patroni
启动patroni集群需非root用户
/usr/local/python3/bin/patroni etc/patroni.yml > patroni_cs1.log 2>&1 &
或者使用centos7的service启动
编辑配置文件 etc/systemd/system/patroni.service
[Unit]
Description=Runners to orchestrate a high-availability PostgreSQL
After=syslog.target network.target

[Service]
Type=simple
User=postgres
Group=postgres
#StandardOutput=syslog
ExecStart=/usr/bin/patroni etc/patroni.yml
ExecReload=/bin/kill -s HUP $MAINPID
KillMode=process
TimeoutSec=30
Restart=no

[Install]
WantedBy=multi-user.target
启动
systemctl start patroni
systemctl status patroni
启动集群
cs1成功启动patroni后,会对数据库进行初始化,并创建配置文件中指定的用户postgres,repl
[postgres@cs1 ~]$ systemctl start patroni
[postgres@cs1 ~]$ systemctl status patroni
● patroni.service - Runners to orchestrate a high-availability PostgreSQL
  Loaded: loaded (/etc/systemd/system/patroni.service; disabled; vendor preset: disabled)
  Active: active (running) since 四 2022-01-06 11:21:31 CST; 12min ago
Main PID: 45853 (patroni)
  CGroup: system.slice/patroni.service
          ├─45853 usr/local/python3/bin/python3.6 usr/bin/patroni etc/patroni.yml
          ├─46000 usr/local/pgsql/bin/postgres -D data/pgdata --config-file=/data/pgdata/postgresql.conf --listen_addresses=0.0.0.0 --port=5432 --cluster_name=pgsql --wal_level=logical --hot_standby=...
          ├─46003 postgres: pgsql: checkpointer
          ├─46004 postgres: pgsql: background writer
          ├─46005 postgres: pgsql: walwriter
          ├─46006 postgres: pgsql: autovacuum launcher
          ├─46007 postgres: pgsql: stats collector
          ├─46008 postgres: pgsql: logical replication launcher
          ├─46012 postgres: pgsql: postgres postgres 127.0.0.1(46932) idle
          └─46465 postgres: pgsql: postgres postgres [local] idle
cs2启动patroni,使用basebackup以cs1为主创建备实例
[root@cs2 pgdata]# systemctl start patroni
[root@cs2 pgdata]# systemctl status patroni
● patroni.service - Runners to orchestrate a high-availability PostgreSQL
  Loaded: loaded (/etc/systemd/system/patroni.service; disabled; vendor preset: disabled)
  Active: active (running) since 四 2022-01-06 11:38:24 CST; 20s ago
Main PID: 50055 (patroni)
  CGroup: system.slice/patroni.service
          ├─50055 usr/local/python3/bin/python3.6 usr/bin/patroni etc/patroni.yml
          ├─50074 usr/local/pgsql/bin/postgres -D data/pgdata --config-file=/data/pgdata/postgresql.conf --listen_addresses=0.0.0.0 --port=5432 --cluster_name=pgsql --wal_level=logical --hot_standby=...
          ├─50076 postgres: pgsql: startup   recovering 00000001000000000000000B
          ├─50079 postgres: pgsql: checkpointer
          ├─50080 postgres: pgsql: background writer
          ├─50081 postgres: pgsql: stats collector
          ├─50082 postgres: pgsql: walreceiver   streaming 0/B000060
          └─50084 postgres: pgsql: postgres postgres 127.0.0.1(40712) idle

1月 06 11:38:25 cs2 patroni[50055]: 2022-01-06 11:38:25.023 CST [50076] LOG: redo starts at 0/A000028
1月 06 11:38:25 cs2 patroni[50055]: 2022-01-06 11:38:25.023 CST [50076] LOG: consistent recovery state reached at 0/B000000
1月 06 11:38:25 cs2 patroni[50055]: 2022-01-06 11:38:25.024 CST [50074] LOG: database system is ready to accept read only connections
1月 06 11:38:25 cs2 patroni[50055]: localhost:5432 - accepting connections
1月 06 11:38:25 cs2 patroni[50055]: 2022-01-06 11:38:25.031 CST [50082] LOG: started streaming WAL from primary at 0/B000000 on timeline 1
1月 06 11:38:25 cs2 patroni[50055]: 2022-01-06 11:38:25,036 INFO: Lock owner: cs1; I am cs2
1月 06 11:38:25 cs2 patroni[50055]: 2022-01-06 11:38:25,036 INFO: establishing a new patroni connection to the postgres cluster
1月 06 11:38:25 cs2 patroni[50055]: 2022-01-06 11:38:25,051 INFO: no action. I am (cs2), a secondary, and following a leader (cs1)
1月 06 11:38:29 cs2 patroni[50055]: 2022-01-06 11:38:29,041 INFO: no action. I am (cs2), a secondary, and following a leader (cs1)
1月 06 11:38:39 cs2 patroni[50055]: 2022-01-06 11:38:39,041 INFO: no action. I am (cs2), a secondary, and following a leader (cs1)
cs3启动patroni
[root@cs3 pgdata]# systemctl start patroni
[root@cs3 pgdata]# systemctl status patroni
● patroni.service - Runners to orchestrate a high-availability PostgreSQL
  Loaded: loaded (/etc/systemd/system/patroni.service; disabled; vendor preset: disabled)
  Active: active (running) since 四 2022-01-06 11:51:34 CST; 17s ago
Main PID: 44135 (patroni)
  CGroup: system.slice/patroni.service
          ├─44135 usr/local/python3/bin/python3.6 usr/bin/patroni etc/patroni.yml
          ├─44150 usr/local/pgsql/bin/postgres -D data/pgdata --config-file=/data/pgdata/postgresql.conf --listen_addresses=0.0.0.0 --port=5432 --cluster_name=pgsql --wal_level=logical --hot_standby=...
          ├─44152 postgres: pgsql: startup   recovering 000000010000000000000011
          ├─44156 postgres: pgsql: checkpointer
          ├─44157 postgres: pgsql: background writer
          ├─44158 postgres: pgsql: stats collector
          ├─44164 postgres: pgsql: postgres postgres 127.0.0.1(53640) idle
          └─44168 postgres: pgsql: walreceiver   streaming 0/11000060

1月 06 11:51:35 cs3 patroni[44135]: 2022-01-06 11:51:35.626 CST [44150] LOG: database system is ready to accept read only connections
1月 06 11:51:36 cs3 patroni[44135]: localhost:5432 - accepting connections
1月 06 11:51:36 cs3 patroni[44135]: 2022-01-06 11:51:36,636 INFO: Lock owner: cs1; I am cs3
1月 06 11:51:36 cs3 patroni[44135]: 2022-01-06 11:51:36,636 INFO: establishing a new patroni connection to the postgres cluster
1月 06 11:51:36 cs3 patroni[44135]: 2022-01-06 11:51:36,653 INFO: no action. I am (cs3), a secondary, and following a leader (cs1)
1月 06 11:51:39 cs3 patroni[44135]: 2022-01-06 11:51:39,039 INFO: no action. I am (cs3), a secondary, and following a leader (cs1)
1月 06 11:51:40 cs3 patroni[44135]: 2022-01-06 11:51:40.645 CST [44168] LOG: started streaming WAL from primary at 0/11000000 on timeline 1
1月 06 11:51:49 cs3 patroni[44135]: 2022-01-06 11:51:49,043 INFO: no action. I am (cs3), a secondary, and following a leader (cs1)
从主实例上可以看到两个备实例的信息
postgres=# select * from pg_stat_replication ;
-[ RECORD 1 ]----+------------------------------
pid             | 46909
usesysid         | 16384
usename         | repl
application_name | cs2
client_addr     | 192.168.43.11
client_hostname |
client_port     | 41906
backend_start   | 2022-01-06 11:38:25.028374+08
backend_xmin     |
state           | streaming
sent_lsn         | 0/11000060
write_lsn       | 0/11000060
flush_lsn       | 0/11000060
replay_lsn       | 0/11000060
write_lag       |
flush_lag       |
replay_lag       |
sync_priority   | 0
sync_state       | async
reply_time       | 2022-01-06 11:53:06.76385+08
-[ RECORD 2 ]----+------------------------------
pid             | 47719
usesysid         | 16384
usename         | repl
application_name | cs3
client_addr     | 192.168.43.12
client_hostname |
client_port     | 51534
backend_start   | 2022-01-06 11:51:40.641628+08
backend_xmin     |
state           | streaming
sent_lsn         | 0/11000060
write_lsn       | 0/11000060
flush_lsn       | 0/11000060
replay_lsn       | 0/11000060
write_lag       |
flush_lag       |
replay_lag       |
sync_priority   | 0
sync_state       | async
reply_time       | 2022-01-06 11:53:00.830284+08
Patroni日常运维
查看集群状态
[postgres@cs1 ~]$ patronictl -c etc/patroni.yml list
+--------+---------------+---------+---------+----+-----------+
| Member | Host         | Role   | State   | TL | Lag in MB |
+ Cluster: pgsql (7049928661691114408) ------+----+-----------+
| cs1   | 192.168.43.10 | Leader | running | 4 |           |
| cs2   | 192.168.43.11 | Replica | running | 4 |         0 |
| cs3   | 192.168.43.12 | Replica | running | 4 |         0 |
+--------+---------------+---------+---------+----+-----------+
或者
[postgres@cs1 ~]$ export PATRONICTL_CONFIG_FILE=/etc/patroni.yml
[postgres@cs1 ~]$ patronictl list
+--------+---------------+---------+---------+----+-----------+
| Member | Host         | Role   | State   | TL | Lag in MB |
+ Cluster: pgsql (7049928661691114408) ------+----+-----------+
| cs1   | 192.168.43.10 | Leader | running | 4 |           |
| cs2   | 192.168.43.11 | Replica | running | 4 |         0 |
| cs3   | 192.168.43.12 | Replica | running | 4 |         0 |
+--------+---------------+---------+---------+----+-----------+
或者通过patroni接口
[postgres@cs1 ~]$ curl -L http://192.168.43.10:8008/
{"state": "running", "postmaster_start_time": "2022-01-07 11:15:35.582231+08:00", "role": "master", "server_version": 120004, "xlog": {"location": 285420392}, "timeline": 4, "replication": [{"usename": "repl", "application_name": "cs3", "client_addr": "192.168.43.12", "state": "streaming", "sync_state": "async", "sync_priority": 0}, {"usename": "repl", "application_name": "cs2", "client_addr": "192.168.43.11", "state": "streaming", "sync_state": "async", "sync_priority": 0}], "dcs_last_seen": 1641535835, "database_system_identifier": "7049928661691114408", "patroni": {"version": "2.1.2", "scope": "pgsql"}}
或者通过etcd接口
[postgres@cs1 ~]$ etcdctl ls --recursive --sort -p service
/service/pgsql/
/service/pgsql/config
/service/pgsql/history
/service/pgsql/initialize
/service/pgsql/leader
/service/pgsql/members/
/service/pgsql/members/cs1
/service/pgsql/members/cs2
/service/pgsql/members/cs3
/service/pgsql/status
[postgres@cs1 ~]$
[postgres@cs1 ~]$ etcdctl get service/pgsql/members/cs1
{"conn_url":"postgres://192.168.43.10:5432/postgres","api_url":"http://192.168.43.10:8008/patroni","state":"running","role":"master","version":"2.1.2","xlog_location":285420392,"timeline":4}
切换主实例
把原cs1是主的切换到cs3
[postgres@cs1 ~]$ patronictl -d etcd://192.168.43.11:2379 switchover pgsql
Master [cs1]:
Candidate ['cs2', 'cs3'] []: cs2
When should the switchover take place (e.g. 2022-01-07T15:14 ) [now]:
Current cluster topology
+--------+---------------+---------+---------+----+-----------+
| Member | Host         | Role   | State   | TL | Lag in MB |
+ Cluster: pgsql (7049928661691114408) ------+----+-----------+
| cs1   | 192.168.43.10 | Leader | running | 4 |           |
| cs2   | 192.168.43.11 | Replica | running | 4 |         0 |
| cs3   | 192.168.43.12 | Replica | running | 4 |         0 |
+--------+---------------+---------+---------+----+-----------+
Are you sure you want to switchover cluster pgsql, demoting current master cs1? [y/N]: y
2022-01-07 14:14:49.30555 Successfully switched over to "cs2"
+--------+---------------+---------+---------+----+-----------+
| Member | Host         | Role   | State   | TL | Lag in MB |
+ Cluster: pgsql (7049928661691114408) ------+----+-----------+
| cs1   | 192.168.43.10 | Replica | stopped |   |   unknown |
| cs2   | 192.168.43.11 | Leader | running | 4 |           |
| cs3   | 192.168.43.12 | Replica | running | 4 |         0 |
+--------+---------------+---------+---------+----+-----------+

[postgres@cs1 ~]$ patronictl list
+--------+---------------+---------+---------+----+-----------+
| Member | Host         | Role   | State   | TL | Lag in MB |
+ Cluster: pgsql (7049928661691114408) ------+----+-----------+
| cs1   | 192.168.43.10 | Replica | running | 5 |         0 |
| cs2   | 192.168.43.11 | Leader | running | 5 |           |
| cs3   | 192.168.43.12 | Replica | running | 5 |         0 |
+--------+---------------+---------+---------+----+-----------+

[postgres@cs1 ~]$ psql
psql (12.4)
Type "help" for help.

postgres=# select pg_is_in_recovery();
pg_is_in_recovery
-------------------
t
(1 row)
禁用开启故障转移
[postgres@cs1 ~]$ patronictl pause
Success: cluster management is paused
重启cs1服务器,其它实例状态过程日志
[postgres@cs2 ~]$ patronictl -c etc/patroni.yml list
+--------+---------------+---------+---------+----+-----------+
| Member | Host         | Role   | State   | TL | Lag in MB |
+ Cluster: pgsql (7049928661691114408) ------+----+-----------+
| cs1   | 192.168.43.10 | Replica | stopped |   |   unknown |
| cs2   | 192.168.43.11 | Replica | running | 6 |         0 |
| cs3   | 192.168.43.12 | Replica | running | 6 |         0 |
+--------+---------------+---------+---------+----+-----------+
恢复故障转移切换,主实例自动切换到cs3
[postgres@cs1 ~]$ patronictl -c etc/patroni.yml resume
Success: cluster management is resumed

[postgres@cs1 ~]$ patronictl -c etc/patroni.yml list
+--------+---------------+---------+---------+----+-----------+
| Member | Host         | Role   | State   | TL | Lag in MB |
+ Cluster: pgsql (7049928661691114408) ------+----+-----------+
| cs1   | 192.168.43.10 | Replica | running | 7 |         0 |
| cs2   | 192.168.43.11 | Replica | running | 7 |         0 |
| cs3   | 192.168.43.12 | Leader | running | 7 |           |
+--------+---------------+---------+---------+----+-----------+
修改集群所有实例配置参数
修改连接数并重启集群
patronictl -c etc/patroni.yml edit-config -p 'max_connections=250'
实操示例
[postgres@cs1 ~]$ psql
psql (12.4)
Type "help" for help.

postgres=# show max_connections ;
max_connections
-----------------
100
(1 row)

postgres=# \q
[postgres@cs1 ~]$ patronictl -c etc/patroni.yml edit-config -p 'max_connections=200'
---
+++
@@ -5,6 +5,7 @@
  parameters:
    hot_standby: 'on'
    listen_addresses: 0.0.0.0
+   max_connections: 200
    max_replication_slots: 10
    max_wal_senders: 10
    port: 5432

Apply these changes? [y/N]: y
Configuration changed


[postgres@cs1 ~]$ patronictl -c etc/patroni.yml restart pgsql
+--------+---------------+---------+---------+----+-----------+-----------------+
| Member | Host         | Role   | State   | TL | Lag in MB | Pending restart |
+ Cluster: pgsql (7049928661691114408) ------+----+-----------+-----------------+
| cs1   | 192.168.43.10 | Leader | running | 4 |           | *               |
| cs2   | 192.168.43.11 | Replica | running | 4 |         0 | *               |
| cs3   | 192.168.43.12 | Replica | running | 4 |         0 | *               |
+--------+---------------+---------+---------+----+-----------+-----------------+
When should the restart take place (e.g. 2022-01-07T12:15) [now]:
Are you sure you want to restart members cs1, cs3, cs2? [y/N]: y
Restart if the PostgreSQL version is less than provided (e.g. 9.5.2) []:
Success: restart on member cs1
Success: restart on member cs3
Success: restart on member cs2

[postgres@cs2 ~]$ psql
psql (12.4)
Type "help" for help.

postgres=# show max_connections ;
max_connections
-----------------
200
(1 row)
修改work_mem并重新加载配置
[postgres@cs1 pgdata]$ patronictl -c etc/patroni.yml edit-config -p 'work_mem=102400'
---
+++
@@ -13,6 +13,7 @@
    wal_keep_segments: 100
    wal_level: logical
    wal_log_hints: 'on'
+   work_mem: 102400
  use_pg_rewind: true
  use_slots: true
retry_timeout: 10

Apply these changes? [y/N]: y
Configuration changed
[postgres@cs1 pgdata]$ patronictl -c etc/patroni.yml reload pgsql
+--------+---------------+---------+---------+----+-----------+-----------------+
| Member | Host         | Role   | State   | TL | Lag in MB | Pending restart |
+ Cluster: pgsql (7049928661691114408) ------+----+-----------+-----------------+
| cs1   | 192.168.43.10 | Leader | running | 20 |           | *               |
| cs2   | 192.168.43.11 | Replica | running | 20 |         0 | *               |
| cs3   | 192.168.43.12 | Replica | running | 20 |         0 | *               |
+--------+---------------+---------+---------+----+-----------+-----------------+
Are you sure you want to reload members cs3, cs2, cs1? [y/N]: y
Reload request received for member cs3 and will be processed within 10 seconds
Reload request received for member cs2 and will be processed within 10 seconds
Reload request received for member cs1 and will be processed within 10 seconds
脑裂问题
Patroni在主库故障时会自动执行failover,确保服务的高可用。但是自动failover如果控制不当会有产生脑裂的风险。因此Patroni在保障服务的可用性和防止脑裂的双重目标下会在特定场景下执行一些自动化动作。
| 故障位置 | 场景 | Patroni的动作 |
|---|---|---|
| 备库 | 备库PG停止 | 停止备库PG |
| 备库 | 停止备库Patroni | 停止备库PG |
| 备库 | 强杀备库Patroni(或Patroni crash) | 无操作 |
| 备库 | 备库无法连接etcd | 无操作 |
| 备库 | 非Leader角色但是PG处于生产模式 | 重启PG并切换到恢复模式作为备库运行 |
| 主库 | 主库PG停止 | 重启PG,重启超过master_start_timeout设定时间,进行主备切换 |
| 主库 | 停止主库Patroni | 停止主库PG,并触发failover |
| 主库 | 强杀主库Patroni(或Patroni crash) | 触发failover,此时出现"双主" |
| 主库 | 主库无法连接etcd | 将主库降级为备库,并触发failover |
| - | etcd集群故障 | 将主库降级为备库,此时集群中全部都是备库。 |
| - | 同步模式下无可用同步备库 | 临时切换主库为异步复制,在恢复为同步复制之前自动failover暂不生效 |
部署在数据库节点上的patroni进程会执行一些保护操作,确保不会出现多个“主库”
-
非Leader节点的PG处于生产模式时,重启PG并切换到恢复模式作为备库运行
-
Leader节点的patroni无法连接etcd时,不能确保自己仍然是Leader,将本机的PG降级为备库
-
正常停止patroni时,patroni会顺便把本机的PG进程也停掉
可以通过一些措施来避免:
-
Patroni支持通过Linux的watchdog监视patroni进程的运行,当patroni进程无法正常往watchdog设备写入心跳时,由watchdog触发Linux重启。
这方案有两个缺点:
-
不能100%保证
-
直接重启机器的暴力操作
-
利用pg的同步复制
在Patroni配置文件
/etc/patroni.yml
中设置同步模式synchronous_mode:true
对于已部署的Patroni可以通过patronictl命令修改配置
patronictl edit-config -s 'synchronous_mode=true'
此配置下,如果同步备库临时不可用,Patroni会把主库的复制模式降级成了异步复制,确保服务不中断。 如果主库没有被降级为异步复制,那么即使出现“双主”,由于旧主处于同步复制模式,数据无法被写入,也不会出现“双写”。
适合只有一主一备的集群中
如果集群中包含3个以上的节点,还可以考虑采取更严格的同步策略,禁止Patroni把同步模式降级为异步
synchronous_mode:true
synchronous_mode_strict:true
如果集群包含异地的灾备节点,可以根据需要配置该节点为不参与选主,不参与负载均衡,也不作为同步备库。
tags:
  nofailover: true
  noloadbalance: true
  clonefrom: false
nosync: true -
调整etcd的连接超时
当Patroni无法访问etcd时,将不能确认自己所处的角色。为了防止这种状态下产生脑裂,如果本机的PG是主库,Patroni会把PG降级为备库。如果集群中所有Patroni节点都无法访问etcd,集群中将全部都是备库,业务无法写入数据。
当我们使用集中式的一套etcd集群管理很多套PG集群时,为了预防etcd集群故障带来的严重影响,可以考虑设置超大的
retry_timeout
参数,比如1万天,同时通过同步复制模式防止脑裂。retry_timeout:864000000
synchronous_mode:trueVIP实现
通过Patroni回调脚本实现VIP漂移
Patroni支持用户配置在特定事件发生时触发回调脚本。因此我们可以配置一个回调脚本,在主备切换后动态加载VIP。
这里是官方文档的说明
https://patroni.readthedocs.io/en/latest/SETTINGS.html?highlight=callbacks#postgresql
准备加载VIP的回调脚本/usr/local/pgsql/loadvip.sh
#!/bin/bash
登录后复制
VIP=192.168.43.9
GATEWAY=192.168.43.2
DEV=ens33
action=$1
role=$2
cluster=$3
log()
{
echo "loadvip: $*"|logger #日志打印到系统/var/log/messages
#echo "loadvip: $*"
}
load_vip()
{
ip a|grep -w ${DEV}|grep -w ${VIP} >/dev/null
if [ $? -eq 0 ] ;then
log "vip exists, skip load vip"
else
sudo ip addr add ${VIP}/32 dev ${DEV} >/dev/null
rc=$?
if [ $rc -ne 0 ] ;then
log "fail to add vip ${VIP} at dev ${DEV} rc=$rc"
exit 1
fi
log "added vip ${VIP} at dev ${DEV}"
arping -U -I ${DEV} -s ${VIP} ${GATEWAY} -c 5 >/dev/null
rc=$?
if [ $rc -ne 0 ] ;then
log "fail to call arping to gateway ${GATEWAY} rc=$rc"
exit 1
fi
log "called arping to gateway ${GATEWAY}"
fi
}
unload_vip()
{
ip a|grep -w ${DEV}|grep -w ${VIP} >/dev/null
if [ $? -eq 0 ] ;then
sudo ip addr del ${VIP}/32 dev ${DEV} >/dev/null
rc=$?
if [ $rc -ne 0 ] ;then
log "fail to delete vip ${VIP} at dev ${DEV} rc=$rc"
exit 1
fi
log "deleted vip ${VIP} at dev ${DEV}"
else
log "vip not exists, skip delete vip"
fi
}
log "loadvip start args:'$*'"
case $action in
on_start|on_restart|on_role_change)
case $role in
master)
load_vip
;;
replica)
unload_vip
;;
*)
log "wrong role '$role'"
exit 1
;;
esac
;;
*)
log "wrong action '$action'"
exit 1
;;
esac修改Patroni配置文件
/etc/patroni.yml
,配置回调函数postgresql:
...
callbacks:
on_start: /bin/bash usr/local/pgsql/loadvip.sh
on_restart: /bin/bash usr/local/pgsql/loadvip.sh
on_role_change: /bin/bash usr/local/pgsql/loadvip.sh所有节点的Patroni配置文件都修改后,重新加载Patroni配置文件
注意每个机器配置文件不一样,不能覆盖
patronictl -c etc/patroni.yml reload pgsql
重启cs1上的patroni服务
[root@cs1 pgsql]# systemctl restart patroni
可以看到日志,cs2切换成主了,cs1会删除vip,cs2会增加vip
[root@cs1 pgsql]# tail -100f var/log/messages|grep loadvip
Apr 25 14:54:22 cs1 postgres: loadvip: loadvip start args:'on_start replica pgsql'
Apr 25 14:54:22 cs1 postgres: loadvip: vip not exists, skip delete vip

[root@cs2 ~]# tail -100f var/log/messages|grep loadvip
Apr 25 14:54:20 cs2 postgres: loadvip: loadvip start args:'on_role_change master pgsql'
Apr 25 14:54:20 cs2 postgres: loadvip: added vip 192.168.43.9 at dev ens33
Apr 25 14:54:24 cs2 postgres: loadvip: called arping to gateway 192.168.43.2

[postgres@cs3 ~]$ patronictl -c etc/patroni.yml list
+--------+--------------------+---------+---------+----+-----------+
| Member | Host               | Role   | State   | TL | Lag in MB |
+ Cluster: pgsql (7049928661691114408) -+---------+----+-----------+
| cs1   | 192.168.43.10:5432 | Replica | running | 8 |         0 |
| cs2   | 192.168.43.10:5432 | Leader | running | 9 |           |
| cs3   | 192.168.43.10:5432 | Replica | running | 8 |         0 |
+--------+--------------------+---------+---------+----+-----------+
通过keepalived实现VIP漂移
Patroni提供了用于健康检查的REST API,可以根据节点角色返回正常(200)和异常的HTTP状态码
-
GET
或GET leader运行中且是leader节点
-
GET replica运行中且是replica角色,且没有设置tag noloadbalance
-
GET read-only和
GET replica
类似,但是包含leader节点
使用REST API,Patroni可以和外部组件搭配使用。比如可以配置keepalived动态在主库或备库上绑VIP。
关于Patroni的REST API接口详细,参考Patroni REST API。
下面的例子在一主一备集群(node1和node2)中动态在备节点上绑只读VIP(192.168.234.211),当备节点故障时则将只读VIP绑在主节点上。
安装keepalived
yum install -y keepalived
准备keepalived配置文件
/etc/keepalived/keepalived.confglobal_defs {
router_id LVS_DEVEL
}
vrrp_script check_leader {
script "/usr/bin/curl -s http://127.0.0.1:8008/leader -v 2>&1|grep '200 OK' >/dev/null"
interval 2
weight 10
}
vrrp_script check_replica {
script "/usr/bin/curl -s http://127.0.0.1:8008/replica -v 2>&1|grep '200 OK' >/dev/null"
interval 2
weight 5
}
vrrp_script check_can_read {
script "/usr/bin/curl -s http://127.0.0.1:8008/read-only -v 2>&1|grep '200 OK' >/dev/null"
interval 2
weight 10
}
vrrp_instance VI_1 {
state BACKUP
interface ens33
virtual_router_id 211
priority 100
advert_int 1
track_script {
check_can_read
check_replica
}
virtual_ipaddress {
192.168.43.55
}
}启动keepalived
systemctl start keepalived
上面的配置方法也可以用于读写vip的漂移,只要把
track_script
中的脚本换成check_leader
即可。但是在网络抖动或其它临时故障时keepalived管理的VIP容易飘,因此个人更推荐使用Patroni回调脚本动态绑定读写VIPhaproxy实现读写分离和负载匀衡
haproxy作为服务代理和Patroni配套使用可以很方便地支持failover,读写分离和负载均衡,也是Patroni社区作为Demo的方案。缺点是haproxy本身也会占用资源,所有数据流量都经过haproxy,性能上会有一定损耗。
下面配置通过haproxy访问一主两备PG集群的例子。
安装haproxy
在cs2和cs3机器安装
yum install -y haproxy
编辑haproxy配置文件
/etc/haproxy/haproxy.cfgglobal
maxconn 100
log 127.0.0.1 local2
defaults
log global
mode tcp
retries 2
timeout client 30m
timeout connect 4s
timeout server 30m
timeout check 5s
listen stats
mode http
bind *:7000
stats enable
stats uri /
listen pgsql
bind *:5000
option httpchk
http-check expect status 200
default-server inter 3s fall 3 rise 2 on-marked-down shutdown-sessions
server cs1 192.168.43.11:5432 maxconn 100 check port 8008
server cs2 192.168.43.12:5432 maxconn 100 check port 8008
server cs3 192.168.43.13:5432 maxconn 100 check port 8008
listen pgsql_read
bind *:6000
option httpchk GET /replica
http-check expect status 200
default-server inter 3s fall 3 rise 2 on-marked-down shutdown-sessions
server cs1 192.168.43.11:5432 maxconn 100 check port 8008
server cs2 192.168.43.12:5432 maxconn 100 check port 8008
server cs3 192.168.43.13:5432 maxconn 100 check port 8008如果只有2个节点,上面的
GET /replica
需要改成GET /read-only
,否则备库故障时就无法提供只读访问了,但是这样配置主库也会参与读,不能完全分离主库的读负载。启动haproxy
systemctl start haproxy
启动失败:
处理:
关闭selinux
setsebool -P haproxy_connect_any=1
修改/etc/sysctl.conf
net.ipv4.ip_nonlocal_bind = 1 #启动haproxy的时候,允许忽视VIP的存在
net.ipv4.ip_forward = 1       #打开内核的转发功能
haproxy自身也需要高可用,通过keepalived控制VIP(192.168.43.5)在cs2和cs3上漂移。
准备keepalived配置文件
/etc/keepalived/keepalived.confglobal_defs {
router_id LVS_DEVEL
}
vrrp_script check_haproxy {
script "killall -0 haproxy"
interval 2
weight 10
}
vrrp_instance VI_1 {
state BACKUP
interface ens33
virtual_router_id 210
priority 100
advert_int 1
track_script {
check_haproxy
}
virtual_ipaddress {
192.168.43.5
}
}启动keepalive
systemctl start keepalived
systemctl status keepalived
验证
[postgres@cs3 pgdata]$ ip a
1: lo: <LOOPBACK,UP,LOWER_UP> mtu 65536 qdisc noqueue state UNKNOWN group default qlen 1000
  link/loopback 00:00:00:00:00:00 brd 00:00:00:00:00:00
  inet 127.0.0.1/8 scope host lo
      valid_lft forever preferred_lft forever
  inet6 ::1/128 scope host
      valid_lft forever preferred_lft forever
2: ens33: <BROADCAST,MULTICAST,UP,LOWER_UP> mtu 1500 qdisc pfifo_fast state UP group default qlen 1000
  link/ether 00:0c:29:7e:25:09 brd ff:ff:ff:ff:ff:ff
  inet 192.168.43.12/24 brd 192.168.43.255 scope global noprefixroute ens33
      valid_lft forever preferred_lft forever
  inet 192.168.43.5/32 scope global ens33
      valid_lft forever preferred_lft forever
  inet6 fe80::5556:ff82:e50d:99ac/64 scope link noprefixroute
      valid_lft forever preferred_lft forever
[postgres@cs3 pgdata]$ psql "host=192.168.43.5 port=6000 dbname=postgres user=postgres password=postgres" -c "select pg_is_in_recovery()"
pg_is_in_recovery
-------------------
t
(1 row)
参考文档
https://zhuanlan.zhihu.com/p/260958352
https://mp.weixin.qq.com/s/ou2y29B0EgAhESTGnNAqTw
https://www.cnblogs.com/VicLiu/p/14333778.html -