一、简介

1.前置知识
● Java17
● Spring、SpringMVC、MyBatis
● Maven、IDEA
2.环境要求
| 环境&工具 | 版本(or later) |
|---|---|
| SpringBoot | 3.1.x |
| IDEA | 2023.x |
| Java | 17+ |
| Maven | 3.5+ |
| Tomcat | 10.0+ |
| Servlet | 5.0+ |
| GraalVM Community | 22.3+ |
| Native Build Tools | 0.9.19+ |
二、SpringBoot3-基础特性
1. SpringApplication
1.1. 自定义 banner
- 类路径添加banner.txt或设置spring.banner.location就可以定制 banner
- 推荐网站:Spring Boot banner 在线生成工具,制作下载英文 banner.txt,修改替换 banner.txt 文字实现自定义,个性化启动 banner-bootschool.net
 __   __                   __ _    ___           __   __   ___
 \ \ / /  __ _    _ _     / _` |  | _ )   _  _   \ \ / /  |_ _|
  \ V /  / _` |  | ' \    \__, |  | _ \  | +| |   \ V /    | |
  _|_|_  \__,_|  |_||_|   |___/   |___/   \_,_|   _|_|_   |___|
_| """ |_|"""""|_|"""""|_|"""""|_|"""""|_|"""""|_| """ |_|"""""|
"`-0-0-'"`-0-0-'"`-0-0-'"`-0-0-'"`-0-0-'"`-0-0-'"`-0-0-'"`-0-0-'
-------------------------------------------------------------------
    __   __   ___   __   __    __             ___     ___   __  __
 \ \ / /  | _ )  \ \ / /   / /            / __|   / _ \ |  \/  |
  \ V /   | _ \   \ V /   / _ \     _    | (__   | (_) || |\/| |
  _|_|_   |___/   _|_|_   \___/   _(_)_   \___|   \___/ |_|__|_|
_| """ |_|"""""|_| """ |_|"""""|_|"""""|_|"""""|_|"""""|_|"""""|
"`-0-0-'"`-0-0-'"`-0-0-'"`-0-0-'"`-0-0-'"`-0-0-'"`-0-0-'"`-0-0-'
1.2. 自定义 SpringApplication
import org.springframework.boot.Banner;
import org.springframework.boot.SpringApplication;
import org.springframework.boot.autoconfigure.SpringBootApplication;

@SpringBootApplication
public class MyApplication {

    public static void main(String[] args) {
        SpringApplication application = new SpringApplication(MyApplication.class);
        application.setBannerMode(Banner.Mode.OFF);
        application.run(args);
    }

}
1.3. FluentBuilder API
new SpringApplicationBuilder()
    .sources(Parent.class)
    .child(Application.class)
    .bannerMode(Banner.Mode.OFF)
    .run(args);
2. Profiles
环境隔离能力;快速切换开发、测试、生产环境
步骤:
- 标识环境:指定哪些组件、配置在哪个环境生效
- 切换环境:这个环境对应的所有组件和配置就应该生效
2.1. 使用
2.1.1 指定环境
- Spring Profiles 提供一种隔离配置的方式,使其仅在特定环境生效;
- 任何@Component, @Configuration 或 @ConfigurationProperties 可以使用 @Profile 标记,来指定何时被加载。【容器中的组件都可以被
@Profile标记】
2.1.2 环境激活
- 配置激活指定环境; 配置文件
spring.profiles.active=production,hsqldb
也可以使用命令行激活。--spring.profiles.active=dev,hsqldb
还可以配置默认环境; 不标注@Profile 的组件永远都存在。
-
- 以前默认环境叫default
spring.profiles.default=test
推荐使用激活方式激活指定环境
2.1.3 环境包含
注意:
- spring.profiles.active 和spring.profiles.default 只能用到 无 profile 的文件中,如果在application-dev.yaml中编写就是无效的
- 也可以额外添加生效文件,而不是激活替换。比如:
spring.profiles.include[0]=common
spring.profiles.include[1]=local
最佳实战:
生效的环境 = 激活的环境/默认环境 + 包含的环境
项目里面这么用
-
- 基础的配置
mybatis、log、xxx:写到包含环境中 - 需要动态切换变化的
db、redis:写到激活的环境中
- 基础的配置
2.2. Profile 分组
创建prod组,指定包含db和mq配置
spring.profiles.group.prod[0]=db
spring.profiles.group.prod[1]=mq
使用--spring.profiles.active=prod ,就会激活prod,db,mq配置文件
2.3. Profile 配置文件
application-{profile}.properties可以作为指定环境的配置文件。激活这个环境,配置就会生效。最终生效的所有配置是
-
application.properties:主配置文件,任意时候都生效application-{profile}.properties:指定环境配置文件,激活指定环境生效
profile优先级 > application
3. 外部化配置
场景:线上应用如何快速修改配置,并应用最新配置?
- SpringBoot 使用 配置优先级 + 外部配置 简化配置更新、简化运维。
- 只需要给
jar应用所在的文件夹放一个application.properties最新配置文件,重启项目就能自动应用最新配置
3.1. 配置优先级
Spring Boot 允许将配置外部化,以便可以在不同的环境中使用相同的应用程序代码。
我们可以使用各种外部配置源,包括Java Properties文件、YAML文件、环境变量和命令行参数。
@Value可以获取值,也可以用@ConfigurationProperties将所有属性绑定到java object中
**以下是 SpringBoot 属性源加载顺序。**后面的会覆盖前面的值。由低到高,高优先级配置覆盖低优先级
- 默认属性(通过
SpringApplication.setDefaultProperties指定的) - @PropertySource指定加载的配置(需要写在@Configuration类上才可生效)
- 配置文件(application.properties/yml等)
- RandomValuePropertySource支持的random.*配置(如:@Value("$"))
- OS 环境变量
- Java 系统属性(System.getProperties())
- JNDI 属性(来自java:comp/env)
- ServletContext 初始化参数
- ServletConfig 初始化参数
- SPRING_APPLICATION_JSON属性(内置在环境变量或系统属性中的 JSON)
- 命令行参数
- 测试属性。(@SpringBootTest进行测试时指定的属性)
- 测试类@TestPropertySource注解
- Devtools 设置的全局属性。($HOME/.config/spring-boot)
结论:配置可以写到很多位置,常见的优先级顺序:
命令行>配置文件>springapplication配置
配置文件优先级如下:(后面覆盖前面)
- jar 包内的application.properties/yml
- jar 包内的application-.properties/yml
- jar 包外的application.properties/yml
- jar 包外的application-.properties/yml
建议:用一种格式的配置文件。如果.properties和.yml同时存在,则.properties优先
结论:包外 > 包内; 同级情况:profile配置 > application配置
所有参数均可由命令行传入,使用--参数项=参数值,将会被添加到环境变量中,并优先于配置文件。
比如java -jar app.jar --name="Spring",可以使用@Value("${name}")获取
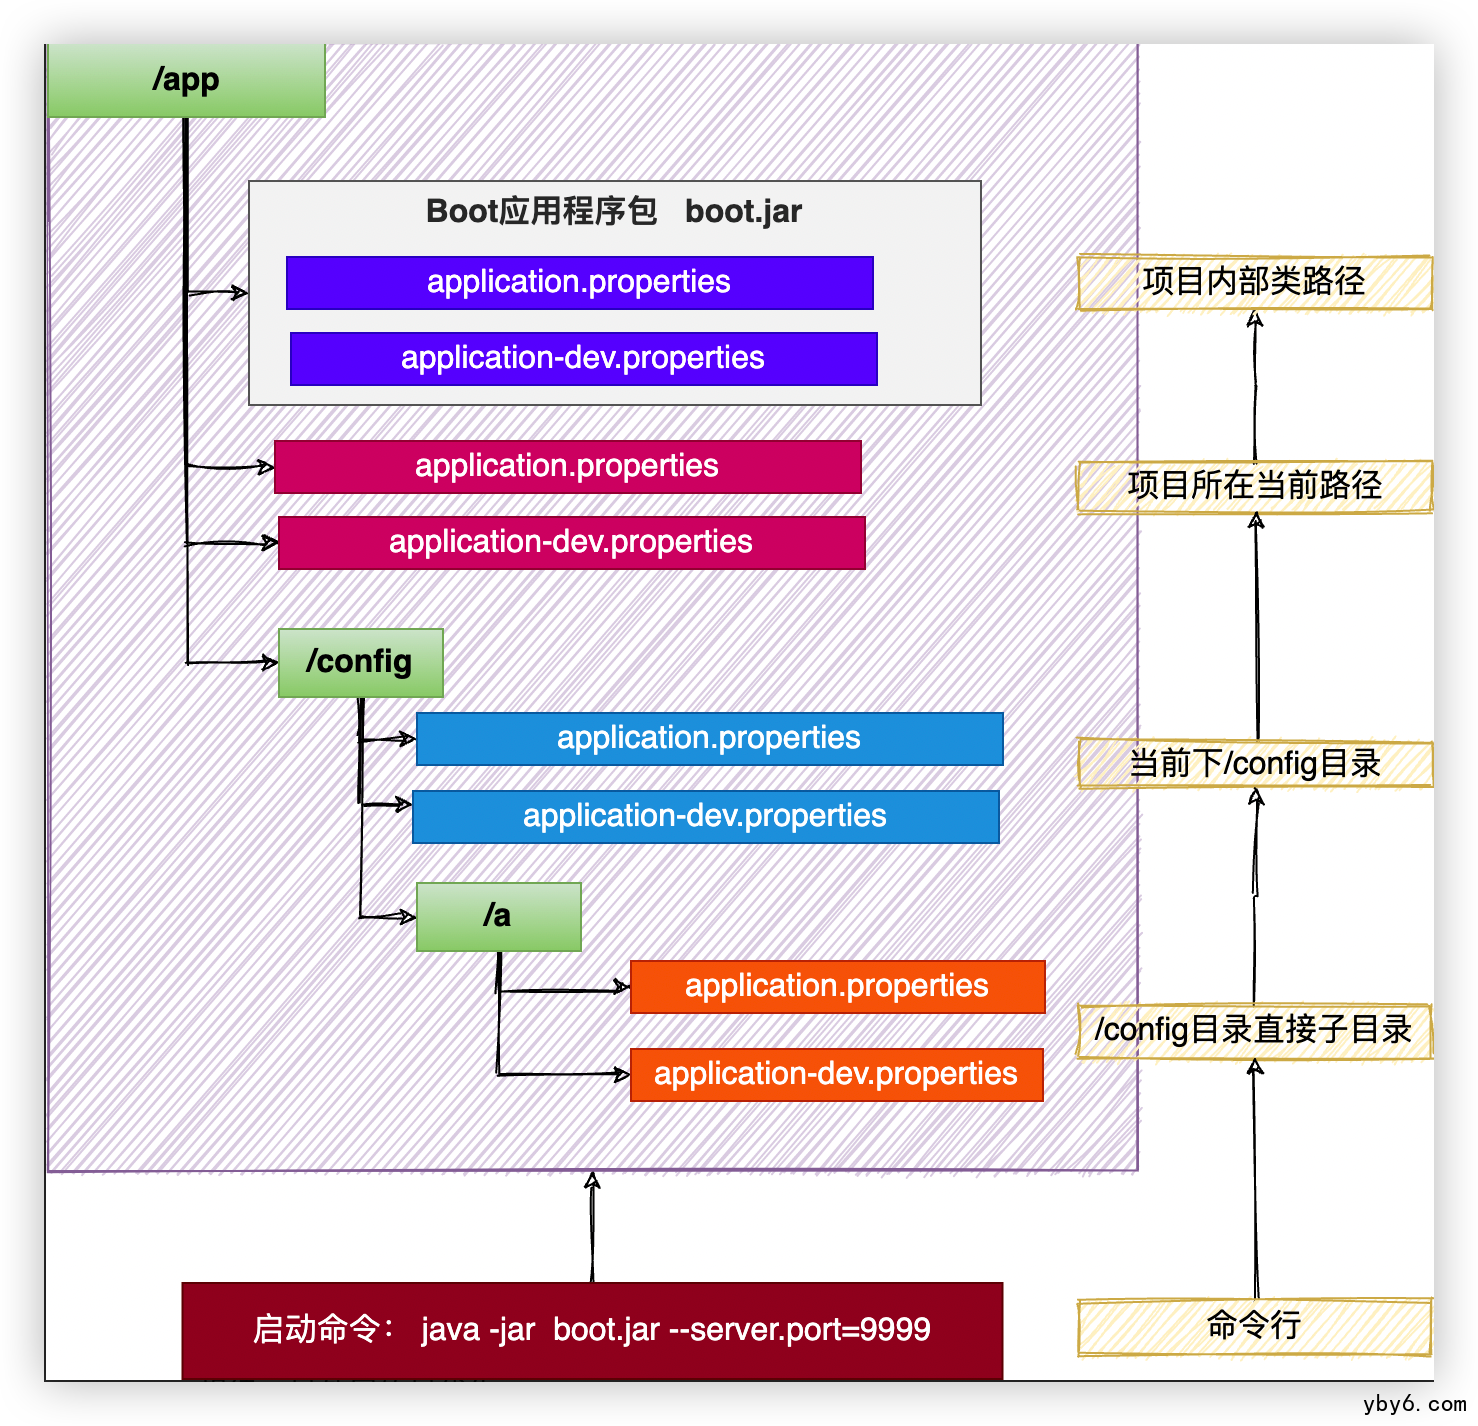
演示场景:
- 包内: application.properties
server.port=8000 - 包内: application-dev.properties
server.port=9000 - 包外: application.properties
server.port=8001 - 包外: application-dev.properties
server.port=9001
启动端口?:命令行 > 9001 > 8001 > 9000 > 8000
3.2. 外部配置
SpringBoot 应用启动时会自动寻找application.properties和application.yaml位置,进行加载。顺序如下:(后面覆盖前面)
类路径: 内部
-
- 类根路径
- 类下/config包
当前路径(项目所在的位置)
-
- 当前路径
- 当前下/config子目录
- /config目录的直接子目录
最终效果:优先级由高到低,前面覆盖后面
命令行 > 包外config直接子目录 > 包外config目录 > 包外根目录 > 包内目录
同级比较:
-
- profile配置 > 默认配置
- properties配置 > yaml配置

规律:最外层的最优先。
- 命令行 > 所有
- 包外 > 包内
- config目录 > 根目录
- profile > application
配置不同就都生效(互补),配置相同高优先级覆盖低优先级
3.3. 导入配置
使用spring.config.import可以导入额外配置
spring.config.import=my.properties
my.property=value
无论以上写法的先后顺序,my.properties的值总是优先于直接在文件中编写的my.property。
3.4. 属性占位符
配置文件中可以使用 $形式取出之前配置过的值。
app.name=MyApp
app.description=${app.name} is a Spring Boot application written by ${username:Unknown}
4. 单元测试-JUnit5
4.1. 整合
SpringBoot 提供一系列测试工具集及注解方便我们进行测试。
spring-boot-test提供核心测试能力,spring-boot-test-autoconfigure 提供测试的一些自动配置。
我们只需要导入spring-boot-starter-test 即可整合测试
<dependency>
    <groupId>org.springframework.boot</groupId>
    <artifactId>spring-boot-starter-test</artifactId>
    <scope>test</scope>
</dependency>
spring-boot-starter-test 默认提供了以下库供我们测试使用
4.2. 测试
4.2.0 组件测试
直接@Autowired容器中的组件进行测试
4.2.1 注解
JUnit5的注解与JUnit4的注解有所变化
https://junit.org/junit5/docs/current/user-guide/#writing-tests-annotations
- **@Test 标签:__,spring,void,配置,特性,application,SpringBoot3,properties,玩转 From: https://www.cnblogs.com/Yangbuyi/p/17553192.html