作者:梁青松
项目介绍
本项目基于OpenHarmony的ArkUI框架:TS扩展的声明式开发范式,关于语法和概念直接看官网官方文档地址:基于TS扩展的声明式开发范式,因为OpenHarmony的API相对于HarmonyOS的API,功能上比较完善和成熟的,有些新的技术也早早接触到,所以本项目直接使用OpenHarmony SDK开发。
工具版本: DevEco Studio 3.0 Release
SDK版本: 3.1.7.7(API Version 8 Release)
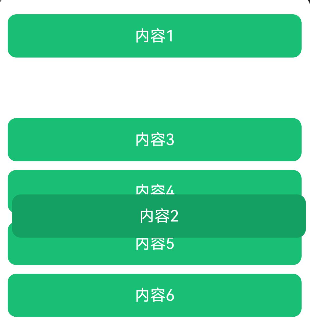
效果演示
实现思路
先记录每个index对应的item的y轴坐标;使用属性方法:position() 来设置item的位置;再使用onTouch事件移动选中的item并完成与其他item的位置交换。
1. 页面布局
@Entry
@Component
struct Index {
  // 列表数据
  @State array: Array<string> = ['1', '2', '3', '4', '5', '6', '7', '8', '9']

  build() {
    Column() {
      ForEach(this.array, (item, index) => {
        Text('内容' + item)
          .width('100%')
          .height(50)
          .fontSize(18)
          .fontColor(Color.White)
          .borderRadius(10)
          .margin({ bottom: 10 })
          .textAlign(TextAlign.Center)
          .backgroundColor('#18BF74')
      }, item => item)
    }.width('100%')
    .height('100%')
    .padding(10)
  }
}
2. 记录y轴坐标并设置位置
新增三个变量
- mapOffsetY:存入每一个index对y轴位置
- moveIndex:移动的索引
- moveOffsetY:移动的y轴偏移量
使用onAreaChange方法记录index对应的y轴位置,使用position方法设置item的位置
@Entry
@Component
struct Index {
  // 列表数据
  @State array: Array<string> = ['1', '2', '3', '4', '5', '6', '7', '8', '9']
  // key:索引,value:y轴位置
  private mapOffsetY: Map<number, number> = new Map()
  // 移动的index
  @State moveIndex: number = -2
  // 移动的偏移量
  @State moveOffsetY: number = 0

  build() {
    Column() {
      ForEach(this.array, (item, index) => {
        Text('内容' + item)
          .width('100%')
          .height(50)
          .fontSize(18)
          .fontColor(Color.White)
          .borderRadius(10)
          .margin({ bottom: 10 })
          .textAlign(TextAlign.Center)
		  .backgroundColor('#18BF74')
          .position({
            x: this.moveIndex === index ? 5 : 0,
            y: this.moveIndex === index ? this.moveOffsetY : this.mapOffsetY.get(index)
          })
          .onAreaChange((oldValue: Area, newValue: Area) => {
            if (this.mapOffsetY.size !== this.array.length) {
              // 记录每个item的y坐标
              console.info(`index = ${index} ${JSON.stringify(newValue)}`)
              const height = Number.parseInt(newValue.height.toString())
              this.mapOffsetY.set(index, 10 + (index * 10) + index * height)
              // 更新页面,才能让position起作用
              this.moveIndex = -1
            }
          })
      }, item => item)
    }.width('100%')
    .height('100%')
    .padding(10)
  }
3. 移动选中的item
3.1 zIndex(移动时浮在其他item之上)
3.2 backgroundColor(移动时改变移动中的item背景颜色)
3.3 onTouch(触摸事件,手指移动时,更改选中的item位置)
@Entry
@Component
struct Index {
  ......
  // 按下时自身顶点y轴位置
  private downSelfY = 0
  // 按下时距屏幕的y轴位置
  private downScreenY = 0

  build() {
    Column() {
      ForEach(this.array, (item, index) => {
        Text('内容' + item)
          ......
          .zIndex(this.moveIndex === index ? 1 : 0)
          .backgroundColor(this.moveIndex === index ? '#14a063' : '#18BF74')
          .onTouch((event: TouchEvent) => this.onTouchEvent(event, index))
      }, item => item)
    }.width('100%')
    .height('100%')
    .padding(10)
  }

  onTouchEvent(event: TouchEvent, index: number) {
    switch (event.type) {
      case TouchType.Down: // 手指按下
        {
          // 更新当前移动的index
          this.moveIndex = index
          // 按下时自身顶点y轴位置
          this.downSelfY = event.touches[0].y
          // 按下时距屏幕的y轴位置
          this.downScreenY = event.touches[0].screenY
          // 更改偏移量
          this.moveOffsetY = this.downScreenY - this.downSelfY - 5
        }
        break
      case TouchType.Move: // 手指移动
        {
          // 距离屏幕y坐标
          const screenY = event.touches[0].screenY
          // 更改偏移量
          this.moveOffsetY = screenY - this.downSelfY - 5
        }
        break
      case TouchType.Up: // 手指抬起
        this.moveIndex = -1
        break
      default:
        break;
    }
  }
}
4. 位置交换
位置交换只是视觉上面的改变,列表的索引index还是从0到7,其实改变的是满足交换的两个item内容(列表中数据)主要的逻辑是在以下代码:向下拖动、向上拖动这一部分。
......
onTouchEvent(event: TouchEvent, index: number) {
    switch (event.type) {
      case TouchType.Down: // 手指按下
        {
			......
        }
        break
      case TouchType.Move: // 手指移动
        {
          // 距离屏幕y坐标
          const screenY = event.touches[0].screenY
          // 更改偏移量
          this.moveOffsetY = screenY - this.downSelfY - 5
          ......
          // 向下拖动
          if (screenY - this.downScreenY > 25) {
            // 交换满足条件的两个item内容
            const tempOffsetY = this.array[this.moveIndex+1]
            this.array[this.moveIndex+1] = this.array[this.moveIndex]
            this.array[this.moveIndex] = tempOffsetY
            // 更新按下的y坐标
            this.downScreenY += 60
            // 更新移动的索引,触发页面的更新
            this.moveIndex++
          }
          // 向上拖动
          if (screenY - this.downScreenY < -35) {
            const tempOffsetY = this.array[this.moveIndex-1]
            this.array[this.moveIndex-1] = this.array[this.moveIndex]
            this.array[this.moveIndex] = tempOffsetY
            this.downScreenY -= 60
            this.moveIndex--
          }
        }
        break
      case TouchType.Up: // 手指抬起
        this.moveIndex = -1
        break
      default:
        break;
    }
  }
完整代码
在上面的代码的基础上加了属性动画animation,让位置交换看起来没有那么生硬。
@Entry
@Component
struct Index {
  // 列表数据
  @State array: Array<string> = ['1', '2', '3', '4', '5', '6', '7', '8', '9']
  // key:索引,value:y轴位置
  private mapOffsetY: Map<number, number> = new Map()
  // 移动的index
  @State moveIndex: number = -2
  // 移动的偏移量
  @State moveOffsetY: number = 0
  // 按下时自身顶点y轴位置
  private downSelfY = 0
  // 按下时距屏幕的y轴位置
  private downScreenY = 0

  build() {
    Column() {
      ForEach(this.array, (item, index) => {
        Text('内容' + item)
          .width('100%')
          .height(50)
          .fontSize(18)
          .fontColor(Color.White)
          .borderRadius(10)
          .margin({ bottom: 10 })
          .textAlign(TextAlign.Center)
          .zIndex(this.moveIndex === index ? 1 : 0)
          .position({
            x: this.moveIndex === index ? 5 : 0,
            y: this.moveIndex === index ? this.moveOffsetY : this.mapOffsetY.get(index)
          })
          .animation({ duration: this.moveIndex === index ? 0 : 100 })
          .backgroundColor(this.moveIndex === index ? '#14a063' : '#18BF74')
          .onTouch((event: TouchEvent) => this.onTouchEvent(event, index))
          .onAreaChange((oldValue: Area, newValue: Area) => {
            if (this.mapOffsetY.size !== this.array.length) {
              // 记录每个item的y坐标
              console.info(`index = ${index} ${JSON.stringify(newValue)}`)
              const height = Number.parseInt(newValue.height.toString())
              this.mapOffsetY.set(index, 10 + (index * 10) + index * height)
              // 更新页面,才能让position起作用
              this.moveIndex = -1
            }
          })
      }, item => item)
    }.width('100%')
    .height('100%')
    .padding(10)
  }

  onTouchEvent(event: TouchEvent, index: number) {
    switch (event.type) {
      case TouchType.Down: // 手指按下
        {
          // 更新当前移动的index
          this.moveIndex = index
          // 按下时自身顶点y轴位置
          this.downSelfY = event.touches[0].y
          // 按下时距屏幕的y轴位置
          this.downScreenY = event.touches[0].screenY
          // 更改偏移量
          this.moveOffsetY = this.downScreenY - this.downSelfY - 5
        }
        break
      case TouchType.Move: // 手指移动
        {
          // 距离屏幕y坐标
          const screenY = event.touches[0].screenY
          // 更改偏移量
          this.moveOffsetY = screenY - this.downSelfY - 5
          // 第一位,不能上移
          if (this.moveIndex === 0 && this.moveOffsetY < 0) {
            this.moveOffsetY = 0
            return
          }
          // 最后一位,不能下移
          if (this.moveIndex === this.array.length - 1 && this.moveOffsetY > this.mapOffsetY.get(this.moveIndex)) {
            this.moveOffsetY = this.mapOffsetY.get(this.moveIndex)
            return
          }
          // 向下拖动
          if (screenY - this.downScreenY > 25) {
            // 交换满足条件的两个item内容
            const tempOffsetY = this.array[this.moveIndex+1]
            this.array[this.moveIndex+1] = this.array[this.moveIndex]
            this.array[this.moveIndex] = tempOffsetY
            // 更新按下的y坐标
            this.downScreenY += 60
            // 更新移动的索引,触发页面的更新
            this.moveIndex++
          }
          // 向上拖动
          if (screenY - this.downScreenY < -35) {
            const tempOffsetY = this.array[this.moveIndex-1]
            this.array[this.moveIndex-1] = this.array[this.moveIndex]
            this.array[this.moveIndex] = tempOffsetY
            this.downScreenY -= 60
            this.moveIndex--
          }
        }
        break
      case TouchType.Up: // 手指抬起
        this.moveIndex = -1
        break
      default:
        break;
    }
  }
}
总结
本项目的难点就是位置交换那块:index的顺序并没有改变,只是更改列表中的数据和移动的中索引。还有就是onAreaChange这个方法,如果没有设置方法position,在其方法内是能拿到每个item的y坐标,设置position后,y坐标是错误的,需要在onAreaChange计算一下item的y坐标,然后再更新页面。这样列表才能展示出来。
每天进步一点点、需要付出努力亿点点。
更多原创内容请关注:中软国际 HarmonyOS 技术团队
入门到精通、技巧到案例,系统化分享HarmonyOS开发技术,欢迎投稿和订阅,让我们一起携手前行共建鸿蒙生态。
https://ost.51cto.com/#bkwz
标签:OpenHarmony,index,TS,event,item,moveIndex,打卡,screenY,array From: https://blog.51cto.com/harmonyos/5716480