标签:10.0 ## repo nginx base yum week3
week3
1.yum私有仓库的实现及博客输出
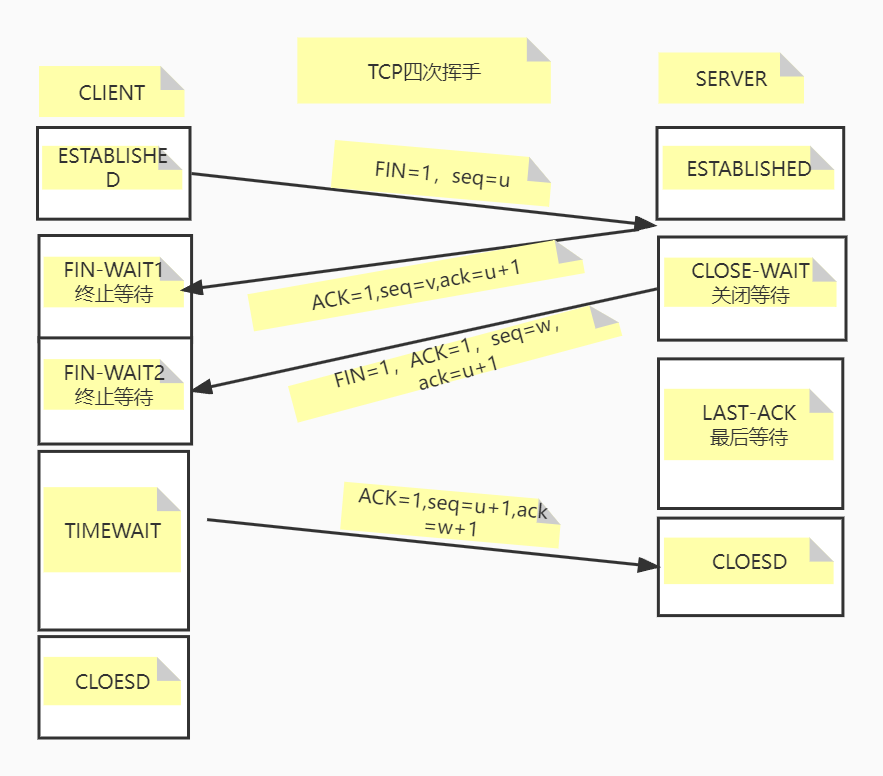
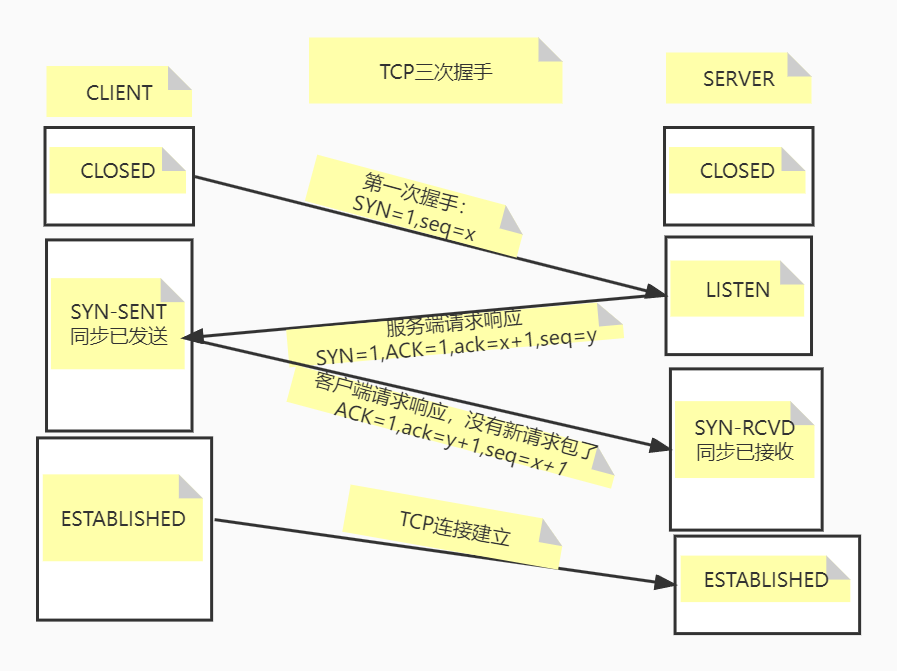
2.阅读《图解TCP/IP》一书,地址:https://leon-wtf.github.io/doc/%E5%9B%BE%E8%A7%A3TCPIP.pdf,有时间的可以写下读书笔记
3.画图 TCP协议和三次握手及四次挥手,可以参考别人的,但是需要自己画一次
4.静态配置网卡IP,centos/ubuntu实现
脚本题
5.实现免密登陆脚本, expect登陆远程主机,将生成的密钥写入到目标主机, expect测试远程登陆。
1)通过shift读取脚本参数
2)通过select来选择功能.例如功能有
- 安装mysql
- 安装apache
- 免密钥登陆主机
当前我们只实现免密钥登陆主机
3)通过函数封装每个功能
4)将免密钥登陆的过程可以重复进行, while 循环实现重复,需要有退出过程。当用户输入exit时,退出免密钥功能。
5)支持输入一批主机免密钥,使用数组 实现
1.搭建私有的yum仓库
环境:server端 10.0.0.129
client端 10.0.0.130
server端本地yum源:/etc/yum.repos.d/base.repo
1
2
3
4
5
6
7
8
9
10
11
12
13
14
15
16
17
18
19
20
21
22
23
|
[base]
name=base
baseurl=https://mirrors.aliyun.com/centos/$releasever/os/$basearch/
gpgcheck=1
gpgkey=file:///etc/pki/rpm-gpg/RPM-GPG-KEY-CentOS-$releasever

[epel]
name=epel
baseurl=https://mirrors.aliyun.com/epel/$releasever/$basearch/
gpgcheck=1
gpgkey=https://mirrors.aliyun.com/epel/RPM-GPG-KEY-EPEL-$releasever

[extras]
name=extras
baseurl=https://mirrors.aliyun.com/centos/$releasever/extras/$basearch/
gpgcheck=1
gpgkey=file:///etc/pki/rpm-gpg/RPM-GPG-KEY-CentOS-$releasever

[updates]
name=updates
baseurl=https://mirrors.aliyun.com/centos/$releasever/updates/$basearch/
gpgcheck=1
gpgkey=file:///etc/pki/rpm-gpg/RPM-GPG-KEY-CentOS-$releasever
Copy
|
安装nginx,添加yum源的web端发布
添加base,epel,extras,appstream源的发布
1
2
3
4
5
6
7
8
9
10
|
##安装nginx编译依赖包gcc,支持ssl,zlib压缩等
yum install -y pcre pcre-devel gcc gcc-c++ openssl openssl-devel zlib zlib-devel gd gd-devel
wget -O https://nginx.org/download/nginx-1.20.2.tar.gz /data/nginx
tar xf nginx-1.20.2.tar.gz

##指定nginx安装目录 --prefix
cd nginx-1.20.2 ; ./configure --perfix=/usr/local/nginx
make && make install

nginx默认目录:/usr/local/nginx/html
Copy
|
1.配置nginx服务器
1
2
3
4
5
6
7
8
9
10
11
12
13
14
15
16
17
18
19
20
21
22
23
24
25
26
27
28
29
30
31
32
|
##进入到nginx
vim /usr/local/nginx/conf/nginx.conf

##监听端口为8080
server {
        listen       8080;
        server_name  localhost;

        #charset koi8-r;

        #access_log  logs/host.access.log  main;

#        location / {
#            root   /repo ;
#            index  index.html index.htm;
#        }

   	    #8080的server默认访问路径
        root /usr/local/nginx/html/repo;
        autoindex on;

        #error_page  404              /404.html;

        # redirect server error pages to the static page /50x.html
        #
        error_page   500 502 503 504  /50x.html;
        location = /50x.html {
            root   html;
        }

##重启服务
./nginx -s reload
Copy
|
2.访问站点查看是否生效:10.0.0.129:8080

image-20220813113330186
在server端搭建yum源
1.同步本地的yum源packages到repo目录
1
2
3
|
##reposync:yum源同步工具,同步到对应的nginx发布中,同步现有的base源内的内容
##repo指的是同步本地的yum源到这个发布目录
reposync -r base -p /usr/local/nginx/html/repo
Copy
|

image-20220813082226420
2.创建源数据
1
2
3
4
5
6
7
8
9
|
##创建源数据,这个路径以后就放repo文件的
[10:55:20 root@slave1 repo]#createrepo /usr/local/nginx/html/repo/base
Spawning worker 0 with 10072 pkgs
Workers Finished
Saving Primary metadata
Saving file lists metadata
Saving other metadata
Generating sqlite DBs
Sqlite DBs complete
Copy
|

image-20220813105749148
3.制作yum源文件
这里制作yum源文件的时候,由于只有一个base.repo,所以包括base库,extras库,updates库,epel库都写在一起,用于给其他的client获取,地址写本机的IP地址10.0.0.129
1
2
3
4
5
6
7
8
9
10
11
12
13
14
15
16
17
18
19
20
21
22
23
24
25
26
27
28
29
30
31
32
33
34
|
##制作repo文件
vim /usr/local/nginx/html/repo/base.repo

# 不需要的仓库可以注释掉
# 内网仓库全部关闭gpgcheck校验
# 实现base仓库
# base仓库
[base]
name=Local CentOS-7  Base
baseurl=http://10.0.0.129/base
enabled=1
gpgcheck=0

# extras仓库
[extras]
name=Local CentOS-7  Extras
baseurl=http://10.0.0.129/base
enabled=1
gpgcheck=0

# updates仓库
[updates]
name=Local CentOS-7  Updates
baseurl=http://10.0.0.129/base
enabled=1
gpgcheck=0

# epel仓库
[epel]
name=Local Extra Packages for Enterprise Linux 7
baseurl=http://10.0.0.129/base
enabled=1
gpgcheck=0

Copy
|
1
2
|
#查看本地的yum仓库情况
yum repolist
Copy
|
client测试yum仓库
yum源文件必须放在/etc/yum.repos.d才生效,记得加上10.0.0.129:8080端口
1
2
3
4
5
6
7
8
9
|
##备份yum源
mkdir /etc/yum.repos.d/backup
mv /etc/yum.repos.d/* backup

##从server端获取yum源,curl -o指定目标路径
curl -o /etc/yum.repos.d/base.repo http://10.0.0.129:8080/base.repo

##构建缓存,查看yum仓库
yum clean all ; yum makecache ; yum repolist
Copy
|

image-20220813114310972
查看bind-utils有无,测试,证明yum源搭建成功

image-20220813114432789
2.阅读《图解TCP/IP》一书
地址:https://leon-wtf.github.io/doc/%E5%9B%BE%E8%A7%A3TCPIP.pdf,有时间的可以写下读书笔记
3.TCP三次挥手/四次挥手

TCP四次挥手

TCP三次挥手
4.静态配置网卡IP,centos/ubuntu实现
1
2
3
4
5
6
7
8
9
10
11
12
13
14
15
16
17
18
19
20
21
22
23
24
|
##centos7,8
vim /etc/sysconfig/network-scripts/ifcfg-ens33
BOOTPROTO="static"
IPADDR=10.0.0.128
PREFIX=24
GATEWAY=10.0.0.2
DNS1=114.114.114.114
DNS2=8.8.8.8
centos7:systemctl restart network
centos8:nmcli connection down ens160 && nmcli connection up ens160

##ubuntu
##已提前改过名字
vim /etc/netplan/ifcfg-ens33.yaml
# This is the network config written by 'subiquity'
network:
  ethernets:
    ens33:
      addresses: [10.0.0.131/24]
      gateway4: 10.0.0.2
      nameservers:
              addresses: [114.114.114.114,8.8.8.8]
      dhcp4: no
  version: 2
Copy
|
5.实现脚本功能
1
2
3
4
5
6
7
8
9
10
11
12
13
14
15
16
17
18
19
20
21
22
23
24
25
26
27
28
29
30
31
32
33
34
35
36
37
38
39
40
41
42
43
44
45
46
47
48
49
50
51
52
53
54
55
56
57
58
59
60
61
62
63
64
65
66
67
68
69
70
71
72
73
74
75
76
77
78
79
80
81
82
83
84
85
86
87
88
89
90
91
92
93
94
95
96
97
98
99
100
101
102
103
104
105
106
107
108
109
110
111
112
113
114
115
116
117
118
119
120
121
122
123
124
125
126
127
128
129
130
131
132
133
134
135
136
137
138
139
140
141
142
143
|
#!/bin/bash
########################################
#Author:Catyer
#time:2022-08-07_14:53:44
#filename:scp.sh
#Script description:
#实现免密登陆脚本, expect登陆远程主机,将生成的密钥写入到目标主机, expect测试远程登陆。
#1)通过shift读取脚本参数
#2)通过select来选择功能.例如功能有
#- 安装mysql
#- 安装apache
#- 免密钥登陆主机
#当前我们只实现免密钥登陆主机
#3)通过函数封装每个功能
#4)将免密钥登陆的过程可以重复进行, while 循环实现重复,需要有退出过程。当用户输入exit时,退出免密钥功能。
#5)支持输入一批主机免密钥,使用数组 实现
########################################

##引用function功能
. /etc/init.d/functions


MYSQL(){
	##二进制安装mysql
	echo "MYSQL"
}


APACHE(){

	OS=`awk -F= '/ID/{print $2}' /etc/os-release | head -n 1 | sed 's/\"//g'`
	##yum安装Apache
	if [ $OS == "centos" ] ;then
        	rpm -q httpd && echo "apache install" || yum -y install httpd;systemctl enable --now httpd
 	elif [ $OS == "ubuntu" ] ;then
        ##ubuntu自动启动服务
        	apt list --installed | grep httpd && echo "ubuntu httpd is installed" || apt update; apt -y install httpd
        else
                echo "invalid $OS"
    	fi
        echo "httpd test" > /var/www/html/index.html
    	curl 127.0.0.1:80
}

##使用SSHPASS功能
#SSHPASS(){
#
#pass1=123
#IP=(10.0.0.129
#10.0.0.130
#10.0.0.131
#10.0.0.132)
#
#echo "目标主机:${IP[*]}"
#
#cd /root && rm -rf .ssh
###生成自己的密钥,-p ""空密码,-f路径
#ssh-keygen -P "" -f /root/.ssh/id_rsa &>/dev/null
###判断sshpass是否安装
#rpm -q sshpass && echo "sshpass already install" || yum update;yum -y install sshpass
#for i in ${IP[*]};do
#        sshpass -p $pass1 ssh-copy-id -o StrictHostKeyChecking=no -i /root/.ssh/id_rsa.pub $i
#	ssh $i "echo `hostname -I`" && echo "$i ssh-keygen执行成功" || echo "failed"
#done
#
#}

EXPECT(){

host=(
10.0.0.129
10.0.0.130
10.0.0.131
10.0.0.132
)

pass1=123

##本机删除掉SSH秘钥
cd /root ; rm -rf .ssh
ssh-keygen -P "" -f /root/.ssh/id_rsa &>/dev/null

##定义x的值
x=0

##x值小于等于数组长度,执行循环,包括数组最大长度
while [ $x -le ${#host[*]} ] ; do
i=${host[$x]} ##数组对应下标元素(IP)赋值给i变量

cat << EOF
EXPECT选项
1.expect:执行免秘钥
2.exit:退出
EOF

read -p "please input your choice:" choice
case $choice in
1|"expect")

##再次判断一次x的值,如果小于数组长度,则退出;不包括数组最大长度,当x达到数组最大长度,则不执行以下循环,退出
if [ $x -lt ${#host[*]} ];then
	let x++
	expect <<EOF
	spawn ssh-copy-id root@$i
	expect {
		"yes/no" {send "yes\n";exp_continue}
		"password" {send "$pass1\n"}
	}
	expect eof
EOF
##调用action
action "主机$i SSH成功" true

else
	echo "已经达到数组最大长度,退出"
	break
fi

#let x++
;;

2|"exit") break ;; ##退出函数,可以在两次expect之间退出

esac
done

}


while :
do
echo "输入想要实现的功能:"
select order in 安装MySQL 安装apache EXPECT测试 EXIT退出;do
case $REPLY in
    1)  MYSQL ;;
    2)  APACHE ;;
    3)  EXPECT ;;
    4)  exit 2 ;; ##退出两层循环
    esac
done
done


Copy
|
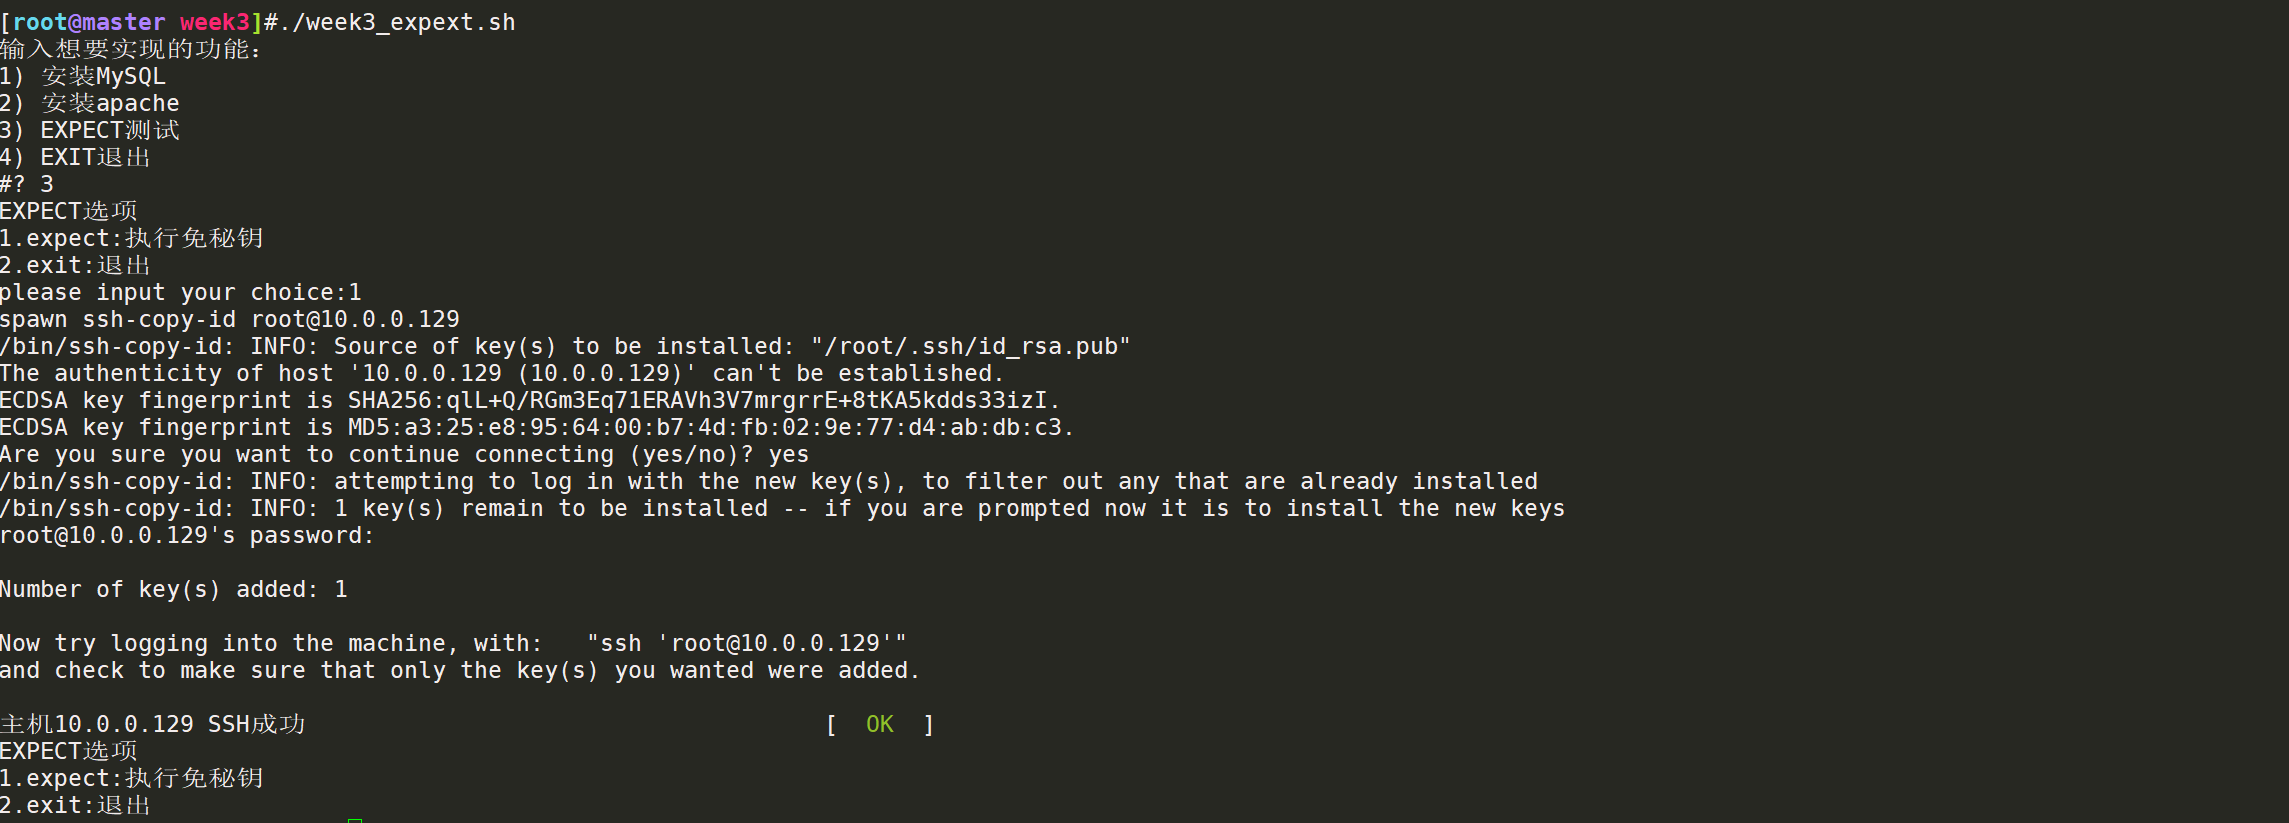
实现效果
主界面

image-20220813122734744
执行安装Apache(已安装)

image-20220813122822678
执行安装 Apache(未安装)

image-20220813122942630

image-20220813122954319
执行第一次expect

image-20220813123029478
测试scp文件是否能够免秘钥传输到10.0.0.129

image-20220813123138302
执行第二次expect

image-20220813123213314
达到数据长度上限,退出脚本

image-20220813123305069
标签:10.0,
##,
repo,
nginx,
base,
yum,
week3
From: https://www.cnblogs.com/catyer/p/16593227.html


