12-KVM虚拟机磁盘在线扩容
虚拟机磁盘在线扩容的两种方法:
方法一:通过virsh blockresize扩容当前磁盘,然后通过虚拟机系统LVM逻辑卷管理方式进行管理,扩展磁盘空间。
方法二:新创建一块磁盘,virsh attach-disk命令在线添加到当前KVM虚拟机,然后通过虚拟机系统lvm逻辑卷管理方式进行管理,扩展磁盘空间。(不推荐)
blockresize方式在线扩容
查看虚拟机状态
virsh domstate VM6

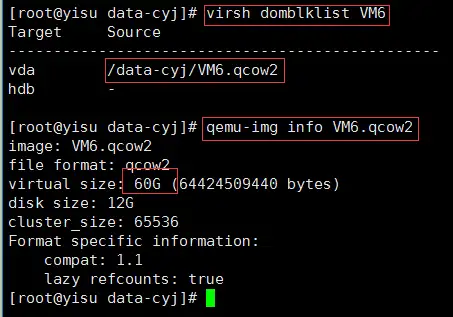
查看磁盘信息
查看虚拟机VM6磁盘列表:virsh domblklist VM6
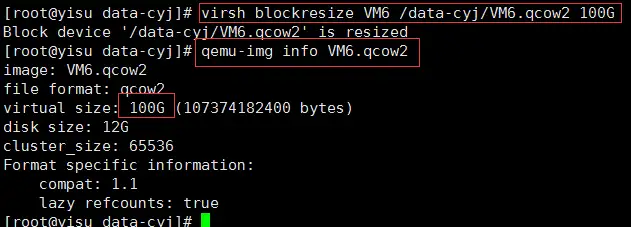
查看VM6.qcow2的磁盘信息:qemu-img info VM6.qcow2
磁盘扩容
VM6从60G扩容到100G:virsh blockresize VM6 /data-cyj/VM6.qcow2 100G
virsh blockresize命令用法:
virsh blockresize <domain> <path> <size>
domain 虚拟机名称
path 磁盘路径,可填 vda或者/data-cyj/VM6.qcow2
size 扩容后容量
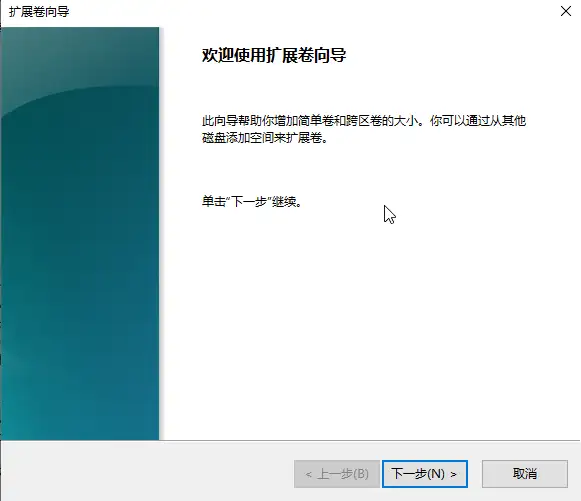
登录虚拟机配置LVM磁盘扩展
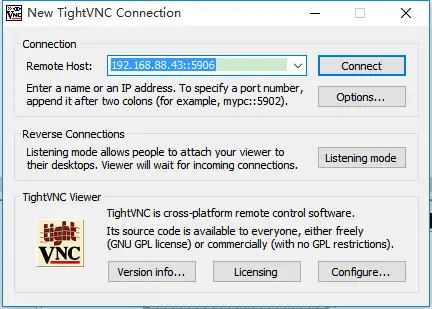
- vnc登录
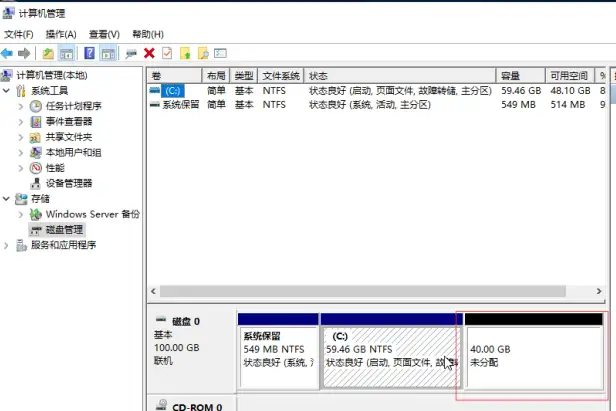
- 打开计算机管理->磁盘管理器,当前C:盘容量为59.46G,出现新增未分配的盘40G就是刚刚扩容的容量。
- 选中C:盘,右键单击扩展卷,出现扩展向导,点击下一步
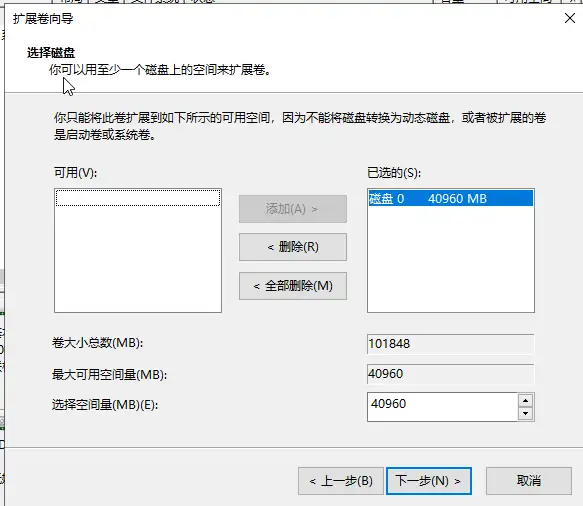
- 选择磁盘0,点击下一步
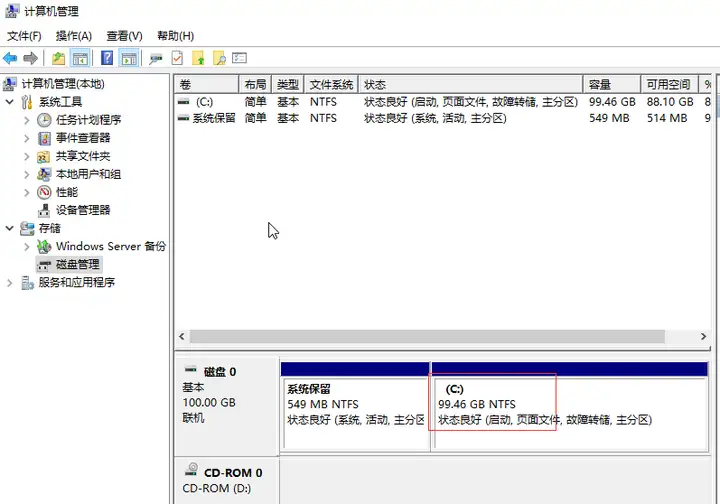
- 完成扩容

- 查看C:盘最新容量,为99.46G,扩容40G成功。
attach-disk方式在线扩容
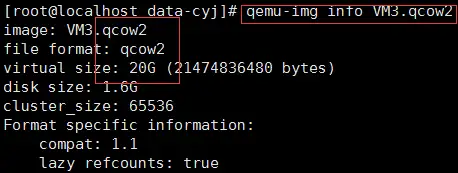
查看磁盘信息
qemu-img info VM3.qcow2
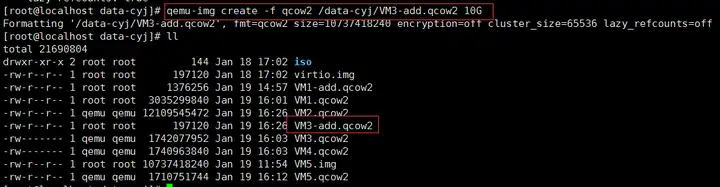
创建磁盘
创建相同格式的磁盘:qemu-img create -f qcow2 /data-cyj/VM3-add.qcow2 10G
在线添加磁盘
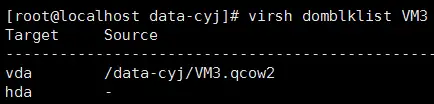
查看虚拟机现有磁盘:virsh domblklist VM3
在线添加磁盘:
virsh attach-disk VM3 /data-cyj/VM3-add.qcow2 vdb --cache=none --subdriver=qcow2
注意:--subdriver必须使用,否则默认为raw格式
----persistent 可以在线永久添加磁盘,如果使用此参数,直接跳过第5步修改配置的步骤

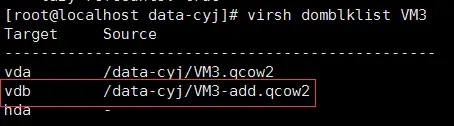
查看添加后虚拟机磁盘列表:virsh domblklist VM3
查看虚拟机磁盘情况
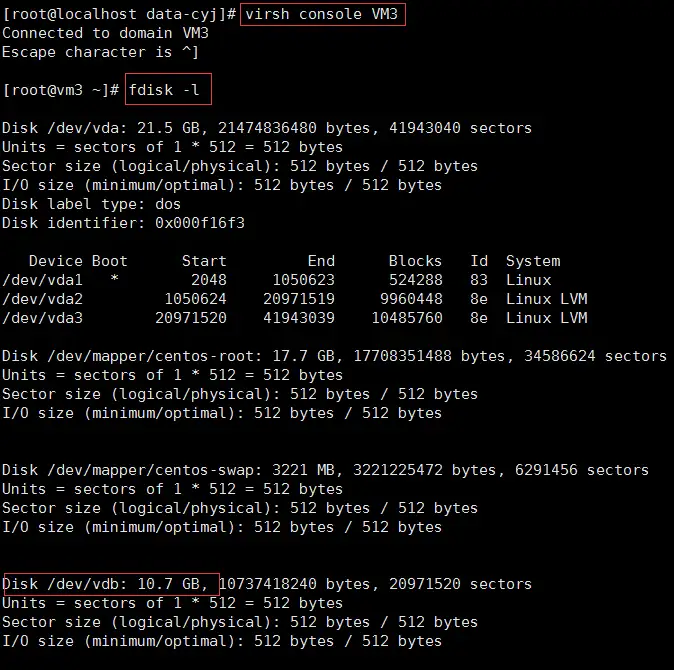
Console登录虚拟机查看磁盘情况
修改配置
查看当前虚拟机的配置,并将新增加的磁盘信息添加到VM3.xml中。
如果第3步在线添加磁盘时使用了persistent 参数,那么此步骤跳过。
- 查看磁盘配置
[root@localhost data-cyj]# virsh dumpxml VM3
<domain type='kvm' id='9'>
<name>VM3</name>
<uuid>5fa71db7-f304-4100-bc0e-01876fc2a84b</uuid>
<memory unit='KiB'>524288</memory>
<currentMemory unit='KiB'>524288</currentMemory>
<vcpu placement='static'>1</vcpu>
<resource>
<partition>/machine</partition>
</resource>
<os>
<type arch='x86_64' machine='pc-i440fx-rhel7.0.0'>hvm</type>
<boot dev='hd'/>
</os>
<features>
<acpi/>
<apic/>
</features>
<cpu mode='custom' match='exact' check='full'>
<model fallback='forbid'>IvyBridge-IBRS</model>
<feature policy='require' name='md-clear'/>
<feature policy='require' name='spec-ctrl'/>
<feature policy='require' name='ssbd'/>
<feature policy='require' name='hypervisor'/>
<feature policy='require' name='xsaveopt'/>
</cpu>
<clock offset='utc'>
<timer name='rtc' tickpolicy='catchup'/>
<timer name='pit' tickpolicy='delay'/>
<timer name='hpet' present='no'/>
</clock>
<on_poweroff>destroy</on_poweroff>
<on_reboot>restart</on_reboot>
<on_crash>destroy</on_crash>
<pm>
<suspend-to-mem enabled='no'/>
<suspend-to-disk enabled='no'/>
</pm>
<devices>
<emulator>/usr/libexec/qemu-kvm</emulator>
<disk type='file' device='disk'>
<driver name='qemu' type='qcow2'/>
<source file='/data-cyj/VM3.qcow2'/>
<backingStore/>
<target dev='vda' bus='virtio'/>
<alias name='virtio-disk0'/>
<address type='pci' domain='0x0000' bus='0x00' slot='0x05' function='0x0'/>
</disk>
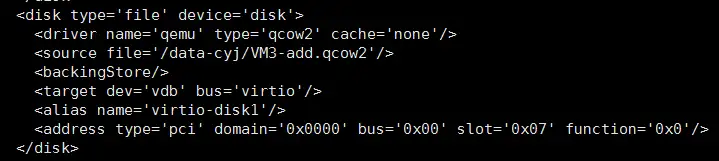
<disk type='file' device='disk'>
<driver name='qemu' type='qcow2' cache='none'/>
<source file='/data-cyj/VM3-add.qcow2'/>
<backingStore/>
<target dev='vdb' bus='virtio'/>
<alias name='virtio-disk1'/>
<address type='pci' domain='0x0000' bus='0x00' slot='0x07' function='0x0'/>
</disk>
<disk type='file' device='cdrom'>
<driver name='qemu'/>
<target dev='hda' bus='ide'/>
<readonly/>
<alias name='ide0-0-0'/>
<address type='drive' controller='0' bus='0' target='0' unit='0'/>
</disk>
<controller type='usb' index='0' model='ich9-ehci1'>
<alias name='usb'/>
<address type='pci' domain='0x0000' bus='0x00' slot='0x04' function='0x7'/>
</controller>
<controller type='usb' index='0' model='ich9-uhci1'>
<alias name='usb'/>
<master startport='0'/>
<address type='pci' domain='0x0000' bus='0x00' slot='0x04' function='0x0' multifunction='on'/>
</controller>
<controller type='usb' index='0' model='ich9-uhci2'>
<alias name='usb'/>
<master startport='2'/>
<address type='pci' domain='0x0000' bus='0x00' slot='0x04' function='0x1'/>
</controller>
<controller type='usb' index='0' model='ich9-uhci3'>
<alias name='usb'/>
<master startport='4'/>
<address type='pci' domain='0x0000' bus='0x00' slot='0x04' function='0x2'/>
</controller>
<controller type='pci' index='0' model='pci-root'>
<alias name='pci.0'/>
</controller>
<controller type='ide' index='0'>
<alias name='ide'/>
<address type='pci' domain='0x0000' bus='0x00' slot='0x01' function='0x1'/>
</controller>
<interface type='bridge'>
<mac address='52:54:00:21:a0:6f'/>
<source bridge='br0'/>
<target dev='vnet4'/>
<model type='virtio'/>
<alias name='net0'/>
<address type='pci' domain='0x0000' bus='0x00' slot='0x03' function='0x0'/>
</interface>
<serial type='pty'>
<source path='/dev/pts/7'/>
<target type='isa-serial' port='0'>
<model name='isa-serial'/>
</target>
<alias name='serial0'/>
</serial>
<console type='pty' tty='/dev/pts/7'>
<source path='/dev/pts/7'/>
<target type='serial' port='0'/>
<alias name='serial0'/>
</console>
<input type='mouse' bus='ps2'>
<alias name='input0'/>
</input>
<input type='keyboard' bus='ps2'>
<alias name='input1'/>
</input>
<graphics type='vnc' port='5903' autoport='no' listen='0.0.0.0'>
<listen type='address' address='0.0.0.0'/>
</graphics>
<video>
<model type='cirrus' vram='16384' heads='1' primary='yes'/>
<alias name='video0'/>
<address type='pci' domain='0x0000' bus='0x00' slot='0x02' function='0x0'/>
</video>
<memballoon model='virtio'>
<alias name='balloon0'/>
<address type='pci' domain='0x0000' bus='0x00' slot='0x06' function='0x0'/>
</memballoon>
</devices>
<seclabel type='dynamic' model='dac' relabel='yes'>
<label>+107:+107</label>
<imagelabel>+107:+107</imagelabel>
</seclabel>
</domain>
- 编辑虚拟机
virsh edit VM3,编辑虚拟机,将vdb 磁盘的配置(①中已标红),添加到配置文件。
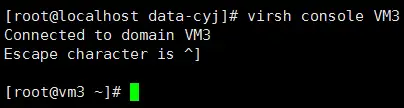
登录虚拟机,配置LVM磁盘扩展
- console登录VM3:
- 开始分区
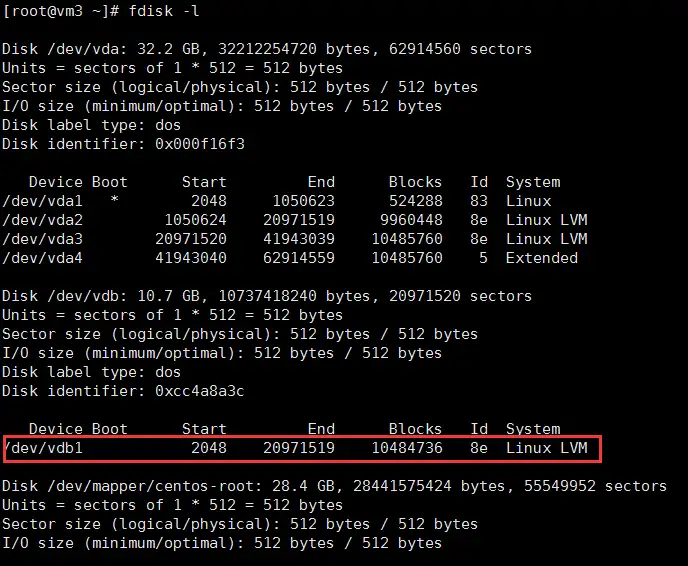
fdisk -l 查询
fdisk /dev/vdb
n创建分区,其他默认
t选择格式8e
w保存退出
执行partprobe 通知系统分区表的变化
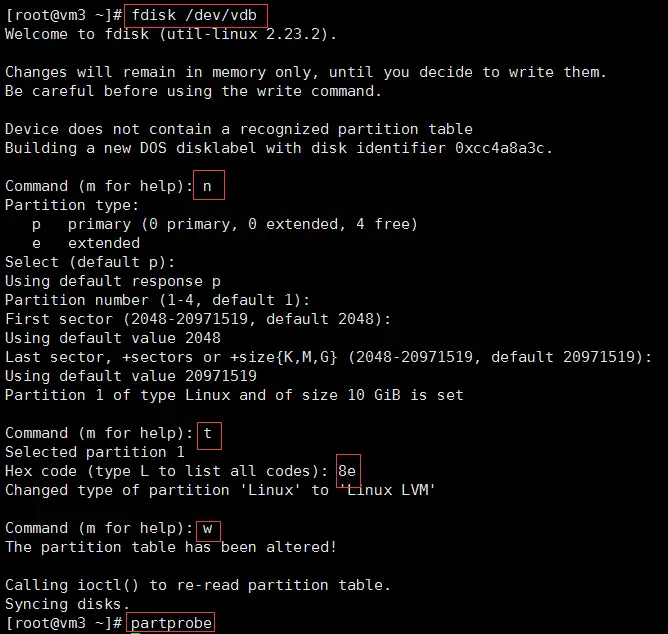
/dev/vdb1创建成功
- LVM磁盘扩展
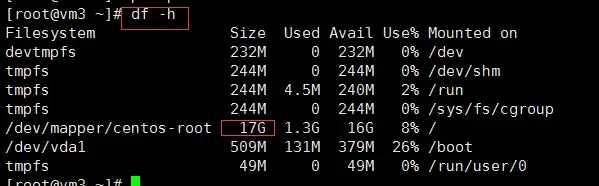
df -h 查看扩容前的容量
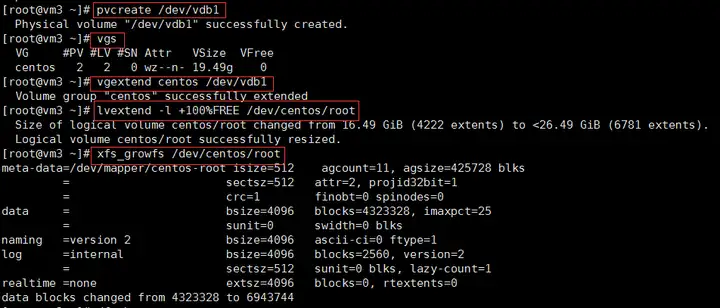
pvcreate /dev/vdb1 创建物理卷
pvs查询pv
vgextend centos /dev/vdb1 扩容
vgs查询group
#Lvextend 只是扩展了卷的大小,执行xfs_growfs 后才能将扩展空间加到文件系统
lvextend -l +100%FREE /dev/centos/root 扩容逻辑卷大小
xfs_growfs /dev/centos/root 更新修改到文件系统
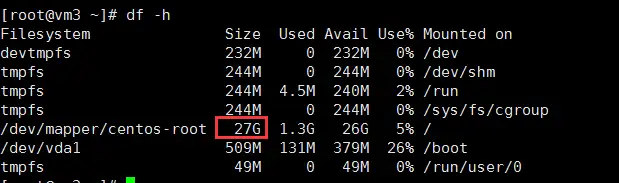
df -h查询扩容后容量
df -h查询扩容后,发现容量从17G扩展到27G,扩容成功
编辑于 2022-02-28 16:17 硬盘数据恢复 虚拟机 KVM(Kernel-based Virtual Machine) 标签:扩容,虚拟机,KVM,virsh,VM6,磁盘,VM3 From: https://www.cnblogs.com/cheyunhua/p/17358428.html