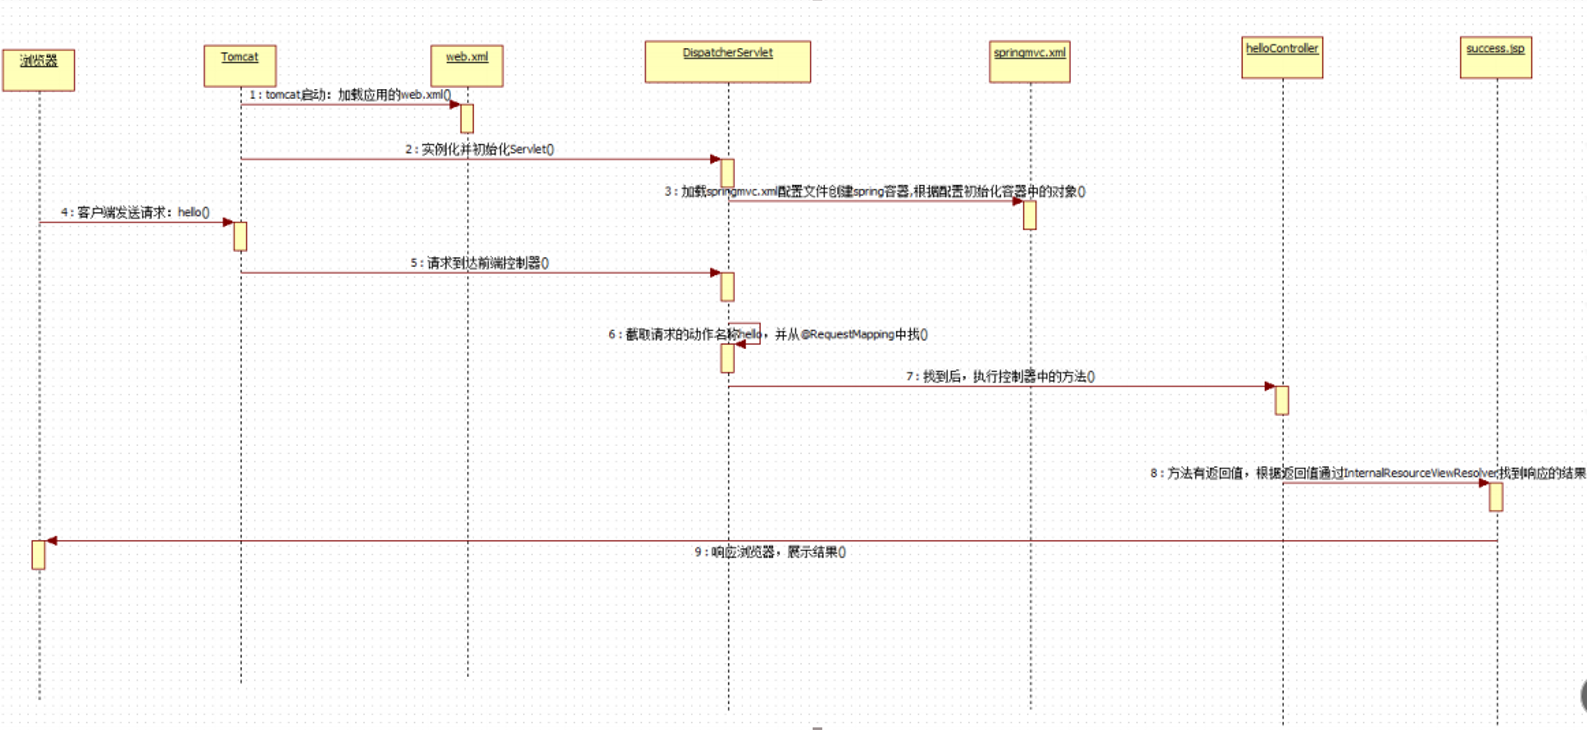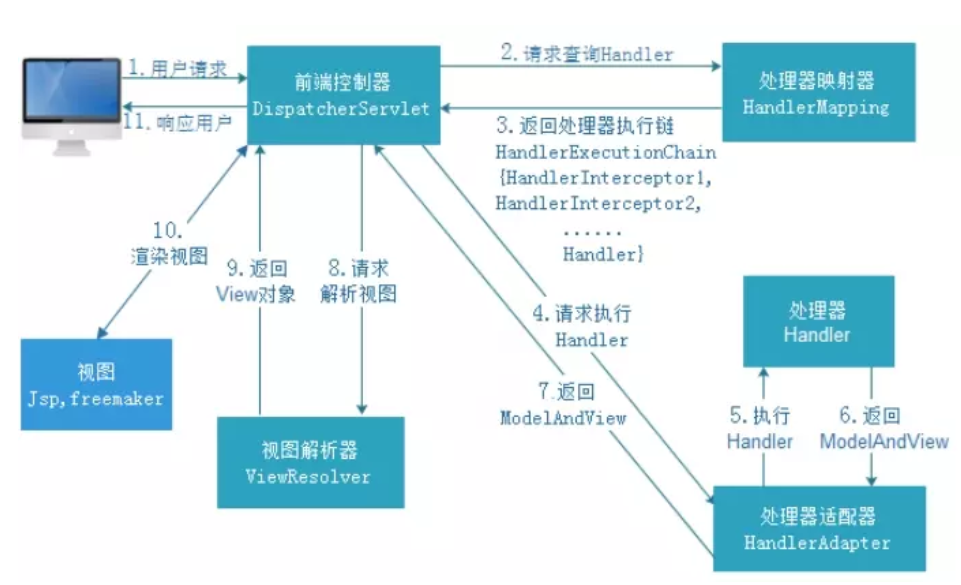

1DispatcherServlet:前端控制器
用户请求到达前端控制器,它就相当于 mvc 模式中的 c,dispatcherServlet 是整个流程控制的中心,由 它调用其它组件处理用户的请求,dispatcherServlet 的存在降低了组件之间的耦合性。
2 HandlerMapping:处理器映射器
HandlerMapping 负责根据用户请求找到 Handler 即处理器,SpringMVC 提供了不同的映射器实现不同的 映射方式,例如:配置文件方式,实现接口方式,注解方式等。
3 Handler:处理器 (自己定义的Controller处理单元)
它就是我们开发中要编写的具体业务控制器。由 DispatcherServlet 把用户请求转发到 Handler。由 Handler 对具体的用户请求进行处理。
4 HandlAdapter:处理器适配器
通过 HandlerAdapter 对处理器进行执行,这是适配器模式的应用,通过扩展适配器可以对更多类型的处理器进行执行

5 View Resolver:视图解析器
View Resolver 负责将处理结果生成 View 视图,View Resolver 首先根据逻辑视图名解析成物理视图名 即具体的页面地址,再生成 View 视图对象,最后对 View 进行渲染将处理结果通过页面展示给用户。
6 View:视图
SpringMVC 框架提供了很多的 View 视图类型的支持,包括:jstlView、freemarkerView、pdfView等。我们最常用的视图就是 jsp。 一般情况下需要通过页面标签或页面模版技术将模型数据通过页面展示给用户,需要由程序员根据业务需求开 发具体的页面。
7 <mvc:annotation-driven>说明
在 SpringMVC 的各个组件中,处理器映射器、处理器适配器、视图解析器称为 SpringMVC 的三大组件。
使 用 <mvc:annotation-driven> 自动加载 RequestMappingHandlerMapping (处理映射器) 和 RequestMappingHandlerAdapter ( 处 理 适 配 器 ) , 可 用 在 SpringMVC.xml 配 置 文 件 中 使 用 <mvc:annotation-driven>替代注解处理器和适配器的配置。
protected void doDispatch(HttpServletRequest request, HttpServletResponse response) throws Exception {
        HttpServletRequest processedRequest = request;
        HandlerExecutionChain mappedHandler = null;
        boolean multipartRequestParsed = false;
        WebAsyncManager asyncManager = WebAsyncUtils.getAsyncManager(request);
        try {
            try {
                ModelAndView mv = null;
                Object dispatchException = null;
                try {
                    processedRequest = this.checkMultipart(request);
                    multipartRequestParsed = processedRequest != request;
                    mappedHandler = this.getHandler(processedRequest);
                    if (mappedHandler == null) {
                        this.noHandlerFound(processedRequest, response);
                        return;
                    }
                    HandlerAdapter ha = this.getHandlerAdapter(mappedHandler.getHandler());
                    String method = request.getMethod();
                    boolean isGet = "GET".equals(method);
                    if (isGet || "HEAD".equals(method)) {
                        long lastModified = ha.getLastModified(request, mappedHandler.getHandler());
                        if ((new ServletWebRequest(request, response)).checkNotModified(lastModified) && isGet) {
                            return;
                        }
                    }
                    if (!mappedHandler.applyPreHandle(processedRequest, response)) {
                        return;
                    }
                    mv = ha.handle(processedRequest, response, mappedHandler.getHandler());
                    if (asyncManager.isConcurrentHandlingStarted()) {
                        return;
                    }
                    this.applyDefaultViewName(processedRequest, mv);
                    mappedHandler.applyPostHandle(processedRequest, response, mv);
                } catch (Exception var20) {
                    dispatchException = var20;
                } catch (Throwable var21) {
                    dispatchException = new NestedServletException("Handler dispatch failed", var21);
                }
                this.processDispatchResult(processedRequest, response, mappedHandler, mv, (Exception)dispatchException);
            } catch (Exception var22) {
                this.triggerAfterCompletion(processedRequest, response, mappedHandler, var22);
            } catch (Throwable var23) {
                this.triggerAfterCompletion(processedRequest, response, mappedHandler, new NestedServletException("Handler processing failed", var23));
            }
        } finally {
            if (asyncManager.isConcurrentHandlingStarted()) {
                if (mappedHandler != null) {
                    mappedHandler.applyAfterConcurrentHandlingStarted(processedRequest, response);
                }
            } else if (multipartRequestParsed) {
                this.cleanupMultipart(processedRequest);
            }
        }
    }
    private void applyDefaultViewName(HttpServletRequest request, @Nullable ModelAndView mv) throws Exception {
        if (mv != null && !mv.hasView()) {
            String defaultViewName = this.getDefaultViewName(request);
            if (defaultViewName != null) {
                mv.setViewName(defaultViewName);
            }
        }
    }
HandlerMapping的实现类的作用
实现类RequestMappingHandlerMapping,它会处理@RequestMapping 注解,并将其注册到请求映射表中。
HandlerAdapter的实现类的作用
实现类RequestMappingHandlerAdapter,则是处理请求的适配器,确定调用哪个类的哪个方法,并且构造方法参数,返回值。
当配置了mvc:annotation-driven/后,Spring就知道了我们启用注解驱动。然后Spring通过context:component-scan/标签的配置,会自动为我们将扫描到的@Component,@Controller,@Service,@Repository等注解标记的组件注册到工厂中,来处理我们的请求,这个时候接收返回json数据、参数验证、统一异常等功能。
<?xml version="1.0" encoding="UTF-8"?>
<beans xmlns="http://www.springframework.org/schema/beans"
       xmlns:xsi="http://www.w3.org/2001/XMLSchema-instance"
       xmlns:p="http://www.springframework.org/schema/p"
       xmlns:c="http://www.springframework.org/schema/c"
       xmlns:util="http://www.springframework.org/schema/util"
       xmlns:context="http://www.springframework.org/schema/context"
       xmlns:aop="http://www.springframework.org/schema/aop"
       xmlns:tx="http://www.springframework.org/schema/tx"
       xmlns:mvc="http://www.springframework.org/schema/mvc"
       xsi:schemaLocation="
       http://www.springframework.org/schema/beans
       http://www.springframework.org/schema/beans/spring-beans.xsd
       http://www.springframework.org/schema/util
       http://www.springframework.org/schema/util/spring-util.xsd
       http://www.springframework.org/schema/context
       http://www.springframework.org/schema/context/spring-context.xsd
       http://www.springframework.org/schema/aop
       http://www.springframework.org/schema/aop/spring-aop.xsd
       http://www.springframework.org/schema/tx
       http://www.springframework.org/schema/tx/spring-tx.xsd
       http://www.springframework.org/schema/mvc
       http://www.springframework.org/schema/mvc/spring-mvc.xsd
">
    <!--配置spring包扫描-->
    <context:component-scan base-package="com.msb"></context:component-scan>

    <!--配置处理器映射器-->
    <!-- <bean class="org.springframework.web.servlet.mvc.method.annotation.RequestMappingHandlerMapping"></bean>-->
    <!--配置处理器适配器-->
    <!-- <bean class="org.springframework.web.servlet.mvc.method.annotation.RequestMappingHandlerAdapter"></bean>-->
    <!--一个注解替换上面的两个配置-->
    <!--<mvc:annotation-driven>会自动注册RequestMappingHandlerMapping与RequestMappingHandlerAdapter两个Bean-->
    <mvc:annotation-driven/>
    <!--配置视图解析器-->
    <bean class="org.springframework.web.servlet.view.InternalResourceViewResolver">
        <property name="prefix" value="/WEB-INF/view/"  ></property>
        <property name="suffix" value=".jsp"  ></property>
    </bean>
    <!--静态资源放行-->
    <!--<mvc:resources mapping="/js/**" location="/js/"></mvc:resources>
    <mvc:resources mapping="/img/**" location="/img/"></mvc:resources>
    <mvc:resources mapping="/css/**" location="/css/"></mvc:resources>-->
    <mvc:resources mapping="/static/**" location="/static/"></mvc:resources>
</beans>
标签:SpringMVC,流程,request,视图,mv,mappedHandler,执行,response,processedRequest From: https://www.cnblogs.com/89564f/p/17155238.html