QT做串口的完整代码:
main.cpp
#include "myserial.h"

#include <QApplication>

int main(int argc, char *argv[])
{
    QApplication a(argc, argv);
    MySerial w;
    w.show();
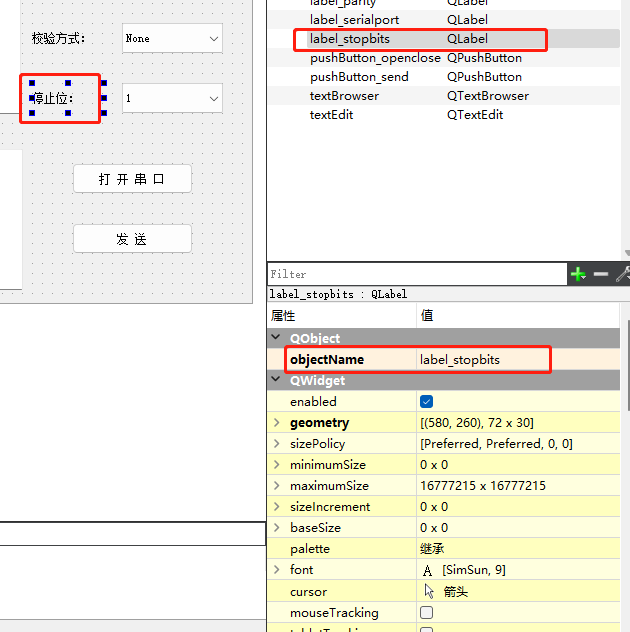
    return a.exec();
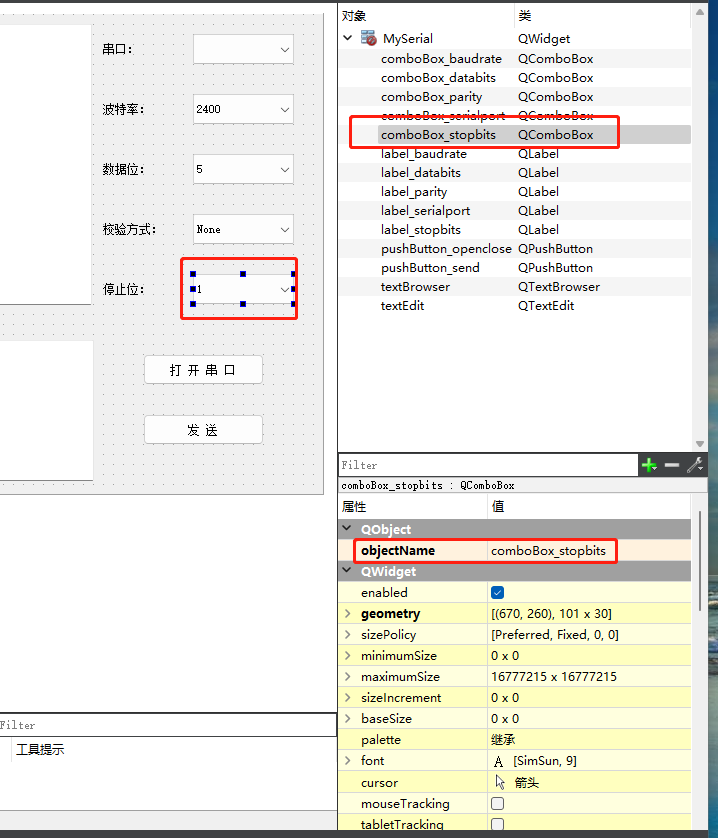
}
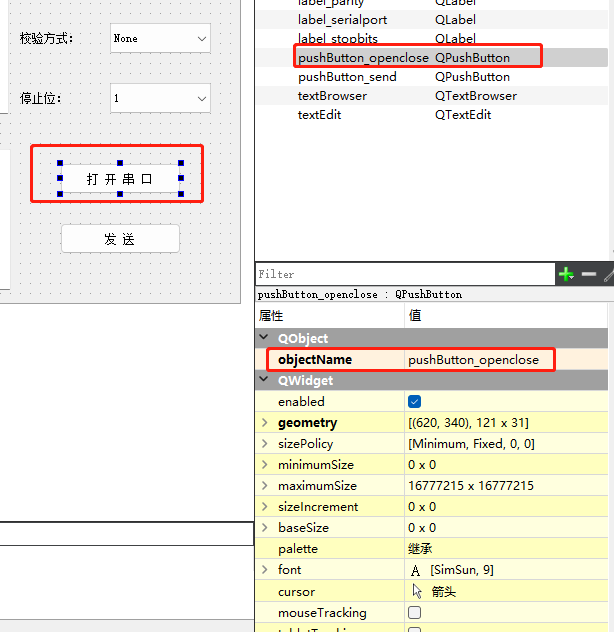
myserial.cpp
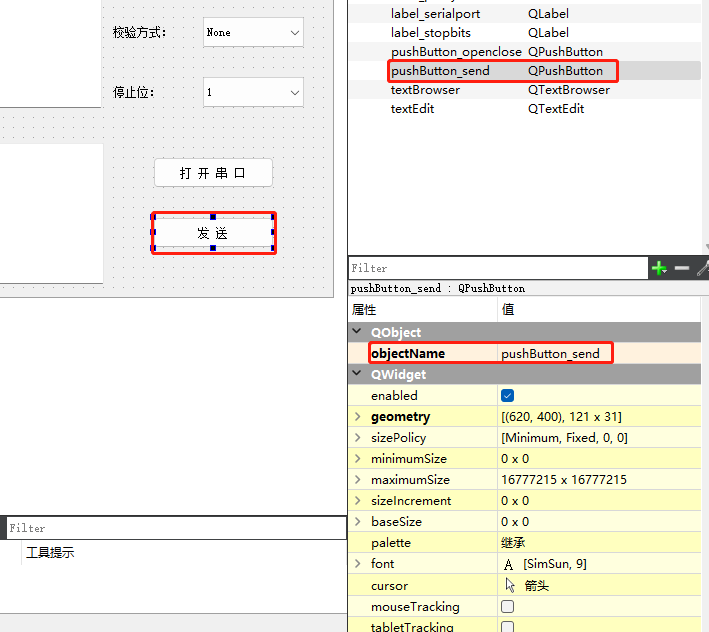
#include "myserial.h"
#include "ui_myserial.h"
#include <QDebug>

MySerial::MySerial(QWidget *parent)
    : QWidget(parent)
    , ui(new Ui::MySerial)
{
    ui->setupUi(this);

    //获取系统所有可用的串口
    foreach(const QSerialPortInfo &info,QSerialPortInfo::availablePorts()){
        qDebug()<<info.portName()<<info.description();
        //ui->comboBox_serialport->addItem(info.portName());
        QSerialPort serial(info);
        //测试串口是否可用
        if(serial.open(QIODevice::ReadWrite)){//空闲
            //将串口名加入选项列表
            ui->comboBox_serialport->addItem(serial.portName());
            //关闭串口
            serial.close();
        }
        else{//被占用
            ui->comboBox_serialport->addItem(serial.portName()+"(被占用)");
        }
    }

    ui->pushButton_send->setEnabled(false);
}

MySerial::~MySerial()
{
    delete ui;
}

//打开/关闭串口
void MySerial::on_pushButton_openclose_clicked()
{
    if(ui->pushButton_openclose->text()=="打 开 串 口"){//打开
        ser = new QSerialPort(ui->comboBox_serialport->currentText(),this);
        //打开串口
        if(!ser->open(QIODevice::ReadWrite)){
            qDebug()<<"打开失败";
            ser->deleteLater();
            return;
        }

        //设置波特率
        switch (ui->comboBox_baudrate->currentIndex()) {
            case 0:
                ser->setBaudRate(QSerialPort::Baud2400);
                break;
            case 1:
                ser->setBaudRate(QSerialPort::Baud4800);
                break;
            case 2:
                ser->setBaudRate(QSerialPort::Baud9600);
                break;
            case 3:
                ser->setBaudRate(QSerialPort::Baud38400);
                break;
            case 4:
                ser->setBaudRate(QSerialPort::Baud115200);
                break;
        }

        //设置数据位位数
        switch (ui->comboBox_databits->currentIndex()) {
            case 0:
                ser->setDataBits(QSerialPort::Data5);
                break;
            case 1:
                ser->setDataBits(QSerialPort::Data6);
                break;
            case 2:
                ser->setDataBits(QSerialPort::Data7);
                break;
            case 3:
                ser->setDataBits(QSerialPort::Data8);
                break;
        }

        //设置校验位
        switch (ui->comboBox_parity->currentIndex()) {
            case 0:
                ser->setParity(QSerialPort::NoParity);
                break;
            case 1:
                ser->setParity(QSerialPort::OddParity);
                break;
            case 2:
                ser->setParity(QSerialPort::EvenParity);
                break;
        }

        //设置停止位
        switch (ui->comboBox_parity->currentIndex()) {
        case 0:
            ser->setStopBits(QSerialPort::OneStop);
            break;
        case 1:
            ser->setStopBits(QSerialPort::TwoStop);
            break;
        }

        //关闭流控
        ser->setFlowControl(QSerialPort::NoFlowControl);

        //关闭选项菜单
        ui->comboBox_parity->setEnabled(false);
        ui->comboBox_baudrate->setEnabled(false);
        ui->comboBox_databits->setEnabled(false);
        ui->comboBox_stopbits->setEnabled(false);
        ui->comboBox_serialport->setEnabled(false);
        ui->pushButton_send->setEnabled(true);

        //修改按钮显示
        ui->pushButton_openclose->setText("关 闭 串 口");

        //连接信号和槽
        QObject::connect(ser,&QSerialPort::readyRead,this,&MySerial::readData);
    }
    else{//关闭
        ser->clear();
        ser->close();
        ser->deleteLater();

        ui->comboBox_parity->setEnabled(true);
        ui->comboBox_baudrate->setEnabled(true);
        ui->comboBox_databits->setEnabled(true);
        ui->comboBox_stopbits->setEnabled(true);
        ui->comboBox_serialport->setEnabled(true);
        ui->pushButton_send->setEnabled(false);

        ui->pushButton_openclose->setText("打 开 串 口");

    }
}

//接收数据
void MySerial::readData()
{
    //接收所有数据
    QByteArray data = ser->readAll();

    if(!data.isEmpty()){
        ui->textBrowser->append(QString(data));
    }

    //data.clear();
}

//发送数据
void MySerial::on_pushButton_send_clicked()
{
    //获取要发送的数据
    QByteArray data = ui->textEdit->toPlainText().toUtf8();
    ser->write(data);
}
myserial.h
#ifndef MYSERIAL_H
#define MYSERIAL_H

#include <QWidget>
#include <QSerialPortInfo>
#include <QSerialPort>

QT_BEGIN_NAMESPACE
namespace Ui { class MySerial; }
QT_END_NAMESPACE

class MySerial : public QWidget
{
    Q_OBJECT

public:
    MySerial(QWidget *parent = nullptr);
    ~MySerial();

private slots:
    void on_pushButton_openclose_clicked();
    //接收串口数据槽函数
    void readData();

    void on_pushButton_send_clicked();

private:
    Ui::MySerial *ui;
    //串口类
    QSerialPort *ser;
};
#endif // MYSERIAL_H
4.5.6行的 #include问题 的解决方案:
https://blog.csdn.net/qq_52926110/article/details/122780655
mySerial.pro
QT       += core gui serialport

greaterThan(QT_MAJOR_VERSION, 4): QT += widgets

CONFIG += c++11

# The following define makes your compiler emit warnings if you use
# any Qt feature that has been marked deprecated (the exact warnings
# depend on your compiler). Please consult the documentation of the
# deprecated API in order to know how to port your code away from it.
DEFINES += QT_DEPRECATED_WARNINGS

# You can also make your code fail to compile if it uses deprecated APIs.
# In order to do so, uncomment the following line.
# You can also select to disable deprecated APIs only up to a certain version of Qt.
#DEFINES += QT_DISABLE_DEPRECATED_BEFORE=0x060000    # disables all the APIs deprecated before Qt 6.0.0

SOURCES += \
    main.cpp \
    myserial.cpp

HEADERS += \
    myserial.h

FORMS += \
    myserial.ui

# Default rules for deployment.
qnx: target.path = /tmp/$${TARGET}/bin
else: unix:!android: target.path = /opt/$${TARGET}/bin
!isEmpty(target.path): INSTALLS += target
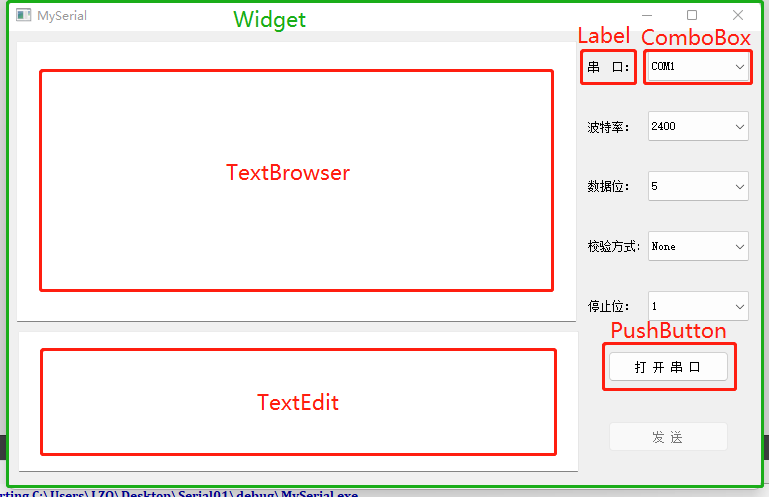
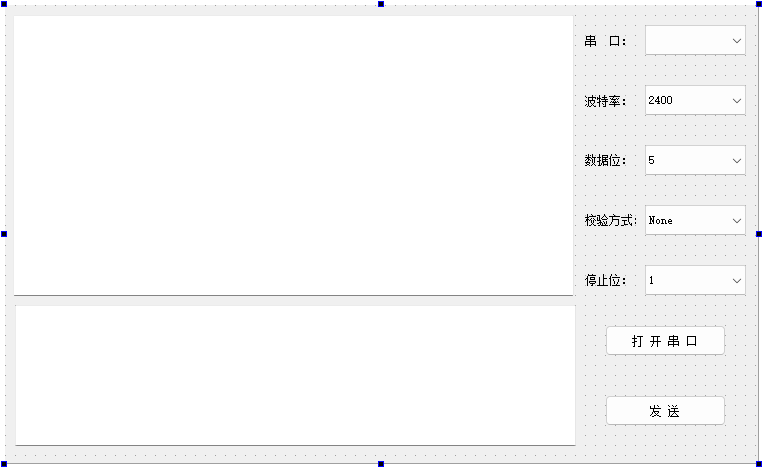
UI界面设置:


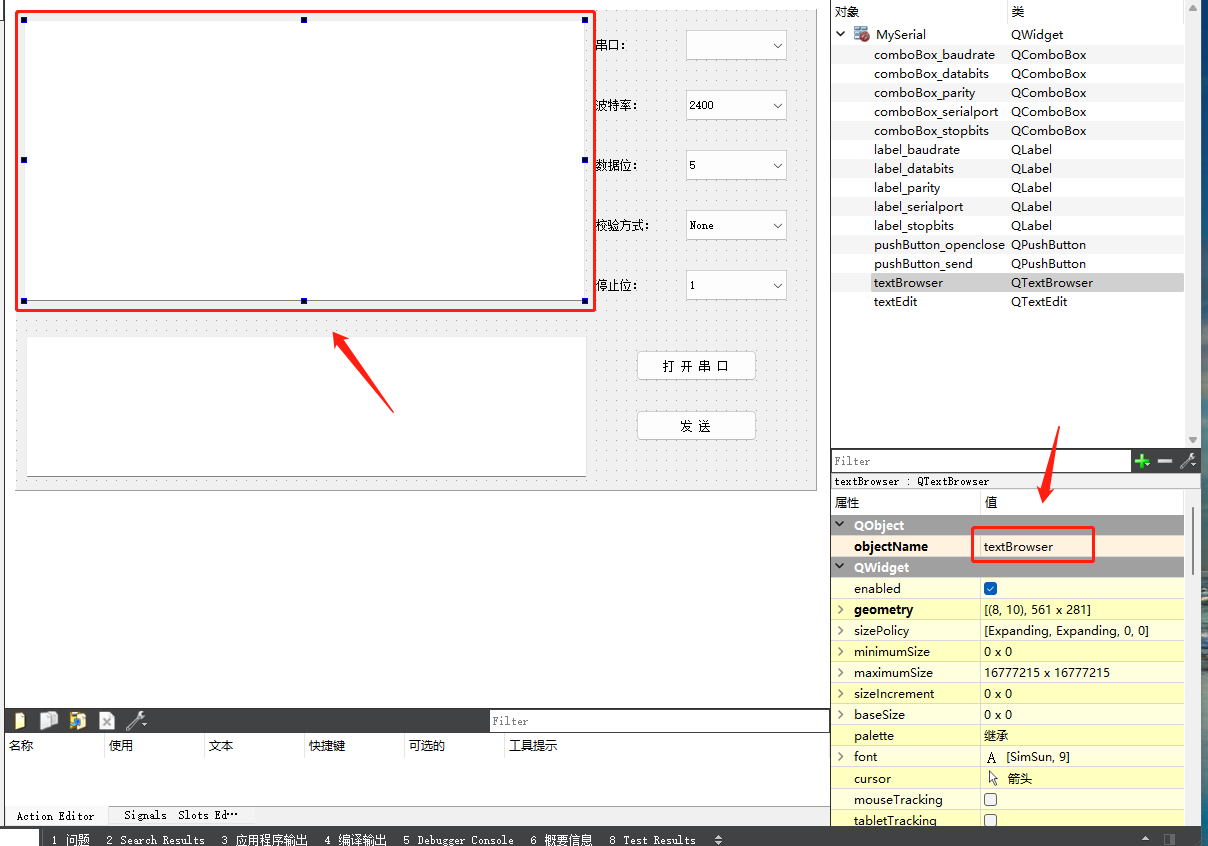
1.输出显示框 textBrower
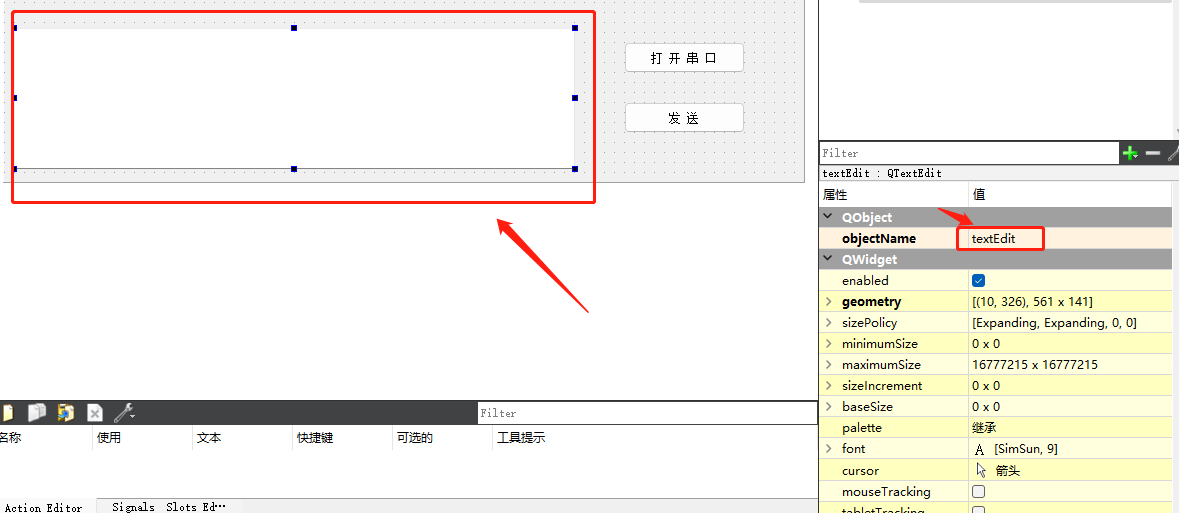
2.输入文本框 textEdit
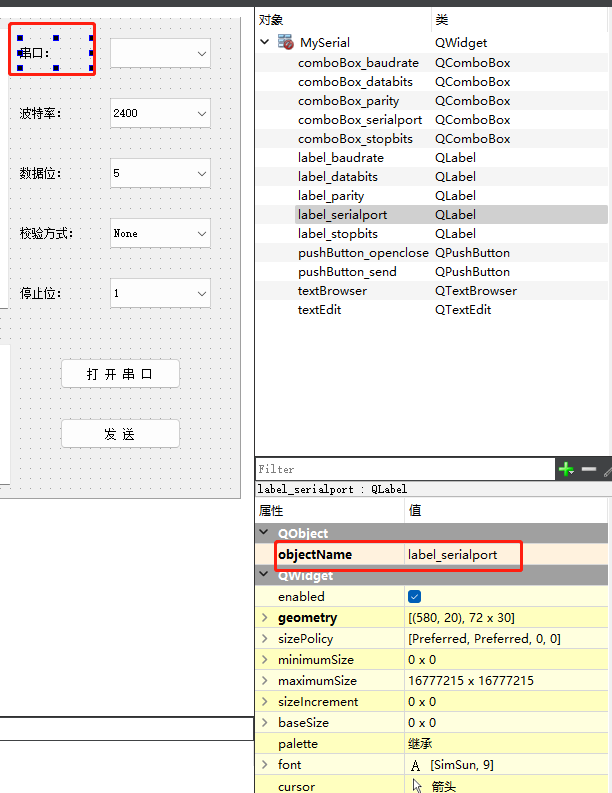
3.串口 文本 label_serialport
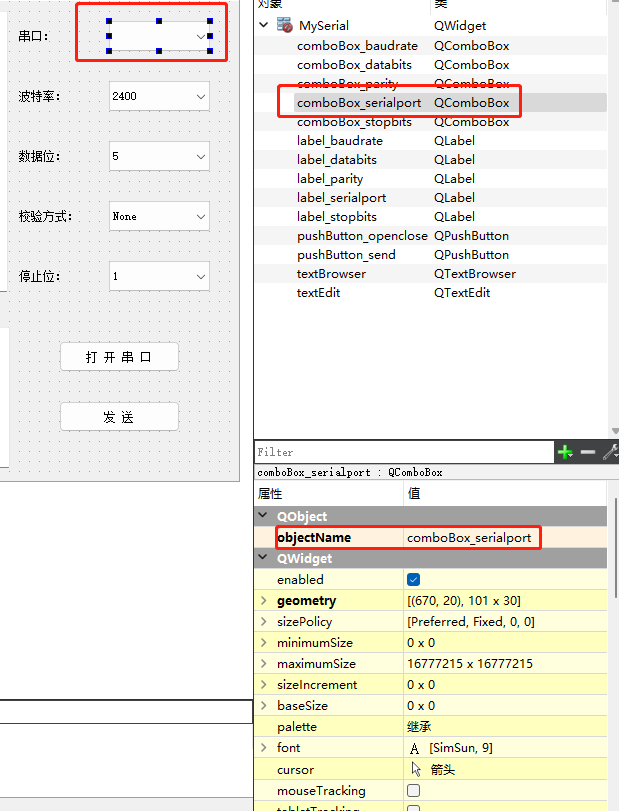
4.串口 选项框 comboBox_serialport
5.波特率选择框 comboBox_baudrate
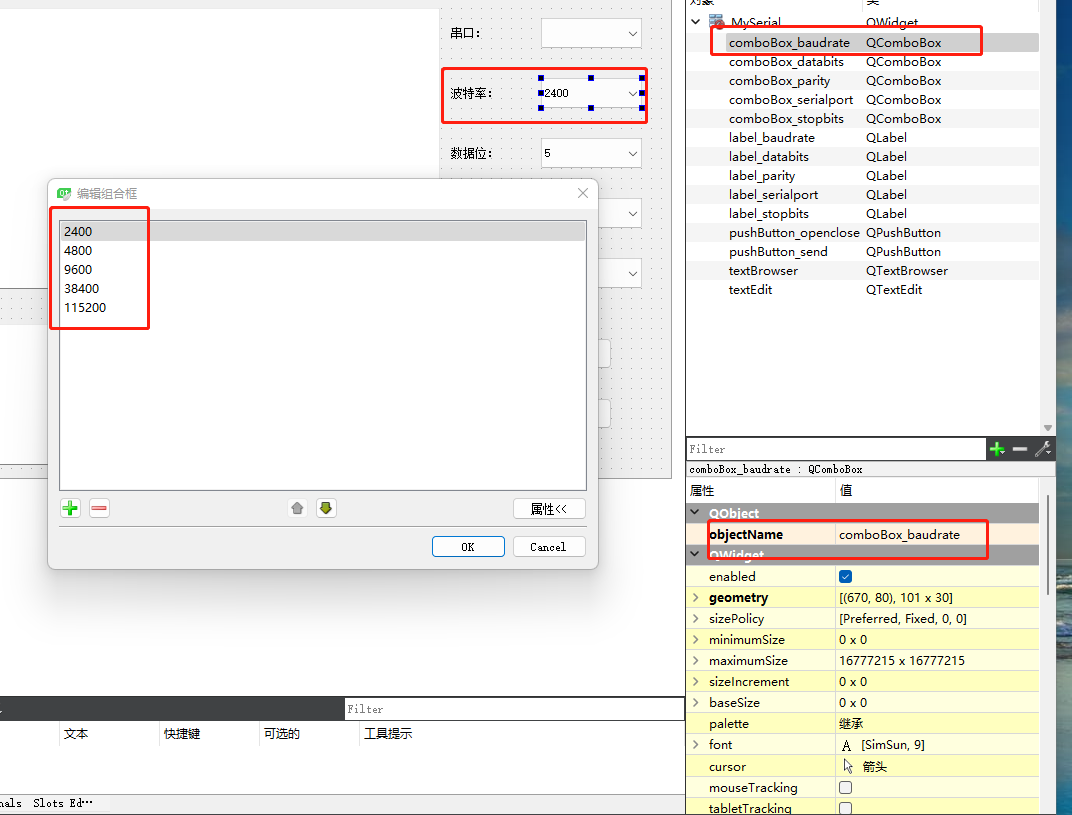
6.数据位选择框 comboBox_databits
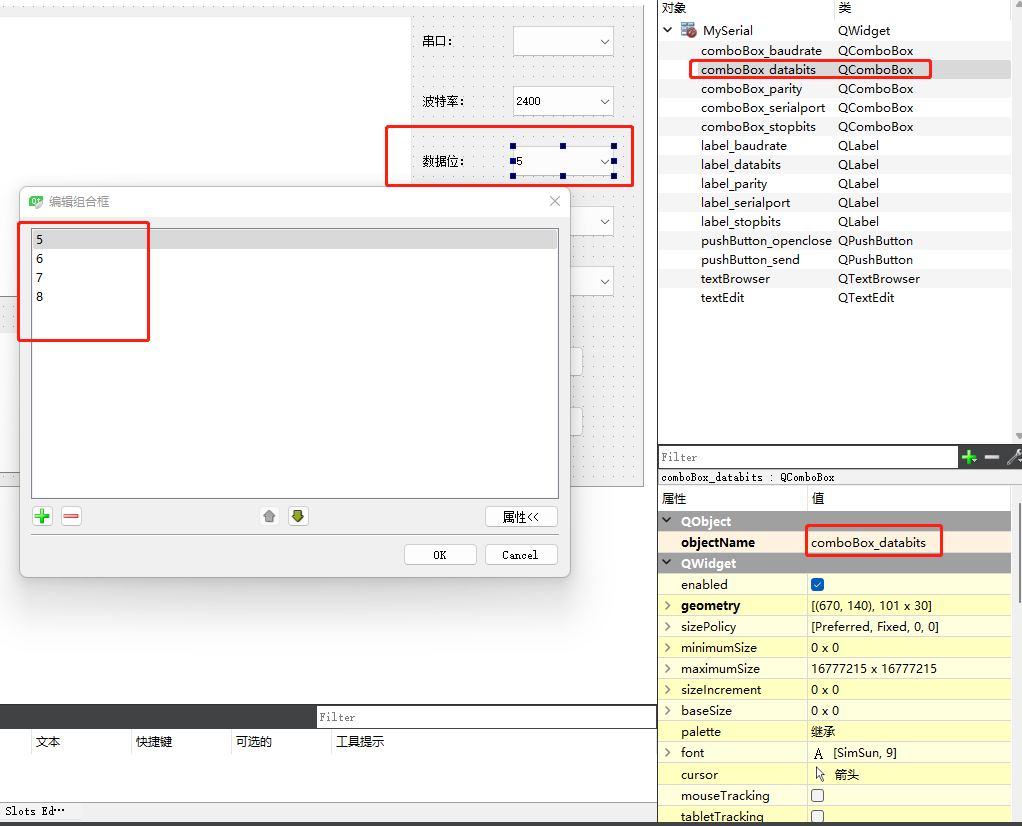
7.校验方式选择框 comboBox_parity
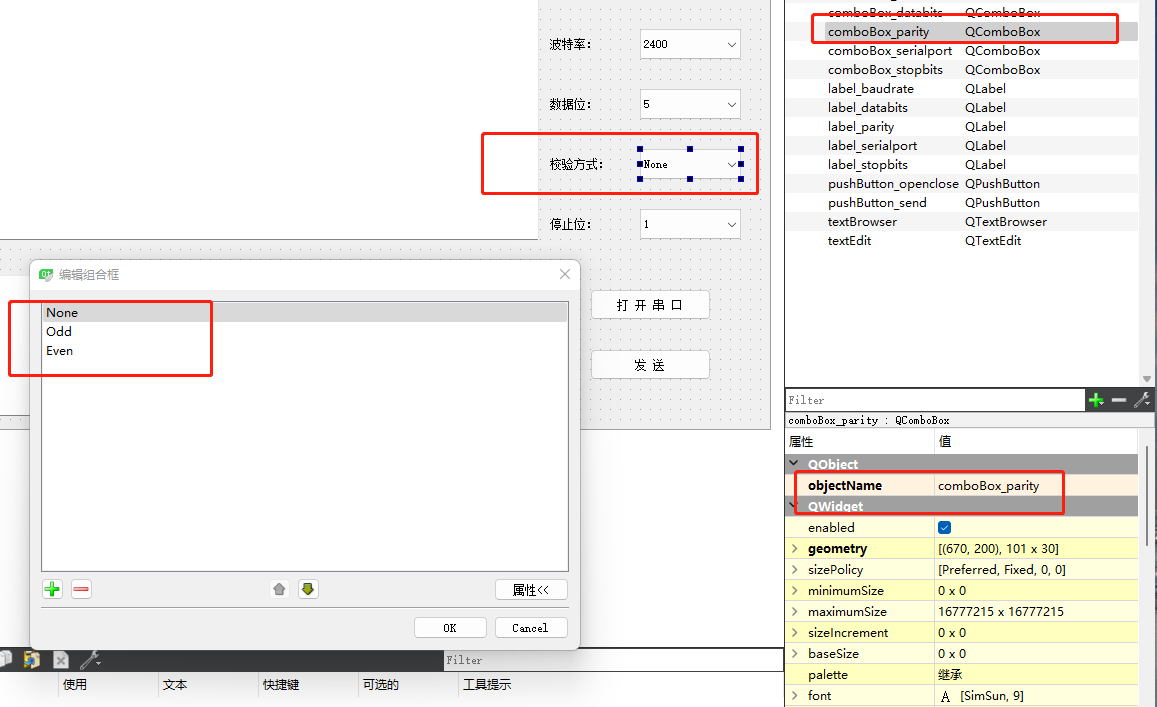
8.校验方式(文本)label_parity
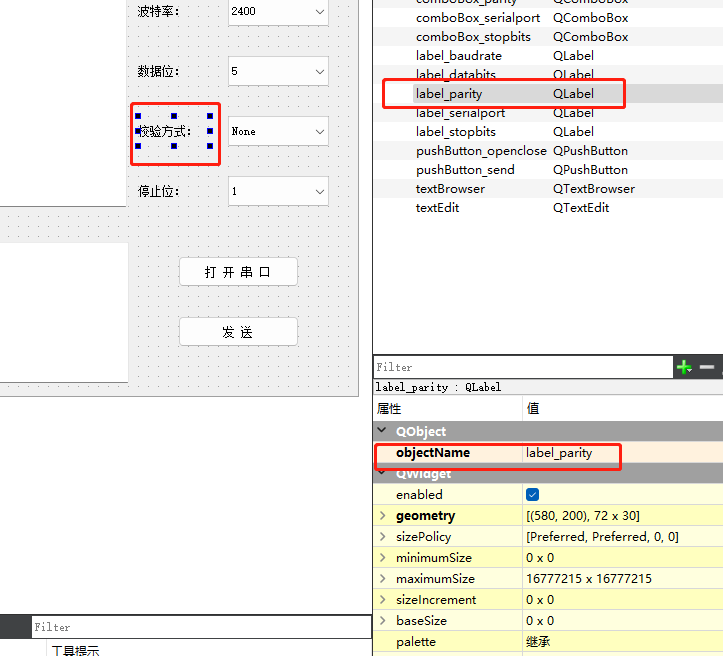
9.停止位(文本)label_stopbits
10.停止位选择框 comboBox_stopbits
11.打开串口按钮 pushButton_openclose
12.发送按钮 pushButton_send
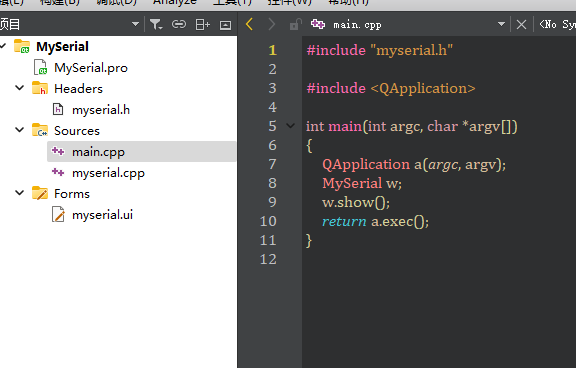
QT的新建工程文件部分:
新建工程之后的代码结构:
main.cpp:
#include "mainwindow.h"
#include <QApplication>

int main(int argc, char *argv[])
{
    QApplication a(argc, argv);
    MainWindow w;
    w.show();

    return a.exec();
}
mainwindow.cpp
#include "mainwindow.h"
#include "ui_mainwindow.h"

MainWindow::MainWindow(QWidget *parent) :
    QMainWindow(parent),
    ui(new Ui::MainWindow)
{
    ui->setupUi(this);
}

MainWindow::~MainWindow()
{
    delete ui;
}
mainwindow.h
#ifndef MAINWINDOW_H
#define MAINWINDOW_H

#include <QMainWindow>

namespace Ui {
class MainWindow;
}

class MainWindow : public QMainWindow
{
    Q_OBJECT

public:
    explicit MainWindow(QWidget *parent = nullptr);
    ~MainWindow();

private:
    Ui::MainWindow *ui;
};

#endif // MAINWINDOW_H
重点详解步骤:
mySerial.pro
qt串口这里需要用到一个很关键的类serialport,要现在.pro工程文件里面添加该模块(在QT += core gui 代码后面加上该模块)
.pro
QT += core gui serialport
然后在头文件引入就可以使用了
#include <QtSerialPort/QSerialPort>
#include <QtSerialPort/QSerialPortInfo>
QSerialPort:提供访问串口的功能
QSerialPortInfo:提供系统中存在的串口的信息
接下来需要创建一个QSerialPort的对象,对串口的名称、波特率、数据位、校验位、停止位等参数进行设置,然后才进行串口读写操作。
大概总结了一下,设置、读、写的过程。
.PRO具体代码
QT       += core gui serialport

greaterThan(QT_MAJOR_VERSION, 4): QT += widgets

CONFIG += c++11

# The following define makes your compiler emit warnings if you use
# any Qt feature that has been marked deprecated (the exact warnings
# depend on your compiler). Please consult the documentation of the
# deprecated API in order to know how to port your code away from it.
DEFINES += QT_DEPRECATED_WARNINGS

# You can also make your code fail to compile if it uses deprecated APIs.
# In order to do so, uncomment the following line.
# You can also select to disable deprecated APIs only up to a certain version of Qt.
#DEFINES += QT_DISABLE_DEPRECATED_BEFORE=0x060000    # disables all the APIs deprecated before Qt 6.0.0

SOURCES += \
    main.cpp \
    myserial.cpp

HEADERS += \
    myserial.h

FORMS += \
    myserial.ui

# Default rules for deployment.
qnx: target.path = /tmp/$${TARGET}/bin
else: unix:!android: target.path = /opt/$${TARGET}/bin
!isEmpty(target.path): INSTALLS += target
main.cpp
#include "myserial.h"

#include <QApplication>

int main(int argc, char *argv[])
{
    QApplication a(argc, argv);
    MySerial w;
    w.show();
    return a.exec();
}
myserial.cpp
(1)串口功能:(myserial.cpp)
接下来,使用代码将串口号给加进去。打开“myserial.cpp文件”,对文件进行编写和修改。
#include "myserial.h"
#include "ui_myserial.h"
#include <QDebug>               /************************/

MySerial::MySerial(QWidget *parent)    //定义派生类的构造函数
    QMainWindow(parent),
    ui(new Ui::myserial)
{
    ui->setupUi(this);
      /******************获取系统所有可用的串口(后加的功能)*******************/
    //获取系统所有可用的串口
        foreach(const QSerialPortInfo &info,QSerialPortInfo::availablePorts()){
            qDebug()<<info.portName()<<info.description();
            //ui->comboBox_serialport->addItem(info.portName());
            QSerialPort serial(info);
            //测试串口是否可用
            if(serial.open(QIODevice::ReadWrite)){//空闲
                //将串口名加入选项列表
                ui->comboBox_serialport->addItem(serial.portName());
                //关闭串口
                serial.close();
            }
            else{//被占用
                ui->comboBox_serialport->addItem(serial.portName()+"(被占用)");
            }
        }

        ui->pushButton_send->setEnabled(false);
  /***************************************************************/
}

MySerial::~MySerial()
{
    delete ui;
}
用法解析(1):
MySerial::MySerial(QWidget *parent)    //定义派生类的构造函数
    QMainWindow(parent),
    ui(new Ui::myserial)
{
    ui->setupUi(this);
}
1、
QMainWindow是MySerial的父类2、
QWidget *parent中的 parent 值赋值给QMainWindow(parent)中的parent, 这其实是用到C++的语法,执行
MySerial的构造函数前先执行父类QMainWindow的构造函数3、写这句
QMainWindow(parent)的原因是new一个myserial对象可以指定父对象, 从而使用 Qt 提供的内存自动回收机制
4、
QWidget *parent中为QWidget的原因是QWidget为窗口类型的类的基类, 对于其他父类(比如非
QMainWindow,即非窗口类),parent类型是 QObject5、
ui(new Ui::MainWindow)的作用相当于ui = new Ui::MainWindow,即对对象 ui 进行实例化
用法解析(2)
后补充的代码
      /******************获取系统所有可用的串口(后加的功能)*******************/
    //获取系统所有可用的串口
        foreach(const QSerialPortInfo &info,QSerialPortInfo::availablePorts())     //添加新串口
        {
            qDebug()<<info.portName()<<info.description();         //ui->comboBox_serialport->addItem(info.portName());

            QSerialPort serial(info);  //测试串口是否可用

            if(serial.open(QIODevice::ReadWrite)){       //空闲

                ui->comboBox_serialport->addItem(serial.portName());       //将串口名加入选项列表

                serial.close();      //关闭串口
            }
            else{//被占用
                ui->comboBox_serialport->addItem(serial.portName()+"(被占用)");
            }
        }

        ui->pushButton_send->setEnabled(false);
  /***************************************************************/
解析:
Qt自带的
QSerialPortInfo中自带了这样的获取当前串口的简易方法QSerialPortInfo::availablePorts()foreach(const QSerialPortInfo &info, QSerialPortInfo::availablePorts()) { QSerialPort serial; serial.setPort(info); ui->comboBox_PortName->addItem(serial.portName()); }上述代码是通过
QSerialPortInfo的方法availablePorts()返回一个QList,然后通过foreach遍历。 注意:因为
QSerialPortInfo类在提供的是一个包含port name, system location, description, and manufacturer几种内容的,所以不能直接使用,我们通过SerialPort的setPort方法设置一下,转而获取QSerialPort的port Name(),就可以添加到我们的QComboBox中了。以上就是获取所有可获得的串口号的方法,但是有的时候我们会发现,获取到的串口不一定能用(被占用或其他情况),这时我们只要在上面代码中稍微处理一下就好。foreach(const QSerialPortInfo &info, QSerialPortInfo::availablePorts()) { QSerialPort serial; serial.setPort(info); if(serial.open(QIODevice::ReadWrite)) { ui->comboBox_PortName->addItem(serial.portName()); serial.close(); } }这里相当于先尝试串口是否能打开,但是由于这个过程是需要时间的,所以在界面上来看会有卡顿。
(2)打开或者关闭串口功能(myserial.cpp)
/****************************打开/关闭串口***************************/
void MySerial::on_pushButton_openclose_clicked()
{
    if(ui->pushButton_openclose->text()=="打 开 串 口")  //打开
    {
        ser = new QSerialPort(ui->comboBox_serialport->currentText(),this);    //打开串口

        if(!ser->open(QIODevice::ReadWrite))   // 以读写方式打开串口
        {
            qDebug()<<"打开失败";
            ser->deleteLater();
            return;
        }

        /******************设置波特率******************/
        switch (ui->comboBox_baudrate->currentIndex())
        {
            case 0:
                ser->setBaudRate(QSerialPort::Baud2400);
                break;
            case 1:
                ser->setBaudRate(QSerialPort::Baud4800);
                break;
            case 2:
                ser->setBaudRate(QSerialPort::Baud9600);
                break;
            case 3:
                ser->setBaudRate(QSerialPort::Baud38400);
                break;
            case 4:
                ser->setBaudRate(QSerialPort::Baud115200);
                break;
        }

        /******************设置数据位位数******************/
        switch (ui->comboBox_databits->currentIndex())
        {
            case 0:
                ser->setDataBits(QSerialPort::Data5);
                break;
            case 1:
                ser->setDataBits(QSerialPort::Data6);
                break;
            case 2:
                ser->setDataBits(QSerialPort::Data7);
                break;
            case 3:
                ser->setDataBits(QSerialPort::Data8);
                break;
        }

        /******************设置校验位******************/
        switch (ui->comboBox_parity->currentIndex())
       {
            case 0:
                ser->setParity(QSerialPort::NoParity);
                break;
            case 1:
                ser->setParity(QSerialPort::OddParity);
                break;
            case 2:
                ser->setParity(QSerialPort::EvenParity);
                break;
        }

        /******************设置停止位******************/
        switch (ui->comboBox_parity->currentIndex())
        {
        case 0:
            ser->setStopBits(QSerialPort::OneStop);
            break;
        case 1:
            ser->setStopBits(QSerialPort::TwoStop);
            break;
        }

        /******************关闭流控******************/
        ser->setFlowControl(QSerialPort::NoFlowControl);

        /******************关闭选项菜单******************/
        ui->comboBox_parity->setEnabled(false);
        ui->comboBox_baudrate->setEnabled(false);
        ui->comboBox_databits->setEnabled(false);
        ui->comboBox_stopbits->setEnabled(false);
        ui->comboBox_serialport->setEnabled(false);
        ui->pushButton_send->setEnabled(true);

        /******************修改按钮显示******************/
        ui->pushButton_openclose->setText("关 闭 串 口");

        /******************连接信号和槽******************/
        QObject::connect(ser,&QSerialPort::readyRead,this,&myserial::readData);
    }
    else{//关闭
        ser->clear();
        ser->close();
        ser->deleteLater();

        ui->comboBox_parity->setEnabled(true);
        ui->comboBox_baudrate->setEnabled(true);
        ui->comboBox_databits->setEnabled(true);
        ui->comboBox_stopbits->setEnabled(true);
        ui->comboBox_serialport->setEnabled(true);
        ui->pushButton_send->setEnabled(false);

        ui->pushButton_openclose->setText("打 开 串 口");

    }
}
解析
void MySerial::on_pushButton_openclose_clicked()
{
   if(ui->pushButton_openclose->text()=="打 开 串 口")  //打开
   {
       ser = new QSerialPort(ui->comboBox_serialport->currentText(),this);    //打开串口

       if(!ser->open(QIODevice::ReadWrite))   // 以读写方式打开串口
       {
           qDebug()<<"打开失败";
           ser->deleteLater();
           return;
       }
if(ui->pushButton_openclose->text()=="打 开 串 口")如果 UI界面中的
pushButton_openclose的文本是"打 开 串 口"ser = new QSerialPort(ui->comboBox_serialport->currentText(),this);
currentText()是直接返回下拉框中的内容.if(!ser->open(QIODevice::ReadWrite))QT文件打开方式:file.open(QIODevice::Truncate)
QIODevice::ReadWrite 以读写方式打开
QIODevice::ReadOnly 以只读方式打开
QIODevice::WriteOnly 以只写方式打开
QIODevice::Append 以追加的方式打开
QIODevice::NotOpen 未打开
qDebug()<<"打开失败";qDebug() << "Hello" << 123;此处
qDebug()的作用是输出字符串ser->deleteLater();deleteLater()。这个api的特点就是不会立即删除,而是在下一次消息循环中去删除。
obj.deleteLater()
- 删除对象的api
- 删除一个对象时,也会解除他与父对象之间的关系
- 工作过程:deleteLater()并没有将对象立即销毁,而是向主消息循环发送了一个event,下一次主消息循环收到这个event之后才会销毁对象
- 应用场景:想要移除某一对象的时候使用
设置波特率
       /******************设置波特率******************/
       switch (ui->comboBox_baudrate->currentIndex())
       {
           case 0:
               ser->setBaudRate(QSerialPort::Baud2400);
               break;
           case 1:
               ser->setBaudRate(QSerialPort::Baud4800);
               break;
           case 2:
               ser->setBaudRate(QSerialPort::Baud9600);
               break;
           case 3:
               ser->setBaudRate(QSerialPort::Baud38400);
               break;
           case 4:
               ser->setBaudRate(QSerialPort::Baud115200);
               break;
       }
ser是选中的串口号
currentIndex()在Qt5的QTabWidget类中,在默认情况下是以0开始作为标签索引值,而
currentIndex()函数返回的值指的是 在 当前的页面切换的界面中所停留的那一个页面对应的标签索引值。
设置数据位
/******************设置数据位位数******************/ switch (ui->comboBox_databits->currentIndex()) { case 0: ser->setDataBits(QSerialPort::Data5); break; case 1: ser->setDataBits(QSerialPort::Data6); break; case 2: ser->setDataBits(QSerialPort::Data7); break; case 3: ser->setDataBits(QSerialPort::Data8); break; }currentIndex()在Qt5的QTabWidget类中,在默认情况下是以0开始作为标签索引值,而
currentIndex()函数返回的值指的是 在 当前的页面切换的界面中所停留的那一个页面对应的标签索引值。// 通常设置八位数据位 serial->setDataBits(QSerialPort::Data8);
设置校验位
/******************设置校验位******************/ switch (ui->comboBox_parity->currentIndex()) { case 0: ser->setParity(QSerialPort::NoParity); break; case 1: ser->setParity(QSerialPort::OddParity); break; case 2: ser->setParity(QSerialPort::EvenParity); break; }currentIndex()在Qt5的QTabWidget类中,在默认情况下是以0开始作为标签索引值,而
currentIndex()函数返回的值指的是 在 当前的页面切换的界面中所停留的那一个页面对应的标签索引值。NoParity :无奇偶校验
OddParity:奇数 奇偶校验
EvenParity:偶数 奇偶校验
设置停止位
   ```
   /******************设置停止位******************/
         switch (ui->comboBox_parity->currentIndex())
         {
         case 0:
             ser->setStopBits(QSerialPort::OneStop);
             break;
         case 1:
             ser->setStopBits(QSerialPort::TwoStop);
             break;
         }
   ```


   >```
   >currentIndex()
   >```
   >
   >在Qt5的==QTabWidget==类中,在默认情况下是以0开始作为标签索引值,而`currentIndex()`函数返回的值指的是 在  当前的页面切换的界面中所停留的那一个页面对应的标签索引值。
关闭流控
       /******************关闭流控******************/
       ser->setFlowControl(QSerialPort::NoFlowControl);
flowControl : FlowControl
这个是设置串口的流控的。跟波特率一样,要在打开串口之前设置。也可以在QSerialPort::error里面看到错误反馈。流控的默认配置是关闭的,默认值为NoFlowControl。
跟这个参数相关的函数有这两个:
FlowControl flowControl() const bool setFlowControl(FlowControl flowControl) 相关的信号有:
void flowControlChanged(QSerialPort::FlowControl flow)
关闭选项菜单
/******************关闭选项菜单******************/ ui->comboBox_parity->setEnabled(false); ui->comboBox_baudrate->setEnabled(false); ui->comboBox_databits->setEnabled(false); ui->comboBox_stopbits->setEnabled(false); ui->comboBox_serialport->setEnabled(false); ui->pushButton_send->setEnabled(true);ui->comboBox_parity->setEnabled(false);关闭串口后“校验” 下拉框 不可用
ui->comboBox_baudrate->setEnabled(false);关闭串口后“波特率” 下拉框 不可用
ui->comboBox_databits->setEnabled(false);关闭串口后“数据位” 下拉框 不可用
ui->comboBox_stopbits->setEnabled(false);关闭串口后“停止位” 下拉框 不可用
ui->comboBox_serialport->setEnabled(false);关闭串口后“串口” 下拉框 不可用
ui->pushButton_send->setEnabled(true);关闭串口后“发送” 按钮 可用
修改按钮显示
       /******************修改按钮显示******************/
       ui->pushButton_openclose->setText("关 闭 串 口");
连接信号和槽
/******************连接信号和槽******************/ QObject::connect(ser,&QSerialPort::readyRead,this,&myserial::readData); } else{//关闭 ser->clear(); ser->close(); ser->deleteLater(); ui->comboBox_parity->setEnabled(true); ui->comboBox_baudrate->setEnabled(true); ui->comboBox_databits->setEnabled(true); ui->comboBox_stopbits->setEnabled(true); ui->comboBox_serialport->setEnabled(true); ui->pushButton_send->setEnabled(false); ui->pushButton_openclose->setText("打 开 串 口"); } }QObject::connect(ser,&QSerialPort::readyRead,this,&myserial::readData);连接信号和槽
ui->comboBox_parity->setEnabled(true); ui->comboBox_baudrate->setEnabled(true); ui->comboBox_databits->setEnabled(true); ui->comboBox_stopbits->setEnabled(true); ui->comboBox_serialport->setEnabled(true); ui->pushButton_send->setEnabled(false); ui->pushButton_openclose->setText("打 开 串 口");ui->comboBox_parity->setEnabled(true);关闭串口后“串口” 下拉框 可用
ui->comboBox_baudrate->setEnabled(true);关闭串口后“波特率” 下拉框 可用
ui->comboBox_databits->setEnabled(true);关闭串口后“数据位” 下拉框 可用
ui->comboBox_stopbits->setEnabled(true);关闭串口后“停止位” 下拉框 可用
ui->comboBox_serialport->setEnabled(true);关闭串口后“串口” 下拉框 可用
ui->pushButton_send->setEnabled(false);关闭串口后“发送” 按钮 不可用
ui->pushButton_openclose->setText("打 开 串 口");修改按钮显示为“打开串口”
(3)接收数据功能(myserial.cpp)
/******************接收数据******************/
void myserial::readData()
{
    //接收所有数据
    QByteArray data = ser->readAll();
    QString str = QString(data);

    if(!data.isEmpty()){
        ui->textBrowser->append(QString(str));
    }

    //data.clear();
}
QByteArray
QByteArray是字节数组,可用于存储原始字节(包括'\0')和传统的 8 位以'\0'结尾的字符串。使用QByteArray比使用const char *方便得多。在幕后,它始终确保数据后跟一个“\0”终止符,并使用隐式共享(copy-on-write)来减少内存使用并避免不必要的数据复制。 除了
QByteArray,Qt 还提供了QString类来存储字符串数据。对于大多数用途,QString是理想的字符串类。它将其内容理解为 Unicode 文本(使用 UTF-16 编码),QString在 Qt API 中贯穿始终。QByteArray没有经过编码,储存的是原始的数据。QByteArray 适用的两种主要情况:
- 当需要存储原始二进制数据时
- 当内存资源很宝贵时
QByteArray转换为QStringQByteArray Data; QString str = QString(Data);
QString str = QString(data);
QString str =直接赋值
QT-QString类
QT-QString类
介绍
- 采用Unicode编码
- 采用隐式共享技术,节省内存和不必要的数据拷贝
- 隐式共享介于浅拷贝和深拷贝之间,当两个string对象赋值时,会实现浅拷贝(共享一块内存),如果某个对象被修改了,则会实现深拷贝(从新开辟内存)
- 跨平台使用,不需要考虑不同平台的兼容性
- QString直接支持字符串与数字的相互转换
- QString直接支持字符串大小比较
- QString直接支持不同字符编码间的相互转换
- QString直接支持std::string和std::wstring的相互转换
- QString直接支持正则表达式的应用
QString常用函数解析:
static const QChar data[4] = { 0x0055, 0x006e, 0x10e3, 0x03a3 };
QString str(data, 4);    //通过QChar宽字符初始化
str = "hello";     //直接赋值
str.length();    //获取字符串长度
str.size();     //获取字符串数量,等价于length()
str.capacity();   //获取容量,容量包含了当前string里不必增加内存就能使用的字符数
str.isEmpty();      //如果str为空或为0 ,则返回true,否则返回false
str.isNull();    //如果为0,则返回true,否则返回false
str.clear();    //清空str
str. resize(8);    //设置str的字符串长度
str.fill('m');     //将str字符串,全部字符填为'm'
str.fill('m',5);    //填充5个字符'm',并修改str的字符串长度为5
str.append("ABC");   //在str字符串末尾附加"ABC"子串
str.prepend("abc");    //在str字符串头部添加"abc"子串
str. chop(2);    //从str字符串末尾, 去掉2个字符
str = "Montreal";
str.remove(1, 4);    //从str下标1位置开始,清除4个字符, s = "Meal"
str.setNum(1234.5);    //数字转字符串 str = "1234.5"
double val = str.toDouble();   //字符串转double  val =1234.5


/*arg()成员函数:通过string串里通过“%数字”表示argument(参数) */
str = QString("%1,%2,%3,%4,%5,%6")
    .arg("A","B","C")
    .arg("D","E","D");     //字符串参数替换 str1 = "A,B,C,D,E,D"

str = QString("%1,%2")
        .arg(40)
        .arg(40,0,16);        //将40以16进制转换为字符串,如果想使用大写的话,通过toUpper()函数来实现
                              //还可以这样写QString("%1").arg(cnt,5,10,QChar('0');  //输出00050,表示保留5位有效数字,
(4)发送数据功能(myserial.cpp)
/******************发送数据******************/
void myserial::on_pushButton_send_clicked()
{
    //获取要发送的数据
    QByteArray data = ui->textEdit->toPlainText().toUtf8();
    ser->write(data);
}
toPlainText()
QPlainTextEdit 多行简单文本框 用 toPlainText();QTextEdit 富文本框 用 toHtml().
toUtf8()
将QString 字符串写入文件时,通常会借用
QByteArray作为中间变量,有两种方法。
QString::toUtf8是输出UTF-8编码的字符集
QString::toLatin1是相当与ASCii码不包含中文的遇到中文默认转换为ascii码0x3f也就是字符’?‘
QString::Local8bit是本地操作系统设置的字符集编码,一般为GB2312.
myserial.h
#ifndef MYSERIAL_H
#define MYSERIAL_H
/*************************************************/
#include <QWidget>
#include <QtSerialPort/QSerialPortInfo>      //做了个修改  只填一半会报错
#include <QtSerialPort/QSerialPort>             //
/*************************************************/
QT_BEGIN_NAMESPACE  /*********************/
namespace Ui {class myserial;}
QT_END_NAMESPACE   /*********************/

class myserial : public QMainWindow
{
    Q_OBJECT

public:
    explicit myserial(QWidget *parent = nullptr);
    ~myserial();


private slots:                                                        //
    void on_pushButton_openclose_clicked();     //
    //接收串口数据槽函数                                     //
    void readData();                                             //
    void on_pushButton_send_clicked();             //


private:
    Ui::myserial *ui;


  /*********************/
    //串口类
    QSerialPort *ser;
  /*********************/
};

#endif // MYSERIAL_H
QT_BEGIN_NAMESPACE
QT_BEGIN_NAMESPACE  /*********************/
namespace Ui {class myserial;}
QT_END_NAMESPACE   /*********************/
QT_BEGIN_NAMESPACE是QT系统自己使用的命名空间预定义宏。也就是说以更快捷的方式定义QT自己的命名空间。关于命名空间可以参考C++的命名空间。这其实是指的同一种技术。当然我们也可以用相同方式定义一套宏。比如:MY_Begin_NAMESPACE等等。//定义以下内容: QT_BEGIN_NAMESPACE class MyAction; class MyMenu; class MyPlainTextEdit; QT_END_NAMESPACE //在编译时就会变成这样: namespace QT_NAMESPACE { class MyAction; class MyMenu; class MyPlainTextEdit; } /// //QT_NAMESPACE是Qt自己定义的命名空间 # define QT_BEGIN_NAMESPACE namespace QT_NAMESPACE { # define QT_END_NAMESPACE }如果使用
QT_BEGIN_NAMESPACE声明,也就意味着我们把所有的声明体放进了QT命名空间。这样声明的东西更像是QT系统库的一部分一样。也许这样解释更容易理解。命名空间主要的任务就是防止命名污染,同时更容易对不同功能的程序分组。QT_BEGIN_NAMESPACE就是C++命名空间。
private slots:
private slots:槽在Qt的C++类中是private slots,是一种函数类型。
最终的结果验证:
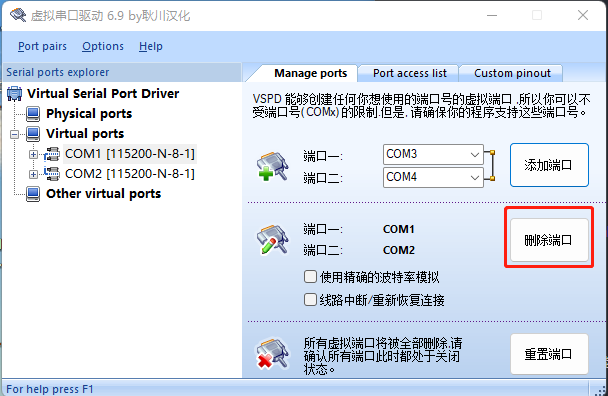
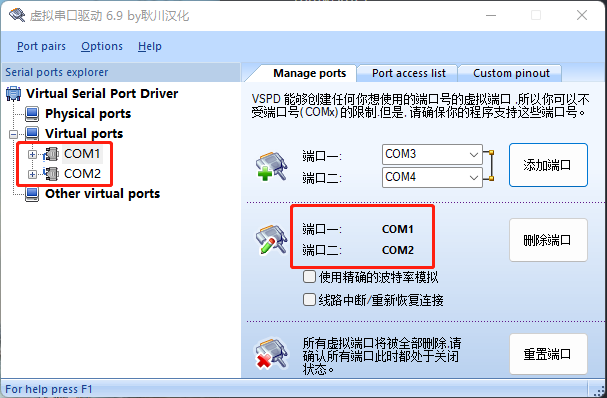
虚拟串口工具vspdconfig
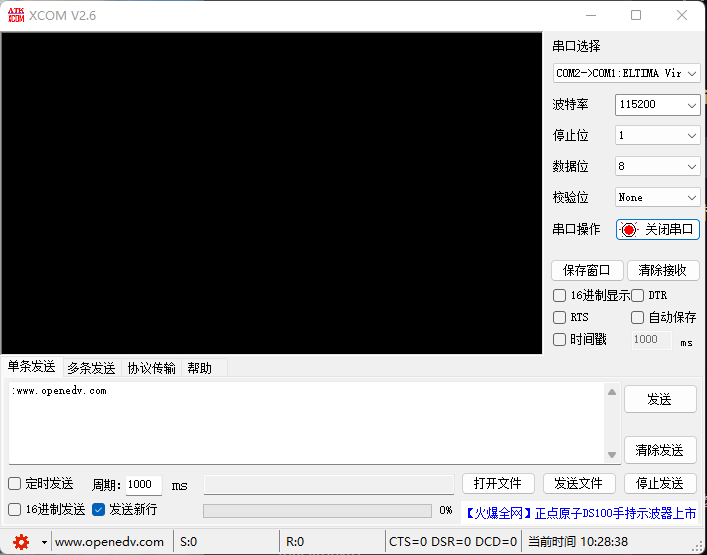
XCOM V2.6 串口助手
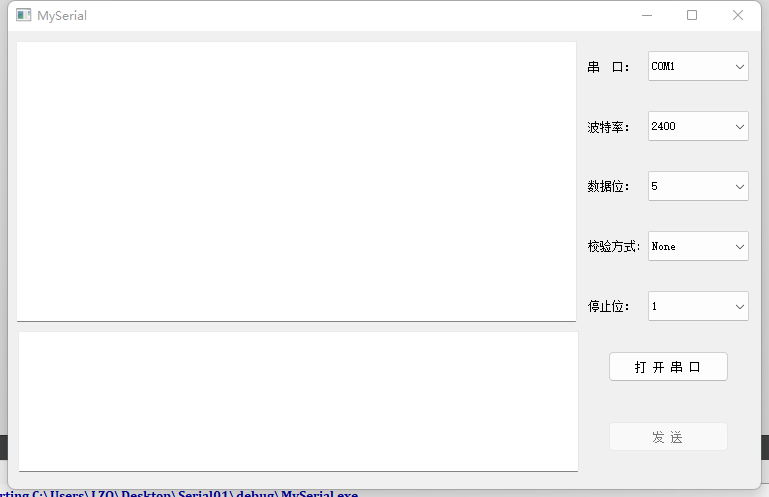
运行我的串口工具
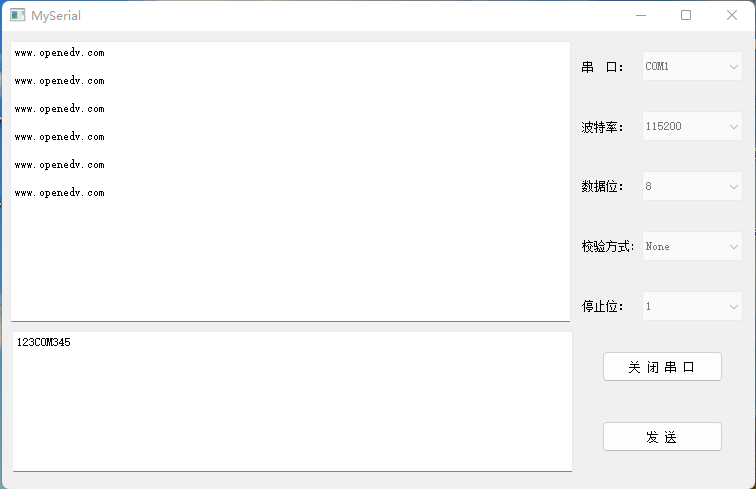
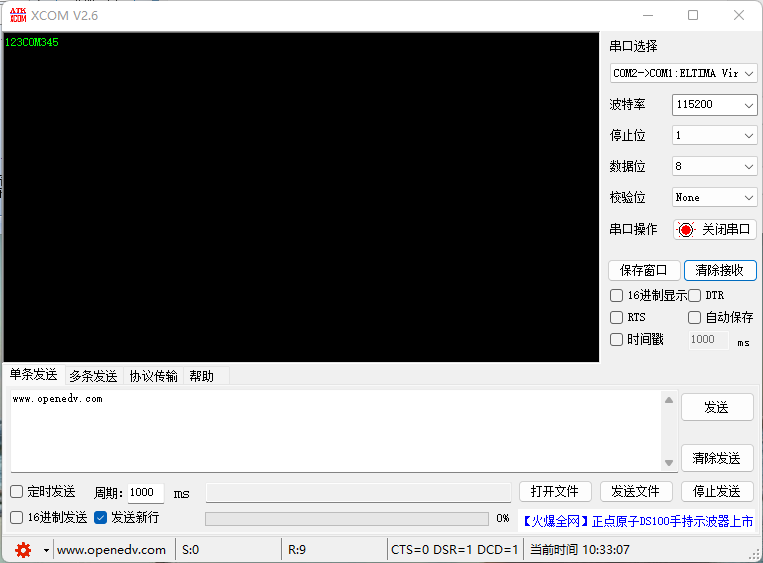
结论:能实现信息互传,实验成功。
注意:
验证完成后记得将虚拟串口工具关闭,防止出现串口占用的现象
