WMI Scripting Primer: Part 1
Greg Stemp, Dean Tsaltas, and Bob Wells
Microsoft Corporation
Ethan Wilansky
Network Design Group
June 13, 2002
Summary: The Scripting Guys' first Scripting Clinic column shows how to use the WMI scripting library to create an array of useful Windows system administration scripts. (15 printed pages)
Microsoft® Windows® Management Instrumentation (WMI) is Microsoft's best-kept secret, or so we've been told. Be that as it may, make no mistake; WMI is Microsoft's primary management enabling technology for Windows. What does that mean to you? Well, if you manage Windows servers and workstations, or if you create Windows management applications, you need to know WMI. This article is the first in a series of articles that will teach you WMI, and more specifically, how to use the WMI scripting library to create a vast array of Windows system administration scripts.
Before we get started, we should take a second to thank Andrew Clinick for giving us the opportunity to carry Scripting Clinic forward. You could say Andrew wasn't kidding when he said he planned to delegate more in his last column! The fact is, Andrew is moving on to another project, so he graciously asked us to pick up where he left off. Despite our initial reluctance due to the high quality bar Andrew set for Scripting Clinic, we're glad to be here.
So who are we? We're the Scripting Guys; the team writing the System Administration Scripting Guide, a new book that will ship as part of the Microsoft® Windows Server 2003 Resource Kit. That's Dean on the left and Greg on the right in the column's mug shot. Rumor has it Ethan and Bob missed the photo op due to their weekly Botox appointment. So if their photos appear overly handsome when they do show up, we're here to tell you Ethan and Bob are really two of the nerdiest looking guys we've ever seen! Consider yourself warned.
What Is WMI?
Originally released in 1998 as an add-on component with Windows NT 4.0 Service Pack 4, WMI is the core management-enabling technology built into Windows 2000, Windows XP, and the Windows Server 2003 family of operating systems. Based on industry standards overseen by the Distributed Management Task Force (DMTF), WMI is the instrumentation and plumbing through which all—well, almost all—Windows resources can be accessed, configured, managed, and monitored.
To grasp the power and breadth of WMI, consider how you managed and monitored Windows workstations and servers yesteryear, and perhaps even today. You probably used, or use, numerous graphical administrative tools to manage Windows resources, such as disks, event logs, files, folders, file systems, networking components, operating system settings, performance data, printers, processes, registry settings, security, services, shares, users, groups, and so on.
Although the graphical tools provided a functional management solution, what did they all have in common? One answer is, prior to WMI, all Windows graphical administrative tools relied on Win32 application programming interfaces (APIs) to access and manage Windows resources. Why? Because the only way you could programmatically access Windows resources before WMI was through the Win32 APIs. This situation left Windows system administrators without an easy way to automate common system administrative tasks using popular scripting languages, because most scripting languages cannot call Win32 APIs directly. WMI changes that by providing a consistent model and framework through which all Windows resources are described and exposed to the outside world. And best of all, system administrators can use the WMI Scripting Library to create system administrative scripts to manage any Windows resource exposed through WMI!
Using Windows Script Host and Microsoft Visual Basic® Scripting Edition (VBScript), or any scripting language supporting COM automation (for example, ActiveState Corporation's ActivePerl), you can write scripts to manage and automate the following aspects of your enterprise systems, applications, and networks:
- Windows Server 2003, Windows XP Professional, and Windows 2000 systems management. You can write scripts to retrieve performance data, manage event logs, file systems, printers, processes, registry settings, scheduler, security, services, shares, and numerous other operating system components and configuration settings.
- Network management. You can create WMI-based scripts to manage network services such as DNS, DHCP, and SNMP-enabled devices.
- Real-time health monitoring. Using WMI event subscriptions, you can write scripts to monitor and respond to event log entries as they occur, file system and registry modifications, and other real-time operating system changes. Conceptually, WMI event subscriptions and notifications are to WMI what SNMP traps are in the SNMP world.
- Windows .NET Enterprise Server management. You can write scripts to manage Microsoft® Application Center, Operations Manager, Systems Management Server, Internet Information Server, Exchange Server, and SQL Server.
Quick Start to WMI Scripting
To give you some idea of what WMI scripting is all about, let's look at the seemingly trivial task of retrieving the total amount of physical memory installed in a remote Windows-based computer. Before WMI, this task could not be easily accomplished using a script without the addition of a third-party tool. In fact, prior to WMI, the only way to determine the amount of memory installed in a computer using a tool included with the operating system tool was by way of the System Properties dialog. Today, providing WMI is installed on the target computer and you have administrator access to the computer, you can retrieve the amount of physical memory installed in a remote Windows computer using a WMI script as simple as the script shown in Listing 1.
Listing 1. Retrieving total physical memory using WMI and VBScript
strComputer = "atl-dc-01"

Set wbemServices = GetObject("winmgmts:\\" & strComputer)
Set wbemObjectSet = wbemServices.InstancesOf("Win32_LogicalMemoryConfiguration")

For Each wbemObject In wbemObjectSet
    WScript.Echo "Total Physical Memory (kb): " & wbemObject.TotalPhysicalMemory
Next
To run the example script in Listing 1, copy and paste it into your favorite text editor (notepad.exe works too), change the value assigned to the strComputer variable to a valid WMI-enabled computer in your domain, save the script with a .vbs extension, and run the script as shown in Figure 1.

Figure 1. GetMemory.vbs output
With a little magic, and barring any typos, you should see the target computer's amount of physical memory echoed to the console.
Now, before you say, "Gee whiz, does it really take six lines of script to fetch the amount of memory in a computer?" let us politely chime in, because what's not yet obvious is that you can use the same basic steps as those demonstrated in Listing 1, to retrieve configuration and status information from any Windows resource exposed through WMI.
Suppose you want to retrieve the name, state, and startup type for all of the services installed on a remote computer. The example script in Listing 2 does exactly that using the same basic steps used in Listing 1.
Listing 2. Retrieving services information using WMI and VBScript
strComputer = "atl-dc-01"

Set wbemServices = GetObject("winmgmts:\\" & strComputer)
Set wbemObjectSet = wbemServices.InstancesOf("Win32_Service")

For Each wbemObject In wbemObjectSet
    WScript.Echo "Display Name:  " & wbemObject.DisplayName & vbCrLf & _
                 "   State:      " & wbemObject.State       & vbCrLf & _
                 "   Start Mode: " & wbemObject.StartMode
Next
Running Listing 2 produces the output shown in Figure 2.

Figure 2. GetServices.vbs output
Suppose you're not interested in services, but you need to retrieve records from the Windows event logs. Again, using the script template in Listing 1, you can easily read the Windows event logs as demonstrated in Listing 3. Before you run Listing 3, we should point out that the example script can take a long time to run if your event logs contain thousands of records.
Listing 3. Reading Windows event log records
strComputer = "atl-dc-01"

Set wbemServices = GetObject("winmgmts:\\" & strComputer)
Set wbemObjectSet = wbemServices.InstancesOf("Win32_NTLogEvent")

For Each wbemObject In wbemObjectSet
    WScript.Echo "Log File:        " & wbemObject.LogFile        & vbCrLf & _
                 "Record Number:   " & wbemObject.RecordNumber   & vbCrLf & _
                 "Type:            " & wbemObject.Type           & vbCrLf & _
                 "Time Generated:  " & wbemObject.TimeGenerated  & vbCrLf & _
                 "Source:          " & wbemObject.SourceName     & vbCrLf & _
                 "Category:        " & wbemObject.Category       & vbCrLf & _
                 "Category String: " & wbemObject.CategoryString & vbCrLf & _
                 "Event:           " & wbemObject.EventCode      & vbCrLf & _
                 "User:            " & wbemObject.User           & vbCrLf & _
                 "Computer:        " & wbemObject.ComputerName   & vbCrLf & _
                 "Message:         " & wbemObject.Message        & vbCrLf
Next
If we examine Listings 1, 2, and 3 closely, we can make two very important observations about the three scripts. The first observation is that all three scripts perform the same three steps: the scripts connect to WMI, retrieve a WMI managed resource, and echo a few of the resource's properties. The second important observation is that the only thing changed in each script is the class name (that is, Win32_LogicalMemoryConfiguration, Win32_Service, and Win32_NTLogEvent respectively) identifying the target resource, and the resource's corresponding properties.
The three steps used in the scripts are common to any WMI script used to retrieve information about a WMI managed resource. Let's look at each step in a little more detail.
Step One: Connecting to the WMI Service
The first step in any WMI script is establishing a connection to the Windows Management Service on the target computer. Connecting to WMI on a local or remote computer is as simple as calling VBScript's Getobject function and passing GetObject the name of the WMI Scripting Library's moniker, which is "winmgmts:" followed by the name of the target computer.
Connecting to WMI in this way returns a reference to a SWbemServices object, which we reference using the variable named wbemServices in Listings 1, 2, and 3. SWbemServices is one of the dozen or so objects defined in the WMI scripting library. The WMI scripting library provides the set of general purpose objects scripts use to access the WMI infrastructure. Once you have a reference to a SWbemServices object, you can call any of the methods provided SWbemServices; InstancesOf is one such method.
Step Two: Retrieve Instances of WMI managed Resources
Admittedly, the second step largely depends on the task you want to perform. In the case of retrieving information about a WMI managed resource, step two is as simple as calling the SWbemServices object's InstancesOf method. As the methods name suggests, InstancesOf returns all the instances of the managed resource identified by the resource's class name. InstancesOf returns the requested resources in the form of a SWbemObjectSet collection, which we reference in Listings 1, 2, and 3 by using the variable named wbemObjectSet. SWbemObjectSet is another scripting object defined in the WMI scripting library.
Step Three: Display Properties of WMI managed Resources
The last and final step is enumerating the contents of the SWbemObjectSet collection. Each item in a SWbemObjectSet is a SWbemObject (yet another object in the WMI scripting library) that represents a single instance of the requested resource. You use SWbemObject to access the methods and properties defined in the managed resource's class definition.
So, if the scripting steps to retrieve information from WMI are identical, what are the Win32_LogicalMemoryConfiguration, Win32_Service, and Win32_NTLogEvent classes? Furthermore, where do they come from, what other classes are available, and how do you use them? The answers to these questions lie in the components that make up the WMI architecture. Let's have a look.
WMI Architecture
The WMI architecture consists of three primary layers as shown in Figure 3:
- Managed resources
- WMI infrastructure
- Consumers

Figure 3. WMI architecture
We'll start at the lowest layer since that's where the resources reside.
Managed Resources
A managed resource is any logical or physical component, which is exposed and manageable by using WMI. Windows resources that can be managed using WMI include the computer system, disks, peripheral devices, event logs, files, folders, file systems, networking components, operating system subsystems, performance counters, printers, processes, registry settings, security, services, shares, SAM users and groups, Active Directory, Windows Installer, Windows Driver Model (WDM) device drivers, and SNMP Management Information Base (MIB) data to name a few. A WMI managed resource communicates with WMI through a provider. As you begin to write scripts to interact with WMI managed resources, you'll often see the term instance used to refer to a virtual representation of the managed resource in the running script.
WMI Infrastructure
The middle layer is the WMI infrastructure. WMI consists of three primary components: the Common Information Model Object Manager (CIMOM), the Common Information Model (CIM) repository, and providers. Together, the three WMI components provide the infrastructure through which configuration and management data is defined, exposed, accessed, and retrieved. A fourth component, albeit small, but absolutely essential to scripting is the WMI scripting library.
WMI Providers
WMI providers act as an intermediary between WMI and a managed resource. Providers request information from, and send instructions to WMI managed resources on behalf of consumer applications and scripts. For example, Listings 1 and 2 use the built-in Win32 provider to retrieve memory and service-related information. Listing 3 uses the built-in Event Log provider to retrieve records from the Windows event logs.
Providers hide the implementation details unique to a managed resource by exposing the managed resource to the WMI infrastructure based on WMI's standards-based, uniform access model. WMI providers communicate with their respective managed resources using the managed resources native APIs, and communicate with the CIMOM using WMI programming interfaces. For example, the built-in Event Log provider calls Win32 Event Log APIs to access event logs.
Software developers can develop and integrate add-on providers to expose the management functions unique to their products, based on WMI's extensible architecture. The Exchange Server 2000 provider, which monitors Exchange connector status is one such example. Likewise, Application Center, Operations Manager, Systems Management Server, Internet Information Server, and SQL Server all include WMI providers.
Providers are generally implemented as dynamic link libraries (DLLs) residing in the %SystemRoot%\system32\wbem directory. WMI includes many built-in providers for Windows 2000, Windows XP, and the Windows Server 2003 family of operating systems. The built-in providers, also known as standard providers, supply data and management functions from well-known operating system sources such as the Win32 subsystem, event logs, performance counters, and registry. Table 1 lists several of the standard WMI providers included with Windows 2000, Windows XP, and the Windows Server 2003 family of operating systems.
Table 1. Partial list of standard WMI providers
| Provider | DLL | Namespace | Description |
|---|---|---|---|
| Active Directory provider | dsprov.dll | root\directory\ldap | Maps Active Directory objects to WMI. |
| Event Log provider | ntevt.dll | root\cimv2 | Manage Windows event logs, for example, read, backup, clear, copy, delete, monitor, rename, compress, uncompress, and change event log settings. |
| Performance Counter provider | wbemperf.dll | root\cimv2 | Provides access to raw performance data. |
| Registry provider | stdprov.dll | root\default | Read, write, enumerate, monitor, create, and delete registry keys and values. |
| SNMP provider | snmpincl.dll | root\snmp | Provides access to SNMP MIB data and traps from SNMP-managed devices. |
| WDM provider | wmiprov.dll | root\wmi | Provides access to information on WDM device drivers. |
| Win32 provider | cimwin32.dll | root\cimv2 | Provides information about the computer, disks, peripheral devices, files, folders, file systems, networking components, operating system, printers, processes, security, services, shares, SAM users and groups, and more. |
| Windows Installer provider | msiprov.dll | root\cimv2 | Provides access to information about installed software. |
Windows XP and Windows Server 2003 include many additional standard providers. For a complete list of standard providers, see the WMI Providers reference in the WMI Software Developers Kit (SDK) Documentation.
CIMOM
The CIMOM (pronounced see-mom) handles the interaction between consumers and providers. The term comes from the Web-Based Enterprise Management initiative and Common Information Model specification maintained by the Distributed Management Task Force.
You can think of the CIMOM as the WMI information broker. All WMI requests and data flow through the CIMOM. The Windows Management Instrumentation service, winmgmt.exe, provides the role of the CIMOM on Windows XP and the Windows Server 2003 family of operating systems, which runs under the control of the generic services host process, svchost.exe.
**Note **On computers running Windows 2000 or Windows NT 4.0 Service Pack 4, the WMI service runs as a separate service process. On computers running Windows Millennium Edition (Me), Windows 98, or Windows 95 OSR 2.5, WMI runs as a standard executable process.
In addition to providing the common interface through which consumers access WMI, the CIMOM provides the following core services to the WMI infrastructure:
- Provider registration. WMI providers register location and capability information with the CIMOM. This information is stored in the CIM repository.
- Request routing. The CIMOM uses the provider registration information to route consumer requests to the appropriate provider.
- Remote access. Consumers access remote WMI-enabled systems by connecting to the CIMOM on the remote system. Once a connection is established, consumers can perform the same operations that can be performed locally.
- Security. The CIMOM controls access to WMI managed resources by validating each user's access token before the user is permitted to connect to WMI, on either the local computer or a remote computer. WMI does not override or circumvent security provided by the operating system.
- Query processing. Allows a consumer to issue queries against any WMI managed resource using the WMI Query Language (WQL). For example, you can query the event logs for all events matching a specific Event ID, which occurred during the past 24 hours. The CIMOM performs the evaluation of the query in cases where providers don't natively support query operations.
- Event processing. Allows a consumer to subscribe to events that represent a change to a WMI managed resource. For example, you can subscribe to an event indicating when the amount of space on a logical disk drive drops below an acceptable threshold. The CIMOM polls the managed resource at an interval you specify, and generates an event notification when the subscription is satisfied.
Management applications, administrative tools, and scripts call into the CIMOM to mine data, subscribe to events, or to perform some other management-related task. The CIMOM obtains provider and class information necessary to service consumers' requests from the CIM. The CIMOM uses the information obtained from the CIM to hand-off consumer's requests to the appropriate provider.
CIM Repository
WMI is based on the idea that configuration and management information from different sources can be uniformly represented with a schema. The CIM is the schema, also called the object repository or class store that models the managed environment and defines every piece of data exposed by WMI. The schema is based on the DMTF Common Information Model standard.
Much like Active Directory's schema is built on the concept of a class, the CIM consists of classes. A class is a blueprint for a WMI manageable resource. However, unlike Active Directory classes, which represent objects created and stored in the directory, CIM classes generally represent dynamic resources. That is, instances of resources are not stored in the CIM, but are dynamically retrieved by a provider based on a consumer request. The reason for this is simple; the operational state for most WMI managed resources changes frequently and therefore must be read on-demand to ensure the most up-to-date information is retrieved.
**Note **The term repository is somewhat misleading in the context of the CIM. Although the CIM is a repository and is capable of storing static data, its primary role is storing the blueprints for managed resources.
Also like Active Directory classes, CIM classes are organized hierarchically where child classes inherit from parent classes. The DMTF maintains the set of core and common base classes from which system and application software developers, such as those at Microsoft, derive and create system- or application-specific extension classes.
Classes are grouped into namespaces, which are logical groups of classes representing a specific area of management. For example, the root\cimv2 namespace includes most of the classes that represent resources commonly associated with a computer and operating system. The classes used in the previous scripts (Win32_LogicalMemoryConfiguration, Win32_Service, and Win32_NTLogEvent) reside in the root\cimv2 namespace, and are just three of literally hundreds of classes defined in the CIM.
CIM classes consist of properties and methods. Properties describe the configuration and state of a WMI managed resource, and methods are executable functions that perform actions on the WMI managed resource.
Note Don't confuse the methods and properties defined by a CIM class with the methods and properties provided by automation objects in the WMI scripting library.
Physically, the CIM resides in the %SystemRoot%\system32\wbem\Repository\FS\ directory and consists of the following four files:
- index.btr. Binary-tree (btree) index file.
- index.map. Transaction control file.
- objects.data. CIM repository where managed resource definitions are stored.
- objects.map. Transaction control file.
**Note **In Microsoft Windows 2000 and Windows NT 4.0 Service Pack 4, the CIM is stored in %SystemRoot%\system32\wbem\Respository\cim.rep. In Windows Millennium Edition (Me), Windows 98, and Windows 95 OSR 2.5 operating systems, the CIM is stored in %windir%\system\wbem\Respository\cim.rep.
Although the CIM is based on object-oriented design principles, you need not become an expert in information modeling or schema design to be productive using WMI and writing WMI-based scripts. What is important is that you understand the basic structure and organization of the CIM, and how to navigate and interpret its contents.
WMI Scripting Library
The WMI scripting library provides the set of automation objects through which scripting languages, such as VBScript, Jscript, and ActiveState's ActivePerl access the WMI infrastructure.
The automation objects in the WMI scripting library provide a consistent and uniform scripting model for the WMI infrastructure. As demonstrated earlier, once you understand how to retrieve one managed resource type using the WMI scripting library, you can easily use the same steps to retrieve other WMI managed resources. For example, you can take any one of the three scripts presented earlier and easily modify the script to retrieve information about the processes (Win32_Process) running on a remote computer, processor (Win32_Processor) information, operating system (Win32_OperatingSystem) information, or any one of the hundreds of managed resources exposed by WMI.
The WMI scripting library is implemented in a single DLL named wbemdisp.dll, which physically resides in the %SystemRoot%\system32\wbem directory. The WMI scripting library also includes a type library named wbemdisp.tlb. You can use the WMI scripting type library to reference WMI constants from XML-based Windows Script Files, WSH scripts with a .wsf extension.
WMI Consumers
Consumers are the top layer. A consumer is a script, enterprise management application, Web-based application, or other administrative tool, that accesses and controls management information available through the WMI infrastructure.
**Note **Many management applications serve dual roles as both WMI consumer and WMI provider. Such is the case with several Microsoft management products, such as Application Center, Operations Manager, and Systems Management Server.
Exploring the CIM
We've covered a fair amount of material, but there's one remaining detail we've not yet addressed, and that's how to determine what resources are exposed through WMI. Fortunately, you can use a number of different tools to browse the CIM schema and examine class definitions for WMI managed resources.
- WMI Control. WMI Control (wmimgmt.msc) is a Microsoft Management Console (MMC) snap-in that allows you to configure WMI settings on a local or remote computer. Although you cannot use WMI Control to browse the CIM, you can use the tool's Security tab to determine the CIM namespaces available on a local or remote computer. For information about using WMI Control, see the WMI Control overview in Windows 2000 Help or Windows XP Help and Support Center.
- WMI Tester. WMI Tester (wbemtest.exe) is a general-purpose, graphical tool for interacting with the WMI infrastructure. You can use WMI Tester to browse the CIM schema and examine managed resource class definitions. WMI Tester can also be used to perform the same actions your WMI-based scripts perform, such as retrieving instances of managed resources and running queries. Because WMI Tester is part of the default WMI installation on all WMI-enabled computers, wbemtest.exe is an excellent WMI learning and troubleshooting tool. For information about using WMI Tester, see the WMI Tester overview in Windows XP Help and Support Center.
- WMI Command-line. Released as part of Windows XP, the WMI Command-line tool (wmic.exe) provides a command line interface to the WMI infrastructure. You can use wmic.exe to perform common WMI tasks from the command line, including browsing the CIM and examining CIM class definitions. For information about using the WMI Command-line tool, see Using the WMI Command-line (WMIC) tool in Windows XP Help and Support Center.
- CIM Studio. CIM Studio, part of the WMI SDK, provides a Web-based interface to interact with the WMI infrastructure. Like WMI Tester, you can use CIM Studio to browse the CIM schema, view class definitions, and retrieve instances of managed resources. CIM Studio's superior user interface makes it easy to view class relationships and associations, and CIM Studio provides a rudimentary search facility—two features not available with the WMI Tester tool. To use CIM Studio, you must download and install the WMI SDK. You can download the WMI SDK from Windows Management Instrumentation (WMI) SDK.
- EnumClasses.vbs, EnumInstances.vbs, and EnumNamespaces.vbs. The Windows 2000 Server Resource Kit includes dozens of scripts that leverage the power of WMI. The three scripts listed here are general purpose scripts that can be used to browse the CIM schema, view class definitions, and retrieve instances of managed resources.
Some additional resources you should check out include:
- WMI SDK Documentation. The WMI SDK contains a comprehensive list of the classes provided by the standard WMI providers. You can access the WMI SDK documentation in the MSDN online Library.
- TechNet Script Center. Call it a shameless plug if you like, but the TechNet Script Center contains hundreds of WMI-based sample scripts from the forthcoming System Administration Scripting Guide.
WMI Tester (wbemtest.exe) Walkthrough
Now that you have some knowledge of the tools available to browse and explore the CIM, let's use WMI Tester (wbemtest.exe) to examine the Win32_Process class definition, and modify Listing 2 to retrieve several properties from the processes running on your local computer.
-
Open a command prompt, type
C:\>wbemtest.exe, and press Enter to start the WMI Tester tool. Notice most of the buttons are disabled on the main WMI Tester window, which means that you haven't connected to WMI at this point. -
Click Connect… to connect to the WMI service on a local or remote computer. The Connect dialog is displayed, which provides a text entry field labeled Namespace that contains root\default as its default value. Change the Namespace field's value to root\cimv2 and click the Connect dialog's Connect button to return to the main WMI Tester window.
-
The Namespace identifier in the main window's upper-left hand corner should read root\cimv2. Notice all of the buttons are now enabled, which indicates that you have successfully connected to WMI on the local host under the context of your current credentials. Click Enum Classes… to open the Superclass Info dialog.
-
In the Superclass Info dialog, leave the Enter superclass name field blank, click the Recursive option, and click OK to enumerate all CIM classes defined in the root\cimv2 namespace.
At this point, you should be looking at a Query Result dialog that lists hundreds of class definitions. The number of classes largely depends on the version of Windows you're running. If you're using Windows 2000, for example, you should see somewhere in the neighborhood of 600 class definitions. If you're running Windows XP, you should see approximately 900.
Notice that the classes listed at the top of the Query Result dialog are prefaced with two underscores. These are system classes. System classes are predefined CIM classes that support internal WMI configuration and operations, such as provider registration, namespace security, and event notification. For now, ignore the system classes and scroll down the Query Result dialog until you get to classes that begin with CIM_.
Classes whose names begin with CIM_ are the core and common base classes maintained by the DMTF. Continue scrolling until you reach the classes that begin with Win32_.
Classes whose names begin with Win32_ are Microsoft extension classes, which represent Windows-specific managed resources. If this is the first time you've examined the root\cimv2 namespace, you might want to become familiar with the comprehensive set of classes in the root\cimv2 namespace, especially the classes that have a Win32_ prefix.
-
Scroll down the Query Result dialog until you reach the Win32_Process class, and double-click the class name to open the Object editor for Win32_Process dialog.
-
The Object editor dialog reveals the definition and implementation details (properties and methods) of the selected class. Recall from our earlier discussion that the class definition is the blueprint for a WMI-manageable resource.
Select the Hide System Properties check box to hide the system properties. The remaining Win32_Process properties represent the information you can retrieve from the processes running on a local or remote computer.
To complete your WMI scripting exercise, try retrieving the Name, Handle, and ProcessID properties. Use one of the three previous listings as your template and try running your script before proceeding to Step 7.
**Note **To run the script on your local computer, set the value of the strComputer variable to "." (a single dot inside quotation marks).
-
After you run your newly created GetProcesses.vbs script, you can verify the script's results using WMI Tester. In the Object editor for Win32_Process dialog, click Instances. The resulting Query Result dialog lists the instances of the processes running on your computer. Double-click on a specific process instance to view the details for that instance.
All for Now
Admittedly, we only scratched the surface of WMI scripting. To be completely honest, it was intentional. WMI provides so many scripting possibilities that it's easy to miss the forest for the trees. Don't worry, however; we'll fill in all the gaps as this series progresses. What's important to take away at this point is this: WMI is Windows' single most important management-enabling technology, and you need not be a developer or scripting guru to begin writing WMI-based scripts. Continue modifying your newly created script to retrieve additional process properties, or better yet, other managed resources. You just might find yourself with a toolbox full of custom system administration scripts before we meet next month. Let us know how you do.
Listing 4. Answer to WMI Tester walkthrough
strComputer = "."   ' Dot (.) equals local computer in WMI

Set wbemServices = GetObject("winmgmts:\\" & strComputer)
Set wbemObjectSet = wbemServices.InstancesOf("Win32_Process")

For Each wbemObject In wbemObjectSet
    WScript.Echo "Name:          " & wbemObject.Name      & vbCrLf & _
                 "   Handle:     " & wbemObject.Handle    & vbCrLf & _
                 "   Process ID: " & wbemObject.ProcessID
Next
Scripting Clinic
Greg Stemp has long been acknowledged as one of the country's foremost authorities on scripting, and has been widely acclaimed as a world-class... huh? Well, how come they let football coaches make up stuff on their resumes? Really? He got fired? Oh, all right. Greg Stemp works at... Oh, come on now, can't I even say that? Fine. Greg Stemp gets paid by Microsoft, where he—tenuously—holds the title of lead writer for the System Administration Scripting Guide.
Bob Wells wanders around aimlessly espousing the virtues of scripting to anyone who will listen. Rumor has it, Bob's two dachshunds know more about scripting than most humans. In his spare time, Bob contributes to the System Administration Scripting Guide.
Ethan Wilansky spends a lot of his work time writing and consulting. He's crazy about scripting, Yoga, gardening, and his family (not necessarily in that order). He is currently working on a way to create script that will take out the trash and wash the dinner dishes.
WMI Scripting Primer: Part 2
Greg Stemp, Dean Tsaltas, and Bob Wells
Microsoft Corporation
Ethan Wilansky
Network Design Group
August 13, 2002
Summary: The Scripting Guys continue their discussion of writing WMI scripts, this time focusing on the CIM repository and CIM classes to help you tap the full power of WMI scripting. (39 printed pages)
If you're going to build a house, you need to know how to read and interpret an architectural drawing. If you're going to build an electronic gadget, you need to know how to read and interpret a schematic diagram. And if you're going to write WMI scripts, you guessed it, you need to know how to interpret WMI's blueprint for management—the CIM repository. The CIM repository, which is also referred to as the WMI repository in the WMI SDK, is the WMI schema that stores the class definitions that model WMI managed resources.
To emphasize the importance of the CIM and CIM classes, consider the four scripts presented in WMI Scripting Primer: Part 1, and Listings 1 and 2 below. Listing 1 is a slightly enhanced version of the services script from Part 1, and Listing 2 is yet another variation of the same script using the Win32_OperatingSystem class.
**Note **If you find Listings 1 and 2 confusing, we encourage you to read (or reread as the case may be) Part 1 of this series.
Listing 1. Retrieving services information using WMI and VBScript
strComputer = "."   ' Dot (.) equals local computer in WMI

Set objWMIService = GetObject("winmgmts:\\" & strComputer)
Set colServices = objWMIService.InstancesOf("Win32_Service")

For Each objService In colServices
    WScript.Echo "Name:           " & objService.Name        & vbCrLf & _
                 "Display Name:   " & objService.DisplayName & vbCrLf & _
                 "   Description: " & objService.Description & vbCrLf & _
                 "   Path Name:   " & objService.PathName    & vbCrLf & _
                 "   Start Mode:  " & objService.StartMode   & vbCrLf & _
                 "   State:       " & objService.State       & vbCrLf
Next
Listing 2. Retrieving operating system information using WMI and VBScript
strComputer = "."

Set objWMIService = GetObject("winmgmts:\\" & strComputer)
Set colOperatingSystems = objWMIService.InstancesOf("Win32_OperatingSystem")

For Each objOperatingSystem In colOperatingSystems
    Wscript.Echo "Name:            " & objOperatingSystem.Name   & vbCrLf & _
        "Caption:         " & objOperatingSystem.Caption         & vbCrLf & _
        "CurrentTimeZone: " & objOperatingSystem.CurrentTimeZone & vbCrLf & _
        "LastBootUpTime:  " & objOperatingSystem.LastBootUpTime  & vbCrLf & _
        "LocalDateTime:   " & objOperatingSystem.LocalDateTime   & vbCrLf & _
        "Locale:          " & objOperatingSystem.Locale          & vbCrLf & _
        "Manufacturer:    " & objOperatingSystem.Manufacturer    & vbCrLf & _
        "OSType:          " & objOperatingSystem. OSType         & vbCrLf & _
        "Version:         " & objOperatingSystem.Version         & vbCrLf & _
        "Service Pack:    " & objOperatingSystem.ServicePackMajorVersion  & _
                "." & objOperatingSystem.ServicePackMinorVersion & vbCrLf & _
        "Windows Directory: " & objOperatingSystem.WindowsDirectory
Next
The only distinguishing characteristic in each of the scripts in Part 1 of this article series, and in Listings 1 and 2 in this article, is the class name identifying a WMI managed resource and a subset of each class's properties. The fact that the same script template can be used to retrieve total physical memory, services, event-log records, processes, and operating-system information demonstrates the important role CIM classes play in WMI scripting. Once you know how to write a script to manage one type of WMI managed resource, you can use the same basic technique for other managed resources.
Of course, knowing a managed resource's class name and the class's corresponding properties is only part of the story. Before you can tap the full power of WMI scripting, you need to know a little bit more about the structure of the CIM repository and CIM classes. Why? We'll give you two important reasons.
- Understanding how to navigate the CIM will help you determine the computer and software resources exposed through WMI.
- Understanding how to interpret a managed resource's blueprint (class definition) will help you understand the tasks that can be performed on the managed resource.
Both points are true regardless of the WMI tool you use; whether you use the WMI scripting library, the WMI command-line tool (wmic.exe), or an enterprise-management application, you need to know how to navigate the CIM and interpret CIM classes.
A less obvious, yet equally important reason to learn the CIM, is that the CIM is an excellent source of documentation for WMI managed resources. Yes, if you need detailed information about a WMI class, you can use the WMI SDK. But what if you don't need detailed information about a WMI class? Suppose you only want to know if a specific class, method, or property is supported on the version of Microsoft® Windows® you're running. Well, look in the target computer's CIM.
For example, we're often asked, "Why doesn't the Join Computer to a Domain script in TechNet's Script Center work on Windows 2000?" The answer is because the Win32_ComputerSystem class (which is the WMI class used in the script) doesn't support the JoinDomainOrWorkGroup method on Windows 2000. The JoinDomainOrWorkGroup method was added to the Win32_ComputerSystem class in the version of WMI built-in to Windows XP and Windows Server 2003.
So how would you know or learn this? One way is by using the collection of WMI tools we listed in Part 1. A second, more powerful and flexible approach is by using the WMI scripting library. One of the really cool things about WMI is that you can use the WMI scripting library to learn about WMI. That's right; in the same way you write WMI scripts to retrieve WMI managed resources, you can also write WMI scripts to learn all sorts of interesting details about WMI itself. You can write WMI scripts to list all the namespaces and classes in the CIM repository. You can write scripts to list all the providers installed on a WMI-enabled computer. You can even write WMI scripts to retrieve managed-resource class definitions.
Whether you choose to use existing tools or create your own, you need a basic understanding of the CIM repository's structure, its contents, and how to interpret managed-resource class definitions. So let's pick up where we left off in Part 1 by taking a closer look at WMI's blueprint for management—the CIM repository. Throughout the discussion, we'll show you how to retrieve WMI configuration information and managed-resource class definitions using the WMI scripting library.
Blueprint for Management
In Part 1, we said WMI is based on the idea that configuration and management information from different sources can be uniformly represented with a schema, and that the CIM repository is the schema for WMI. Think of a schema as a blueprint or model that represents something that exists in the real world. Much like an architectural drawing models a physical structure, such as a house, the WMI CIM models the hardware, operating system, and software that make up a computer. The CIM is the data model for WMI.
**Note **Although the CIM repository is capable of storing some data (and it does), its primary purpose is to model the managed environment. The CIM is not designed to store the volumes of management information it defines. Instead, most of the data is dynamically retrieved, on demand, from a WMI provider. The exception is WMI operational data. WMI operational data, such as namespace information, provider registration information, managed-resource class definitions, and permanent event subscriptions, is stored in the CIM repository.
Figure 1 provides a conceptual view of the internal structure and organization of the CIM repository. As illustrated in Figure 1, the CIM uses classes to create the data model. Admittedly, the CIM contains far more classes than the eleven shown in the diagram—somewhere in the neighborhood of 5000 the last time we counted on Windows Server 2003. The fact that the schema is a complex mesh of approximately 5000 classes is largely academic in the context of WMI scripting. What's important to understand is that the CIM repository is the class store that defines the WMI managed environment and every manageable resource exposed through WMI.
There are three important CIM concepts illustrated in Figure 1 that you need to understand to successfully navigate and interpret the WMI schema.
- The CIM repository is divided into multiple namespaces.
- Each namespace can contain one or more of the following groups of classes: system classes, core and common classes, and/or extension classes.
- There are three primary class types: abstract, static, and dynamic. An abstract class is a template used to derive (define) new abstract and non-abstract classes, and cannot be used to retrieve instances of managed resources. A static class defines data physically stored in the CIM repository—the most common of which is WMI configuration and operational data. A dynamic class is a class that models a WMI managed resource that's dynamically retrieved from a provider. A fourth class type, known as an association class, is also supported. An association class is an abstract, static, or dynamic class that describes a relationship between two classes or managed resources. Don't worry too much about CIM class types for the moment; we'll discuss CIM class types in a more practical context shortly.
Let's examine each of these CIM concepts in more detail.
.gif)
Figure 1. Structural view of the CIM repository—the WMI schema
**Note **The CIM physically resides in the file named %SystemRoot%\system32\wbem\Repository\FS\objects.data on Windows XP and Windows Server 2003. Windows 2000 and Windows NT 4.0 Service Pack 4 store the CIM in %SystemRoot%\system32\wbem\Repository\cim.rep. And in Windows Millennium Edition (Me), Windows 98, and Windows 95 OSR 2.5 operating systems, the CIM is stored in %windir%\system\wbem\Repository\cim.rep.
Namespaces Defined
CIM classes are organized into namespaces. Namespaces are the partitioning mechanism employed by the CIM and control the scope and visibility of managed-resource class definitions. Each namespace in the CIM contains a logical group of related classes representing a specific technology or area of management. All classes within a namespace must have a unique class name, and classes in one namespace cannot be derived from classes in another namespace, which is why you'll find identical system, core, and common classes defined in multiple namespaces.
Most of the classes that model Windows managed resources reside in the root/cimv2 namespace. However, root\cimv2 is not the only namespace you need to be aware of, as suggested in Figure 1. For example, the event log, performance counter, Windows Installer, and Win32 providers all store their managed-resource class definitions in the root\cimv2 namespace. The registry provider, on the other hand, stores its class definitions in the root\default namespace. And the new Windows Server 2003 DNS provider stores its managed-resource class definitions in the root\MicrosoftDNS namespace.
Namespace Usage
So how do namespaces affect your WMI scripts? Every WMI script connects to a namespace as part of the initial connection step we briefly discussed last month, as shown below:
strComputer = "."
Set wbemServices = GetObject("winmgmts:\\" & strComputer)
If the target namespace is not specified, as is the case above, the script connects to the namespace identified by the following registry setting:
HKEY_LOCAL_MACHINE\SOFTWARE\Microsoft\WBEM\Scripting\Default Namespace.
The default namespace setting is to WMI scripting what the %PATH% environment variable is to the operating system. When you submit a command via the command prompt without specifying the command's fully qualified path, the operating system uses the %PATH% environment variable to locate the command's executable file. If the operating system cannot find the file, an error is generated.
Similarly, when you retrieve a managed resource in a WMI script, the CIMOM (WMI service) looks for the managed resource's blueprint (class definition) in the default namespace if no namespace is specified. If the CIMOM cannot find the managed-resource class definition in the default namespace, a WBEM_E_INVALID_CLASS (0x80041010) error is generated.
Note Don't confuse the Default Namespace setting with the root\DEFAULT namespace. They are unrelated, unless of course, you set root\DEFAULT as your default namespace.
The root\cimv2 namespace is initially configured as the default namespace for scripting; however, the default scripting namespace can easily be changed. As such, you should always identify a managed resource's namespace in your WMI scripts rather than assume the default. Had we followed our own advice last month, the connection step in all four listings (and Listings 1 and 2 of this article) would have been written as follows.
strComputer = "."
Set wbemServices = GetObject("winmgmts:\\" & strComputer & "\root\cimv2")
Adding the target namespace to the connection string tells the CIMOM where to look for the managed resource's class definition in the CIM, much like a fully qualified path tells the operating system where exactly to look for a file. When you specify the target namespace, the default namespace is not used.
Managing the Default Namespace for Scripting
You can use the WMI scripting library in combination with the Win32_WMISetting class to read and change the default namespace for scripting as demonstrated in Listings 3 and 4. Win32_WMISetting is a dynamic class that models operational parameters for the WMI service. The writeable property representing the default namespace for scripting is ASPScriptDefaultNamespace.
Listing 3 uses the same three WMI scripting steps—connect, retrieve, and display—that we've been using all along with one notable change. As we recommended earlier, we specify the fully qualified namespace for the Win32_WMISetting class in the WMI connection string passed to the GetObject function of Microsoft® Visual Basic®, Scripting Edition (VBScript). And here you thought Microsoft didn't follow their own advice. Not only do we follow our namespace recommendation in Listing 3, but we'll be qualifying namespaces from this point forward. Yes, it's that important if you want to avoid invalid class errors in your WMI scripts.
Listing 3. Retrieving the default namespace for scripting using WMI and VBScript
strComputer = "."

Set objWMIService = GetObject("winmgmts:\\" & strComputer & "\root\cimv2")
Set colWMISettings = objWMIService.InstancesOf("Win32_WMISetting")

For Each objWMISetting in colWMISettings
    Wscript.Echo "Default namespace for scripting: " & _
                 objWMISetting.ASPScriptDefaultNamespace
Next
To run the example script in Listing 3, copy and paste the script into your favorite text editor, save the script with a .vbs extension, and run the script as shown in Figure 2. You should see the local computer's default namespace echoed to the console.

Figure 2. GetDefaultNamespace.vbs output
To set the default namespace for scripting, you perform the same scripting steps as in Listing 3 with one important change—well, two if you're counting lines of script. Rather than using the WMI scripting library's SWbemObject to read a property from an instance of a WMI managed resource, you use SWbemObject to set the property followed by calling SWbemObject's Put_ method to commit the change to the WMI managed resource. The set and commit operations are performed inside the For Each loop in Listing 4 because the SWbemServicesInstancesOf method always returns an SWbemObjectSet collection, even when there's only one instance of the target WMI managed resource, as is the case with Win32_WMISetting.
Listing 4. Setting the default namespace for scripting using WMI and VBScript
strComputer = "."

Set objWMIService = GetObject("winmgmts:\\" & strComputer & "\root\cimv2")
Set colWMISettings = objWMIService.InstancesOf("Win32_WMISetting")

For Each objWMISetting in colWMISettings
        objWMISetting.ASPScriptDefaultNamespace = "root\cimv2"
        objWMISetting.Put_
Next
Don't get too wrapped up in the mechanics of the WMI scripting library, because we cover the WMI scripting library in detail in Part 3 of this series. For now, let's turn our attention back to the CIM.
Listing Namespaces
Thus far, we've been using the same WMI scripting technique to retrieve instances of dynamic WMI managed resources. In Part 1, for example, we used the same script template to retrieve total physical memory, services, event log records, and processes. And in Part 2, we've retrieved services, operating system information, and the default namespace for scripting. As it turns out, you can use the same WMI scripting technique to retrieve namespace information from the CIM. As was the case in the managed resource scripts, the only change you need to make to the script is the target class name.
Namespace information is stored inside the CIM as static instances of the __NAMESPACE class. The __NAMESPACE class is an example of the static class type we briefly defined earlier. Unlike dynamic WMI managed resources that are retrieved on demand from a provider, static class instances are stored in the CIM and retrieved directly from the CIM without the use of a WMI provider. Listing 5 uses the __NAMESPACE class to retrieve and echo all of the namespaces directly beneath the root namespace.
Listing 5. Retrieving CIM namespaces using WMI and VBScript
strComputer = "."

Set objServices = GetObject("winmgmts:\\" & strComputer & "\root")
Set colNameSpaces = objServices.InstancesOf("__NAMESPACE")

For Each objNameSpace In colNameSpaces
    WScript.Echo objNameSpace.Name
Next
Figure 3 shows the result of running Listing 5 on a Windows Server 2003 computer. The list of namespaces will vary based on the version of Windows and WMI installed on the target computer.

Figure 3. GetNamespaces.vbs output
As you may have noticed, Listing 5 does not provide a complete picture of all of the namespaces available on the target computer. It only retrieves and displays the namespaces beneath a single, specified namespace. To echo all of the namespaces on a local or remote WMI-enabled computer, you need to modify Listing 5 to recursively connect to and enumerate each namespace. Fortunately, this is not as difficult as you might think—especially when we do the work for you, as shown in Listing 6.
Changing Listing 5 into the recursive namespace script shown in Listing 6 primarily involves implementing the body of the original script inside a subroutine and providing a mechanism to call the subroutine for each namespace instance retrieved from the CIM. Listing 6 accomplishes this by performing the following steps:
- Listing 6 begins by initializing strComputer with the name of the target computer. A single dot (".") in WMI represents the local computer. You can change the value assigned to strComputer to any WMI-enabled computer in your domain that you have administrative control of.
- The script calls the recursive subroutine, EnumNameSpaces, and passes the subroutine a string identifying the initial namespace to connect to, "root".
- The body of the EnumNameSpaces subroutine is identical to Listing 5 with one important change. Let's examine the subroutine step-by-step.
- EnumNameSpaces begins by echoing the value of the subroutines single argument, strNameSpace. strNameSpace identifies the namespace used in the connection string each time the subroutine is called.
- Using the GetObject function in VBScript, the subroutine connects to the namespace identified by the subroutine's strNameSpace argument.
- After establishing a connection to the WMI service and namespace on the target computer, the subroutine retrieves all namespace instances immediately beneath the namespace referenced by strNameSpace.
- Using a For Each loop, the subroutine enumerates the namespace instances immediately beneath the currently connected namespace. However, rather than simply echoing the names of the child (or sub-) namespaces, each child (or sub-) namespace name is concatenated with the current namespace, which is passed to a new invocation of the EnumNameSpaces subroutine. These subroutine steps repeat until all namespace instances are enumerated.
Listing 6. Retrieving all CIM namespaces using WMI and VBScript
strComputer = "."

Call EnumNameSpaces("root")

Sub EnumNameSpaces(strNameSpace)

  WScript.Echo strNameSpace

  Set objWMIService = GetObject("winmgmts:\\" & strComputer & "\" & strNameSpace)
  Set colNameSpaces = objWMIService.InstancesOf("__NAMESPACE")

  For Each objNameSpace In colNameSpaces
    Call EnumNameSpaces(strNameSpace & "\" & objNameSpace.Name)
  Next

End Sub
Figure 4 shows the result of running Listing 6 on the same Windows Server 2003 computer.

Figure 4. GetAllNamespaces.vbs output
Class Categories Defined
As illustrated earlier in Figure 1, there are three general categories of classes used to construct the CIM: system, core and common, and extension.
System Classes
System classes are classes that support internal WMI configuration and operations, such as namespace configuration, namespace security, provider registration, and event subscriptions and notifications. When browsing the CIM, you can easily identify system classes by the two underscores prefacing each system class's name. For example, the __SystemClass, __Provider, and __Win32Provider classes shown in Figure 1 are system classes. The __NAMESPACE class we examined in the previous section is another example of a system class.
System classes are either abstract or static. Abstract system classes are templates used to derive (define) other abstract or static system classes. Static system classes define WMI configuration and operational data that's physically stored in the CIM repository. For example, the __Win32Provider system class defines provider registration information stored in the CIM. The CIMOM (WMI Service) uses the provider registration information stored in the CIM to map requests for dynamic managed resources to the appropriate provider.
As we demonstrated with the __NAMESPACE system class earlier, you can use the same WMI scripting technique to retrieve static instances of system classes stored in the CIM. Listing 7, for example, retrieves and displays all of the __Win32Provider instances registered in the root\cimv2 namespace.
Listing 7. Retrieving Win32 providers registered in the root\cimv2 namespace using WMI and VBScript
strComputer = "."

Set objWMIService = GetObject("winmgmts:\\" & strComputer & "\root\cimv2")
Set colWin32Providers = objWMIService.InstancesOf("__Win32Provider")

For Each objWin32Provider In colWin32Providers
    WScript.Echo objWin32Provider.Name
Next
Unless you're writing a book about WMI, it's unlikely you'll use system classes in your WMI scripts. The one exception is WMI monitoring scripts. WMI monitoring scripts are scripts that subscribe to WMI events. (Events are real-time notifications that something of interest has changed to a WMI managed resource.) We'll cover WMI event subscriptions and notifications in a future column.
Note For those of you that just can't wait, the three most common WMI __Event system classes are __InstanceCreationEvent, __InstanceModificationEvent, and __InstanceDeletionEvent. Although we're still not going to cover them here, you can find example monitoring scripts that demonstrate how to use these system classes in the Monitoring section of TechNet's Script Center.
Core and Common Classes
The core and common classes serve two roles. First and foremost, they represent the abstract classes from which system and application software developers, such as those at Microsoft, derive and create technology-specific extension classes. Second, they define resources common to particular management areas, but independent of a particular technology or implementation. The Distributed Management Task Force (DMTF) defines and maintains the set of core and common classes, which can be identified by the CIM_ prefix. The four classes prefaced with CIM_ in Figure 1 are core and common classes.
Of the approximately 275 core and common classes defined in the root\cimv2 namespace, all are abstract classes with a few exceptions. What does this mean to you? It means you'll rarely use core and common classes (classes prefaced with CIM_) in your WMI scripts. Why? Because you cannot retrieve instances of abstract classes; abstract classes can only be used as a base for new classes. Since 271 of the core and common classes are abstract, they are primarily used by software developers creating technology-specific extension classes.
So, what are the exceptions? Four of the 275 core and common classes are not abstract classes. They are dynamic classes that use the Win32 provider (cimwin32.dll) to retrieve instances of managed resources. For the record, the four dynamic classes are CIM_DataFile, CIM_DirectoryContainsFile, CIM_ProcessExecutable, and CIM_VideoControllerResolution.
Extension Classes
Extension classes are technology-specific classes created by system and application software developers. The Win32_BaseService, Win32_Service, Win32_SystemServices, and Win32_ComputerSystem classes shown in Figure 1 are Microsoft extension classes. Microsoft extension classes in the root\cimv2 namespace can be identified by the Win32_ prefix. That said, you should not conclude that all Microsoft extension class names begin with Win32_ because they do not. For example, the StdRegProv class defined in the root\DEFAULT namespace is not prefaced with Win32_ despite the fact that the StdRegProv class is Microsoft's extension class for registry management tasks. And before you ask: No, we do not know why the StdRegProv class is defined in the root\DEFAULT namespace rather than root\cimv2.
As we write this, there are approximately 463 Win32 extension classes defined in the root\cimv2 namespace. Of the 463 Win32 classes, 68 are abstract classes and the remaining 395 are dynamic. What does this mean to you? It means extension classes are the primary category of classes you'll use in your WMI scripts.
**Note **The class statistics we're providing are based on a beta version of Windows Server 2003 and are only intended to illustrate general CIM concepts. Your numbers will be different based on several factors, such as Windows version, WMI version, and installed software.
Listing Classes
At this point, what we're about to tell you shouldn't come as a big surprise. You can write a script to retrieve all of the classes defined within a namespace. Listing 8, for example, lists all classes defined in the root\cimv2 namespace. However, unlike all of the previous scripts that used the SWbemServicesInstancesOf method, Listing 8 uses a different method, SubclassesOf, which is also provided by the WMI scripting library's SWbemServices object.
As the method's name suggests, SubclassesOf returns all of the child (or sub-) classes of a specified parent (super-) class, or namespace when no parent class is provided. Like InstancesOf, SubclassesOf returns all of the subclasses inside a SWbemObjectSet collection, where each item in the collection is a SWbemObject representing a single class.
Another important difference in Listing 8 is the objClass.Path_.Path property echoed in the body of For Each loop. Let's examine the For Each loop to understand exactly what this is. The For Each loop is enumerating each SWbemObject (objClass) in the SWbemObjectSet (colClasses) collection returned by the SWbemServicesSubclassesOf method. Each SWbemObject represents a discrete class in the root\cimv2 namespace.
Here's the potentially confusing part. Unlike all of our previous scripts that displayed properties defined by a managed resource's blueprint (class definition), Path_ is a property provided by the WMI scripting library's SWbemObject. To understand this, you have to think about the context in which you're using SWbemObject. Are you using SWbemObject to access an instance of a managed resource? Or are you using SWbemObject to access the managed resource's class definition?
When you use SWbemObject to access an instance of a managed resource, you're more likely to use SWbemObject to access properties and methods defined by the managed resource's blueprint (class definition). When you use SWbemObject to get detailed class information, such as supported properties, methods, and qualifiers, you use properties and methods provided by SWbemObject itself. Path_ is one such property.
Path_ actually references another WMI scripting library object named SWbemObjectPath, which provides the Path property. The SWbemObjectPathPath property contains the fully qualified path to the class referenced by SWbemObject (objClass in Listing 8). Again, don't get too wrapped up in the scripting objects now because we'll cover them in detail in Part 3.
Listing 8. Retrieving all classes defined in the root\cimv2 namespace using WMI and VBScript
strComputer = "."

Set objWMIService = GetObject("winmgmts:\\" & strComputer & "\root\cimv2")
Set colClasses = objWMIService.SubclassesOf()

For Each objClass In colClasses
    WScript.Echo objClass.Path_.Path
Next
Running Listing 8 on our Windows Server 2003 computer displays a long list of 914 classes, a portion of which are shown in Figure 5.

Figure 5. GetClasses.vbs output
Of course, you can easily modify Listing 8 to list classes in other namespaces by simply changing the script's target namespace. You can also use Listing 8 in combination with the findstr.exe command to search for classes. For those of you unfamiliar with the findstr.exe command, findstr.exe is a command-line tool that searches for strings in files.
Suppose, for example, you need to know if the new Windows XP and Windows Server 2003 Win32_TSSessionSetting class is supported on the version of Windows you're running. You could use the following command to determine if the Win32_TSSessionSetting class exists in the root\cimv2 namespace.
C:\Scripts> cscript GetClasses.vbs |findstr /I "win32_tssessionsetting"
Here are few additional scenarios to try.
-
List all system classes in the root\cimv2 namespace:
C:\Scripts> cscript GetClasses.vbs |findstr /I "__" -
List all core and common classes in the root\cimv2 namespace:
C:\Scripts> cscript GetClasses.vbs |findstr /I "CIM_" -
List all Win32 extension classes in the root\cimv2 namespace:
C:\Scripts> cscript GetClasses.vbs |findstr /I "Win32_" -
List all classes in the root\cimv2 namespace that contain the string "process":
C:\Scripts> cscript GetClasses.vbs |findstr /I "process"
CIM Class Types Defined
It should be obvious at this point that classes are the basic building blocks in the CIM repository. WMI configuration information and WMI managed resources are defined by one or more classes. Similar to the Active Directory schema, CIM classes are organized hierarchically where child classes inherit properties, methods, and qualifiers from parent classes (don't worry about properties, methods, and qualifiers for the moment; we'll get to those in the next section). For example, the Win32_Service dynamic class is inherited from the Win32_BaseService abstract class, which is inherited from the CIM_Service abstract class, which is inherited from the CIM_LogicalElement abstract class, which is inherited from the CIM_ManagedSystemElement abstract class, as illustrated in Figure 1. It is the sum of the classes in a managed resource's class hierarchy that ultimately defines a managed resource.
As mentioned earlier, there are three primary class types: abstract, static, and dynamic.
Abstract Classes
An abstract class is a template used to define new classes. Like abstract classes in the Active Directory schema, CIM abstract classes serve as base classes for other abstract, static, and dynamic classes. Every—well, almost every—WMI managed resource class definition is built (or derived) from one or more abstract classes.
You can identify an abstract class by examining the class's Abstract qualifier. An abstract class must define the Abstract qualifier and set the Abstract qualifier's value to true. Supplementary Listing A at the end of this article demonstrates how to use the WMI scripting library to list all abstract classes defined in the root\cimv2 namespace.
The most common use of the abstract class type is in the definition of core and common classes. Abstract classes are rarely used in WMI scripts because you cannot retrieve instances of abstract classes.
Static Classes
A static class defines data that's physically stored in the CIM repository. Static classes have instances just like dynamic classes; however, instances of static classes are stored in the CIM repository. Likewise, static class instances are retrieved directly from the CIM. They do not use a provider.
You can identify a static class by examining the class's qualifiers. However, unlike abstract and dynamic class types that are identified by the presence of a specific qualifier, static classes are identified by the absence of the Abstract and Dynamic qualifiers.
The most common use of the static class type is in the definition of system classes. Static classes are rarely used in WMI scripts.
Dynamic Classes
A dynamic class is a class that models a WMI managed resource that's dynamically retrieved from a provider.
You can identify a dynamic class by examining the class's Dynamic qualifier. A dynamic class must define the Dynamic qualifier and set the Dynamic qualifier's value to true. Supplementary Listing B at the end of this article demonstrates how to use the WMI scripting library to list all dynamic classes defined in the root\cimv2 namespace.
The most common use of the dynamic class type is in the definition of extension classes. Dynamic classes are the most common types of classes used in WMI scripts.
Association Classes
A fourth class type, known as an association class, is also supported. An association class is an abstract, static, or dynamic class that describes a relationship between two classes or managed resources. The Win32_SystemServices class, shown in Figure 1, is an example of a dynamic association class that describes the relationship between a computer and the services running on the computer.
You can identify an association class by examining the class's Association qualifier. An abstract, static, or dynamic association class must define the Association qualifier and set the Association qualifier's value to true.
Dissecting a Class
At the risk of sounding like a broken record, every hardware and software resource that's manageable through WMI is defined by a class. A class is a blueprint (or template) for a discrete WMI managed resource, and all instances of the resource use the blueprint. Classes represent the things computers have. And because computers have things like disks, event logs, files, folders, memory, printers, processes, processors, services, and so on, WMI has classes for disks, event logs, files, folders, memory, printers, processes, processors, services, and so on. Although there are exceptions (like __Event abstract system classes), most classes that are used in scripting can be directly tied to real, live things.
These so-called blueprints consist of properties, methods, and qualifiers. Before we examine properties, methods, and qualifiers, let's briefly discuss where managed-resource class definitions originate.
Suppose Microsoft decides to create a new WMI provider that system administrators can use to manage and monitor Microsoft DNS servers. At a minimum, the DNS provider development team would need to create two files: a provider and something called a Managed Object Format (MOF) file.
The provider is the dynamic link library that acts as the intermediary between the WMI infrastructure and the underlying managed resource—the Microsoft DNS server in this case. The provider services WMI requests by calling the managed resource's native APIs.
The MOF file contains the class definitions that describe the capabilities provided by the DNS provider. The MOF file describes the DNS provider's capabilities using classes that model resources commonly associated with a DNS server (zone files and resource records, for example). Each class defined in the DNS MOF file defines the data (properties) associated with a specific DNS-related resource and the actions (methods) you can perform on the resource.
When the DNS provider is installed, the DNS provider dynamic link library is registered with the operating system and WMI, and the DNS MOF file undergoes a compilation process, which loads the DNS provider's class definitions into the CIM repository. At this point, the DNS provider can be used by any WMI-enabled consumer, including scripts.
While our story is true—Microsoft developed a new DNS provider for Windows Server 2003—the important take away is that managed-resource class definitions originate in MOF files. MOF files are to WMI what MIB files are to SNMP.
MOF files are text files based on the MOF language created and maintained by the Distributed Management Task Force (DMTF). Every managed resource's class definition follows a well-defined structure and syntax as illustrated in Figure 6.
.gif)
Figure 6. Structure of a managed-resource class definition
As shown in Figure 6, every managed-resource class definition consists of properties, methods, and qualifiers.
Properties
Properties are nouns that describe a managed resource. Classes use properties to describe things like the identity, configuration, and state of a managed resource. Services, for example, have a name, display name, description, startup type, and status. The Win32_Service class has the same things.
Each property has a name, type, and optional property qualifiers. You use the property's name in combination with the WMI scripting library's SWbemObject to access a managed resource's property, as demonstrated way back in Listing 1.
Methods
Methods are verbs that perform an action on a managed resource. What can you do with services? Well, you can start them, stop them, pause them, and resume them. Turns out there are methods that allow you to start, stop, pause, and/or resume services. Nothing magical at all.
Each method has a name, return type, optional parameters, and optional method qualifiers. Like properties, you use the method's name in combination with the WMI scripting library's SWbemObject to call a method.
Not all classes define methods.
Qualifiers
Qualifiers are adjectives that provide additional information about the class, property, or method to which they apply. For example, the question, "What type of class is Win32_Service?" is answered by the class's Dynamic qualifier. As you begin to write WMI scripts that do more than simply retrieve information, such as modify properties or call methods, qualifiers become increasingly important because they define the operational characteristics of the property you're updating or the method you're calling. So what kind of information do qualifiers provide?
Class Qualifiers
Class qualifiers provide operational information about a class. For example:
- As you learned earlier, the Abstract, Dynamic, and Association qualifiers tell you the class type.
- The Provider qualifier tells you the provider that services the class. For example, the Provider qualifier for the Win32_Service class tells you that the class uses the CIMWin32 provider (cimwin32.dll). On the other hand, the Win32_NTLogEvent class uses the MS_NT_EVENTLOG_PROVIDER provider (ntevt.dll) as indicated by the Win32_NTLogEvent class's Provider qualifier.
- The Privileges qualifier informs you of special privileges required to use the class. For example, the Win32_NTLogEvent class's Privileges qualifier tells you the SeSecurityPrivilege must be enabled before the Win32_NTLogEvent class can be used to manage the Security log.
Property Qualifiers
Property qualifiers provide information about each property. For example:
- The CIMType qualifier tells you the property's data type.
- The Read qualifier indicates the property is readable.
- The Write qualifier indicates whether or not you can modify the property's value. For example, the Win32_WMISetting class's ASPScriptDefaultNamespace property we modified in Listing 4 is marked as writeable. On the other hand, all of the Win32_Service properties echoed in Listing 1 are defined as read-only—that is, they do not define the Write qualifier.
- The Key qualifier indicates the property is the class's key and is used to identify unique instances of a managed resource in a collection of identical resources.
Method Qualifiers
Method qualifiers provide information about each method. For example:
- The Implemented qualifier indicates the method has an implementation supplied by a provider.
- The ValueMap qualifier defines a set of permissible values for a method parameter or return type.
- The Privileges qualifier informs you of special privileges required to call the method.
Note There are many more qualifiers than those mentioned here. For the complete list, see the WMI Qualifiers topic in the WMI SDK.
You can examine a class's properties, methods, and qualifiers using the WMI Tester (wbemtest.exe) tool, as shown in Figure 7. Of course, you can also use the WMI scripting library to retrieve the same information, as you'll see shortly.
.gif)
Figure 7. Viewing the Win32_Service class using WMI Tester (wbemtest.exe)
Comparing Classes to Managed Resources
Most WMI properties and methods are reasonably well named. For example, if you compare the properties and methods defined by the Win32_Service class to the Services' Properties dialog, as shown in Figure 8, it's not too hard to figure out what Win32_Service.Name, Win32_Service.DisplayName, or Win32_Service.Descritpion might contain.
.gif)
Figure 8. Services properties dialog and Win32_Service class properties and methods
So why do we care about all this stuff? Well, classes determine what you can and cannot do with WMI. If you have a class for services, you can manage services; if you don't, you can't. Properties and methods are important because the versions of WMI differ between operating systems. The Win32_ComputerSystem class in Windows XP has many new properties and methods not in the Win32_ComputerSystem class in Windows 2000. You have to know the WMI details, too, because unlike ADSI, the WMI properties and methods must be available on the target computer in order to get things to work.
How do you determine if a property or method is supported on a remote Windows computer? You examine the class definition.
Retrieving Class Definitions
Like everything in WMI, there are a gazillion ways to retrieve a managed resource's class definition. OK, so maybe we're exaggerating, but suffice to say, there are so many ways that there's a solution for every user interface preference. If you like to grep text files, slice and dice the MOF file. If you prefer the command line, use the WMI Command-line tool, wmic.exe (Windows XP only). If you enjoy spending time in graphical tools, use WMI Tester (wbemtest.exe) or CIM Studio. Or if you're like us, reach for the WMI scripting library.
You can retrieve managed-resource class definitions three different ways using the WMI scripting library.
- You can use the SWbemObjectQualifiers_, Properties_, and Methods_ properties to retrieve class information.
- You can use the SWbemObjectGetObjectText_ method to retrieve the class definition formatted in MOF syntax.
- You can use the SWbemObjectExGetText_ method to retrieve the class definition formatted in XML (Windows XP and Windows Server 2003 only).
Let's briefly look at each scripting solution and then call it a day.
Using SWbemObject Properties_, Methods_, and Qualifiers_
Listings 9, 10, and 11 demonstrate how to use the Properties_, Methods_, and Qualifiers_ properties of the WMI scripting library's SWbemObject to retrieve information about the Win32_Service class. We'll examine Listing 9 and then point out the differences in Listings 10 and 11 since all three scripts employ the same basic approach.
Listing 9 begins by initializing three variables: strComputer, strNameSpace, and strClass. The value assigned to strComputer is the target WMI-enabled computer. The value assigned to strNameSpace is the namespace to connect to. And the value assigned to strClass is the name of the class within the target namespace whose properties are going to be retrieved and displayed. Separating the three values into multiple variables makes it easy to reuse the script for other computers, namespaces, and classes. In fact, you could easily turn Listing 9 into a command-line script using the Windows Script Host (WSH) Arguments collection.
Next, the script uses VBScript's GetObject function to connect to the WMI service on the target computer. Notice anything different about the connection string passed to GetObject? In addition to specifying the target namespace, the class name is also specified, which has a profound impact on what GetObject and the WMI scripting library return. Rather than returning a reference to a SWbemServices object, as was the case in all of our previous scripts, GetObject returns a reference to a SWbemObject representing the target class. Why? The answer lies in something called an object path. Although we cover object paths in detail in Part 3, we'll give you a quick explanation here to help you understand what's going on in Listings 9 through 11 (and Supplementary Listing C).
Every WMI class and every instance of a WMI managed resource has an object path. Think of an object path as the WMI version of a file's fully qualified path. Every file has a fully qualified path that consists of a device name, followed by zero or more directory names, followed by the file name. Likewise, every class and managed resource has an object path that consists of the WMI-enabled computer name, followed by the CIM namespace, followed by the managed resource's class name, followed by the class's key property and the key property's value, as shown below. (Note the square brackets only serve to delimit the four permissible parts of an object path; they are not part of the object path.)
[\\ComputerName][\Namespace][:ClassName][.KeyProperty='Value']
When you use all or part of an object path in the connection string passed to GetObject (which, by the way, we've been doing all along), the object path you use determines the type of reference returned by GetObject and the WMI scripting library. For example, if you only include the computer name part of an object path, you get back a SWbemServices object reference connected to the default namespace. If you include the computer name and/or namespace, you also get a reference to a SWbemServices object. If you include the computer name, namespace, and class name, you get back a reference to a SWbemObject representing the class. And if you include all four parts, you get back a SWbemObject representing the managed resource instance identified by the class, key, and value. Again, we'll cover object paths in more detail in Part 3 of this series. For now, understand objClass in Listing 9 is a reference to a SWbemObject representing the Win32_Service class.
The remainder of the script is reasonably straightforward. After echoing a simple header identifying the class name whose properties are going to be displayed, the script use's the SWbemObject reference (objClass) returned from GetObject to access the SWbemObjectProperties_ property (objClass.Properties_). The SWbemObjectProperties_ property references a SWbemPropertySet, which is the collection of properties for the class. Each property in the SWbemPropertySet collection is a SWbemProperty (objClassProperty) object, which we use to read and echo each property's name.
So to summarize, the For Each loop enumerates the class's SWbemPropertySet collection (by way of the SWbemObjectProperties_ property) and echoes the Name property for each SWbemProperty in the SWbemPropertySet collection.
Listing 9. Using SWbemObject properties_ to retrieve Win32_Service properties
strComputer = "."
strNameSpace = "root\cimv2"
strClass = "Win32_Service"

Set objClass = GetObject("winmgmts:\\" & strComputer & _
                         "\" & strNameSpace & ":" & strClass)

WScript.Echo strClass & " Class Properties"
WScript.Echo "------------------------------"

For Each objClassProperty In objClass.Properties_
    WScript.Echo objClassProperty.Name
Next
Figure 9 displays the names of the 25 properties defined (or inherited) by the Win32_Service class.

Figure 9. GetProperties.vbs output
Listing 10 is identical to Listing 9 with one primary exception. The For Each loop enumerates the class's SWbemMethodSet collection (by way of the SWbemObjectMethods_ property) and echoes the Name property for each SWbemMethod (objClassMethod) in the SWbemMethodSet collection.
Listing 10. Using SWbemObject methods_ to retrieve Win32_Service methods
strComputer = "."
strNameSpace = "root\cimv2"
strClass = "Win32_Service"

Set objClass = GetObject("winmgmts:\\" & strComputer & _
                         "\" & strNameSpace & ":" & strClass)

WScript.Echo strClass & " Class Methods"
WScript.Echo "---------------------------"

For Each objClassMethod In objClass.Methods_
    WScript.Echo objClassMethod.Name
Next
Figure 10 displays the names of the 10 methods defined (or inherited) by the Win32_Service class.

Figure 10. GetMethods.vbs output
Listing 11 is identical to Listings 9 and 10 with three exceptions.
- The For Each loop enumerates the class's SWbemQualifierSet collection (by way of the SWbemObjectQualifiers_ property) and echoes the Name property for each SWbemQualifier (objClassQualifier) in the SWbemQualifierSet collection.
- Because class qualifiers are part of the class definition and qualifiers have values, Listing 11 also retrieves and echoes the Value property for each SWbemQualifier (objClassQualifier) in the SWbemQualifierSet collection.
- Since a qualifier can have multiple values stored in an array, Listing 11 must account for this prior to reading a qualifier's value. Not doing so would result in a run-time error if the script tried to read an array-based qualifier as a scalar variable. The Win32_NTLogEvent class's Privileges qualifier is an example of an array-based qualifier.
Listing 11. Using SWbemObject qualifiers_ to retrieve Win32_Service class qualifiers
strComputer = "."
strNameSpace = "root\cimv2"
strClass = "Win32_Service"

Set objClass = GetObject("winmgmts:\\" & strComputer & _
                         "\" & strNameSpace & ":" & strClass)

WScript.Echo strClass & " Class Qualifiers"
WScript.Echo "------------------------------"

For Each objClassQualifier In objClass.Qualifiers_
    If VarType(objClassQualifier.Value) = (vbVariant + vbArray) Then
        strQualifier = objClassQualifier.Name & " = " & _
                       Join(objClassQualifier.Value, ",")
    Else
        strQualifier = objClassQualifier.Name & " = " & _
                       objClassQualifier.Value
    End If
    WScript.Echo strQualifier
    strQualifier = ""
Next
Figure 11 displays the names and values of the 5 class qualifiers defined (or inherited) by the Win32_Service class.

Figure 11. GetClassQualifiers.vbs output
As you might have noticed, Listings 9 and 10 fail to show you the property and method qualifiers. To be honest, it was intentional to keep the scripts to a size that could be easily explained. The good news is we've included the complete class qualifier, property, property qualifier, method, and method qualifier script at the end of the column (see Supplementary Listing C). You're welcome.
And in case it's not obvious, you could combine Listings 9, 10, and 11 with Listing 6 (the GetAllNamespaces.vbs script) and Listing 8 (the GetClasses.vbs script) to retrieve the properties, methods, and qualifiers for every class defined in the CIM. Use your resulting script with the findstr.exe command, and you've got a solution to search for any class, property, method, or qualifier defined in the CIM.
Using SWbemObject GetObjectText_
Earlier we said that you can retrieve managed-resource class definitions directly from the MOF file in which the class is defined. And you can. For example, if you want to look up the Win32_Service class, look in the %SystemRoot%\system32\wbem\cimwin32.mof file. However, using MOF files directly comes with a price. You must examine every class in a managed resource's class hierarchy to obtain the complete blueprint for the managed resource.
Say, for example, you did want to lookup Win32_Service. You would have to examine all five classes in the Win32_Service class hierarchy, as illustrated in Figure 1, to get the complete picture. The same is true if you use the WMI Tester's (wbemtest.exe) Show MOF button (see Figure 7). An easier approach to obtaining the MOF representation of a class is to use the WMI scripting library's SWbemObjectGetObjectText_ method, as demonstrated in Listing 12.
Unlike Listings 9 through 11, Listing 12 uses the SWbemServicesGet method to retrieve the class rather than GetObject. The SWbemServicesGet method must be used so the wbemFlagUseAmendedQuailifiers flag can be enabled. Enabling the wbemFlagUseAmendedQuailifiers flag tells WMI to return the entire managed resource blueprint (class definition) rather than just the local definition.
Using the wbemFlagUseAmendedQualifiers flag has a second benefit as well. You also get back the class description, and descriptions for each of the class's properties, methods, and qualifiers. Class, property, method, and qualifier descriptions are commonly defined in a separate MOF file for localization purposes. For example, the language-neutral portion of the Win32_Service class is defined in cimwin32.mof. The language-specific portion of the Win32_Service class, which includes description information, is defined in cimwin32.mfl. Language-specific (or localized) MOF files commonly have a .mfl extension rather than .mof.
The SWbemServicesGet method returns a reference to a SWbemObject (objClass) representing the target class, which is used to call the SWbemObjectGetObjectText_ method. The GetObjectText_ method returns the MOF representation for the class. Had we used GetObjectText_ without enabling the wbemFlagUseAmendedQuailifiers flag, the method would have only returned those properties, methods, and qualifiers defined by Win32_Service; inherited properties and methods would have been omitted.
Listing 12. Using SWbemObject GetObjectText_ to retrieve the MOF representation of the Win32_Service class
strComputer = "."
strNameSpace = "root\cimv2"
strClass = "Win32_Service"

Const wbemFlagUseAmendedQualifiers = &h20000

Set objWMIService = GetObject("winmgmts:\\" & strComputer & "\" & strNameSpace)
Set objClass = objWMIService.Get(strClass, wbemFlagUseAmendedQualifiers)
strMOF = objClass.GetObjectText_

WScript.Echo strMOF
There is a caveat to using GetObjectText_, however: there's no information about inherited qualifiers included in the MOF syntax returned by the method. This could present a problem if you wanted to use GetObjectText_ to determine a class's Key property when the Key qualifier is defined on a property in a parent class.
Using SWbemObjectEx GetText_
Windows XP and Windows Server 2003 both include a new method named GetText_ that can be used to retrieve the XML representation of a managed-resource class definition.
Using GetText_ is similar to GetObjectText_ with one noticeable exception: the three parameters passed to the GetText_ method.
The first parameter is required and identifies the resulting XML format. It can currently be one of two values as defined by the WMI WbemObjectTextFormatEnum: wbemObjectTextFormatCIMDTD20 (value: 1) or wbemObjectTextFormatWMIDTD20 (value: 2). A value of 2 (wbemObjectTextFormatWMIDTD20) tells GetText_ to format the resulting XML according to the extended WMI version of the Distributed Management Task Force CIM document type definition (DTD) Version 2.0.
The second parameter is optional and is currently reserved for operation flags. It should be set to 0 (zero).
The third parameter (also optional), colNamedValueSet, is a SWbemNamedValueSet collection that provides special instructions to GetText_. Here we're telling GetText_ to:
- Retrieve and encode all properties and methods, not just locally defined properties and methods.
- Include class qualifiers, property qualifiers, and method qualifiers in the resulting XML.
- Include system properties in the resulting XML.
- Include the class origin for all properties and methods.
Listing 13. Using SWbemObjectEx GetText_ to retrieve the XML representation of the Win32_Service class (Windows XP and Windows .NET only)
strComputer = "."
strNameSpace = "root\cimv2"
strClass = "Win32_Service"

Const wbemFlagUseAmendedQualifiers = &h20000
Const wbemObjectTextFormatWMIDTD20 = 2

Set objWMIService = GetObject("winmgmts:\\" & strComputer & "\" & strNameSpace)
Set objClass = objWMIService.Get(strClass, wbemFlagUseAmendedQualifiers)

Set colNamedValueSet = CreateObject("Wbemscripting.SWbemNamedValueSet")
colNamedValueSet.Add "LocalOnly", False
colNamedValueSet.Add "IncludeQualifiers", True
colNamedValueSet.Add "ExcludeSystemProperties", False
colNamedValueSet.Add "IncludeClassOrigin", True

strXML = objClass.GetText_(wbemObjectTextFormatWMIDTD20, 0, colNamedValueSet)

WScript.Echo strXML
To successfully run Listing 13, copy and paste the script into your favorite text editor, save the script with a .vbs extension (for example, GetXML.vbs), and run the script using the command line shown below.
C:\Scripts> cscript //nologo GetXML.vbs >Win32_Service.xml
Figure 12 displays the resulting XML file, Win32_Service.xml, using Microsoft® Internet Explorer.
.gif)
Figure 12. GetXML.vbs output
All for Now
If there's anything confusing, difficult, or overwhelming about WMI, it's getting a handle on the mountain of data exposed through WMI. We'd like to think we've equipped you with the knowledge and tools necessary to effectively find and interpret WMI managed resource class definitions. Of course, you're the best judge of that, so by all means let us know if and where we've fallen short. With the boring stuff out of the way, be prepared to have some fun in Part 3 when we dive into the details of the WMI scripting library. Oh, and by all means, feel free to take the rest of the day off.
Wait! One final note before you pack-up and head home: The WMI Development Team asked us to let you know that the WMI Tools, formerly only available with the WMI SDK, have been updated. The updated tools (which include WMI CIM Studio, WMI Event Registration, WMI Event Viewer, and the WMI Object Browser), are now compatible with Windows XP and Windows Server 2003, as well as with Windows 2000. In addition, the updated tools do not include the WMI SDK, which means you can now install the tools without installing the entire WMI SDK. Is that cool or what?
Supplementary Scripts
Listing A. Listing abstract class types defined in the root\cimv2 namespace
strComputer = "."

Set objWMIService = GetObject("winmgmts:\\" & strComputer & "\root\cimv2")
Set colClasses = objWMIService.SubclassesOf()

For Each objClass in colClasses
    For Each objClassQualifier In objClass.Qualifiers_
        If LCase(objClassQualifier.Name) = "abstract" Then
            WScript.Echo objClass.Path_.Class   & ": " & _
                         objClassQualifier.Name & "="  & _
                         objClassQualifier.Value
        End If
    Next
Next
Listing B. Listing dynamic class types defined in the root\cimv2 namespace
strComputer = "."

Set objWMIService = GetObject("winmgmts:\\" & strComputer & "\root\cimv2")
Set colClasses = objWMIService.SubclassesOf()

For Each objClass in colClasses
    For Each objClassQualifier In objClass.Qualifiers_
        If LCase(objClassQualifier.Name) = "dynamic" Then
            WScript.Echo objClass.Path_.Class   & ": " & _
                         objClassQualifier.Name & "="  & _
                         objClassQualifier.Value
        End If
    Next
Next
Listing C. Using SWbemObject Qualifiers_, Properties_, and Methods_ to retrieve class qualifiers, properties, property qualifiers, methods, and method qualifiers
strComputer = "."
strNameSpace = "root\cimv2"
strClass = "Win32_Service"

Set objClass = GetObject("winmgmts:\\" & strComputer & _
                         "\" & strNameSpace & ":" & strClass)

WScript.Echo strClass & " Class Qualifiers"
WScript.Echo "------------------------------"
i = 1
For Each objClassQualifier In objClass.Qualifiers_
    If VarType(objClassQualifier.Value) = (vbVariant + vbArray) Then
        strQualifier = i & ". " & objClassQualifier.Name & " = " & _
                                  Join(objClassQualifier.Value, ",")
    Else
        strQualifier = i & ". " & objClassQualifier.Name & " = " & _
                                  objClassQualifier.Value
    End If
    WScript.Echo strQualifier
    strQualifier = ""
    i = i + 1
Next

WScript.Echo
WScript.Echo strClass & " Class Properties and Property Qualifiers"
WScript.Echo "------------------------------------------------------"
i = 1 : j = 1
For Each objClassProperty In objClass.Properties_
    WScript.Echo i & ". " & objClassProperty.Name
    For Each objPropertyQualifier In objClassProperty.Qualifiers_
        If VarType(objPropertyQualifier.Value) = (vbVariant + vbArray) Then
            strQualifier = i & "." & j & ". " & _
                           objPropertyQualifier.Name & " = " & _
                           Join(objPropertyQualifier.Value, ",")
        Else
            strQualifier = i & "." & j & ". " & _
                           objPropertyQualifier.Name & " = " & _
                           objPropertyQualifier.Value
        End If
        WScript.Echo strQualifier
        strQualifier = ""
        j = j + 1
    Next
    WScript.Echo
    i = i + 1 : j = 1
Next

WScript.Echo
WScript.Echo strClass & " Class Methods and Method Qualifiers"
WScript.Echo "-------------------------------------------------"
i = 1 : j = 1
For Each objClassMethod In objClass.Methods_
    WScript.Echo i & ". " & objClassMethod.Name
    For Each objMethodQualifier In objClassMethod.Qualifiers_
        If VarType(objMethodQualifier.Value) = (vbVariant + vbArray) Then
            strQualifier = i & "." & j & ". " & _
                           objMethodQualifier.Name & " = " & _
                           Join(objMethodQualifier.Value, ",")
        Else
            strQualifier = i & "." & j & ". " & _
                           objMethodQualifier.Name & " = " & _
                           objMethodQualifier.Value
        End If
        WScript.Echo strQualifier
        strQualifier = ""
        j = j + 1
    Next
    WScript.Echo
    i = i + 1 : j = 1
Next
Scripting Clinic
Greg Stemp has long been acknowledged as one of the country's foremost authorities on scripting, and has been widely acclaimed as a world-class... huh? Well, how come they let football coaches make up stuff on their resumes? Really? He got fired? Oh, all right. Greg Stemp works at... Oh, come on now, can't I even say that? Fine. Greg Stemp gets paid by Microsoft, where he tenuously holds the title of lead writer for the System Administration Scripting Guide.
Dean Tsaltas is a Nova Scotian living in Redmond. He has become fluent in American and even chuckles at the accent of his friends and family back in the Maritimes. He got his start in computing at a tender age when his grandma and parents chipped in and bought him his beloved C-64 and a subscription to Compute!'s Gazette. He has been at Microsoft for a couple of years now and has a message for friends and family back home and in Vancouver: "No, I have not met Bill!"
Bob Wells wanders around aimlessly espousing the virtues of scripting to anyone who will listen. Rumor has it, Bob's two dachshunds know more about scripting than most humans. In his spare time, Bob contributes to the System Administration Scripting Guide.
Ethan Wilansky spends a lot of his work time writing and consulting. He's crazy about scripting, Yoga, gardening, and his family (not necessarily in that order). He is currently working on a way to create script that will take out the trash and wash the dinner dishes.
WMI Scripting Primer: Part 3
Greg Stemp, Dean Tsaltas, and Bob Wells
Microsoft Corporation
Ethan Wilansky
Network Design Group
January 23, 2003
Summary: Defines the WMI scripting library and shows how to use it to access and manage WMI managed resources. Walks through the seven basic script types that can be created using the WMI scripting library for such tasks as creating, deleting, and retrieving instances of managed resources, and more. (22 printed pages)
Greetings fellow script scribes! It's been awhile. Rather than bore you with excuses—like we were finishing the Microsoft® Windows® 2000 Scripting Guide (more on that later)—let's dive in, shall we? We're going to pick up where we left off in our WMI Scripting Primer series by turning your attention to the remaining piece of the WMI scripting puzzle, the WMI Scripting Library.
Before we get too far along, let's briefly recap what we've covered so far. In WMI Scripting Primer: Part 1, we covered the architecture and major components of WMI as they relate to WMI scripting. In WMI Scripting Primer: Part 2, we talked about the Common Information Model, the repository that holds the blueprints (class definitions) for WMI managed resources. Although we know many of you skipped Part 2 (based on the number of "Rate this page" hits), we're still going to assume you know the material. If you don't, well, you know where to find it.
WMI Scripting Library Defined
So, just what is the WMI scripting library? Let's use an analogy to answer that question. Think about your stereo system or the media player on your computer for a moment. What do all stereos have in common? Well, they all have a volume control, treble and bass controls, a tuner in the case of a radio, and perhaps an equalizer. And it doesn't matter whether you choose to listen to Beethoven, Led Zeppelin, Art of Noise, or whoever; the controls always work the same.
The WMI scripting library is like—not really, but humor us—the controls on your stereo. That is, the WMI scripting library provides a consistent set of controls (in the form of automation objects) that allow you to access and manage WMI managed resources. It doesn't matter whether you're managing computers, event logs, the operating system, processes, services, or pick your favorite resource; the objects in the WMI scripting library always work the same.
The consistency provided by the automation objects in the WMI scripting library is best conveyed by the finite set of tasks you can perform using the WMI scripting library. All told, you can create seven basic script types using the WMI scripting library.
- You can retrieve instances of WMI managed resources.
- You can read the properties of a WMI managed resource.
- You can modify the properties of a WMI managed resource.
- You can call a method of a WMI managed resource.
- You can create a new instance of a WMI managed resource.
- You can delete an instance of a WMI managed resource.
- You can subscribe to events to monitor the creation, modification, and/or deletion of a WMI managed resource.
You can think of the seven basic script types as script templates. And just like the volume control adjusts the loudness of any CD, cassette, 8-track tape, or .wma file, the WMI script templates can be used to manage any WMI managed resource. Once you understand a template well enough to manage one type of WMI managed resource, you can easily adapt the same template to manage hundreds of other WMI managed resources.
WMI Scripting Library Object Model
Now that we've established the WMI scripting library is your control panel to the entire WMI infrastructure, let's open the chassis and look inside. Figure 1 in Part 1 of this series showed you that the WMI scripting library is implemented in a single automation component named wbemdisp.dll that physically resides in the %SystemRoot%\system32\wbem directory.
All told, the WMI scripting library consists of twenty-four automation objects (nineteen in Windows 2000 and earlier), twenty-one of which are illustrated in the WMI scripting library object model diagram shown in Figure 1. Now, before you go into meltdown thinking you must learn the gory details of all twenty-four objects, let us politely point out that you do not. In fact, you'll be happy to learn you can create 6 of the 7 script templates listed earlier with a basic understanding of just two or three of the objects shown in Figure 1. What are those objects? Sit tight, you're getting ahead of us.
In addition to the twenty-four automation objects in the Microsoft Windows XP and Windows Server 2003 version of wbemdisp.dll, the scripting library also contains thirteen enumerations. Enumeration is just a fancy name for a group of related constants. We're not going to cover the groups of constants here, because they're covered quite well in the WMI SDK. To learn more about the WMI scripting constants, see Scripting API Constants in the WMI SDK.
In many ways, you can compare the automation objects in the WMI scripting library to the core interfaces provided by ADSI. What do we mean by that? Well, the ADSI core interfaces—IADs and IADsContainer, for example—provide a consistent approach to scripting objects in the Active Directory, irrespective of an object's class and attributes. Similarly, the automation objects in the WMI scripting library provide a consistent and uniform scripting model for WMI managed resources.
It's important to understand the relationship between the automation objects in the WMI scripting library (wbemdisp.dll) and the managed resource class definitions that reside in the CIM repository (objects.data). As we explained in Part 2, managed resource class definitions are the blueprints for the computer resources exposed through WMI. In addition to defining the resources that can be managed, the blueprints define the methods and properties unique to each managed resource.
The WMI scripting library, on the other hand, provides the general purpose set of automation objects scripts used to authenticate and connect to WMI, and subsequently access instances of WMI managed resources. Once you obtain an instance of a WMI managed resource using the WMI scripting library, you can access the methods and properties defined by the managed resource's class definition—as if the methods and properties were part of the scripting library itself.
.gif)
Figure 1. WMI scripting library object model, wbemdisp.dll
Interpreting the WMI Scripting Library Object Model
Although Figure 1 may not appear very intuitive at first glance, the WMI scripting library object model provides a great deal of insight into the mechanics of how WMI scripting works. The lines in Figure 1 point to the object that is obtained by calling a method (or accessing a property) of the originating object. For example, calling the SWbemLocator ConnectServer method returns a SWbemServices object. Calling the SWbemServicesExecNotificationQuery method returns a SWbemEventSource object. On the other hand, calling the SWbemServicesExecQuery or InstancesOf method returns a SWbemObjectSet collection. And calling the SWbemServicesGet method returns a SWbemObject.
Let's compare the WMI scripts presented in Part 1 and Part 2 of this series to the object model to see how they worked. Each script performed three basic steps common to many WMI scripts.
-
Each script started by connecting to the WMI service on a target computer. The scripts used the Microsoft® Visual Basic® Scripting Edition (VBScript) GetObject function combined with a WMI connection string consisting of the WMI moniker, "winmgmts:", followed by a WMI object path to the target computer and namespace.
strComputer = "."
Set objSWbemServices = GetObject("winmgmts:\\" & strComputer & "\root\cimv2")
Connecting to WMI in this way returns a reference to the SWbemServices object shown in Figure 1. Once you obtain a reference to a SWbemServices object, you can call one of SwbemServices methods. The SWbemServices method you call largely depends on the type of WMI script you're creating.
-
Next, each script retrieved instances of a WMI managed resource using the SWbemServicesInstancesOf method.
Set colSWbemObjectSet = objSWbemServices.InstancesOf("Win32_Service")InstancesOfalways returns a SWbemObjectSet collection. As shown by the line between the SWbemServices and SWbemObjectSet objects in Figure 1, SWbemObjectSet is one of the three WMI scripting library object types SWbemServices can return.
-
Finally, each script accessed properties of a WMI managed resource by enumerating the instances in the SWbemObjectSet.
For Each objSWbemObject In colSWbemObjectSet
    WScript.Echo "Name: " & objSWbemObject.Name
Next
As illustrated in Figure 1, each managed resource instance in a SWbemObjectSet collection is represented by a SWbemObject.
Of the twenty-four automation objects in the WMI scripting library, the three most important—that is, the three you should learn first—are SWbemServices, SWbemObjectSet, and SWbemObject. Why? Because SWbemServices, SWbemObjectSet, and SWbemObject are an essential part of darn near every WMI script. In fact, if we revisit our ADSI analogy, SWbemServices, SWbemObjectSet, and SWbemObject are to WMI scripting what IADs and IADsContainer are to ADSI scripting. (Scripting Guys Freebie: There's a tip in there for those of you that haven't dabbled in ADSI scripting.—.That is, of the sixty interfaces provided by the ADSI library, IADs and IADsContainer are the two you should learn first. Trust us.)
SWbemServices is the object that represents an authenticated connection to a WMI namespace on a local or remote computer. Additionally, SWBemServices plays an important role in every WMI script. For example, you use the SWbemServicesInstancesOf method to retrieve all instances of a managed resource. Similarly, you use the SWbemServicesExecQuery method combined with a WQL (WMI Query Language) query to retrieve all or a subset of instances of a managed resource. And you use the SWbemServicesExecNotificationQuery method to subscribe to events that represent changes in the managed environment.
A SWbemObjectSet is a collection of zero or more SWbemObject objects. Why zero? Because it's possible for a computer to have zero instances of, say, a tape drive (modeled by Win32_TapeDrive). Each SWbemObject in a SWbemObjectSet can represent one of two things:
- An instance of a WMI managed resource.
- An instance of a class definition.
SWbemObject is the multiple-identity object that masquerades as the resource you're managing. For example, if you retrieve instances of the Win32_Process managed resource, SWbemObject takes on an identity modeled after the Win32_Process class definition, as shown on the left of Figure 2. On the other hand, if you retrieve instances of the Win32_Service managed resource, SWbemObject takes on an identity modeled after the Win32_Service class, as shown on the right of Figure 2.

Figure 2. SWbemObject masquerading as a Win32_Process and Win32_Service
If you examine Figure 2 closely, you'll notice SWbemObject exposes two distinct sets of methods and properties. The top set with the names that end with an underscore are part of SWbemObject and live in wbemdisp.dll. The underscores are used to prevent name collisions with methods and properties defined by a managed resource's class definition.
The bottom set of methods and properties are not part of SWbemObject. They are defined by a managed resource's class definition in the CIM. When you retrieve an instance or instances of a managed resource, SWbemObject dynamically binds to the methods and properties defined by the managed resource's class definition. You use SWbemObject to call the methods and access the properties defined in the managed resource's class definition as if the methods and properties were part of SWbemObject. The ability of SWBemObject to morph into any managed resource defined in the CIM is what makes WMI scripting so intuitive. Once you know how to connect and retrieve instances, everything is a SWbemObject.
OK. So what else does the WMI scripting library object model tell you? The object model tells you SWbemServices and SWbemObject can be directly created using the VBScript (or WSH) GetObject function combined with the WMI moniker (winmgmts:) and a WMI object path (for example, "[\\ComputerName][\Namespace][:ClassName][.KeyProperty='Value']"). On the other hand, SWbemLocator, SWbemLastError, SWbemObjectPath, SWbemNamedValueSet, SWbemSink, SWbemDateTime, and SWbemRefresher objects are created using the VBScript (or WSH) CreateObject function. The remaining objects cannot be created using GetObject or CreateObject. Instead, they are obtained by calling a method or accessing a property.
The object model also tells you that seven of the objects in the WMI scripting library expose a SWbemSecurity object, as indicated by the security callout icon immediately beneath or to the right of the object.
For more information about a specific scripting library object, method, or property, see Scripting API for WMI in the WMI SDK Documentation. To understand the basic mechanics of the WMI scripting library, let's turn our attention to the seven WMI script templates we listed earlier. Before we do that, how about a paragraph or two about variable naming conventions.
A Paragraph or Two About Variable Naming Conventions
In the example scripts that follow, the variable names used to reference each WMI automation object follow a consistent naming convention. Each variable is named according to the automation object's name in the WMI scripting library, and prefaced with "obj" (to indicate an object reference) or "col" (to indicate a collection object reference). For example, a variable that references a SWbemServices object is named objSWbemServices. A variable that references a SWbemObject is named objSWbemObject. And a variable that references a SWbemObjectSet is named colSWbemObjectSet.
Why is this important? Well, one could certainly argue that it's not. However, the idea is to help you understand the type of WMI object you're working with at different points in a WMI script. If it helps, great. If it doesn't, just ignore it. The other mildly important thing to keep in mind is that the object reference variable names can be whatever suits your fancy. If you prefer variable names like foo and bar, or dog and cat, that's fine too. There is no requirement stating you must name a reference to a SWbemServices object objSWbemServices. That's just how we did it.
The Scripting Guys Guide to WMI Script Templates
Admittedly, WMI has a reputation for being very difficult to learn and even more difficult to use. In many respects, this reputation has been acquired not so much because WMI really is difficult, but simply because it is so big. WMI can be used to manage computer hardware, computer software, and nearly everything in between. The assumption is that any technology that encompasses so many different elements must be difficult.
In reality, though, many of the tasks that can be performed by using WMI follow one of a handful of standard approaches. For example, you've already seen how a template can serve as the basis for scripts that return information about almost any managed resource. In Part 1 of this series, the same basic script (with one or two minor modifications) was used to return information about items as disparate as installed memory, services, and events recorded in the event logs.
The following topics present basic WMI script templates that can be used to:
- Retrieve instances of a managed resource.
- Display the properties of a managed resource.
- Modify the properties of a managed resource.
- Call a method of a managed resource.
- Create a new instance of a managed resource.
- Delete an instance of a managed resource.
- Subscribe to events to monitor the creation, modification, and/or deletion of a managed resource.
Before we get started, we need to make sure we're perfectly clear on one important point: What you can and cannot do to a WMI managed resource is governed by the managed resource's blueprint (that is, class definition) in the Common Information Model (CIM) repository, and not the WMI scripting library. This is why Part 2 of this series is mildly important (hint, hint). Still not convinced? We'll give you a couple of examples.
You can only modify writeable properties. How do you determine if a property is writeable? You use WbemTest.exe, WMI CIM Studio, WMIC.exe, or a script to examine the property's Write qualifier. (See Figure 7 or Listing C in Part 2 of this series for an example of how to examine property qualifiers.) If the Write qualifier isn't defined for a property, the default value is FALSE, which means the property is read-only.
Here's another example. You can only create new instances of managed resources if the resource's class definition sets the SupportsCreate class qualifier to TRUE. How do you determine if a managed resource's class definition sets SupportsCreate to TRUE? You examine the managed resource's class qualifiers, again, as shown in Figure 7 and demonstrated in Listing C in Part 2 of this series.
**Note **In practice you'll find some managed resources can be created, updated, and/or deleted even though the managed resource's class definition fails to set the appropriate qualifiers. We're told the situation is being corrected.
One more thing before we get started. All of the following script templates are designed to work on the local computer. This is done by setting the value of the variable strComputer to a dot ("."). To run a script against a remote computer, simply set the value of strComputer to the name of the remote computer. For example, this line of code causes a script to run against a computer named atl-dc-01:
strComputer = "atl-dc-01"
Retrieving Instances of a Managed Resource
Up to this point, we've used the SWbemServicesInstancesOf method to retrieve instances of managed resources, as shown in Listing 1.
Listing 1. Retrieving services information using SWbemServices InstancesOf
strComputer = "."
Set objSWbemServices = GetObject("winmgmts:\\" & strComputer & "\root\cimv2")
Set colSWbemObjectSet = objSWbemServices.InstancesOf("Win32_Service")
For Each objSWbemObject In colSWbemObjectSet
    WScript.Echo "Display Name:  " & objSWbemObject.DisplayName & vbCrLf & _
                 "   State:      " & objSWbemObject.State       & vbCrLf & _
                 "   Start Mode: " & objSWbemObject.StartMode   & vbCrLf
Next
While InstancesOf certainly does the trick, what about situations where you only want a subset of instances or properties? Suppose you want to optimize instance and property retrieval to minimize network traffic. In such cases, you'll be glad to learn WMI supports a rich and powerful query facility.
Querying WMI is the process of issuing a request for managed resources that match some predefined criteria. For example, a WMI query can request only those services with a StartMode of Auto that are in a Stopped state.
WMI queries provide a more efficient mechanism for retrieving instances of managed resources and their properties than the InstancesOf method. WMI queries return only those instances and properties that match the query, whereas InstancesOf always returns all instances of a specified resource and all of the properties for each instance. Also, queries are processed on the target computer identified in the object path rather than on the source computer running the script. Therefore, WMI queries can significantly reduce the amount of network traffic that would otherwise be encountered by less efficient data retrieval mechanisms, such as InstancesOf.
To query WMI, you construct a query string using the WMI Query Language (WQL). The query string defines the criteria that must be satisfied to result in a successful match. After the query string is defined, the query is submitted to the WMI service using the SWbemServicesExecQuery method. Instances of managed resources that satisfy the query are returned to the script in the form of a SWbemObjectSet collection.
Using WQL and the ExecQuery method (rather than InstancesOf) provides you with the flexibility to create scripts that return only the items that are of interest to you. For example, you can use a basic WQL query to return all properties of all instances of a given managed resource, as shown in Listing 2. This is the same information that is returned by the InstancesOf method. If you compare Listings 1 and 2, you'll notice the bold part of Line 3 is the only difference between the two scripts.
Listing 2. Retrieving services information using SWbemServices ExecQuery
strComputer = "."
Set objSWbemServices = GetObject("winmgmts:\\" & strComputer & "\root\cimv2")
Set colSWbemObjectSet = objSWbemServices.ExecQuery("SELECT * FROM Win32_Service")
For Each objSWbemObject In colSWbemObjectSet
    WScript.Echo "Display Name:  " & objSWbemObject.DisplayName & vbCrLf & _
                 "   State:      " & objSWbemObject.State       & vbCrLf & _
                 "   Start Mode: " & objSWbemObject.StartMode   & vbCrLf
Next
You can also create targeted queries using WQL, queries that do such things as:
-
Return only selected properties of all the instances of a managed resource.
"SELECT DisplayName, State, StartMode FROM Win32_Service" -
Return all the properties of selected instances of a class.
"SELECT * FROM Win32_Service WHERE State = 'Stopped'" -
Return selected properties of selected instances of a class.
"SELECT DisplayName,State,StartMode FROM Win32_Service WHERE State='Stopped'"
Creating targeted queries will sometimes noticeably increase the speed with which data is returned. (For instance, it's much faster to return only those events in the Application event log that have EventCode 0 than to return all the events in all the event logs.) Targeted queries also make it easier to work with the returned data. For example, suppose you want only events from the Application event log with EventCode 0. Using a targeted query will return only those items. By contrast, InstancesOf would return all the events, and you would have to individually examine each one and determine whether it, 1) came from the Application event log and, 2) has EventCode 0. Although this can be done, it is less efficient and requires additional work on your part.
Targeted queries can also cut down on the amount of data that is returned, an important consideration for scripts that run over the network. Table 1 shows some relative figures for different query types. As you can see, there can be a considerable difference in the amount of data returned by the various query types.
Table 1. Comparing different WMI instance retrieval methods and queries
| Method/WQL Query | Bytes Returned |
|---|---|
| objSWbemServices.InstancesOf("Win32_Service") | 157,398 |
| objSWbemServices.ExecQuery("SELECT * FROM Win32_Service") | 156,222 |
| objSWbemServices.ExecQuery("SELECT Name FROM Win32_Service") | 86,294 |
| objSWbemServices.ExecQuery("SELECT StartMode FROM Win32_Service") | 88,116 |
| objSWbemServices.ExecQuery("SELECT StartMode FROM Win32_Service WHERE State='Running'") | 52,546 |
| objSWbemServices.ExecQuery("SELECT StartMode, State FROM Win32_Service WHERE State='Running'") | 56,314 |
| objSWbemServices.ExecQuery("SELECT * FROM Win32_Service WHERE Name='WinMgmt'") | 27,852 |
| objSWbemServices.Get("Win32_Service.Name='WinMgmt'") | 14,860 |
At this point, we hope we've convinced you ExecQuery is superior to InstancesOf. Now let's turn Listing 2 into a generic WMI script template that can easily be modified to retrieve instances of any WMI managed resource. Listing 3 contains our first template.
Listing 3. Template for retrieving instances of managed resources
strComputer = "."
strNamespace = "\root\cimv2"
strClass = "Win32_Service"

Set objSWbemServices = GetObject("winmgmts:\\" & strComputer & strNamespace)
Set colSWbemObjectSet = objSWbemServices.ExecQuery("SELECT * FROM " & strClass)

For Each objSWbemObject In colSWbemObjectSet
    WScript.Echo "Display Name: " & objSWbemObject.DisplayName
    WScript.Echo "State:        " & objSWbemObject.State
    WScript.Echo "Start Mode:   " & objSWbemObject.StartMode
Next
To use this template with other WMI classes:
-
Set the value of strClass to the appropriate WMI class for the target-managed resource.
-
If necessary, set the value of strNamespace to the WMI namespace for the target class.
-
Replace the statements within the For Each loop that echo the properties and their values. Remove the following lines and replace them with the appropriate lines of code for the property values being displayed.
WScript.Echo "Display Name: " & objSWbemObject.DisplayName
WScript.Echo "State:        " & objSWbemObject.State
WScript.Echo "Start Mode:   " & objSWbemObject.StartMode
**Scripting Guys Freebie **If you're working with a managed resource that returns a lot of instances (we'll define a lot as more than 1000 for the purpose of this discussion), you can optimize the behavior of ExecQuery through the use of optional flags. For example, suppose you use ExecQuery to query Event Log records (modeled by the Win32_NTLogEvent class). As you already know, the Event Log(s) can contain thousands and thousands of records. By default, you may encounter performance problems associated with queries that return large result sets, such as Event Log queries. The reason has to do with the way WMI caches a SWbemObject reference for each and every instance, or in our example, for each and every Event Log record. To avoid the problem, you can tell ExecQuery to return a forward-only SWbemObjectSet, as demonstrated below.
strComputer = "."
strNamespace = "\root\cimv2"
strClass = "Win32_NTLogEvent"

Const wbemFlagReturnImmediately = &h10
Const wbemFlagForwardOnly = &h20

Set objSWbemServices = GetObject("winmgmts:\\" & strComputer & strNamespace)
Set colSWbemObjectSet = objSWbemServices.ExecQuery("SELECT * FROM " & strClass, _
                        "WQL" _
                        wbemFlagReturnImmediately + wbemFlagForwardOnly)

' Insert remainder of script here (e.g., For Each Next loop)...
**Note **The wbemFlagReturnImmediately flag (which is defined in one of the enumerations we briefly touched on earlier) is the default ExecQuery behavior and is semi-synchronous. The important optimization is the addition of the wbemFlagForwardOnly flag. Combining wbemFlagReturnImmediately with wbemFlagForwardOnly results in a forward-only enumerator. A forward-only enumerator performs much faster than the default enumerator, because WMI doesn't maintain references to objects in the SWbemObjectSet.
Displaying the Properties of a Managed Resource
One limitation of the script shown in Listing 3 is that it requires you to know, in advance, the names of all of the properties that you want to retrieve and display. What if you want to display values for all the properties of a resource, but you either do not know the property names or do not want to type the 40 or 50 lines of code required to display each property value? In that case, you can use the template in Listing 4, which automatically retrieves and displays the values of each property found in a class.
Listing 4. Scriptomatic lite template
strComputer = "."
strNamespace = "\root\cimv2"
strClass = "Win32_Process"

Set objSWbemServices = GetObject("winmgmts:\\" & strComputer & strNamespace)
Set colSWbemObjectSet = objSWbemServices.ExecQuery("SELECT * FROM " & strClass)

Wscript.Echo "Scriptomatic Lite - Class: " & strClass
Wscript.Echo "===========================" & String(Len(strClass), "=") & vbCrLf

intInstance = 1
For Each objSWbemObject In colSWbemObjectSet
    WScript.Echo "Instance: " & intInstance & vbCrLf & "--------------"
    For Each objSWbemProperty In objSWbemObject.Properties_
        strPropertyValue = ConvertPropertyValueToString(objSWbemProperty.Value)
        WScript.Echo objSWbemProperty.Name & ": " & strPropertyValue
    Next
    WScript.Echo
    intInstance = intInstance + 1
Next

Function ConvertPropertyValueToString(ByVal PropertyValue)
    If IsObject(PropertyValue) Then
        ConvertPropertyValueToString = "<CIM_OBJECT (embedded SWbemObject)>"
    ElseIf IsNull(PropertyValue) Then
        ConvertPropertyValueToString = "<NULL>"
    ElseIf IsArray(PropertyValue) Then
        ConvertPropertyValueToString = Join(PropertyValue, ",")
    Else
        ConvertPropertyValueToString = CStr(PropertyValue)
    End If
End Function
To use this template with other WMI classes:
- Set the value of strClass to the appropriate WMI class for the target-managed resource.
- If necessary, set the value of strNamespace to the WMI namespace for the target class.
Modifying the Properties of a Managed Resource
In Windows 2000, WMI is primarily a read-only technology. Of the 4,395 properties defined in the Windows 2000 root\cimv2 namespace, only 39 properties are writeable. Those numbers improve in Microsoft® Windows® XP, where 145 of approximately 6560 properties are writeable. And the numbers get even better in Windows Server 2003.
The template in Listing 5 demonstrates how to modify a writeable property. The script retrieves all instances of the managed resource modeled by the Win32_OSRecoveryConfiguration class. (In this case, the class contains only a single instance.) The script provides new values for three properties—DebugInfoType, DebugFilePath, and OverWriteExistingDebugFile—and then commits the changes (and thus configures operating system recovery options) using the SWbemObjectPut_ method. If you forget to call the Put_ method, the changes will not be applied.
**Note **This template works only for properties that are writeable. Attempting to change a read-only property will result in an error. To determine if a property is writeable, examine the property's Write qualifier.
Listing 5. Template for modifying writeable properties of a managed resource
strComputer = "."
strNamespace = "\root\cimv2"
strClass = "Win32_OSRecoveryConfiguration"

Set objSWbemServices = GetObject("winmgmts:\\" & strComputer & strNamespace)
Set colSWbemObjectSet = objSWbemServices.ExecQuery("SELECT * FROM " & strClass)

For Each objSWbemObject In colSWbemObjectSet
    objSWbemObject.DebugInfoType = 1
    objSWbemObject.DebugFilePath = "c:\tmp\memory.dmp"
    objSWbemObject.OverWriteExistingDebugFile = False
    objSWbemObject.Put_
Next
Notice how SWbemObject is used inside the For Each loop to: 1) Directly access and modify properties defined by the Win32_OSRecoveryConfiguration class, and 2) call its own Put_ method to commit the change.
To use this template with other WMI classes that implement writeable properties:
-
Set the value of strClass to the appropriate WMI class for the target-managed resource.
-
If necessary, set the value of strNamespace to the WMI namespace for the target class.
-
Replace the statements within the For Each loop that configure new property values. Remove the following lines, and replace them with the appropriate lines of code for the properties being modified:
objSWbemObject.DebugInfoType = 1
objSWbemObject.DebugFilePath = "c:\tmp\memory.dmp"
objSWbemObject.OverWriteExistingDebugFile = False
Calling a Method of a Managed Resource
Methods defined in a managed resource's class definition allow you to perform actions on the managed resource. For example, the Win32_Service class includes methods that let you perform such tasks as starting and stopping services; the Win32_NTEventlogFile class includes methods for backing up and clearing event logs; the Win32_OperatingSystem class includes methods for rebooting or shutting down a computer.
Listing 6 provides a template that can be used to write scripts that call WMI managed resource methods. This particular script uses the StopService method of the Win32_Service class to stop the Alerter service on the local computer.
**Note **Before you can call a method defined in a managed resource's class definition, the method must be implemented. How do you determine if a method is implemented? Examine the method's implemented qualifier. A value of TRUE indicates that a method has an implementation supplied by a provider. Having said that, be aware that some methods do not define the implemented qualifier although the method is implemented. The Win32_ServiceStopService method, shown below, is an example of such a method. The bottom line is determining whether or not a method is implemented can also involve a bit of trial and error. As we mentioned earlier, we're told the situation is being corrected.
Listing 6. Template for calling a method of a managed resource
strComputer = "."
strNamespace = "\root\cimv2"
strClass = "Win32_Service"
strKey = "Name"
strKeyValue = "Alerter"

Set objSWbemServices = GetObject("winmgmts:\\" & strComputer & strNamespace)
Set colSWbemObjectSet = objSWbemServices.ExecQuery _
    ("SELECT * FROM " & strClass & " WHERE " & strKey & "='" & strKeyValue & "'")

For Each objSWbemObject in colSWbemObjectSet
     objSWbemObject.StopService()
Next
To use this template with other WMI classes:
-
Set the value of strClass to the appropriate WMI class for the target-managed resource.
-
If necessary, set the value of strNamespace to the WMI namespace for the target class.
-
Set the value of strKey to the name of the property that forms the basis of the WHERE clause.
-
Set the value of strKeyValue to an appropriate value for strKey.
-
Replace the statement within the For Each loop that calls the method. Remove the following line, and replace it with the appropriate line of code for the method being called. If necessary, you must also include the appropriate method parameters.
objSWbemObject.StopService()
Creating a New Instance of a Managed Resource
Some WMI classes allow you to create a new instance of the resource they model. For example, you can use the Win32_Environment class to create environment variables, the Win32_Process class to create processes, and the Win32_Share class to create shared resources, to name a few.
Before you create a new instance of a resource, you must verify that the managed resource's class supports the create operation. You do this by examining the class's SupportsCreate qualifier. A value of TRUE indicates the class supports the creation of instances (the default is FALSE). Once you've determined the class supports the create operation, you must determine the method used to create new instances. There are two approaches to creating new instances:
- If the class defines the CreateBy class qualifier with a value of PutInstance, you use the SWbemObjectSpawnInstance_ and Put_ methods to create the new instance.
- If the value assigned to the CreateBy class qualifier is something other than PutInstance (Create, for example), you use the method identified by the CreateBy qualifier to create the new instance.
Let's look at a template for each.
Listing 7 demonstrates how to create an instance of a resource when the resource's class definition sets SupportsCreate to TRUE and CreateBy to PutInstance. After connecting to WMI on the target computer, your first step is obtaining the blueprint (that is, class definition) for the thing you're creating. To do that, you use the SWbemServicesGet method to fetch the actual WMI class (rather than retrieve instances of the class). After you have an object representing the class, use the SWbemObjectSpawnInstance_ method to create a new, "blank," instance of the class. Set the properties for the new instance, and call the SWbemObjectPut_ method to create the new instance.
Listing 7. Template for creating a new instance using SpawnInstance_ and Put_
strComputer = "."
strNamespace = "\root\cimv2"
strClass = "Win32_Environment"

Set objSWbemServices = GetObject("winmgmts:\\" & strComputer & strNamespace)
Set objSWbemObject = objSWbemServices.Get(strClass)
Set objNewSWbemObject = objSWbemObject.SpawnInstance_()

objNewSWbemObject.Properties_.Item("Name") = "TMPSHARE"
objNewSWbemObject.Properties_.Item("UserName") = "<SYSTEM>"
objNewSWbemObject.Properties_.Item("VariableValue") = "c:\tmp"

objNewSWbemObject.Put_
To use this template with other WMI classes that support PutInstance:
-
Set the value of strClass to the appropriate WMI class for the target-managed resource.
-
If necessary, set the value of strNamespace to the WMI namespace for the target class.
-
Replace the statements that configure the values for the environment variable. Remove the following lines, and replace them with the appropriate lines of code for the object being created:
objNewSWbemObject.Properties_.Item("Name") = "TMPSHARE"
objNewSWbemObject.Properties_.Item("UserName") = "<SYSTEM>"
objNewSWbemObject.Properties_.Item("VariableValue") = "c:\tmp"
**Scripting Guys Freebie **When creating a new instance using the SWbemObjectSpawnInstance_ and Put_ methods, you must provide value(s) for all of the class's key properties. For example, the Win32_Environment class used in Listing 7 defines two key properties: Name and UserName. How do you determine a class's key(s) property or properties? You use WbemTest.exe, WMI CIM Studio, WMIC.exe, or a script to examine the property's Key qualifier.
Listing 8 demonstrates how to create an instance of a resource when the resource's class definition provides its own create method. After connecting to WMI on the target computer, your first step is obtaining the blueprint (that is, class definition) for the thing you're creating. To do that, you use the SWbemServicesGet method to fetch the actual WMI class (rather than retrieve instances of the class). After you have an object representing the class, use SWbemObject to call the method identified by the class's CreateBy qualifier. The script template in Listing 8 uses the Win32_Share Create method to create a new shared folder.
Listing 8. Template for creating a new instance using a managed resource method
strComputer = "."
strNamespace = "\root\cimv2"
strClass = "Win32_Share"

Const SHARED_FOLDER = 0
strPath = "c:\tmp"
strShareName = "tmp"
intMaximumAllowed = 1
strDescription = "Temporary share"

Set objSWbemServices = GetObject("winmgmts:\\" & strComputer & strNamespace)
Set objSWbemObject = objSWbemServices.Get(strClass)

intReturnValue = objSWbemObject.Create(strPath, _
                                       strShareName, _
                                       SHARED_FOLDER, _
                                       intMaximumAllowed, _
                                       strDescription)

WScript.Echo "Return value: " & intReturnValue
To use this template with other WMI classes that provide a custom create method:
-
Set the value of strClass to the appropriate WMI class for the target-managed resource.
-
If necessary, set the value of strNamespace to the WMI namespace for the target class.
-
Replace the statements that initialize the variables that represent the parameters passed to the create method. Remove the following lines, and replace them with the appropriate lines of code for the object being created:
Const SHARED_FOLDER = 0 strPath = "c:\tmp" strShareName = "tmp" intMaximumAllowed = 1 strDescription = "Temporary share" -
Replace the Win32_Share Create method call with the appropriate method for the managed resource you're creating. Remove the following lines, and replace them with the appropriate lines of code for the object being created:
intReturnValue = objSWbemObject.Create(strPath, _
                                       strShareName, _
                                       SHARED_FOLDER, _
                                       intMaximumAllowed, _
                                       strDescription)
**Scripting Guys Freebie **When creating a new instance using a method provided by a managed resource's class definition, you must provide values for any mandatory parameters defined by the method. For example, the Win32_Share class used in Listing 8 defines three mandatory parameters: Path, Name, and Type. How do you determine a method's mandatory parameters? Refer to the managed resource's class definition in the WMI SDK.
Deleting an Instance of a Managed Resource
If you can create new instances of managed resources, it stands to reason you can delete instances too, and you can. In fact, the rules that govern which managed resource instances you can delete are strikingly similar to those governing the create operation. Let's review the requirements, and then we'll look at a couple of examples.
Before you delete an instance of a resource, you must verify that the managed resource's class supports the delete operation. You do this by examining the class's SupportsDelete qualifier. A value of TRUE indicates the class supports delete (the default is FALSE). Once you've determined the class supports delete, you must determine the method used to delete instances. There are a couple of approaches to deleting instances:
- If the class defines the DeleteBy class qualifier with a value of DeleteInstance, you can use SWbemServicesDelete or the SWbemObjectDelete_ method to delete an instance.
- If the value assigned to the DeleteBy class qualifier is something other than DeleteInstance (delete, for example), you use the method identified by the DeleteBy qualifier to delete an instance.
Listings 9 and 10 demonstrate how to delete the environment variable created in Listing 7. Listing 9 uses the SWbemServicesDelete method and Listing 10 uses the SWbemObjectDelete_ method. You can use Listings 9 or 10 when the resource's class definition sets SupportsDelete to TRUE and DeleteBy to DeleteInstance.
Listing 9. Template for deleting an instance using the SWbemServices Delete method
strComputer = "."
strNamespace = "\root\cimv2"
strInstance = "Win32_Environment.Name='TMPSHARE',UserName='<SYSTEM>'"

Set objSWbemServices = GetObject("winmgmts:\\" & strComputer & strNamespace)
objSWbemServices.Delete strInstance
Listing 10. Template for deleting an instance using the SWbemObject Delete_ method
strComputer = "."
strNamespace = "\root\cimv2"
strInstance = "Win32_Environment.Name='TMPSHARE',UserName='<SYSTEM>'"

Set objSWbemServices = GetObject("winmgmts:\\" & strComputer & strNamespace)
Set objSWbemObject = objSWbemServices.Get(strInstance)
objSWbemObject.Delete_
To use these templates with other WMI classes that support DeleteInstance:
- Set the value of strInstance to the appropriate WMI class, key(s), and key value(s) for the target-managed resource instance.
Listing 11 deletes the shared folder created in Listing 8, and in so doing, demonstrates how to delete an instance of a resource when the resource's class definition provides its own delete method. Take a second to compare Listings 10 and 11. See any difference outside of the obvious value assigned to strInstance? Listing 10 uses the SWbemObjectDelete_ method (note the underscore) to delete instances when the managed resource's class definition sets the DeleteBy class qualifier to DeleteInstance. Listing 11, on the other hand, is using the Win32_Share Delete method.
Listing 11. Template for deleting an instance using a managed resource method
strComputer = "."
strNamespace = "\root\cimv2"
strInstance = "Win32_Share.Name='tmp'"

Set objSWbemServices = GetObject("winmgmts:\\" & strComputer & strNamespace)
Set objSWbemObject = objSWbemServices.Get(strInstance)
objSWbemObject.Delete
To use this template with other WMI classes that provide a custom delete method:
- Set the value of strInstance to the appropriate WMI class, key(s), and key value(s) for the target-managed resource instance.
Subscribing to Events
Okay. It's time to practice programmer virtue number one: laziness! Don't worry, we're still going to cover event subscriptions. However, rather than cover them here, we're going to point you to our sister publication: TechNet's Tales from the Script column, where we just published A Brief Introduction to WMI Events. So in addition to getting an introduction to WMI event subscriptions, you discover yet another scripting resource.
All for Now
This ends our trilogy on WMI scripting. Admittedly, there's more to cover and we will. If you'd like to send us suggestions for Scripting Clinic topics you'd like to read, we'd love to hear them. You can drop us a note at [email protected] or in the User Comments at the top of this page.
One more thing before we forget. Remember the Microsoft Windows 2000 Scripting Guide, Automating System Administration book we mentioned at the beginning of the article? Well, it's done! And while we hope you all rush out and buy a copy—Bookpool is cheapest technical book e-tailer on the planet by the way—we also recognize the planet is full of cheapskates, such as ourselves. For that reason, we've also posted all 1328 pages of the book online. So the next time Scripting Clinic is, um, late, you have somewhere to turn. Should you decide to read all or some of the book, by all means, let us know what you think—good, bad, or ugly. Of course, we're more interested in what's missing and what we can do to improve version 2. Have fun!
Scripting Clinic
Greg Stemp has long been acknowledged as one of the country's foremost authorities on scripting, and has been widely acclaimed as a world-class... huh? Well, how come they let football coaches make up stuff on their resumes? Really? He got fired? Oh, all right. Greg Stemp works at... Oh, come on now, can't I even say that? Fine. Greg Stemp gets paid by Microsoft, where he tenuously holds the title of lead writer for the System Administration Scripting Guide.
Dean Tsaltas is a Nova Scotian living in Redmond. He has become fluent in American and even chuckles at the accent of his friends and family back in the Maritimes. He got his start in computing at a tender age when his grandma and parents chipped in and bought him his beloved C-64 and a subscription to Compute!'s Gazette. He has been at Microsoft for a couple of years now and has a message for friends and family back home and in Vancouver: "No, I have not met Bill!"
Bob Wells wanders around aimlessly espousing the virtues of scripting to anyone who will listen. Rumor has it that Bob's two dachshunds know more about scripting than most humans. In his spare time, Bob contributes to the System Administration Scripting Guide.
Ethan Wilansky spends a lot of his work time writing and consulting. He's crazy about scripting, Yoga, gardening, and his family (not necessarily in that order). He is currently working on a way to create script that will take out the trash and wash the dinner dishes.
vbscript监控进程内存,高内存占用时利用ntsd生成dump文件
最近服务器上某些进程的内存使用会突然升高,于是写了一个脚本在内存占用高点时抓取dump以便分析.
期间走了不少弯路才找到vbscript控制进程时的属性名,随笔记录一下
服务器内存症状如下(运维部门设定了进程内存过高时的自动回收)
监控脚本如下:
1
 'maxM 内存大小
2
'maxVM 虚拟内存大小3
'debug版本功能:只生成最小dump文件4
'release:m改成ma maxM maxVM设置5
On Error Resume Next6
Dim o 7
Dim maxVM,maxM, objWMIService, colProcessList, objProcess 8
maxM =150 * 10000009
maxVM=150 * 100010
11
monitor "Win32_Process"12
monitor "Win64_Process"13
14
Sub monitor(process)15
Set objWMIService = GetObject("winmgmts:{impersonationLevel=impersonate}!\\.\root\cimv2") 16
Set colProcessList = objWMIService.ExecQuery("Select * from " + process ) 17
'MsgBox colProcessList.count18
If colProcessList.count > 0 Then19
For Each objProcess In colProcessList20
If ((objProcess.PageFileUsage - maxVM)>0 or (objProcess.WorkingSetSize - maxM)>0) and objProcess.Handle > 0 Then21
'MsgBox "已发现目标!=" & objProcess.UserModeTime & objProcess.Name& objProcess.PageFileUsage & "m:" & objProcess.WorkingSetSize22
Set o = wscript.createobject("wscript.shell")23
o.run "ntsd -pv -p " & objProcess.Handle & " -c "".dump /ma d:\" & objProcess.Name & Replace(Replace(Replace(Replace(date,"-","_"),"/","_")," ",""),":","_") & Replace(Replace(Replace(Replace(Time,"-","_"),"/","_")," ",""),":","_") & ".dmp;q""",0,true24
End If25
Next26
End If27
End Sub
objprocess的其他常用属性:
'MsgBox "Process: " & objProcess.Name & objProcess.UserModeTime
'MsgBox "Process ID: " & objProcess.ProcessID
'MsgBox "Thread Count: " & objProcess.ThreadCount
'MsgBox "Page File Size: " & objProcess.PageFileUsage
'MsgBox "Page Faults: " & objProcess.PageFaults
'MsgBox "Working Set Size: " & objProcess.WorkingSetSize
看到很多朋友在网上问"得到进程内存应该写成什么, 是objProcess.PageFileUsage还是objProcess.Member?"之类的问题,
wbemtest.exe是一个系统自带的工具,通过它可以更容易地确认win32_process的操作属性
与wmi的一些知识有关.
WMI 测试器。WMI 测试器 (wbemtest.exe) 是一个用于与 WMI 基础结构交互的通用、图形化工具。您可以使用 WMI 测试器来浏览 CIM 架构并检查托管资源类定义。WMI 测试器还可用于执行与基于 WMI 的脚本执行的相同的操作,例如检索托管资源的实例和运行查询。WMI 测试器是在所有启用了 WMI 的计算机上默认的 WMI 安装的一部分,因此 wbemtest.exe 是一个出色的 WMI 学习和疑难解答工具。有关使用 WMI 测试器的信息,参阅 Windows XP 帮助和支持中心内的 WMI 测试器概述。
运行wbemtest.exe,单击 “连接”按钮 连接到本地或远程计算机上的 WMI 服务。显示“连接”对话框,它提供一个标记为 名称空间 的文本输入区域,该区域默认值为 root\default。将 名称空间 区域的值更改为 root\cimv2,单击“连接”对话框的 连接 按钮返回到主 WMI 测试器窗口。
"枚举类别"-"递归":

双击win32_process,弹出的窗口上可以看到wind32_process的一些属性,
点击"实例"并选择需要查看的进程,即可以看到对应的值.
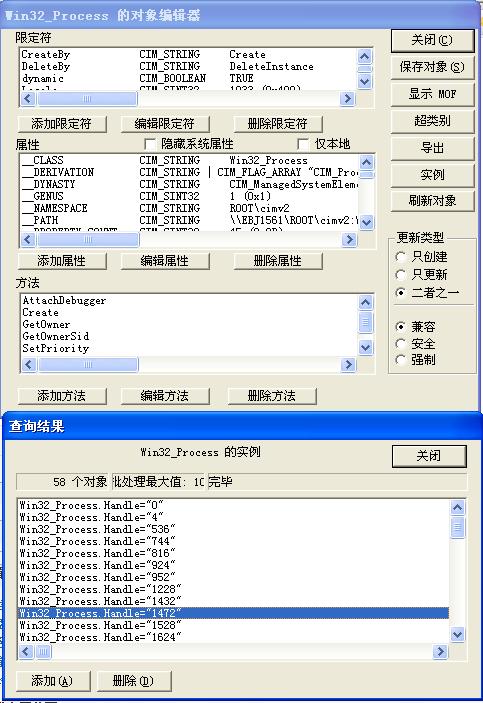
PS:部分网站是运行在64位机上的32位进程,在64位的系统中ntsd有两个版本,分别在system32和syswow64下,
标签:resource,Win32,WMI,classes,managed,Primer,class,Scripting From: https://www.cnblogs.com/ioriwellings/p/17146375.html