1、介绍
总览
机器学习服务(ML Kit)提供机器学习套件,为开发者使用机器学习能力开发各类应用,提供优质体验。得益于华为长期技术积累,ML Kit为开发者提供简单易用、服务多样、技术领先的机器学习能力,助力开发者更快更好地开发各类AI应用。
AppGallery Connect(简称AGC)云存储是一种可伸缩、免维护的云端存储服务,可用于存储图片、音频、视频或其他由用户生成的内容。借助云存储服务,您可以无需关心存储服务器的开发、部署、运维、扩容等事务,大大降低了应用使用存储的门槛,让您可以专注于应用的业务能力构建,助力您的商业成功。
您将建立什么
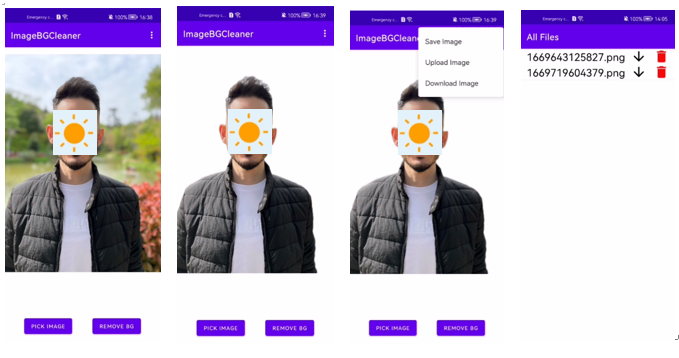
在本次Codelab中,您将建立一个示例项目并集成机器学习服务、云存储和认证服务。通过示例项目,当图像被拾取时,应用程序将从选定图片中删除背景。之后,再将图片可以上传到云。在该项目中,您可以:
1、使用ML Kit删除图片背景
2、将图片保存到手机存储
3、上传镜像文件到云存储
4、列举云存储中的文件
5、从云存储下载和删除图片
您将学会什么
在本codelab中,你需要学习:
1、如何在AppGallery Connect中创建项目和应用程序
2、如何ML Kit、云存储和认证服务
3、使用ML Kit并学习如何从图片中删除背景、使用认证服务和了解云存储的操作
2、您需要什么
硬件需求
-
一台笔记本或台式电脑。
-
华为手机:EMUI 5.0版本或以上,运行HMS Core (APK) 5.0.1.301及以上版本;非华为手机:Android 4.4或以上,运行HMS Core (APK) 5.0.1.301或以上版本。
-
手机用于运行和调试demo
软件需求
-
JDK版本:1.8.211或以上
-
Android Studio版本:3.X或以上
-
minSdkVersion:19或以上(必须)
-
targetSdkVersion:31(推荐)
-
compileSdkVersion:31(推荐)
-
Gradle版本:4.6或以上(推荐)
必备知识
安卓应用开发基础知识
3、集成前准备
集成前,需要完成以下准备工作:
说明:
在进行准备前,请先注册开发者帐号。
-
在AppGallery Connect中创建项目和应用。
-
创建Android Studio项目。
-
生成签名证书。
-
生成签名证书指纹。
-
在AppGallery Connect中将签名指纹添加到应用中。
-
添加必要配置。
-
配置项目签名。
-
同步项目。
详情请参见HUAWEI HMS Core集成准备。
4、集成HMS Core SDK
添加您应用的AppGallery Connect配置文件
1.登录AppGallery Connect,点击“我的项目”,在项目列表中找到并点击您的项目。
2.在“项目设置”页面选择“常规”页签。
3.在“项目”区域下点击“数据处理位置”后的“启用”。

4.点击“应用”区域的“agconnect-services.json”下载配置文件。

5.将配置文件"agconnect-services.json"复制到应用级根目录下。

添加编译依赖
-
打开应用级的“build.gradle”文件。
-
在dependencies代码段中添加如下编译依赖。
dependencies {
//Huawei Auth
implementation 'com.huawei.agconnect:agconnect-auth:1.6.5.300'
//Ml Kit
implementation 'com.huawei.hms:ml-computer-vision-segmentation:3.7.0.302'
// Import the multiclass segmentation model package.
implementation 'com.huawei.hms:ml-computer-vision-image-segmentation-multiclass-model:3.7.0.302'
// Import the human body segmentation model package.
implementation 'com.huawei.hms:ml-computer-vision-image-segmentation-body-model:3.7.0.302'
// Import the hair segmentation model package.
implementation 'com.huawei.hms:ml-computer-vision-image-segmentation-hair-model:3.7.0.302'
//Cloud Storage
implementation "com.huawei.agconnect:agconnect-storage:1.5.0.100"
}
-
在build.gradle文件中,设置Java源代码的兼容性模式为JDK1.8。
compileOptions {
sourceCompatibility = 1.8
    targetCompatibility = 1.8
}
-
在应用级build.gradle文件中配置minSdkVersion。
android {
 ...
compileSdk 32
   defaultConfig {
      ...
   minSdkVersion 24
   targetSdk 32
      ...
  }
   ...
}
-
检查是否已添加AppGallery Connect插件。如没有,在应用级build.gradle文件中添加该插件。
apply plugin: 'com.huawei.agconnect'
配置混淆脚本
编译APK前需要配置混淆脚本,避免混淆HMS Core SDK。如果出现混淆,HMS Core SDK可能无法正常工作。
Android Studio开发环境里的混淆脚本是“proguard-rules.pro”。
加入排除HMS SDK的混淆配置。
-ignorewarnings
-keepattributes *Annotation*
-keepattributes Exceptions
-keepattributes InnerClasses
-keepattributes Signature
-keepattributes SourceFile,LineNumberTable
-keep class com.huawei.hianalytics.**{*;}
-keep class com.huawei.updatesdk.**{*;}
-keep class com.huawei.hms.**{*;}
5、设计UI
6、集成机器学习服务
步骤一:开通服务
1)登录AppGallery Connect,单击我的项目。

2)点击需要集成的项目卡片,在顶部的应用下拉列表中选择要开通服务的应用。

3)单击“API管理”,打开机器学习服务的开关。

步骤二:添加权限
在“AndroidManifest.xml”文件中设置权限
<uses-permission android:name="android.permission.WRITE_EXTERNAL_STORAGE" />
<uses-permission android:name="android.permission.READ_EXTERNAL_STORAGE" />
<application
.
.
. <meta-data
android:name="com.huawei.hms.ml.DEPENDENCY"
android:value="imgseg" />
</application>
步骤三:进行图像分割
1、创建图像分割器
1.1集成人像分割模型包
1.2集成多类型分割模型包
1.3使用多类型分割模型包对图像进行多类别分割时,只支持通过图像分割检测配置器MLImageSegmentationSetting创建图像分割检测器。
   var setting = MLImageSegmentationSetting.Factory()
            .setExact(true)
            .setAnalyzerType(MLImageSegmentationSetting.BODY_SEG)
            .setScene(MLImageSegmentationScene.FOREGROUND_ONLY)
            .create()
        analyzer = MLAnalyzerFactory.getInstance().getImageSegmentationAnalyzer(setting)
        val drawable: BitmapDrawable = binding.imageView.drawable as BitmapDrawable
        bitmap = drawable.bitmap
        val mlFrame = MLFrame.Creator().setBitmap(bitmap).create()
        val task: Task<MLImageSegmentation> = analyzer.asyncAnalyseFrame(mlFrame)
        task.addOnSuccessListener {
            removeBackGround(it)
        }.addOnFailureListener {
            Log.e(TAG1, "analyse -> asyncAnalyseFrame: ", it)
        }
2、使用MLImageSegmentation删除图像背景
private fun removeBackground(mlImageSegmentation: MLImageSegmentation?) {
        if (mlImageSegmentation != null) {
            if (bitmap == null) {
                Log.e(TAG1, "bitmap is null")
                return
            }
            val bitmapFore: Bitmap = mlImageSegmentation.getForeground()
            if (bitmapFore != null) {
                binding.imageView.setImageBitmap(bitmapFore)
            } else {
                Log.e(TAG1, "bitmap is null")
            }
        }    }
7、初始化认证服务
步骤一:开通服务
1)登录AppGallery Connect,单击我的项目。

2)点击需要集成的项目卡片,在顶部的应用下拉列表中选择要开通服务的应用。

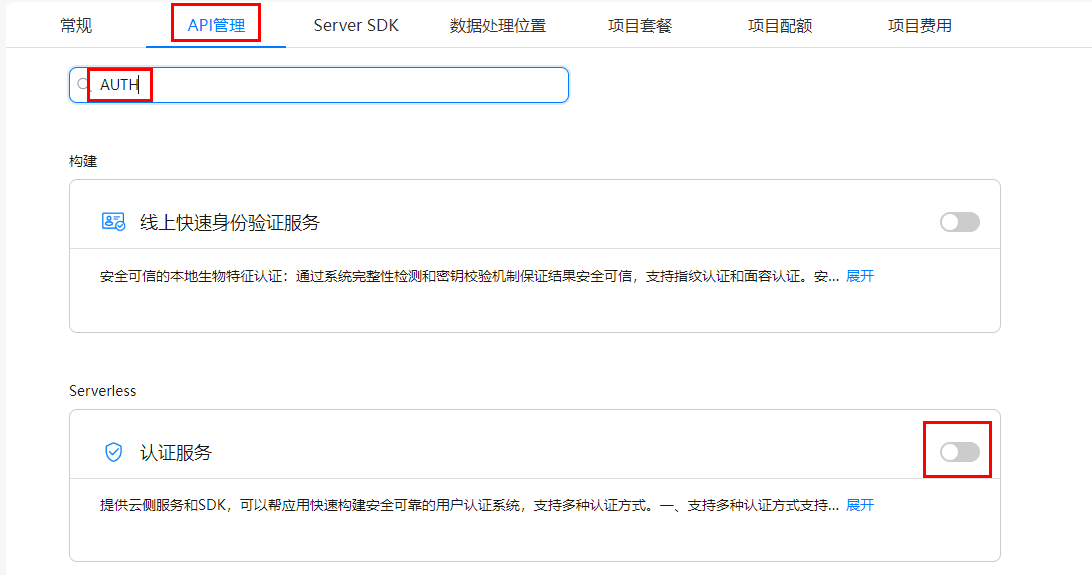
3)单击“API管理”,打开认证服务的开关。
步骤二:实现认证服务
进行匿名登录
     if (AGConnectAuth.getInstance().currentUser != null) {
            DriverManager.println("already sign a user")
            Log.i(TAG2, "already sign a user")
            return
        } else {
            AGConnectAuth.getInstance().signInAnonymously()
                .addOnSuccessListener {
                    DriverManager.println("AGConnect OnSuccess")
                    Log.i(TAG2, "AGConnect OnSuccess")
                }
                .addOnFailureListener { e ->
                    DriverManager.println("AGConnect OnFail: " + e.message)
                    Log.i(TAG2, "AGConnect OnFail ${e.message}")
                }
        }
8、初始化云存储
步骤一:查看权限
<uses-permission android:name="android.permission.INTERNET"/>
<uses-permission android:name="android.permission.ACCESS_NETWORK_STATE" />
   <application
      android:allowBackup="false"
      android:requestLegacyExternalStorage="true"
步骤二:开通服务
1)登录AppGallery Connect,单击我的项目。
2)在项目列表中选择一个项目,单击需要添加云存储的应用。
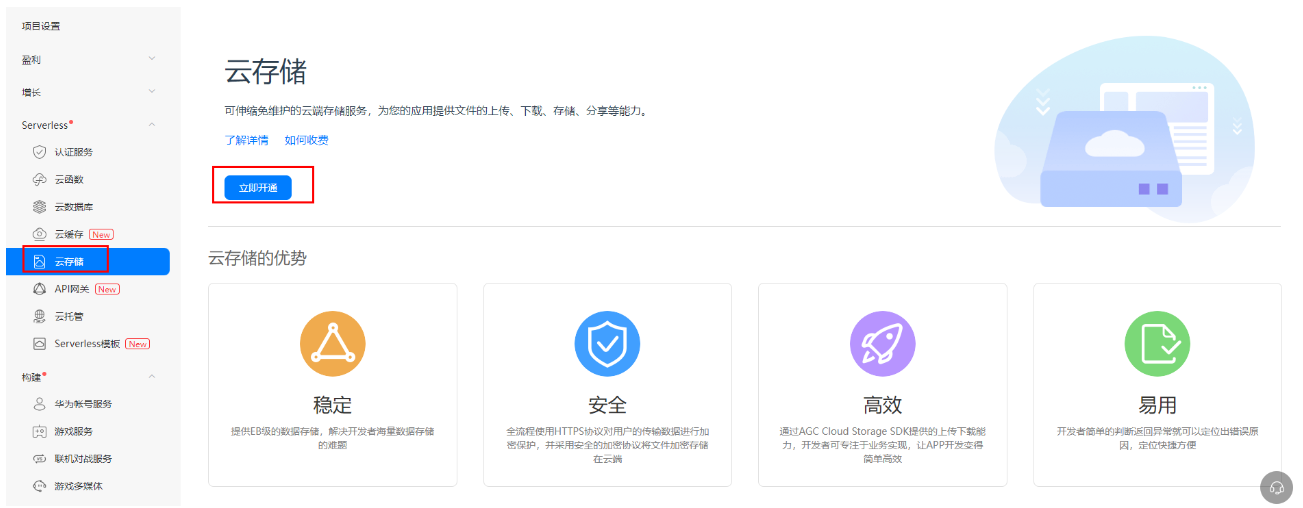
3)在左侧导航栏中,选择“Serverless > 云存储”,在“云存储”页面,单击“立即开通”。
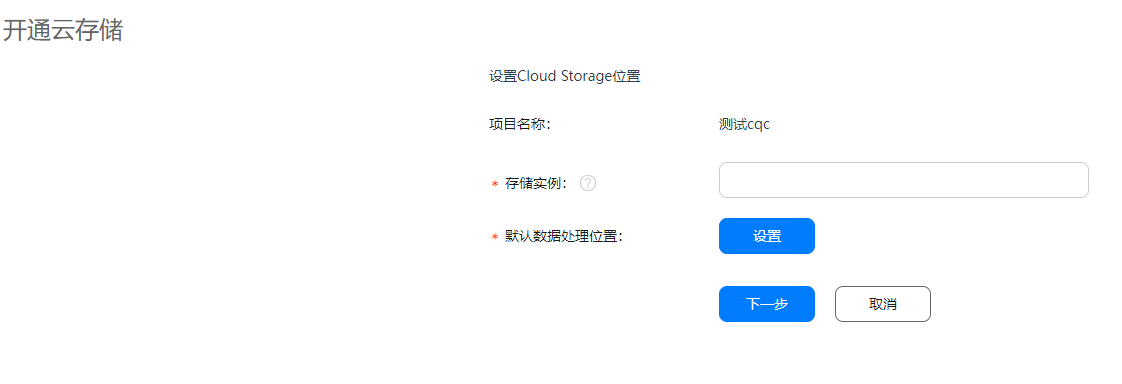
4)在弹出的页面中,设置“存储实例”和“默认数据处理位置”。
5)单击“下一步”,查看默认安全规则。
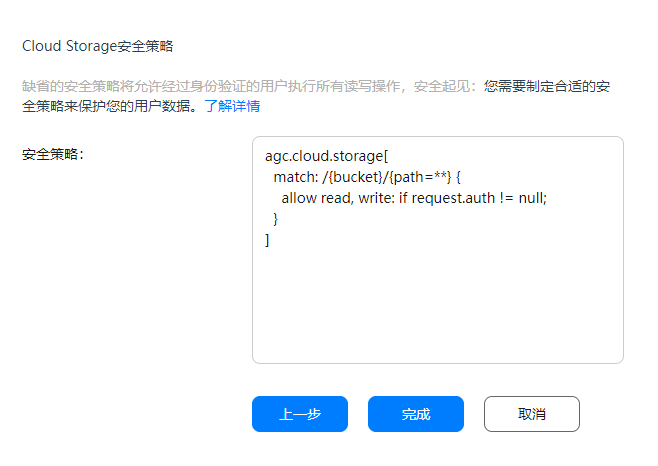
步骤三:初始化权限
private val permissions =
arrayOf<String>(Manifest.permission.WRITE_EXTERNAL_STORAGE,
Manifest.permission.READ_EXTERNAL_STORAGE)
ActivityCompat.requestPermissions(this, permissions, 1)
步骤四:初始化存储实例
前提条件
在应用客户端使用云存储功能前,都需要初始化存储实例。
您可以调用AGCStorageManagement.getInstance方法创建一个AGCStorageManagement对象来初始化默认存储实例。
private var mAGCStorageManagement: AGCStorageManagement? = null
val storageManagement = AGCStorageManagement.getInstance()
private fun initAGCStorageManagement() {
        mAGCStorageManagement = AGCStorageManagement.getInstance()
        Log.i(TAG2, "Init AGC Storage Management success! ")
    }
步骤五:上传文件
   val progressDialog = ProgressDialog(this)
        progressDialog.setMessage("Uploading File....")
        progressDialog.setCancelable(false)
        progressDialog.show()
        val systemCurrentTime: Long = System.currentTimeMillis()
        val path = "/images/${systemCurrentTime}.png"
        val agcSdkDirPath = agcSdkDirPath
        val file = File(agcSdkDirPath)
        if (!file.exists()) {
            Log.i(TAG2, "file is not exist!")
            return
        } else {
            Log.i(TAG2, "file is exist")
            val storageReference =
                mAGCStorageManagement!!.getStorageReference(path)
            val uploadTask = storageReference.putFile(file)

            uploadTask.addOnSuccessListener {
                Log.i(TAG2, "upload success!")
                progressDialog.dismiss()
            }
                .addOnFailureListener { e: Exception ->
                    progressDialog.dismiss()
                    Log.i(
                        TAG2,
                        "Upload Failed $e"
                    )
                }
        }
private val agcSdkDirPath: String
        get() {
            DriverManager.println("path=$path")
            val dir = File(path)
            if (!dir.exists()) {
                dir.mkdirs()
            }
            return path!!
        }
步骤六:列举文件
   val path = "images/"
        val storageReference = mAGCStorageManagement?.getStorageReference(path)
        var listResultTask: Task<ListResult>? = null
        listResultTask = storageReference?.list(100)
        listResultTask?.addOnSuccessListener {
            fileList = ArrayList(it.fileList)
            mAdapter = DownloadListAdapter(
                this@DownloadListActivity,
                fileList = fileList,
                mAGCStorageManagement,
                this@DownloadListActivity
            )
            binding.recyclerView.adapter = mAdapter
            mAdapter.notifyDataSetChanged()

            Log.i("MYSTORAGE", "SUCCEDD: ${fileList.size}")
        }?.addOnFailureListener {
            Log.e("MYSTORAGE", "FAIL: ${it.printStackTrace()}")
        }
    }
步骤七:下载文件
     val progressDialog = ProgressDialog(context)
        progressDialog.setMessage("Downloading File....")
        progressDialog.setCancelable(false)
        progressDialog.show()
        val fileName = fileName
        val path = path
        val agcSdkDirPath = agcSdkDirPath2
        val file = File(agcSdkDirPath, fileName)
        val storageReference = mAGCStorageManagement!!.getStorageReference(path)
        val downloadTask = storageReference.getFile(file)
        downloadTask.addOnSuccessListener {
            Toast.makeText(context, "Download Succeed", Toast.LENGTH_SHORT).show()
            progressDialog.dismiss()
        }.addOnFailureListener { e: Exception ->
            Toast.makeText(context, "Download Error", Toast.LENGTH_SHORT).show()
            progressDialog.dismiss()
            Log.i("MYSTORAGE", "DOWNLOAD ERROR: $e")
        }
private val agcSdkDirPath2: String
        get() {
            val path =
                Environment.getExternalStoragePublicDirectory(Environment.DIRECTORY_DOWNLOADS).absoluteFile.toString()
            DriverManager.println("path=$path")
            val dir = File(path)
            if (!dir.exists()) {
                dir.mkdirs()
            }
            return path
        }
步骤八:删除文件
     val progressDialog = ProgressDialog(context)
        progressDialog.setMessage("Downloading File....")
        progressDialog.setCancelable(false)
        progressDialog.show()
        val fileName = fileName
        val path = path
        val agcSdkDirPath = agcSdkDirPath2
        val file = File(agcSdkDirPath, fileName)
        val storageReference = mAGCStorageManagement!!.getStorageReference(path)
        val downloadTask = storageReference.getFile(file)
        downloadTask.addOnSuccessListener {
            Toast.makeText(context, "Download Succeed", Toast.LENGTH_SHORT).show()
            progressDialog.dismiss()
        }.addOnFailureListener { e: Exception ->
            Toast.makeText(context, "Download Error", Toast.LENGTH_SHORT).show()
            progressDialog.dismiss()
            Log.i("MYSTORAGE", "DOWNLOAD ERROR: $e")
        }
private val agcSdkDirPath2: String
        get() {
            val path =
                Environment.getExternalStoragePublicDirectory(Environment.DIRECTORY_DOWNLOADS).absoluteFile.toString()
            DriverManager.println("path=$path")
            val dir = File(path)
            if (!dir.exists()) {
                dir.mkdirs()
            }
            return path
        }
9、恭喜您
祝贺您,您已经成功完成本codelab并学到了:
-
如何集成机器学习服务、云存储和认证服务。
-
如何从图像中去除背景,并学习了云存储的操作方法。
10、参考文件
点击下载源码。
欲了解更多更全技术文章,欢迎访问https://developer.huawei.com/consumer/cn/forum/?ha_source=zzh
标签:Core,存储,服务,Log,val,APP,HMS,path,progressDialog From: https://www.cnblogs.com/developer-huawei/p/17115422.html