一、缓存算法
1.FIFO
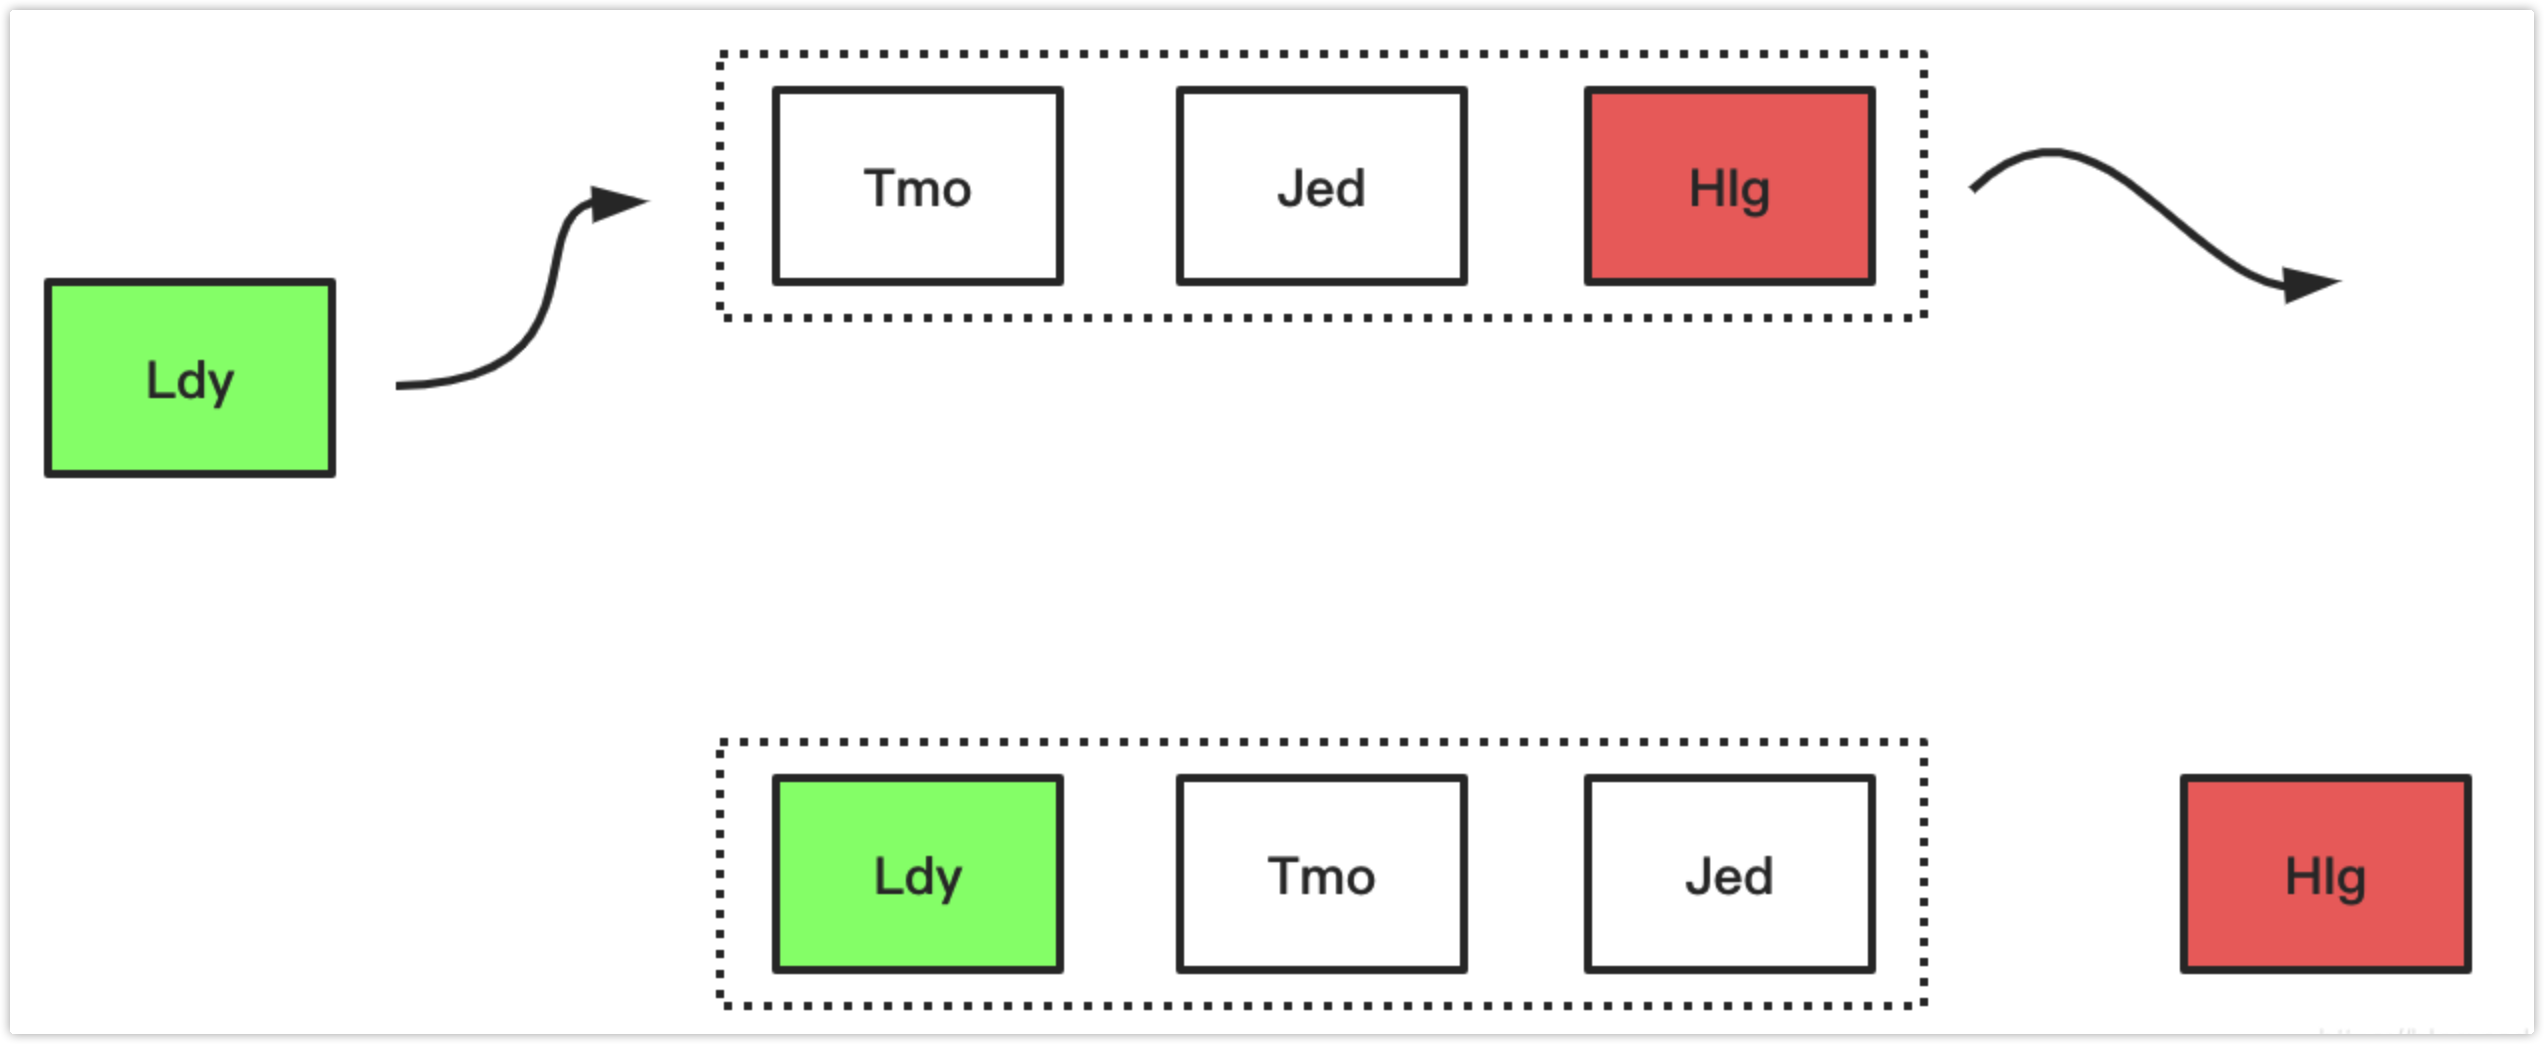
FIFO(First in First out)先进先出。可以理解为是一种类似队列的算法实现
算法:当一个查询请求命中了某个元素之后,便会将它放入到队列中,后续的命中元素也是以此类推,直到队列满了之后,老的元素就会被弹出清除
优点:最简单、最公平的一种数据淘汰算法,逻辑简单清晰,易于实现
缺点:老元素如果某段时间没有访问就会被放置到队列尾部,即使重新访问也依然在队列尾部,当元素面临淘汰的时候,老元素(即使是热点元素)会被误删。
下面简单演示了FIFO的工作过程,假设存放元素尺寸是3,且队列已满,放置元素顺序如下图所示,当来了一个新的数据“ldy”后,因为元素数量到达了阈值,则首先要进行太淘汰置换操作,然后加入新元素,操作如图展示:
2.LRU
LRU(The Least Recently Used)最近最久未使用算法。相比于FIFO算法智能些
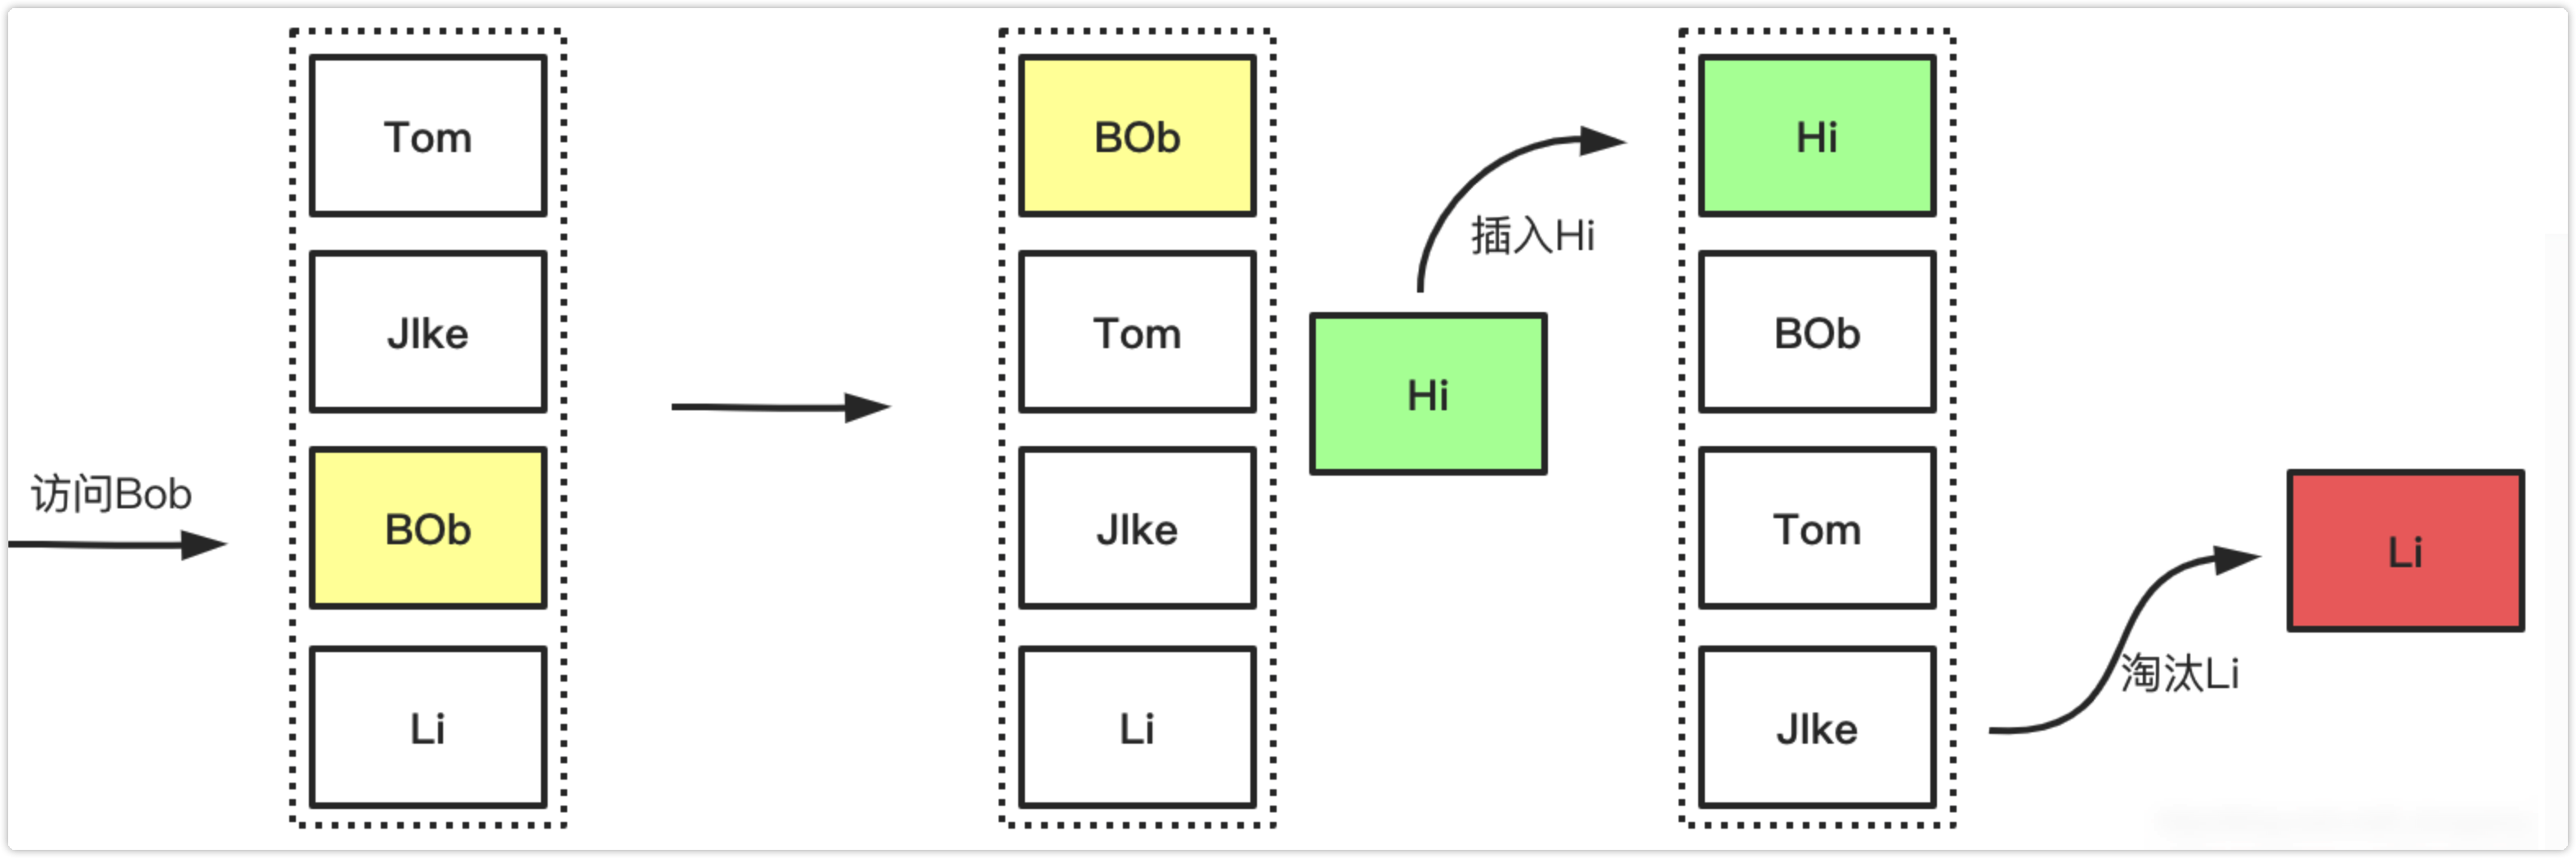
算法:当缓存队列内部已经存在了一批元素之后,后期请求如果命中了队列中的某个元素,那么这个元素就会被前置到队列的头部,从而降低后期被清空的风险
优点:LRU可以有效的对访问比较频繁的数据进行保护,也就是针对热点数据的命中率提高有明显的效果
缺点:LRU算法存在着“缓存污染”的情况需要避免,当突然有一批非热点元素查询打入,大量的非热点数据就会被加载到缓存队列中,从而把真正的热点元素给“挤出去”
下图展示了LRU简单的工作过程,访问时对数据的提前操作,以及数据满且添加新数据的时候淘汰的过程的展示如下:
3.LFU
LFU(The Least Frequently Used)最近很少使用算法,与LRU的区别在于LRU是以时间衡量,LFU是以时间段内的次数
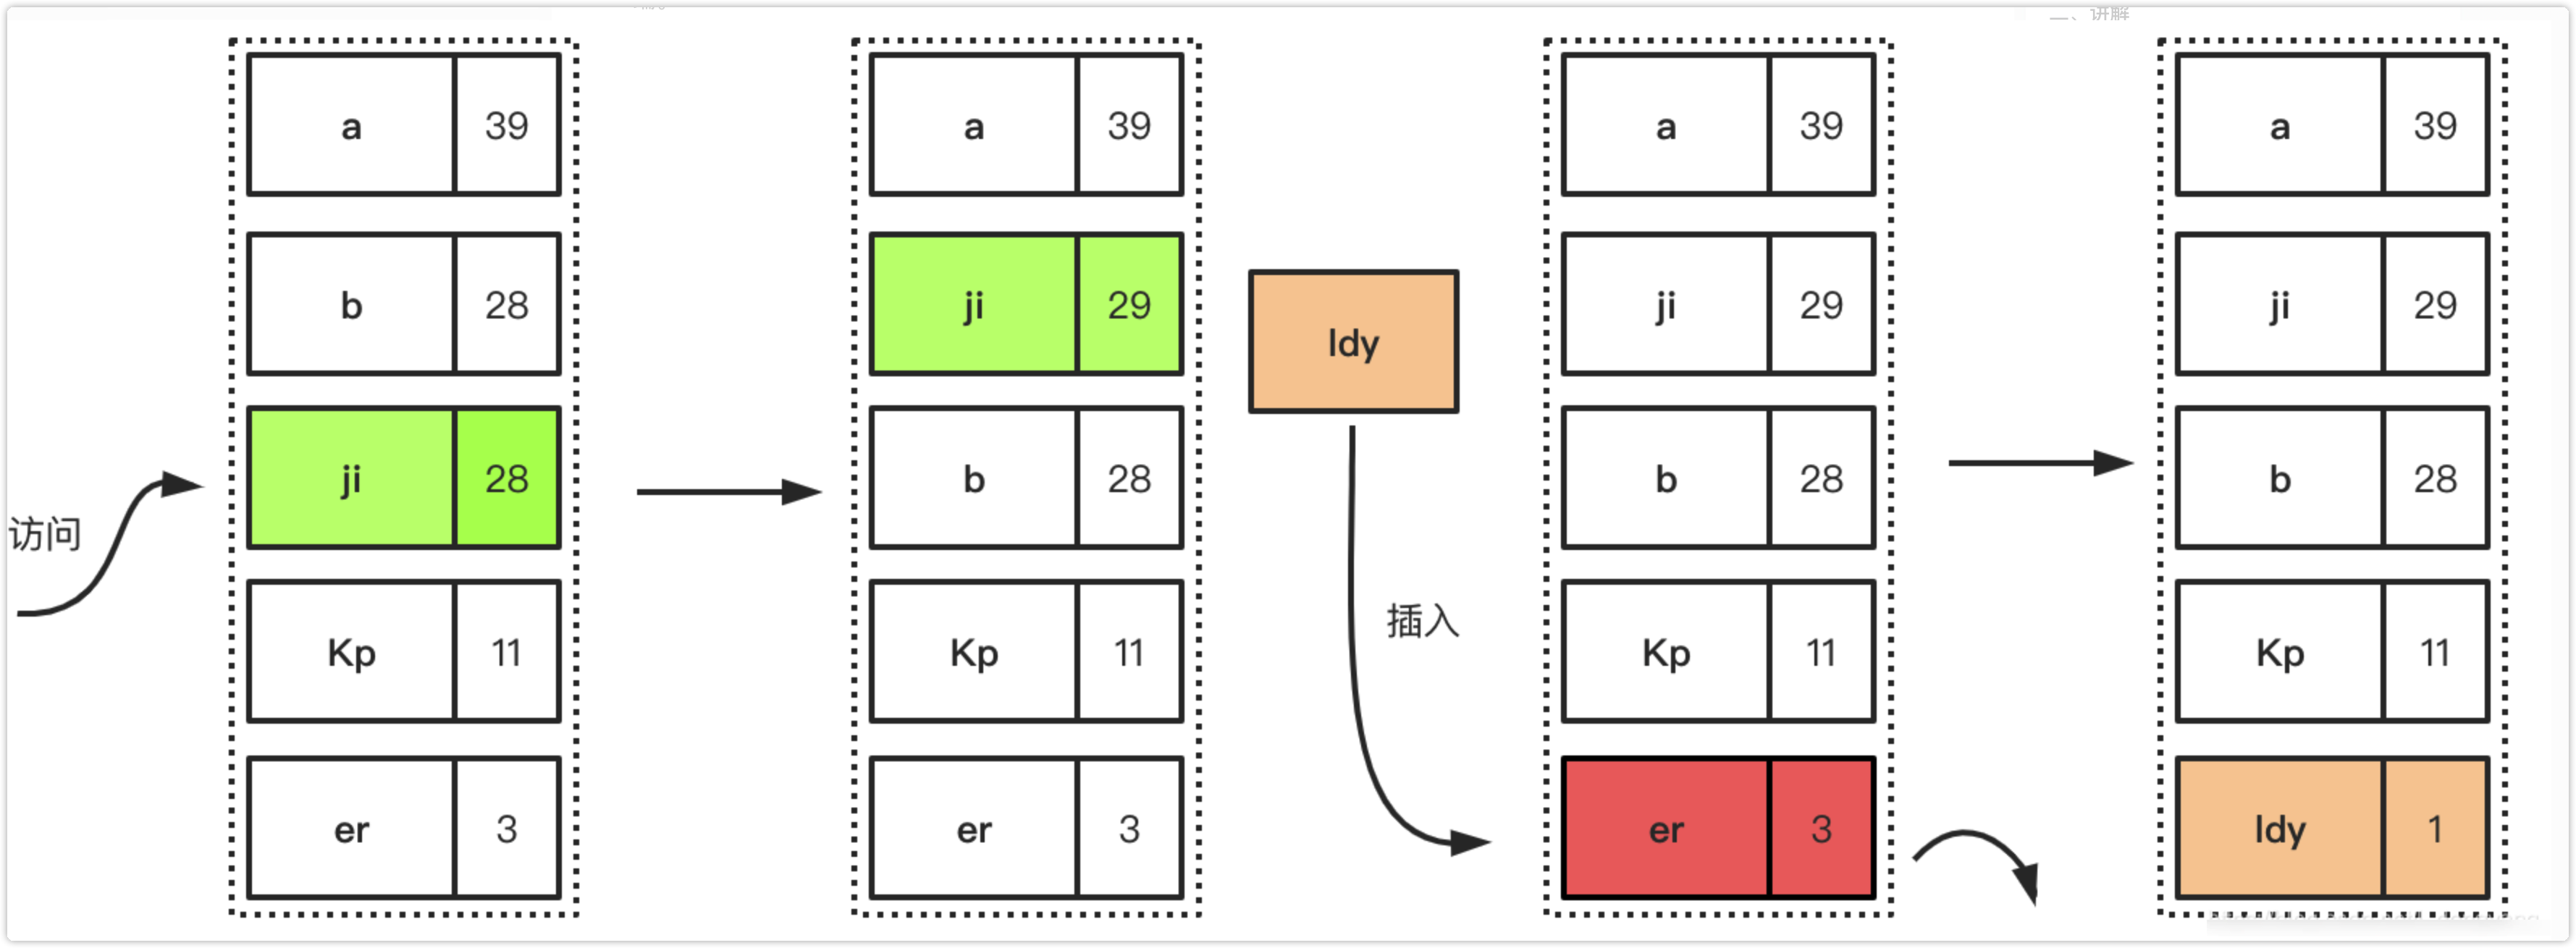
算法:LFU策略就是会在实现缓存队列的基础上额外新增一个内存空间用于记录缓存中每个元素的访问次数,然后根据访问频率来判定哪些元素可以保留,哪些元素需要被删除
优点:LFU也可以有效的保护缓存,相对场景来讲,比LRU有更好的缓存命中率。因为是以次数为基准,所以更加准确,自然能有效的保证和提高命中率
缺点:因为LFU需要记录数据的访问频率,因此需要额外的空间;使用LFU算法也会存在某些程度上的“缓存污染”影响,例如当某天搞秒杀活动,突然一批数据被访问了上千万次,但是第二天这批数据就不再访问了,但是又由于之前秒杀活动导致这批数据的访问基数太过高,导致一直无法清空,所以会一直占用着本地缓存的空间。
下面描述了LFU的简单工作过程,首先是访问元素增加元素的访问次数,从而提高元素在队列中的位置,降低淘汰优先级,后面是插入新元素的时候,因为队列已经满了,所以优先淘汰在一定时间间隔内访问频率最低的元素
4.W-TinyLFU
W-TinyLFU(Window Tiny Least Frequently Used)是对LFU的的优化和加强。
算法:当一个数据进来的时候,会进行筛选比较,进入W-LRU窗口队列,以此应对流量突增,经过淘汰后进入过滤器,通过访问访问频率判决是否进入缓存。如果一个数据最近被访问的次数很低,那么被认为在未来被访问的概率也是最低的,当规定空间用尽的时候,会优先淘汰最近访问次数很低的数据;
优点:使用Count-Min Sketch算法存储访问频率,极大的节省空间;定期衰减操作,应对访问模式变化;并且使用window-lru机制能够尽可能避免缓存污染的发生,在过滤器内部会进行筛选处理,避免低频数据置换高频数据。
缺点:是由谷歌工程师发明的一种算法,目前已知应用于Caffeine Cache组件里,应用不是很多。
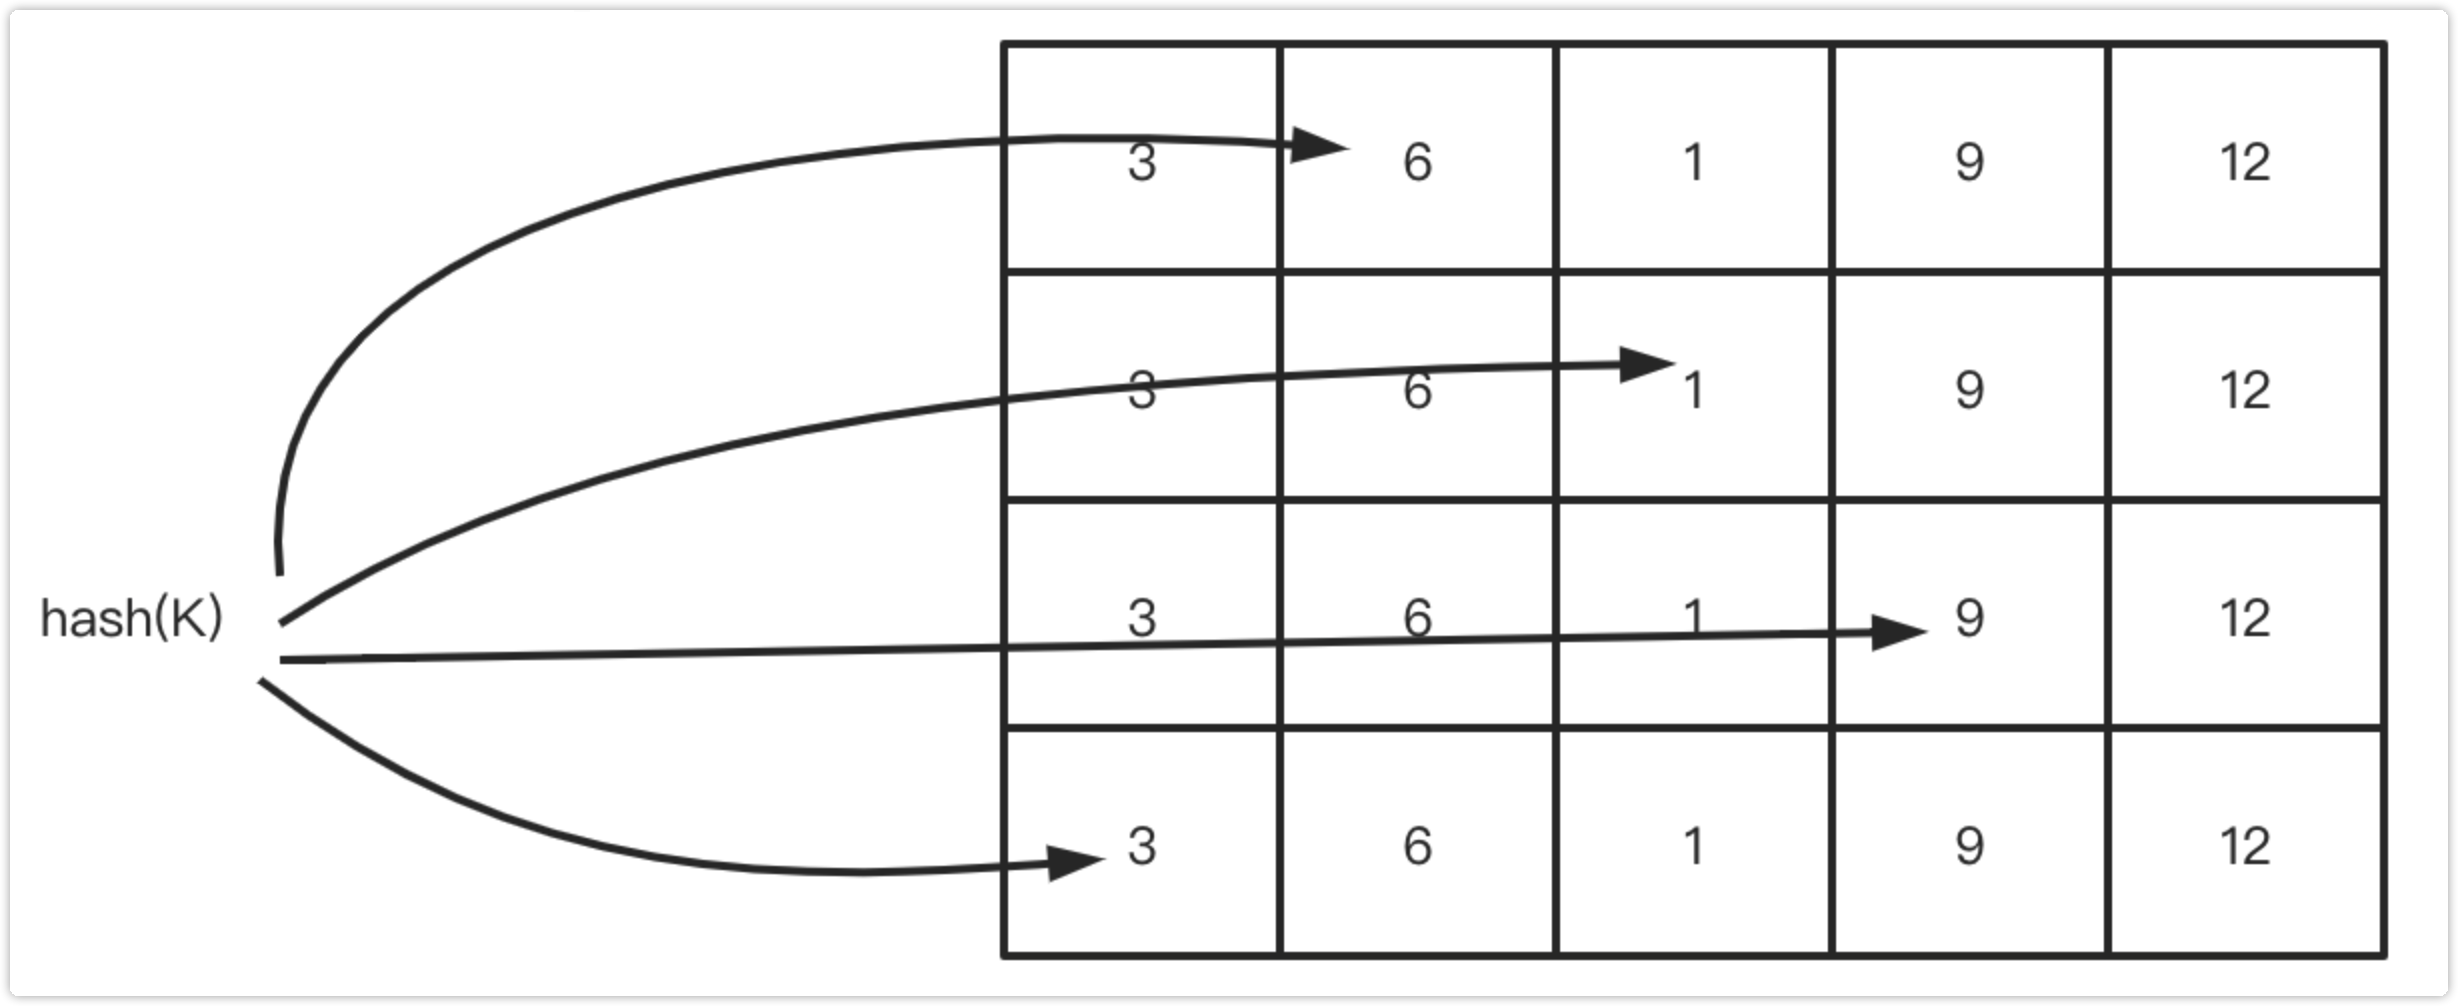
关于Count-Min Sketch算法,可以看作是布隆过滤器的同源的算法,假如我们用一个hashmap来存储每个元素的访问次数,那这个量级是比较大的,并且hash冲突的时候需要做一定处理,否则数据会产生很大的误差,Count-Min Sketch算法将一个hash操作,扩增为多个hash,这样原来hash冲突的概率就降低了几个等级,且当多个hash取得数据的时候,取最低值,也就是Count Min的含义所在。
下图展示了Count-Min Sketch算法简单的工作原理:
假设有四个hash函数,每当元素被访问时,将进行次数加1;
此时会按照约定好的四个hash函数进行hash计算找到对应的位置,相应的位置进行+1操作;
当获取元素的频率时,同样根据hash计算找到4个索引位置;
取得四个位置的频率信息,然后根据Count Min取得最低值作为本次元素的频率值返回,即Min(Count);
二、caffine简介
Caffeine是一种高性能的缓存库,是基于Java 8的最佳(最优)缓存框架。
基于Google的Guava Cache,Caffeine提供一个性能卓越的本地缓存(local cache) 实现, 也是SpringBoot内置的本地缓存实现。(Caffeine性能是Guava Cache的6倍)
Caffeine提供了灵活的结构来创建缓存,并且有以下特性:
自动加载条目到缓存中,可选异步方式
可以基于大小剔除
可以设置过期时间,时间可以从上次访问或上次写入开始计算
异步刷新
keys自动包装在弱引用中
values自动包装在弱引用或软引用中
条目剔除通知
缓存访问统计
1. 数据加载
Caffeine提供以下四种类型的加载策略:
①Manual手动
public static void demo(){
		Cache<String,String> cache = Caffeine.newBuilder()
			.expireAfterWrite(20, TimeUnit.SECONDS)
			.maximumSize(5000)
			.build();

		// 1.Insert or update an entry
		cache.put("hello","world");

		// 2. Lookup an entry, or null if not found
		String val1 = cache.getIfPresent("hello");

		// 3. Lookup and compute an entry if absent, or null if not computable
		cache.get("msg", k -> createExpensiveGraph(k));

		// 4. Remove an entry
		cache.invalidate("hello");
	}

	private static String createExpensiveGraph(String key){
		System.out.println("begin to query db..."+Thread.currentThread().getName());
		try {
			Thread.sleep(2000);
		} catch (InterruptedException e) {
		}
		System.out.println("success to query db...");
		return UUID.randomUUID().toString();
	}
Cache接口可以显式地控制检索、更新和删除Entry
②Loading自动
private static void demo() {
		LoadingCache<String, String> cache = Caffeine.newBuilder()
			.expireAfterWrite(5, TimeUnit.SECONDS)
			.maximumSize(500)
			.build(new CacheLoader<String, String>() {

				@Override
				public String load(String key) throws Exception {
					return createExpensiveGraph(key);
				}

				@Override
				public Map<String, String>  loadAll(Iterable<? extends String> keys) {
					System.out.println("build keys");
					Map<String,String> map = new HashMap<>();
					for(String k : keys){
						map.put(k,k+"-val");
					}
					return map;
				}
			});

		String val1 = cache.get("hello");
		Map<String,String> values = cache.getAll(Lists.newArrayList("key1", "key2"));

	}

	private static String createExpensiveGraph(String key){
		System.out.println("begin to query db..."+Thread.currentThread().getName());
		try {
			Thread.sleep(2000);
		} catch (InterruptedException e) {
		}
		System.out.println("success to query db...");
		return UUID.randomUUID().toString();
	}
LoadingCache通过关联一个CacheLoader来构建Cache, 当缓存未命中会调用CacheLoader的load方法生成V
还可以通过LoadingCache的getAll方法批量查询, 当CacheLoader未实现loadAll方法时, 会批量调用load方法聚合会返回.
当CacheLoader实现loadAll方法时, 则直接调用loadAll返回.
public interface CacheLoader<K, V>{

    V load(@NonNull K var1) throws Exception;

    Map<K, V> loadAll(@NonNull Iterable<? extends K> keys);
}
③Asynchronous Manual异步手动
private static void demo() throws ExecutionException, InterruptedException {
		AsyncCache<String,String> cache = Caffeine.newBuilder()
			.maximumSize(500)
			.expireAfterWrite(10, TimeUnit.SECONDS)
			.buildAsync();

		// Lookup and asynchronously compute an entry if absent
		CompletableFuture<String> future = cache.get("hello", k -> createExpensiveGraph(k));
		System.out.println(future.get());
	}

	private static String createExpensiveGraph(String key){
		System.out.println("begin to query db..."+Thread.currentThread().getName());
		try {
			Thread.sleep(2000);
		} catch (InterruptedException e) {
		}
		System.out.println("success to query db...");
		return UUID.randomUUID().toString();
	}
和Cache的区别是, AsyncCache计算Entry的线程是ForkJoinPool线程池. 手动Cache缓存是调用线程进行计算
④Asynchronously Loading异步自动
public static void demo() throws ExecutionException, InterruptedException {
		AsyncLoadingCache<String,String> cache = Caffeine.newBuilder()
			.expireAfterWrite(10, TimeUnit.SECONDS)
			.maximumSize(500)
			.buildAsync(k -> createExpensiveGraph(k));
		CompletableFuture<String> future = cache.get("hello");
		System.out.println(future.get());
	}

	private static String createExpensiveGraph(String key){
		System.out.println("begin to query db..."+Thread.currentThread().getName());
		try {
			Thread.sleep(2000);
		} catch (InterruptedException e) {
		}
		System.out.println("success to query db...");
		return UUID.randomUUID().toString();
	}
AsyncLoadingCache 是关联了 AsyncCacheLoader 的 AsyncCache
2.数据驱逐
Caffeine提供以下几种剔除方式:基于大小、基于权重、基于时间、基于引用
①基于容量
又包含两种, 基于size和基于weight权重
- 基于size
	LoadingCache<String,String> cache = Caffeine.newBuilder()
			.maximumSize(500)
			.recordStats()
			.build( k -> UUID.randomUUID().toString());

		for (int i = 0; i < 600; i++) {
			cache.get(String.valueOf(i));
			if(i> 500){
				CacheStats stats = cache.stats();
				System.out.println("evictionCount:"+stats.evictionCount());
				System.out.println("stats:"+stats.toString());
			}
		}
如果缓存的条目数量不应该超过某个值,那么可以使用Caffeine.maximumSize(long)。如果超过这个值,则会剔除很久没有被访问过或者不经常使用的那个条目。
上述测试并不是i=500时, 而是稍微延迟于i的增加, 说明驱逐是另外一个线程异步进行的
- 基于权重
	LoadingCache<Integer,String> cache = Caffeine.newBuilder()
			.maximumWeight(300)
			.recordStats()
			.weigher((Weigher<Integer, String>) (key, value) -> {
				if(key % 2 == 0){
					return 2;
				}
				return 1;
			})
			.build( k -> UUID.randomUUID().toString());

		for (int i = 0; i < 300; i++) {
			cache.get(i);
			if(i> 200){
				System.out.println(cache.stats().toString());
			}
		}
如果,不同的条目有不同的权重值的话(不同的实例占用空间大小不一样),那么你可以用Caffeine.weigher(Weigher)来指定一个权重函数,并且使用Caffeine.maximumWeight(long)来设定最大的权重值。
上述测试并不是i=200时, 而是稍微延迟于i的增加, 说明驱逐是另外一个线程异步进行的
简单的来说,要么限制缓存条目的数量,要么限制缓存条目的权重值,二者取其一。
②基于时间
基于时间又分为四种: expireAfterAccess、expireAfterWrite、refreshAfterWrite、expireAfter
-
expireAfterAccess
超时未访问则失效: 访问包括读和写
private static LoadingCache<String,String> cache = Caffeine.newBuilder()
	.expireAfterAccess(1, TimeUnit.SECONDS)
	.build(key -> UUID.randomUUID().toString());
访问包括读和写入
数据失效后不会主动重新加载, 必须依赖下一次访问. (言外之意: 失效和回源是两个动作)
key超时失效或不存在,若多个线程并发访问, 只有1个线程回源数据,其他线程阻塞等待数据返回
对同一数据一直访问, 且间隔小于失效时间, 则不会去load数据, 一直读到的是脏数据 -
expireAfterWrite
写后超时失效
	private static LoadingCache<String,String> cache = Caffeine.newBuilder()
		.expireAfterWrite(1, TimeUnit.SECONDS)
		.build(key -> UUID.randomUUID().toString());
特征:
- 数据失效后不会主动重新加载, 必须依赖下一次访问. (言外之意: 失效和回源是两个动作)
- key超时失效或不存在,若多个线程并发访问, 只有1个线程回源数据,其他线程阻塞等待数据返回
- expire后来访问一定能保证拿到最新的数据
-
refreshAfterWrite
	private static LoadingCache<String,String> cache = Caffeine.newBuilder()
		.refreshAfterWrite(1, TimeUnit.SECONDS)
		.build(key -> UUID.randomUUID().toString());
和expireAfterWrite类似基于写后超时驱逐, 区别是重新load的操作不一样.
特征:
数据失效后不会主动重新加载, 必须依赖下一次访问. (言外之意: 失效和回源是两个动作)
当cache命中未命中时, 若多个线程并发访问时, 只有1个线程回源数据,其他线程阻塞等待数据返回
当cache命中失效数据时, 若多个线程并发访问时, 第一个访问的线程提交一个load数据的任务到公共线程池,然后和所有其他访问线程一样直接返回旧值 -
expireAfter
比较少用
public static void demo(){

		MyTicker ticker = new MyTicker();

		LoadingCache<String,String> cache = Caffeine.newBuilder()
			.maximumSize(500)
			.ticker(ticker)
			//此时的效果为expireAfterWrite(5,TimeUnit.SECONDS)
			.expireAfter(new Expiry<String, String>() {
				//1.如果写入key时是第一次创建,则调用该方法返回key剩余的超时时间, 单位纳秒ns
				//currentTime为当前put时Ticket的时间,单位ns
				@Override
				public long expireAfterCreate(String key,String value, long currentTime) {
					System.out.println("write first currentTime:"+currentTime/1_000_000_000L);
					return 5_000_000_000L;//5s
				}
				//2.如果写入key时已经存在即更新key时,则调用该方法返回key剩余的超时时间, 单位纳秒ns
				//currentTime为当前put时Ticket的时间,单位ns,durationTime为旧值(上次设置)剩余的存活时间,单位是ns
				@Override
				public long expireAfterUpdate(String key,String value, long currentTime,long durationTime) {
					System.out.println("update currentTime:"+currentTime/1_000_000_000L+",leftTime:"+durationTime/1_000_000_000L);
					return 5_000_000_000L;//5s
				}
				//3.如果key被访问时,则调用该方法返回key剩余的超时时间, 单位纳秒ns
				//currentTime为read时Ticket的时间,单位ns,durationTime为旧值(上次设置)剩余的存活时间,单位是ns
				@Override
				public long expireAfterRead(String key,String value, long currentTime,long durationTime) {
					System.out.println("read currentTime:"+currentTime/1_000_000_000L+",leftTime:"+durationTime/1_000_000_000L);
					return durationTime;
				}
			})
			.build(k ->  UUID.randomUUID().toString());

		cache.get("key1");//触发expireAfterCreate
		ticker.advance(1, TimeUnit.SECONDS);//模拟时间消逝
		cache.get("key1");//触发expireAfterRead,剩余生存时间4s
		ticker.advance(2, TimeUnit.SECONDS);//模拟时间消逝
		cache.put("key1","value1");//触发expireAfterUpdate,重置生存时间为5s
		ticker.advance(3, TimeUnit.SECONDS);//模拟时间消逝
		cache.get("key1");//触发expireAfterCreate,剩余生存时间为2s

	}

public class MyTicker implements Ticker {
	private final AtomicLong nanos = new AtomicLong();
	//模拟时间消逝
	public void advance(long time, TimeUnit unit) {
		this.nanos.getAndAdd(unit.toNanos(time));
	}
	@Override
	public long read() {
		return this.nanos.get();
	}
}
上述实现了Expiry接口, 分别重写了expireAfterCreate、expireAfterUpdate、expireAfterRead方法, 当第一次写入时、更新时、读访问时会分别调用这三个方法有机会重新设置剩余的失效时间, 上述案例模拟了expireAfterWrite(5,TimeUnit.SECONDS)的效果.
注意点:
以上基于时间驱逐, 数据超时失效和回源是两个动作, 必须依赖下一次访问. 为了避免服务启动时大量缓存穿透, 可以通过提前项目启动时手动预热
一般expireAfterWrite和refreshAfterWrite结合使用, expire的时间t1大于refresh的时间t2, 在t2~t1内数据更新允许脏数据, t1之后必须要重新同步加载新数据
③基于弱/软引用
/**
	 * 允许GC时回收keys或values
	 */
	public static void demo(){
		LoadingCache<String,String> cache = Caffeine.newBuilder()
			.maximumSize(500)
			.expireAfterWrite(10, TimeUnit.SECONDS)
			.weakKeys()
			.weakValues()
			.build(k -> UUID.randomUUID().toString());

	}
Caffeine.weakKeys() 使用弱引用存储key。如果没有强引用这个key,则GC时允许回收该条目
Caffeine.weakValues() 使用弱引用存储value。如果没有强引用这个value,则GC时允许回收该条目
Caffeine.softValues() 使用软引用存储value, 如果没有强引用这个value,则GC内存不足时允许回收该条目
public static void demo(){
		/**
		 * 使用软引用存储value,GC内存不够时会回收
		 */
		LoadingCache<String,String> cache = Caffeine.newBuilder()
			.maximumSize(500)
			.expireAfterWrite(10, TimeUnit.SECONDS)
			.softValues()//注意没有softKeys方法
			.build(k -> UUID.randomUUID().toString());
	}
Java4种引用的级别由高到低依次为:强引用 > 软引用 > 弱引用 > 虚引用
| 引用类型 | 被垃圾回收时间 | 用途 | 生存时间 |
|---|---|---|---|
| 强引用 | 从来不会 | 对象的一般状态 | JVM停止运行时终止 |
| 软引用 | 在内存不足时 | 对象缓存 | 内存不足时终止 |
| 弱引用 | 在垃圾回收时 | 对象缓存 | gc运行后终止 |
| 虚引用 | Unknown | Unknown | Unknown |
3.驱逐监听
eviction 指受策略影响而被删除
invalidation 值被调用者手动删除
removal 值因eviction或invalidation而发生的一种行为
①手动触发删除
// individual key
cache.invalidate(key)
// bulk keys
cache.invalidateAll(keys)
// all keys
cache.invalidateAll()
②被驱逐的原因
EXPLICIT:如果原因是这个,那么意味着数据被我们手动的remove掉了
REPLACED:就是替换了,也就是put数据的时候旧的数据被覆盖导致的移除
COLLECTED:这个有歧义点,其实就是收集,也就是垃圾回收导致的,一般是用弱引用或者软引用会导致这个情况
EXPIRED:数据过期,无需解释的原因。
SIZE:个数超过限制导致的移除
③监听器
public static void demo(){
		LoadingCache<String,String> cache = Caffeine.newBuilder()
			.maximumSize(5)
			.recordStats()
			.expireAfterWrite(2, TimeUnit.SECONDS)
			.removalListener((String key, String value, RemovalCause cause) -> {
				System.out.printf("Key %s was removed (%s)%n", key, cause);
			})
			.build(key -> UUID.randomUUID().toString());
		for (int i = 0; i < 15; i++) {
			cache.get(i+"");
			try {
				Thread.sleep(200);
			} catch (InterruptedException e) {
			}
		}

		//因为evict是异步线程去执行,为了看到效果稍微停顿一下
		try {
			Thread.sleep(2000);
		} catch (InterruptedException e) {
		}
	}

### 日志打印如下:

Key 0 was removed (SIZE)
Key 1 was removed (SIZE)
Key 6 was removed (SIZE)
Key 7 was removed (SIZE)
Key 8 was removed (SIZE)
Key 9 was removed (SIZE)
Key 10 was removed (SIZE)
Key 2 was removed (EXPIRED)
Key 3 was removed (EXPIRED)
Key 4 was removed (EXPIRED)
4.统计
	public static void demo(){
		LoadingCache<Integer,String> cache = Caffeine.newBuilder()
			.maximumSize(10)
			.expireAfterWrite(10, TimeUnit.SECONDS)
			.recordStats()
			.build(key -> {
				if(key % 6 == 0 ){
					return null;
				}
				return  UUID.randomUUID().toString();
			});

		for (int i = 0; i < 20; i++) {
			cache.get(i);
			printStats(cache.stats());
		}
		for (int i = 0; i < 10; i++) {
			cache.get(i);
			printStats(cache.stats());
		}
	}

	private static void printStats(CacheStats stats){
		System.out.println("---------------------");
		System.out.println("stats.hitCount():"+stats.hitCount());//命中次数
		System.out.println("stats.hitRate():"+stats.hitRate());//缓存命中率
		System.out.println("stats.missCount():"+stats.missCount());//未命中次数
		System.out.println("stats.missRate():"+stats.missRate());//未命中率
		System.out.println("stats.loadSuccessCount():"+stats.loadSuccessCount());//加载成功的次数
		System.out.println("stats.loadFailureCount():"+stats.loadFailureCount());//加载失败的次数,返回null
		System.out.println("stats.loadFailureRate():"+stats.loadFailureRate());//加载失败的百分比
		System.out.println("stats.totalLoadTime():"+stats.totalLoadTime());//总加载时间,单位ns
		System.out.println("stats.evictionCount():"+stats.evictionCount());//驱逐次数
		System.out.println("stats.evictionWeight():"+stats.evictionWeight());//驱逐的weight值总和
		System.out.println("stats.requestCount():"+stats.requestCount());//请求次数
		System.out.println("stats.averageLoadPenalty():"+stats.averageLoadPenalty());//单次load平均耗时
	}
5.其他
Ticker
时钟, 方便测试模拟时间流逝
public static void demo(){

		MyTicker ticker = new MyTicker();

		LoadingCache<String,String> cache = Caffeine.newBuilder()
			.maximumSize(500)
			.ticker(ticker)
			.expireAfterWrite(1, TimeUnit.SECONDS)
			.build(k ->  UUID.randomUUID().toString());

		cache.get("key1");//触发expireAfterCreate
		ticker.advance(1, TimeUnit.SECONDS);//模拟时间消逝
		cache.get("key1");//触发expireAfterRead,剩余生存时间4s
		ticker.advance(2, TimeUnit.SECONDS);//模拟时间消逝
		cache.put("key1","value1");//触发expireAfterUpdate,重置生存时间为5s
	}

public class MyTicker implements Ticker {
	private final AtomicLong nanos = new AtomicLong();
	//模拟时间消逝
	public void advance(long time, TimeUnit unit) {
		this.nanos.getAndAdd(unit.toNanos(time));
	}
	@Override
	public long read() {
		return this.nanos.get();
	}
}
三、springboot集成caffine
1.pom文件引入依赖
<!--    caffeine本地缓存    -->
<dependency>
  <groupId>com.github.ben-manes.caffeine</groupId>
  <artifactId>caffeine</artifactId>
</dependency>
2.CacheConfig配置注入
import com.fasterxml.jackson.annotation.JsonAutoDetect;
import com.fasterxml.jackson.annotation.PropertyAccessor;
import com.fasterxml.jackson.databind.ObjectMapper;
import com.github.benmanes.caffeine.cache.Caffeine;
import com.github.benmanes.caffeine.cache.RemovalCause;
import com.theeternity.common.base.CacheNameTimeConstant;
import com.theeternity.common.base.RedisCacheNameConstant;
import lombok.extern.slf4j.Slf4j;
import org.springframework.beans.factory.annotation.Autowired;
import org.springframework.beans.factory.annotation.Value;
import org.springframework.cache.CacheManager;
import org.springframework.cache.annotation.EnableCaching;
import org.springframework.cache.caffeine.CaffeineCache;
import org.springframework.cache.caffeine.CaffeineCacheManager;
import org.springframework.cache.support.SimpleCacheManager;
import org.springframework.context.annotation.Bean;
import org.springframework.context.annotation.Configuration;
import org.springframework.context.annotation.Primary;
import org.springframework.data.redis.cache.RedisCache;
import org.springframework.data.redis.cache.RedisCacheConfiguration;
import org.springframework.data.redis.cache.RedisCacheManager;
import org.springframework.data.redis.cache.RedisCacheWriter;
import org.springframework.data.redis.connection.RedisConnectionFactory;
import org.springframework.data.redis.connection.RedisPassword;
import org.springframework.data.redis.connection.RedisStandaloneConfiguration;
import org.springframework.data.redis.connection.lettuce.LettuceClientConfiguration;
import org.springframework.data.redis.connection.lettuce.LettuceConnectionFactory;
import org.springframework.data.redis.core.RedisTemplate;
import org.springframework.data.redis.serializer.*;

import java.time.Duration;
import java.util.ArrayList;
import java.util.HashMap;
import java.util.List;
import java.util.Map;
import java.util.concurrent.TimeUnit;


/**
 * @program: ApiBoot
 * @description: 实例化redisTemplate, 并注入容器中
 * @author: TheEternity Zhang
 * @create: 2019-02-14 09:16
 */
@Slf4j
@Configuration
@EnableCaching
public class CacheConfig {

    @Value("${spring.redis.host}")
    private String host;
    @Value("${spring.redis.port}")
    private int port;
    @Value("${spring.redis.password}")
    private String password;
    @Value("${spring.redis.database}")
    private Integer database;

    @Bean
    LettuceConnectionFactory lettuceConnectionFactory() {
        RedisStandaloneConfiguration redisStandaloneConfiguration = new RedisStandaloneConfiguration();
        redisStandaloneConfiguration.setDatabase(database);
        redisStandaloneConfiguration.setHostName(host);
        redisStandaloneConfiguration.setPort(port);
        redisStandaloneConfiguration.setPassword(RedisPassword.of(password));

        LettuceClientConfiguration.LettuceClientConfigurationBuilder lettuceClientConfigurationBuilder = LettuceClientConfiguration.builder();
        LettuceConnectionFactory factory = new LettuceConnectionFactory(redisStandaloneConfiguration,
                lettuceClientConfigurationBuilder.build());
        return factory;
    }

    /**
     * RedisTemplate配置
     */
    @Bean
    public RedisTemplate<String, Object> redisTemplate(LettuceConnectionFactory lettuceConnectionFactory) {
        // 设置序列化
        Jackson2JsonRedisSerializer<Object> jackson2JsonRedisSerializer = new Jackson2JsonRedisSerializer<Object>(Object.class);
        ObjectMapper om = new ObjectMapper();
        om.setVisibility(PropertyAccessor.ALL, JsonAutoDetect.Visibility.ANY);
        om.enableDefaultTyping(ObjectMapper.DefaultTyping.NON_FINAL);
        jackson2JsonRedisSerializer.setObjectMapper(om);
        // 配置redisTemplate
        RedisTemplate<String, Object> redisTemplate = new RedisTemplate<String, Object>();
        redisTemplate.setConnectionFactory(lettuceConnectionFactory);
        RedisSerializer<?> stringSerializer = new StringRedisSerializer();
        redisTemplate.setKeySerializer(stringSerializer);// key序列化
        redisTemplate.setValueSerializer(jackson2JsonRedisSerializer);// value序列化
        redisTemplate.setHashKeySerializer(stringSerializer);// Hash key序列化
        redisTemplate.setHashValueSerializer(jackson2JsonRedisSerializer);// Hash value序列化
        redisTemplate.afterPropertiesSet();
        return redisTemplate;
    }

    /**
     * 常规RedisCacheManager的创建方法
     * @param lettuceConnectionFactory
     * @return
     */
//    @Bean("cacheManager")
//    public RedisCacheManager cacheManager(LettuceConnectionFactory lettuceConnectionFactory) {
//        RedisCacheConfiguration defaultCacheConfig = RedisCacheConfiguration.defaultCacheConfig()
////                .entryTtl(Duration.ofMinutes(entryTtl)) //有效期设置
//                .serializeKeysWith(RedisSerializationContext.SerializationPair.fromSerializer(new StringRedisSerializer()))
//                .serializeValuesWith(RedisSerializationContext.SerializationPair.fromSerializer(new GenericJackson2JsonRedisSerializer()))
//                .disableCachingNullValues();
//
//
//        return RedisCacheManager.builder(lettuceConnectionFactory)
//                .cacheDefaults(defaultCacheConfig)
//                .transactionAware()
//                .build();
//    }

    /**
     * 多个RedisCache的配置方法
     * @param lettuceConnectionFactory
     * @return
     */
    @Bean("cacheManager")
    public RedisCacheManager cacheManager(LettuceConnectionFactory lettuceConnectionFactory) {
        Map<String, RedisCacheConfiguration> cacheConfigurations = new HashMap<>();
        cacheConfigurations.put(RedisCacheNameConstant.REDIS_CACHE_5SECS, RedisCacheConfiguration.defaultCacheConfig()
                .entryTtl(Duration.ofSeconds(5))
                .serializeKeysWith(RedisSerializationContext.SerializationPair.fromSerializer(new StringRedisSerializer()))
                .serializeValuesWith(RedisSerializationContext.SerializationPair.fromSerializer(new GenericJackson2JsonRedisSerializer()))
                .disableCachingNullValues());
        cacheConfigurations.put(RedisCacheNameConstant.REDIS_CACHE_10SECS, RedisCacheConfiguration.defaultCacheConfig()
                .entryTtl(Duration.ofSeconds(10))
                .serializeKeysWith(RedisSerializationContext.SerializationPair.fromSerializer(new StringRedisSerializer()))
                .serializeValuesWith(RedisSerializationContext.SerializationPair.fromSerializer(new GenericJackson2JsonRedisSerializer()))
                .disableCachingNullValues());
        cacheConfigurations.put(RedisCacheNameConstant.REDIS_CACHE_30SECS, RedisCacheConfiguration.defaultCacheConfig()
                .entryTtl(Duration.ofSeconds(30))
                .serializeKeysWith(RedisSerializationContext.SerializationPair.fromSerializer(new StringRedisSerializer()))
                .serializeValuesWith(RedisSerializationContext.SerializationPair.fromSerializer(new GenericJackson2JsonRedisSerializer()))
                .disableCachingNullValues());


        return RedisCacheManager.builder(lettuceConnectionFactory)
                .withInitialCacheConfigurations(cacheConfigurations)
                .transactionAware()
                .build();
    }

    /**
     * 常规CaffeineCacheManager配置方法
     * @return
     */
//    @Bean("caffeineCacheManager")
//    public CaffeineCacheManager caffeineCacheManager() {
//        CaffeineCacheManager cacheManager = new CaffeineCacheManager();
//        cacheManager.setCaffeine(caffeineCacheBuilder());
//        return cacheManager;
//    }
//    @Bean
//    public Caffeine<Object, Object> caffeineCacheBuilder() {
//        return Caffeine.newBuilder()
//                // 设置最后一次写入后经过固定时间过期
//                .expireAfterWrite(30, TimeUnit.SECONDS)
//                // 初始的缓存空间大小
//                .initialCapacity(100)
//                // 缓存的最大条数
//                .maximumSize(1000);
//    }

    /**
     * 多个CaffeineCache的配置方法
     * @return
     */
    @Bean("caffeineCacheManager")
    @Primary
    public CacheManager caffeineCacheManager() {
        SimpleCacheManager cacheManager = new SimpleCacheManager();
        List<CaffeineCache> caches = new ArrayList<>();
        caches.add(new CaffeineCache(CacheNameTimeConstant.CACHE_5SECS,
                Caffeine.newBuilder()
                        .expireAfterWrite(5, TimeUnit.SECONDS)
                        .maximumSize(100)
                        .recordStats()
                        .removalListener((Object key, Object value, RemovalCause cause) -> {
                            log.info("CACHE_5SECS Key {} Value {} was removed ({})", key, value, cause);
                        })
                        .build()));
        caches.add(new CaffeineCache(CacheNameTimeConstant.CACHE_10SECS,
                Caffeine.newBuilder()
                        .expireAfterWrite(10, TimeUnit.SECONDS)
                        .maximumSize(100)
                        .recordStats()
                        .removalListener((Object key, Object value, RemovalCause cause) -> {
                            log.info("CACHE_10SECS Key {} Value {} was removed ({})", key, value, cause);
                        })
                        .build()));
        caches.add(new CaffeineCache(CacheNameTimeConstant.CACHE_30SECS,
                Caffeine.newBuilder()
                        .expireAfterWrite(30, TimeUnit.SECONDS)
                        .maximumSize(100)
                        .recordStats()
                        .removalListener((Object key, Object value, RemovalCause cause) -> {
                            log.info("CACHE_30SECS Key {} Value {} was removed ({})", key, value, cause);
                        })
                        .build()));
        cacheManager.setCaches(caches);
        return cacheManager;
    }
}
3.测试缓存
@Slf4j
@RestController
@RequestMapping("/caffeine")
public class CacheTestController {

    @Autowired
    @Qualifier("caffeineCacheManager")
    CacheManager caffineCacheManager;

    /**
     * 测试第一个CacheName的cache
     * 此时在cache中的key为id的值,value是生成的str
     */
    @GetMapping("/testCacheName1/{id}")
    @Cacheable(value = CacheNameTimeConstant.CACHE_5SECS, key = "#id")
    public String testCacheName1(@PathVariable("id") Integer id) {
        String str = RandomUtil.randomString(10);
        log.info("{} success id:{},value;{}", CacheNameTimeConstant.CACHE_5SECS, id, str);
        return str;
    }

    /**
     * 测试第二个CacheName的cache
     * 此时在cache中的key为name的值,value是生成的str
     */
    @GetMapping("/testCacheName2/{name}")
    @Cacheable(value = CacheNameTimeConstant.CACHE_10SECS, key = "#name")
    public String testCacheName2(@PathVariable("name") String name) {
        String str = RandomUtil.randomString(10);
        log.info("{} success name:{},value;{}", CacheNameTimeConstant.CACHE_10SECS, name, str);
        return str;
    }

    /**
     * 测试第一个CacheName的cache
     * 此时在cache中的key为SimpleKey []的值,value是生成的str
     */
    @GetMapping("/testCacheName3")
    @Cacheable(value = CacheNameTimeConstant.CACHE_5SECS)
    public String testCacheName3() {
        String str = RandomUtil.randomString(10);
        log.info("{} success,value;{}", CacheNameTimeConstant.CACHE_5SECS, str);
        return str;
    }

    /**
     * 测试第一个CacheName的cache
     * 此时在cache中的key为SimpleKey []的值,value是生成的str
     * testCacheName3与testCacheName4的缓存key是一样的,
     * 所以无论哪个首先被访问到,第二个方法访问的时候返回的是第一个访问生成的值
     */
    @GetMapping("/testCacheName4")
    @Cacheable(value = CacheNameTimeConstant.CACHE_5SECS)
    public String testCacheName4() {
        String str = RandomUtil.randomString(10);
        log.info("{} success,value;{}", CacheNameTimeConstant.CACHE_5SECS, str);
        return str;
    }

    /**
     * 此时会报错:Cannot find cache named 'custom:caffeine:key' for Builder
     * 找不到对应的CaffeineCahe
     * @return
     */
    @GetMapping("/testCacheName5")
    @Cacheable(value = "custom:caffeine:key")
    public String testCacheName5() {
        String str = RandomUtil.randomString(10);
        log.info("{} success,value;{}", "custom:caffeine:key", str);
        return str;
    }

    /**
     * 获取不同cacheName下缓存的值
     */
    @GetMapping("/testCacheName/getMap")
    public void getMap() {
        Cache cache5 = caffineCacheManager.getCache(CacheNameTimeConstant.CACHE_5SECS);
        Cache cache10 = caffineCacheManager.getCache(CacheNameTimeConstant.CACHE_10SECS);
        //1是testCacheName1方法中的参数id,测试时用的id是1
        log.info("cache5:{}", cache5.get(1).get());
        //1是testCacheName2方法中的参数name,测试时用的name是eternity
        log.info("cache10:{}", cache10.get("eternity").get());
    }

    /**
     * 测试使用redis缓存值,此时通过cacheManager切换缓存的manager
     * 使用RedisCacheNameConstant.REDIS_CACHE_10SECS的RedisCache,
     * key为:『REDIS_CACHE_10SECS::name的值』
     */
    @GetMapping("/testRedisCacheName1/{name}")
    @Cacheable(cacheManager = "cacheManager", value = RedisCacheNameConstant.REDIS_CACHE_10SECS, key = "#name")
    public String testRedisCacheName1(@PathVariable("name") String name) {
        String str = RandomUtil.randomString(10);
        log.info("redisCacheManager success name:{},value;{}", RedisCacheNameConstant.REDIS_CACHE_10SECS, name, str);
        return str;
    }

    /**
     * 测试使用redis缓存值,此时通过cacheManager切换缓存的manager
     * 使用RedisCacheNameConstant.REDIS_CACHE_10SECS的RedisCache,
     * key为:『REDIS_CACHE_30SECS::id的值』
     */
    @GetMapping("/testRedisCacheName2/{id}")
    @Cacheable(cacheManager = "cacheManager", value = RedisCacheNameConstant.REDIS_CACHE_30SECS, key = "#id")
    public String testRedisCacheName1(@PathVariable("id") Integer id) {
        String str = RandomUtil.randomString(10);
        log.info("redisCacheManager success id:{},value;{}", RedisCacheNameConstant.REDIS_CACHE_30SECS, id, str);
        return str;
    }

    /**
     * 测试使用redis缓存值,此时通过cacheManager切换缓存的manager
     * 使用自定义的CacheName,此时没有过期时间
     * key为:『custom:key::id的值』,没有过期时间
     */
    @GetMapping("/testRedisCacheName3/{id}")
    @Cacheable(cacheManager = "cacheManager", value = "custom:key", key = "#id")
    public String testRedisCacheName3(@PathVariable("id") Integer id) {
        String str = RandomUtil.randomString(10);
        log.info("redisCacheManager success id:{},value;{}", RedisCacheNameConstant.REDIS_CACHE_30SECS, id, str);
        return str;
    }
}
两个常量类
public interface RedisCacheNameConstant {
    String REDIS_CACHE_5SECS = "REDIS_CACHE_5SECS";
    String REDIS_CACHE_10SECS = "REDIS_CACHE_10SECS";
    String REDIS_CACHE_30SECS = "REDIS_CACHE_30SECS";
}

public interface CacheNameTimeConstant {
    String CACHE_5SECS = "CACHE_5SECS";
    String CACHE_10SECS = "CACHE_10SECS";
    String CACHE_30SECS = "CACHE_30SECS";
}
站在巨人肩膀上摘苹果
https://blog.csdn.net/l_dongyang/article/details/108583476
https://juejin.cn/post/6844903670014803981
https://blog.csdn.net/w727655308/article/details/121623776
标签:缓存,springboot,caffine,cache,key,CACHE,public,String From: https://www.cnblogs.com/eternityz/p/17040097.html