##### 京东物流 孔祥东
```
_____ _ ____ _
/ ____| (_) | _ \ | |
| (___ _ __ _ __ _ _ __ __ _| |_) | ___ ___ | |_
___ | '_ | '__| | '_ \ / _` | _ < / _ \ / _ | __|
____) | |_) | | | | | | | (_| | |_) | (_) | (_) | |_
|_____/| .__/|_| |_|_| |_|__, |____/ ___/ ___/ __|
| | __/ |
|_| |___/
```
# 1. 为什么要用Starter?
- 现在我们就来回忆一下,在还没有Spring-boot框架的时候,我们使用Spring 开发项目,如果需要某一个框架,例如mybatis,我们的步骤一般都是:
<!---->
- 到maven仓库去找需要引入的mybatis jar包,选取合适的版本(易发生冲突)
<!---->
- 到maven仓库去找mybatis-spring整合的jar包,选取合适的版本(易发生冲突)
<!---->
- 在spring的applicationContext.xml文件中配置dataSource和mybatis相关信息
<!---->
-
<!---->
- 假如所有工作都到位,一般可以一气呵成;但很多时候都会花一堆时间解决jar 冲突,配置项缺失,导致怎么都启动不起来等等,各种问题。
所以在2012 年 10 月,一个叫 Mike Youngstrom 的人在 Spring Jira 中创建了一个功能请求,要求在 Spring Framework 中支持无容器 Web 应用程序体系结构,提出了在主容器引导 Spring 容器内配置 Web 容器服务;这件事情对 SpringBoot 的诞生应该说是起到了一定的推动作用。
所以SpringBoot 设计的目标就是简化繁琐配置,快速建立Spring 应用。
- 然后在开发Spring-boot 应用的是时候, 经常可以看到我们的pom 文件中引入了spring-boot-starter-web、spring-boot-starter-data-redis、mybatis-spring-boot-starter 这样的依赖,然后几乎不用任何配置就可以使用这些依赖的功能,真正的感受到了**开箱即用**的爽。
<!---->
- 下面我们就先来尝试自己开发一个Starter。
# 2. 命名规范
在使用spring-boot-starter,会发现,有的项目名称是 XX-spring-boot-starter,有的是spring-boot-starter-XX,这个项目的名称有什么讲究呢?从springboot官方文档摘录:
![]()
这段话的大概意思就是,麻烦大家遵守这个命名规范:
**Srping官方命名格式为:spring-boot-starter-{name}**
**非Spring官方建议命名格式:{name}-spring-boot-starter**
# 3. 开发示例
下面我就以记录日志的一个组件为示例来讲述开发一个starter 的过程。
## 3.1 新建工程
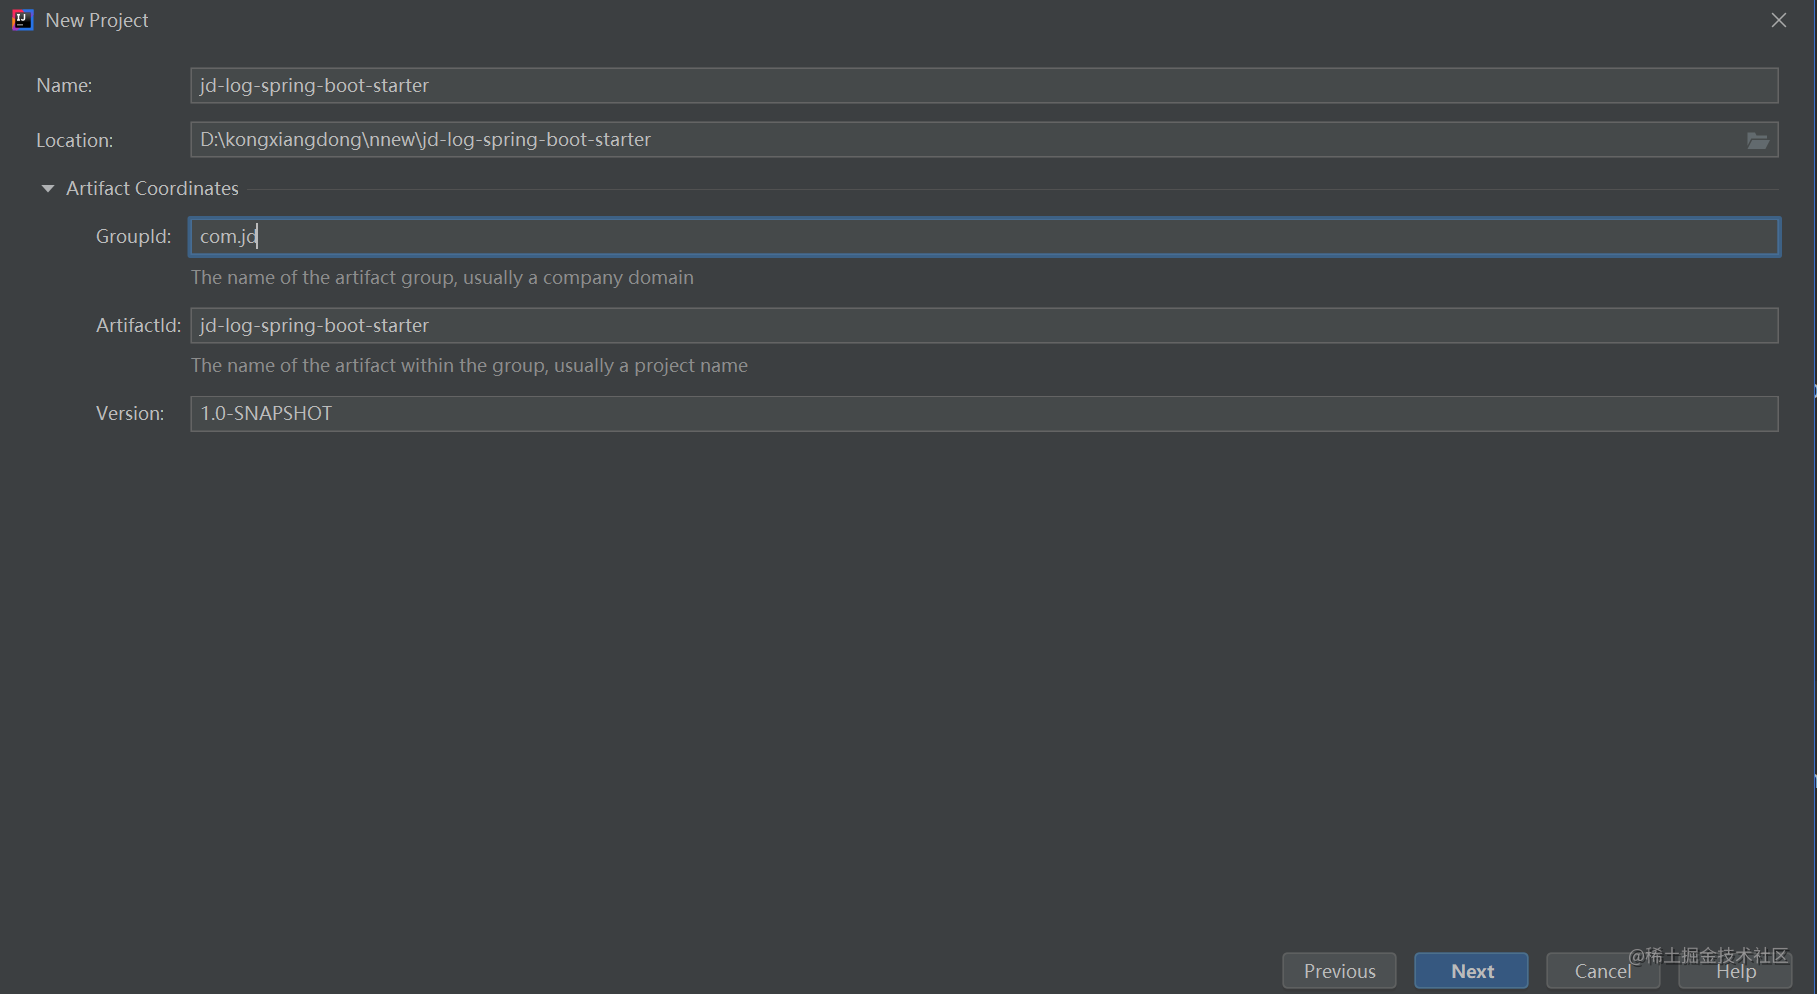
首先新建一个maven 工程,名称定义为jd-log-spring-boot-starter
## 3.2 Pom 引入依赖
```
<?xml version="1.0" encoding="UTF-8"?>
<project xmlns="http://maven.apache.org/POM/4.0.0" xmlns:xsi="http://www.w3.org/2001/XMLSchema-instance"
xsi:schemaLocation="http://maven.apache.org/POM/4.0.0 http://maven.apache.org/xsd/maven-4.0.0.xsd">
<modelVersion>4.0.0</modelVersion>
<parent>
<groupId>org.springframework.boot</groupId>
<artifactId>spring-boot-starter-parent</artifactId>
<version>2.5.13</version>
<relativePath/> <!-- lookup parent from repository -->
</parent>
<groupId>com.jd</groupId>
<artifactId>jd-log-spring-boot-starter</artifactId>
<version>1.0-SNAPSHOT</version>
<name>jd-log-spring-boot-starter</name>
<url>http://www.example.com</url>
<properties>
<project.build.sourceEncoding>UTF-8</project.build.sourceEncoding>
<maven.compiler.source>1.8</maven.compiler.source>
<maven.compiler.target>1.8</maven.compiler.target>
</properties>
<dependencies>
<!-- 提供了自动装配功能-->
<dependency>
<groupId>org.springframework.boot</groupId>
<artifactId>spring-boot-autoconfigure</artifactId>
</dependency>
<!-- 在编译时会自动收集配置类的条件,写到一个META-INF/spring-autoconfigure-metadata.json中-->
<dependency>
<groupId>org.springframework.boot</groupId>
<artifactId>spring-boot-configuration-processor</artifactId>
</dependency>
<!--记录日志会用到切面,所以需要引入-->
<dependency>
<groupId>org.springframework.boot</groupId>
<artifactId>spring-boot-starter-aop</artifactId>
</dependency>
<dependency>
<groupId>org.projectlombok</groupId>
<artifactId>lombok</artifactId>
</dependency>
</dependencies>
<build>
<plugins>
<plugin>
<groupId>org.apache.maven.plugins</groupId>
<artifactId>maven-source-plugin</artifactId>
<version>2.2.1</version>
<executions>
<execution>
<id>attach-sources</id>
<goals>
<goal>jar-no-fork</goal>
</goals>
</execution>
</executions>
</plugin>
</plugins>
</build>
</project>
```
这边稍微解释一下这几个依赖:
spring-boot-autoconfigure :提供自动化装配功能,是为了Spring Boot 应用在各个模块提供自动化配置的作用;即加入对应 pom,就会有对应配置其作用;所以我们想要自动装配功能,就需要引入这个依赖。
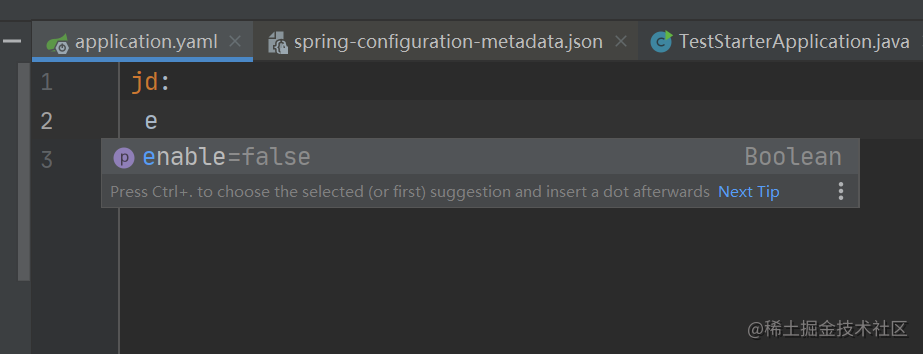
spring-boot-configuration-processor:将自定义的配置类生成配置[元数据](https://so.csdn.net/so/search?q=%E5%85%83%E6%95%B0%E6%8D%AE&spm=1001.2101.3001.7020),所以在引用自定义STARTER的工程的YML文件中,给自定义配置初始化时,会有属性名的提示;确保在使用@ConfigurationProperties注解时,可以优雅的读取配置信息,引入该依赖后,IDEA不会出现“spring boot configuration annotation processor not configured”的错误;编译之后会在META-INF 下生成一个spring-configuration-metadata.json 文件,大概内容就是定义的配置的元数据;效果如下截图。
spring-boot-starter-aop :这个就不用解释了,因为示例是记录日志,我们用到切面的功能,所以需要引入。
## 3.3 定义属性配置
```
/**
* @author kongxiangdong2
* @Title: LogProperties
* @ProjectName jd-log-spring-boot-starter
* @Description: TODO
* @date 2022/9/110:04
*/
@ConfigurationProperties(prefix = "jd")
@Data
public class LogProperties {
/**
* 是否开启日志
*/
private boolean enable;
/**
* 平台:不同服务使用的区分,默认取 spring.application.name
*/
@Value("${spring.application.name:#{null}}")
private String platform;
```
@ConfigurationProperties:该注解和@Value 注解作用类似,用于获取配置文件中属性定义并绑定到Java Bean 或者属性中;换句话来说就是将配置文件中的配置封装到JAVA 实体对象,方便使用和管理。
这边我们定义两个属性,一个是是否开启日志的开关,一个是标识平台的名称。
## 3.4 定义自动配置类
```
/**
* @author kongxiangdong2
* @Title: JdLogAutoConfiguration
* @ProjectName jd-log-spring-boot-starter
* @Description: TODO
* @date 2022/9/110:06
*/
@Configuration
@ComponentScan("com.jd")
@ConditionalOnProperty(prefix = "jd",name = "enable",havingValue = "true",matchIfMissing = false)
@EnableConfigurationProperties({LogProperties.class})
public class JdLogAutoConfiguration {
//
}
```
这个类最关键了,它是整个starter 最重要的类,它就是将配置自动装载进spring-boot的;具体是怎么实现的,下面在讲解原理的时候会再详细说说,这里先完成示例。
@Configuration :这个就是声明这个类是一个配置类
@ConditionalOnProperty:作用是可以指定prefix.name 配置文件中的属性值来判定configuration是否被注入到Spring,就拿上面代码的来说,会根据配置文件中是否配置jd.enable 来判断是否需要加载JdLogAutoConfiguration 类,如果配置文件中不存在或者配置的是等于false 都不会进行加载,如果配置成true 则会加载;指定了havingValue,要把配置项的值与havingValue对比,一致则加载Bean;配置文件缺少配置,但配置了matchIfMissing = true,加载Bean,否则不加载。
在这里稍微扩展一下经常使用的Condition
| 注解 | 类型 | 说明 |
| ------------------------------- | ---------------------------------- | --------------------------------------------------------------- |
| @ConditionalOnClass | Class Conditions类条件注解 | 当前classpath下有指定类才加载 |
| @ConditionalOnMissingClass | Class Conditions类条件注解 | 当前classpath下无指定类才加载 |
| @ConditionalOnBean | Bean ConditionsBean条件注解 | 当期容器内有指定bean才加载 |
| @ConditionalOnMissingBean | Bean ConditionsBean条件注解 | 当期容器内无指定bean才加载 |
| @ConditionalOnProperty | Property Conditions环境变量条件注解(含配置文件) | prefix 前缀name 名称havingValue 用于匹配配置项值matchIfMissing 没找指定配置项时的默认值 |
| @ConditionalOnResource | ResourceConditions 资源条件注解 | 有指定资源才加载 |
| @ConditionalOnWebApplication | Web Application Conditionsweb条件注解 | 是web才加载 |
| @ConditionalOnNotWebApplication | Web Application Conditionsweb条件注解 | 不是web才加载 |
| @ConditionalOnExpression | SpEL Expression Conditions | 符合SpEL 表达式才加载 |
@EnableConfigurationProperties使@ConfigurationProperties 注解的类生效。
## 3.5 配置EnableAutoConfiguration
在resources/META-INF/ 目录新建spring.factories 文件,配置内容如下;
```
org.springframework.boot.autoconfigure.EnableAutoConfiguration=com.jd.JdLogAutoConfiguration
```
好了,至此自定义Starter 大体框架已经好了,下面就是我们记录日志的功能。
## 3.6 业务功能实现
首先我们先定义一个注解Jdlog
```
/**
* @author kongxiangdong2
* @Title: Jdlog
* @ProjectName jd-log-spring-boot-starter
* @Description: TODO
* @date 2022/9/110:04
*/
@Target(ElementType.METHOD)
@Retention(RetentionPolicy.RUNTIME)
public @interface Jdlog {
}
```
定义切面执行逻辑,这边就简单的打印一下配置文件的属性值+目标执行方法+耗时。
```
import com.jd.annotation.Jdlog;
import com.jd.config.LogProperties;
import lombok.AllArgsConstructor;
import lombok.extern.slf4j.Slf4j;
import org.aspectj.lang.ProceedingJoinPoint;
import org.aspectj.lang.annotation.Around;
import org.aspectj.lang.annotation.Aspect;
import org.aspectj.lang.annotation.Pointcut;
import org.springframework.stereotype.Component;
/**
* @author kongxiangdong2
* @Title: LogAspectjProcess
* @ProjectName jd-log-spring-boot-starter
* @Description: TODO
* @date 2022/9/111:12
*/
@Aspect
@Component
@Slf4j
@AllArgsConstructor
public class LogAspectjProcess {
LogProperties logProperties;
/**
* 定义切点
*/
@Pointcut("@annotation(com.jd.annotation.Jdlog)")
public void pointCut(){}
/**
* 环绕通知
*
* @param thisJoinPoint
* @param jdlog
* @return
*/
@Around("pointCut() && @annotation(jdlog)")
public Object around(ProceedingJoinPoint thisJoinPoint, Jdlog jdlog){
//执行方法名称
String taskName = thisJoinPoint.getSignature()
.toString().substring(
thisJoinPoint.getSignature()
.toString().indexOf(" "),
thisJoinPoint.getSignature().toString().indexOf("("));
taskName = taskName.trim();
long time = System.currentTimeMillis();
Object result = null;
try {
result = thisJoinPoint.proceed();
} catch (Throwable throwable) {
throwable.printStackTrace();
}
log.info("{} -- method:{} run :{} ms",logProperties.getPlatform(), taskName,
(System.currentTimeMillis() - time));
return result;
```
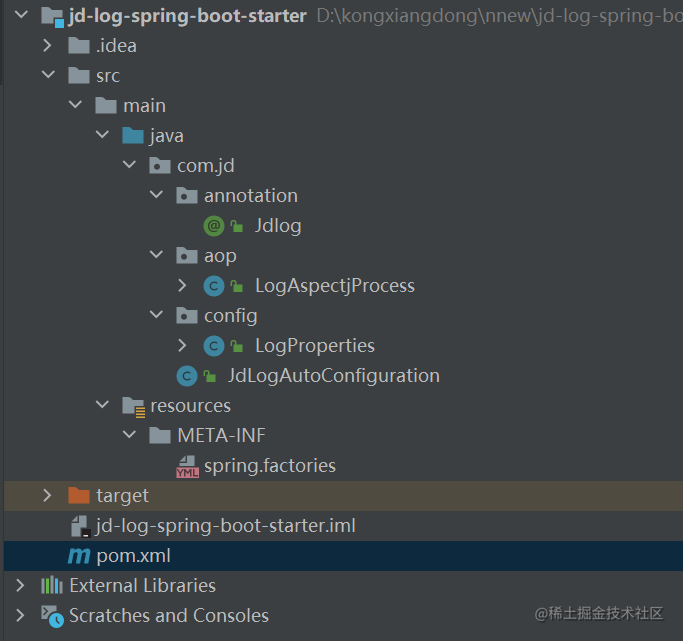
整体项目结构就是这样子
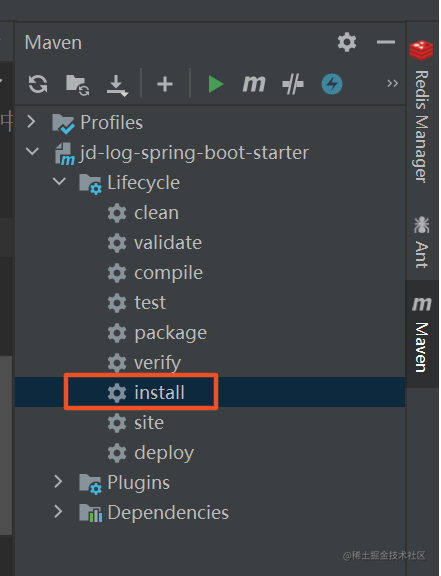
好了,现在就可以打包编译安装
## 3.7 测试使用
然后就可以在其他项目中引入使用了;下面以一个简单的spring-boot web 项目做个测试,在pom 中引入下面的依赖配置。
```
<dependency>
<groupId>com.jd</groupId>
<artifactId>jd-log-spring-boot-starter</artifactId>
<version>1.0-SNAPSHOT</version>
</dependency>
```
增加一个http 访问的方法,标注上@Jdlog 注解
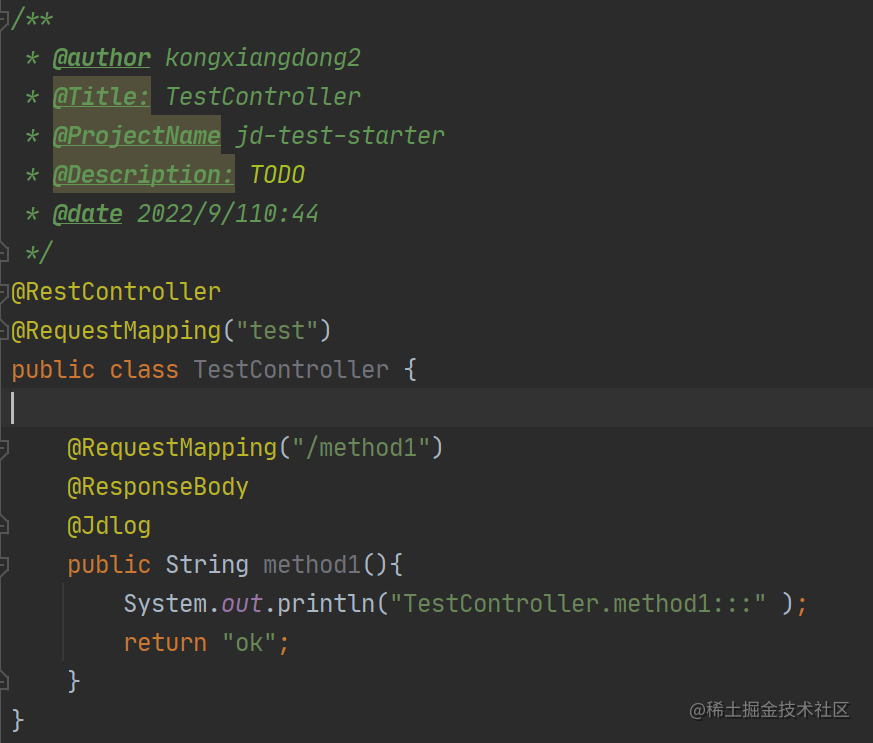
application.yaml 文件中配置
```
jd:
enable: true
platform: "测试项目"
```
启动测试,访问地址http://localhost:8080/test/method1,控制台打印如下:

咋样,自定义的Starter是不是特别的简单啊,快动手试试吧!
上面我们讲的都是怎么去开发一个starter,但是到底为什么要这样,spring-boot 是如何去实现的?是不是还不知道?那下面我们就来说说;
代码示例地址:<https://coding.jd.com/kongxiangdong2/jd-log-spring-boot-starter.git>
# 4. 原理讲解
我们上面已经看到一个starter,只需要引入到pom 文件中,再配置一下(其实都可以不配置)jd.enable=true,就可以直接使用记录日志的功能了,Spring-boot 是怎么做到的?
在开始的时候说过,Spring-boot 的好处就是可以自动装配。那下面我就来说说自动装配的原理。
相比于传统Spring 应用,我们搭建一个SpringBoot 应用,我们只需要引入一个注解(前提:引入springBoot y依赖)@SpringBootApplication,就可以直接运行;所以我们就从这个注解开始入手,看看这个注解到底做了写什么?
## SpringBootApplication 注解
点开@SpringBootApplication注解可以看到包含了@SpringBootConfiguration,@EnableAutoConfiguration,@ComponentScan三个注解。
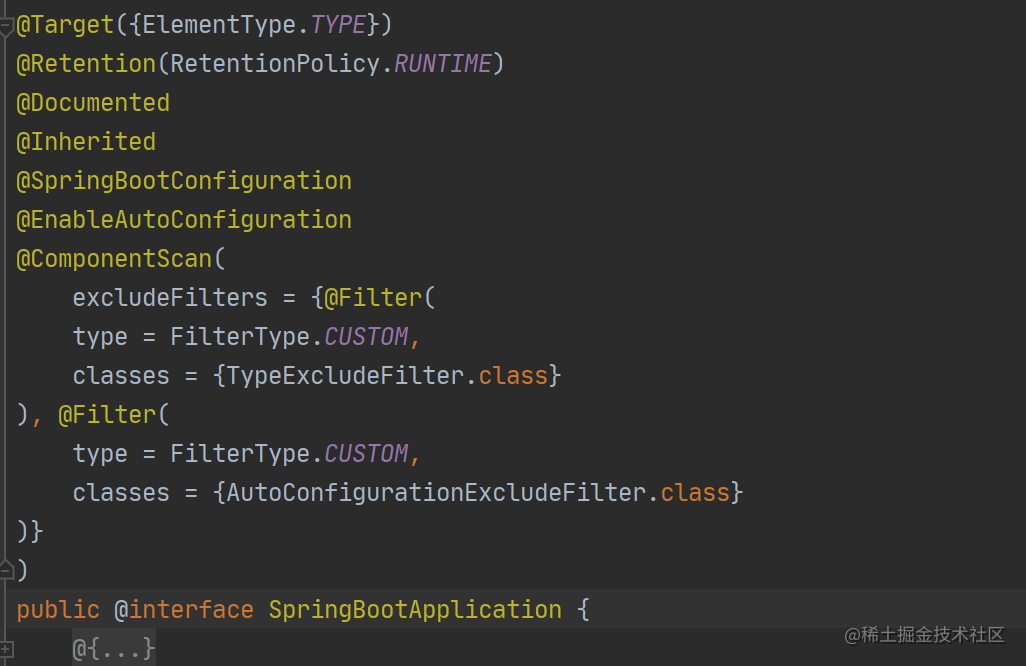
前面的四个注解就不用过多叙述了,是定义注解最基本的,关键在于后面的三个注解:@SpringBootConfiguration,@EnableAutoConfiguration,@ComponentScan,其实也就是说在启动类上如果不使用@SpringBootApplication 这个复合注解,直接使用者三个注解一样可以达到相同的效果。
@SpringBootConfiguration 注解:我们再次点进去看这个注解,其实它就是一个@Configuration 注解。
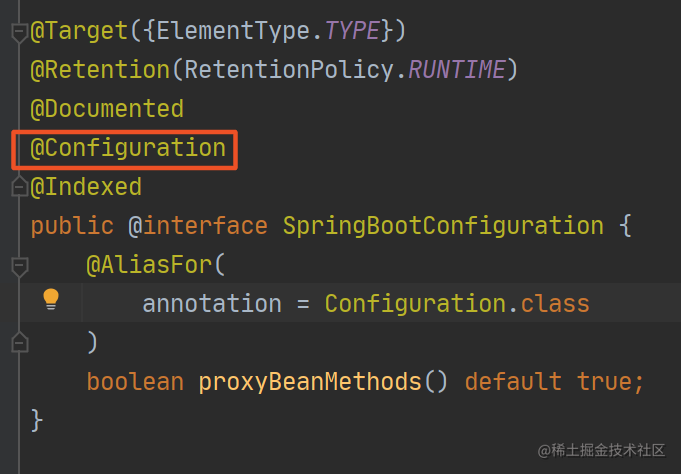
### @ComponentScan 注解
@ComponentScan 注解:配置包扫描定义的扫描路径,把符合扫描规则的类装配到spring容器
### @EnableAutoConfiguration 注解
@EnableAutoConfiguration 打开自动装配(自动配置着重来看该注解)
| 注解 | 作用 | 解释 |
| ------------------------ | --------------------------------- | ---------------------------------------------------------------------------------------------------------------------------------------------- |
| @SpringBootConfiguration | 标记当前类为配置类 | 加上这个注解就是为了让当前类作为一个配置类交由 Spring 的 IOC 容器进行管理,因为前面我们说了,SpringBoot 本质上还是 Spring,所以原属于 Spring 的注解 @Configuration 在 SpringBoot 中也可以直接应用 |
| @ComponentScan | 配置包扫描定义的扫描路径,把符合扫描规则的类装配到spring容器 | 用于定义 Spring 的扫描路径,等价于在 xml 文件中配置 <context:component-scan>,假如不配置扫描路径,那么 Spring 就会默认扫描当前类所在的包及其子包中的所有标注了 @Component,@Service,@Controller 等注解的类。 |
| @EnableAutoConfiguration | 打开自动装配 | 下面着重讲解 |
我们再次点击@EnableAutoConfiguration进入查看,它是一个由 @AutoConfigurationPackage 和 @Import 注解组成的复合注解;

首先我们先来看@Import 这个注解,这个是比较关键的一个注解;
在说这个注解之前我们先举个例子,假如我们有一个类Demo,它是一个不在启动配置类目录之下的,也就意味着它不会被扫描到,Spring 也无法感知到它的存在,那么如果需要能将它被扫描到,是不是我们可以通过加@Import 注解来导入Demo 类,类似如下代码
```
@Configuration
@Import(Demo.class)
public class MyConfiguration {
}
```
所以,我们可以知道@Import 注解其实就是为了去导入一个类。所以这里@Import({AutoConfigurationImportSelector.class}) 就是为了导入AutoConfigurationImportSelector 类,那我们继续来看这个类,AutoConfigurationImportSelector实现的是`DeferredImportSelector`接口,这是一个延迟导入的类;再细看会有一个方法比较显眼,根据注解元数据来选择导入组件,当注解元数据空,直接返回一个空数组;否则就调用getAutoConfigurationEntry ,方法中会使用AutoConfigurationEntry的getConfigurations(),configurations是一个`List<String>`,那么我们看下AutoConfigurationEntry是怎么生成的。

进入到getAutoConfigurationEntry 方法中可以看到主要是getCandidateConfigurations 来获取候选的 Bean,并将其存为一个集合;后续的方法都是在去重,校验等一系列的操作。

我们继续往getCandidateConfigurations 方法里看,最终通过SpringFactoriesLoader.loadFactoryNames来获取最终的configurations,并且可以通过断言发现会使用到META-INF/spring.factories文件,那么我们再进入SpringFactoriesLoader.loadFactoryNames()中来看下最终的实现。

SpringFactoriesLoader.loadFactoryNames()方法会读取META-INF/spring.factories文件下的内容到Map中,再结合传入的factoryType=EnableAutoConfiguration.class,因此会拿到 org.springframework.boot.autoconfigure.EnableAutoConfiguration为key对应的各个XXAutoConfiguration的值,然后springboot在结合各个starter中的代码完成对于XXAutoConfiguration中的Bean的加载动作。
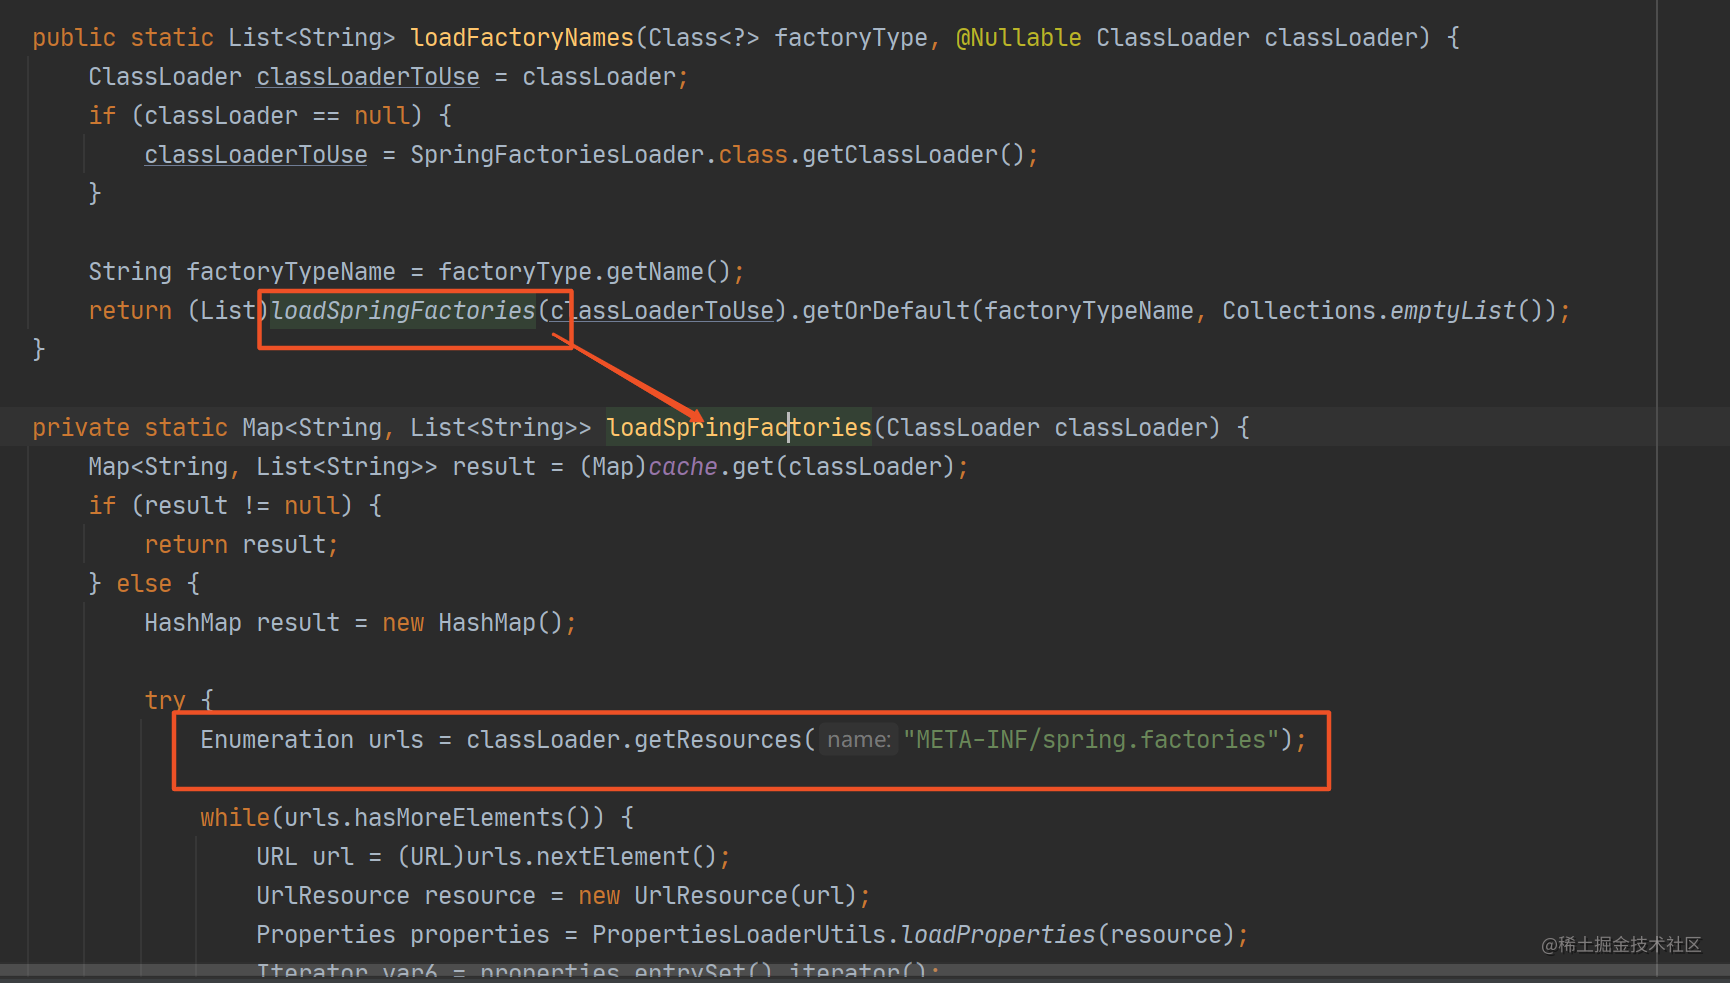
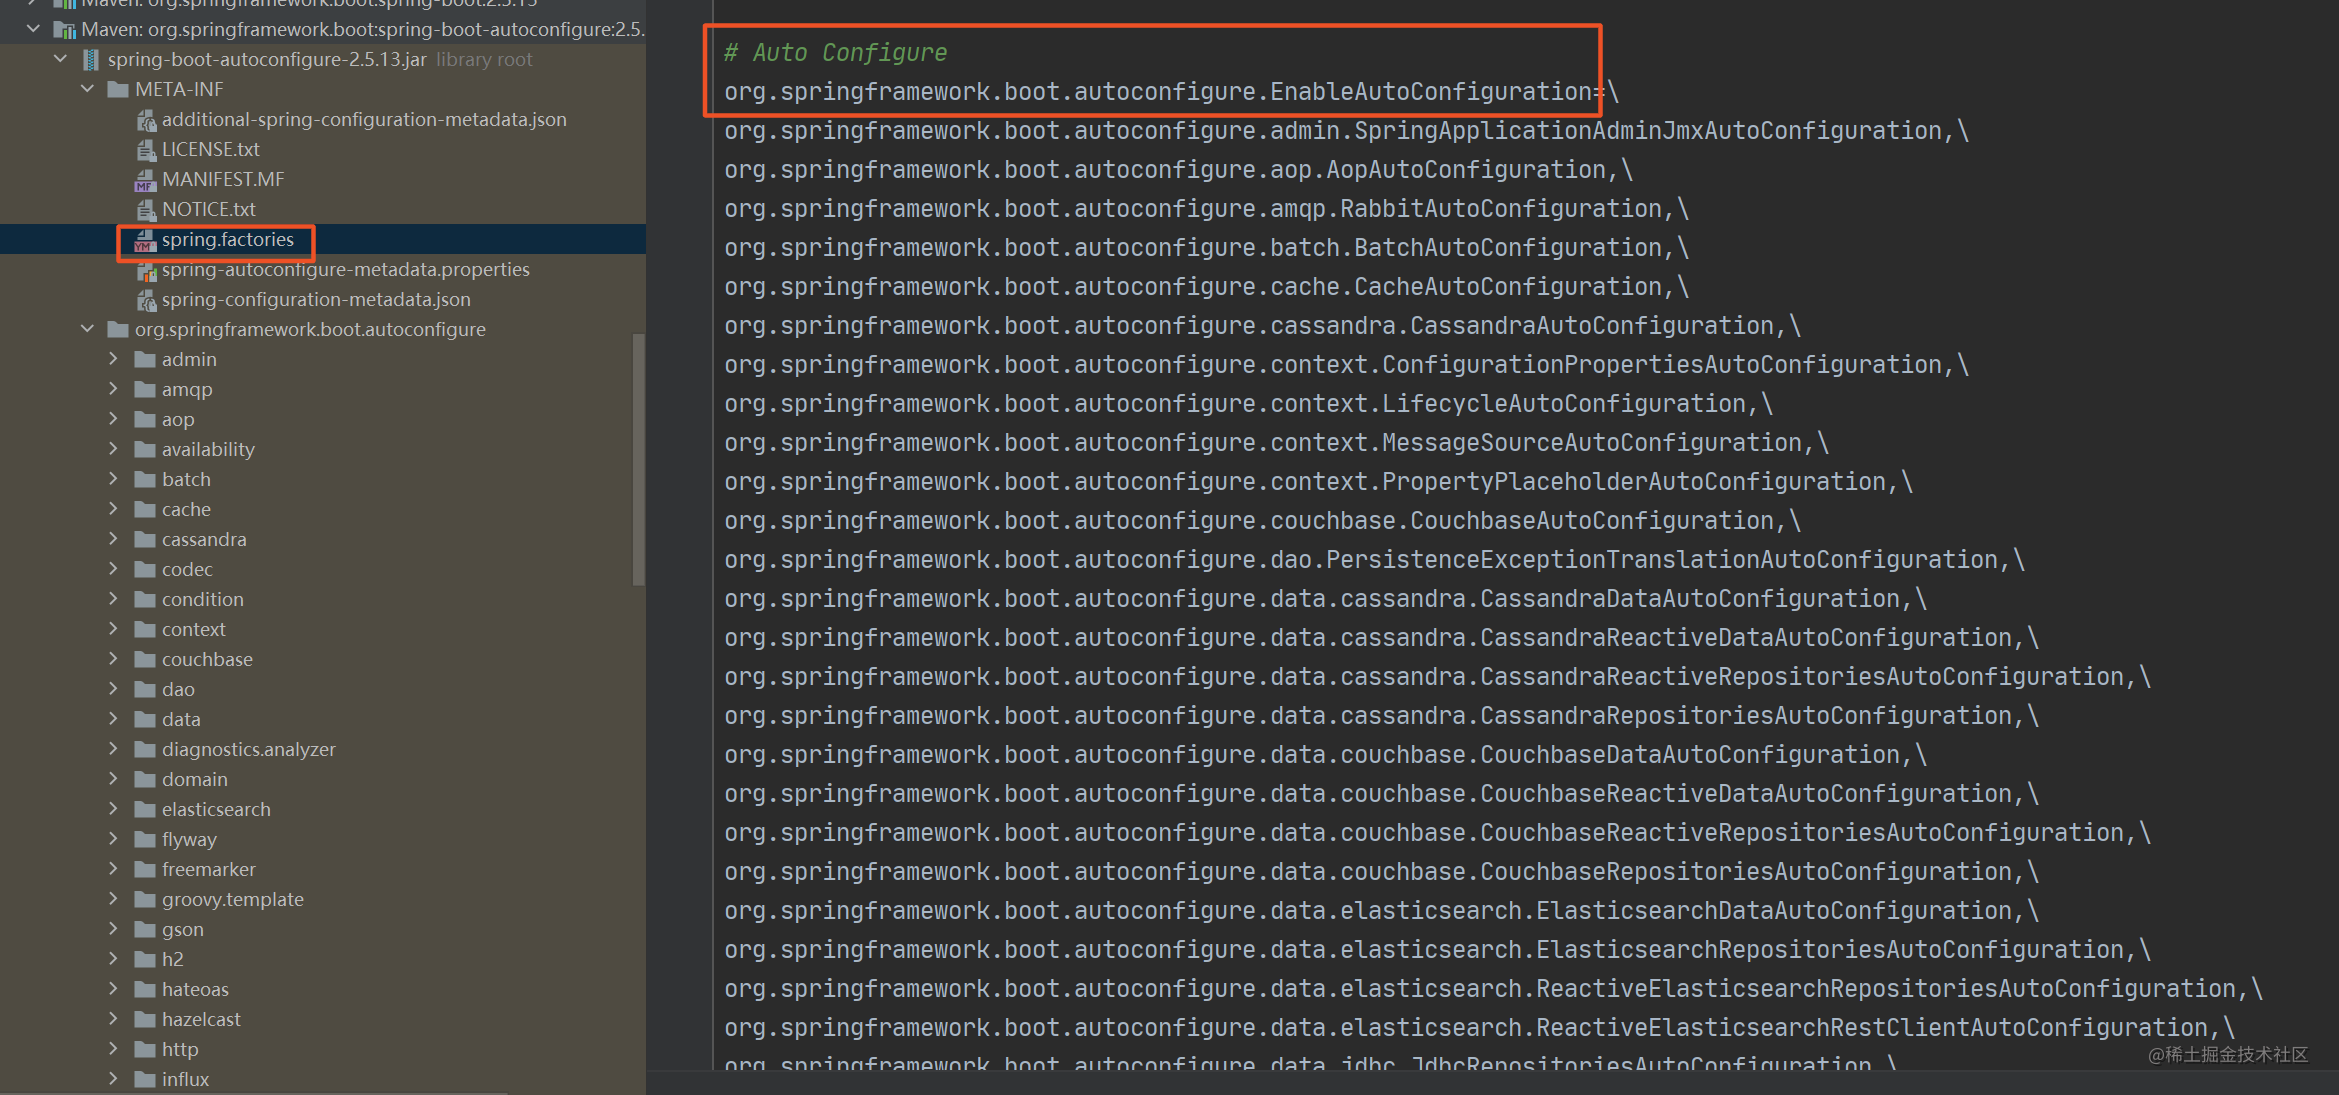
这边再扩展一下这个内容,通过 SpringFactoriesLoader 来读取配置文件 spring.factories 中的配置文件的这种方式是一种 SPI 的思想。
### @AutoConfigurationPackage 注解
进入这个注解看,其实它就是导入了Registrar 这个类

再进入这个类查看,它其实是一个内部类,看代码的大概意思就是读取到我们在最外层的 @SpringBootApplication 注解中配置的扫描路径(没有配置则默认当前包下),然后把扫描路径下面的Bean注册到容器中;

## 总结
好了,现在我们大概来理一下整个自动装配的流程:
1. 启动类中通过使用@SpringBootApplication实现自动装配的功能;
<!---->
1. 实际注解@SpringBootApplication是借助注解@EnableAutoConfiguration的功能。
<!---->
1. 在注解@EnableAutoConfiguration中又有两个注解,@AutoConfigurationPackage,@EnableAutoConfiguration。
<!---->
1. 通过@AutoConfigurationPackage实现对于当前项目中Bean的进行加载;
<!---->
1. @EnableAutoConfiguration通过@Import({AutoConfigurationImportSelector.class})实现对于Pom引入的start中的XXAutoConfiguration的加载;
<!---->
1. @AutoConfigurationImportSelector类中通过SpringFactoriesLoader读取 META-INF/spring.factories中key为org.springframework.boot.autoconfigure.EnableAutoConfiguration对应的各个XXAutoConfiguration的值,然后springboot在结合各个start中的代码完成对于XXAutoConfiguration中的Bean的加载动作;
到这里是不是已经可以很了然对我们之前开发starter中的定义了啊,赶紧试试吧
标签:spring,image,boot,点对点,k3u1fbpfcp,手把手,注解,starter From: https://www.cnblogs.com/Jcloud/p/17021527.html